The best way to start designing web sound is to ask some basic questions. Once you’ve formulated your answers, you can make some concrete decisions about which tools to use to solve problems and meet project goals. Here are three things to consider in planning your sound design:
Overall site purpose . Determine the purpose of your site. Will this site provide news, entertainment, or both? If you are selling a product, what’s the best approach: a demo or a tutorial? RealNetworks, Macromedia, and other companies selling technology or software often have galleries that show off how customers have used their products creatively. But the galleries do more than showcase the products; they build a community of users, who are also the company’s customer base.
Target audience. Determine your target audience. Who will be using your site? This may influence the types of sounds or music you use. For example, extreme sports advocates may be looking for a different web experience than someone seeking health care information. Determine how much time your audience spends on a given page. Getting an average can help you decide the length of your streamed sound files. How will they be using your site? Intense gamers may be bent on immersing themselves in a site while news hounds might want to just grab headlines and move on.
Bandwidth limitations. Determine your limitations before you begin the sound design process. What types of delivery machine and platform are typically used by your target audience? Working with bandwidth limitations requires a thorough understanding of your output medium and target platform.
In addition, answering these general questions before you start will help you avoid future problems:
Will the web site audience have either slow analog modems or faster DSL, cable, or T1 connections?
How much will you need to compress your audio to meet the bandwidth target?
Which is more important to your audience: higher quality sound files or shorter download times?
To hear the quality of your final sound design, test the delivery machine or platform that represents the lowest common denominator. Make sure your audio sounds good over the Web and not just on your studio monitors. It is always more costly to change your soundtrack or fix mistakes at the end of the project. Don’t get caught having to tell the producers that the great audio they have been hearing will not work in the final product.
Three types of sound can be incorporated into a web site:
Narration. In the form of speech, interviews, voice annotations, dialogue, and newscasts, narration can be used as informative rich content. Narration as an accompaniment to text and graphics is also a great way to enrich your web content with more in-depth information.
Sound effects. Interactive sound effects triggered by user actions, such as button rollovers or transition sounds, can enhance site navigation and make your content more engaging and responsive to user input. Sound effects are also commonly referred to as foley sounds (see What is foley? later in this chapter).
Music. Music in the form of ambient loops or long-playing streaming media clips can add life and emotional impact to your entertainment content and presentations. Ambient loops are short background music or audio clips that repeat, or “loop.” Short sound loops are the most commonly used method for adding music to a web page in low-bandwidth conditions. A good loop downloads fast and creates the illusion of continuous music playing in the background.
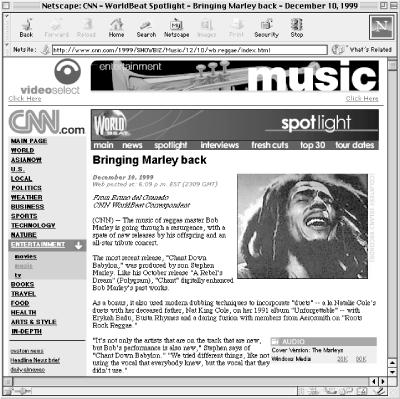
Narration is one of the most popular applications of web audio because it is straightforward, easy to use, and provides a dynamic source of information and entertainment for your audience. Visitors can click on a button and listen to audio while they continue to read the rest of the web page. A small link to a streaming narration audio file can be unobtrusively placed to the side of a text column or below a picture caption. Figure 1-1 illustrates how a popular news site uses narration to enhance its text content. If users do not have the appropriate plug-in or do not wish to listen to audio, they can easily scroll past the audio link without disrupting their viewing experience. You can also offer a simple HTML page slide show with narration, graphics, and text.
The downside to using narration in the form of real-time streaming audio is that it may require dedicated servers, special software, and user licenses. As opposed to short sound effects and music loops that download in a few seconds then quickly play back, narration or voice clips are much longer in length and need to be broadcast in real time. Streaming to large audiences of several hundred or thousands of listeners simultaneously requires intensive bandwidth and infrastructure. If you are broadcasting to only a few hundred listeners per day, you can get away with much simpler and cost-effective solutions. For example, RealAudio’s Basic RealServer will run on the same web server that serves up your web pages. See Chapter 6 for more information.
Unlike ambient loops and sound effects, capturing high-quality narration is more a matter of practicing good general recording and editing techniques than of using special fade effects or seamless looping tricks (for more about recording, see Chapter 3; for more about editing, see Chapter 4). The quality of streaming audio is determined by two factors: the condition of the source audio prior to encoding, and the compression format or encoding scheme used to encode your audio files for web delivery. If you start with low-quality audio source material, you will get poor results regardless of the speed of the users’ modems or the compression format. As a web developer, you may not be able to discern your potential audience’s bandwidth capabilities, but you can ensure that your audio source material is set to the proper volume level and is free of distortion and background system noise.
As we’ll explain in Chapter 5, the amount and form of compression used to encode your source audio greatly effects the quality of the end sound. In contrast to text, audio eats up enormous amounts of bandwidth. A one-minute sound file can easily exceed the amount of digital information needed to reproduce an entire novel. In order to reduce the file size and bandwidth requirements of your audio files, encoding schemes and compression formats discard small pieces of digital information that represent the sound. As you might expect, this process degrades the sound quality. The amount of degradation is equivalent to how small you need to make the sound file to fit your bandwidth constraints. Some audio formats such as MP3 do a better job at compression than other formats such as AIFF or RealMedia’s original audio compression scheme.
There are several formats widely used to stream narration: RealAudio, Windows Media, QuickTime 4, MP3, and Flash. RealAudio is the most popular and well-tested system for streaming audio. If you are embedding audio on a large web site with hundreds or thousands of visitors per day and need technical support, use the RealAudio system with a dedicated RealServer. If you are more daring or have more technical skills, you can deploy an MP3 server. Most popular audio players and plug-ins such as RealAudio, Windows Media, and Flash play back MP3 files.
HTTP pseudo-streaming with RealAudio, Flash, or Shockwave is a viable alternative for those who do not have administrative access to a web server. It is best suited for web sites with low traffic volume or for cutting-edge sites that have an audience willing to download the plug-in or look past the occasional audio drop-out error message. The Shockwave audio player is customizable and easy to embed directly in a web page.
You’ll find more information on RealAudio in Chapter 7 and on Shockwave and Flash in Chapter 10, or you can visit the following sites for additional information:
| RealAudio: http://www1.real.com/devzone/index.html |
| Shockwave/Flash: http://www.macromedia.com/shockwave/ |
Sound effects are generally short, interface-oriented audio clips triggered by user action. Button sounds make it easier for people to navigate your web site. An audio cue, in addition to a graphic button, adds another sensory dimension to your web page.
Sound effects can also be used as short audio clips synchronized with animation. An animated intro screen or home page with audio pulls people into your site. Sound effects are a great way to engage your audience and get them interested in your site’s content.
Sound effects should be relatively short in length so they can download and play back quickly. Lengthier sounds take too long to download and should be incorporated into a site as a streaming narration or a music file. Figure 1-2 shows a typical button sound just over a second in length. Notice the quick fade-in and immediate rapid decay.
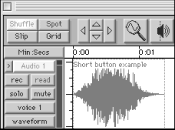
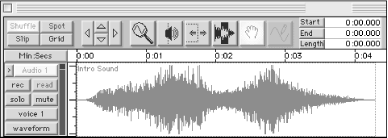
Figure 1-3 shows an example of a sound effect used for a Flash intro screen. The sound is just over four seconds in length. Notice the more gradual fade-in and fade-out. The sound file has two peaks in volume that correspond to events in the animation. The volume peaks of both the intro and button sounds have been normalized or raised to reach just below the maximum volume level. By using the full dynamic range, you get higher quality audio playback. For more information about digital audio basics and enhancing your sound files, read Chapter 2 and Chapter 4.
Music on the web is found in three forms:
For purposes of designing web audio in limited-bandwidth environments, this chapter focuses on creating great music loops. Since web sound design relies on bandwidth-friendly techniques, short catchy loops that do not become monotonous or get on your nerves are the sounds you want to hear.
There are many techniques and tools for creating seamless loops. If you create loops frequently, it is worth investing in the software. Infinity Looping Tools for the Macintosh by Antares Systems automates many of the painstaking steps of building seamless loops in a standard sound editor. Bias Peak is another audio editing application that features many looping tools. If you are a Windows user, try using the Sound Forge Acid looping tool or Cool Edit.
Background audio loops convey emotion and create mood, and they are most effective when they do not overpower the text and graphics on your web site.
A good loop sounds as if it were being randomly generated over time instead of repeating over and over. The trick to making a good background loop is to recreate the same auditory experience someone would have walking in the forest or along the ocean or listening to a music recording. This effect, also called sonic realism, is difficult to achieve in limited-bandwidth environments using two- to four-second loops. Sonic realism is much easier to achieve in a high-bandwidth environment with six- to thirteen-second loops. Three factors that help build this sense of realism are good mixing, optimum loop length, and seamless loops.
Sonic realism is achieved when there are no perceptible gaps or noticeable “pops” when the loop repeats or when the two endpoints meet. An ambient sound loop is different from a repetitive sound effect. A repetitive sound effect is a sound with fade-ins and fade-outs and gaps of silence between cycles or loops. A true sound loop is seamless and infinite with no recognizable start or endpoint
In some cases, it may be more appropriate to use repeating sound effects with long gaps of silence rather than ambient loops. This is due in part to the lack of scripting controls for elegant cross-fades between sound loops, and the danger of loops becoming too monotonous. For example, if someone clicks on a link to a section of your web site that has a different sound loop, the new loop abruptly cuts in and stops the previous sound. If you built your web pages entirely within the framework of a Shockwave movie, you could use Lingo to script cross-fades between loops. But if you embedded Shockwave in frames as we’ll discuss later in this section, you cannot use Lingo for cross-fades. For these reasons, you may decide that in this rare case a repeating sound effect set to retrigger after a few seconds of silence creates a better effect than an ambient loop.
One key to good ambient loop mixing is to avoid using distinctive sounds that overpower the other sounds in your mix. Include one sound element that continues through the entire loop. Build your audio loop in layers starting with a soft, background ambient music wash, a continuous noise such as chirping crickets, or an undulating synth drone. Then add subtle, varied sound effects to the loop such as a bird chirp, drops of water, long notes rising in pitch, or a short drumbeat.
Ornamental sounds should be used sparingly in your loop, and they should rest just above the continuous background sound or even faintly below the surface. It is best to make a sound almost imperceptible rather than overstate it by making it too loud. The idea with loops is to create a gentle continuous landscape that does not have jagged peaks or rugged valleys. Like a chef using spices, audio mixing is an art form that takes many years to master. The previous techniques are merely suggestions of approaches you can take to make a good ambient loop.
The key to a successful sound loop is to create the shortest loop possible that still sounds dynamic and random. If the loop is too short, you will recognize the start and endpoints, making the repetition more noticeable. Longer loops allow for greater intervals between distinctive noises, which creates the illusion of infinite sound. If you make the loop too long, however, it will require too much bandwidth.
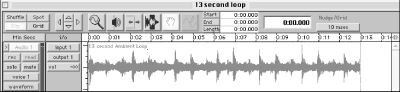
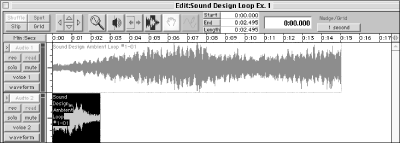
In our experience, the optimum loop length is between 10 and 13 seconds, depending on the type of sound you are looping. That length is just long enough to create the impression that the loop is an infinite background sound, as shown in Figure 1-4.
For certain web applications or page-size constraints, you may have to compromise and make loops shorter than an optimal 13 seconds in length. In fact, if your target audience is using 33.6 Kbps modems, you will be limited to two- to four-second sound loops. If you have to create shorter loops, keep the mix simple by using fewer ornamental sounds and more synthesizer drone sounds, or incorporate rhythm, a naturally repetitive sound texture.
By incorporating a percussion rhythm or short melody in your ambient loops, you can produce a two- to four-second loop that sounds intentionally repetitive or musical. If you use music or rhythm, make sure the loop lines up on the start and endpoints of one complete rhythmic pattern, as discussed in Section 1.7.3.5 later in this chapter. It is easy to visually spot where loud percussion hits appear on your waveform-editing screen when you audition your rhythm track. Locate the first beat, such as from a snare or kick drum, and the point where it next repeats in the cycle, then select the area in between the two points to capture a seamless rhythm loop.
One of the best ways to embed a loop into your web page is to use an audio file with a transparent Shockwave movie. (Note that you can use Flash in the same manner.) Attach the Shockwave file to a frame. Place the content of your web pages within the frame. Now the loop will play back continuously across any pages placed within the frame.
The main advantage to embedding Shockwave in frames is that if some visitors do not have the plug-in, they won’t receive an error message; the loop simply will not play. Shockwave lets you set many of the parameters directly into HTML pages, including the loop mode, which specifies that a browser keep looping the SWA sound file.
For an average web site with four main sections containing four subcategory pages each, create a frame for each main section. Embed the subcategory pages within a frame. By using four separate frames, you can play different ambient loops for each section. By using several loops, you avoid the monotony of having one sound playing throughout the entire site. To create silence and a break from the ambient loops in the rest of your site, do not place a loop on the home page. See Chapter 5 for a step-by-step guide to using Shockwave loops.
The goal of producing seamless loops is to cross-fade the overlapping endpoints of your audio file so they blend perfectly. Imagine bending a straight piece of metal into a circle, welding the ends together, and sanding down the rough edges until it is impossible to feel the two endpoints in the circle. That’s what we’re trying to do with a seamless loop.
Making a sound file loop is easy. Making the loop seamless is not. Here is a step-by-step walk-through of one of the more popular methods of creating loops in a standard multitrack sound editor:
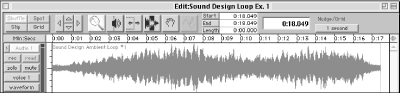
To make an ambient loop, download the sample file from http://www.designingwebaudio.com/, shown in Figure 1-5. (If you are making a music loop or a loop that has a distinctive continuous rhythm, such as an undulating synth drone or drum beat, quickly review this section and then proceed to Section 1.7.3.5.)
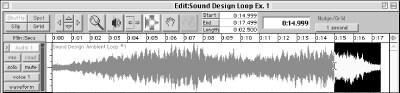
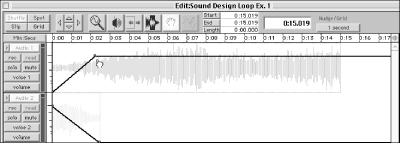
Select approximately two seconds of the last portion of the audio clip as shown in Figure 1-6. After you have made your selection, leave the two-second portion highlighted.
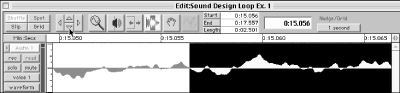
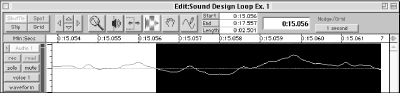
Zoom in close. Hold the Shift key down and modify your selection so that the left end of the highlighted region starts at a zero point on the waveform, as shown in Figures Figure 1-7 and Figure 1-8. Then your highlighted selection on the right part of the audio region should simply go to the end of the sound file. Making your edit point at the zero point is the best way to avoid pops and glitches at the beginning of your loop. This rule of thumb pertains to all digital audio editing. With stereo files, you may have to compromise when trying to locate a zero point on both tracks.
Once you have your selection, cut and paste it to a new track as shown in Figure 1-9. Make sure it is placed at the very beginning of the track.
Set the volume parameters of your cross-fade as shown in Figure 1-10. On the first track, set the fade-in diagonal volume points at 0% to 100% volume over the two-second overlapping portion of the audio clip. On the second track, set the volume points of the fade-out at 100% to 0% over the portion of the clip. Now select the top audio clip and listen in loop playback mode as shown in Figure 1-11. Often the first cross-fade you set will need minor adjustment. Play with the volume cross-fades until you get a smooth transition with no dips or peaks in volume at the edit points. Note that a “linear” or standard “X” cross-fade will result in a dip in volume.
Once you have made minor adjustments to your loop, bounce the tracks to disk. Convert the file to your format of choice and you’re ready to upload a professional loop to your web site. You can use this same technique to produce stereo audio loops.

In many online projects, bandwidth constraints dictate minimal use of audio. Music or rhythm loops work great when bandwidth constraints limit you to short two- to four-second loops instead of the ideal loop length of about 13 seconds used in higher-bandwidth environments. Generally, it’s very difficult to create good ambient background loops such as a soundscape of a forest, city, or peaceful synthesizer in two to four seconds. At that length, the audio tends to sound repetitive and monotonous. Music or ambient sounds with percussion, on the other hand, are naturally repetitive, so they often work well for short loops. Music styles that work particularly well are rap, techno, and “world beat.” These styles are repetitive in nature, where the listener expects the music to “ride” on a rhythmic figure. Music that has a lot of melodic or harmonic rhythm (like many jazz or classical styles) does not loop as well because the listener expects the music to develop into other sounds.
If you have an audio clip that has a consistent rhythm such as rap, a percussive instrument, or a pulsing sound, you will need to take extra precaution to select the right edit point. Music loops or rhythmic loops are the most challenging to produce because the component of precise timing adds to the difficulty of making a good cross-fade.
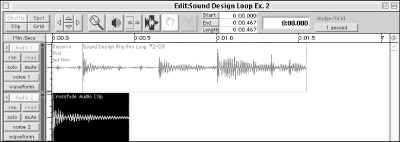
A close look at the digital audio waveform can reveal the phrasing or timing of the music without your having to listen to it. You can often spot repetition in the waveform, which gives you the best visual indication of the start and endpoints of a music loop. Percussion is particularly apparent in a music waveform. For instance, you can see the amplitude from a sharp spike or snare drum, as shown in Figure 1-12. Using the snare drum as a landmark, follow these steps to select a musical measure:
Scan the audio waveform for a distinct pattern of peaks or spikes that correspond to percussive rhythm sounds in the audio file such as a snare drum or kick drum, as shown in Figure 1-12. Listen to the sound to determine if it hits on the same beat of each cycle or measure of music. The idea is to find a one- or two-measure unit of time that makes musical sense when repeated.
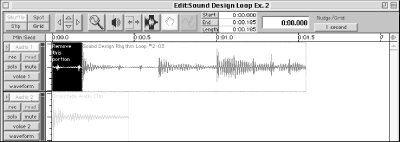
Once you locate the repeating percussive sound in the waveform, make your short (one to two seconds) or approximately one-measure selection point at the precise start of the percussive sound, as shown in Figure 1-13.
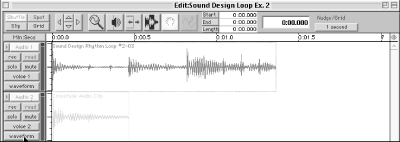
Move your selection to track 2 as shown in Figure 1-14.
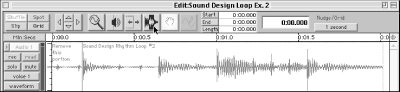
Select the beginning portion of the audio clip on track 1 as shown in Figure 1-15. Select up to the percussive sound or peak in the waveform that you are using as your start point. In this example, it is the first snare drum hit.
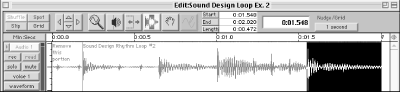
Delete the portion of the waveform up to the point of the first percussive sound, as shown in Figure 1-16, so that both the percussive peaks on tracks 1 and 2 line up perfectly. At this point, the audio region on track 1 should be exactly one measure or cycle in length.
Set your cross-fade volume points as shown in Figure 1-17 and bounce the tracks to disk. Now you should have a perfect music loop!

Get Designing Web Audio & CD-ROM now with the O’Reilly learning platform.
O’Reilly members experience books, live events, courses curated by job role, and more from O’Reilly and nearly 200 top publishers.

