All recently manufactured full sized iPods, iPhones, and iPads have
cameras available. The flash.media.CameraUI class
allows your application to utilize the device’s native camera
interface.
Let’s review the code below. First, you will notice there is a
private variable named camera declared of type
flash.media.CameraUI. Within
applicationComplete of the application, an event
handler function is called, which first checks to see whether the device
has an available camera by reading the static property of the
CameraUI class. If this property returns as true, a new
instance of CameraUI is created and event listeners of
type MediaEvent.COMPLETE and ErrorEvent.COMPLETE are added to handle a
successfully captured image, as well as any errors that may occur.
A Button with an event listener on the click
event is used to allow the application user to launch the
CameraUI. When the user clicks the TAKE A PICTURE
button, the captureImage method is
called, which then opens the camera by calling the
launch method and passing in the MediaType.IMAGE static property. At this point
the user is redirected from your application to the native camera. Once
the user takes a picture and clicks OK, the user is directed back to your
application, the MediaEvent.COMPLETE
event is triggered, and the onComplete method is
called. Within the onComplete method, the
event.data property is cast to a
flash.Media.MediaPromise object. Since iOS does not
automatically write the new image to disk like Android or BlackBerry
tablets, we are not able to simply read the file property of the
flash.Media.MediaPromise object to display the new
image within our application. The solution to this is to load the
flash.Media.MediaPromise object into a
flash.display.Loader. Within the
onComplete method, you will see a new
Loader being created and an event listener added to the
loader’s contentLoaderInfo property to listen for the
Event.COMPLETE of the loader. Finally,
the loader’s loadPromiseFile method is called with the
mediaPromise passed in. Once the mediaPromise is
loaded, the onMediaPromiseLoaded method is called. The
target of the event is cast as a
flash.display.LoaderInfo object and its loader property
is set as the source of the Image component.
This example also demonstrates how to write the new image to the
CameraRoll so that it will persist on the iOS device.
Within the onMediaPromiseLoaded method, you will notice
that there is a test to see if the application has the permission to write
to the CameraRoll, by checking the static property
supportsAddBitmapData on the
CameraRoll class. In addition, I have added a
CheckBox that allows this function to be toggled on and
off so that we can easily test to see when images are being written to the
CameraRoll. If the
supportsAddBitmapData is true and the
saveImage CheckBox is checked, a new
flash.display.BitmapData object is created using the
data from the LoaderInfo and the
draw method is called. Finally, a new
CameraRoll object is created and the
addBitmapData method is called with the
bitmapData passed in.
Note
Utilizing CameraUI within your application is
different than the raw camera access provided by Adobe AIR on the
desktop. Raw camera access is also available within AIR on iOS and works
the same as the desktop version.
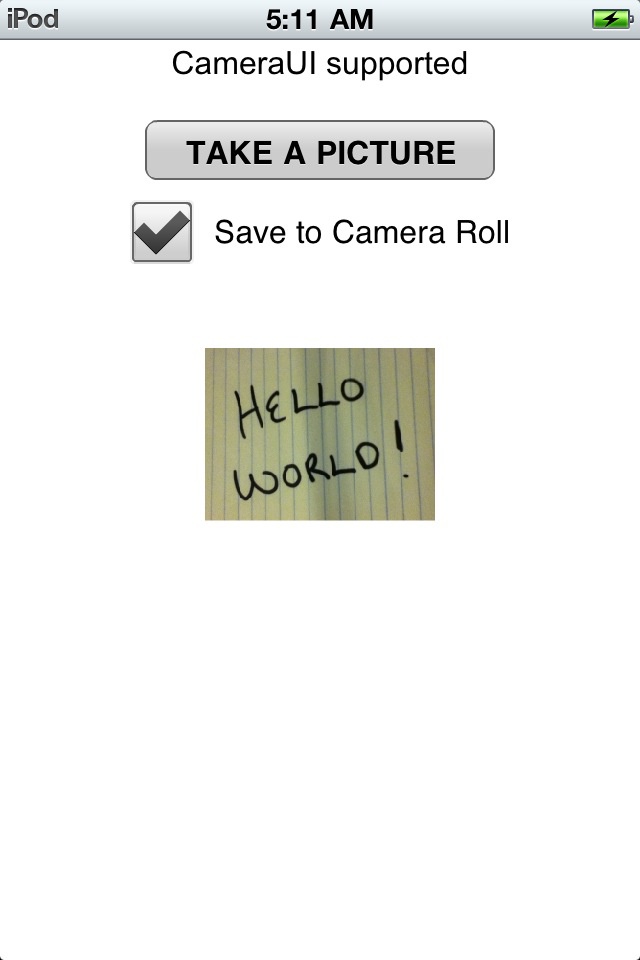
Figure 4-4 shows the application,
Figure 4-5 shows the native camera user
interface, and Figure 4-6 shows
the application after a picture was taken, the user clicked Use to return
to the application, and the new image was loaded. Figure 4-7 shows the new image
within the iOS Photos application
after being written to the CameraRoll:
<?xml version="1.0" encoding="utf-8"?>
<s:Application xmlns:fx="http://ns.adobe.com/mxml/2009"
                  xmlns:s="library://ns.adobe.com/flex/spark"
                  applicationComplete="application1_applicationCompleteHandler(event)">
    <fx:Script>
          <![CDATA[
               import mx.events.FlexEvent;
               import mx.graphics.codec.JPEGEncoder;

               private var camera:CameraUI;
               private var loader:Loader;

               protected function application1_applicationCompleteHandler(event:FlexEvent):void {
                     if (CameraUI.isSupported){
                          camera = new CameraUI();
                          status.text="CameraUI supported";
                     } else {
                          status.text="CameraUI NOT supported";
                     }
               }

               private function captureImage(event:MouseEvent):void {
                     camera.addEventListener(MediaEvent.COMPLETE, onComplete);
                     camera.addEventListener(ErrorEvent.ERROR, onError);
                     camera.launch(MediaType.IMAGE);
               }

               private function onError(event:ErrorEvent):void {
                     trace("error has occurred");
               }

               private function onComplete(e:MediaEvent):void {
                     camera.removeEventListener(MediaEvent.COMPLETE, onComplete);
                     camera.removeEventListener(ErrorEvent.ERROR, onError);
                     var mediaPromise:MediaPromise = e.data;
                     this.loader = new Loader();
                     this.loader.contentLoaderInfo.addEventListener(Event.COMPLETE,
                         onMediaPromiseLoaded);
                     this.loader.loadFilePromise(mediaPromise);
               }

               private function onMediaPromiseLoaded(e:Event):void {
                     var loaderInfo:LoaderInfo = e.target as LoaderInfo;
                     image.source = loaderInfo.loader;

                     if(CameraRoll.supportsAddBitmapData && saveImage.selected){
                          var bitmapData:BitmapData = new BitmapData(loaderInfo.width,
                              loaderInfo.height);
                          bitmapData.draw(loaderInfo.loader);
                          var c:CameraRoll = new CameraRoll();
                          c.addBitmapData(bitmapData);
                     }
               }

          ]]>
    </fx:Script>
    <fx:Declarations>
          <!-- Place non-visual elements (e.g., services, value objects) here -->
    </fx:Declarations>

    <s:Label id="status" text="Click Take a Picture button" top="10" width="100%" textAlign="center"/>

    <s:CheckBox id="saveImage" top="160" label="Save to Camera Roll" horizontalCenter="0"/>

    <s:Button width="350" height="60" label="TAKE A PICTURE" click="captureImage(event)"
                 horizontalCenter="0" enabled="{CameraUI.isSupported}"
                 top="80"/>

    <s:Image id="image" width="230" height="350" horizontalCenter="0" top="220"/>
</s:Application>Get Developing iOS Applications with Flex 4.5 now with the O’Reilly learning platform.
O’Reilly members experience books, live events, courses curated by job role, and more from O’Reilly and nearly 200 top publishers.


