Chapter 4. Pipelines
The Job of the deployment pipeline is to prove that the release candidate is unreleasable.
Jez Humble
Pipelines allow teams to automate and organize all of the activities required to deliver software changes. By rapidly providing visible feedback, teams can respond and react to failures quickly.
In this chapter we are going to learn about using pipelines inside OpenShift so that we can connect deployment events to the various upstream gates and checks that need to be passed as part of the delivery process.
Our First Pipeline Example
Log in to OpenShift as our user and create a new project. We will follow along using both the web-ui and the command-line interface (choose whichever one you’re most comfortable using):
$ oc login -u developer -p developerCreate a new project called samplepipeline:
$oc new-project samplepipeline --display-name="Pipeline Sample"\--description='Pipeline Sample'
Add the Jenkins ephemeral templated application to the project—it should be an instant app in the catalog which you can check from the web-ui by using Add to Project or from the CLI:
$oc get templates -n openshift|grep jenkins-pipeline-example jenkins-pipeline-example This example showcases the new Jenkins Pipeline ...
If you have persistent storage and you want to keep your Jenkins build logs after Jenkins Container restarts, then you could use the jenkins-persistent template instead.
$ oc new-app jenkins-ephemeralIn the web-ui continue to the overview page. A Jenkins deployment should be underway, and after the Jenkins images have been pulled from the repository, a pod will be running (Figure 4-1). There are two services created: one for the Jenkins web-ui and the other for the jenkins-jnlp service. This is used by the Jenkins slave/agent to interact with the Jenkins application:
$oc get pods NAME READY STATUS RESTARTS AGE jenkins-1-1942b 1/1 Running01m
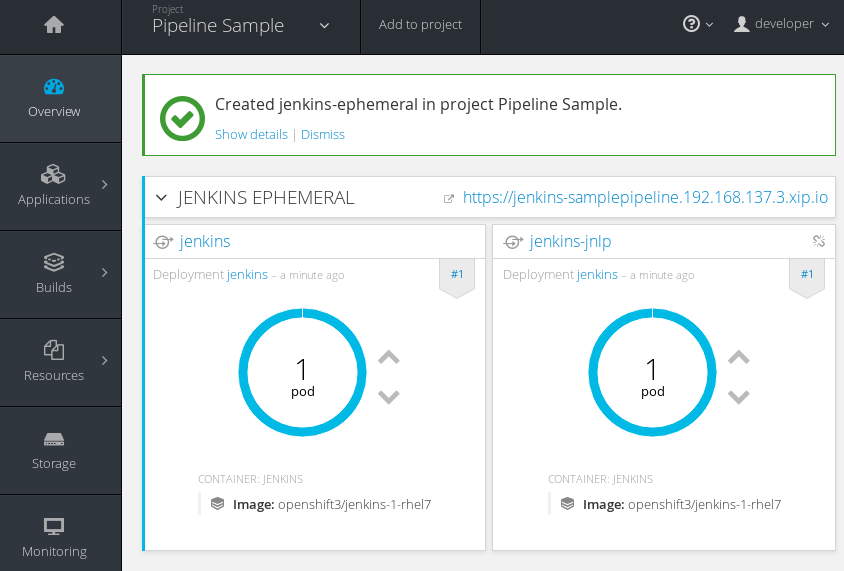
Figure 4-1. The running Jenkins pod with two services
Let’s add the example Jenkins pipeline application using the “Add to project” button in Figure 4-1, and the jenkins-pipeline-example template:
$ oc new-app jenkins-pipeline-exampleJenkins Example Application Template
If your installation doesn’t have the Jenkins pipeline example template, you can find and load it into OpenShift using this command:
$oc create -f\https://raw.githubusercontent.com/openshift/origin/master/examples/jenkins/pipeline/samplepipeline.yaml
Once you have hit the Create button, select “Continue to overview”. The example application contains a MySQL database; you should see this database pod spin up once the image has been pulled. Let’s start the application pipeline build (Figure 4-2). Browse to Builds → Pipelines, and click the Start Pipeline button or use the following command:
$ oc start-build sample-pipeline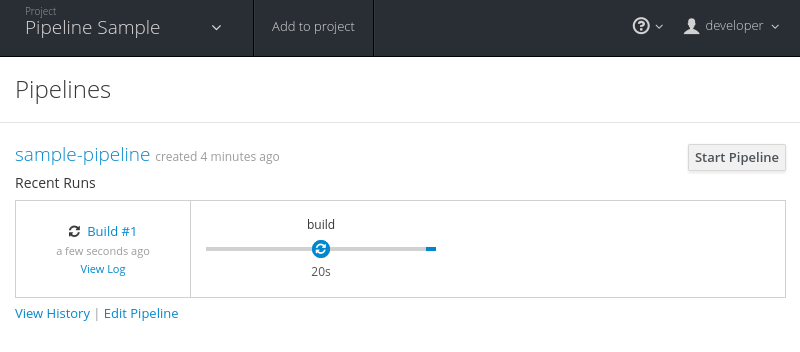
Figure 4-2. Start the application pipeline build
$ocgetpodsNAMEREADYSTATUSRESTARTSAGEjenkins-1-ucw9g1/1Running01dmongodb-1-t2bxf1/1Running01dnodejs-mongodb-example-1-3lhg81/1Running015mnodejs-mongodb-example-1-build0/1Completed016m
After the build and deploy completes (Figure 4-3), you should be able to see:

The Jenkins server pod.

The MongoDB database pod.

A running Node.js application pod.

And a Completed build pod.
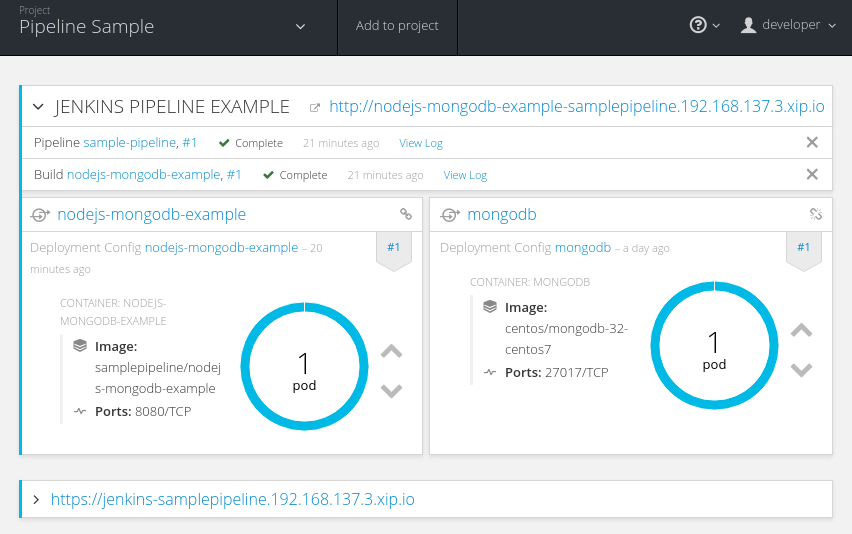
Figure 4-3. Successful pipeline build
If you select the route URL, you should now be able to browse to the running application that increments a page count every time the web page is visited (Figure 4-4).
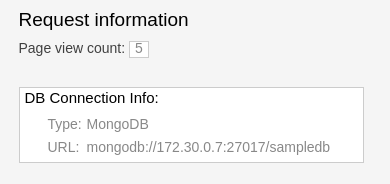
Figure 4-4. Running pipeline application
Pipeline Components
There are a few moving pieces required to set up a basic flow for continuous testing, integration, and delivery using Jenkins pipelines. Before we look at the details, let’s review them at a component level (Figure 4-5).
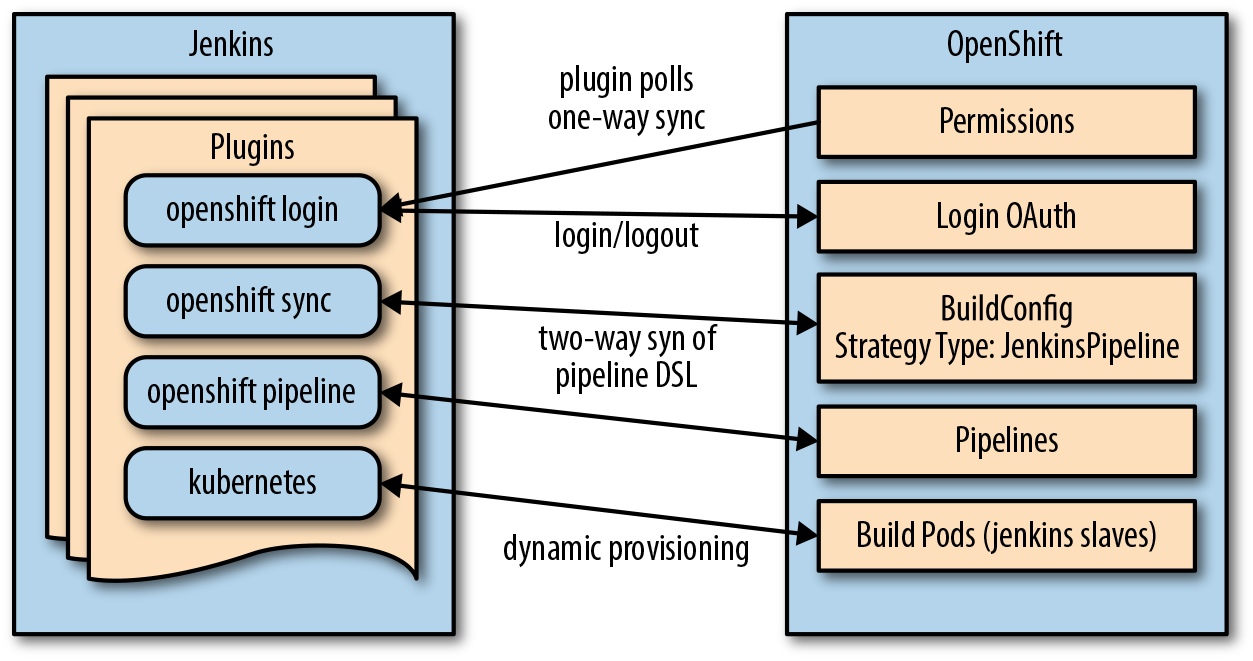
Figure 4-5. Pipeline components
Within Jenkins, the main components and their roles are as follows:
-
Jenkins server instance running in a pod on OpenShift
-
Jenkins OpenShift Login plug-in: manages login to Jenkins, permissions polling, and one-way synchronization from OpenShift to Jenkins
-
Jenkins OpenShift Sync plug-in: two-way synchronization of pipeline build jobs
-
Jenkins OpenShift Pipeline plug-in: construction of jobs and workflows for pipelines to work with Kubernetes and OpenShift
-
Jenkins Kubernetes plug-in: for provisioning of slave Jenkins builder pods
The product documentation is a great place to start for more in-depth reading.
So What’s Happened Here? Examination of the Pipeline Details
We’ve done a lot in a short amount of time! Let’s drill down into some of the details to get a better understanding of pipelines in OpenShift. Browse to Builds → Pipelines → sample-pipeline → Configuration in the web-ui, as shown in Figure 4-6.
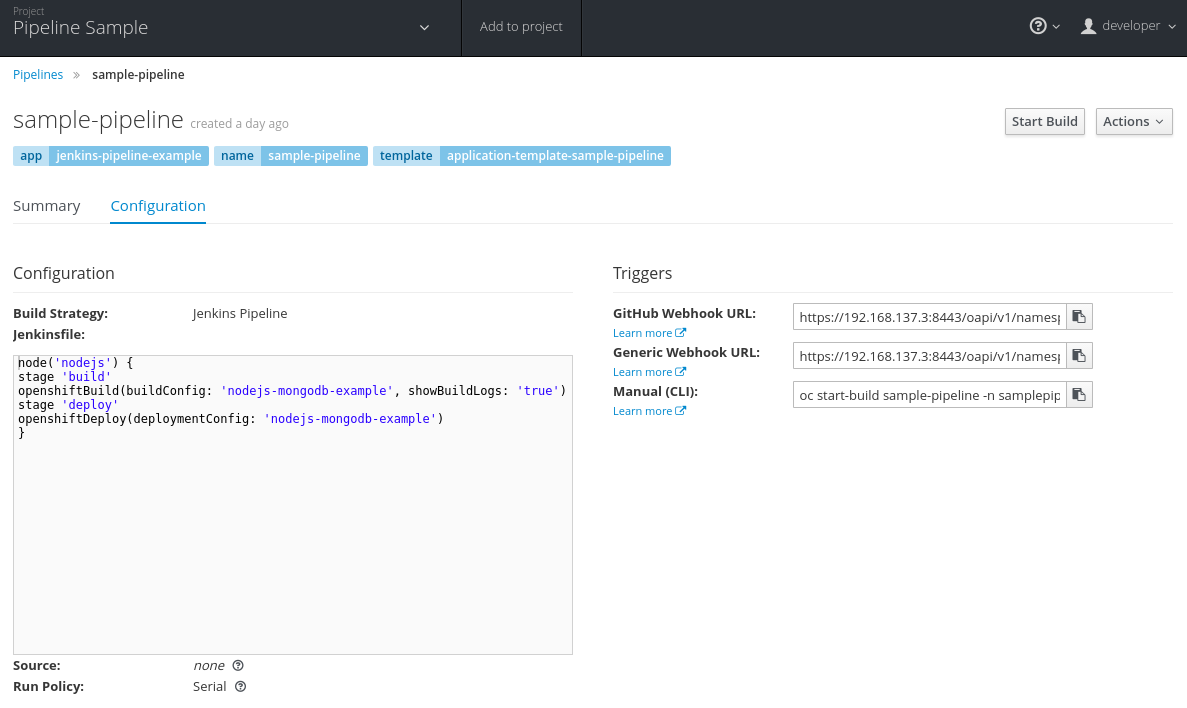
Figure 4-6. Pipeline configuration
You can see a build strategy of type Jenkins Pipeline as well as the pipeline as code that is commonly named a Jenkinsfile. The pipeline is a Groovy script that tells Jenkins what to do when your pipeline is run.
The commands that are run within each stage make use of the Jenkins OpenShift plug-in. This plug-in provides build and deployment steps via a domain-specific language (DSL) API (in our case, Groovy). So you can see that for a build and deploy we:
-
Start the build referenced by the build configuration called nodejs-mongodb-example:
openshiftBuild(buildConfig:'nodejs-mongodb-example', showBuildLogs:'true')
-
Start the deployment referenced by the deployment configuration called nodejs-mongodb-example:
openshiftDeploy(deploymentConfig:'nodejs-mongodb-example')
The basic pipeline consists of:
- node
-
A step that schedules a task to run by adding it to the Jenkins build queue. It may be run on the Jenkins master or slave (in our case, a container). Commands outside of node elements are run on the Jenkins master.
- stage
-
By default, pipeline builds can run concurrently. A stage command lets you mark certain sections of a build as being constrained by limited concurrency.
In the example we have two stages (build and deploy) within a node. When this pipeline is executed by starting a pipeline build, OpenShift runs the build in a build pod, the same as it would with any source to image build. There is also a Jenkins slave pod, which is removed once the build completes successfully. It is this slave pod that communicates back and forth to Jenkins via the jenkins-jnlp service.
So, when a build is running, you should be able to see the following pods:
$ocgetpodsNAMEREADYSTATUSRESTARTSAGEjenkins-1-ucw9g1/1Running01dmongodb-1-t2bxf1/1Running01dnodejs-3465c67ce7541/1Running051snodejs-mongodb-example-1-build1/1Running040s

Jenkins server pod.

MongoDB database pod.

Jenkins slave pod—in this case, a Node.js slave that is removed once the build is completed.

The actual pod running the build of our application.
Pipeline Basics
To learn more about Jenkins pipeline basics, see the Jenkins pipeline plug-in tutorial for new users.
Explore Jenkins
One of the great features of the integrated pipelines view in OpenShift is that you do not have to drill into Jenkins if you don’t want to—all of the pipeline user interface components are available in the OpenShift web-ui. If you want a deeper view of the pipeline in Jenkins, select the View Log link on a Pipeline build in your browser.
OAuth Integration
The OpenShift Jenkins image now supports the use of an OpenShift binding credentials plug-in. This plug-in integrates the OpenShift OAuth provider with Jenkins so that when users attempt to access Jenkins, they are redirected to authenticate with OpenShift. After authenticating successfully, they are redirected back to the original application with an OAuth token that can be used by the application to make requests on behalf of the user.
Log in to Jenkins with your OpenShift user and password; if OAuth integration is configured, you will have to authorize access as part of the workflow (Figure 4-7).
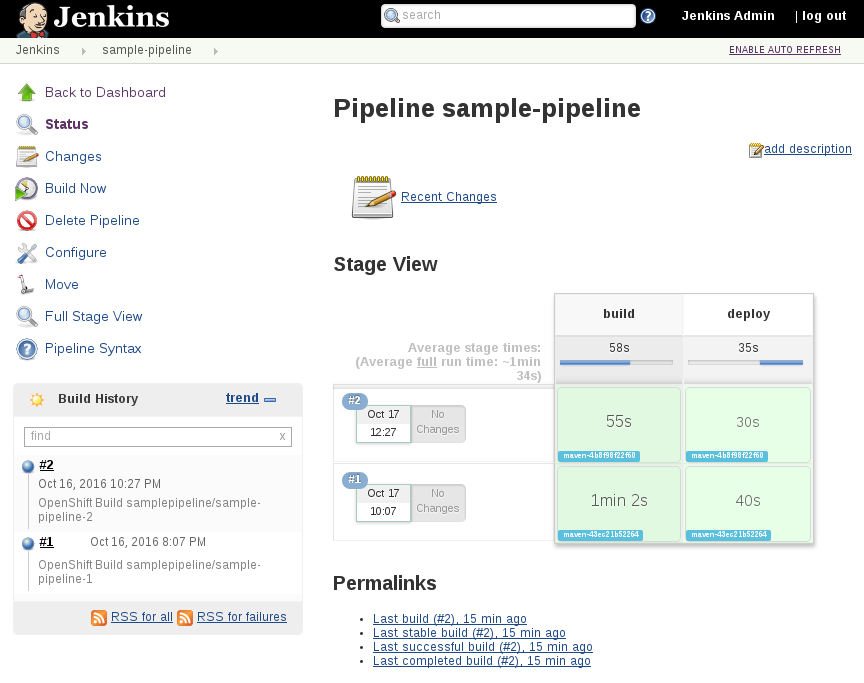
Figure 4-7. Jenkins user interface
There are various editors and drill-down screens within Jenkins available for pipeline jobs. You can browse the build logs and pipeline stage views and configuration. If you are using a newer version of Jenkins, you can also use the Blue Ocean pipeline view.
Jenkins Slave Images
By default, the Jenkins installation has preconfigured Kubernetes plug-in slave builder images. If you log in to Jenkins and browse to Jenkins → Manage Jenkins → Kubernetes, there are pod templates configured for Maven and Node.js and you may add in your own custom images. You can convert any OpenShift S2I image into a valid Jenkins slave image using a template; see the full documentation for extensions.
Multiple Project Pipeline Example
Now that we have the basic pipeline running within a single OpenShift project, the next logical step is to expand our use of pipelines to different projects and namespaces. In a software delivery lifecycle we want to separate out the different pipeline activities such as development, testing, and delivery into production. Within a single OpenShift PaaS cluster we can map these activities to projects. Different collaborating users and groups can access these different projects based on the role-based access control provided by the platform.
Build, Tag, Promote
Ideally we want to build our immutable application images once, then tag the images for promotion into other projects—to perform our pipeline activities such as testing and eventually production deployment. The feedback from our various activities forms the gates for downstream activities. The process of build, tag, and promote forms the foundation for every container-based application to flow through our delivery lifecycle.
We can take the concept further with multiple PaaS instances by using image registry integration to promote images between clusters. We may also have an arbitrary number of different activities that can occur that are not specifically linked to environments. Refer to the documentation for information on cross-cluster promotion techniques.
Common activities such as user acceptance testing (UAT) and pre-production (pre-prod) can be added into our basic workflow to meet any requirements your organization may have.
So, let’s get going on our next pipeline deployment. We are going to set up four projects for our pipeline activities using OpenShift integrated pipelines:
- CICD
-
Containing our Jenkins instance
- Development
-
For building and developing our application images
- Testing
-
For testing our application
- Production
-
Hosting our production application
Figure 4-8 depicts the general form of our application flow through the various projects (development to testing to production) as well as the access requirements necessary between the projects to allow this flow to occur when using a build, tag, promote strategy. OpenShift authorization policy is managed and configured for project-based service accounts as described in the following section.
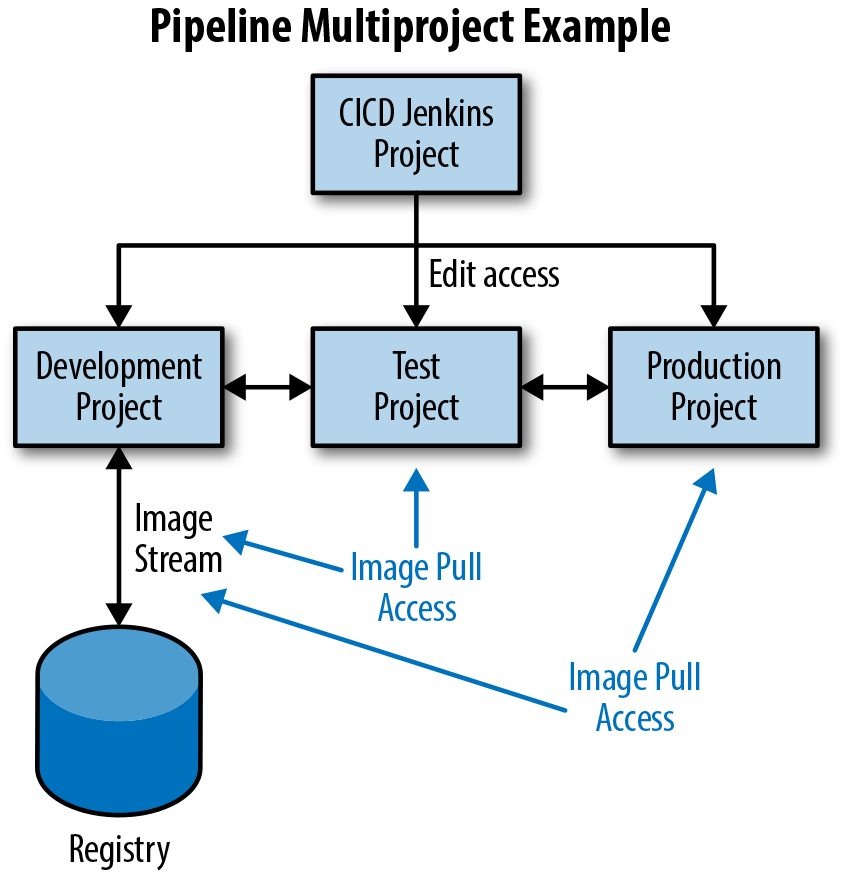
Figure 4-8. Multiple project pipeline
Create Projects
We are going to use the CLI for this more advanced example so we can speed things up a bit. You can, of course, use the web-ui or your IDE if you prefer. Let’s create our projects first:
$oc login -u developer -p developer$oc new-project cicd --display-name='CICD Jenkins'--description='CICD Jenkins'$oc new-project development --display-name='Development'\--description='Development'$oc new-project testing --display-name='Testing'--description='Testing'$oc new-project production --display-name='Production'--description='Production'
Project Name Patterns
It is often useful to create project names and patterns that model an organization. For example:
“organization/tenant”-“environment/activity”-“project”
In this way you can create user groups to a full-tenant, tenant-env, or tenant-env-project and do fine-grained RBAC on it. Also, it’s easier to identify from the name to which user the project belongs, in which activity or environment, so you can use the same internal project name on every environment. With this pattern it is easier to avoid project name collisions because within an OpenShift cluster, the project name must be unique.
Add Role-Based Access Control
Let’s add in RBAC to our projects to allow the different service accounts to build, promote, and tag images. First we will allow the cicd project’s Jenkins service account edit access to all of our projects:
$oc policy add-role-to-user edit system:serviceaccount:cicd:jenkins\-n development$oc policy add-role-to-user edit system:serviceaccount:cicd:jenkins\-n testing$oc policy add-role-to-user edit system:serviceaccount:cicd:jenkins\-n production
Now we want to allow our testing and production service accounts the ability to pull images from the development project:
$oc policy add-role-to-group system:image-puller system:serviceaccounts:testing\-n development$oc policy add-role-to-group system:image-puller system:serviceaccounts:production\-n development
Deploy Jenkins and Our Pipeline Definition
Deploy a Jenkins ephemeral instance to our cicd project, enable OAuth integration (the default), and set a Java heap size:
$oc project cicd$oc new-app --template=jenkins-ephemeral\-pJENKINS_IMAGE_STREAM_TAG=jenkins-2-rhel7:latest\-pNAMESPACE=openshift\-pMEMORY_LIMIT=2048Mi\-pENABLE_OAUTH=true
Which Image?
Depending on which version of OpenShift you are using (community OpenShift Origin or the supported OpenShift Container Platform), you may wish to use different base images. The -1- series refers to the Jenkins 1.6.X branch, and -2- is the Jenkins 2.X branch:
jenkins-1-rhel7:latest, jenkins-2-rhel7:latest
    - officially supported Red Hat images from registry.access.redhat.com
jenkins-1-centos7:latest, jenkins-2-centos7:latest
    - community images on hub.docker.io
Let’s create the pipeline itself using the all-in-one command if you are using the CLI:
$oc create -n cicd -f\https://raw.githubusercontent.com/devops-with-openshift/pipeline-configs/master/pipeline.yaml
You could do this manually as well if you wanted to break it down into constituent steps. Add in an empty pipeline definition through the web-ui using Add to project → Import YAML/JSON, and cut and paste an empty pipeline definition:
https://raw.githubusercontent.com/devops-with-openshift/pipeline-configs/master/empty-pipeline.yaml
We can then edit the pipeline in the web-ui using Builds → Pipelines → sample-pipeline → Actions → Edit using the following pipeline code, and then pressing Save:
https://raw.githubusercontent.com/devops-with-openshift/pipeline-configs/master/pipeline-groovy.groovy
It’s worth noting that you can easily create this piece of YAML configuration yourself once you have performed the cut-and-paste exercise. This allows you to rapidly develop and prototype your pipelines as code. Run the following command:
$ocexportbc pipeline -o yaml -n cicd
Jenkinsfile Path
Rather than embed the pipeline code in the build configuration, it can be
extracted into a file and referenced using the jenkinsfilePath parameter.
See the OpenShift product documentation for more details.
Deploy Our Sample Application
Let’s deploy our sample Cat/City of the Day application into our development project.
Tip
To demonstrate a code change propagating through our environment, you can create a fork of the Git-hosted repository first—so you can check in a source code change that triggers the pipeline webhook automatically.
Invoke new-app using the builder image and Git repository URL—remember to replace this with your Git repo. When creating a route, replace the hostname with something appropriate for your environment:
$oc project development$oc new-app --name=myapp\openshift/php:5.6~https://github.com/devops-with-openshift/cotd.git#master$oc expose service myapp --name=myapp\--hostname=cotd-development.192.168.137.3.xip.io
By default, OpenShift will build and deploy our application in the development project and use a rolling deployment strategy for any changes. We will be using the image stream that has been created to tag and promote into our testing and production projects, but first we need to create deployment configuration items in those projects.
To create the deployment configuration, you first need to know the IP address of the Docker registry service for your deployment. By default, the development user does not have permission to read from the default namespace, so we can also glean this information from the development image stream:
$oc get is -n development NAME DOCKER REPO TAGS UPDATED myapp 172.30.18.201:5000/development/myapp latest13minutes ago
As a cluster admin user, you may also look at the Docker registry service directly:
$ocgetsvcdocker-registry-ndefaultNAMECLUSTER-IPEXTERNAL-IPPORT(S)AGEdocker-registry172.30.18.201<none>5000/TCP18d

Cluster IP address and port for the docker registry. See the product services documentation for more information.
Create the deployment configuration in the testing project. Be sure to use your own environment registry IP address. Every time we change or edit the deployment configuration, a configuration trigger causes a deployment to occur. We cancel the automatically triggered deployment because we haven’t used our pipeline to build, tag, and promote our image yet—so the deployment would run until it timed out waiting for the correctly tagged image:
$oc project testing$oc create dc myapp --image=172.30.18.201:5000/development/myapp:promoteQA$oc deploy myapp --cancel
One change we need to make in testing is to update the imagePullPolicy for our container. By default, it is set to IfNotPresent, but we wish to always trigger a deployment when we tag a new image:
$oc patch dc/myapp\-p'{"spec":{"template":{"spec":{"containers":[{"name":"default-container","imagePullPolicy":"Always"}]}}}}'$oc deploy myapp --cancel
Let’s also create our service and route while we’re at it (be sure to change the hostname to suit your environment):
$oc expose dc myapp --port=8080$oc expose service myapp --name=myapp\--hostname=cotd-testing.192.168.137.3.xip.io
Repeat these steps for the production project:
$oc project production$oc create dc myapp --image=172.30.18.201:5000/development/myapp:promotePRD$oc deploy myapp --cancel$oc patch dc/myapp\-p'{"spec":{"template":{"spec":{"containers":[{"name":"default-container","imagePullPolicy":"Always"}]}}}}'$oc deploy myapp --cancel$oc expose dc myapp --port=8080$oc expose service myapp --hostname=cotd-production.192.168.137.3.xip.io --name=myapp
We are using two separate (arbitrary) image tags: promoteQA for testing promotion and promotePRD for production promotion.
Run Our Pipeline Deployment
Now we are ready to run our pipeline deployment from the cicd project:
$ oc start-build pipeline -n cicdYou should be able to see the pipeline build progressing using the web-ui in the cicd project by navigating to Browse → Builds → Pipeline (Figure 4-9).
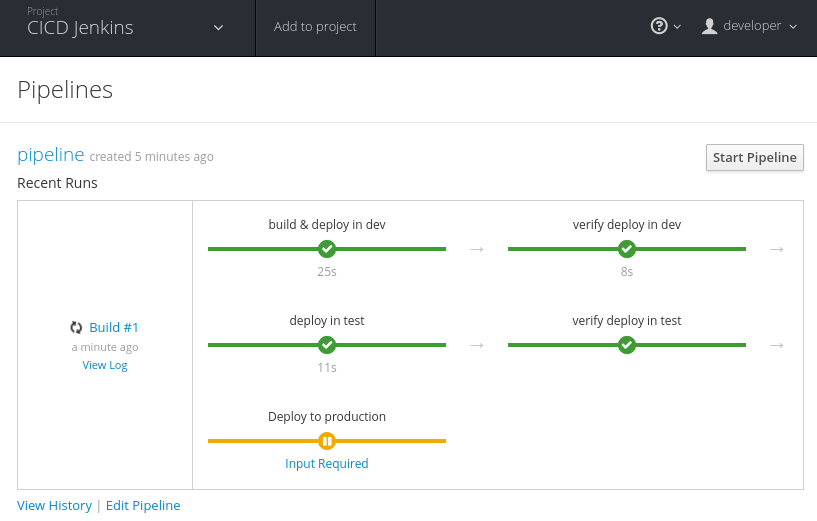
Figure 4-9. Complex pipeline running
If we browse to the testing project, we can also see two pods spun up and deployed. We could then run automated or manual test steps against this environment. A testing environment on-demand—great!
We can also see that the pipeline is paused waiting for user input. If you select Input Required you will be taken to the running Jenkins (you may have to log in if you haven’t already). Select Proceed to allow the pipeline to continue to deploy to production (Figure 4-10).

Figure 4-10. Manually approve deployment to production
If you browse back to the production project, you’ll now see that two pods deployed OK, and if you browse to the production application URL, you should be able to see our City of the Day.
Hold on a second! That’s a cat. It looks like we deployed the wrong branch of code into our environments—perhaps our testing wasn’t as great as we thought.
Quickly Deploying a New Branch
Go to the development project and browse to Builds → Builds → myapp → Actions → Edit. We can change the branch by changing master in the Source Repository Ref to feature.
$oc project development$oc patch bc/myapp -p'{"spec":{"source":{"git":{"ref":"feature"}}}}'
Let’s start another pipeline build, but this time do some manual testing to ensure we get the right results before we deploy to production:
$ oc start-build pipeline -n cicdThat looks better. Manually approve the changes into our production environment (Figure 4-11).

Figure 4-11. City of the Day (take 2)
Managing Image Changes
Operations teams looking to adopt containers in production have to think about software supply chains and how they can help developers to sensibly adopt and choose supported enterprise-grade containers on which to base their own software. Given that a container image is made up of layers, it is very important that developers and operations teams are aware of what’s going into their containers as early in the development lifecycle as possible.
Containers converge the software supply chain that makes up the layered build artifact (Figure 4-12). Infra/ops still needs to update the underlying standard operating environment, while developers can cleanly separate their own code and deliver it free of impediments. Both teams can operate at a speed or cadence that suits, only changing their pieces of the container repository when they need to. Incompatibilities can be surfaced early during build instead of at deploy time, and tests can be used to increase confidence.

Figure 4-12. Image build chain
The core build will contain enough of the operating system to run the middleware and application. If you are using one of the Red Hat base
builder images, that will already provide middleware for your application. In our City of the Day application we can easily see build chain
dependencies using the oc adm build-chain command:
$oc login -u sysadmin:admin$oc adm build-chain php:5.6 -n openshift --all <openshift istag/php:5.6> <development bc/myapp> <development istag/myapp:latest>
The build-chain command is great because it can create pictures of the dependencies. I have created a new playground namespace using the same image and application deployed—let’s have a look at the build chain dependecies (Figure 4-13):
$oc adm build-chain php:5.6 -n openshift --all -o dot|dot -T svg -o deps.svg
dot Utility
To run this command you may need to install the dot utility from the graphviz package. For RPM-based Linux systems:
$ yum install graphvizSee http://www.graphviz.org/Download.php for other systems (Mac, Windows, other Linux distros).
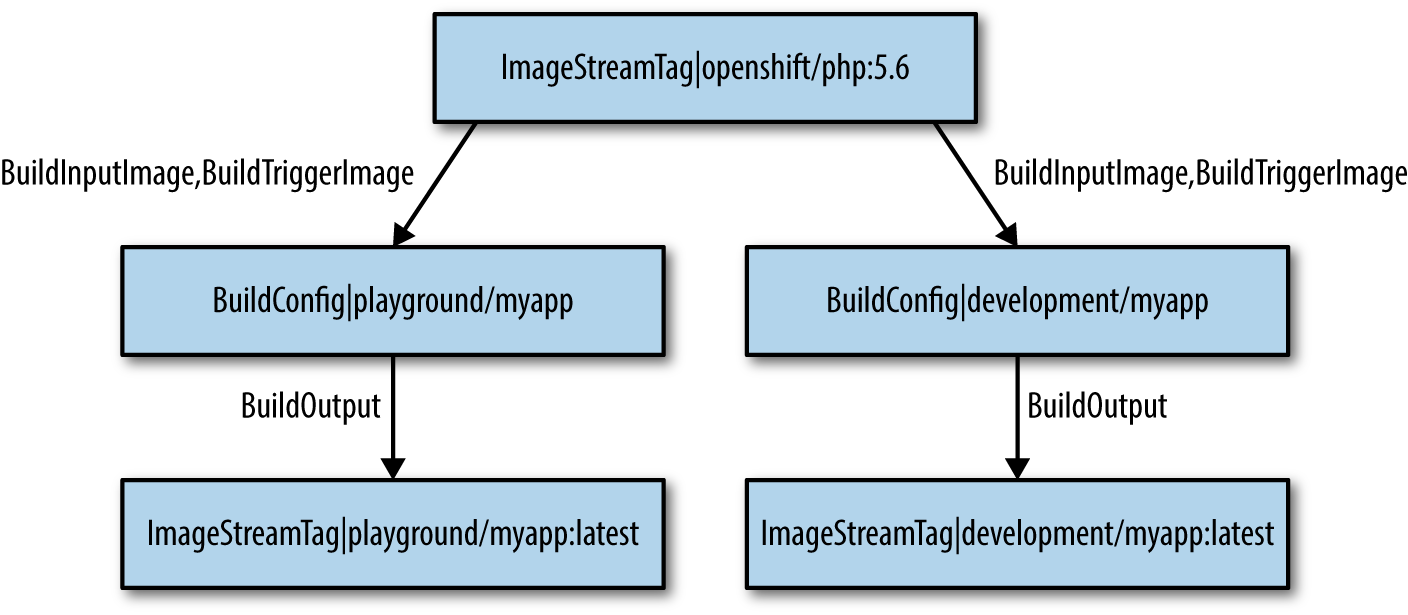
Figure 4-13. ImageStream dependencies
We can easily determine if a change in our base builder image php:5.6 will cause a change in our application stack. This deployment uses
an Image Change Trigger on the build configuration
to detect that a new image is available in OpenShift. When the image changes, our dependent applications are built and redeployed automatically in
our development and playground projects.
We can see the trigger in the build configuration (YAML/JSON) or by inspecting:
$ocprojectdevelopment$ocsettriggersbc/myapp--allNAMETYPEVALUEAUTObuildconfigs/myappconfigtruebuildconfigs/myappimageopenshift/php:5.6truebuildconfigs/myappwebhookgqBsJ6bdHVdjiEfZi8Upbuildconfigs/myappgithubuAmMxR1uQnW66plqmKOt
But what if we want the pipeline to manage our build and deployment based on a base image change?
Cascading Pipelines
Lets take a simple layered Dockerfile build strategy example. We have two Dockerfiles that we are going to use to layer up our image in this example. The layers are related to each other using the standard FROM image definition in the Dockerfile. For example:
Layered Image _____________________________ | app layer (foo app) || ------------------------- | | ops layer (middleware) |
| ------------------------- | | busybox |
|___________________________|

Base busybox image from Dockerhub

ops middleware layer—a shell script

foo application layer built from ops image
Now, we have arbitrarily made this example pretty simple and our operations managed middleware layer is a simple shell script! We are going to run through a worked example, but this is how you would write the Dockerfiles:
# middleware ops/DockerfileFROM docker.io/busybox ADD ./hello.sh ./ EXPOSE 8080 CMD["./hello.sh"]# application foo/DockerfileFROM welcome/ops:latest CMD["./hello.sh","foo"]
Now, what we would like is a pipeline build of the foo application being triggered when the ops application image is rebuilt (either manually, or because a new busybox image is pushed into our registry).
Let’s set up our welcome project and give the Jenkins service account edit access:
$oc login -u developer -p developer$oc new-project welcome --display-name='Welcome'--description='Welcome'$oc policy add-role-to-user edit system:serviceaccount:cicd:jenkins -n welcome
Next we create builds for the ops and foo applications. We need to wait for the ops:latest image to exist before we can create and build foo, or we could use the --allow-missing-imagestream-tags flag on the foo new-app command:
$oc new-build --context-dir=sh --name=ops --strategy=docker\https://github.com/devops-with-openshift/welcome$oc new-build --context-dir=foo --name=foo --strategy=docker\--allow-missing-imagestream-tags\https://github.com/devops-with-openshift/welcome
Once the foo build completes, deploy our newly built image, and create a service and a route for the foo application:
$oc create dc foo --image=172.30.18.201:5000/welcome/foo:latest$oc expose dc foo --port=8080$oc expose svc foo
We can test the running foo application:
$ curl foo-welcome.192.168.137.3.xip.io
Hello foo ! Welcome to OpenShift 3
Let’s create our welcome and foo pipeline builds in the cicd project we created earlier:
$oc create -n cicd -f\https://raw.githubusercontent.com/devops-with-openshift/pipeline-configs/master/ops-pipeline.yaml
We can then set up the build configuration triggers. We want to disable the build configuration ImageChange trigger from our foo application—because we want our foo pipeline build to manage this build and deployment:
$ocsettriggers bc foo --from-image='ops:latest'--remove -n welcome
We now want to add the ImageChange trigger to our foo pipeline build configuration—so that every time a new welcome image is pushed, our pipeline build will start:
$oc patch bc foo -n cicd\-p'{"spec":{"triggers":[{"type":"ImageChange","imageChange":{"from":{"kind":"ImageStreamTag","namespace": "welcome","name": "ops:latest"}}}]}}'
Similarly, we want to remove the build configuration ImageChange trigger from our welcome application—because we want our
welcome pipeline build to manage this build and deployment when the busybox:latest image changes:
$ocsettriggers bc ops --from-image='busybox:latest'--remove -n welcome$oc patch bc ops -n cicd\-p'{"spec":{"triggers":[{"type":"ImageChange","imageChange":{"from":{"kind":"ImageStreamTag","namespace": "welcome","name": "busybox:latest"}}}]}}'
Let’s test things out by triggering a welcome pipeline application build and deployment. What we expect to see is a new foo pipeline build start automatically once the welcome:latest image is pushed:
$ oc start-build ops -n cicdWe now have cascading build and deployment pipelines that we can use to manage our various image changes (Figure 4-14). These pipelines can be managed separately by different teams with different cadences for change. For example, the ops pipeline may be run and changed occasionally for security patching or updates. The foo application will be changed and run regularly by developers.
The pipelines can also be arbitrarily complex—for example, we would want to include testing of our images! We may also wish to manage the pipelines across separate projects and namespaces. So we have a basic InfraOps pipeline along with a Developer pipeline.
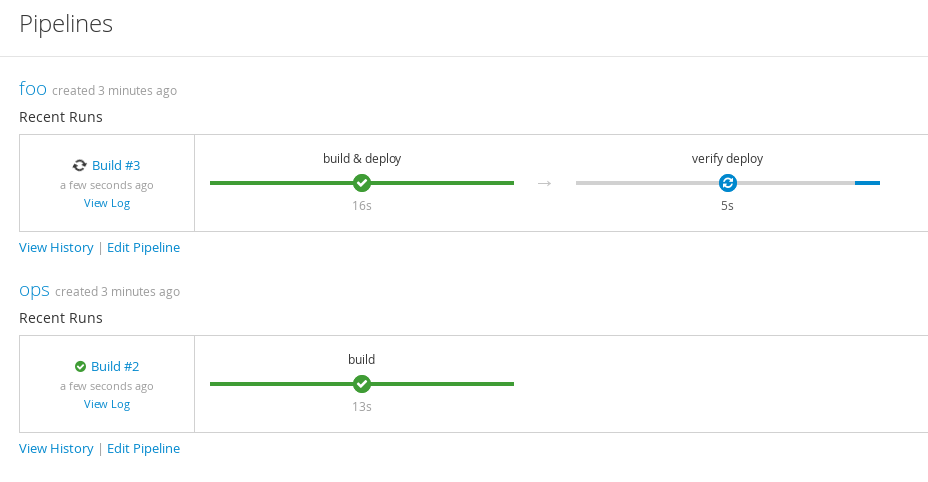
Figure 4-14. Cascading pipeline deployment using ImageChange triggers
Customizing Jenkins
There are several important things you will need to consider when running Jenkins as part of integrated pipelines on OpenShift. The product documentation is a great place to learn about these. We are going to cover some important choices here.
The Jenkins template deployed as part of integrated pipeline is configured in the OpenShift master configuration file. By default, this
is usually the ephemeral (nonpersistent) Jenkins template. You can change this behavior by editing the templateName and templateNamespace field
of the jenkinsPipelineConfig stanza. To keep all of your historical build jobs after a Jenkins container restart, you can provision the
jenkins-persistent template and provide a PersistentVolume to keep those records in.
You may also wish to turn on auto-provisioning of a Jenkins instance when a pipeline build configuration is deployed by
setting the autoProvisionEnabled: true flag. You can set template parameters in the parameters section of the master config
jenkinsPipelineConfig section (openshift.local.config/master/master-config.yaml):
jenkinsPipelineConfig: autoProvisionEnabled:trueparameters: JENKINS_IMAGE_STREAM_TAG: jenkins-2-rhel7:latest ENABLE_OAUTH:"true"serviceName: jenkins templateName: jenkins-ephemeral templateNamespace: openshift
With these settings, when you deploy the sample pipeline application example:
$ oc new-app jenkins-pipeline-examplean ephemeral Jenkins instance using the supported jenkins-2-rhel7:latest image is automatically created with OAuth enabled. To customize the official OpenShift Container Platform Jenkins image, you have two options:
-
Use Docker layering
-
Use the Jenkins image as a source to image builder
If you are using persistent storage for Jenkins, you could also add plug-ins through the Manage Jenkins → Manage Plugins admin page that will persist across restarts. This is not considered very maintainable because the configuration is manually applied. You may also wish to extend the base Jenkins image by adding your own plug-ins—for example, by adding in:
- SonarQube
-
For continuous inspection of code quality.
- OWASP
-
Dependency check plug-in that detects known vulnerabilities in project dependencies.
- Ansible
-
Plug-in that allows you to add Ansible tasks as a job build step.
- Multibranch
-
Plug-in to handle code branching in a single group.
This way, your customized, reusable Jenkins image will contain all the tooling you need to support more complex CICD pipeline jobs—you can perform code quality checks, check for vulnerabilities (continuous security) in your dependencies at build and deployment time, as well as run Ansible playbooks to help provision off-PaaS resources.
The multibranch plug-in will automatically create a new Jenkins job whenever a new branch is pushed to a source code repository. Other plug-ins can define various branch types (e.g., a Git branch, a Subversion branch, a GitHub pull request, etc.). This is extremely useful when we want to reuse our Jenkinsfile pipeline as code definitions across branches, especially if we are doing bug-fixing or feature enhancements on branches and merging back to trunk when completed.
See the product documentation for more details on customizing the Jenkins image.
Extending Your Pipelines Using Libraries
There are some great dynamic and reusable Jenkins pipeline libraries that you can use within your own pipelines as code that offer a lot of reusable features:
- Fabric8 Pipeline for Jenkins
Provides a set of reusable Jenkins pipeline steps and functions.
- Jenkinsfiles Library
Provides a set of reusable Jenkinsfile files you can use on your projects.
Parallel Build Jobs
An important part of running jobs fast within our pipeline is the ability to run each node in parallel if we choose. We can use the Groovy keyword parallel to achieve this. Running lots of tests in parallel is a good example use case:
stage'parallel'parallel'unitTests':{node('maven'){echo'This stage runs automated unit tests'// code ...}},'sonarAnalysis':{node('maven'){echo'This stage runs the code quality tests'// code ...}},'seleniumTests':{node('maven'){echo'This stage runs the web user interface tests'// code ...}},failFast:true
When we execute this pipeline, we can look at the pods created to run this job, or inspect the Jenkins logs:
[unitTests]Running on maven-38d93137cc2 in /tmp/workspace/parallel[sonarAnalysis]Running on maven-38fc49f8a37 in /tmp/workspace/parallel[seleniumTests]Running on maven-392189bf779 in /tmp/workspace/parallel
We can see three different slave builder pods were launched to run each node. This makes it easy to run steps at the same time, making our pipelines faster to execute as well as making use of the elasticity OpenShift provides for running build steps in containers on demand.
Summary
This chapter demonstrated how you can readily use integrated pipelines with your OpenShift projects. Automating each gate and step in a pipeline allows you to visibly feed back the results of your activities to teams, allowing you to react fast when failures occur. The ability to continually iterate what you put in your pipeline is a great way to deliver quality software fast. Use pipeline capabilities to easily create container applications on demand for all of your build, test, and deployment requirements.
Get DevOps with OpenShift now with the O’Reilly learning platform.
O’Reilly members experience books, live events, courses curated by job role, and more from O’Reilly and nearly 200 top publishers.

