Chapter 1. Node Overview
1.1 The Document Object Model (a.k.a. the DOM) Is a Hierarchy/Tree of JavaScript Node Objects
When you write an HTML document, you encapsulate HTML content inside other HTML content. By doing this, you set up a hierarchy that can be expressed as a tree. Often this hierarchy or encapsulation system is indicated visually by indenting markup in an HTML document. The browser, when loading the HTML document, interrupts and parses this hierarchy to create a tree of node objects that simulates how the markup is encapsulated.
<!DOCTYPE html>
<html lang="en">
    <head>
        <title>HTML</title>
    </head>
    <body>
        <!-- Add your content here-->
    </body>
</html>
The preceding HTML code, when parsed by a browser, creates a document that contains nodes structured in a tree format (i.e., DOM). In Figure 1-1, I reveal the tree structure from the preceding HTML document using Opera’s Dragonfly DOM Inspector.
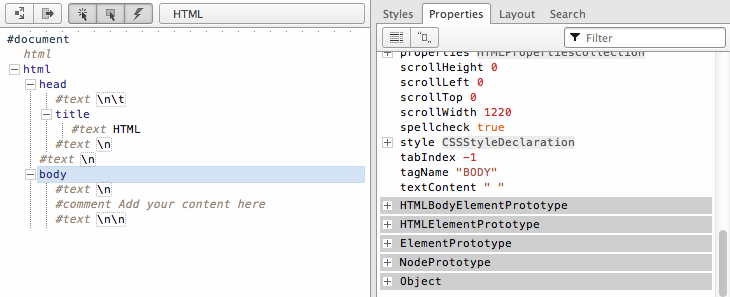
On the left, you see the HTML document in its tree form. And on the
right, you see the corresponding JavaScript object that represents the
selected element on the left. For example, the selected
<body> element, highlighted in blue, is an
element node and an instance of the HTMLBodyElement
interface.
What you should take away here is that HTML documents get parsed by a browser and converted into a tree structure of node objects representing a live document. The purpose of the DOM is to provide a programmatic interface for scripting (removing, adding, replacing, eventing, and modifying) this live document using JavaScript.
1.2 Node Object Types
Here is a list of the most common types of nodes (i.e.,
nodeType/node classifications) one encounters when
working with HTML documents:
DOCUMENT_NODE(e.g.,window.document)ELEMENT_NODE(e.g.,<body>,<a>,<p>,<script>,<style>,<html>,<h1>)ATTRIBUTE_NODE(e.g.,class="funEdges")TEXT_NODE(e.g., text characters in an HTML document including carriage returns and whitespace)DOCUMENT_FRAGMENT_NODE(e.g.,document.createDocumentFragment())DOCUMENT_TYPE_NODE(e.g.,<!DOCTYPE html>)
I’ve listed the node types formatted (all uppercase, with _
separating words) exactly as the constant property is written in the
JavaScript browser environment as a property of the
Node object. These Node properties
are constant values and are used to store numeric code values that map to
a specific type of node object. For example, in the following code,
Node.ELEMENT_NODE is equal to 1. And
1 is the code value used to identify element
nodes.
<!DOCTYPE html>
<html lang="en">
<body>
<script>

console.log(Node.ELEMENT_NODE) /* logs 1, one is the numeric code value for element nodes */

</script>
</body>
</html>
In the following code I log all the node types and their values.
<!DOCTYPE html>
<html lang="en">
<body>
<script>

for(var key in Node){
    console.log(key,' = '+Node[key]);
};

/* the above code logs to the console the following
ELEMENT_NODE  = 1
ATTRIBUTE_NODE  = 2
TEXT_NODE  = 3
CDATA_SECTION_NODE  = 4
ENTITY_REFERENCE_NODE  = 5
ENTITY_NODE  = 6
PROCESSING_INSTRUCTION_NODE  = 7
COMMENT_NODE  = 8
DOCUMENT_NODE  = 9
DOCUMENT_TYPE_NODE  = 10
DOCUMENT_FRAGMENT_NODE  = 11
NOTATION_NODE  = 12
DOCUMENT_POSITION_DISCONNECTED  = 1
DOCUMENT_POSITION_PRECEDING  = 2
DOCUMENT_POSITION_FOLLOWING  = 4
DOCUMENT_POSITION_CONTAINS  = 8
DOCUMENT_POSITION_CONTAINED_BY  = 16
DOCUMENT_POSITION_IMPLEMENTATION_SPECIFIC  = 32 */

</script>
</body>
</html>
The preceding code example gives an exhaustive list of all node types. For the purposes of this book, I’ll be discussing the shorter list of node types shown at the start of this section. These nodes will most likely be the ones you encounter when scripting an HTML page.
In Table 1-1, I list the name given to the
interface/constructor that instantiates the most common node types and
their corresponding nodeType classifications by number
and name. What I hope you take away from the table is that the
nodeType value (i.e., 1) is just a
numeric classification used to describe a certain type of node constructed
from a certain JavaScript interface/constructor. For example, the
HTMLBodyElement interface represents a node object that
has a node type of 1, which is a classification for
ELEMENT_NODEs.
Interface/constructor | nodeType (returned from .nodeType) |
| 1 (i.e.,
|
3 (i.e.,
| |
2 (i.e.,
ATTRIBUTE_NODE) | |
9 (i.e.,
DOCUMENT_NODE) | |
11 (i.e.,
| |
10 (i.e.,
| |
Notes
The DOM specification semantically labels nodes like
Node, Element,
Text, Attr, and
HTMLAnchorElement as interfaces, which they are, but
keep in mind that these are also the names given to the JavaScript
constructor functions that construct the nodes. As you read this book, I
will be referring to these interfaces (i.e., Element,
Text, Attr,
HTMLAnchorElement) as objects or constructor
functions, while the specification refers to them as interfaces.
ATTRIBUTE_NODE is not actually part of a tree,
but rather is listed for historical reasons. In this book, I do not
provide a chapter on attribute nodes and instead discuss them in Chapter 3, given that attribute nodes are sublike nodes
of element nodes with no participation in the actual DOM tree structure.
Be aware that the ATTRIBUTE_NODE is being deprecated
in DOM4.
I’ve not included detail in this book on
COMMENT_NODE, but you should be aware that comments
in an HTML document are Comment nodes and are similar
in nature to Text nodes.
As I discuss nodes throughout the book, I rarely refer to a
specific node using its nodeType name (e.g.,
ELEMENT_NODE). This is done to be consistent with
verbiage used in the specifications provided by the W3C and
WHATWG.
1.3 Subnode Objects Inherit From the Node Object
Each node object in a typical DOM tree inherits properties and
methods from Node. Depending on the type of node in the
document, there are also additional subnode objects/interfaces that extend
the Node object. The following list details the
inheritance model implemented by browsers for the most common node
interfaces (< indicates “inherited from”):
Object<Node<Element<HTMLElement< (e.g.,HTML*Element)Object<Node<Attr(this is deprecated in DOM4)Object<Node<CharacterData<TextObject<Node<Document<HTMLDocumentObject<Node<DocumentFragment
It’s important to remember not only that all node types inherit from
Node, but also that the chain of inheritance can be
long. For example, all HTMLAnchorElement nodes inherit
properties and methods from HTMLElement,
Element, Node, and
Object objects.
Note
Node is just a JavaScript constructor function.
Logically, therefore, Node inherits from
Object.prototype just like all objects in
JavaScript.
To verify that all node types inherit properties and methods from
the Node object, let’s loop over an
Element node object and examine its properties and
methods (including those that are inherited).
<!DOCTYPE html>
<html lang="en">
<body>

<a href="#">Hi</a> <!-- this is a HTMLAnchorElement which inherits from... -->

<script>

//get reference to element node object
var nodeAnchor = document.querySelector('a');
//create props array to store property keys for element node object
var props = [];

//loop over element node object getting all properties and methods (inherited too)
for(var key in nodeAnchor){
    props.push(key);
}

//log alphabetical list of properties and methods
console.log(props.sort());

</script>
</body>
</html>
If you run the preceding code in a web browser, you will see a long
list of properties that are available to the element node object. The
properties and methods inherited from the Node object
are in this list, as are a great deal of other inherited properties and
methods from the Element,
HTMLElement, HTMLAnchorElement,
Node, and Object objects. It’s not
my point to examine all these properties and methods now, but rather to
simply mention that all nodes inherit a set of baseline properties and
methods from their constructor as well as properties from the prototype
chain.
If you are more of a visual learner, consider the inheritance chain denoted from examining the previous HTML document with Opera’s DOM Inspector (see Figure 1-2).
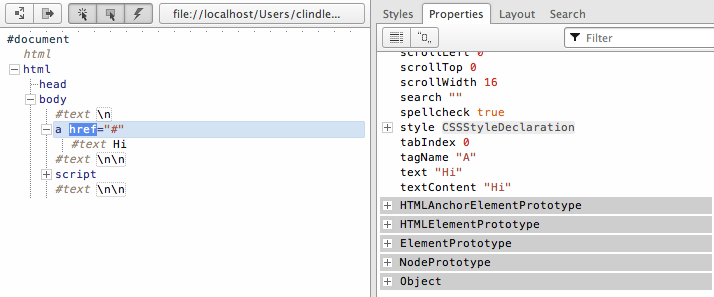
Notice in Figure 1-2 that the anchor node inherits
from HTMLAnchorElement, HTMLElement, Element,
Node, and Object, all of which are
shown in the list of properties highlighted with a gray background. This
inheritance chain provides a great deal of shared methods and properties
to all node types.
Note
Adding your own custom methods and properties to the DOM is possible, given the mutable and dynamic nature of JavaScript. But generally, extending host objects comes with several problems, so it’s probably not a good idea to do so.
1.4 Properties and Methods for Working with Nodes
As we have been discussing, all node objects (e.g.,
Element, Attr,
Text, and so on) inherit properties and methods from a
primary Node object. These properties and methods are
the baseline values and functions for manipulating, inspecting, and
traversing the DOM. In addition to the properties and methods provided by
the node interface, a great deal of other relevant properties and methods
are provided by subnode interfaces such as the
document, HTMLElement, and
HTML*Element interfaces.
The following are the most common Node properties
and methods inherited by all node objects, including the relevant
inherited properties for working with nodes from subnode
interfaces.
- Node properties
childNodesfirstChildlastChildnextSiblingnodeNamenodeTypenodeValueparentNodepreviousSibling
- Node methods
appendChild()cloneNode()compareDocumentPosition()contains()hasChildNodes()insertBefore()isEqualNode()removeChild()replaceChild()
- Document methods
document.createElement()document.createTextNode()
HTML*ElementpropertiesinnerHTMLouterHTMLtextContentinnerTextouterTextfirstElementChildlastElementChildnextElementChildpreviousElementChildchildren
- HTML element method
insertAdjacentHTML()
1.5 Identifying the Type and Name of a Node
Every node has a nodeType and
nodeName property that is inherited from
Node. For example, Text nodes have a
nodeType code of 3 and a nodeName
value of #text. As I mentioned previously, the numeric
value 3 is a numeric code representing the type of underlying object the
node represents (i.e., Node.TEXT_NODE === 3).
Here are the values returned for nodeType and
nodeName for the node objects discussed in this book.
It makes sense to simply memorize these numeric codes for the more common
nodes, given that we are only dealing with five numeric codes.
<!DOCTYPE html>
<html lang="en">
<body>

<a href="#">Hi</a>

<script>

/* This is DOCUMENT_TYPE_NODE or nodeType 10 because Node.DOCUMENT_TYPE_NODE === 10 */
console.log(
    document.doctype.nodeName, /* logs 'html' also try document.doctype to get <!DOCTYPE html> */
    document.doctype.nodeType //logs 10 which maps to DOCUMENT_TYPE_NODE
);
//This is DOCUMENT_NODE or nodeType 9 because Node.DOCUMENT_NODE === 9
console.log(
    document.nodeName, //logs '#document'
    document.nodeType //logs 9 which maps to DOCUMENT_NODE
);

/* This is DOCUMENT_FRAGMENT_NODE or nodeType 11 because Node.DOCUMENT_FRAGMENT_NODE === 11 */
console.log(
    document.createDocumentFragment().nodeName, //logs '#document-fragment'
    document.createDocumentFragment().nodeType /* logs 11 which maps to DOCUMENT_FRAGMENT_NODE */
);

//This is ELEMENT_NODE or nodeType 1 because Node. ELEMENT_NODE === 1
console.log(
    document.querySelector('a').nodeName, //logs 'A'
    document.querySelector('a').nodeType //logs 1 which maps to ELEMENT_NODE
);

//This is TEXT_NODE or nodeType 3 because Node.TEXT_NODE === 3
console.log(
    document.querySelector('a').firstChild.nodeName, //logs '#text'
    document.querySelector('a').firstChild.nodeType /* logs 3 which maps to TEXT_NODE */
);

</script>
</body>
</html>
In case it’s not obvious, the fastest way to determine whether a
node is of a certain type is to simply check its
nodeType property. In the following code, I check to
see if the anchor element has a node number of 1. If it does, I can
conclude that it’s an Element node, because
Node.ELEMENT_NODE === 1.
<!DOCTYPE html>
<html lang="en">
<body>

<a href="#">Hi</a>

<script>

//is <a> a ELEMENT_NODE?
console.log(document.querySelector('a').nodeType === 1); /* logs true, <a> is an Element node */

//or use Node.ELEMENT_NODE which is a property containing the numeric value of 1
console.log(document.querySelector('a').nodeType === Node.ELEMENT_NODE); //logs true, <a> is an Element node

</script>
</body>
</html>
Determining the type of node you might be scripting can be very handy if you want to know which properties and methods are available to script the node.
Note
The values returned by the nodeName property
vary according to the node type. See the DOM4 specification for
details.
1.6 Getting a Node’s Value
The nodeValue property returns
null for most of the node types (except
Text and Comment). Its use is
centered on extracting actual text strings from Text
and Comment nodes. In the following code, I demonstrate
its use on all the nodes discussed in this book.
<!DOCTYPE html>
<html lang="en">
<body>

<a href="#">Hi</a>

<script>

/* logs null for DOCUMENT_TYPE_NODE, DOCUMENT_NODE, DOCUMENT_FRAGMENT_NODE, ELEMENT_NODE below */
console.log(document.doctype.nodeValue);
console.log(document.nodeValue);
console.log(document.createDocumentFragment().nodeValue);
console.log(document.querySelector('a').nodeValue);

//logs string of text
console.log(document.querySelector('a').firstChild.nodeValue); //logs 'Hi'

</script>
</body>
</html>
1.7 Using JavaScript Methods to Create Element and Text Nodes
When a browser parses an HTML document, it constructs the nodes and
tree based on the contents of the HTML file. The browser deals with the
creation of nodes for the initial loading of the HTML document. However,
it’s possible to create your own nodes using JavaScript. The following two
methods allow us to programmatically create Element and Text nodes
using JavaScript:
createElement()createTextNode()
Other methods are available but are not commonly used (e.g.,
createAttribute() and
createComment()). In the following code, I show how
simple it is to create element and text nodes.
<!DOCTYPE html>
<html lang="en">
<body>
<script>

var elementNode = document.createElement('div');
console.log(elementNode, elementNode.nodeType); /* log <div> 1, and 1 indicates an element node */

var textNode = document.createTextNode('Hi');
console.log(textNode, textNode.nodeType); /* logs Text {} 3, and 3 indicates a text node */

</script>
</body>
</html>
Notes
The createElement() method accepts one
parameter that is a string specifying the element to be created. The
string is the same string that is returned from the
tagName property of an Element
object.
The createAttribute() method is deprecated and
should not be used for creating attribute nodes. Instead, developers
typically use the getAttribute(),
setAttribute(), and
removeAttribute() methods. I will discuss this in
more detail in Chapter 3.
The createDocumentFragment() method will be
discussed in Chapter 8.
You should be aware that a createComment()
method is available for creating comment nodes. It’s not discussed in
this book, but is available to any developer who finds its usage
valuable.
1.8 Using JavaScript Strings to Create and Add Element and Text Nodes to the DOM
The innerHTML, outerHTML,
textContent, and
insertAdjacentHTML() properties and methods provide the
functionality to create and add nodes to the DOM using JavaScript
strings.
In the following code, I am using the innerHTML,
outerHTML, and textContent
properties to create nodes from JavaScript strings that are then
immediately added to the DOM.
<!DOCTYPE html>
<html lang="en">
<body>

<div id="A"></div>
<span id="B"></span>
<div id="C"></div>
<div id="D"></div>
<div id="E"></div>

<script>

//create a strong element and text node and add it to the DOM
document.getElementById('A').innerHTML = '<strong>Hi</strong>';

/* create a div element and text node to replace <span id="B"></div> (notice span#B is replaced) */
document.getElementById('B').outerHTML = '<div id="B"
    class="new">Whats Shaking</div>'

//create a text node and update the div#C with the text node
document.getElementById('C').textContent = 'dude';


//NON standard extensions below i.e., innerText and outerText

//create a text node and update the div#D with the text node
document.getElementById('D').innerText = 'Keep it';

/* create a text node and replace the div#E with the text node (notice div#E is gone) */
document.getElementById('E').outerText = 'real!';

console.log(document.body.innerHTML);
/* logs
<div id="A"><strong>Hi</strong></div>
<div id="B" class="new">Whats Shaking</div>
<span id="C">dude</span>
<div id="D">Keep it</div>
real!
*/

</script>
</body>
</html>
The insertAdjacentHTML() method, which only works
on Element nodes, is a good deal more precise than the
previously mentioned methods. Using this method, it’s possible to insert
nodes before the beginning tag, after the beginning tag, before the end
tag, and after the end tag. In the following code, I construct a sentence
using the insertAdjacentHTML()
method.
<!DOCTYPE html>
<html lang="en">
<body><i id="elm">how</i>

<script>

var elm = document.getElementById('elm');

elm.insertAdjacentHTML('beforebegin', '<span>Hey-</span>');
elm.insertAdjacentHTML('afterbegin', '<span>dude-</span>');
elm.insertAdjacentHTML('beforeend', '<span>-are</span>');
elm.insertAdjacentHTML('afterend', '<span>-you?</span>');

console.log(document.body.innerHTML);
/* logs
<span>Hey-</span><i id="A"><span>dude-</span>how<span>-are</span></i><span>-you?</span>
*/

</script>
</body>
</html>
Notes
The innerHTML property will convert HTML
elements found in the string to actual DOM nodes, while
textContent can only be used to construct text nodes. If you pass
textContent a string containing HTML elements, it
will simply spit it out as text.
document.write() can also be used to
simultaneously create and add nodes to the DOM. However, it’s typically
not used unless its usage is required to accomplish third-party
scripting tasks. Basically, the write() method will
output to the page the values passed to it during page loading/parsing.
You should be aware that using the write() method
will stall/block the parsing of the HTML document being loaded.
innerHTML invokes a heavy and expensive HTML
parser, whereas text node generation is trivial; thus, use
innerHTML and friends sparingly.
The insertAdjacentHTML options
beforebegin and afterend will only
work if the node is in the DOM tree and has a parent element.
Support for outerHTML was not available
natively in Firefox until version 11. A polyfill is
available.
textContent gets the content of all elements,
including <script> and
<style> elements, but
innerText does not.
innerText is aware of style and will not return
the text of hidden elements, whereas textContent
will.
Available to all modern browsers
except Firefox are insertAdjacentElement() and
insertAdjacentText().
1.9 Extracting Parts of the DOM Tree as JavaScript Strings
Exactly the same properties (innerHTML,
outerHTML, textContent) that we use
to create and add nodes to the DOM can also be used to extract parts of
the DOM (or really, the entire DOM) as a JavaScript string. In the
following code example, I use these properties to return a string value
containing text and HTML values from the HTML document.
<!DOCTYPE html>
<html lang="en">
<body>

<div id="A"><i>Hi</i></div>
<div id="B">Dude<strong> !</strong></div>

<script>

console.log(document.getElementById('A').innerHTML); //logs '<i>Hi</i>'

console.log(document.getElementById('A').outerHTML); /* logs <div id="A">Hi</div> */

/* notice that all text is returned even if it's in child element nodes (i.e., <strong> !</strong>) */
console.log(document.getElementById('B').textContent); //logs 'Dude !'

//NON standard extensions below i.e., innerText and outerText

console.log(document.getElementById('B').innerText); //logs 'Dude !'

console.log(document.getElementById('B').outerText); //logs 'Dude !'

</script>
</body>
</html>
Note
The textContent, innerText,
and outerText properties, when being read, will
return all the text nodes contained within the selected node. So, as an
example (note that this is not a good idea in practice),
document.body.textContent will get all the text nodes
contained in the body element, not just the first text node.
1.10 Using appendChild() and insertBefore() to Add Node Objects to the DOM
The appendChild() and
insertBefore() node methods allow us to insert
JavaScript node objects into the DOM tree. The
appendChild() method will append a node (or multiple
nodes) to the end of the child node(s) of the node the method is called
on. If there is no child node(s), the node being appended is appended as
the first child. For example in the following code, I am creating an
element node (<strong>) and a text node
(Dude). Then the <p> element
is selected from the DOM and the <strong> element
is appended using appendChild(). Notice that the
<strong> element is encapsulated inside the
<p> element and added as the last child node.
Next, the <strong> element is selected and the
text Dude is appended to the
<strong> element.
<!DOCTYPE html>
<html lang="en">
<body>

<p>Hi</p>

<script>

//create a blink element node and text node
var elementNode = document.createElement('strong');
var textNode = document.createTextNode(' Dude');

//append these nodes to the DOM
document.querySelector('p').appendChild(elementNode);
document.querySelector('strong').appendChild(textNode);

//log's <p>Hi<strong> Dude</strong></p>
console.log(document.body.innerHTML);

</script>
</body>
</html>
When it becomes necessary to control the location of insertion
beyond appending nodes to the end of a child list of nodes, we can use
insertBefore(). In the following code, I am inserting
the <li> element before the first child node of
the <ul> element.
<!DOCTYPE html>
<html lang="en">
<body>

<ul>
    <li>2</li>
    <li>3</li>
</ul>

<script>

//create a text node and li element node and append the text to the li
var text1 = document.createTextNode('1');
var li = document.createElement('li');
li.appendChild(text1);

//select the ul in the document
var ul = document.querySelector('ul');

/*
add the li element we created above to the DOM, notice I call on <ul> and pass reference to <li>2</li> using ul.firstChild
*/
ul.insertBefore(li,ul.firstChild);

console.log(document.body.innerHTML);
/*logs
<ul>
<li>1</li>
<li>2</li>
<li>3</li>
</ul>
*/

</script>
</body>
</html>
The insertBefore() method requires two
parameters: the node to be inserted and the reference node in the document
before which you would like the node inserted.
Note
If you do not pass a second parameter to the
insertBefore() method, then it functions just like
appendChild().
We have more methods (e.g.,
prepend(), append(),
before(), and after()) to look
forward to in DOM4.
1.11 Using removeChild() and replaceChild() to Remove and Replace Nodes
Removing a node from the DOM is a bit of a multistep process. First
you have to select the node you want to remove. Then you need to gain
access to its parent element, typically by using the
parentNode property. It’s on the parent node that you
invoke the removeChild() method, passing it the
reference to the node to be removed. Here I demonstrate its use on an
element node and a text node.
<!DOCTYPE html>
<html lang="en">
<body>

<div id="A">Hi</div>
<div id="B">Dude</div>

<script>

//remove element node
var divA = document.getElementById('A');
divA.parentNode.removeChild(divA);

//remove text node
var divB = document.getElementById('B').firstChild;
divB.parentNode.removeChild(divB);

//log the new DOM updates, which should only show the remaining empty div#B
console.log(document.body.innerHTML);

</script>
</body>
</html>
Replacing an element or text node is not unlike removing one. In the
following code, I use the same HTML structure as in the preceding code
example, except this time, I use replaceChild() to
update the nodes instead of removing them.
<!DOCTYPE html>
<html lang="en">
<body>

<div id="A">Hi</div>
<div id="B">Dude</div>

<script>

//replace element node
var divA = document.getElementById('A');
var newSpan = document.createElement('span');
newSpan.textContent = 'Howdy';
divA.parentNode.replaceChild(newSpan,divA);

//replace text node
var divB = document.getElementById('B').firstChild;
var newText = document.createTextNode('buddy');
divB.parentNode.replaceChild(newText, divB);

//log the new DOM updates
console.log(document.body.innerHTML);

</script>
</body>
</html>
Notes
Depending on what you are removing or replacing, simply providing
the innerHTML, outerHTML, and
textContent properties with an empty string might be
easier and faster. Be careful,
however, as memory leaks in the browser might come back to haunt
you.
replaceChild() and
removeChild() return the replaced and removed node,
respectively. Basically, the node is not gone just because you replace
or remove it. These actions simply take the node out of the current live
document. You still have a reference to it in memory.
We have more methods (e.g.,
replace(), remove()) to look
forward to in DOM4.
1.12 Using cloneNode() to Clone Nodes
Using the cloneNode() method, it’s possible to
duplicate a single node or a node and all its child nodes.
In the following code, I clone only the
<ul> (i.e., HTMLUListElement)
that, once cloned, can be treated like any node reference.
<!DOCTYPE html>
<html lang="en">
<body>

<ul>
  <li>Hi</li>
  <li>there</li>
</ul>

<script>

var cloneUL = document.querySelector('ul').cloneNode();

console.log(cloneUL.constructor); //logs HTMLUListElement()
console.log(cloneUL.innerHTML); //logs (an empty string) as only the ul was cloned

</script>
</body>
</html>
To clone a node and all its child nodes, you pass the
cloneNode() method a parameter of
true. The following code uses the
cloneNode() method again, but this time, I am cloning
all the child nodes as well.
<!DOCTYPE html>
<html lang="en">
<body>

<ul>
  <li>Hi</li>
  <li>there</li>
</ul>

<script>

var cloneUL = document.querySelector('ul').cloneNode(true);

console.log(cloneUL.constructor); //logs HTMLUListElement()
console.log(cloneUL.innerHTML); //logs <li>Hi</li><li>there</li>

</script>
</body>
</html>
Note
When cloning an Element node, all of its
attributes and their values (including in-line events) are cloned as
well. Anything added with addEventListener()
or node.onclick is not cloned.
You might think that cloning a node and its children using
cloneNode(true) would return a
NodeList, but it in fact does not.
cloneNode() may lead to duplicate element IDs
in a document.
1.13 Grokking Node Collections (i.e., NodeList and HTMLCollection)
When selecting groups of nodes from a tree (see Chapter 3) or accessing predefined sets of nodes, the
nodes are placed in either a NodeList
[e.g., document.querySelectorAll('*')] or an HTMLCollection
(e.g., docu). These
array-like object collections have the following characteristics:ment.scripts
A collection can be either live or static. This means the nodes contained in the collection are either literally part of the live document or a snapshot of the live document.
By default, nodes are sorted inside the collection by tree order. This means the order matches the linear path from tree trunk to branches.
The collections have a
lengthproperty that reflects the number of elements in the list.
1.14 Getting a List/Collection of All Immediate Child Nodes
Using the childNodes property produces an
array-like list [i.e., NodeList]
of the immediate child nodes. In the following code, I select the
<ul> element, which I then use to create a list
of all the immediate child nodes contained inside the
<ul>.
<!DOCTYPE html>
<html lang="en">
<body>

<ul>
  <li>Hi</li>
  <li>there</li>
</ul>

<script>

var ulElementChildNodes = document.querySelector('ul').childNodes;

console.log(ulElementChildNodes); /* logs an arraylike list of all nodes inside of the ul */

/* Call forEach as if it's a method of NodeLists so we can loop over the NodeList. Done because NodeLists are arraylike, but do not directly inherit from Array */
Array.prototype.forEach.call(ulElementChildNodes,function(item){
   console.log(item); //logs each item in the array
});

</script>
</body>
</html>1.15 Converting a NodeList or HTMLCollection to a JavaScript Array
Node lists and HTML collections are array-like but are not true
JavaScript arrays, which inherit array methods. In the following code, I
programmatically confirm this using isArray().
<!DOCTYPE html>
<html lang="en">
<body>

<a href="#"></a>

<script>

console.log(Array.isArray(document.links)); /* returns false, it's an  HTMLCollection not an Array */
console.log(Array.isArray(document.querySelectorAll('a'))); /* returns false, it's a NodeList not an Array */
</script>
</body>
</html>
Converting a node list and HTML collection list to a true JavaScript
array can provide several benefits. For one, it gives us the ability to
create a snapshot of the list that is not tied to the live DOM,
considering that NodeList and
HTMLCollection are live lists. Second, converting a list
to a JavaScript array gives access to the methods provided by the
Array object (e.g., forEach,
pop, map, reduce,
and so on.).
To convert an array-like list to a true JavaScript array we pass the
array-like list to call() or
apply(), in which the call() or
apply() is calling a method that returns an unaltered
true JavaScript array. In the following code, I use the
.slice() method, which doesn’t really slice anything; I
am just using it to convert the list to a JavaScript
Array since the slice() returns an
array.
<!DOCTYPE html>
<html lang="en">
<body>

<a href="#"></a>

<script>

console.log(Array.isArray(Array.prototype.slice.call(document.links))); //returns true
console.log(Array.isArray(Array.prototype.slice.call(document.querySelectorAll('a')))); //returns true

</script>
</body>
</html>
1.16 Traversing Nodes in the DOM
From a node reference (i.e.,
document.querySelector('ul')), it’s possible to get a
different node reference by traversing the DOM using the following
properties:
parentNodefirstChildlastChildnextSiblingpreviousSibling
In the following code example, I examine the Node
properties providing DOM traversal functionality.
<!DOCTYPE html>
<html lang="en">
<body><ul><!-- comment -->
<li id="A"></li>
<li id="B"></li>
<!-- comment -->
</ul>

<script>

//cache selection of the ul
var ul = document.querySelector('ul');

//What is the parentNode of the ul?
console.log(ul.parentNode.nodeName); //logs body

//What is the first child of the ul?
console.log(ul.firstChild.nodeName); //logs comment

//What is the last child of the ul?
console.log(ul.lastChild.nodeName); /* logs text not comment, because there is a line break */

//What is the nextSibling of the first li?
console.log(ul.querySelector('#A').nextSibling.nodeName); //logs text

//What is the previousSibling of the last li?
console.log(ul.querySelector('#B').previousSibling.nodeName); //logs text

</script>
</body>
</html>
If you are familiar with the DOM, you should not be surprised that traversing the DOM includes traversing not just element nodes, but also text and comment nodes (I believe the preceding code example makes this clear), and this is not exactly ideal. Using the following properties we can traverse the DOM, while ignoring text and comment nodes:
firstElementChildlastElementChildnextElementChildpreviousElementChildchildrenparentElement
Note
The childElementCount is not mentioned, but you
should be aware of its availability for calculating the number of child
elements a node contains.
Let’s examine our code example again using only element traversing methods.
<!DOCTYPE html>
<html lang="en">
<body><ul><!-- comment -->
<li id="A">foo</li>
<li id="B">bar</li>
<!-- comment -->
</ul>

<script>

//cache selection of the ul
var ul = document.querySelector('ul');

//What is the first child of the ul?
console.log(ul.firstElementChild.nodeName); //logs li

//What is the last child of the ul?
console.log(ul.lastElementChild.nodeName); //logs li

//What is the nextSibling of the first li?
console.log(ul.querySelector('#A').nextElementSibling.nodeName); //logs li

//What is the previousSibling of the last li?
console.log(ul.querySelector('#B').previousElementSibling.nodeName); //logs li

//What are the element only child nodes of the ul?
console.log(ul.children); //HTMLCollection, all child nodes including text nodes

//What is the parent element of the first li?
console.log(ul.firstElementChild.parentElement); //logs ul

</script>
</body>
</html>
1.17 Verifying a Node Position in the DOM Tree with contains() and compareDocumentPosition()
It’s possible to know whether a node is contained inside another
node by using the contains() node method. In the
following code I ask if <body> is contained
inside <html lang="en">.
<!DOCTYPE html>
<html lang="en">
<body>

<script>

// is <body> inside <html lang="en"> ?
var inside =
  document.querySelector('html').contains(document.querySelector('body'));

console.log(inside); //logs true

</script>
</body>
</html>
If you need more robust information about the position of a node in
the DOM tree in regard to the nodes around it, you can use the
compareDocumentPosition() node method. Basically, this
method gives you the ability to request information about a selected node
relative to the node passed in. The information that you get back is a
number that corresponds to the information shown in Table 1-2.
Number code returned from compareDocumentPosition() | Number code information |
0 | Elements are identical. |
1 |
Set when selected node and passed-in node are not in the same document. |
2 |
Set when passed-in node is preceding selected node. |
4 |
Set when passed-in node is following selected node. |
8 |
Set when passed-in node is an ancestor of selected node. |
16, 10 |
Set when passed-in node is a descendant of selected node. |
Notes
contains() will return true
if the node selected and the node passed in are identical.
compareDocumentPosition() can be rather
confusing, because it’s possible for a node to have more than one type
of relationship with another node. For example, when a node both
contains (16) and precedes (4), the returned value from
compareDocumentPosition() will be 20.
1.18 Determining Whether Two Nodes Are Identical
According to the DOM3 specification, two nodes are equal if and only if the following conditions are satisfied:
The two nodes are of the same type.
The following string attributes are equal:
nodeName,localName,namespaceURI,prefix, andnodeValue. That is, they are bothnull, or they have the same length and are identical character for character.The
attributes NamedNodeMapsare equal. That is, they are bothnull, or they have the same length and for each node that exists in one map, there is a node that exists in the other map and is equal, although not necessarily at the same index.The
childNodes NodeListsare equal. That is, they are bothnull, or they have the same length and contain equal nodes at the same index. Note that normalization can affect equality; to avoid this, nodes should be normalized before being compared.
Calling the isEqualNode() method on a node in the
DOM will ask if that node is equal to the node that you pass it as a
parameter. In the following code, I exhibit a case of two identical nodes
and two nodes that do not meet the conditions of being equal to each
other.
<!DOCTYPE html>
<html lang="en">
<body>

<input type="text">
<input type="text">

<textarea>foo</textarea>
<textarea>bar</textarea>

<script>

//logs true, because they are exactly identical
var input = document.querySelectorAll('input');
console.log(input[0].isEqualNode(input[1]));

//logs false, because the child text node is not the same
var textarea = document.querySelectorAll('textarea');
console.log(textarea[0].isEqualNode(textarea[1]));

</script>
</body>
</html>
Get DOM Enlightenment now with the O’Reilly learning platform.
O’Reilly members experience books, live events, courses curated by job role, and more from O’Reilly and nearly 200 top publishers.

