Creating a Form
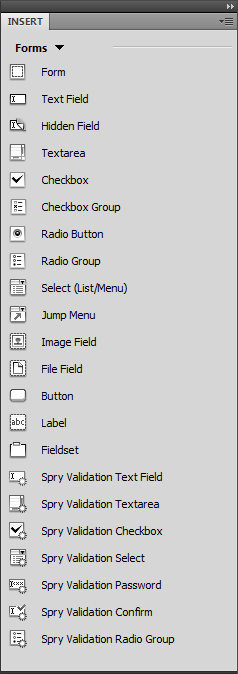
In Dreamweaver, you can build forms with one-click ease using the Insert panel’s Forms category (see Figure 12-2).
To begin, you need to insert a <form> tag on your web page to indicate the boundaries of a form:
In the document window, click the location where you want to insert the form.
You might decide to place it after a paragraph of introductory text, for example, or into a <div> tag that holds the page’s main content.
Note
If you plan on using an HTML table to organize a form’s fields, insert the form first, then insert the table inside the <form> tag.
On the Insert panel, select the Forms category.
The tab reveals 22 form-building tools.

Figure 12-2. The Insert panel’s Forms category gives you one-click access to all the different form elements—buttons, text fields, checkboxes, and more. Since the Forms category has so many buttons, you might want to turn off the labels that appear next to each icon as described on page 34. This step lets you see all the form buttons without taking up your monitor’s entire height. Another option is to choose the “Classic” view from the Workspace switcher as described in the note on page 35. This moves the insert panel into a toolbar that runs along the top of the application (see Figure 12-28). (You can also just drag the Insert panel up to the top of the screen to turn it into a toolbar.)
Click the Form icon (the very first square in ...
Get Dreamweaver CS5: The Missing Manual now with the O’Reilly learning platform.
O’Reilly members experience books, live events, courses curated by job role, and more from O’Reilly and nearly 200 top publishers.

