Transferring Files
Once you tell Dreamweaver how to ship your web pages off to the Net, you can set about actually doing so. Thanks to Dreamweaver’s Files panel, the whole process takes only a few steps.
Moving Files to the Web Server
To transfer files to your web server:
Open the Files panel (Figure 18-6).
Choose Window→Files (keyboard shortcut: F8 [Shift-⌘-F]).
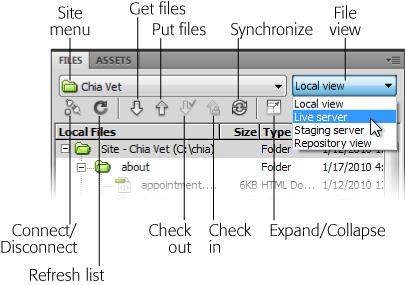
Figure 18-6. The Files panel offers toolbar buttons for uploading and downloading your web files to and from the web server that actually dishes them out to your site’s adoring public. (See Chapter 16 for much more on this important window.
From the Site menu, choose the name of the site whose files you wish to move (if it isn’t already selected).
The Files panel displays files for the selected site. You can use the File View pop-up menu to access either a list of the local files or the files on the remote server (see Figure 18-6). You can also see both local and remote server files side by side if you first choose “Remote server” from the File View pop-up menu and then click the Expand button on the Files panel, as described in Figure 16-8.
Note
The color of the folders in the Site panel lets you know which view you’re currently in: green folders mean Local view (your computer), beige (blue on the Mac) folders mean Remote view, and red folders indicate the Testing view if you have a testing server, as described on Setting Up a Testing ...
Get Dreamweaver CS5: The Missing Manual now with the O’Reilly learning platform.
O’Reilly members experience books, live events, courses curated by job role, and more from O’Reilly and nearly 200 top publishers.

