Formatting Tables
When you first insert a table, you set the number of rows and columns, as well as the table’s cell padding, cell spacing, width, and borders. You’re not stuck, however, with the properties you first give a table; you can change any or all of them, and set a few additional ones, using the Property Inspector.
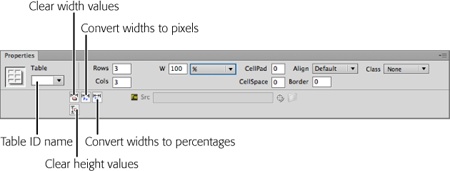
When you select a table, the Property Inspector changes to reflect that table’s settings (see Figure 6-5). You can adjust the table by entering different values for width, rows, columns, and so on in the appropriate fields.

Figure 6-5. When you select a table, you can do all kinds of editing in the Property Inspector, everything from adjusting the table’s basic structure to fine-tuning its appearance. Dreamweaver includes two menus—Table on the far left and Class on the far right—that let you apply an ID or assign a class (page 124) to a table.
In addition, the Property Inspector lets you set alignment options and add colors or a background image, as described next.
Aligning Tables
In the normal flow of a web page, a table acts like a paragraph, header, or any other HTML block-level element. Browsers align it to the left of the page, with other elements placed either above or below it.
But you can make several useful changes to the way a table interacts with the text and other elements on a page. After selecting the table, use one of the three alignment options in the ...
Get Dreamweaver CS6: The Missing Manual now with the O’Reilly learning platform.
O’Reilly members experience books, live events, courses curated by job role, and more from O’Reilly and nearly 200 top publishers.

