Formatting Tables
When you first insert a table, you set the number of rows and columns, as well as the table’s cell padding, cell spacing, width, and borders. You’re not stuck, however, with the properties you first give the table. You can change any or all of these properties, and set a few additional ones, using the Property inspector.
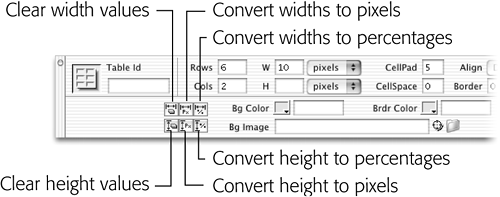
When you select a table in Standard view, the Property inspector changes to reflect that table’s settings (see Figure 6-14). You can adjust the table by entering different values for height, width, rows, columns, and so on in the appropriate fields.

Figure 6-14. When you select a table, you can do everything from adjusting its basic structure to fine-tuning (bottom row) its appearance in the Property inspector.
In addition, the Property inspector lets you set alignment options and add colors or a background image, as described next.
Aligning Tables
In the normal flow of a Web page, a table acts like a paragraph, header, or any other block-level element. It’s aligned to the left of the page, with other elements placed either above it or below it.
But you can make several useful changes to the way a table interacts with the text and other elements around it. After selecting the table, use one of the three alignment options in the pop-up menu at the right of the Property inspector:
The Left and Right options align the table with the left or right page margins. ...
Get Dreamweaver MX: The Missing Manual now with the O’Reilly learning platform.
O’Reilly members experience books, live events, courses curated by job role, and more from O’Reilly and nearly 200 top publishers.

