Chapter 1. Setting Up a Local Development Environment and Installing Drupal
When I first started working in Drupal, I created all my sites on a staging URL (like newsite.tzk-design.com) that lived as a subdomain of my studio website. Updating a module meant downloading the project from drupal.org, unpacking and uploading it to the staging URL, then running updates manually on the server. Theming meant making changes to a file, uploading it to the server, and refreshing the page to see changes.
While this is a totally reasonable way to work, there were a few problems with it:
Depending on my Internet connection or the size of a file, uploading files to a server took a significant amount of time—particularly when you add up the time spent tweaking little bits of CSS and checking the results.
If I had no Internet connection (for example, when traveling), or the connection was spotty, I was screwed.
Perhaps most importantly, everything I was doing could conceivably be found by someone else on the Web. This left me constantly worried that people—particularly clients—would end up randomly finding my half-finished work all over the Web. And while there were certainly ways to avoid that, like HTTP authentication on the server[1], that alone didn’t solve the first two problems, which are much more annoying.
When I finally figured out how to set up a local hosting environment on my laptop (thanks to a few wonderful friends in the Drupal community, including developer Ben Buckman, interviewed earlier), I was delighted. Now I could develop sites more efficiently from anywhere I happened to be with my laptop. Of course, it also meant that I was more likely to work on vacation (ask me about the time I had to launch a website in the middle of a yoga retreat), but overall, it’s been very worth it.
In this section, we’ll focus on creating a local development environment, and installing Drupal 7 in a temporary folder we can access from that environment. In later chapters, we’ll learn a bit about the command line, install Drush and use it to download and enable some modules, and learn how to set up Git so we can keep track of changes and revert mistakes easily. Before we start, we have to install MAMP.[2] Once you download the software package, simply drag the MAMP folder into your Applications folder and drag the icon into your dock for easy access.
Step 1: Install MAMP
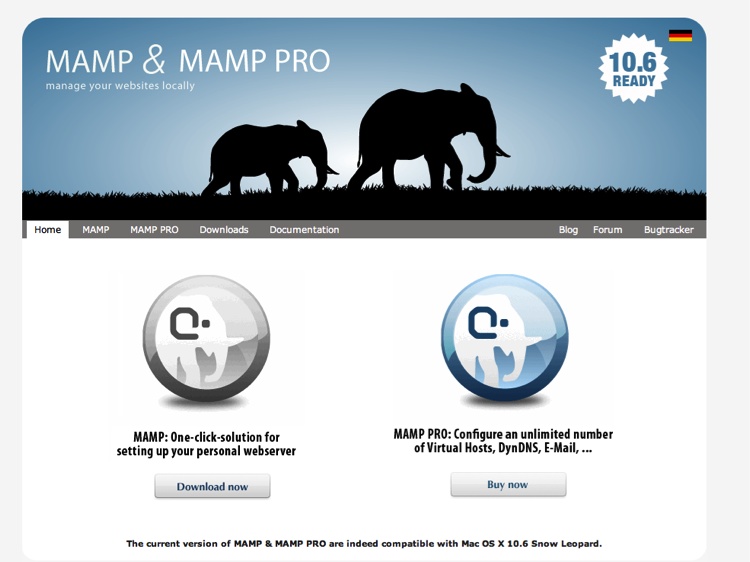
In order to set up a Drupal-friendly environment on your computer, you’ll need an Apache server running PHP version 5 and MySQL. The good news is that you can get this—easily and for FREE—on the Web (see Figure 1-1). If you’re on the Mac platform, you can download MAMP at http://mamp.info for free.[3]
Once you have your copy of MAMP downloaded, you’ll want to set up your computer to support development on your local server (which is called localhost).
Step 2: Setting Up Your Main File Structure
Drupal’s database and code depends on having a well-organized file
structure. MAMP, and its Windows and Linux counterparts, essentially turn
a single folder in your computer into a miniature development server. This
means that all of the sites you develop in MAMP will be subfolders of that
main folder (e.g.
/MAMP/my-crazy-awesome-site).
Once you have MAMP installed, it’s important to make sure you set the
location of the main folder to something that makes sense for your
filesystem, and to back up that folder regularly. I like to keep my MAMP
folder in a Dropbox (http://getdropbox.com), which allows me to sync my site
files in the cloud and access them from any computer I’m on.
To start up MAMP and reset the main folder’s location:
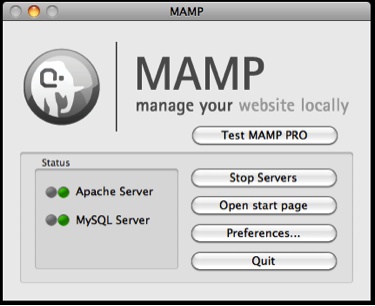
After you’ve installed MAMP and moved the application icon into your dock, press the MAMP icon in your dock. This will start up the MySQL server and PHP. You should see a screen like the one in Figure 1-2.
Ignore the browser window that it opens up and go back to the MAMP application.
Note
If you want to turn off the Start screen, you can change it in your MAMP settings by unchecking “Open start page at startup” from the Start/Stop tab in the Preferences screen.
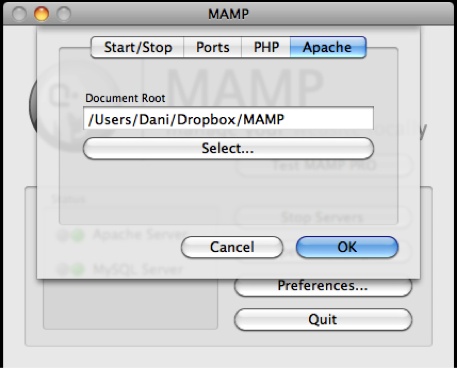
Choose Preferences from the menu on the right, and go to the Apache Tab (see Figure 1-3). Set the document root (which we’ll call the “web root” going forward) to something that makes sense for your filesystem (see Figure 1-3). As I mentioned earlier, I’m using a Dropbox for my files.
Note
When starting up MAMP for the first time, you may get a dialog asking you if you want to use MAMP or MAMP Pro. If you get this dialog, choose MAMP instead of MAMP Pro. For most Drupal development, the free version of MAMP will be more than sufficient.
Dropbox is available at getdropbox.com, and it allows you to store up to 2GB of data for free, which is synced over the Web. If you don’t have a ton of large files to store, it’s an easy way to keep your data available to you no matter what machine you’re on. If you build sites using multiple machines, however, you also need to make sure to sync your databases among those machines; MAMP keeps the databases you create in the /Applications/MAMP/db/mysql folder of the machine you create them on, so you may have to export a file of the site’s database using a module like Backup and Migrate (drupal.org/project/backup_migrate), and import them into the database of the machine you’re working on at the beginning of each session. Backup and Migrate lets you back up your site’s database and import databases from other sources; it also includes Dropbox integration, which allows you to export the databases directly into a Dropbox instead of on the FTP server.
Step 3: Setting Up the Drupal files
Drupal’s core files are hosted as a project on Drupal.org along with thousands of contributed modules (called “projects”) that can extend the core functionality of Drupal. Start the installation process by downloading Drupal at drupal.org/project/drupal. You want to download the latest stable release of Drupal 7 (7.12 as of this writing).
Once you have these files downloaded, extract the Drupal folder into your MAMP directory, and rename the folder to something that makes sense for your site. I like to name my site folders after the client, generally using a short code for them to save time when navigating to the site. For example, my portfolio site, tzk-design.com, is in my MAMP folder as /tzk. For this demonstration, we’ll be using the folder name d7-demo.
Note
It is essential that any code that you add to or customize for your Drupal site—whether it’s modules, themes, or uploaded files—goes into the /sites/ folder, and not into any of the core folders, e.g. the core modules or themes folder. Not doing this could result in all your hard work being replaced the next time you upgrade. Seriously.[4]
Now that you’ve extracted Drupal and put it into your MAMP directory, navigate to the sites folder within your Drupal files. Any modules, themes, libraries, etc. that you use to customize this Drupal site should be downloaded into the sites/all folder, in folders named modules, themes, or libraries, depending on their purpose. If you’re using Drush to download modules (which we’ll be doing in Chapter 3), Drush will create those folders within the sites folder for you if they don’t exist. Because it’s awesome.
Now, to develop locally, we want to create a
localhost folder within sites,
which will hold the database settings for our local Drupal installation.
If you’re already cozy with the command line, there are several ways you
could set this up, including creating multiple local sites within the same
Drupal installation; however, for our purposes, we can stick with creating
a localhost folder.[5] Once you’ve created that folder, navigate into the
sites/default folder and make a copy of the file
called default.settings.php, move it into your
localhost folder, and rename the file to
settings.php. Leave it alone for now; you’ll need
it for what happens later.
Note
You may notice that we’re putting our Drupal configuration in a
different folder than sites/default, which is the
typical way of installing Drupal. We’re doing this because leaving
sites/default where it is for now is useful for
minimizing confusion when you eventually publish the site to its final
URL. Doing this, however, means that all the changes you make in your
Drupal site will be stored in the localhost folder,
and you will need to use drushsql-sync to sync the
localhost database with the
default database, which will require logging into
the staging server via SSH. You can also sync the local and remote
databases using a program like Navicat (see Step 4: Creating the Database), or by exporting the
localhost database and importing it into the remote
site—both of which can be done using the Backup and Migrate module
(drupal.org/project/backup_migrate). As with all
things in Drupal, there are about 372 ways to accomplish the same
goal.
Step 4: Creating the Database
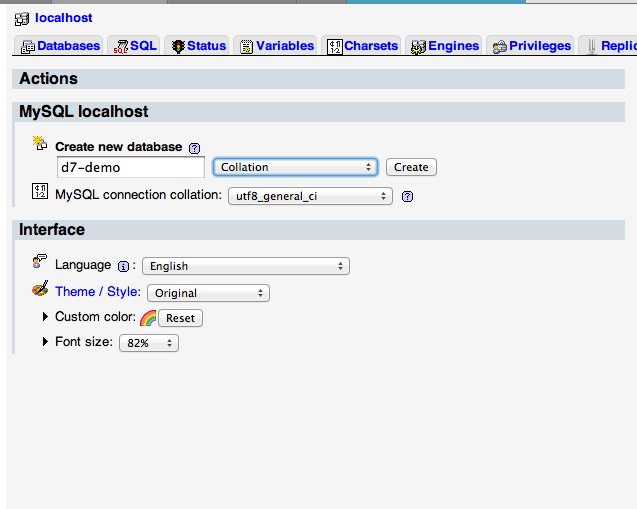
Drupal stores all the information related to your site in a database. In order to install Drupal, you need to create this database on your local MySQL server.
You can create a database using phpMyAdmin, which is free and comes
with MAMP (instructions on how to create the database using phpMyAdmin are
available in Using phpMyAdmin). If you prefer a more
visually oriented way of dealing with databases, Navicat, a paid software
package available at navicat.com, is one of the best programs
I’ve found. Although the premium software is on the pricey side (and
you’ll need it for copying or syncing databases on multiple servers,
unless you use drushsql-sync—important
when it’s time to launch your site), you can download an inexpensive
version called Navicat Premium Essentials for about $10 at www.navicat.com/en/download/download.html.
Both are available for Windows, Mac, and Ubuntu. If you just want to check
it out for now, you can also download Navicat as a free trial for 30
days.
For the purposes of this demonstration, we’ll use Navicat Premium. The process in Navicat Premium Essentials should basically be the same.
Open Navicat and select Connection→New Connection→MySQL from the top menu.
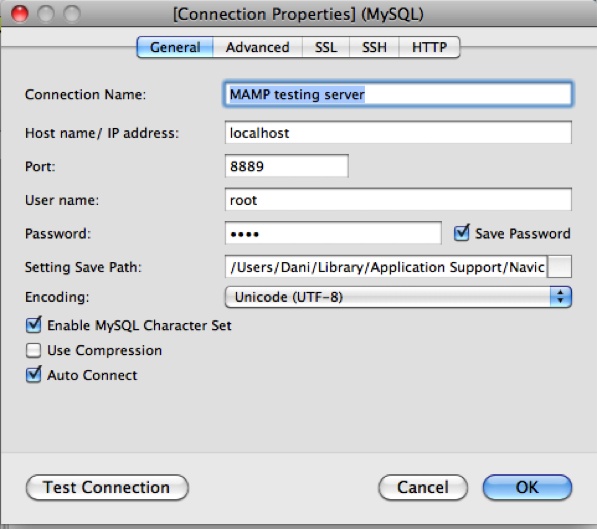
Create your settings as shown in Figure 1-4. Your hostname is localhost, and your username and password will both be root. Port, if you’ve left your MAMP defaults as is, will likely be 8888. Mine has been changed to 8889, for reasons I can’t remember.
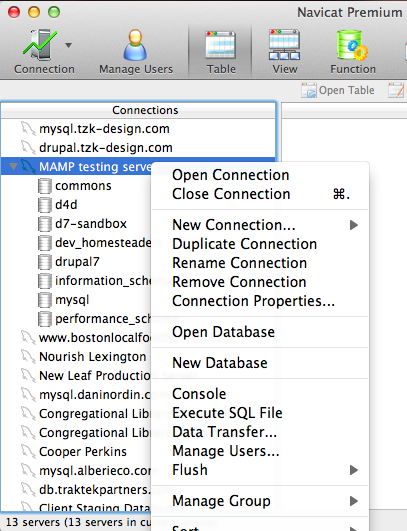
Once you’ve created the connection, open the connection by double-clicking its name in the left column. Right-click on the connection name and select “Create New Database” from the menu (see Figure 1-5). Give the database a name that represents the project you’re creating; I’m going to call this one d7-demo.
That’s it. Done. See how easy?
Step 5: Install Drupal
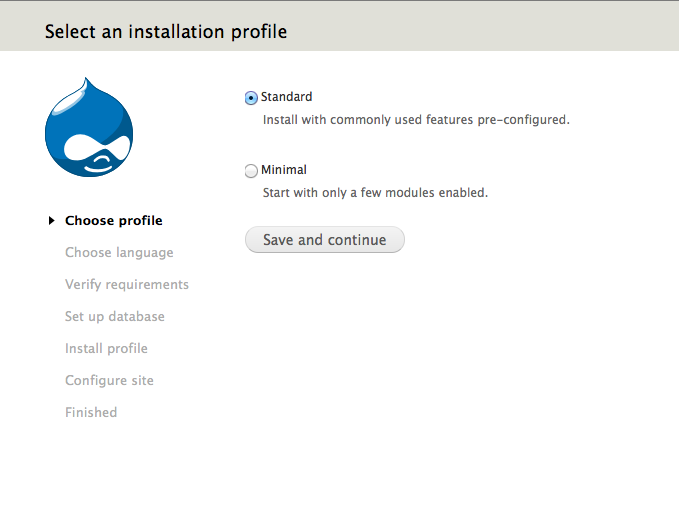
Now that you’ve created your database, go back into your favorite browser (I use Chrome: http://www.google.com/chrome) and go to localhost:8888/d7-demo/install.php. Choose the “standard” installation profile for now (see Figure 1-8); it will take care of some basic configurations for you. On the next page, select English as the installation language. If you need to install it in another language, there’s a handy link on that screen that will show you how to do it.
Now that you’ve taken care of that, it’s time to add the values for the database that we just created. On the screen that follows, enter the values that you provided when you created the database. In my case, the database name is d7-demo, the host is localhost, and the username and password are both root.
Note
You might be wondering why we’re setting up Drupal with a pretty obviously insecure password. When you’re developing locally, security is important, but less of an issue than when you’re developing on a remote site. When you transfer this local version of the site to a remote server, for staging or production, you’re actually going to create a new database (with a stronger username and password), and sync the data from the local database to the new remote database.
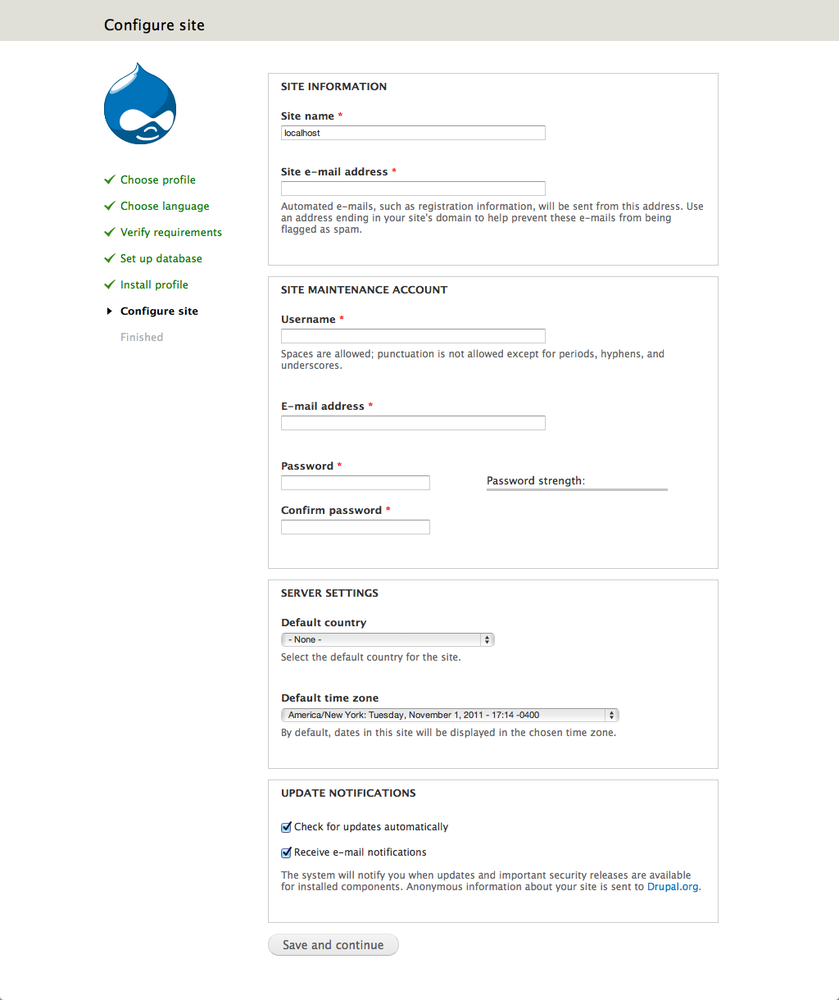
Submit the form, and Drupal will install itself within a couple of minutes. When the installer finishes (see Figure 1-9), you’ll be able to fill in some basic site details along with a username and email address for the administrative user account.
Warning
The first user created in the installation process is given permission to do everything on the site, ALWAYS. Therefore, it is strongly advised never to use this user as your own personal account, but rather as an administrator account, and to give it a strong password. The site might be just on your computer now, but when you move it online, you’ll need to make sure to preserve the user accounts. Drupal requires all email addresses for site users to be unique, so if you have only one email address, it makes sense to create a second email account, like admin.user@gmail.com, that you use specifically for the administrator account. For some email providers, like Gmail, you can also add a “+” to the email address to create a subaccount. Drupal 7 will recognize these as a separate address, e.g. dani+drupaladmin@gmail.com will go to dani@gmail.com.
Congratulations! You now have an empty Drupal site, ready for content. Before we start playing with Drupal, however, it’s time to move on to a few more things that can make local Drupal development easier. Next up, we’ll learn just a little bit of the command line to prepare us to start working with Drush, which will help us more efficiently download and update modules and themes.
[1] If you are using a remote staging server, one way to prevent your dev/staging environments from being seen is to edit the .htaccess file (included in Drupal) to require all visitors to use a password just to view the site. You can use this tool to create the text you need to paste into the top of .htaccess: http://www.htaccesstools.com/htaccess-authentication/. Then use this to generate the .htpasswd file that contains the username and password: http://www.htaccesstools.com/htpasswd-generator/. Of course, I didn’t learn any of this until after I’d discovered how to work locally, but that’s my issue, not yours.
[2] If you want to try some other options, there’s also XAMPP, which is open source and available for a host of systems, including Windows, OS X, and Ubuntu.
[3] If you’re on Windows, you can download WAMP at http://www.wampserver.com. If you’re on Ubuntu, the Lullabots have put together a video on how to install a LAMP server on Ubuntu: http://www.lullabot.com/videos/install-local-web-server-ubuntu.
[4] All. Of. It.
[5] If you plan on using the same Drupal distribution to host multiple sites (which is totally valid and possible), you’ll need to learn how to create multiple local URLs.
Get Drupal Development Tricks for Designers now with the O’Reilly learning platform.
O’Reilly members experience books, live events, courses curated by job role, and more from O’Reilly and nearly 200 top publishers.
