Chapter 4. Getting Started with Version Control
The reasons for using version control on your Drupal projects are several and various, and have only recently become clear to me as I’ve started working with Drush and Git. Although adding version control to your workflow can be daunting at first, the benefits far outweigh the initial annoyances. Consider this:
In a recent project, while attempting to theme complex navigation on a Drupal 7 prototype, I found myself messing things up in a bad, bad way, shortly before stakeholders were supposed to look at the site. Because we had Git installed on our server, I was able to roll back to the former, not messed-up menu and leave it there while we focused on other priorities—without having to make a frantic phone call to our developer.
When working with more than one person, especially on remote teams, version control allows you not only to figure out who made what changes to the code, it allows you to work on the same file at once without accidentally overwriting each other’s changes.
Finally, version control also ensures you have exactly the same files installed in all locations. This means that you never have to worry that your local site is on a different version of a module than your server copy.
Note
If you don’t have a GitHub account yet, skip to Step 4: Set Up a GitHub Account for a moment and come back.
In this chapter, we’ll install Git in our local development environment, set up a local and remote repository for our d7-demo site, and learn how to work Git into our Drupal workflow.
Master Versus Origin
Git allows for multiple development tracks to be going on simultaneously, using a technique called branching. Branches could be used to separate work by multiple developers on a team, to isolate work on specific bugs, or to separate development code from stable/production code. Working with branches is not necessary to get started with an effective version control workflow, however; so for now, we’ll assume all work is on the default branch, called “master.” Where the word “master” appears in the Git commands to follow, you can substitute other branch names if you’re using other branches.[7]
When working with Git, you’ll primarily be working with a local copy, or clone, of your repository (which we’ll be calling Master) and pushing/pulling that copy to a remote copy, called Origin, usually hosted on a separate server. A repository, in version control terms, is a collection of all the files that Git is tracking for your particular project.
As you work, you add your changes to stage, a
temporary space that tracks the files, using the command git
add [filename,
foldername, or -A for all
files]. When you’re ready to finalize things, you
commit your changes to the branch using the command
git commit -m ".message goes
here"
Origin is your remote repository, where you push and pull all the working code for your project. This is generally a repository that is saved on GitHub or a similar Git-enabled hosting service.
Setting Up Git for Your Workflow
For a solo workflow, I’ll typically start with three clones of the same repository:
A remote Origin, hosted on GitHub.
A local clone of the repository, hosted on my MAMP server.
A second remote clone, hosted on a staging server with protected access. The staging server allows clients and collaborators to view the site’s progress as it’s happening, without affecting the production (i.e. live/launch) domain.
All of these repositories are clones of each other, which means they have the same files and data; pushing and pulling syncs the files among them. Most development workflows will typically start this way; as you add collaborators, or move your code from staging to launch, each of these different environments will require its own clone of the main repository. Each collaborator on the team will push and pull to the main repository.
When I first started using Git, I was overwhelmed by trying to figure out how everything worked. After a few times, however, I realized it was relatively easy to get the hang of. The basic workflow is this:
Create an empty repository on GitHub, which will become Origin.
Create a local directory for your installation and copy your files into it.
In Terminal.app, navigate to the new directory and initialize your new Master:
git init;
Commit your files to Master by typing the following:
git add -A git commit -m "first commit"
Add the remote Origin you just created on GitHub using the command:
git remote add origin git@github.com/
USERNAME/REPOSITORY-NAME.git;Push the files to GitHub using the following:
git push origin master
Next, we’ll look at those steps in a bit more detail. Steps 1–4 cover installation, and only need to be done once per computer you’re installing Git on. The rest of the steps will help you set up the workflow for each project.
Step 1: Create an SSH Key
In order to push your first commit to the remote Origin you’ll create in step 2, you’ll need to create an SSH key for your account. This helps your computer connect securely to GitHub, and you only need to do it once per computer you want to access the repository from. The GitHub site has a pretty in-depth writeup of how to do this at http://help.github.com/mac-set-up-git/; however, I’ll give you the basic steps here.
In Terminal.app, navigate to your ssh directory using the command:
cd ~/.ssh
Check to see what’s in the directory by using the command:
ls
This will list all the contents of the directory. If you see the filenames id_rsa and id_rsa.pub, those are your current SSH keys; you can skip to 5. If you don’t see them, you want to create a new one. To generate a new SSH key, enter the code:
ssh-keygen -t rsa -C "
your_email@youremail.com" Enter file in which to save the key (/Users/your_user_directory/.ssh/id_rsa):Now you need to enter a passphrase.
Enter passphrase (empty for no passphrase):
<enter a passphrase>Enter same passphrase again:<enter passphrase again>This should give you a message like this:
Your identification has been saved in /Users/your_user_directory/.ssh/id_rsa. Your public key has been saved in /Users/your_user_directory/.ssh/id_rsa.pub. The key fingerprint is: 01:0f:f4:3b:ca:85:d6:17:a1:7d:f0:68:9d:f0:a2:db user_name@username.com
You now want to add this key to your GitHub account.
Note
If you don’t have a GitHub account yet, skip to Step 4: Set Up a GitHub Account for a moment and come back.
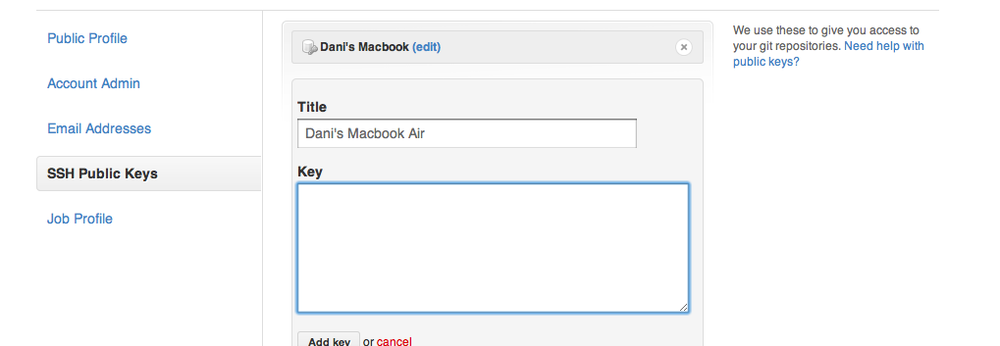
To do this, go into the Account Settings page and click the SSH Public Keys tab (see Figure 4-1). Create a new key by pressing the Add a New Key button.
Now you have to get the contents of your actual RSA key. If you have
your Finder set up to show hidden files (this is usually not a good idea,
as it’s easy to accidentally delete things you need), you can navigate
directly to the .ssh directory and open
id_rsa.pub in a text editor like TextWrangler to copy
the key. Personally, I prefer using the command line. Assuming that you’re
still in the ~/.ssh directory (if you aren’t, use
cd ~/.ssh to navigate there now) you can use the
following code to spit out the key:
ls
This spits out the contents of the directory, which should be:
id_rsa id_rsa.pub known_hosts
From there, type the following code:
cat id_rsa.pub
It should spit out a long line of gobbledygook that starts with
ssh-rsa and ends with your email address. Copy all of
it with no lines or extra spaces and paste it into the text box on GitHub,
then click Add Key. Go ahead; I’ll wait.
Once you do that, you should be all set to push and pull
to your GitHub account.
Step 2: Install Git
Installing Git is fairly straightforward, although it does require you to step into the command Line.l
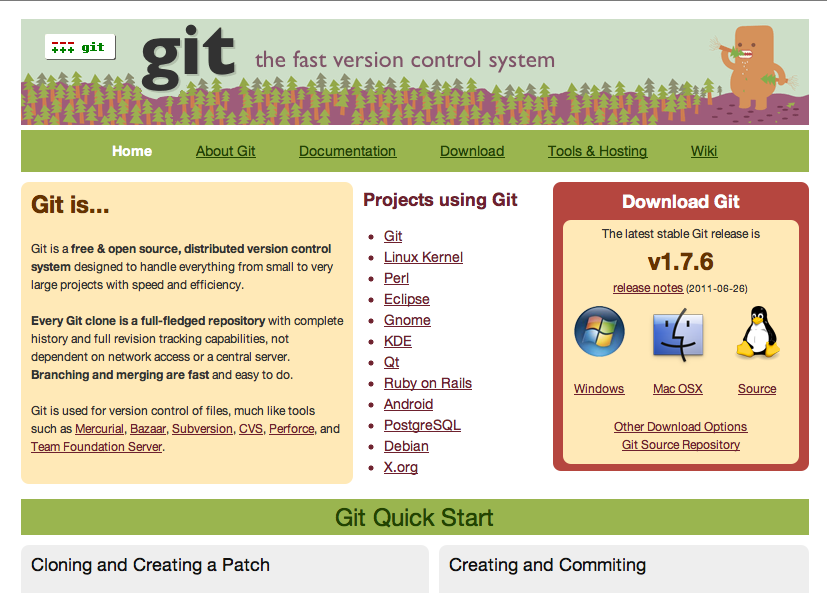
To install Git, the first thing you need to do is grab the installer. To do this, visit git-scm.com and download the installer appropriate to your OS. Find the icon that suits your operating system (see the box on the right in Figure 4-2), and use it to download the right installer.
Install the Git software using the instructions that come with the
package you downloaded. Once it’s installed, if you go into Terminal.app
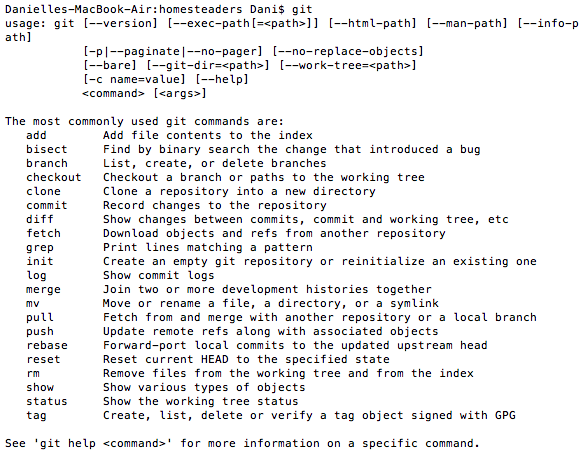
(on the Mac) and type git, you should
see a whole bunch of commands in the window (see Figure 4-3). If it doesn’t
work, try quitting Terminal.app and re-opening it.
Once you’ve installed Git, you also want to set up some configurations within your specific installation. This helps make it easier to see what’s been checked out and in by whom, which is especially useful if you’re collaborating with others.
Step 3: Set Up Your Git Configuration
Type the following into Terminal to navigate to the .ssh directory:
cd ~/.ssh
If you don’t have an .ssh directory (which sometimes happens), you can create it:
mkdir ~/.ssh chmod 700 ~/.ssh
mkdir creates the directory,
while chmod 700 makes sure that only
your user—i.e., YOU—has access to that directory (important for the
security of your system).
Type the following into your Terminal (within the .ssh folder) to set up your Git configuration:
git config --global user.name "First Last" git config --global user.email "username@example.com" git config --global color.ui true git config --global color.status auto git config --global color.branch auto git config --global color.interactive auto git config --global color.diff auto
Then type the following into Terminal:
git config -l --global
Now you’ll see your configuration settings. The above configuration gives Git records as to who made the commit that you’ve posted, and it gives you the ability to read the Git commands more easily by color coding them.
Step 4: Set Up a GitHub Account
I use GitHub to store my remote repositories. GitHub is fairly easy to set up, and it’s reasonably priced (free if you make all your repositories public; $7/month if you want to have up to five private repositories and a few collaborators—important for client work; there are additional plans available as well). Once you have an account and sign in, the GitHub Dashboard (see Figure 4-4) has instructions on how to create a repository and do some other common things you’ll need to do on GitHub. Go ahead, poke around; I’ll wait.
Step 5: Create the Remote Repository
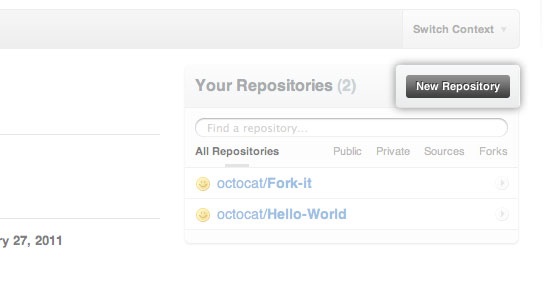
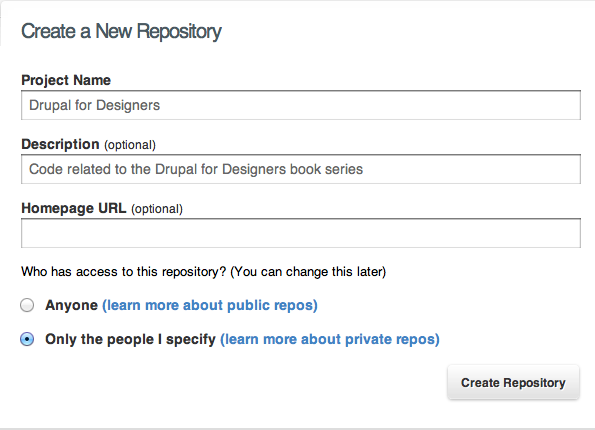
Once you have your account set up, the first step is to create a repository. For client projects, I keep my repositories private. I prefer not to have my code hanging around where other people can grab at it. To create a new repository, click the “New Repository” button on your GitHub dashboard (see Figure 4-5).
In the screen that follows (see Figure 4-6), give the repository a name and description, and choose whether you want it to be private or public.
Step 6: Set Up the Local Repository
Once you have your repository set up on GitHub, you’ll get a set of instructions on the next screen that walks you through the commands you need to create a local repository on your computer. This will help you set up Git so that your code can synchronize between your local and remote repositories.
To create your local repository, you want to start by going into the folder that holds your Drupal installation. This, as we may recall, is done using the following:
cd ~/path/to/d7-demoOnce you’re there, use the following commands to start a local repository, make your first commit, add a remote repository, and push your files to the remote repository.
git init
git add -A
git commit -m "first commit"
git remote add origin git@github.com:USERNAME/REPOSITORY-NAME.git
git push origin masterDo all of those things in Terminal.app, using the values for your
GitHub account name and the name of your repository. Once you’ve created
your remote Origin, use the git pull command to pull down the changes on the
remote server each time you start doing work, and use git push to push the changes back once you’re
done.
So What Happens on a Team?
The instructions above will help you set up a Master repository on your local machine, and push it to a remote Origin account. But what happens if you’re working on a team? Or you want to have a version of the code on a staging server? This is where things get fun.
First Things First: The Git Workflow
Assuming that you’re developing locally (you are developing locally, aren’t you?), your workflow would look like this:
At the start of your coding session, use the following code in Terminal.app to navigate to your project folder and pull the latest code from the repository:
cd ~/
PATH/TO/FOLDERgit pullAs you work, use this code to add your changes to Git for tracking and commit them to the Master repository:
git add [
FILENAME,DIRECTORYor -A] git commit -m "Description of Changes"When you’re finished, or ready to show your changes to the team, do one last pull:
git pull
Then push your changes back into the Origin repository by using the following:
git push
If you have a second version of the repository hosted on a staging server, you’d then log into the staging server via SSH and use
git pullto pull the changes down into the staging server.
Note
Why pull before pushing? You may have noticed that in step 3, we pulled from Origin before we pushed back to it. This is important when you have more than one person working on a repository, and it’s a good habit to get into. Pulling the code down syncs any changes that have been made by your other collaborators with the code you’re working on; pushing the code adds all the changes back to Origin.
And There We Go
So now we’ve set up a local development environment, installed Drush, downloaded some modules, and set up Git for our project. Next, we’ll talk about two additional bits of awesomeness that you can add to your Drupal toolkit to make life easier: Features and Drush Make files.
[7] For more on branches, check out this great writeup on version control: http://hoth.entp.com/output/git_for_designers.html.
Get Drupal Development Tricks for Designers now with the O’Reilly learning platform.
O’Reilly members experience books, live events, courses curated by job role, and more from O’Reilly and nearly 200 top publishers.
