In this chapter
| What White Balance Does, and Why You Can Never Forget to Set It |
| The Importance of Setting an Aperture |
At the most fundamental level, lighting allows an audience to see what you’re shooting. Digital cameras function much like the human eye, transforming different amounts of reflected light into recognizable images. To a skilled filmmaker, lighting is also a tool to add depth, texture, and nuance to a composition. Careful use of shadows, color tints, and highlights can transform an otherwise unimpressive shot into something that speaks to your audience on both aesthetic and emotional levels. Skillful lighting can make a good shot great and a great shot epic.
Most lighting isn’t neutral. Most light contains a color cast that tints the objects in a shot. Even if you can’t see the tint with your eye, it makes a difference to the camera. Depending on lighting conditions, the light in a location may have a blue or a yellow tint that colors everything you see. The human eye and brain do a remarkable job of compensating for differences in lighting, so most of the time people don’t even notice a tint unless it’s really strong. If you stand next to a red light bulb, you’ll notice it’s turning everything around you red, but most people don’t notice that everyday light bulbs make things look yellow. Cameras, however, don’t compensate—they record the lighting conditions in an environment, for better or worse.
In contrast to a light bulb’s yellow tint, daylight looks blue. You can sometimes see the difference in mixed lighting situations—if you turn on a lamp at dusk, you may notice the natural light coming in through the windows makes the room look blue, except for the area around the lamp, which looks yellow. Cinematographers describe the difference in terms of color temperature. The concept refers to the range of color a light source emits, and is measured as a temperature in units called Kelvin. At the lower end of the scale, light sources emit more red and yellow light. At the higher end, sources emit more blue light. Daylight at noon on a sunny day measures approximately 5500 k, and tungsten light measures approximately 3400 k. (Tungsten refers to the metal used in the filament in a specific type of bulb used in film and video lighting; other kinds of indoor lighting, such as fluorescents, produce different color temperatures and different lighting tints.)
Each of the three lighting types pictured in Figure 4-1 (from top to bottom: fluorescents, commonly available household light bulbs, and tungsten production lights) creates a different color cast. In mixed lighting situations, they can be notoriously difficult to work with in combination. If you’re shooting in an indoor location with mixed lighting and your subject moves across the room, he will appear to change color when moving from one area of light to the next. This might look really cool if you’re shooting a music video in a disco, but other than that, it’s a good thing to avoid.
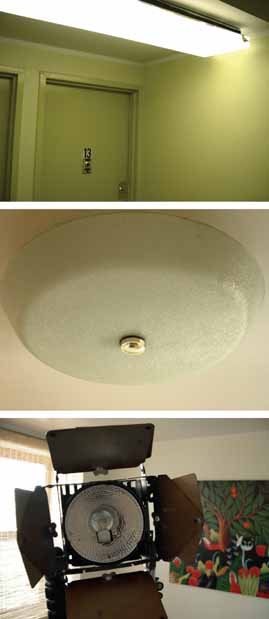
Figure 4-1. Photos of a fluorescent light fixture, a fixture that uses a household light bulb, and a tungsten film/video light.
To avoid problems with mixed lighting, filmmakers often turn off all the household light bulbs and any fluorescent lights in a room and rely on their own tungsten lamps to light a shot. Turning off fluorescent lights is an especially good idea, because in addition to making people look green in video, fluorescent lights flicker. The flicker might not be visible to the human eye, but in a video recording, it can look like a strobe effect. Again, if you’re going for a disco look, you’re all set; otherwise, turning off fluorescents is a good habit to get into.
To compensate for differences in color temperature, reels of film are balanced to shoot in daylight or tungsten environments. A filmmaker shooting outside would use a reel of daylight film, and would switch to a reel of tungsten for an indoor shoot. Use the wrong type of film in the wrong lighting, and you’re stuck with discolored images. DV cameras, as you may have noticed, use the same tape regardless of lighting conditions. To compensate for differences in lighting, DV camcorders have a white balance setting.
DV camcorders adjust their color by taking a sample of white area or object in a scene each time the camcorder setup is changed. Because lighting varies from location to location, setting an accurate white value becomes especially important—a bad white balance throws off all the other colors in your image. If you ever looked at a tape and noticed that all the images looked especially yellow or blue, the white balance was probably set incorrectly. Some experienced directors intentionally use a distorted white balance to create a desired effect, most of the time a bad white balance simply means someone behind the camera made a mistake.
The color temperature of indoor lighting varies depending on the type of lights in use, and color temperature outdoors can vary by the time of day (dusk and dawn are lower on the scale than midday). It can even vary in a single scene when the sun goes behind a cloud. Many cameras offer preset white balance modes for outdoor, indoor, and nighttime shots, but the safest way to set a truly accurate white balance is to use your camera’s manual white balance function. If you’re using lights in an indoor location, daylight coming into the room through any windows can create a mixed lighting situation that renders a preset white balance mode useless anyway.
Setting a manual white balance varies from camcorder to camcorder, but the essential action involves zooming in on a flat white object so it fills the frame (you can buy expensive white balance cards or use a white loose-leaf binder, white foam core, illustration board, or even a blank piece of paper) and then pressing a button to set the white balance. This manual function specifically defines what white looks like in a particular lighting situation, and the camera adjusts all the other colors accordingly.
For example, to set the white balance on a Sony PD-170, as shown in Figure 4-2:
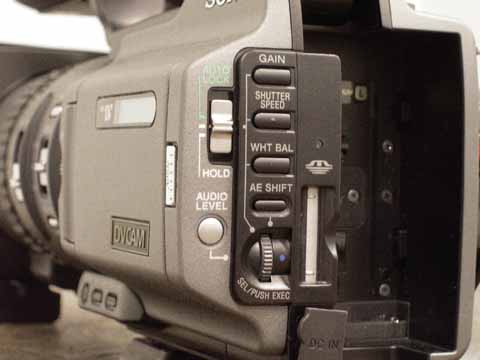
Fill the frame with a white object (make sure it’s white and not off-white or light gray).
Press the button labeled “WHT BAL” on the back of the camera.
Press the SEL/PUSH EXEC wheel. The white balance icon in the display (or viewfinder) will begin to flash.
Hold the SEL/PUSH EXEC wheel until the icon stops flashing.
When you’re shooting indoors, a window becomes a light source. Daylight, or natural light, can be very bright—even when you’re inside. Filmmakers often use natural light to their advantage, especially when composing interview shots. If you seat a person near a window, facing the camera, you can use natural light to create an attractive highlight on the side of her face. The parts of a person’s face farther away from the window will fall into shadow, creating a very nice contour effect. If the shadows become too dark, you can set up a light or reflect some daylight to fill them in. Even if using daylight creates a mixed lighting situation, you’ll be okay as long as you set the white balance and as long as your subject stays in the same part of the room.
Get DV Filmmaking now with the O’Reilly learning platform.
O’Reilly members experience books, live events, courses curated by job role, and more from O’Reilly and nearly 200 top publishers.

