Multicolor Buttons

Let's take a look at one more quick project with 2-bit overlays. Instead of gaining access to six effective colors for buttons, let's make one interesting, multicolor overlay button. We'll head back to our Hawaii tour over the volcano and turn out a quick menu with fancy buttons.

The mask of the red death

Well, this isn't as horrific as Poe's mask, but we're going to use our mask to produce some nice red lava on a volcano. And for a change, we're going to use the mask for the button text as well. Figure 4-51 shows the grayscale version of the mask.

A 2-bit mask for a multicolored button and some text

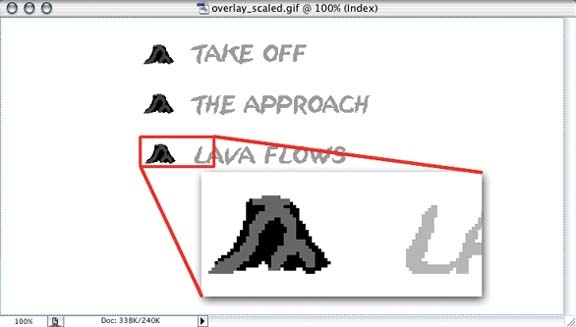
Figure 4-51. A 2-bit mask for a multicolored button and some text

We intend to use the mask for all the menu options here. This isn't common, but it enables us to be remarkably flexible in our background choices. We can use a layered menu, a standard menu, a standard menu with music, or even a full-video background. In fact, let's go the full-video route.

Note

One other thing to remember when building your mask is that fonts should not be antialiased if you're using your shades of gray for distinct colors. Having the occasional red pixel show up around the edges of your light-blue text is not often a desirable thing!

Multicolor button demonstration

Start a new project in DVDSP and import the following files from the projects/ch04 folder:

  • overlay_scaled.gif

  • volcano.m2v

  • volcano.AC3

Notice that we didn't include any menu files except for the mask document. That's on purpose!

Now follow these steps:

  1. Create a Menu with the Video Clip as the Background. Create a new menu as you've done before. This time, however, drag the volcano.m2v file over and set it as the background, as shown in Figure 4-52. If you want, go ahead and add in the audio clip as well.

    Setting up the background for our multicolored buttons menu

    Figure 4-52. Setting up the background for our multicolored buttons menu

  2. Set the Loop Settings. We set the loop for about 30 seconds over the fairly constant, dried lava flows. The exact times are shown in the property sheet in Figure 4-53. Be sure to set the loop point at the starting point. The buttons don't show up until the loop kicks in. That's great for skipping over intro video that isn't part of the loop, but until the loop point, the user won't be able to see what he's selecting.

    The loop settings for our video background (with a 3.5-second video lead-in)

    Figure 4-53. The loop settings for our video background (with a 3.5-second video lead-in)

  3. Set the Overlay Document to the Photoshop Mask File. Only one layer should exist, so you don't have to worry about which one to pick.

  4. Set the Mask Colors. Before you create the buttons, get the colors set up. In the menu's Property Inspector, take a look at the Colors tab. You want to use an "advanced" scheme that enables you to choose everything about the mappings. Figure 4-54 shows the options available for the Advanced color scheme.

    Using the Advanced color options for our multicolored buttons

    Figure 4-54. Using the Advanced color options for our multicolored buttons

    Notice that you can set different colors for each of the three states. You also can build three separate "sets" of buttons so that different categories or groups of buttons can have their own color mappings. We need to work with only the first set, but we want to make different colors for the three button states, as follows.

    The normal state

    Our normal state is, well, not quite normal. The text for our buttons appeared in the mask, so we need to make sure the text shows up even when the button is not selected or activated. The normal state is usually all transparent. We're going to leave the two colors for the volcano transparent, but we'll alter the color for the text (see Figure 4-55).

    The normal settings for our multicolored buttons

    Figure 4-55. The normal settings for our multicolored buttons

    The selected state

    For the selected state, we want the text to stand out and we definitely want the volcano icon to show up. For the text, we set the transparency on the text color to completely opaque. For the volcano, we pick a brown and a red and make them at least partially opaque. Figure 4-56 shows these settings.

    The selected settings for our multicolored buttons

    Figure 4-56. The selected settings for our multicolored buttons

    The activated state

    For the final state, we want to give the user confirmation that the player understood his selection. We'll make the lava in the icon completely opaque and change the color of the text just for good measure. Those settings are shown in Figure 4-57.

    The activated settings for our multicolored buttons

    Figure 4-57. The activated settings for our multicolored buttons

  5. Create the Buttons. Nothing new here; we just drag an outline over the button area, as we did before. This time, however, the buttons should appear as we're dragging! Figure 4-58 shows this spiffy feature in action.

    The button (including its colors) appearing as we drag the new outline

    Figure 4-58. The button (including its colors) appearing as we drag the new outline

    Notice that the colors (and opacity levels) we picked for the normal state of the buttons made the text show up even before we selected it as part of a button.

Hook up the buttons to the chapter markers, as you normally would, and take your new multicolor buttons for a spin. Figure 4-59 shows our menu running in the Simulator.

Our multicolored volcano buttons in action

Figure 4-59. Our multicolored volcano buttons in action

Clever use of advanced mappings

Just a quick parting note: you can do some clever things with these 2-bit masks and the advanced color schemes. One very clever trick is to use the three shades of gray to build three unique icons. They have to occupy the same space, so you can't go completely crazy, but you can do additive things to the icons.

We won't bother to build an entire menu project for this snippet, but Figure 4-60 shows an example of such a dynamic icon. The only trick to using this in DVDSP is to make sure you keep the unwanted colors fully transparent in the normal and selected states.

Figure 4-60. A complex multicolored button

Figure 4-60.  Figure 4-60. A complex multicolored button

In this example you could set the following colors and transparency levels for the different shades of gray, as shown in Table 4-2. Remember that a transparency of 0 is fully transparent, and a transparency of 15 is fully opaque.

Table 4-2. Highlight colors for a complex overlay (as shown in Figure 4-57)


Normal

Selected

Activated

Black

Blue, 15

Blue, 15

Blue, 15

Dark gray

Black, 0

Black, 0

Yellow, 15

Light gray

Black, 0

Yellow, 15

Yellow, 15

White

Black, 0

Black, 0

Black, 0

Appendix B has some more notes on color combinations with respect to menu buttons. The DVD included with the book also has some onscreen tests with various colors so that you can judge for yourself what combinations are appealing.

Get DVD Studio Pro 3: In the Studio now with the O’Reilly learning platform.

O’Reilly members experience books, live events, courses curated by job role, and more from O’Reilly and nearly 200 top publishers.