Chapter 1. Essential Eclipse
If you’re reading this book, you’re most likely a Java programmer,
and you know how finicky Java can be at times. Missed import statements, forgotten variable
declarations, omitted semicolons, garbled syntax, typos—all these problems
will cause the Java command-line compiler, javac, to cough in your face and display pages
of annoying error messages. The error messages tell you that javac knows what the error is, so why doesn’t it
just fix the problem and let you get on developing?
Because javac can’t fix
the problem; it isn’t an editor. That makes long streams of errors
scrolling off the page an all-too-common experience for Java developers,
and leaves them with the feeling that Java is too prickly about what can
go wrong. To change all that, you can use an integrated development
environment (IDE), which will not only catch errors before you try to
compile, but also suggest solutions. Java is badly in need of a good IDE,
and a number of candidates are available, but the premiere Java IDE these
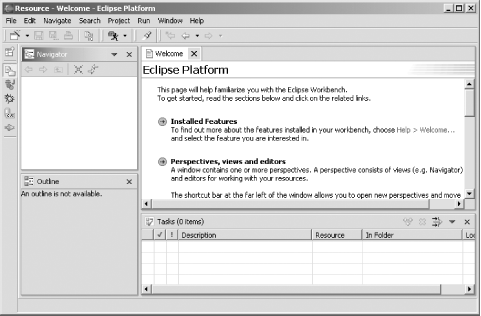
days is the one this book is all about: Eclipse. You can see Eclipse in
action in Figure 1-1.
Eclipse and Java
Although Eclipse can act as an IDE for many different languages—IDEs are available from C/C++ to Cobol—its great popularity is as a Java IDE, and it comes with Java support built-in. Eclipse refers to itself as a universal tool platform, capable of handling IDEs for many different languages, but the Java IDE that comes with Eclipse is going to be our main focus, as it is for the great majority of Eclipse users.
The whole Eclipse magic is that it will take the rough edges off
Java development in the way you’ve always imagined. The errors that
would cause javac to stumble are
usually handled before you even try to compile, and if there is an
issue, Eclipse will suggest solutions. All you have to do is point and
click—no need for serious head-scratching. If you’re like most Java
developers, you’re going to find yourself thinking, This is
great!
Some Background
Eclipse is free for the downloading, like a number of other Java IDEs, but Eclipse has a serious advantage behind it: the power of IBM, which reportedly spent $40 million in the development of the IDE. The first version, Version 1.0, appeared in November 2001 and gradually became popular (although—as with any developer tool—there was a great deal of discussion of its faults).
In time, Eclipse has changed and improved, and the current version, 2.1.1, is getting much praise. In fact, it’s become so popular that when Version 2.1 first appeared, the servers at http://www.eclipse.org were so busy that it was almost impossible to download a copy for the first few days.
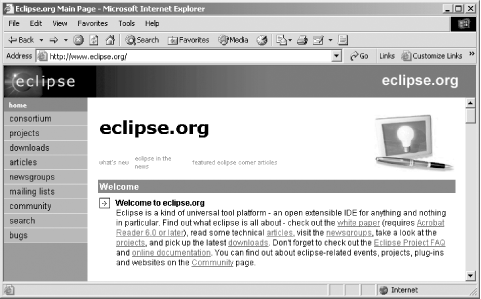
Eclipse was created by IBM in a massive effort that has left Java programmers the winners. It’s now an open source project, still largely under IBM’s development, but part of a software consortium named eclipse.org. You can see the consortium’s page, http://www.eclipse.org, in Figure 1-2.
The Eclipse consortium originally consisted of IBM’s subsidiary, Object Technologies International (OTI)—who developed Eclipse in the first place—along with Borland, IBM, MERANT, QNX Software Systems, Rational Software3, Red Hat, SuSE, TogetherSoft3, and Webgain2 in November 2001. Since then, the consortium has grown to more than 45 members, including Sybase, Hitachi, Oracle, Hewlett-Packard, Intel, and others.
OTI is not a new player either; it’s been around for quite some time, and it was responsible for the foundations behind IBM’s Visual Age line of products (IBM acquired OTI in 1996). Long ago, OTI created a Java tool written in the Smalltalk language, Visual Age for Java—also called VA4J—that was well received. Eclipse itself is more or less VA4J rewritten in Java and updated—many of VA4J’s idiosyncratic features have been removed in favor of more standard ones, and a great deal of development power has been added. In other words, although Eclipse itself is relatively new, it already has considerable history.
The Eclipse project as a whole is divided into three subprojects:
These various subprojects are themselves divided into other subprojects—the JDT subproject, for example, is made up of the user interface (UI), core, and debug subprojects. You can learn more about these three subprojects at http://www.eclipse.org/eclipse/, and of course you’ll learn a lot more about them in this book.
A Word About the Common Public License (CPL)
Eclipse is open source software, which leaves some people uncertain about legal rights when using it. Open source software gives users open access to the software’s source code and the right to modify and distribute the software themselves. If you want to modify that software, on the other hand, it’s often true that open source licenses don’t allow distribution of the modified software unless the end user is also given these rights (as opposed to a copyright, this is sometimes called a copyleft in open source projects).
Some open source licenses insist that any software bundled with other open source software also be open source. However, the open source license that Eclipse uses, the Common Public License (CPL), is also designed to allow commercial interests. The CPL allows software bundled with open source software to be distributed under more restrictive licenses for commercial purposes.
If you ever plan to modify and distribute new versions of Eclipse, you can read about the CPL at http://www.opensource.org (in particular, at http://www.opensource.org/licenses/cpl.php). Among other things, the CPL says, “this license is intended to facilitate the commercial use of the Program.”
That’s it for the overview—let’s get this show on the road.
Getting Eclipse
How do you get and install Eclipse? Eclipse is free for the downloading—all you have to do is navigate to http://www.eclipse.org/downloads and select one of the download mirrors available on that page. When you do, you’ll be presented with a list of the available downloads, which are of these types:
- Release builds
The Eclipse team releases these versions for general use. Usually when you download Eclipse, you’ll use one of the release versions. These builds have been thoroughly tested, and the chance of coming across serious bugs is minimal. This is a version of Eclipse comparable to the version that other companies would sell—if Eclipse were for sale.
- Stable builds
These are comparable to beta versions. A stable build is a step along the way toward a release version. The Eclipse team considers this build to be relatively stable, but there may be problems. This is where you’ll find the new features that are upcoming in Eclipse.
- Integration builds
These builds are made up of components that have been fairly well tested, but their operation with other components may still have some issues. If things work out OK and the integration build proves itself, it may be elevated to a stable version.
- Nightly builds
These are the most experimental of all publicly available Eclipse builds. They’re created nightly by the Eclipse team, and there’s really no guarantee that things will work well. Some experience with these builds indicates that they can actually have substantial problems.
Normally, you’ll use the most recent release version of Eclipse. To get Eclipse, select the most recent release download for your operating system and click the appropriate link to download it.
Tip
Want to learn more about the current and upcoming versions of Eclipse? See http://www.eclipse.org/eclipse/development/main.html.
Installing Eclipse is not difficult—all you’ve got to do is unzip or untar it, depending on your operating system. Since you’ve downloaded the version of Eclipse targeted to your operating system, you’ll find the executable file ready to run as soon as you uncompress Eclipse.
Tip
Windows users will be pleased to learn that Eclipse doesn’t use the Windows registry, so (re)installation is easy and trouble free.
You start Eclipse by running the Eclipse executable, such as eclipse.exe. When you start the program the first time, it may ask you to wait while it completes the installation, which does not take long (Eclipse is creating the workspace directories it’ll be using). When you first run Eclipse, you should see something like Figure 1-1, shown earlier in this chapter.
Tip
You must have Java installed on your machine when you try to start Eclipse. If you start Eclipse for the first time and see a dialog box with the message that begins “A Java Runtime Environment (JRE) or Java Development Kit (JDK) must be available in order to run Eclipse,” you’ve got to download and install Java first. You can get Java for free at http://java.sun.com/j2se/.
In the next chapter, we’ll see how to switch the local installation of Java that Eclipse will use if you have multiple installations of Java (for example, you might want to use a newly downloaded JDK instead of the default JRE that comes with many browsers).
To make starting Eclipse easier, you can also connect
various shortcuts to the Eclipse executable. In Windows, right-click the
executable file in the Windows Explorer and select “Create Shortcut”
from the context menu that opens, then drag the new shortcut where you
want it. In Linux or Unix, just add the Eclipse directory to your path,
or use ln -s to create a symbolic link to the Eclipse
executable.
Understanding Eclipse
So what is Eclipse itself? Most people think of Eclipse as a Java IDE, and when you download Eclipse, you get the Java IDE (this is the Java Development Toolkit, the JDT) and the Plug-in Development Environment (the PDE) with it. If you only want to develop Java, it’s easy to think of Eclipse as a Java IDE because that’s the main tool you’ll be using.
Eclipse itself, however, is a universal tool platform. The JDT is really an addition to Eclipse—it’s a plug-in, in fact. Eclipse itself is really the Eclipse platform, which provides support for tools beyond just the Java set you get on download. These tools are implemented as plug-ins, so the platform itself only needs to be a relatively small software package.
The platform provides the support the plug-ins need to run; if you want to develop Java, you use the JDT plug-in that comes with Eclipse; if you want to develop in other languages, you’ll need to get other plug-ins, such as the CDT, which lets you develop C/C++ code. Installing a plug-in is easy, as we’re going to see—all you have to do is drop it into the Eclipse plugins directory and restart Eclipse. Eclipse does some checking on each plug-in when it starts, but the plug-ins are not loaded until they’re needed in order to save processing time and memory space.
Tip
It’s also important to realize that although Eclipse is written in Java, it’s intended to be language-neutral. To develop in any programming language, all you need is the corresponding plug-in. In fact, Eclipse is also intended to be spoken-language neutral, too—you can easily change the language that Eclipse uses. To change languages, you can use the same plug-in mechanism that supports plug-ins, except that languages are supported with what are called plug-in fragments. OTI has a language pack available that supports a number of languages—Japanese, Korean, German, French, Italian, Portuguese, Spanish, even traditional and simplified Chinese.
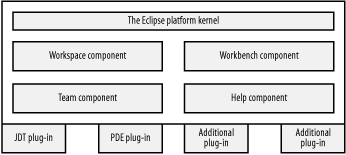
The Eclipse Platform
The Eclipse platform is made up of several components: the platform kernel, the workbench, the workspace, the team component, and the help component. You can see an overview of the platform in Figure 1-3.
The Platform Kernel
The kernel’s task is to get everything started and to load needed plug-ins. When you start Eclipse, this is the component that runs first, and it loads the other plug-ins that you normally think of as Eclipse itself, such as the workbench.
The Eclipse Workbench
The Eclipse workbench is what you saw back in Figure 1-1—it’s the basic graphical interface you work with when you use Eclipse. It’s got all kinds of toolbars and menus for you to use, and its job is to present those items and the internal windows you saw in Figure 1-1.
Next to the platform kernel, the workbench is Eclipse at its most basic. When you start Eclipse, before working with any specific IDE like the JDT, the workbench displays a Welcome message. When you open another tool like the JDT, that tool takes over.
The workbench looks like a native application, targeted to the operating system you run it on, which is both a feature and a controversial point of Eclipse. The workbench itself—that is to say, Eclipse’s graphical user interface—is built using Eclipse’s own Standard Widget Toolkit (SWT) and JFace (which is built on top of SWT). The SWT uses the operating system’s native graphics support to give the look-and-feel of a native application for the operating system. This is quite different from how most Java applications have worked historically, even those that use Swing.
SWT has to be ported to each operating system that supports Eclipse, and that’s been the source of some contention in the Eclipse community, with many people saying that Eclipse, like Java, should be completely operating system-independent. However, that’s the way that Eclipse has decided to go, and it’s already been ported to most major operating systems, including Windows, Solaris, Mac OS X, Linux/Motif, Linux/GTK2, HP-UX, and a number of others.
In fact, we’re going to see how to use SWT and JFace in this book to create Java applications with a totally native look-and-feel. SWT provides some basic graphics and control support, which JFace extends considerably. Eclipse is not only built using SWT and JFace, but it lets you use them as well.
The Eclipse Workspace
The workspace manages all your resources for you—that is, everything you store on disk or connect to on other machines. When you write code in Eclipse, you work with Eclipse projects. Each project is given its own folder in Eclipse’s workspace directory, which makes it easy to keep track of them. Each project itself can contain many subfolders. Usually, all of a project’s folders are subfolders of the main project folder, but they don’t have to be—you can include folders anywhere in your machine in a project, and you can include networked folders in a project as well.
When working with code, the workspace component is responsible for managing all the resources connected to a project, which includes all the files in the project. It saves the low-level changes to those resources as well, storing the history of each resource’s changes and letting you undo those changes as needed. The workspace informs the plug-ins of those changes.
Tip
The fact that all your Eclipse projects are stored in the same directory has its advantages. For example, if you install a new version of Eclipse, you can often simply copy the workspace directory from the old version directly to the new workspace directory. (Check the new version’s release notes to make sure there is no specific problem doing things this way—for example, you can’t import Eclipse 1.0 projects into Eclipse 2.0 or later workspaces. If there is a problem, you can always simply delete the new installation and reinstall Eclipse by unzipping or untarring it.)
The Team Component
The team component is the plug-in that supports version control in Eclipse. In version control, program code is checked in to or out of a repository as needed so that the changes to that software can be tracked. This is also done so team members don’t overlap or obliterate changes made by other team members as they work on different versions of the code at the same time.
This component acts like a Concurrent Versions System (CVS) client that interacts with a CVS server. If you’re not familiar with CVS, don’t worry; we’ll take a look at using CVS to support version control in Chapter 4. Using the team component, you’ll be able to maintain version control over your software, which is a very useful feature when working in teams.
The Help Component
The help component, as you can gather from its name, provides help to the user. It’s actually an extensible documentation system for providing Help; plug-ins can provide HTML documentation with XML-formatted data to indicate how that help documentation should be navigated.
That covers the main components of Eclipse in overview. To actually use Eclipse, you have to know about a few more concepts: views and perspectives.
Views and Perspectives
When you’re working with the workbench, you’ll see a number of different internal windows, called views, and the idea is that they give you different “views” into your projects. For example, one view may give you an overview of the Java classes in your project, while another may let you navigate between projects. For example, back in Figure 1-1, you can see the Navigator view at the upper left in Eclipse—this is the view that will display all your projects and let you move from one to another.
Because screen space is always at a premium in GUIs, views are often stacked, one on top of another, and you select the one you want to see using tabs that appear on the edge of the stacked views.
Tip
If you ever want to reopen a view you’ve closed by mistake, select Window→ Show View, and select the view you want from the menu that appears.
The editor is one special type of window that usually appears in the center of the workbench. When you open up documents, code, or resources, they’ll appear in an editor. Eclipse automatically selects the correct type of editor for the item you’re opening: the Java editor for a Java source code file, a GUI you’re developing using a plug-in with the editor supplied by the plug-in, and so on. You can even open Microsoft Word documents in the Editor (Eclipse displays an MS Word window in the editor space using Windows Object Linking and Embedding, OLE). In Figure 1-1, the space normally reserved for editors is showing the Eclipse Welcome text.
The editor window is where you do most of the work when developing your code; for example, it’s where you enter and edit your code. As we’re going to see, the JDT has an editor that is lavish with built-in details, such as syntax checking, code highlighting, and much more. You might have several editors open at once, in which case they’ll be stacked with tabs showing at the top of the stack, and you can pick out the one you want by clicking the corresponding tab (or with the Window→ Switch to Editor menu item, which displays a list of editors you can switch to). You can close an editor simply by clicking the X in its associated tab (or with the Window→ Hide Editors menu item, which toggles to Window→ Show Editors after hiding an editor). To sum up: views give you overviews of your projects, and editors let you develop code and resources.
There’s one more concept to master here as well: perspectives. You don’t normally decide what views and editors to display yourself; instead, they’re organized into groups called perspectives (although it is easy to customize perspectives yourself). For example, when you create a Java application, you’ll use the Java perspective; when you want to debug a Java program, you’ll use the Debug perspective.
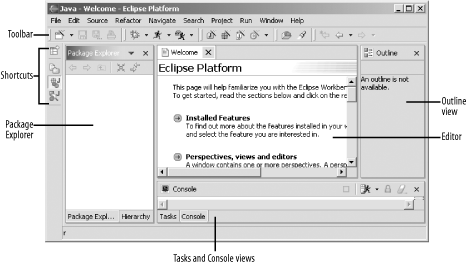
Perspectives have a predefined set of views and editors built-in; when you select a perspective, that set of views and editors appears automatically. For example, we’ll take a look at the Java perspective here: to select a perspective, you use the Window→ Open Perspective menu item, which displays a submenu of the installed perspectives. In this case, we’ll choose the Window→ Open Perspective→ Java menu item to open the Java perspective, shown in Figure 1-4.

This perspective presents an editor, which appears in the center pane, that lets you write Java code, as well as show several views. For example, the Package Explorer view you see at left gives you an overview of the Java packages and classes in a project, and it lets you move between them. When you debug a Java application, the workbench makes the Debug perspective appear, which you see in Figure 1-5. This perspective displays the code you’re debugging, where you are in the program, the values of variables and expressions you want to watch, and so on, in various views.

Much of the time, the idea of views, editors, and perspectives is transparent to the user, and that’s certainly the case when you master Eclipse and use it on a daily basis. But they’re important concepts for us and ones we’ll be referring to by name throughout the book.
Now that we’re fortified with the concepts and overview that we need, it’s time to start actually working with Eclipse. Although Eclipse is a universal tool platform, its great popularity comes from developing Java code, and we’re going to put it to work doing that here. When you first start Eclipse, you’ll see the Resource perspective, which is the default perspective for developing general resources. But when we put Eclipse to work in this book, we’re going to switch to the Java perspective and start developing some code.
Working with Eclipse
You use the Eclipse Java Development Tools (JDT), a series of six seamlessly integrated plug-ins, for Java development in Eclipse. Even if you’ve written Java for years, you’re about to have a whole new experience, one that makes Java development so smooth that when you understand how to use the JDT, you’ll wonder what took people so long to make this a reality.
Eclipse is all about code development, and the only way to really understand what’s going on is by creating code, so we’re going to start by using the JDT to create and run the amazingly useful application you see in Example 1-1. This Java application just displays the message “No worries.” on the console.
public class Ch01_01
{
    public static void main(String[] args)
    {
        System.out.println("No worries.");
    }
}
How can you create this application using Eclipse, and how is Eclipse going to make your job easier? The answers are coming up right now. In Eclipse, all Java code must be inside a Java project, so the first step is to create a Java project.
Creating a Java Project
To invoke the Java perspective, and enter the code for our first example, Ch01_01.java, start Eclipse and select the Window→ Open Perspective→ Java menu item to open the Java perspective using the JDT, as you see in Figure 1-6. This is the perspective you’ll use over and over as you start relying on Eclipse for Java development.
It’s worth getting to know the Java perspective before we start using it. At the top are the standard menu bars and toolbars, populated with new items for the Java perspective, which we’ll become familiar with in the coming pages.
The left pane holds the Package Explorer and Hierarchy views, and you use the tabs at the bottom of this pane to flip between these views. The Package Explorer view gives you an overview of the package you’re working on and lets you navigate through Java projects, selecting what files you want to open in the editor. The Hierarchy view lets you examine type hierarchies—you select an item in a code editor, right-click it, and select the Open Type Hierarchy context menu item. When you do, the hierarchy view will display the hierarchy of that item, giving you a clickable inheritance tree for the item, including all members. That can be a big help if you’re trying to figure out the syntax of methods you want to override or which methods are available.
The Outline view in the pane at right presents a structured, hierarchical view of the contents of the file open in the main editor pane and lets you jump to elements in it. This is great for developers who are accustomed to using a simple text editor to develop long Java files, because this view organizes the main sections of long code files, letting you move around at will (more on this view in the next chapter).
At the bottom of the Java perspective are the Tasks and Console views, which you can select between using tabs. The Tasks view displays pending tasks, such as errors that the compiler has noticed and which need to be fixed, and the Console view shows you what’s going on in the output console—our sample application will write to the Console view, for example.
Editors are stacked in the middle pane and are accessible with the tabs at upper left in that pane. The JDT code editors give you an immense amount of power, far beyond simply entering text. There are all kinds of hidden assets built-in here, most of which are utterly unobtrusive until you decide you want to use them.
That gives us an overview; to create a new Java project in the Java perspective, select the File→ New→ Project menu item now (alternately, right-click the Package Explorer and select the New→ Project context menu item), opening the New Project dialog box, as you see in Figure 1-7.
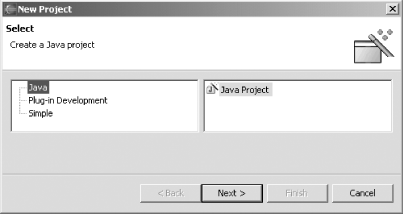
Select the Java and Java Project items and click Next to bring
up the next pane of this dialog box. Enter the name of this new
project, Ch01_01, in the Project
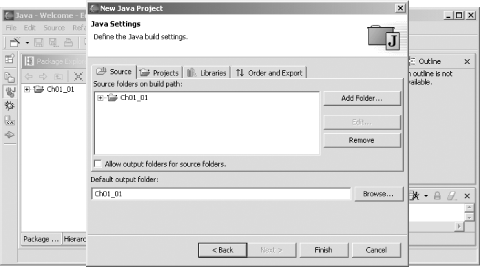
Name box, and click Next, bringing up the next pane of the dialog,
which you see in Figure
1-8. As you can see in this pane, we’re about to create a new
project named Ch01_01 in its own
folder. You can use the Projects tab here to include other projects in
the build path, something we’ll do as our projects become more
involved. The Libraries tab lets you browse to libraries and JAR files
you want included in the build path; by default, only the JRE System
Library is included. The Order and Export tab lets you specify the
order of classes in your build path, and gives you the option of
whether you want to export the current projects so its code will be
available to other projects. In this case, just click Finish to create
our new project, Ch01_01.
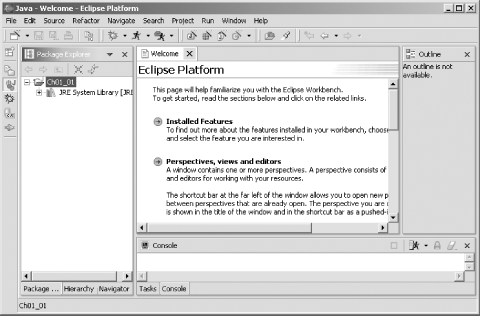
This adds the new Ch01_01
project to the Package Explorer, as you see in Figure 1-9. The project is
represented as a folder in your workspace, and, at this point, the
folder only contains the libraries we’ve included on the build path,
the JRE System Library.
Projects like this organize your files, classes, libraries, and exports. We don’t even have any code in this one yet, so the next step is to add a new public Java class to the project.
Creating a Java Class
In our example, the public class is Ch01_01, and Eclipse stores public classes
like this one in their own files. There are several techniques for
creating new classes in Eclipse: you can use the toolbar item with the
circled C icon, you can use the File→ New→ Class menu item, or you can right-click a
project in the Package Explorer and select the New→ Class item in the context menu. Any one of
these methods opens the New Java Class dialog box you see in Figure 1-10.
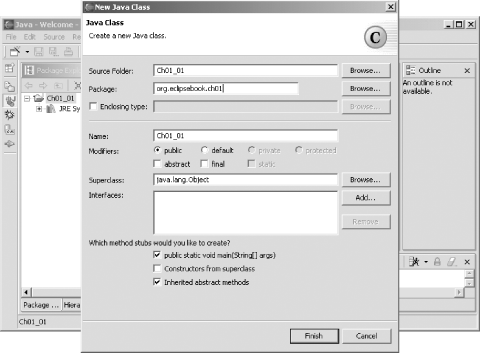
Note the options in this dialog. You can set a class’s
access specifier—public, private, or protected; you can make the class abstract or final; you can specify the new class’s
superclass (java.lang.Object is the
default); and you can specify which, if any, interfaces it implements.
We’re going to put our examples into Java packages to avoid any
conflict with other code; here, we’ll use packages named after the
example’s chapter, like org.eclipsebook.ch01. In this case, just
enter the name of this new class, Ch01_01, in the Name box, and enter the name
of a new package we’ll create for this class, org.eclipsebook.ch01, in the Package box,
and click Finish to accept the other defaults. Note, in particular,
that under the question “Which method stubs would you like to create?”
we’re leaving the checkbox marked “public static void main(String[]
args)” checked. Doing so means that Eclipse will automatically create
an empty main method for
us.
Clicking the Finish button creates and opens our new public
class, Ch01_01, as you see in Figure 1-11; note the package statement that creates the org.eclipsebook.ch01 package. This new class
will be stored in its own file, Ch01_01.java, in
the Eclipse folder workspace\Ch01_01.
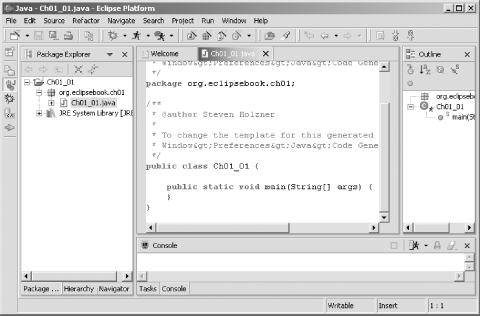
So far, so good; you can see the main method that Eclipse has added to our
class already. Now let’s enter some code of our own.
Using Code Assist
You can type in code using the JDT’s editor as with any editor, as you’d expect, but there’s a lot more utility here than in a standard text editor. For example, the JDT also supports a facility named code assist that helps you by completing code you’ve already started to type, and it’s a handy tool you’ll find yourself using over and over.
For example, say that you want to enter the code
System.out.println("No worries."); in the main method. To see code assist do its
thing, move the mouse cursor inside the main method’s body and type System., and then pause. Code assist will
automatically display the various classes in the System namespace, as you see in Figure 1-12.
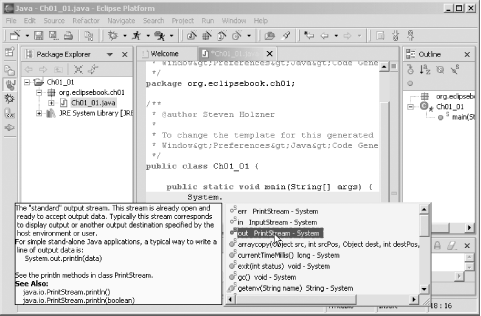
When you highlight out in the
list of possible classes with the mouse, code assist will give you a
rundown of what this class does, as you see at left in the figure.
Double-click out in the code assist
list so that code assist will insert it into your code, and type a
period to give you System.out., and
pause again. Code assist will display the methods of the out class. Double-click the code assist
suggestion println(String arg0), and code assist will insert this code
into the main method:
public class Ch01_01
{
public static void main(String[] args)
{
System.out.println( )
}
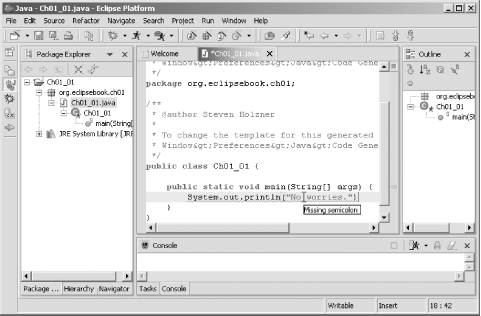
}Edit this now to display our “No worries.” text (you’ll see that code assist adds the closing quotation mark automatically as you type):
public class Ch01_01
{
    public static void main(String[] args)
    {
        System.out.println("No worries.")
    }
}
However, Eclipse displays this new code with a wavy red line under it, which indicates there’s a problem. To see what’s going on, rest the mouse cursor over the new code, and a tool tip will appear, as you can see in Figure 1-13, indicating that there’s a missing semicolon at the end of the line.
Add that semicolon now to give you the complete code and make the wavy red line disappear:
public class Ch01_01
{
    public static void main(String[] args)
    {
        System.out.println("No worries.");
    }
}
Our code is complete. In Figure 1-13, note that the
Package Explorer is giving us an overview of the project, showing the
public class Ch01_01 and the
main method in that class. In this
way, the Package Explorer view gives you access to all the items in a
project. To bring an item up in a code editor, just double-click it in
the Package Explorer view.
Tip
Another handy way to find all the members of a class or object
is to highlight an item’s name in a code editor, right-click the
highlighted name, and select the Open Type Hierarchy item from the
context menu. Doing so will open the item’s complete type hierarchy
in the Hierarchy view, and you’ll see all its members, the data
types of fields, the arguments you pass to methods, and more. In
fact, the code where the selected item is defined will also appear
in a code editor (unless that code is inaccessible, as when it’s in
a JAR file—for example, the System.out class is defined in rt.jar, so no source code is
available—although there are now ways to attach source directories
to JAR files).
As you can see in this example, the coding was made a
little easier because code assist knew all the members of the System.out class and let you select from
among them. Code assist will automatically appear when you type a dot
(.). You can also make code assist appear at any time while you’re
typing code—just type Ctrl+Space.
Tip
You can also turn code assist off. To configure code assist as you like, select Window→ Preferences, then Editor in the left pane of the Preferences dialog, and then the Code Assist tab.
Each time you edit the code in a file, as we’re doing here in Ch01_01.java, an asterisk appears in front of the filename file in its code editor tab, as you see in Figure 1-13. This asterisk indicates that changes to the file have not yet been saved. There are many ways to save your work: click the diskette icon (for Save) in the toolbar; click the diskette followed by an ellipsis ( . . . ) icon (for Save As . . . ) in the toolbar; right-click the code itself and select the Save context menu item; or select the Save, Save As, or Save All menu items in the File menu.
Alright, we’ve got our first code written and stored to disk. How about running it?
Running Your Code
If you look closely at the Package Explorer view in
Figure 1-13, you’ll see
that the circled C icon for our Ch01_01 class also has a small running
figure in it. That is Eclipse’s way of indicating this class is
runnable because it has a main method. To run this code and see the
output, select the Run→
Run As→ Java Application
menu item, or open the pull-down menu for the running figure icon in
the toolbar and select the Run As→ Java Application menu item. This runs our
code (Eclipse will ask you to save it first if the code has not been
saved yet), and the System.out.println method will write our
message to the console. The text of that message, “No worries.”,
appears in the Console view at the bottom of the Java Perspective, as
you see in Figure 1-14.
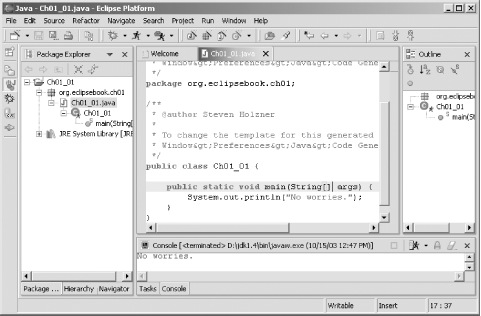
Congratulations—now you’re an Eclipse developer.
Using the Scrapbook
There’s another way to run code in a Java Project, and
you don’t need a main method to do
it: you can use a scrapbook page instead.
Scrapbook pages give you a way of executing code, even partial code,
on the fly—a big help in the development process. This is not an
essential skill, but it’s a useful one.
To create a scrapbook page, select the File→ New→ Scrapbook Page menu item to open the New
Scrapbook Page dialog box, enter the name Ch01_01Scrapbook in the File name box, and
click Finish to create the new scrapbook page, which will be saved as
Ch01_01Scrapbook.jpage. The new page appears in
the Package Explorer and is automatically opened in the editor view,
as you see in Figure 1-15.
You can enter code or code snippets to run in this page, which helps
when your code is getting long and you just want to test part of it.
For example, to run our example, enter this code in the scrapbook page
(as you see in Figure
1-15)—note that you must include the package name here when
referencing the main method in your
code:
String[] args = {};
org.eclipsebook.ch01.Ch01_01.main(args);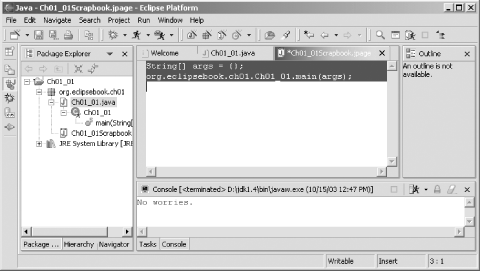
To tell the scrapbook page what code to run, select all the code you’ve entered, as you see in Figure 1-15, right-click it, and select the Execute context menu item (you can also select the Run→ Execute menu item). The results appear in the Console view as before, as you can see in Figure 1-15. In this way, you can execute Java code using a scrapbook page, even snippets of code, and see the results as they’d appear in the console. To close the scrapbook page, click the X button in the tab corresponding to its editor in the workbench’s central pane.
Tip
If you select the Display item instead of the Execute item, you’ll see the net return value of the code you’ve highlighted in the scrapbook, which is useful for testing methods on the fly. Also, note that you can set imports for the scrapbook page, importing other packages as needed, by right-clicking the scrapbook’s code in the editor view and selecting the context menu’s Set Imports menu item.
As you can see, the JDT are very helpful. There’s also a lot more—for example, what if you’ve got an error in your code? Eclipse can help here, too.
Using Quick Fix
Quick Fix lets the JDT suggest ways of fixing simple
errors, and that’s one of the things that Java should have had a long,
long time ago. For example, say you change the Ch01_01 code to display the “No worries.”
message along with today’s date:
public class Ch01_01 {
    public static void main(String[] args) {
        outString = "No Worries on ";
        Calendar rightNow = Calendar.getInstance( );
        System.out.println(outString + rightNow.getTime( ));
    }
}
You can probably spot a few errors here. The variable outString is not declared, which makes the
first and last lines of code in main
invalid, and the Calendar class has
not been imported, making the middle line of code invalid. If you were
using javac, you’d have to quit
editing and run javac to catch those
errors. But the second you enter these lines into Eclipse, they’ll be
flagged as errors with wavy red underlines, as you see in Figure 1-16.
Eclipse doesn’t let you down by just showing you the errors—it also suggests solutions. Note the yellow light bulb and red X icons in the bar to the left of the code editor, which is called the marker bar. These icons tell you that Quick Fix is available for all the errors. Note also the hollow red rectangles in the bar on the right of the code editor view, called the overview ruler. These hollow red rectangles indicate statements that Quick Fix can fix—solid red rectangles flag compiler errors—and you can use these icons to navigate to problems to fix.
If you let the mouse cursor hover over the first light bulb icon in the marker bar, you’ll see a tool tip appear with the description of the error (“outString cannot be resolved”), as in Figure 1-17.
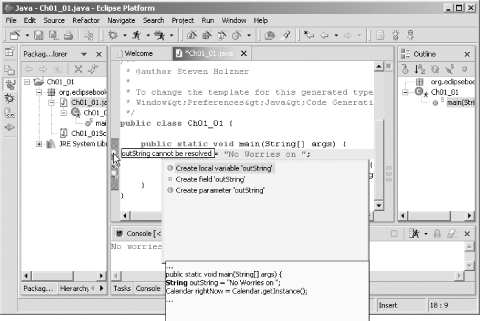
To activate Quick Fix and see what the JDT suggests to fix the
problem, click the light bulb icon on the affected line. Doing that
displays a number of options, the first of which is “Create local
variable `outString’”, as you see in Figure 1-17. Quick Fix also
indicates what its suggested solution will look like in the context of
your code, as you see at the bottom of the figure. To fix the code,
select the Create local variable option by double-clicking it, which
changes our code to this, declaring outString as a variable of type String:
public class Ch01_01 {
    public static void main(String[] args) {
        String outString = "No Worries on ";
        Calendar rightNow = Calendar.getInstance( );
        System.out.println(outString + rightNow.getTime( ));
    }
}
Declaring outString also fixes
the last line in the main method,
which references that variable, so the light bulb icon disappears from
that line as well.
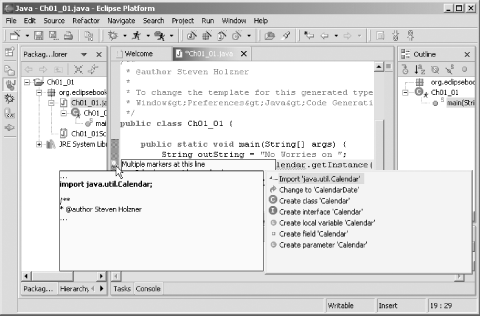
We’ve still got to fix the problem with the middle line of
code in the main method, which uses
the Calendar class. You can see what
Quick Fix suggests for this problem in Figure 1-18—importing the java.util.Calendar class. (This aspect of
Quick Fix alone is worth the price of admission: you no longer have to
hunt through entire package hierarchies to find what package to import
when you want to use a class whose name—but not package—you
remember.)
To use this suggested Quick Fix, double-click the “Import
`java.util.Calendar’” line, which imports java.util.Calendar and changes your code to
this:
import java.util.Calendar;
.
.
.
public class Ch01_01 {
public static void main(String[] args) {
String outString = "No Worries on ";
Calendar rightNow = Calendar.getInstance( );
System.out.println(outString + rightNow.getTime( ));
}
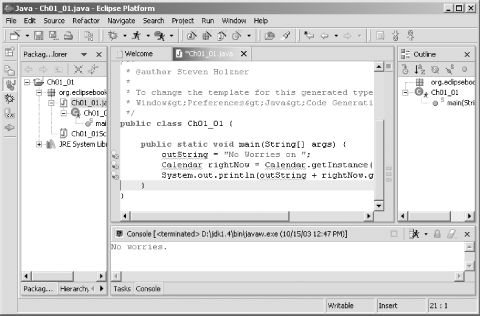
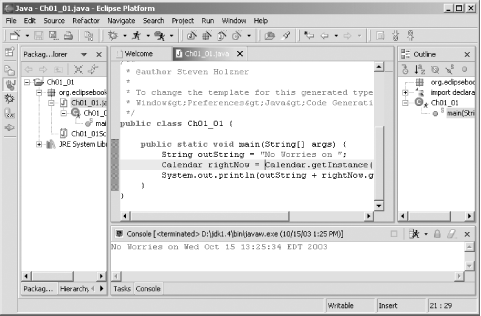
}After resolving these problems with Quick Fix, you can run the code as you see in Figure 1-19. Now you’ll see that there are no worries, as the text message in the Console view indicates.
A Word About Project Management
As you
create more projects like Ch01_01,
you’ll find Eclipse getting more and more crowded, since all your
projects are displayed in the Java perspective’s Package Explorer view,
as well as the Navigator view (recall that the Navigator view is there
to let you navigate between projects). If you have 30 projects, there
will be 30 entries there. There are various ways to deal with this
clutter (such as creating working sets, as we’ll see in Chapter 2), but we’ll take a look at the
simplest one here.
To remove a project from the Package Explorer and
Navigator views, you can simply delete it. This does
not necessarily delete the actual files used for
the project, and, whenever you want, you can add the project back to
these views. For example, to remove the Ch01_01 project, just right-click its icon and
select the Delete item. Eclipse will
display the Confirm Project Delete dialog box, as you see in Figure 1-20.
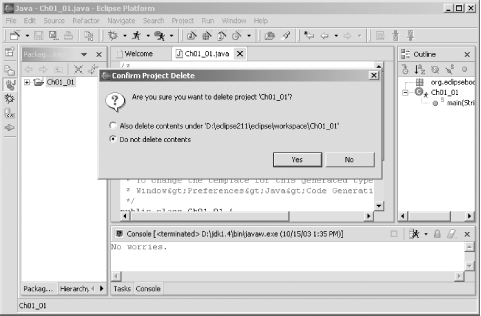
In this case, make sure that the “Do not delete contents” radio button is selected and click Yes to remove the project from Eclipse. The project will disappear from the Package Explorer and Navigator views. Clicking the other radio button will make Eclipse delete all the files and their contents in the project, so don’t do that if you want to use the project again later.
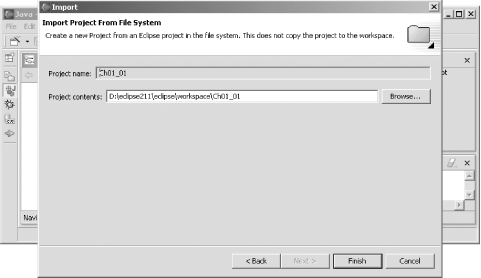
When you want to work with the project again, you just import it. To do that, right-click the Package Explorer or Navigator and select the Import context menu item, or select the File→ Import menu item. This opens the Import dialog; select the “Existing Project into Workspace” item and click Next. In the next pane, click the Browse button, select the Ch01_01 folder, and click OK, giving you results like those shown in Figure 1-21.
Click Finish to import
the Ch01_01 project again. Now the
project is back and ready for use. To run it, select the project in the
Package Explorer and select the Run→ Run As→ Java Application menu item. That’s all you
need; this is a crude but effective way of doing project management, and
we’ll see others as we progress.
Tip
You can also close projects if you right-click them and select the Close Project menu item. However, that doesn’t remove them from the Package Explorer and Navigator views—it just closes the project folder and changes its icon. The only real benefit of closing projects is that it will allow Eclipse to start up a little faster later because it doesn’t have to initialize closed projects.
That’s it for this chapter. We got our start working with Eclipse here, and we’re coming up to speed. In the next chapter, we’re going to get into more depth on Java development and the JDT.
Get Eclipse now with the O’Reilly learning platform.
O’Reilly members experience books, live events, courses curated by job role, and more from O’Reilly and nearly 200 top publishers.

