Chapter 1. Up and Running with Elastic Beanstalk
Applications deployed on Elastic Beanstalk are “cloud citizens.” Therefore, they have to submit to “cloud law.” The resulting requirements are sensible for any application expecting to grow above a certain level of traffic. We’ll start this chapter with a description of these requirements, illustrated with examples of applications. Then we will choose an application that is ready for the cloud, and ready for Elastic Beanstalk, and deploy it. The sample application is also available under GPL license, so you can try the full example yourself. You can even use the application, because it’s a generic URL shortener, ready to use. At the end of this chapter you should know how to deploy a Java application on Elastic Beanstalk.
What Is Elastic Beanstalk?
But what is Elastic Beanstalk, actually? Elastic Beanstalk is one of the many Amazon Web Services, and its purpose is to let developers and engineers easily deploy and run web applications in the cloud, but in a way that they are highly available and scalable. It stands next to other AWS services (like EC2 instances, Elastic Load Balancers, and Auto Scaling —if you are not familiar with these concepts, you can fast forward to Chapter 2, where they are explained in more detail), and uses sensible defaults that you can modify to adapt to your application needs.
Perhaps Beanstalk’s most important feature is deployment. Deployment has always been quite a hassle, even using tools like Hudson or Jenkins for continuous integration. Moving an application around from one environment to another is usually difficult.
At the moment of writing, Amazon only provides Elastic Beanstalk for applications that can be deployed on a Tomcat container, so it’s mainly used for Java web applications, though anything you can run as a WAR inside Tomcat should work.
Elastic Beanstalk helps you with running your application in several ways:
- Deploying
You can upload and manage different versions of your application, and switch between them in different environments (e.g., development, test, production environments). We will do an example deployment in this chapter.
- Provisioning
When you deploy your application, Elastic Beanstalk will provision the necessary instances, load balancers, and other resources you might have configured.
- Monitoring
When your application is running in production, you want to know if something goes wrong, and ideally fix it right away. Elastic Beanstalk will do regular health checks to make sure your application is running, and if not, try to find the cause and solve it. The solution might be to launch a new instance to replace one that is failing, or replace the load balancer if the cause is there. It might even tell you that your security settings are incorrectly configured and that you need to open up port 80, for example. This kind of automated troubleshooting is invaluable to get work off your hands.
You also have access to all the monitoring metrics provided by Amazon CloudWatch, such as request count, CPU usage, and inbound and outbound network traffic. At all moments, you can see the health status of your application.
- Autoscaling
You might have a game application that runs smoothly on one server most of the time. But perhaps the majority of users play during the weekends, so then you need two or three instances. With Elastic Beanstalk, you have triggers for adding or removing instances depending on load, and you can tailor them to your needs (e.g., “increase the number of servers if the average CPU usage goes above 50%”).
- Sending notifications
Elastic Beanstalk will send you notifications when important events from any of the above activities take place, such as new servers being launched, thresholds being surpassed, or new deployments occurring.
- Managing your running app
From the Beanstalk console, you can administer your versions and environments and view the Tomcat logs. You can also restart all your Tomcat instances in one go, or rebuild the whole infrastructure. You can, as well, configure your application and the underlying infrastructure by choosing a different instance type with more or less memory, changing JVM settings and environment variables, or enabling SSH access to your instances.
Beanstalk introduces some terms that we will use throughout the book:
- Application Version
A version is the deployable code. For JVM-based applications, that means a WAR file. It has a label and a description. You can see where it is deployed (in what environments, see below), and you can download the file itself if necessary.
- Environment
An environment has a deployed version on specific instances, load balancers, auto scaling groups, etc. You can deploy one of the existing versions to any environment inside the application. Typically you could create an environment for production and another one for testing, but you can create as many as you need —and as your budget allows, of course. You can access your environment in a URL of the type http://
<cname>.elasticbeanstalk.com, where<cname>is a value that you choose.An environment can be in different health statuses: green (OK), yellow (it hasn’t responded within the last 5 minutes), red (it hasn’t responded for more than 5 minutes), gray (unknown).
- Events
Events tell you what is going on with your environments. Events could be informative, warnings, or errors, such as “environment x has been successfully launched,” “instance x is using 90% CPU,” or “instance x did not start correctly.” You can view the events in the web console, or you can get them sent to you by email.
- Application
An application in Beanstalk is a collection of environments, versions, and everything else related to them, like events. You would normally create an Elastic Beanstalk application for each of your applications, but this is not required.
Let’s see, then, how to find out if your application can be immediately deployed using Elastic Beanstalk.
Which Apps Run on Elastic Beanstalk?
As we discovered while trying to run many different Java applications on Beanstalk, most are not immediately ready for running on the cloud. Generally the reason is that they use local—filesystem—storage. This is not a good idea for two reasons: being able to scale, and being prepared for failures.
One big advantage of the cloud is elasticity: being able to launch new servers (instances) when usage increases, and shrinking down (terminating servers) when usage subsides. This is what we call scaling out and scaling in. With the AWS services we get a virtually unlimited number of resources, and with services like Auto Scaling, we can make sure we always have what we need. Not less, but also not more. If we are using several instances and their usage is under a certain threshold (that we can determine), one of them is going to be terminated, because it’s not needed anymore.
This means that our instances must be “disposable.” So, we can’t use local storage unless it’s on a temporary basis and we don’t count on it when the instance goes away. If there is data that needs to be saved permanently, it has to be in proper persistent storage, such as a relational database (Amazon provides RDS service for this), SimpleDB and/or S3.
Note
Local storage on an AWS instance comes in two forms. There is an EBS volume that acts as the root device, and there is ephemeral storage (the real local hard drive). Both are unreliable for storage that needs to be persisted.
Even if you decide to use only one instance and never autoscale, you have to be ready for your instance to die. Think, for example, that if something fails in the underlying hardware of your instance, Elastic Beanstalk will decide to terminate the instance and launch another one, and everything on that instance will be lost.
Note
There is a configuration option on the instances called Termination Protection. This prevents the instance from being terminated, so that the local storage remains accessible. If you use this option to avoid losing your local storage, you will still have to do some work to recover your data.
There is another way of protecting your data, and that is to prevent the root volume itself from being deleted when the instance is terminated. You can read more details about it in this article by Eric Hammond.
Sign Up
Before we can do anything, we have to sign up to Elastic Beanstalk. If you are already an AWS user with some experience, you’ll have no trouble with this. You have been exposed to the countless number of services and accompanying acronyms. If you are new to AWS, we suggest you take the easy way, and follow along with us.
Elastic Beanstalk requires you to sign up for a number of other AWS services. Beanstalk uses services like EC2 (compute), EBS (storage), ELB (load balancing), and S3 (another type of storage). Of course, Amazon makes signing up to services as easy as possible. And the only thing you have to do is sign up for Elastic Beanstalk. The rest of the services are automatically added to your arsenal of AWS tools.
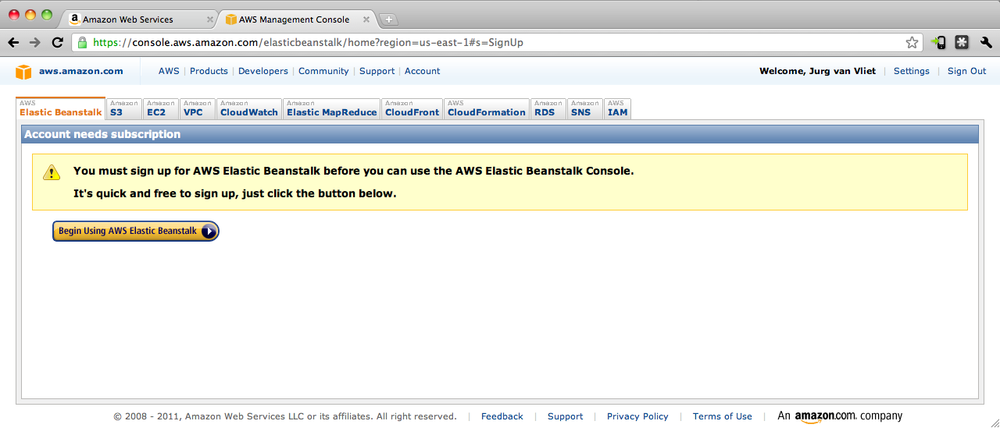
But, where to sign up for Beanstalk? If you are already familiar with AWS, you have probably seen the AWS Console. The very first (leftmost) tab in that console is home to Elastic Beanstalk. And having never used Beanstalk before, you probably see something like Figure 1-1.
You can also go to the product page for Elastic Beanstalk and follow the instructions. You will need an Amazon.com account, and you will have to provide a credit card and a phone number.
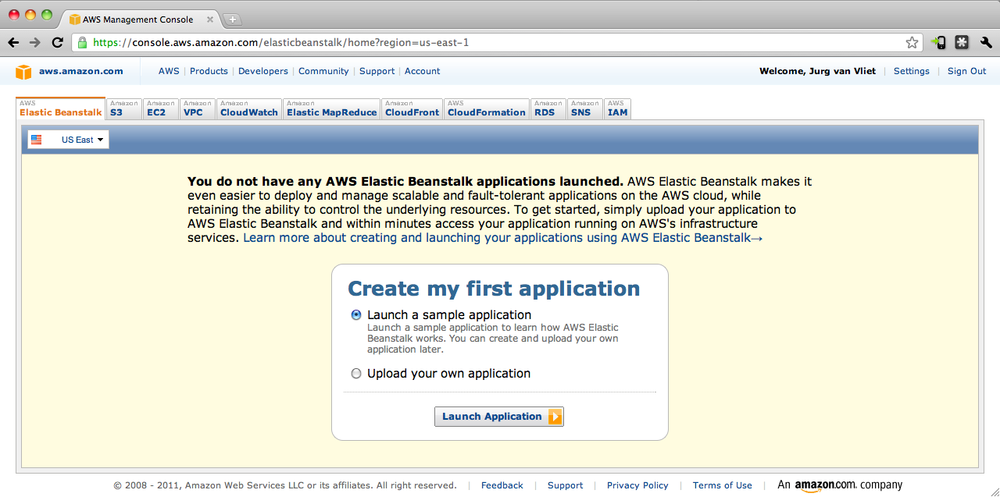
If you are successful in signing up, you’ll be notified by email. And the Beanstalk home (the Elastic Beanstalk tab in the AWS Console) will look like Figure 1-2.
For the example we are going to use in this chapter, we will also use SimpleDB, an easy-to-use data store service from Amazon. You will need to sign up to that service as well, in a similar way. You can go to the SimpleDB product page for that. If you don’t want to use SimpleDB, you can use a database compatible with Hibernate, such as MySQL, and configure it to use it.
So, ready to go. Now we have to find a useful app, ready to be deployed on Beanstalk.
Candidates for Running on Elastic Beanstalk
The TIOBE index shows us that Java is the undisputed leader in programming languages over the last decade. So there must be numerous readily available (preferably open source) Java applications. There are, but not all are really useful to us. And, of those that are useful, a lot are just not ready for Elastic Beanstalk in particular, or the cloud in general.
Our first two candidates were JIRA and Liferay. The first is the popular “Bug, Issue and Project Tracking” software. The second is an enterprise open source portal, in use by many high-profile corporations. We could get both to work on AWS with Beanstalk, but not in 15 minutes. Both JIRA and Liferay use local file storage, which you can’t rely on with Beanstalk (see Which Apps Run on Elastic Beanstalk?).
Another very interesting example was Nuxeo, an open source platform for enterprise content management. Nuxeo uses a relational database, but it does not really work with MySQL, or at least using it with MySQL (a relational database we can use with Amazon’s RDS without installation setup) is discouraged. This disqualifies it for our purpose, because we only had 15 minutes to start with.
With some effort we can make these apps run, but they are not 100% cloud-ready, in our humble opinions. We can’t use them out of the box, so to speak. Later in the book, we’ll see how we can extend Beanstalk or massage it to do other things. For now, make sure your app does not use local file storage and uses a database you can set up easily, like Amazon SimpleDB (no setup) or Amazon RDS.
Hystqio, Our Pick
These days everyone wants their own URL shortener. We didn’t have one yet, and we thought we could easily build one and run it on Elastic Beanstalk, preferably for free within AWS’s Free Usage Tier.
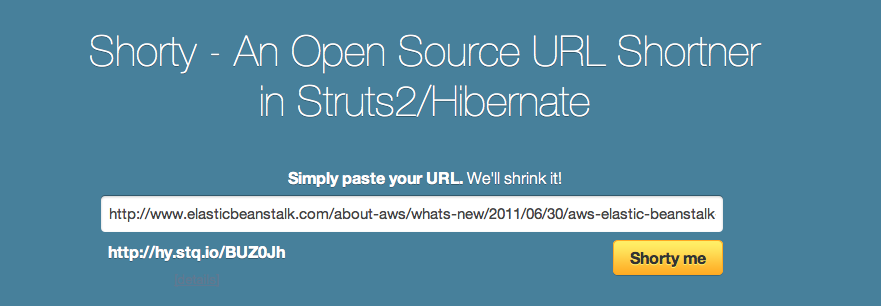
We found a URL shortener called Shorty, written by Viral Patel, at the beginning of 2010. He used it to demonstrate Struts 2 and Hibernate. We asked if we could use it to show how Beanstalk works. And he said we could. (We also got his permission to GPL the codebase.) You can download his application and follow his explanation on his blog.
There were a couple of things we changed:
We used a more impressive-looking hash generator (instead of counting up, we generate the short codes randomly).
We added the alternative of using SimpleDB for storage apart from Hibernate (because it is easy to use and less expensive than using MySQL on AWS, probably free).
We used Maven to help us create a WAR.
The full modified source code and Maven project can be found in our GitHub repository. And you can see it running (on Elastic Beanstalk) at http://hy.stq.io (Figure 1-3).
The Hystqio Code
We created a project with the structure shown in Figure 1-4. This is the default structure for a web application when using Maven. We created the pom.xml file with all the dependencies of the project, including, for example, hibernate, the MySQL connector library, and struts. For using SimpleDB, we added the AWS Java library:
<project xmlns="http://maven.apache.org/POM/4.0.0" xmlns:xsi="http://www.w3.org/2001/
XMLSchema-instance"
  xsi:schemaLocation="http://maven.apache.org/POM/4.0.0 http://maven.apache.org/maven-
v4_0_0.xsd">
  <modelVersion>4.0.0</modelVersion>
  <groupId>net.nineapps.hystqio</groupId>
  <artifactId>hystqio</artifactId>
  <packaging>war</packaging>
  <version>1.0-SNAPSHOT</version>
  <name>hystqio Maven Webapp</name>
  <url>http://maven.apache.org</url>
  <dependencies>

    […]

    <dependency>
      <groupId>com.amazonaws</groupId>
      <artifactId>aws-java-sdk</artifactId>
      <version>1.1.9</version>
    </dependency>
  </dependencies>

</project>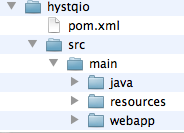
We won’t delve into the details of Struts or Hibernate. You can learn more about them on Viral’s page. But we want to show you the modified hashing function and the class for accessing SimpleDB. You can also skip the rest of this section and go directly to Deploy Hystqio to Elastic Beanstalk, if you want to focus on the deployment.
Creating the hash for the short URLs
The hashing function simply generates random strings of six characters, which can be numbers or upper and lowercase letters. We need to make sure a string has not yet been used, but, choosing from 62 characters, we have in the order of tens of billions of strings (1010), so we have a long way to go. We’ll output some warnings when we start getting repeated strings, and then maybe we can use longer codes or just start reusing them.
This is how we generate the short codes:
public class HystqioUtils {

  private static final String CHARSET = "0123456789abcdefghijklmnopqrstuvwxyzABCDEFGH
IJKLMNOPQRSTUVWXYZ";
  private static final Random random = new Random(System.currentTimeMillis());

  /**
   * Randomly generates a short code of 6 characters
   * @return
   */
  public static String generateShortCode() {
    StringBuilder buffer = new StringBuilder();
    for(int i=0; i<6; i++) {
      int r = random.nextInt(CHARSET.length());
      buffer.append(CHARSET.charAt(r));
    }
    return buffer.toString();
  }


[…]
SimpleDB as a database
For storage we created an interface that determines what we require to be able to persist our URLs:
/**
 * Interface for persisting and retrieving links
 * in the persistence layer (be it RDS, SimpleDB, plain MySQL, etc.)
 */
public interface LinkDAO {

  Link get(String shortCode);
  Link add(Link link);
  void incrementClicks(Link link);
}
We have two classes implementing this interface: HibernateLinkDAO and SimpleDBLinkDAO. The Hibernate class is not
interesting in this context, and the SimpleDB class uses the AWS SDK
for Java for saving and retrieving the short codes in SimpleDB. We
have created a domain—something that can be compared to a table for
relational databases—called “links” in SimpleDB for storing the URLs
with their short code, number of clicks, and date on which they were
created.
For accessing the SimpleDB API, we first initialize the AmazonSimpleDB object, passing the
credentials provided in our AWS account (and saved in a properties
file):
private void initSimpleDBService() {
  ResourceBundle bundle = ResourceBundle.getBundle ("aws");

  AWSCredentials credentials = new BasicAWSCredentials(
      bundle.getString("accessKey"), bundle.getString("secretKey"));

  simpleDB = new AmazonSimpleDBClient(credentials);
}
Then we can use the SimpleDB API for Get Attributes, Put Attributes and Select for getting a specific link, adding a new one or modifying, and checking if a specific URL is already in the data store. The main methods for this are listed below:
/**
 * Data access object which uses SimpleDB
 * to persist the links.
 *
 */
public class SimpleDBLinkDAO implements LinkDAO {

[…]

  public Link get(String shortCode) {

    AmazonSimpleDB simpleDB = getSimpleDBService();

    Link link = new Link();

    GetAttributesResult result = simpleDB.getAttributes(new GetAttributesRequest
(LINKS, shortCode));
    for (Attribute attribute : result.getAttributes()) {
      if (URL_ATTRIBUTE.equals(attribute.getName())) {
        link.setUrl(attribute.getValue());
      } else if (SHORTCODE_ATTRIBUTE.equals(attribute.getName())) {
        link.setShortCode(attribute.getValue());
      } else if (CLICKS_ATTRIBUTE.equals(attribute.getName())) {
        link.setClicks(Long.parseLong(attribute.getValue()));
      } else if (CREATED_ATTRIBUTE.equals(attribute.getName())) {
        link.setCreated(string2Date(attribute));
      }
    }

    return link;
  }

  public void incrementClicks(Link link) {

    AmazonSimpleDB simpleDB = getSimpleDBService();

    List<ReplaceableAttribute> attribs = new ArrayList<ReplaceableAttribute>();

    boolean clicksOverwritten;
    int attempts = 0;

    do {
      try {

        long oldClicks = numberOfClicks(link, simpleDB);

        // add 1 to number of clicks
        attribs.add(new ReplaceableAttribute(CLICKS_ATTRIBUTE, "" + (oldClicks + 1),
true));

        // use UpdateCondition so we only update
        // if the previous value for clicks was the same that we just retrieved before
        simpleDB.putAttributes(new PutAttributesRequest(LINKS, link.getShortCode(),
attribs,
            new UpdateCondition(CLICKS_ATTRIBUTE, "" + oldClicks, true)));

        clicksOverwritten = false;

      } catch (AmazonServiceException e) {
        log.error(e.getErrorCode());
        if ("ConditionalCheckFailed".equals(e.getErrorCode())) {
          clicksOverwritten = true;
          attempts++;
        } else{
          throw e;
        }
      }
    } while (clicksOverwritten && attempts < 10);

    if (clicksOverwritten && attempts >= 10) {
      log.error("WARNING: Could not update the number of clicks.");
    }

  }

  private long numberOfClicks(Link link, AmazonSimpleDB simpleDB) {
    long oldClicks = 0;

    // get the current number of clicks
    // do a consistent read to get the latest written value
    GetAttributesRequest request = new GetAttributesRequest(LINKS, link.getShort
Code());
    request.setConsistentRead(true);
    GetAttributesResult result = simpleDB.getAttributes(request);

    for (Attribute attribute: result.getAttributes()) {
      if (CLICKS_ATTRIBUTE.equals(attribute.getName())) {
        oldClicks = Long.parseLong(attribute.getValue());
        break;
      }
    }
    return oldClicks;
  }

  public Link add(Link link) {

    SimpleDateFormat format = dateFormat();

    AmazonSimpleDB simpleDB = getSimpleDBService();

    // Check if the URL has already been shortened
    // by doing a consistent read
    SelectRequest request = new SelectRequest(
        "select shortcode from links where url = '" +link.getUrl()+ "'", true);

    SelectResult result = simpleDB.select(request);

    String shortcode = null;

    // if so, get the already existing short URL
    if (result.getItems().size() > 0) {
      // we assume there is only one item
      Item item = result.getItems().get(0);
      for (Attribute attribute : item.getAttributes()) {
        if (SHORTCODE_ATTRIBUTE.equals(attribute.getName())) {
          shortcode = attribute.getValue();
          break;
        }
      }
    }

    // if the url was not yet in the database, generate a new short url
    if (shortcode == null) {
      shortcode = generateShortcode();
    }

    link.setShortCode(shortcode);

    List<ReplaceableAttribute> attribs = new ArrayList<ReplaceableAttribute>();
    attribs.add(new ReplaceableAttribute(URL_ATTRIBUTE, link.getUrl(), true));
    attribs.add(new ReplaceableAttribute(SHORTCODE_ATTRIBUTE, link.getShortCode(),
true));
    attribs.add(new ReplaceableAttribute(CREATED_ATTRIBUTE, format.format(new java.
util.Date()), true));
    attribs.add(new ReplaceableAttribute(CLICKS_ATTRIBUTE, "0", true));

    simpleDB.putAttributes(new PutAttributesRequest(LINKS, link.getShortCode(),
attribs));

    return link;
  }

[…]

}
As a result, the “links” SimpleDB domain contents will look similar to Figure 1-5.

Note
If you want to use the shortener with a relational database
using Hibernate, change the value of the persistence parameter in the
src/main/webapp/WEB-INF/web.xml to hibernate. Your database can then be
configured in
src/main/resources/hibernate.cfg.xml.
Deploy Hystqio to Elastic Beanstalk
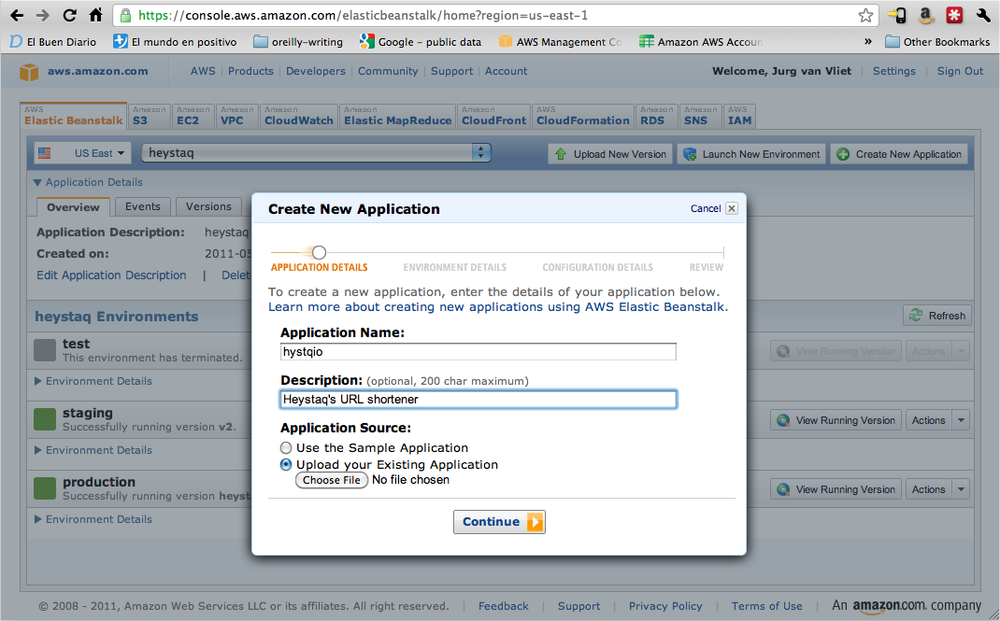
So we have a WAR and we have Elastic Beanstalk: we are ready to run! Go to the Elastic Beanstalk tab of the AWS Console and tap on “Create New Application” (Figure 1-6). Choose “Upload your Existing Application” and select your WAR.
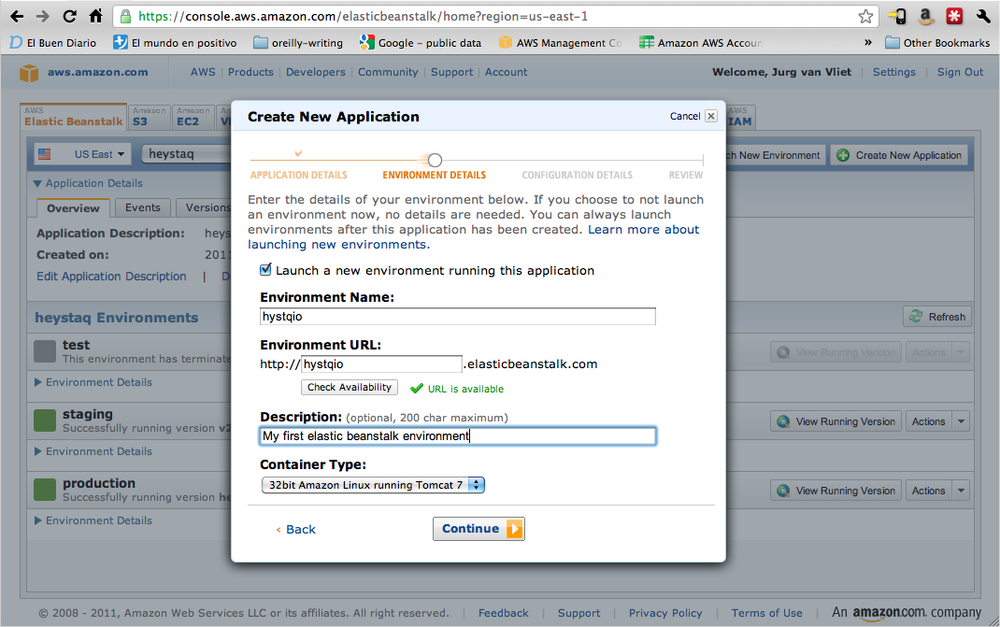
Next, you are prompted to create a new environment. Create one and give it a name, choose a convenient available URL, and choose a container type (Figure 1-7).
In the third step, we can leave the default options. The instance type is the size of the machine we want to use. Micro is fine for a start, and we can benefit from the free tier. The key pair would be used to give us SSH access to the instance, but for now we only want it to run; we’ll worry about getting onto the machine later in this book. Take into account, though, that if you are running a real application, you should assign a key pair to be able to log in to your instances when the need arises.
Configure an email address if you want to receive notifications about the changes in status and events happening in your application, such as restarts, instances being removed or added when autoscaling, health check failures, etc. All these options can be changed later on.
When you finish the wizard, you’ll see that it takes a few minutes
to launch the environment. You can check what is going on in the Events
tab (Figure 1-8). In the end, if all goes well,
your environment will be in “green” status, with the text “Successfully
running version First Release.” Tap on “View Running Version” or go
directly to
http://<cname>.elasticbeanstalk.com
to see your app running.

Conclusion
In this chapter, we showed you how easy it is to deploy a Java application on Elastic Beanstalk by using an open source URL shortener. In the process, we introduced the basic components of Beanstalk, and explained how you should design your application to be Elastic Beanstalk–ready.
In the coming chapter, we will explain in more detail how all the underlying AWS services interact when you deploy an application on Beanstalk.
Get Elastic Beanstalk now with the O’Reilly learning platform.
O’Reilly members experience books, live events, courses curated by job role, and more from O’Reilly and nearly 200 top publishers.

