Chapter 1. Comparing Selected Flex Frameworks
The first 90% of the code accounts for the first 90% of the development time. The remaining 10% of the code accounts for the other 90% of the development time.
Frameworks Versus Component Libraries
Whenever the subject of third-party architectural frameworks is raised at a gathering of Flex developers, the developers are quick to start explaining how they use and like a particular framework. But a simple question like, “Why do you use this framework?” often catches them off guard. Many enterprise developers, especially those who came to Flex after spending some time developing Java EE applications, just know that using these frameworks is the right thing to do. Is it so? What are the benefits of using architectural frameworks? This chapter offers some answers as to what you should expect of a framework built on top of the Flex framework.
The goal of any well-designed framework is to make the process of software development and maintenance easier. There are different ways of achieving this goal. Some people prefer working with frameworks that are based on the Model-View-Controller pattern; others like dealing with libraries of components. Each approach has its benefits and costs. In this chapter, you will learn how to build the same application using several frameworks or component libraries used by Flex developers.
First, let’s define the term framework versus component library. Imagine a new housing development. For some pieces of property, the builder has already erected the frames for certain house models, but other pieces of property have only piles of construction materials guarded by specially trained dogs. By the entrance to the new community, you see a completely finished model house with lots of upgrades.
You have three options:
Purchase the model house and move in in a month.
Purchase one of five prearchitected models (see those houses that are framed?). The frames are pretty much ready; you just need to select windows, flooring, and kitchen appliances.
Purchase a custom house using a mix of the builder’s and your own materials.
Now, to draw some analogies to the software engineering world, Case A is the equivalent of purchasing an all-encompassing enterprise software package that comes with 2,000 database tables and thousands of lines of code, with a promise to cover all the needs of your organization.
Case B is the equivalent of a software framework that you must code in ways that operate by the rules of the framework, adding your own application-specific logic where appropriate. Often such frameworks are intrusive—you have to include in your application code hooks to build your software on the pillars of the selected framework.
Case C gives you complete freedom of choice, as long as you have all the components and the know-how to put them together. For some people, it’s the most appealing option, but for others it is the most intimidating option, because it has such freedom; these people select option B to ensure that their house will not be blown away by the Big Bad Wolf, as in the fairy tale “The Three Little Pigs.”
Adobe Flex provides you with an extendable framework that you can use as a solid starting point for your business application. Along with that, there are a number of third-party frameworks and component libraries created with the same noble goal: to make your life easier.
As Flex is already a framework, you should have very strong reasons to create another one. Flex has extendable components and events, and when you work in a team of developers, each of them may have a different understanding of how custom components should find and communicate with each other, how to properly organize the project, and how to make a team work more productively. At the time of this writing, there are about a dozen Flex frameworks from which you can choose to help you organize your Flex project. Each of these frameworks has the same goal: to increase each developer’s productivity.
In this chapter, you’ll get familiar with three architectural frameworks and one toolkit, which includes additional productivity plug-ins and a component library. Of course, as the readers of this book may have a different understanding of what easy means, the authors decided to show you how you can build the same application using each of the frameworks or libraries. (Each of the reviewed products is offered at no charge.)
The sample application that you will build is based on Café Townsend, a small program that was originally developed by creators of the Cairngorm framework. This application allows the end user to maintain data for Café Townsend’s employees. The application reads data from the database, displays a list of employees, and allows the user to add a new employee or edit an existing employee.
The chapter starts by introducing the original Cairngorm Café Townsend application on the Adobe website. Next, it explores the version of the application written in the Mate framework and published on the AsFusion website. The chapter then analyzes the version of the application written in Cliff Hall’s PureMVC framework. Finally, you’ll explore a version of the Café Townsend application generated with the help of the open source Clear Toolkit. The Café Townsend application versions are posted on each framework’s corresponding website, which is the best place to download the sample application and the given framework, as it’s safe to assume that the authors of the frameworks in each case have either written or approved the code.
Each of the following sections starts with a brief introduction of the framework or library, followed by a code walkthrough and conclusions. Each framework will be explored, followed by a report card evaluation of the framework’s pros and cons.
Introducing Café Townsend
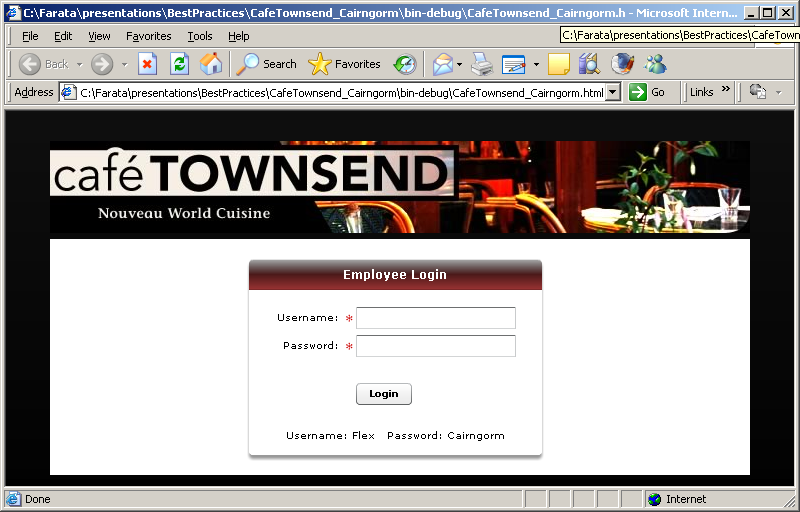
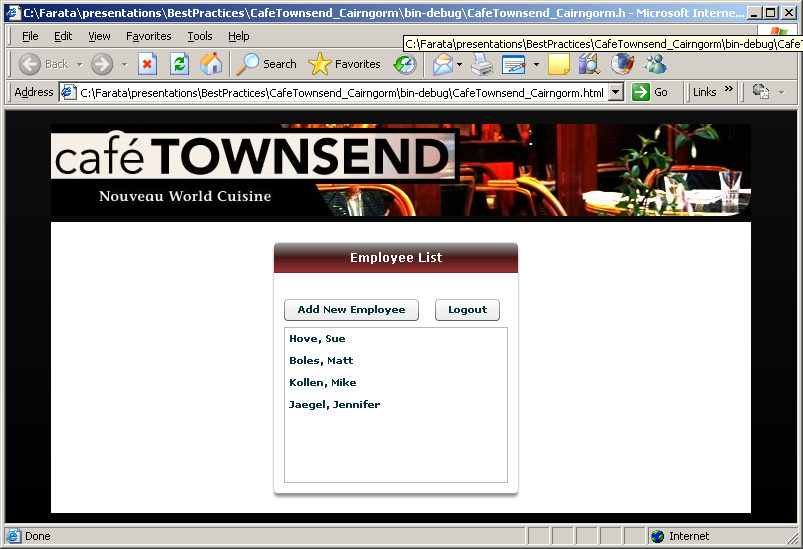
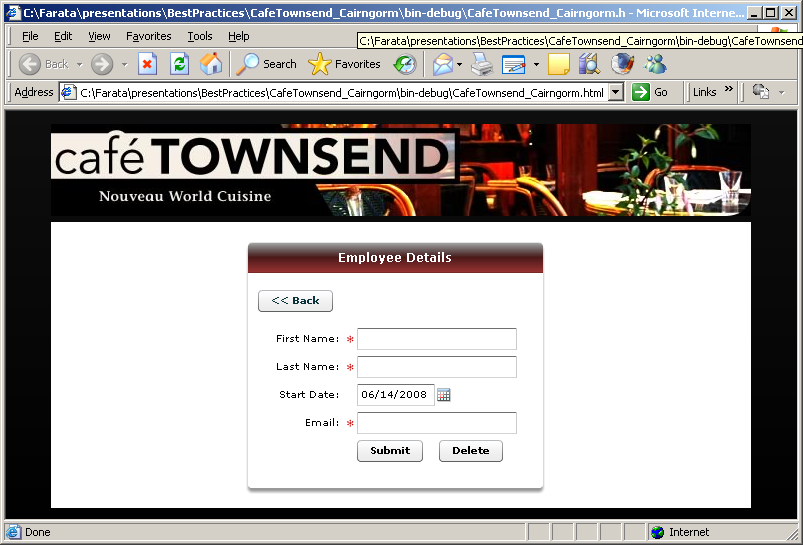
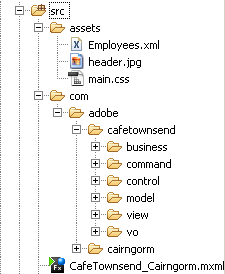
The original Café Townsend application consists of three views (Figures 1-1, 1-2, and 1-3). These views allow the user to log in, display the list of employees, and add a new employee of the Café. The application also has one image (the Café Townsend logo) and a CSS file, main.css, for styling.
The application retrieves data from Employee.xml, as shown in the following code snippet:
<?xml version="1.0" encoding="utf-8"?>
<employees>
  <employee>
    <emp_id>1</emp_id>
    <firstname>Sue</firstname>
    <lastname>Hove</lastname>
    <email>shove@cafetownsend.com</email>
    <startdate>01/07/2006</startdate>
  </employee>
    ...
</employees>
Although retrieving data from an XML file simplifies the explanation
of this framework in this example, it is preferable that you pass the
typed data from the server in real-world projects, for example, Java value
objects converted into their ActionScript strongly typed peers. This
technique eliminates the need to write a lot of mundane code to convert
the startdate from String to Date and the like.
At the end of this chapter, you’ll learn how to include a Java-to-ActionScript 3.0 version of the Café Townsend application, which uses Flex remoting to populate the data.
Employee List Without Frameworks
The title of this section is a bit of a misnomer, because Flex itself is a framework. But we wanted to stress that you can create an application that reads XML and displays the data in a list control without the use of any additional third-party framework or component library.
The Flex framework already supports the MVC pattern by separating
the View (the List control) and the
data that can be stored in a nonvisual data provider such as ArrayCollection. Let’s write a
quick-and-dirty version of the EmployeeList component that does not use any
frameworks.
This Café application uses HTTPService to read the file Employees.xml located in the folder assets, and a List component displays the full name of the
employee using the label function fullName().
The data is stored in the data provider
employees (a.k.a. MVC’s Model), and the List controls play the role of MVC’s View. For
simplicity, this version does not have error processing, and the Add
Employee and Logout buttons are nonfunctional.
The following application (Example 1-1) reads the list of employees using just the Flex framework.
<?xml version="1.0" encoding="utf-8"?>
<!-- The service call empService.send() plays the role of MVC Controller -->
<mx:Application xmlns:mx="http://www.adobe.com/2006/mxml" layout="absolute"
   creationComplete="empService.send()">

   <mx:Panel title="Employee List" horizontalCenter="0">
      <mx:HBox paddingTop="25">
         <mx:Button label="Add New Employee" />
         <mx:Spacer width="100%" />
         <mx:Button label="Logout" />
         <mx:Spacer width="100%" height="20" />
      </mx:HBox>

     <!-- List of Employees a.k.a. View-->
      <mx:List id="employees_li" dataProvider="{employees}"
         labelFunction="fullName" width="100%"/>
   </mx:Panel>

   <mx:HTTPService id="empService" url="assets/Employees.xml"
      result="employeeDataHandler(event)" />

   <mx:Script>
      <![CDATA[
      import mx.rpc.events.ResultEvent;
      import mx.collections.ArrayCollection;

      //data provider for the list is an ArrayCollection a.k.a. model
      [Bindable]
      private var employees: ArrayCollection=new ArrayCollection;

      private function employeeDataHandler(event:ResultEvent):void{
         employees=event.result.employees.employee;
      }
      // format the names to display last and first names in the List
      public function fullName( empItem : Object ) : String {
         return empItem.lastname + ", " + empItem.firstname;
      }
      ]]>
   </mx:Script>
</mx:Application>
Because real-world RIAs are a lot more complex than this simple application and may contain a hundred or more different views created by multiple developers with data coming from different sources, consider using one of the additional frameworks or component libraries to simplify the programming of similar tasks and to better organize the project.
Now let’s consider the Café application rewritten in Cairngorm, Mate, PureMVC, and the Clear Toolkit.
Cairngorm
The architectural framework Cairngorm was created by Alistair McLeod and Steven Webster while they were working at the company iteration::two (they are presently employed by Adobe Consulting). Cairngorm implements several design patterns such as MVC, Command, and Delegate. It was open sourced in the summer of 2008.
Cairngorm was designed to ensure that UI components do not need to know where data is located. The business layer retrieves data from the servers and stores it in the memory objects that represent the data model, which use binding to notify the UI components about data arrival or changes. On the same note, changes in the UI are propagated to the server side through this business layer.
The Cairngorm framework promotes the use of the MVC design pattern in the client portion of your RIA. It offers a number of classes implementing Model, View, and Controller tiers, and interaction between them.
The Model tier is represented by the class ModelLocator, which stores the
application-specific data (these are often collections of value
objects, a.k.a. data transfer objects).
ModelLocator’s data is bound to the
View controls.
The View portion contains visual components required by your application, value objects, and Cairngorm-specific event classes used for communication with the Model and Controller tiers.
The Controller tier is responsible for invoking appropriate code
containing the business logic of your application, which is implemented by
using global FrontController and
ServiceLocator classes as well as
additional Command and Delegate
classes.
The Cairngorm framework’s documentation and sample applications are located at http://www.cairngormdocs.org.
Note
As this chapter was being written, Adobe decided to rebrand Cairngorm; instead of a mere framework, Adobe is promoting it as a set of tools and methodologies containing various frameworks, including what has been earlier known as the “Cairngorm framework.” You can read about this Cairngorm 3 initiative at http://opensource.adobe.com/wiki/display/cairngorm/Cairngorm+3. In this chapter, we refer to Cairngorm 2, which is an MVC Flex framework and nothing else.
Café Townsend with Cairngorm
The “pure Flex” code shown in Example 1-1 includes
representatives of each MVC tier. The code knows that the data will be
loaded into an ArrayCollection (the
Model) by the HTTP service pointing at the Employees.xml file by calling a send() method on the creationComplete event (the Controller) of the
application. The List component (the
View) knows about its model and is bound to it directly via its dataProvider property.
The data flow between Cairngorm components while displaying a list of Café employees is depicted in Figure 1-4.
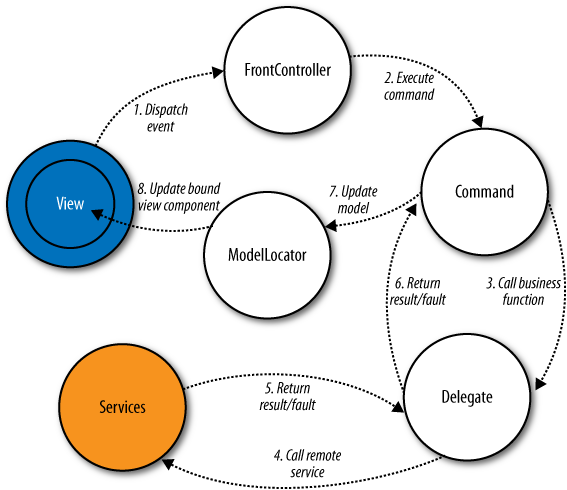
The Cairngorm version of this application has the following six major participants:
- Services
The UI portion does not know about implementation of services and can’t call them directly, so you must move the
HTTPServiceobject into a special file called Services.mxml.FrontControllerThe View and the service layer can’t send events to each other directly, but rather have to be registered with a singleton
FrontControllerthat maps all application events to appropriate actions (commands).CommandWhen a
Viewcomponent fires an event,FrontControllerfinds theCommandclass that was registered with this event and calls its methodexecute().DelegateThe method
execute()of theCommandclass creates an instance of theDelegateclass that knows which service to call (HTTPService,RemoteObject,WebService) and returns the result or fault to theCommandclass.ModelLocatorThe
Commandclass updates the data in the model (typically, a collection of value objects) defined in the globalModelLocator.ViewBecause each model located inside the
ModelLocatoris bound to a UI control, its content gets updated automatically.
Use the source code of the Café Townsend Multi-View Contact Management application that was converted to Cairngorm 2 by Darren Houle and is available under the Creative Commons license. You can download the source code of this application at http://cairngormdocs.org/blog/?p=19.
Figure 1-5 is a
screenshot of the Café Townsend Flash Builder project. Please note that
the code for the six participants mentioned earlier is organized in
separate packages (folders). The business folder is
for delegates and service components. The command folder is for
Command classes; control is for events and FrontController; the ModelLocator is located in the
model folder; and the view folder has visual components as shown in
Figures 1-1 through 1-3. The value objects of the application
have been placed in the folder called vo. Regardless of what framework you are
going to use, separating various application components in project
subfolders helps make the project more organized.
To make Cairngorm classes available to your application, just download Cairngorm’s compiled version (binary) and add cairngorm.swc to the Library path of your Flex project (use the Flex Build Path menu under your project’s properties).
Let’s get familiar with the Cairngorm workflow by tracing the data
and events starting from the main application object of Café Townsend,
shown in Example 1-2.
Please note the use of four global objects: AppModelLocator, Services, AppController, and CairngormEventDispatcher.
<?xml version="1.0" encoding="utf-8" standalone="no"?>
<!--
  Cafe Townsend MVC Tutorial © 2006 Adobe
  Converted to Cairngorm 2 by Darren Houle
   lokka_@hotmail.com   http://www.digimmersion.com
  This is released under a Creative Commons license.
  http://creativecommons.org/licenses/by/2.5/
-->
<mx:Application xmlns:mx="http://www.adobe.com/2006/mxml"
xmlns:business="com.adobe.cafetownsend.business.*"
   xmlns:control="com.adobe.cafetownsend.control.*"
  xmlns:view="com.adobe.cafetownsend.view.*" backgroundColor="#000000"
  creationComplete="loadEmployees();" layout="vertical
   viewSourceURL="srcview/index.html">

   <mx:Script>
      <![CDATA[
      import com.adobe.cairngorm.control.CairngormEventDispatcher;
      import com.adobe.cafetownsend.control.LoadEmployeesEvent;
      import com.adobe.cafetownsend.model.AppModelLocator;

      [Bindable]
      private var model: AppModelLocator =
                  AppModelLocator.getInstance();

      private function loadEmployees() : void {
       var cgEvent : LoadEmployeesEvent = new LoadEmployeesEvent();
        CairngormEventDispatcher.getInstance().dispatchEvent(cgEvent);
      }
      ]]>
   </mx:Script>

   <business:Services id="services"/>

   <control:AppController id="appController"/>

   <mx:Style source="assets/main.css"/>
   <mx:Image source="assets/header.jpg" width="700"/>
   <mx:HBox backgroundColor="#ffffff" paddingBottom="10" paddingLeft="10"
               paddingRight="10" paddingTop="10" width="700">
   <mx:VBox paddingRight="10" verticalScrollPolicy="off" width="100%">
    <mx:ViewStack paddingBottom="10" paddingTop="10" resizeToContent="true"
                selectedIndex="{model.viewing}" width="100%">
      <view:EmployeeLogin/>
      <view:EmployeeList/>
      <view:EmployeeDetail/>
    </mx:ViewStack>
   </mx:VBox>
  </mx:HBox>
</mx:Application>
In the example code, CairngormEventDispatcher dispatches the
cgEvent:
CairngormEventDispatcher.getInstance().dispatchEvent(cgEvent);
Cairngorm’s front controller (AppController) creates an instance of a
command class that was registered to process this event (see Example 1-4 later).
To eliminate the need to import CairngormEventDispatcher in every view,
starting from Cairngorm 2.2 you can call the dispatch() method on the event itself, which
uses CairngormEventDispatcher
internally, that is:
cgEvent.dispatch();
The three views of the Café Townsend application object are
implemented as components located in the ViewStack container.
On the application startup, the code dispatches LoadEmployeesEvent and, as if by magic, the
EmployeeList gets populated from
Employees.xml. How did it happen?
LoadEmployeesEvent is a subclass of
CairngormEvent (Example 1-3).
package com.adobe.cafetownsend.control {

   import com.adobe.cairngorm.control.CairngormEvent;
   import com.adobe.cafetownsend.control.AppController;

   public class LoadEmployeesEvent extends CairngormEvent {

      public function LoadEmployeesEvent() {
         super( AppController.LOAD_EMPLOYEES_EVENT );
         }
      }
}
This class creates an event with an ID AppController.LOAD_EMPLOYEES_EVENT, which
among other events has been registered and mapped to the command
LoadEmployeesCommand in the global
AppController implementation shown in
Example 1-4.
package com.adobe.cafetownsend.control {

   import com.adobe.cairngorm.control.FrontController;
   import com.adobe.cafetownsend.command.*;

   public class AppController extends FrontController {

      public static const LOAD_EMPLOYEES_EVENT : String =
         "LOAD_EMPLOYEES_EVENT";
      public static const LOGIN_EMPLOYEE_EVENT : String =
         "LOGIN_EMPLOYEE_EVENT";
      public static const ADD_NEW_EMPLOYEE_EVENT : String =
        "ADD_NEW_EMPLOYEE_EVENT";
      public static const UPDATE_EMPLOYEE_EVENT : String =
        "UPDATE_EMPLOYEE_EVENT";
      public static const LOGOUT_EVENT : String =
         "LOGOUT_EVENT";
      public static const CANCEL_EMPLOYEE_EDITS_EVENT : String =
        "CANCEL_EMPLOYEE_EDITS_EVENT";
      public static const DELETE_EMPLOYEE_EVENT : String =
         "DELETE_EMPLOYEE_EVENT";
      public static const SAVE_EMPLOYEE_EDITS_EVENT : String =
        "SAVE_EMPLOYEE_EDITS_EVENT";

 public function AppController() {
  addCommand( AppController.LOAD_EMPLOYEES_EVENT, LoadEmployeesCommand );
  addCommand( AppController.LOGIN_EMPLOYEE_EVENT, LoginEmployeeCommand );
  addCommand( AppController.ADD_NEW_EMPLOYEE_EVENT, AddNewEmployeeCommand );
  addCommand( AppController.UPDATE_EMPLOYEE_EVENT, UpdateEmployeeCommand );
  addCommand( AppController.LOGOUT_EVENT, LogoutCommand );
  addCommand( AppController.CANCEL_EMPLOYEE_EDITS_EVENT,
                        CancelEmployeeEditsCommand );
  addCommand( AppController.DELETE_EMPLOYEE_EVENT, DeleteEmployeeCommand );
  addCommand( AppController.SAVE_EMPLOYEE_EDITS_EVENT,
                       SaveEmployeeEditsCommand );
 }
 }
}
The next point of interest is the class LoadEmployeesCommand. This command class
implements the Command implementation (Example 1-5), which forces you to implement
the method execute(), which can
invoke the right delegate class that has the knowledge of “who to talk
to” when a specific command has been received. The method execute() must have an argument—the
instance of the CairngormEvent object
that may or may not encapsulate some application data (for example, some
value object that is not used in our scenario).
It also implements the interface IResponder, which requires you to add the
result() and fault() methods. By using these callbacks the
delegate will return to the command class the result (or error
information) of the execution of the command in question.
package com.adobe.cafetownsend.command {

   import mx.rpc.IResponder;
   import com.adobe.cairngorm.commands.Command;
   import com.adobe.cairngorm.control.CairngormEvent;
   import com.adobe.cafetownsend.business.LoadEmployeesDelegate;
   import com.adobe.cafetownsend.model.AppModelLocator;

 public class LoadEmployeesCommand implements Command, IResponder {

   private var model : AppModelLocator = AppModelLocator.getInstance();

   public function execute( cgEvent:CairngormEvent ) : void {

   // create a worker who will go get some data
   // pass it a reference to this command so the delegate
   // knows where to return the data
    var delegate : LoadEmployeesDelegate = new LoadEmployeesDelegate(this);

   // make the delegate do some work
   delegate.loadEmployeesService();
   }

   // this is called when the delegate receives a result from the service
   public function result( rpcEvent : Object ) : void {
   // populate the employee list in the model locator with
   // the results from the service call
    model.employeeListDP = rpcEvent.result.employees.employee;
   }

   // this is called when the delegate receives a fault from the service
   public function fault( rpcEvent : Object ) : void {
   // store an error message in the model locator
   // labels, alerts, etc. can bind to this to notify the user of errors
    model.errorStatus = "Fault occured in LoadEmployeesCommand.";
   }
 }
}
Because this version of the Café Townsend application uses the
HTTPService request for retrieval,
Flex automatically converts Employees.xml into ArrayCollection and does not use the value
object Employee.as. This leads to the need for
additional coding to convert the data to appropriate types. For example,
employee startDate will be stored as
a string and will require code to convert it to Date
if any date manipulations will be needed.
If you’ll be using Cairngorm in your projects, consider
simplifying the application design by eliminating the delegate classes.
Just move the business logic from the delegate right into the execute() method of the command class
itself.
Create a common ancestor to all your commands and define the fault method there to avoid repeating the same code in each command class.
To load the employees, the Command class
creates an instance of the proper delegate passing the reference to
itself (this is how the delegate knows where to return the data) and
calls the method loadEmployeesService():
var delegate : LoadEmployeesDelegate = new LoadEmployeesDelegate(this);
delegate.loadEmployeesService();
Have you noticed that the Command class has
also reached for the AppModelLocator
to be able to update the model?
private var model : AppModelLocator = AppModelLocator.getInstance();
...
model.employeeListDP = rpcEvent.result.employees.employee;
...
 model.errorStatus = "Fault occured in LoadEmployeesCommand.";
Now, let’s take a peek into the Delegate class
from Example 1-6. It gets a hold of
the global ServiceLocator class, the
only player who knows about who’s hiding behind the mysterious name
loadEmployeesService. The method
loadEmployeesService() sends the
request to the execution and assigns the responder (the instance of
LoadEmployeesCommand), engaging the AsyncToken design pattern described in Chapter 2.
package com.adobe.cafetownsend.business {

   import mx.rpc.AsyncToken;
   import mx.rpc.IResponder;
   import com.adobe.cairngorm.business.ServiceLocator;

 public class LoadEmployeesDelegate {

       private var command : IResponder;
   private var service : Object;

   public function LoadEmployeesDelegate( command : IResponder ) {
    //constructor will store a reference to the service we're going to call
    this.service = ServiceLocator.getInstance().getHTTPService(
                          'loadEmployeesService' );
    // and store a reference to the command that created this delegate
    this.command = command;
   }

   public function loadEmployeesService() : void {
    // call the service
    var token:AsyncToken = service.send();
    // notify this command when the service call completes
    token.addResponder( command );
   }
 }
}
As mentioned previously, each Cairngorm application has a central registry that knows about each and every service that may be used by the application (Example 1-7).
<?xml version="1.0" encoding="utf-8"?>
<cairngorm:ServiceLocator
   xmlns:mx="http://www.adobe.com/2006/mxml"
   xmlns:cairngorm="com.adobe.cairngorm.business.*">

   <mx:HTTPService id="loadEmployeesService" url="assets/Employees.xml" />

</cairngorm:ServiceLocator>
In our case it’s just one HTTPService, but in a real-world scenario, the
Services.mxml file may list dozens
of services. As every service must have a unique ID (in our case, it’s
loadEmployeesService), the delegate
class was able to find it by using the following line:
this.service = ServiceLocator.getInstance().getHTTPService(
                          'loadEmployeesService' );
If you’d need to call a service implemented as RemoteObject, the delegate would be calling
the method getRemoteObject() instead
of getHTTPService(). For web
services, call the method getWebService().
Those who work with Data Management Services can use Cairngorm’s
EnterpriseServiceLocator and its method
getDataService().
ServiceLocator can be used not
only as a repository of all services, but also as an authorization
mechanism that restricts access to certain application services based on
specified credentials. See its methods setCredentials() and setRemoteCredentials() for details.
The final portion of the loading employees process goes as follows:
The
loadEmployeesServiceclass reads Employees.xmlThe delegate gets the result and passes it to the
result()method of theCommandclass (see Example 1-5)The
Commandclass updates themodel.employeeListDPviaModelLocatorThe
Listcomponent on the View gets automatically updated, because it’s bound tomodel.employeeListDP(see Example 1-8)
<?xml version="1.0" encoding="utf-8"?>
<mx:VBox xmlns:mx="http://www.adobe.com/2006/mxml" xmlns="*" width="100%"
   horizontalAlign="center">

   <mx:Script>
      <![CDATA[
   import com.adobe.cairngorm.control.CairngormEventDispatcher;
   import com.adobe.cafetownsend.control.AddNewEmployeeEvent;
   import com.adobe.cafetownsend.control.UpdateEmployeeEvent;
   import com.adobe.cafetownsend.control.LogoutEvent;
   import com.adobe.cafetownsend.model.AppModelLocator;

   [Bindable]
   private var model : AppModelLocator = AppModelLocator.getInstance();

   // mutate the add new employee button's click event
   public function addNewEmployee() : void {
      // broadcast a cairngorm event
      var cgEvent : AddNewEmployeeEvent = new AddNewEmployeeEvent();
      CairngormEventDispatcher.getInstance().dispatchEvent( cgEvent );

       //de-select the list item
       clearSelectedEmployee();
   }

   // mutate the List's change event
   public function updateEmployee() : void {
     //broadcast a cairngorm event that contains selectedItem from the List
     var cgEvent : UpdateEmployeeEvent = new UpdateEmployeeEvent(
                                       employees_li.selectedItem );
     CairngormEventDispatcher.getInstance().dispatchEvent( cgEvent );

     // de-select the list item
     clearSelectedEmployee();
   }

   // mutate the logout button's click event
   private function logout() : void {
     // broadcast a cairngorm event
     var cgEvent : LogoutEvent = new LogoutEvent();
     CairngormEventDispatcher.getInstance().dispatchEvent( cgEvent );
   }

   // format the names that are displayed in the List
   public function properName( dpItem : Object ) : String {
     return dpItem.lastname + ", " + dpItem.firstname;
   }

   // de-select any selected List items
  private function clearSelectedEmployee() : void {
      employees_li.selectedIndex = -1;
   }
      ]]>
   </mx:Script>

   <mx:Panel title="Employee List" horizontalCenter="0">
      <mx:HBox paddingTop="25">
      <mx:Button label="Add New Employee" click="addNewEmployee()" />
      <mx:Spacer width="100%" />
      <mx:Button label="Logout" click="logout()" />
      <mx:Spacer width="100%" height="20" />
      </mx:HBox>
      <!-- data provider for the list is an ArrayCollection stored in
      the centralized model locator -->
      <mx:List id="employees_li" dataProvider="{ model.employeeListDP }"
      labelFunction="properName" change="updateEmployee()" width="100%"
      verticalScrollPolicy="auto"/>
   </mx:Panel>
</mx:VBox>
We’re almost there, but let’s not forget about the ModelLocator, the storage of your
application’s data. At the time of this writing, the code of the Café
Townsend application published at http://cairngormdocs.org still implements the ModelLocator interface, but recently has been renamed
IModelLocator.
In Example 1-9 the
class AppModelLocator implements
IModelLocator.
package com.adobe.cafetownsend.model {

   import mx.collections.ArrayCollection;
   import com.adobe.cairngorm.model.ModelLocator;
   import com.adobe.cafetownsend.vo.Employee;
   import com.adobe.cafetownsend.vo.User;

    [Bindable]
   public class AppModelLocator implements ModelLocator {

      // this instance stores a static reference to itself
      private static var model : AppModelLocator;

      // available values for the main viewstack
      // defined as constants to help uncover errors at compile time
      public static const EMPLOYEE_LOGIN : Number =   0;
      public static const EMPLOYEE_LIST : Number =   1;
      public static const EMPLOYEE_DETAIL : Number =   2;
      // viewstack starts out on the login screen
      public var viewing : Number = EMPLOYEE_LOGIN;

      // user object contains uid/passwd
      // its value gets set at login and cleared at logout but nothing
      // binds to it or uses it retained since it was used in the
      // original Adobe CafeTownsend example app
      public var user : User;

      // variable to store error messages from the httpservice
      // nothing currently binds to it, but an Alert or the login box
      // could to show startup errors
      public var errorStatus : String;

      // contains the main employee list, which is populated on startup
      // mx:application's creationComplete event is mutated into a
      // cairngorm event that calls the httpservice for the data
      public var employeeListDP : ArrayCollection;

      // temp holding space for employees we're creating or editing
      // this gets copied into or added onto the main employee list
      public var employeeTemp : Employee;

      // singleton: constructor only allows one model locator
      public function AppLocator(){
      if ( AppModelLocator.model != null )
         throw new Error(
         "Only one ModelLocator instance should be instantiated" );
      }

      // singleton always returns the only existing instance to itself
      public static function getInstance() : AppModelLocator {
         if ( model == null )
            model = new AppModelLocator();
         return model;
         }
      }
   }
This model locator stores the data and the state of this
application—in particular, the variable employeeListDP, which is the place where the
list of employees is being stored.
Please note that as ActionScript 3 does not support private
constructors, the public constructor of this class throws an error if
someone tries to improperly instantiate it (i.e., using the
new command) but the instance of this object already
exists.
We went through the entire process of displaying the initial list of employees, but just to ensure that the Cairngorm data flow is clear, we’ll include a brief explanation of yet another use case from Café Townsend.
The user presses the Add New Employee button (see Figure 1-2), enters the detail info for a new employee on the View component shown in Figure 1-3, and presses the Submit button. This is what’s happening between this button click and the moment when the new employee appears in the employee list:
Note
If you want to follow along, please download the source code of Café Townsend and start from EmployeeDetail.mxml on the following line:
<mx:Button label="Submit" click="saveEmployeeEdits()"
id="submit" />
The
SaveEmployeeEditsEventevent is dispatched:var cgEvent : SaveEmployeeEditsEvent = new SaveEmployeeEditsEvent(model.employeeTemp.emp_id, firstname.text, lastname.text,startdate.selectedDate, email.text ); CairngormEventDispatcher.getInstance().dispatchEvent( cgEvent );For some reason, the author of this code decided not to use
EmployeeVOhere and stores eachEmployeeattribute separately inSaveEmployeeEvent. This is not the best way of encapsulating data inside a custom event, but let’s keep the original code intact.The
FrontControllerreceives this event and passes it to the registered commandSaveEmployeeEditsCommand(see Example 1-4 earlier) for execution.The
execute()method ofSaveEmployeeEditsCommanddoes not use any delegates, as it just needs to add a newly insertedEmployeeto the model. Because this application does not save modified data anywhere other than in memory, no other service calls are made to pass the changed data to the server side for persistence.The View portion of the employee list gets updated automatically as a result of data binding.
While planning for your application with Cairngorm, think of all events, services, value objects, and business services and then create appropriate classes similarly to the way it was done in the Café Townsend example.
To Use or Not to Use Cairngorm?
Online, you may encounter lots of debate regarding whether Cairngorm should be used in Flex projects. With all due respect to the creators of Cairngorm, we don’t believe that Cairngorm makes a Flex team more productive and that most enterprise projects would not benefit from it. We prefer working with frameworks that offer enhanced Flex components rather than just separation of work among team members. If you have to develop a project without experienced Flex developers on your team, however, Cairngorm can give your project a structure that will prevent it from failing.
So, is Cairngorm right for your project? Read Chapters 2, and 6, and then decide whether you prefer working with the components described there or one of the architectural MVC frameworks. Meanwhile, keep these observations about Cairngorm in mind:
Cairngorm’s architecture is based on components dispatching events to a global event handler without knowing what the latter will do with them. The problem with this approach is in the global nature of such an event handler. The
FrontControllerobject serves as a central registry of all Cairngorm events. Although keeping all application events in one place simplifies their maintenance, it leads to tighter coupling of the application components.Using a centralized
ModelLocatoralso makes multiple components dependent on the knowledge of the properties of the model. If your project will start growing, theModelLocatormay not scale well.Modularizing Flex applications is one of the major ways of minimizing the size of the downloadable Shockwave Flash (SWF) files. The other benefit is reusability of the modules. Now imagine a midsize web application that consists of 10 modules. If this application has been built using Cairngorm, each of these modules becomes dependent on the central
FrontControllerlocated in the main .swf file.Application developers have to write lots of boilerplate code. For example, you have to create additional event and command classes for every event that can be dispatched in your application. Even in a midsize application this can translate to a hundred or more additional Cairngorm-specific classes. To minimize the amount of manually written code, consider using Cairngen, an open source code generator for Cairngorm. It’s available at http://code.google.com/p/cairngen/.
FrontControllerallows you to map only one command per event, yet your application may need to have several event listeners per command.Even though data binding can help in writing less code, because Cairngorm enforces data binding as the only mechanism of updating the views, it makes them nonreusable. For example, you can’t just simply reuse the EmployeeList.mxml from Example 1-8 in another application, because it has an intimate knowledge of the internals of the model and relies on the fact that the model has a public variable
employeeListDP. Just simply renaming this variable in theModelLocatorwill require changes in one or more views that are bound to it.Having no other choice but data binding for updating the UI may cause performance problems. The global
ModelLocatorobject defines multiple bindable variables representing different models, and the Flex compiler may generate additionalEventDispatcherobjects on the class level (this depends on the types of the variables). Suppose you have 10[Bindable] Stringvariables in theModelLocator. If one of them will get updated, not only will its listener get notified to update the view, but the other 9 will get this event, too.The fact that Cairngorm is built around a Command pattern with a centrally located command repository can be very convenient for some projects that require audit or undo functionality. Every command arrives at the same place, and you can conditionally hook up, say, an undo module that remembers old/new states of some data or logs every user request (this can be a must in some financial trading applications).
Cairngorm has been around longer than any other Flex framework. As of today, it’s the most popular framework, and many Flex developers around the world already know it, which may be an important factor for development managers who put together large project teams, especially when the teams consist of a large number of junior Flex developers.
Report Card: Cairngorm
Cairngorm separates business- and UI-related work into different layers, which means that the work of the project team can be split between developers responsible for the visual portion and those who are coding just the business logic of the application. The fact that all services are located in a central place allows us to quickly reconfigure the data sources, i.e., switch to quality assurance (QA) or production servers.
Development managers who have to work with distributed teams of beginner or mid-level Flex developers and need a safety net to split the project work into smaller controllable tasks (e.g., John works on the server side and Srinivas works only on the views) may consider using Cairngorm. Here’s the report card followed by more detailed explanations.
The pros are:
It’s a popular framework—many Flex developers know it.
It allows separate responsibilities of developers.
It lowers the requirements for developers’ skillsets.
The cons are:
It requires developers to write lots of additional classes, which adds to project timeline.
It’s built on global singletons, which complicates modularization.
It allows only one-to-one mapping between events and commands.
The framework design is based on singletons, which leads to tight object coupling.
Mate
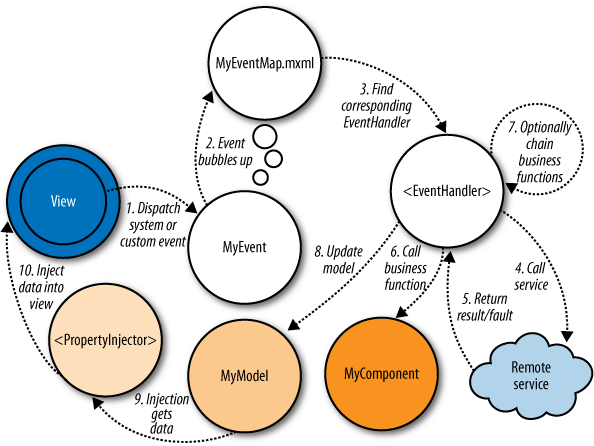
Mate is an event- and tag-based Flex framework. The API is in MXML tags. Mate-based applications are built using implicit invocation caused by dispatching and dependency injection of the results into views.
With implicit invocation, any interested object can listen to the
events that are listed (with their handlers) in one or more MXML
components of type <EventMap>.
Any important action in the application should generate one of the events
listed in this map. In Mate, as opposed to Cairngorm, an application
developer can configure multiple handlers for each event and specify the
sequence in which they should be invoked by assigning priorities in the
event handler.
This section walks you through the Mate framework by analyzing its version of Café Townsend, created by the Mate team, which we encourage you to download from http://mate.asfusion.com/page/examples/cafe-townsend.
The data flow between Mate components while displaying a list of Café employees is depicted in Figure 1-6.
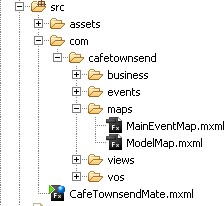
Mate is a much less intrusive framework than Cairngorm, as it does not force developers to add lots of boilerplate code in their applications. Figure 1-7 shows the project structure of the Café. The folder maps contains objects added to the Café project because it’s written using Mate (at least one event map is required). These objects are included in the main application as follows:
<maps:MainEventMap />
<maps:ModelMap />
All events that bubble up in Café will reach these map objects, which will process them according to the event handlers defined in these event maps.
Cairngorm relies on central repositories of events, services, and
models; Mate promotes decoupling among business logic, events, and
services. Mate does not force you to extend any classes. Just create an
<EventMap> in your application
object, define <EventHandler> tags there, and
declare the services required for processing these events inside the
handlers, i.e., <RemoteObjectInvoker>, <HTTPServiceInvoker>, or <WebServiceInvoker>. When your
application grows, consider creating multiple EventMap
objects to keep them manageable.
Example 1-10 depicts about half of the code of the MainEventMap.mxml from Café Townsend.
<?xml version="1.0" encoding="utf-8"?>
<EventMap xmlns:mx="http://www.adobe.com/2006/mxml"
xmlns="http://mate.asfusion.com/">

   <mx:Script>
      <![CDATA[
         import mx.events.*;
         import com.cafetownsend.events.*;
         import com.cafetownsend.business.*;
      ]]>
   </mx:Script>

   <!-- FlexEvent.PREINITIALIZE -->

   <EventHandlers type="{FlexEvent.PREINITIALIZE}">
      <ObjectBuilder generator="{AuthorizationManager}"
             constructorArguments="{scope.dispatcher}" />
   </EventHandlers>

   <!-- FlexEvent.APPLICATION_COMPLETE -->

   <EventHandlers type="{FlexEvent.APPLICATION_COMPLETE}">

      <HTTPServiceInvoker instance="{employeesService}">
         <resultHandlers>
            <MethodInvoker generator="{EmployeeParser}"
               method="loadEmployeesFromXML"
                   arguments="{resultObject}" />

            <MethodInvoker generator="{EmployeeManager}"
            method="saveEmpoyeeList" arguments="{lastReturn}" />
         </resultHandlers>
      </HTTPServiceInvoker>

   </EventHandlers>

   <!-- LoginEvent.LOGIN -->

   <EventHandlers type="{LoginEvent.LOGIN}">
      <MethodInvoker generator="{AuthorizationManager}" method="login"
              arguments="{[event.username, event.password]}" />

<!-- Because there is no server request, we just send the response right away.
   Normally, we would do this inside the resultSequence -->
      <ResponseAnnouncer type="loginResultResponse">
         <Properties loginResult="{lastReturn}"/>
      </ResponseAnnouncer>
   </EventHandlers>

   <!-- EmployeeEvent.SAVE -->

   <EventHandlers type="{EmployeeEvent.SAVE}">
      <MethodInvoker generator="{EmployeeManager}"
            method="saveEmployee" arguments="{event.employee}"/>
      <!-- assume everything was ok, make employee list show up -->
      <EventAnnouncer generator="{NavigationEvent}"
                 type="{NavigationEvent.EMPLOYEE_LIST}"/>
   </EventHandlers>

...
   <mx:HTTPService id="employeesService" url="assets/data/Employees.xml"
                           resultFormat="e4x" />
</EventMap>
In the example code, note the declaration of the handler of the
system Flex event APPLICATION_COMPLETE
with nested HttpServiceInvoker to get
the data from Employees.xml via
employeesService, which is defined at
the very end of this map using the familiar <mx:HTTPService> tag.
EventHandler objects match the type of the received
event with the one specified in the type attribute in the map
file.
When your application receives the result of the call to employeesService, it invokes the functions
defined in the resultHandlers nested
inside the service invoker. In our case, two methods listed in the result
handler section are called sequentially: EmployeeParser.loadEmployeesForXML() and
EmployeeManager.saveEmployeeList():
<resultHandlers>
      <MethodInvoker generator="{EmployeeParser}"
         method="loadEmployeesFromXML"
             arguments="{resultObject}" />

      <MethodInvoker generator="{EmployeeManager}"
            method="saveEmpoyeeList" arguments="{lastReturn}" />
  </resultHandlers>
The first method, loadEmployeeList(), gets the resultObject returned by the HTTPService. The second one, saveEmployeeList(), gets the value returned by
the first method via a predefined Mate variable called lastReturn. This way you can chain several
method calls if needed.
Example 1-11 shows that the method loadEmployees() converts XML into an ActionScript Array object and returns it to Mate, which,
according to the event map, forwards it to the method saveEmployeeList() for further processing (see
Example 1-12). The name saveEmployeeList() is a bit misleading, because
this method does not persist data, but rather stores it in memory in an
ArrayCollection object.
package com.cafetownsend.business{
   import com.cafetownsend.vos.Employee;

   public class EmployeeParser {
    public function loadEmployeesFromXML(employees:XML):Array {
      var employeeList:Array = new Array();

      for each( var thisEmployee:XML in employees..employee ){
         var employee:Employee = new Employee();
         employee.email = thisEmployee.email;
         employee.emp_id = thisEmployee.emp_id;
         employee.firstname = thisEmployee.firstname;
         employee.lastname = thisEmployee.lastname;
         employee.startdate = new
         Date(Date.parse(thisEmployee.startdate));
         employeeList.push(employee);
      }
      return employeeList;
    }
  }
}
The EmployeeManager plays the
role of the model here—it stores employees in the collection employeeList and information about the
selected/new employee in the variable
employee.
package com.cafetownsend.business{
   import com.cafetownsend.vos.Employee;
   import flash.events.Event;
   import flash.events.EventDispatcher;
   import mx.collections.ArrayCollection;

   public class EmployeeManager extends EventDispatcher {

   private var _employeeList:ArrayCollection;
   private var _employee:Employee;

   [Bindable (event="employeeListChanged")]
   public function get employeeList():ArrayCollection{
      return _employeeList;
   }

   [Bindable (event="employeeChanged")]
   public function get employee():Employee{
      return _employee;
   }

   public function saveEmpoyeeList(employees:Array):void {
      _employeeList = new ArrayCollection(employees);
      dispatchEvent(new Event('employeeListChanged'));
   }

   public function selectEmployee(employee:Employee):void {
      _employee = employee;
      dispatchEvent(new Event('employeeChanged'));
   }

   public function deleteEmployee (employee:Employee) : void {
     _employeeList.removeItemAt(_employeeList.getItemIndex(employee));
     selectEmployee(null);
   }

   public function saveEmployee (employee:Employee) : void {
     var dpIndex : int = -1;

    for ( var i : uint = 0; i < employeeList.length; i++ ) {
    // does the the incoming emp_id exist in the list
      if ( employeeList[i].emp_id == employee.emp_id ) {
      // set our ArrayCollection index to that employee position
         dpIndex = i;
      }
    }

   if ( dpIndex >= 0 ) {
      // update the existing employee
      (employeeList.getItemAt(dpIndex) as Employee).copyFrom(employee);
   } else {
      // add the employee to the ArrayCollection
      var tempEmployee:Employee = new Employee();
      tempEmployee.copyFrom(employee);
      employeeList.addItem(tempEmployee);
   }
   // clear out the selected employee
   selectEmployee(null);
  }
 }
}
So far, so good. The array of employees will be passed to the
saveEmployeeList()
function and placed for storage in the employeeList collection. But where’s the link
between the Model and the View?
EmployeeList.mxml, located in the package view, has the fragment shown in Example 1-13.
 [Bindable]
public var employees:ArrayCollection = null;
...
<mx:List id="employees_li" dataProvider="{employees}"
labelFunction="properName" change="updateEmployee()" width="100%" />
And now let’s take a peek at the content of the second mapping
object, called ModelMap.mxml, shown in Example 1-14. It uses Mate’s PropertyInjector object, which “injects” the
value into the variable EmployeeList.employee from EmployeeManager.employeeList (there is one more
PropertyInjector, which is irrelevant
for our discussion).
<?xml version="1.0" encoding="utf-8"?>
<EventMap xmlns:mx="http://www.adobe.com/2006/mxml" xmlns="http://mate.asfusion.com/">
 <mx:Script>
   <![CDATA[
   import com.cafetownsend.business.*;
   import com.cafetownsend.views.*;
   ]]>
</mx:Script>

 <Injectors target="{EmployeeDetail}" >
   <PropertyInjector targetKey="selectedEmployee"
      source="{EmployeeManager}" sourceKey="employee" />
 </Injectors>

 <Injectors target="{EmployeeList}">
   <PropertyInjector targetKey="employees"
      source="{EmployeeManager}" sourceKey="employeeList" />
 </Injectors>
</EventMap>
If you sense a Dependency Injection design pattern, you’re right.
This pattern really helps you create loosely coupled components. Let’s revisit the code fragment of the view shown in Example 1-13. It’s written “assuming” that some outsider object will populate the variable employees. This code does not reach out for another specific component, demanding, “Give me the data!” It waits until someone injects the data.
And this someone is declared in ModelMap.mxml as follows:
<PropertyInjector targetKey="employees"
    source="{EmployeeManager}" sourceKey="employeeList" />
At this point, software developers familiar with Java Spring framework should feel at home. It’s the same concept. Objects never reach out for other object’s data—the plumbing is done in third-party declarative components (XML in Spring and MXML in Mate). The benefits are obvious: components don’t depend on one another. Just write the mapping file like ModelMap.mxml and specify the source and target for the data.
Another benefit is simplified testing—if the real data feed is not
ready, create a mock model object and use it in the PropertyInjector tag. Switching to a real data
model is just a matter of changing a couple of properties in this
injector.
Creators of the Mate version of the Café Townsend application have
decided to use EmployeeParser and EmployeeManager objects, but the Mate framework
does not force you to separate parsing or any other business logic from
the model. In this case, the parser could have injected the data directly
to the View without even performing this loop converting XML into an
array.
In the case of Cairngorm, a view that needs some data would reach
out for the model by making a call like ModelLocator.getModelLocator().employeeList,
which means that the view is tightly coupled with a ModelLocator object.
In the case of Mate injectors, the view waits to receive employeeList without making any remote procedure
calls (RPCs).
Report Card: Mate
Mate is a nonintrusive MXML framework that offers flexible
separation of the application views and processing logic. The
application developers are not forced to do all of their plumbing
exclusively via Mate and are free to use standard Flex event processing
along with the EventMap object
offered by Mate. Because it is tag-based, Flex developers will find it
easy to program with. The learning curves of Mate and Cairngorm are
comparable. Here’s the report card.
The pros are:
Mate is nonintrusive—Mate-specific code can be encapsulated in a handful of objects.
It’s MXML-based and allows you to keep using the Flex event model.
It promotes loose coupling between components by implementing dependency injection.
It’s well documented.
The cons are:
It hasn’t been officially released yet.
It doesn’t support working with Data Management Services offered by LCDS, and because of this you’d need to code this part manually.
As opposed to Cairngorm, using Mate in your application does not require developers to create many additional classes or components just to support the life cycle of the framework itself. This explains why the Mate version of the released Café Townsend SWF is about 10 percent smaller.
Mate promotes loose coupling between components by implementing a Dependency Injection design pattern. But loose coupling comes at a price—all communications in Mate are done via events, which have more overhead compared to direct function calls. Events require additional object instances to be created, as you don’t just call a function on some component, but have to create an instance of some event and dispatch it to that component. The receiving party has to create additional event listeners, which may become a source of memory leaking.
Function calls do not have these issues and offer additional benefit-type checking of arguments and returned values.
Mate also uses singletons, but they do not have to be instantiated
by application developers. Application components are also instantiated
by the framework as per MXML tags included in the EventMap object, which also performs the role
of a class factory with lazy instantiation—if the event that required an
instance of EmployeeManager was never
triggered, the instance is not created. A special Boolean attribute cache on MethodInvoker and ObjectBuilder ensures that the instance will
be garbage-collected.
Currently, Mate offers over 30 MXML tags, but this number can be
increased by application developers. For example, by subclassing Mate’s
AbstractServiceInvoker class, you can
create a new tag that implements a service that’s specific to your
application and can be invoked from EventMap, the same way other services
can.
If your application uses Flex modules, Mate documentation suggests
that you can place EventMap objects
in the main application as well as in modules. But as with any framework
that uses global objects (EventMap in
this case), you can run into conflicts between events defined in the
module’s map and the main application’s map. Of course, if modules are
created to be used with only one application, you can come up with some
naming conventions to ensure that every event has a unique name, but
this may cause issues if you’d like to treat modules as functional black
boxes that can be reused in multiple applications.
Mate does not offer UI controls; it does not include code generators to automate the development process. It does not support automatic data synchronization between the client and the server (LCDS Data Management Service) and would require manual programming in this area.
Mate is the youngest of all frameworks reviewed in this chapter. But even though (at the time of this writing) Mate hasn’t been released yet, it’s well documented.
PureMVC
PureMVC is not Flex but rather an ActionScript (AS) framework. PureMVC concentrates on the task of creating a generic framework for low-level AS objects; Flex comes with “prebuilt suggestions” for how a Model-View-Controller might work—and it offers lots of hooks throughout the data and UI classes that help implement MVC. But because Flex, AIR, and Flash understand this language, PureMVC can be used in any applications built in any of these environments.
Similarly to Cairngorm, PureMVC is built on singletons. The Model, View,
Controller, and Facade classes are singletons. In Cairngorm,
developers need to write code to instantiate each singleton; in PureMVC,
only the Facade class has to be
instantiated in the application code and creation of the Model, View,
and Controller classes is done by the
Facade class itself.
In Cairngorm, you create an application-specific FrontController and register event-command
pairs; in PureMVC, you create a Facade class and
register notification-command pairs
there. With PureMVC, you can execute multiple commands as a reaction to a notification.
Object-oriented programming languages arrange event-driven communication between the objects by implementing the Observer design pattern. An observer object is registered with one or more observable objects that generate notifications to be consumed by the observer.
Cliff Hall, the author of PureMVC, went the same route to ensure
that this framework can be used even in non-Flash environments that don’t
offer flash.events.Event and EventDispatcher classes.
Views are controlled by their mediator objects, which maintain maps of notifications and their observers.
Notifications are a PureMVC implementation of event-driven communication between application components. The author of PureMVC wanted to make this framework portable to other languages; hence standard Flash events are not used in the framework, even though Flex developers still can use regular events to process, say, button clicks.
Although flash.events.Event is
not leveraged by the PureMVC framework, the Notification class has the property
called body typed as Object, which is a place for storing
application-specific data that may need to be carried by a notification
object. In pure ActionScript, you’d have to create a custom event object
providing a placeholder for the custom data (on the other hand, in custom
ActionScript events, the data can be strongly typed as opposed to being
just Objects).
Café Townsend with PureMVC
To better understand this framework, take a walk through the code of Café Townsend that was ported to PureMVC by Michael Ramirez. Please download this application at http://trac.puremvc.org/Demo_AS3_Flex_CafeTownsend.
The data flow between PureMVC components while displaying a list of Café employees is depicted in Figure 1-8.
Your goal remains the same: walk the route that would display the list of Café employees. Figure 1-9 shows the structure of this application in Flash Builder.
The code of the CafeTownsend.mxml application is shown in
Example 1-15. You’ll see a
familiar ViewStack container that
holds employee login, list, and detail views. It declares the variable
facade, which holds the reference to the ApplicationFacade singleton that is created
during initializing the value of this variable. Then the method startup() is called on this ApplicationFacade object inherited from
PureMVC’s Facade class.
<?xml version="1.0"?>
<!-- PureMVC AS3 Demo - Flex CafeTownsend
 Copyright (c) 2007-08 Michael Ramirez <michael.ramirez@puremvc.org>
 Parts Copyright (c) 2005-07 Adobe Systems, Inc.
 Your reuse is governed by the Creative Commons Attribution 3.0 License -->

<mx:Application xmlns:mx="http://www.adobe.com/2006/mxml"
   xmlns:view="org.puremvc.as3.demos.flex.cafetownsend.view.components.*"
   xmlns:mvc="org.puremvc.as3.demos.flex.cafetownsend.*"
   layout="vertical" backgroundColor="#000000"
   creationComplete="facade.startup(this)">

   <mx:Script>
      <![CDATA[
      import org.puremvc.as3.demos.flex.cafetownsend.*;
      private var facade:ApplicationFacade =
                 ApplicationFacade.getInstance();
      ]]>
   </mx:Script>

   <mx:Style source="assets/main.css" />
   <mx:Image source="@Embed('assets/header.jpg')" width="700" />
   <mx:HBox paddingBottom="10" paddingLeft="10" paddingRight="10"
           paddingTop="10" backgroundColor="#ffffff" width="700">
      <mx:VBox width="100%" verticalScrollPolicy="off"
                             paddingRight="10">
         <mx:ViewStack id="vwStack" width="100%" paddingBottom="10"
        paddingTop="10" resizeToContent="true" creationPolicy="all">
            <view:EmployeeLogin id="employeeLogin" />
            <view:EmployeeList id="employeeList" />
            <view:EmployeeDetail id="employeeDetail" />
         </mx:ViewStack>
      </mx:VBox>
   </mx:HBox>
</mx:Application>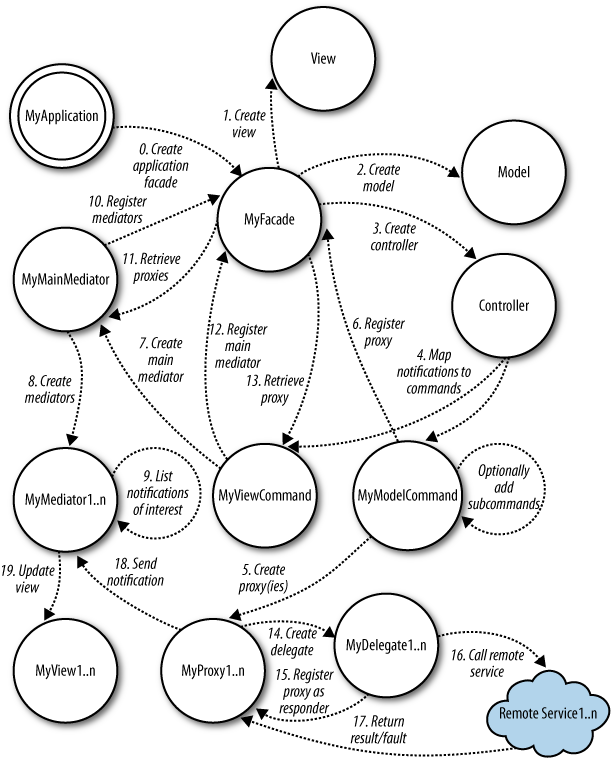

During creation of the Facade instance (see
Example 1-16), PureMVC automatically
initializes the instances of Model,
View, and Controller classes, and if you need to execute
application-specific code during this process, override the appropriate
initialize method.
/* PureMVC AS3 Demo - Flex CafeTownsend
 Copyright (c) 2007-08 Michael Ramirez <michael.ramirez@puremvc.org>
 Parts Copyright (c) 2005-07 Adobe Systems, Inc.
 Your reuse is governed by the Creative Commons Attribution 3.0 License */
package org.puremvc.as3.demos.flex.cafetownsend{
  import org.puremvc.as3.interfaces.*;
  import org.puremvc.as3.patterns.proxy.*;
  import org.puremvc.as3.patterns.facade.*;

  import org.puremvc.as3.demos.flex.cafetownsend.view.*;
  import org.puremvc.as3.demos.flex.cafetownsend.model.*;
  import org.puremvc.as3.demos.flex.cafetownsend.controller.*;

  /**
   * A concrete <code>Facade</code> for the <code>CafeTownsend</code>
     application.
   * The main job of the <code>ApplicationFacade</code> is to act as a single
   * place for mediators, proxies, and commands to access and communicate
   * with each other without having to interact with the Model, View, and
   * Controller classes directly. All this capability it inherits from
   * the PureMVC Facade class.</P>
   * This concrete Facade subclass is also a central place to define
   * notification constants which will be shared among commands, proxies, and
   * mediators, as well as initializing the controller with Command to
   * Notification mappings.</P>
   */
  public class ApplicationFacade extends Facade
  {
  // Notification name constants
  public static const STARTUP:String= "startup";
  public static const SHUTDOWN:String= "shutdown";
  public static const APP_LOGOUT:String= "appLogout";
  public static const APP_LOGIN:String= "appLogin";
  public static const LOAD_EMPLOYEES_SUCCESS:String="loadEmployeesSuccess";
  public static const LOAD_EMPLOYEES_FAILED:String="loadEmployeesFailed";
  public static const VIEW_EMPLOYEE_LOGIN:String= "viewEmployeeLogin";
  public static const VIEW_EMPLOYEE_LIST:String= "viewEmployeeList";
  public static const VIEW_EMPLOYEE_DETAIL:String= "viewEmployeeDetail";
  public static const ADD_EMPLOYEE:String= "addEmployee";
  public static const UPDATE_EMPLOYEE:String= "updateEmployee";
  public static const SAVE_EMPLOYEE:String= "saveEmployee";
  public static const DELETE_EMPLOYEE:String   = "deleteEmployee";
    /**
     * Singleton ApplicationFacade Factory Method
     */
  public static function getInstance() : ApplicationFacade{
      if ( instance == null ) instance = new ApplicationFacade( );
      return instance as ApplicationFacade;
  }
    /**
     * Register Commands with the Controller
     */
  override protected function initializeController( ) : void {
      super.initializeController();
      registerCommand( STARTUP, ApplicationStartupCommand );
  }

  public function startup( app:CafeTownsend ):void{
       sendNotification( STARTUP, app );
    }
  }
}
In Example 1-16, during controller
initialization, the STARTUP notification is registered with the command
class ApplicationStartupCommand. So
far it looks pretty similar to Cairngorm’s FrontController from Example 1-4, doesn’t it?
But PureMVC allows you to invoke more than one command as a
response to a notification. For example, the author of this version of
Café Townsend decided to invoke two commands during the application
startup—ModelPrepCommand and ViewPrepCommand. When your command class
extends MacroCommand, you are allowed
to register a sequence of
subcommands, and the ApplicationStartupCommand looks like Example 1-17.
/* PureMVC AS3 Demo - Flex CafeTownsend
 Copyright (c) 2007-08 Michael Ramirez <michael.ramirez@puremvc.org>
 Parts Copyright (c) 2005-07 Adobe Systems, Inc.
 Your reuse is governed by the Creative Commons Attribution 3.0 License*/
package org.puremvc.as3.demos.flex.cafetownsend.controller
{
  import org.puremvc.as3.patterns.com7mand.*;
  import org.puremvc.as3.interfaces.*;
  /**
   * A MacroCommand executed when the application starts.
   */
  public class ApplicationStartupCommand extends MacroCommand {
    override protected function initializeMacroCommand() :void{
      addSubCommand( ModelPrepCommand );
      addSubCommand( ViewPrepCommand );
    }
  }
}
We’ll follow the model preparation route at this point, but we’ll
get back to ViewPrepCommand in Example 1-22.
After the controller tier that routes commands come the proxy
classes that deal with both—data models and the service calls if need
be. Let’s follow the ModelPrepCommand
(Example 1-18). It registers employee and user
proxy classes with the Facade class, so they know
where to send notifications.
/*PureMVC AS3 Demo - Flex CafeTownsend
 Copyright (c) 2007-08 Michael Ramirez <michael.ramirez@puremvc.org>
 Parts Copyright (c) 2005-07 Adobe Systems, Inc.
 Your reuse is governed by the Creative Commons Attribution 3.0 License */
package org.puremvc.as3.demos.flex.cafetownsend.controller {
  import org.puremvc.as3.interfaces.*;
  import org.puremvc.as3.patterns.command.*;
  import org.puremvc.as3.patterns.observer.*;
  import org.puremvc.as3.demos.flex.cafetownsend.*;
  import org.puremvc.as3.demos.flex.cafetownsend.model.*;
  /**
   * Create and register <code>Proxy</code>s with the <code>Model</code>.
   */
  public class ModelPrepCommand extends SimpleCommand{
    override public function execute( note:INotification ) :void{
     facade.registerProxy(new EmployeeProxy());
     facade.registerProxy(new UserProxy());
    }
  }
}
We are about halfway through the process of getting the employee
list with PureMVC. This time, we’ll just get familiar with a fragment of
the code for the EmployeeProxy class
(Example 1-19).
public class EmployeeProxy extends Proxy implements IResponder {
   public static const NAME:String = "EmployeeProxy";
   public var errorStatus:String;

   public function EmployeeProxy ( data:Object = null ){
      super ( NAME, data );
   }

   public function loadEmployees():void{
   // create a worker who will go get some data; pass it a reference to
  // this proxy so the delegate knows where to return the data
   var delegate : LoadEmployeesDelegate =new LoadEmployeesDelegate(this );

   // make the delegate do some work
   delegate.loadEmployeesService();
  }

   // this is called when the delegate receives a result from the service
   public function result( rpcEvent : Object ) : void{

   // populate the employee list in the proxy with the results
   // from the service call
    data = rpcEvent.result.employees.employee as ArrayCollection;
    sendNotification( ApplicationFacade.LOAD_EMPLOYEES_SUCCESS );
  }

   // this is called when the delegate receives a fault from the service
   public function fault( rpcEvent : Object ) : void {
      data = new ArrayCollection();
    // store an error message in the proxy
    // labels, alerts, etc can bind to this to notify the user of errors
    errorStatus = "Could Not Load Employee List!";
    sendNotification( ApplicationFacade.LOAD_EMPLOYEES_FAILED );
   }
Proxies link the data model with services. The model is
represented by the variable data that’s predefined in the superclass.
The service is available via the delegate class, which in this version
of Café Townsend is called LoadEmployeesDelegate. Because EmployeeProxy implements the IResponder interface, it must include the
methods result() and fault(). In the case of success, the variable
data is populated with the retrieved list of employees and notification
LOAD_EMPLOYEES_SUCCESS is sent to
whoever is interested in hearing about it—you can take a peek at the
method listNotificationInterests() in
Example 1-21. In the case of failure, this
version of Café Townsend just assigns a value to the variable errorStatus and sends the notification
LOAD_EMPLOYEES_FAILED.
As you can see in Example 1-20, the
delegate class to load employees has nothing specific to PureMVC—it just
sets the responder and uses HTTPService to read the file Employees.xml.
 /*
 PureMVC AS3 Demo - Flex CafeTownsend
 Copyright (c) 2007-08 Michael Ramirez <michael.ramirez@puremvc.org>
 Parts Copyright (c) 2005-07 Adobe Systems, Inc.
 Your reuse is governed by the Creative Commons Attribution 3.0 License
 */
package org.puremvc.as3.demos.flex.cafetownsend.model.business
{
   import mx.rpc.AsyncToken;
   import mx.rpc.IResponder;
   import mx.rpc.http.HTTPService;

   public class LoadEmployeesDelegate{
      private var responder : IResponder;
      private var service : HTTPService;

      public function LoadEmployeesDelegate( responder : IResponder ) {
         this.service = new HTTPService();
         this.service.url="assets/Employees.xml";

         // store a reference to the proxy that created this delegate
         this.responder = responder;
      }

      public function loadEmployeesService() : void {
         // call the service
         var token:AsyncToken = service.send();

         // notify this responder when the service call completes
         token.addResponder( responder );
      }
   }
}
Now trace how the employees will arrive to the View. The view tier in PureMVC has two players: the UI component and the mediator class. Chapter 2 discusses the Mediator pattern, but in general, its role is to arrange the communication of two or more components without them knowing about each other. For example, an application container has a shopping cart component and a product list component. When the user makes a selection, the product component sends an event carrying the selected product to the mediator (e.g., an application), which forwards it to the shopping cart component.
But PureMVC mediators play the role of middlemen between the UI
components and proxy objects (not controllers), and the need for these
middlemen is questionable. In our opinion, it would be cleaner to
introduce a value object and pass it directly (in the body of Notification) between the view and its
controller rather than having the mediator reaching out to internals of
both the proxy and the view. But it is what it is, and the EmployeeList view interacts with the EmployeeListMediator, and the latter deals
with the controller’s notifications.
In Example 1-21, note the method
listNotificationInterests(), where
you, the developer, have to list all events this mediator is interested
in (similar to a subscription in messaging). The method handleNotification() will process
notifications when they arrive.
/*
 PureMVC AS3 Demo - Flex CafeTownsend
 Copyright (c) 2007-08 Michael Ramirez <michael.ramirez@puremvc.org>
 Parts Copyright (c) 2005-07 Adobe Systems, Inc.
 Your reuse is governed by the Creative Commons Attribution 3.0 License
 */
package org.puremvc.as3.demos.flex.cafetownsend.view{
   import flash.events.Event;
  import org.puremvc.as3.interfaces.*;
   import org.puremvc.as3.patterns.mediator.Mediator;

  import org.puremvc.as3.demos.flex.cafetownsend.ApplicationFacade;
   import org.puremvc.as3.demos.flex.cafetownsend.view.components.*;
   import org.puremvc.as3.demos.flex.cafetownsend.model.EmployeeProxy;
  /**
   * A Mediator for interacting with the EmployeeList component
   */
 public class EmployeeListMediator extends Mediator{

   public static const NAME:String = "EmployeeListMediator";
   public function EmployeeListMediator( viewComponent:Object ){
    // pass the viewComponent to the superclass where
    // it will be stored in the inherited viewComponent property
    super( NAME, viewComponent );

     employeeProxy = EmployeeProxy( facade.retrieveProxy(
                          EmployeeProxy.NAME ) );

     employeeList.addEventListener( EmployeeList.APP_LOGOUT, logout );
     employeeList.addEventListener( EmployeeList.ADD_EMPLOYEE,
                             addEmployee );
     employeeList.addEventListener( EmployeeList.UPDATE_EMPLOYEE,
                            updateEmployee );
  }
    /**
     * List all notifications this Mediator is interested in.
     * Automatically called by the framework when the mediator
     * is registered with the view.
     * @return Array the list of Notification names
     */
   override public function listNotificationInterests():Array{
      return [ ApplicationFacade.LOAD_EMPLOYEES_SUCCESS,
               ApplicationFacade.LOAD_EMPLOYEES_FAILED ];
  }

    /**
     * Handle all notifications this Mediator is interested in.
     * <P>
     * Called by the framework when a notification is sent that
     * this mediator expressed an interest in when registered
     * (see <code>listNotificationInterests</code>.</P>
     *
     * @param INotification a notification
     */
   override public function handleNotification(note:INotification ):void{
      switch ( note.getName() ) {
       case ApplicationFacade.LOAD_EMPLOYEES_SUCCESS:
          employeeList.employees_li.dataProvider =
                   employeeProxy.employeeListDP;
         break;
        case ApplicationFacade.LOAD_EMPLOYEES_FAILED:
          employeeList.error.text = employeeProxy.errorStatus;
          break;
      }
   }
    /**
     * Cast the viewComponent to its actual type.
     *
     * This is a useful idiom for mediators. The
     * PureMVC Mediator class defines a viewComponent
     * property of type Object. </P>
     *
     * @return EmployeeList the viewComponent cast to EmployeeList
     */
   protected function get employeeList():EmployeeList{
      return viewComponent as EmployeeList;
   }

    private function logout( event:Event = null ):void{
         sendNotification( ApplicationFacade.APP_LOGOUT );
    }

    private function addEmployee( event:Event = null ):void{
         sendNotification( ApplicationFacade.ADD_EMPLOYEE );
    }

    private function updateEmployee( event:Event = null ):void{
      sendNotification( ApplicationFacade.UPDATE_EMPLOYEE,
              employeeList.employees_li.selectedItem);
    }

    private var employeeProxy:EmployeeProxy;
  }
}
The code of handleNotification() directly manipulates the
internals of the view components (e.g., employeeList.employees_li), which leads to
tight coupling between the mediator and the view. If the next version of
the employeeList component will use a
DataGrid instead of the List component, the mediator’s code has to be
refactored, too.
The previous discussion of Example 1-17 did not cover the process of preparing the view for receiving the events. Handling that process is the branch of code originated by the following call:
addSubCommand( ViewPrepCommand );
Shown in Example 1-22, the ViewPrepCommand class registers the main
application mediator (you’d have to write it), and asks the proxy to
load the employee list.
/* PureMVC AS3 Demo - Flex CafeTownsend
 Copyright (c) 2007-08 Michael Ramirez <michael.ramirez@puremvc.org>
 Parts Copyright (c) 2005-07 Adobe Systems, Inc.
 Your reuse is governed by the Creative Commons Attribution 3.0 License
 */
package org.puremvc.as3.demos.flex.cafetownsend.controller{
  import org.puremvc.as3.interfaces.*;
  import org.puremvc.as3.patterns.command.*;
  import org.puremvc.as3.patterns.observer.*;
  import org.puremvc.as3.demos.flex.cafetownsend.*;
  import org.puremvc.as3.demos.flex.cafetownsend.model.*;
  import org.puremvc.as3.demos.flex.cafetownsend.view.ApplicationMediator;
  /**
   * Prepare the View for use.
   * The Notification was sent by the Application, and a reference to that
   * view component was passed on the note body.
   * The ApplicationMediator will be created and registered using this
   * reference. The ApplicationMediator will then register
   * all the Mediators for the components it created.
   */
  public class ViewPrepCommand extends SimpleCommand{
    override public function execute( note:INotification ) :void{
    // Register your ApplicationMediator
    facade.registerMediator( new ApplicationMediator( note.getBody()));

    // Get the EmployeeProxy
    var employeeProxy:EmployeeProxy = facade.retrieveProxy(
                  EmployeeProxy.NAME ) as EmployeeProxy;
    employeeProxy.loadEmployees();

    sendNotification( ApplicationFacade.VIEW_EMPLOYEE_LOGIN );
    }
  }
}
This command class issues a request to load employees without even
waiting for the successful logon of the user. At the end of the execute() method, this code sends the VIEW_EMPLOYEE_LOGIN notification, which
displays the logon view.
For brevity, Example 1-23 does have
most of the comments from the code of ApplicationMediator. It builds all
view components and registers the mediators for each of them.
/* PureMVC AS3 Demo - Flex CafeTownsend
 Copyright (c) 2007-08 Michael Ramirez <michael.ramirez@puremvc.org>
 Parts Copyright (c) 2005-07 Adobe Systems, Inc.
 Your reuse is governed by the Creative Commons Attribution 3.0 License*/
package org.puremvc.as3.demos.flex.cafetownsend.view {
  public class ApplicationMediator extends Mediator{
    public static const NAME:String = "ApplicationMediator";
    public static const EMPLOYEE_LOGIN : Number =   0;
    public static const EMPLOYEE_LIST : Number =   1;
    public static const EMPLOYEE_DETAIL : Number =   2;

    public function ApplicationMediator( viewComponent:Object )
    {
      // pass the viewComponent to the superclass where
      // it will be stored in the inherited viewComponent property
      super( NAME, viewComponent );

      // Create and register Mediators for the Employee
      // components that were instantiated by the mxml application
      facade.registerMediator( new EmployeeDetailMediator(
                         app.employeeDetail ) );
      facade.registerMediator( new EmployeeListMediator(
                          app.employeeList ) );
        facade.registerMediator( new EmployeeLoginMediator(
             app.employeeLogin ) );

      // retrieve and cache a reference to frequently accessed proxys
      employeeProxy = EmployeeProxy( facade.retrieveProxy(
                           EmployeeProxy.NAME ) );
        userProxy = UserProxy( facade.retrieveProxy( UserProxy.NAME ) );
    }

    override public function listNotificationInterests():Array
    {

      return [ ApplicationFacade.VIEW_EMPLOYEE_LOGIN,
                ApplicationFacade.VIEW_EMPLOYEE_LIST,
                ApplicationFacade.VIEW_EMPLOYEE_DETAIL,
                ApplicationFacade.APP_LOGOUT,
                ApplicationFacade.UPDATE_EMPLOYEE
               ];
    }
    /**
     * Handle all notifications this Mediator is interested in.
     */
    override public function handleNotification( note:INotification
                             ):void{
      switch ( note.getName() ){
              case ApplicationFacade.VIEW_EMPLOYEE_LOGIN:
               app.vwStack.selectedIndex = EMPLOYEE_LOGIN;
               break;
            case ApplicationFacade.VIEW_EMPLOYEE_LIST:
               employeeProxy.employee = null;
               app.vwStack.selectedIndex = EMPLOYEE_LIST;
               break;
            case ApplicationFacade.VIEW_EMPLOYEE_DETAIL:
               app.vwStack.selectedIndex = EMPLOYEE_DETAIL;
               break;
            case ApplicationFacade.APP_LOGOUT:
               app.vwStack.selectedIndex = EMPLOYEE_LOGIN;
               break;
            case ApplicationFacade.UPDATE_EMPLOYEE:
               app.vwStack.selectedIndex = EMPLOYEE_DETAIL;
               break;
      }
    }
    /**
     * Cast the viewComponent to its actual type.
     * The PureMVC Mediator class defines a viewComponent
     * property of type Object.
     */
    protected function get app():CafeTownsend{
      return viewComponent as CafeTownsend
    }
      // Cached references to needed proxies
      private var employeeProxy:EmployeeProxy;
      private var userProxy:UserProxy;
  }
}
The ApplicationMediator is also
a central repository of all proxies that know how to get the data
(EmployeeProxy and UserProxy in our case). So the ViewPrepCommand creates an instance of the
ApplicationMediator (which creates
other mediators and proxies to be cached), registers it with the facade,
and asks the facade for a newly created instance of the EmployeeProxy, and calls its loadEmployees() method.
If the EmployeeProxy
successfully retrieves the employee, it triggers the notification
LOAD_EMPLOYEES_SUCCESS, which the
EmployeeMediator processes, putting
the data in the data provider of the EmployeeList (see Example 1-21 earlier):
case ApplicationFacade.LOAD_EMPLOYEES_SUCCESS:
 employeeList.employees_li.dataProvider = employeeProxy.employeeListDP;
The circle is closed. As you can see, the PureMVC way to bring Café Townsend’s employee list is a lot more complicated than the Cairngorm or Mate way.
Still, if you work with an application built on the PureMVC framework, consider using a freeware product by Kap IT called PureMVC Console, available at http://lab.kapit.fr/display/puremvcconsole/PureMVC+Console. This tool comes in handy if you’ve joined a PureMVC project and need to hit the ground running. This console allows you to monitor the internal flow of this framework in real time. The creators of PureMVC Console offer a nice demo of monitoring Café Townsend—check it out at the website.
The MultiCore version of PureMVC supports modular programming where singletons are replaced with so-called Multiton Core actors.
We are having difficulty finding reasons for recommending an architectural framework that requires developers to replace 20 lines of code from Example 1-1 with all the code shown in Examples 1-15 through 1-23 to achieve the same goal: display the list of employees from an XML file in a list control.
Report Card: PureMVC
The author of PureMVC wanted to create a framework that could have been ported to other programming languages, and this approach inadvertently delivers a product that underutilizes benefits offered by language-specific constructs. Because PureMVC was not created specifically for Flex, it doesn’t take advantage of the declarative nature of MXML, which would’ve substantially minimized the amount of handwritten code by application developers. For the same reason, PureMVC doesn’t use standard Flex events and data binding. As an old saying goes, “When in Rome, speak Latin.” It can be rephrased as, “When in Flex, speak MXML and ActionScript.”
The pros are:
It’s well documented.
It supports working with Flex modules.
It’s available for developers who want to use only ActionScript (e.g., Flash programmers). For Flex programmers, though, that can’t be considered a benefit.
The cons are:
It’s not a framework written for Flex, and thus does not use features offered by MXML.
It has too many layers, which are tightly coupled.
It requires staffing projects with more senior developers.
Developers have to write lots of additional classes, which adds to the project timeline.
Its standard version is built on singletons, and application code becomes cluttered by making multiple calls to them.
One of the main Flex selling points is its MXML-to-ActionScript code generator, which spares application developers from manually writing lots of code. PureMVC doesn’t use MXML and forces developers to write more code, which makes them less productive.
PureMVC notifications are more flexible than event maps of Mate,
in that the latter relies on the enabled event bubbling, and if the
EventMap object is not located in the ancestor of the
object that triggers the event, it won’t get it. As a workaround, Mate
offers a special Dispatcher class to
trigger events, say from a pop-up window that is not a descendant of an
Application object. But in PureMVC,
any object can subscribe for any other object’s notifications regardless
of their relations. Also, since the Notification class already has the property
body to carry additional payload,
application developers don’t need to create subclasses for each
notification object.
PureMVC has too many layers, dependencies, and singletons, and as a result has a steeper learning curve than Cairngorm or Mate. Managers on the projects that use PureMVC would need to hire more experienced developers than managers on projects using Mate or Cairngorm.
Note
PureMVC Console is a convenient tool allowing you to monitor the Cairngorm and PureMVC applications; see http://lab.kapit.fr. To monitor the PureMVC version of Café Townsend, click on the image of the Café at http://lab.kapit.fr/display/puremvcconsole/PureMVC+Console.
PureMVC documentation states, “The PureMVC framework has a very narrow main goal: to help you separate your application’s coding concerns into three discrete tiers; Model, View, and Controller.” The framework attempts to achieve this goal by forcing application developers to write a lot of additional ActionScript code.
Unit testing of separate parts of the PureMVC application is nontrivial, because each test case would require additional work to register notifications, mediators, and other objects.
Clear Toolkit
So far, each framework that was reviewed in this chapter is an MVC-based architectural framework. They try to achieve the goal of separating the data flow into different tiers or classes based on the assumption that this would simplify the project management. In Flex project teams, these frameworks help to ensure that the person who creates the view doesn’t need to know where its model is. Why? Is this a real-world situation or an artificial prerequisite that results in additional overhead in your application?
Clear Toolkit is not an architectural framework; it is a set of open source Flex components and utilities that may be called an application framework. As opposed to architectural frameworks, application frameworks don’t just have a goal to organize developer’s code into tiers, but rather offer a set of enhanced classes and methodologies to make application developers more productive. Good examples of application frameworks are Microsoft Foundation Classes, Ruby on Rails, Swing Application Framework (JSR-296), and Powersoft Foundation Classes.
You can download all or some of the Clear Toolkit components at http://sourceforge.net/projects/cleartoolkit/, and see the interface in Figure 1-10.
The main goals of Clear Toolkit are:
To make software developers write less code by offering automatic code generation
To give enterprise developers a set of smart data-driven components (e.g., advanced data grid and form, explained in Chapter ) that would help developers in achieving the first goal—to write less code
The first version of this free and open source toolkit was developed by Farata Systems in 2006. It wasn’t branded as Clear Toolkit back then, but the authors of this book were using these components internally in multiple consulting projects. Two years later, we decided to document these tools so that other Flex developers could also benefit from them.
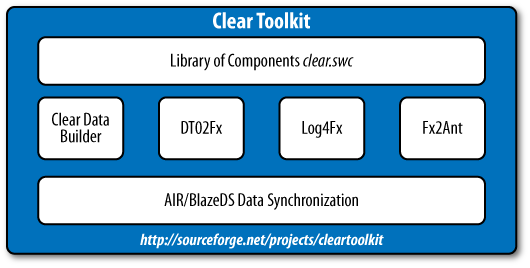
The components library is packaged in a clear.swc file that includes a number of
enhanced Flex components such as Datagrid, ComboBox, et al. Also included are:
- Clear Data Builder
An Eclipse plug-in that can generate CRUD applications for BlazeDS or LCDS based on a SQL statement or a Java data transfer object (DTO)
- DTO2Fx
A utility that automatically generates ActionScript classes based on their Java peers
- Log4Fx
An advanced logger (Eclipse plug-in) that is built on top of the Flex logging API but automates and make the logging process more flexible and user-friendly
- Fx2Ant
A generator of optimized Ant build scripts for Flash Builder projects
Clear Toolkit 3.2.1 includes the following additions:
Flex UI controls to support PDF generation on the client
A data synchronization solution for AIR/BlazeDS applications
Café Townsend with Clear Toolkit
This section demonstrates how to use CDB to generate an application working with Café Townsend employees. In Chapter , you’ll learn how to enhance some of the Flex components and work with those that are already included in clear.swc.
We haven’t included a diagram for the Café application generated
by Clear Data Builder (CDB), because it just uses a DataCollection object with an encapsulated
Flex RemoteObject—no additional
singletons, proxies, commands, or delegates are needed.
Before taking a deep dive into yet another version of Café Townsend, remember that neither Mate nor PureMVC support autosynchronization of the data offered by Data Management Services that are included in LiveCycle Data Services.
Using Employee.xml as a data
source simplifies the explanation of the framework’s basics, but in
real-world situations, more often than not, you need to persist the data
on the server. If you’ve added a new employee, adding a new value object
to an ArrayCollection in memory is
not enough. You need to persist it in a medium that survives computer
reboots and electrical blackouts.
Clear Data Builder offers automatic code generation for both retrieval and persistence of the data, and to illustrate this, we’ll be populating Café Townsend’s employee list not with the data from an XML file but from a MySQL Server employee table stored in DBMS (Figure 1-11).

Installing the software for the CRUD example
At the time of this writing, the latest version of CDB is 3.2.1; it requires Eclipse JEE, which comes with productivity plug-ins for web developers. You can download Eclipse JEE at http://www.eclipse.org/downloads/. Installing Eclipse JEE is just a matter of unzipping the downloaded file to a folder on your hard disk.
Installation of the plug-in version of Flex Builder 3 is also easy. Just go to http://www.adobe.com/products/flex/features/flex_builder/ and select the plug-in version of Flex Builder.
Get a free CDB license at the Clear Toolkit website. The latest CDB installation instructions can be found in the CDB User Guide.
Note
To ensure that you have the latest instructions for installing CDB and running a sample application, we highly recommend that you read the appropriate section of the CDB User Guide.
To generate this version of Café, you’ll also need to download and install three more pieces of software:
The binary edition of Adobe BlazeDS 3.0; unzip it into some folder, for example, C:\blazeds
Apache Tomcat 6 (select Windows Service Installer from the Core Downloads section at http://tomcat.apache.org/download-60.cgi)
In addition, you must create a sample database called test using the SQL script provided in the
accompanying files for this chapter. Create a user called
dba with the password sql and
grant this user full access to the test database.
Note
Important: CDB requires JDK 1.5 or later (note: JDK, not JRE). Select the Eclipse menu Window → Preferences → Java → Installed JREs and point it to your JDK installation directory, as shown in Figure 1-12.
The last preparation step is installing DBMS—we use MySQL
Community Server. During the installation, we’ve entered
dba as a user ID and sql as a
password.
Creating an Eclipse Dynamic Web Project with CDB facets
The first step in creating an Eclipse Dynamic Web Project is to start Eclipse JEE integrated development environment (IDE) and create a new instance of the Tomcat 6 server (File → New → Other → Server). Create a new Dynamic Web Project in Eclipse (File → New → Other → Web → Dynamic Web Project) and name it Café Townsend CDB. Specify the Target Runtime as Apache Tomcat 6.0 in the Dynamic Web Project configuration screen (Figure 1-13).
Note
If you use Eclipse 3.4 or later, click the Modify button in the Configurations section (not shown) and select the checkboxes in the MyFlex section to include MyFlex facets required for proper code generation.
Click the Next button. Select the Clear Data Builder and Flex Web Project facets as shown in Figure 1-14, then click Next.
In the next window, leave unchanged the next screen that suggests RIA_CRUD as a context, WebContent as a content directory, and src as a directory for the Java code; then click Next.
Specify that you are going to use BlazeDS on the server side, and specify the location of your blazeds.war, which in this case is C:\BlazeDS\blazeds.war (Figure 1-15). Click Next.
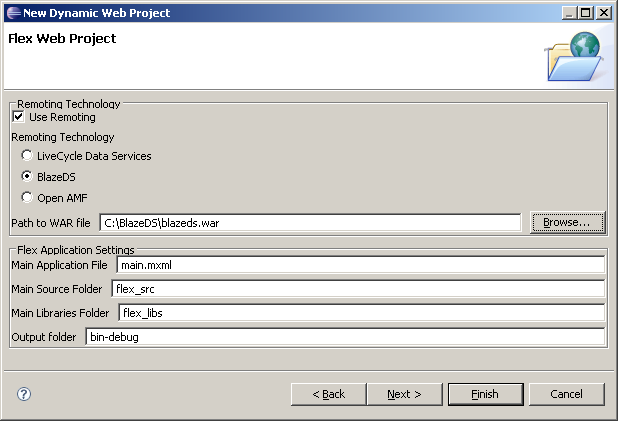
Specify that the application will be deployed under Tomcat, and select and configure the database connection (Figure 1-16). Important: your database server has to be up and running. Select the database DBMS, the driver, specify any name for your connection pool, and enter the URL of your database. By default, MySQL Server runs on port 3306, and the name of our sample database is test.
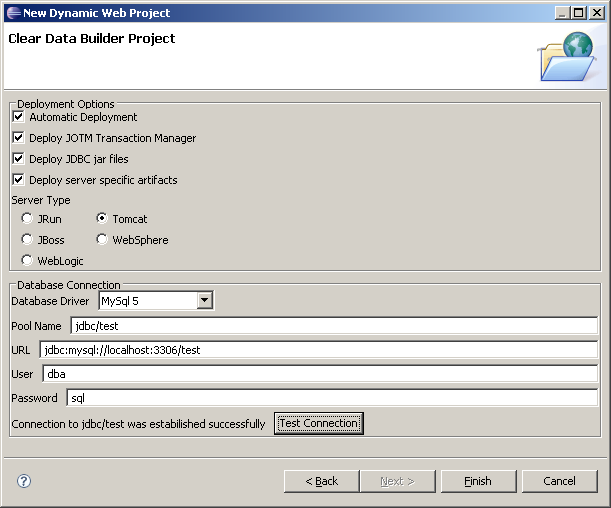
Don’t forget to press the Test Connection button to ensure that there are no problems in that department. If you don’t see a message about successful connection, ensure that you’ve started an instance of MySQL Server and that it runs on the same port specified in the screen shown in Figure 1-16. Also, make sure that the test database exists.
Click the Finish button, and the new Dynamic Web Project will be created. This project will contain both Flex and Java code. The DTO objects were autogenerated by CDB. The resources folder contains special resource files, explained in Chapter . The folder script has SQL scripts required to create a sample test database for various DBMSs (Figure 1-17).
All these goodies were created based on the class Employee.java, explained next.
Now you need to create a small abstract class Employee with defined method signatures that
are to be used for retrieval of the employee data. Right-click on the
folder Java
Resources:src, select New
→ Class, enter the package name
com.farata, and select the abstract
checkbox.
The code of the generated Java class Employee will look like this:
package com.farata;

public abstract class Employee {

}
Specify the data location within CDB. For our Café project, we will add to Employee.java a couple of method signatures, annotated (we use doclets) with SQL statements that will bring the data. We’ll need to specify what table is to be updated and the primary key there. For example, we’ll define where to get the data on employees and departments (see Example 1-24).
package com.farata;
import java.util.List;
/**
 * @daoflex:webservice
 *  pool=jdbc/test
 */
public abstract class Employee{
 /**
 * @daoflex:sql
 * pool=jdbc/test
 * sql=:: select * from employee
 * ::
 * transferType=EmployeeDTO[]
 * keyColumns=emp_id
 * updateTable=employee
 */

 public abstract List getEmployees();
 /**
 * @daoflex:sql
 * sql=:: select * from department
 * ::
 * transferType=DepartmentDTO[]
 */
 public abstract List getDepartments();

}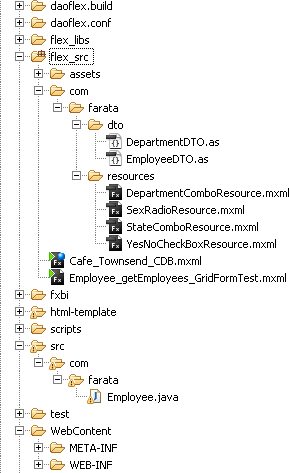
Double colons are used to specify the start and the end of the
SQL statement. CDB can help you with the syntax—just right-click
inside the curly braces in the class Employee, and you’ll see the menu shown in
Figure 1-18.
You can select “Inject SQL sync template” if you need to generate code that can read and update the data, or “Inject SQL fill template” if you are planning to create a read-only application. CDB will insert commented code that will help you write similar code on your own.
Now we can go to Eclipse’s Project menu and select the Clean option, which will start the CDB code generation and build process. The Clean process invokes the Ant build script located under the folder daoflex.build. The only proper outcome of this process is the message BUILD SUCCESSFUL in Eclipse console. If you do not see this message, most likely you’ve done something wrong or in the wrong order.
After this build, the Java DTO and data access classes are generated and deployed in our Tomcat servlet container.
Now run the Ant script daoflex-build.xml located in the daoflex.build directory. You can find the generated Java code in the folder .daoflex-temp\gen. If you don’t see this folder immediately, refresh your Eclipse project.
Technically, you do not need to keep these source files, as they are going to be jarred by the CDB build process and deployed in the lib directory of your servlet container under WEB-INF\lib in the files daoflex-runtime.jar, services-generated.jar, and services-original.jar.
On the client side, CDB has generated the EmployeeDTO.as, which is an ActionScript peer of the generated EmployeeDTO.java.
To deploy the application, add the project Café Townsend CDB to the configured Tomcat server, using the Server view of the Eclipse JEE IDE. Right-click in the Server view on Tomcat Server, select Add or Remove Projects, and add the project Café Townsend CDB to the Configured Projects panel. Start the server by using its right-click menu.
CDB also generates a number of reference client Flex applications, which can be used as the frontend of our Café application. We’ll use the one called Employee_getEmployees_GridFormTest.mxml, which not only creates a data grid, but also generates master/detail support and opens a form view when the user selects and double-clicks on a grid row.
Switch to Flex perspective, copy Employee_getEmployees_GridFormTest.mxml from test/rpc/com/farata/ to flex_src, and set it as the default application (right-click menu).
Create one small MXML file to support population of the Departments drop-down using the function
getDepartments() that we’ve
declared in Employee.java, as shown previously in
Example 1-24.
Programming with resource files will be explained in Chapter . For now, just create a new MXML file called DepartmentComboResource.mxml in the directory flex_src/com/farata/resources (see Example 1-25).
<?xml version="1.0" encoding="utf-8"?>
<resources:ComboBoxResource
   xmlns="com.farata.resources" xmlns:mx="http://www.adobe.com/2006/mxml"
   xmlns:resources="com.theriabook.resources.*"
   width="160"
   dropdownWidth="160"
   destination="com.farata.Employee"
   keyField="DEPT_ID"
   labelField="DEPT_NAME"
   autoFill="true"
   method="getDepartments"
   >
</resources:ComboBoxResource>
Compile and run Employee_getEmployees_GridFormTest.mxml. Figure 1-19 shows the resulting output window.
This window has been automatically generated based on the Java
class Employee shown in Example 1-24. If you select and double-click any row in
this grid, you’ll see details in a form window (Figure 1-20).
A very solid foundation for Café Townsend is ready, and the only code you had to write was shown in Examples 1-24 and 1-25.
Example 1-26 provides the code snippet of the generated Employee_getEmployees_GridFormTest.mxml.
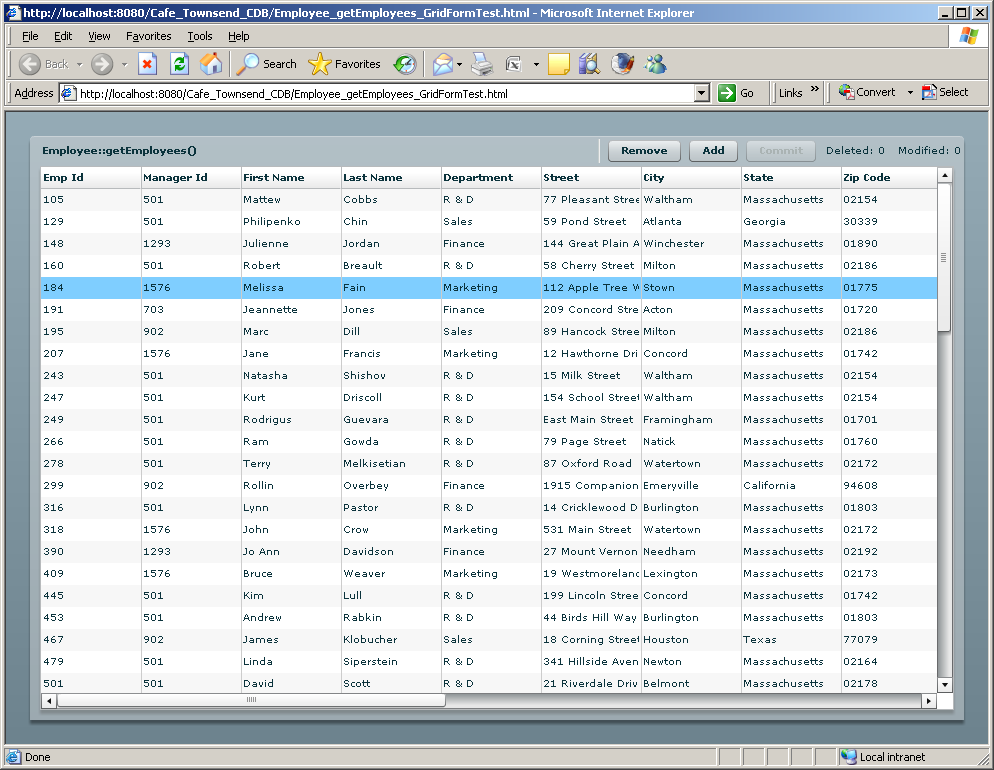
<?xml version="1.0" encoding="UTF-8"?>
<mx:Application xmlns:mx="http://www.adobe.com/2006/mxml"
   xmlns:lib=" http://www.faratasystems.com/2008/components"
         creationComplete="onCreationComplete()">

<mx:ViewStack id="vs" height="100%" width="100%" >
<mx:Canvas height="100%" width="100%">
 <mx:Panel title="Employee::getEmployees()" width="100%"
                           height="100%">
 <lib:DataGrid doubleClick="vs.selectedIndex=1" doubleClickEnabled="true"
     horizontalScrollPolicy="auto" width="100%" id="dg"
     dataProvider="{collection}" editable="true" height="100%">
   <lib:columns>
    <lib:DataGridColumn dataField="EMP_ID" editable="false"
                        headerText="Emp Id"/>
    <lib:DataGridColumn dataField="MANAGER_ID" editable="false"
                        headerText="Manager Id"/>
   <lib:DataGridColumn dataField="EMP_FNAME" editable="false"
                        headerText="First Name"/>
   <lib:DataGridColumn dataField="EMP_LNAME" editable="true"
                         headerText="Last Name"/>
   <lib:DataGridColumn dataField="DEPT_ID" editable="false"
    headerText="Department"
       resource="{com.farata.resources.DepartmentComboResource}"/>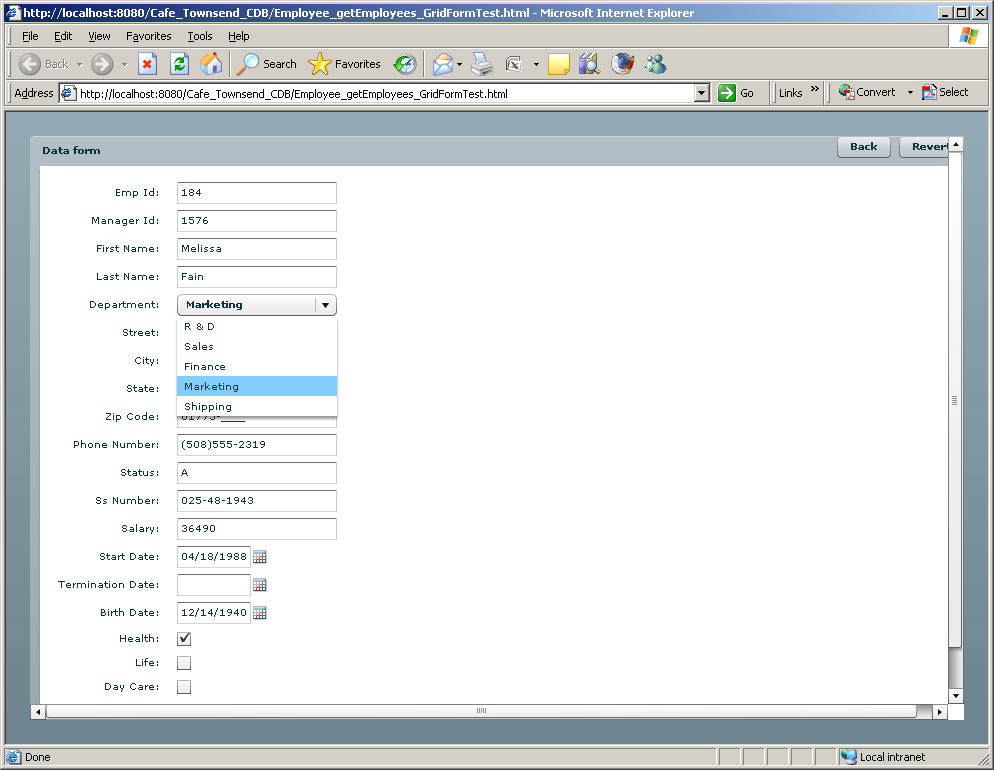
To make some of the columns editable, change the editable attribute of these DataGridColumns to true.
The code in Example 1-26 uses the
DataGrid object from the Clear
Toolkit component library clear.swc. The Department column (and the drop-down in
Figure 1-19) has been
populated by the function getDepartments() declared in Employee.java without the need to do any
additional coding on your part.
The server-side code is deployed under the Tomcat server. While generating this project, CDB has added a library, clear.swc, to the build path. It includes a number of handy components that enhance the standard controls of the Flex framework and a number of classes simplifying communication with the database layer.
The following autogenerated code illustrates another example of
a useful component from clear.swc. It uses a DataCollection object, which is a subclass
of the Flex class ArrayCollection.
You can read more about DataCollection in Chapter 6.
Look at the code in the onCreationComplete() function shown in Example 1-27. DataCollection is a smart,
data-aware class that combines the functionality of Flex’s ArrayCollection and RemoteObject, and some functionality of the
Data Management Services without the need for LCDS. Just set the
values in the DataCollection
properties destination and the
method to call, and call its method
fill() or sync(). No need to define the RemoteObject with result and fault
handlers, as no server-side configuration is required.
<mx:Button label="Fill" click="fill_onClick()"/>
<mx:Button label="Remove" click="collection.removeItemAt(dg.selectedIndex)"
enabled="{dg.selectedIndex != -1}"/>
<mx:Button label="Add" click="addItemAt(Math.max(0,dg.selectedIndex+1)) "/>
<mx:Button label="Commit" click="collection.sync()"
enabled="{collection.commitRequired}"/>
...

   import com.farata.dto.EmployeeDTO;

  Bindable]
   public var collection:DataCollection ;
   [Bindable]
   private var log : ArrayCollection;

   private function onCreationComplete() : void {
      collection = new DataCollection();
      collection.destination="com.farata.Employee";
      collection.method="getEmployees";
      //getEmployees_sync is the default for collection.syncMethod
      log = new ArrayCollection();
      collection.addEventListener( CollectionEvent.COLLECTION_CHANGE,
                                 logEvent);
      collection.addEventListener("fault", logEvent);
      fill_onClick();
   }
   private function fill_onClick():void {
      collection.fill();
   }

   private function addItemAt(position:int):void   {
      var item:EmployeeDTO = new EmployeeDTO();
      collection.addItemAt(item, position);
      dg.selectedIndex = position;
   }

  private function logEvent(evt:Event):void {
      if (evt.type=="fault") {
         logger.error(evt["fault"]["faultString"]);
      } else {
         if (evt.type=="collectionChange") {
            logger.debug(evt["type"] + " " + evt["kind"]);
         } else {
            logger.debug(evt["type"]);
         }
      }
   }
To finalize Café Townsend, we’ll steal (copy) the assets folder from the original Café to display the logo on top, apply the styles defined in main.css, and make just a couple of cosmetic changes:
Remove the
Applicationtag from Example 1-26, moving the declaration of namespaces and thecreationComplete()event to its MXML tagViewStack(you’ll also need to remove three references to the autogenerated variablevsthat was referring to thisViewStack):<mx:ViewStack height="100%" width="100%" xmlns:mx="http://www.adobe.com/2006/mxml" xmlns:lib="http://www.faratasystems.com/2008/components" creationComplete="onCreationComplete()">Create a small application Café_Townsend_CDB to include the styles, the logo, and the main view (see Example 1-28).
<?xml version="1.0" encoding="utf-8" standalone="no"?>
<mx:Application xmlns:mx="http://www.adobe.com/2006/mxml" xmlns:views="*"
                  backgroundColor="#000000" layout="vertical">
   <mx:Style source="assets/main.css"/>
   <mx:Image source="assets/header.jpg" width="700"/>
   <views:Employee_getEmployees_GridFormTest selectedIndex="0"/>
</mx:Application>
Compile and run the application, just to ensure that Café Townsend CDB looks as good as possible (Figure 1-21).
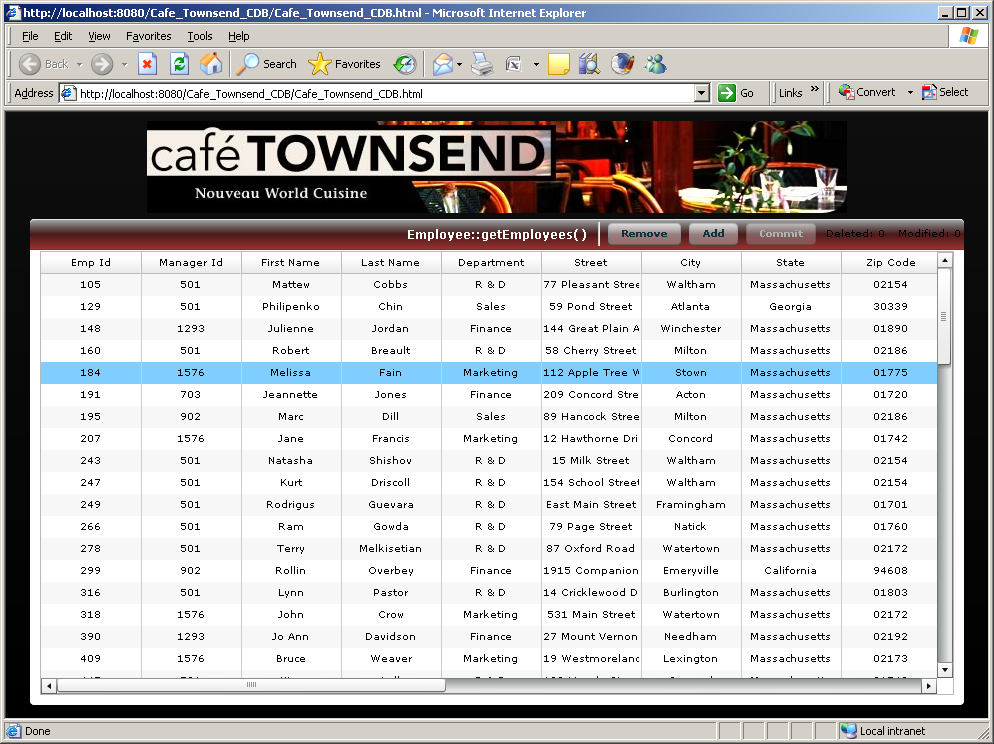
The entire process of creating Café Townsend with Clear Data Builder has been prerecorded, and you can find this screencast in the Demos section at http://www.faratasystems.com.
Report Card: Clear Toolkit
Clear Toolkit is a collection of code generators, methodologies, and smart components. Its components may be used either as an alternative to architectural frameworks or together with them. If you are a development manager starting a Flex project with a team that has at least one senior Flex architect, using Clear Toolkit is the productive way to go.
If you have to deal with a number of junior developers, consider
using the Mate framework with some of the Clear Toolkit components,
e.g., enhanced DataGrid, DataForm, and a number of enhanced UI
controls. Besides, having a good reporter, logger, Ant script, and DTO
generators is quite handy regardless of whether you use architectural
frameworks.
The pros are:
It offers a library of enriched Flex components (supergrid, data-aware components, etc.).
It automatically generates code, which minimizes the amount of code to be written by application developers.
It offers data synchronization functionality in free BlazeDS, similar to Data Management Services from LCDS.
Its components can be used à la carte on an as-needed basis.
It automates creation of Ant build scripts.
It automates creation of ActionScript data transfer objects.
The cons are:
Final Framework Selection Considerations
If you are a Flex architect or a development manager in charge of selecting a third-party Flex framework, ask yourself these questions: “Do I want to use intelligent objects that encapsulate most of the framework functionality, or do I prefer to deal with simple objects and do explicit coding for each instance? Will I have senior developers in the project team? Do I need to modularize the application to be developed? Do I trust code generators?”
After answering these questions, take a detailed look at the implementation of several frameworks, assess the benefits each of them brings to your application, and pick the most appealing one that will give you confidence that it—given the project’s size/nature/deliverables/available human resources—has the least probability of failing.
Always keep in mind that your application may grow and you’ll need to redesign it into modules. Will your selected framework become your friend or foe in a modularized application? In general, if you are going with modules, you need a multilayered framework and intelligent registration services that are written specifically for the task.
Cairngorm, Mate, and PureMVC are architectural frameworks that utilize global objects. These may simplify project management by providing a structure and separating developers’ work on the Model, View, and Controller. All these singletons, managers, and event maps are a way to establish communication between the application parts. By making this process more formal, you can build much smaller chunks, communicating with each other, and in your mind the more formal process will yield better maintainability. On the other hand, it will create more parts in your application that require maintenance and testing.
Clear Toolkit is an application framework that consists of a mix of enhanced components and code generators. Its goal is to make the development process more productive by substantially reducing the need to write code manually.
If the word global gives you goosebumps, but you are uncomfortable with code generators too, consider Joe Berkovitz’s MVCS approach (see References) as a middle ground between the two. This may work better for medium to large teams that would have no access to code generators and data-driven/factories-based architecture.
This book targets enterprise developers whose main concern is data
processing. But there are legions of Flex developers who do not care about
DataGrid and the like. They are into
the creation of small visual components and do not need to use any
application frameworks. For example, if you Google image viewer
Cairngorm, you’ll find an example of a small application to
display images built with this framework. This is clearly overkill and an
example of bad practice, because if you are the only developer working on
a small one-view application, introducing any architectural framework is
plain wrong. For these kinds of applications, all you need is the Flex
framework and possibly one or two self-contained components.
Large projects are different animals. Six months into the project, the functional specification may change. This can happen for a variety of reasons, for example:
The business analyst realizes that she made a mistake.
The business process changes.
Another department needs some of your application’s functionality.
Another line of business has to be handled by your application.
If this happens, commands need to be amended and recoded, views redesigned, and events integrated with a different workflow. Now you are thinking to yourself, “Why didn’t I go with code generators that could’ve made my application more agile?”
Using code generators and components is a way to get you through the “implementation” part faster while giving you maximum flexibility on the “design and functionality” part. If you don’t have 80 percent of your application built in 20 percent of the time, you will be late with the remaining 20 percent.
Flex itself is more of an application framework. It is not a library of patterns, but rather a set of objects that are built to communicate and react. The Flex framework itself uses code generators. The key here is automation of implementation tasks by minimizing the amount of manually written code. That is done by explicitly checking the “related” objects for specific interfaces. By not adhering to the implementation of these interfaces, the external frameworks require serious application development effort to support them.
After rebuilding Café Townsend, we decided to compare the sizes of the produced .swf file. We’ve been using Flex Builder 3’s Project → Export Release Build option with all default settings. These are the results:
| Cairngorm | 409 KB |
| Mate | 368 KB |
| PureMVC | 365 KB |
The total size of the Café Townsend application produced by Clear Toolkit is 654 KB on the client and 30 KB of Java JARs (Java ARchives) deployed on the server. The size is larger, but this application includes full CRUD functionality; Cairngorm, Mate, and PureMVC don’t. And you’ve had to write just a dozen lines of code manually. This is a reasonable size for an application that has full CRUD functionality.
Of course, you can further reduce the size of the business portion of the Café written with any of the frameworks by linking the Flex SDK as an RSL.
When making your selection, consider the benefits you’ll be getting from the framework of your choice. From the learning curve perspective, none of the reviewed frameworks is overly difficult to master. You may spend a day or two with the manuals. But ask yourself, “What will be different in my project development if I use this particular framework?” Are you adding a small library to your project that helps you organize your project better, but still requires you to write a lot of code? Or are you adding a larger library that makes you write less code and be more productive?
Of course we are biased—we created Clear Toolkit to help us develop the types of applications we work on with our business clients, and it serves us well. Before making your final decision on a framework for your application (especially if it’s not as small as Café Townsend), ask yourself one more question: “If three months down the road I realize that I’ve selected the wrong framework, how much time/money would it take to remove it?” The answer to this question may be crucial in the selection process.
If you decide to use one of the architectural frameworks, it doesn’t mean that you can’t throw in a couple of useful components from Clear Toolkit or other libraries mentioned in the following section. You can also find some brief reviews and recommendations of third-party libraries and tools that will make your Flex ecosystem more productive.
References
Due to space constraints, we reviewed only some of the Flex frameworks in this chapter. What other Flex MVC frameworks would we have reviewed if space allowed? We recommend you to take a close look at Swiz and Parsley, which are light MVC frameworks that implement the Inversion of Control design pattern. Here is a comprehensive list of Flex frameworks and component libraries, in alphabetical order:
While analyzing frameworks, fill out the following questionnaire for each candidate:
Will using this framework reduce the time required for development of my project?
Does it offer enhanced Flex components or just help with separation of responsibilities of developers?
Is it well documented?
Is it easy to master for developers that were assigned to this project?
Is technical support available? If yes, is it provided by creators of this framework or is it available via an online community?
If I make the wrong choice, how long will it take to remove this framework from the application code?
Does it support modularized applications?
How long has this framework been around? Has it been released or is it still in beta?
This chapter was a brief comparison of selected frameworks. If you’d like to get a better understanding of how things work in Flex and maybe consider creating your own framework of rich and reusable components, we encourage you to study Chapters 2, , and 6. The authors sincerely hope that after reading this book, you’ll be able to pick the right Flex framework for your project!
Get Enterprise Development with Flex now with the O’Reilly learning platform.
O’Reilly members experience books, live events, courses curated by job role, and more from O’Reilly and nearly 200 top publishers.

