Chapter 4. Developing Web Applications in the Ext JS Framework
In Chapter 3, you became familiar with the JavaScript library jQuery. Now we’ll introduce you to a more complex product: the JavaScript framework Ext JS from Sencha. This is one of the most feature-complete frameworks available on the market, and you should give it serious consideration while deciding on the tooling for your next enterprise HTML5 application.
Exploring JavaScript Frameworks
The word framework implies that there is some precreated “software frame,” and application developers need to fit their business-specific code inside such a frame. Why would you want to do this, as opposed to having full freedom in developing your application code the way you want? The reason is that most enterprise projects are developed by teams of software engineers, and having an agreed-upon structure of the application, with clear separation of software layers, can make the entire process of development more productive.
Some JavaScript frameworks are mainly forcing developers to organize application code in layers by implementing the Model-View-Controller (MVC) design pattern. More than a dozen MVC JavaScript frameworks are being used by professional developers: Backbone.js, ExtJS, AngularJS, Ember.js, and Knockout, just to name a few.
Note
Ext JS also supports MVC, and you can read about it later in this chapter in Best Practice: MVC.
Tip
An excellent website called TodoMVC shows examples of implementing one application (a Todo list) by using various popular frameworks. Studying the source code of this application implemented in several frameworks can help you select one for your project.
Note
To keep the size of this book manageable, we were not able to review more JavaScript frameworks. But if you’d ask us to name one more great JavaScript framework that didn’t make it into this book, we would recommend that you learn AngularJS from Google. There are lots of free online resources on AngularJS that Jeff Cunningham has collected all in one place on GitHub.
Besides splitting the code into tiers, frameworks might offer prefabricated UI components and build tools. Ext JS is one of those frameworks.
Note
If you decide to develop your application with Ext JS, you don’t need to use the jQuery library.
Choosing to Use Ext JS
After learning how the jQuery library can simplify development of HTML5 applications, you might be wondering what’s so good about Ext JS that makes it worthwhile for studying. First, jQuery Core is just a library of utilities that simplify working with the Document Object Model (DOM), and you still need to write the web application by using HTML and JavaScript. In addition, there are lots and lots of jQuery plug-ins that include handy widgets to add to your manually created website. We just mentioned the frameworks that help with better organizing or modularizing your project, but enterprise applications might need more. So here comes the Ext JS sales pitch:
-
Ext JS is an HTML5 framework that doesn’t require you to write HTML. Your single HTML file (index.html) will include just three files in the
<head>section: one with the Ext JS framework, one CSS file, and one app.js, but the<body>section will be empty. - Ext JS includes a comprehensive library of JavaScript-based classes that can help you with pretty much everything you need to develop a web application (UI components, UI layouts, collections, networking, CSS compiler, packaging tool, and more).
-
Ext JS offers a way to write object-oriented code (for those who like it), to define classes and inheritance in a way that’s closer to classical inheritance and doesn’t require the
prototypeproperty. - Ext JS can jump-start your application development by generating the initial code layered according to the MVC design pattern.
- Ext JS is a cross-browser framework that promises to automatically take care of all differences in major web browsers.
If you just finished reading Chapter 3, you’ll need to switch to a different state of mind. The jQuery Core library was light; it didn’t drastically change the way of developing pure HTML/JavaScript applications. But working with Ext JS is a completely different ball game. It’s not about improving an existing web page; it’s about rewriting it from scratch without using HTML. Ext JS includes a rich library of UI components, a flexible class system, custom layouts, and code generators. But web browsers understand only HTML, DOM, CSS, and JavaScript. This means that the framework will have to do some extra work in converting the code written using the homemade Ext JS class system into the same old HTML objects. Such extra work requires additional processing time, and we’ll discuss this in Exploring a Component’s Life Cycle.
The title clearly states that this chapter is about the Ext JS framework. Providing detailed coverage of Ext JS in one chapter is almost mission impossible because of the vast variety of features this framework offers. Consider this chapter a hands-on overview of Ext JS. The material in this chapter is divided into two parts:
- You’ll get a high-level overview of the Ext JS framework.
- We’ll do a code review of a new version of the Save The Child application developed with Ext JS. This is where we want you to spend most of the time in this chapter. Learn while studying commented code. We’ve also provided multiple links to the relevant product documentation.
Downloading and Installing Ext JS
First, you need to know that Ext JS can be used for free only for noncommercial projects. To use Ext JS for enterprise web development, you or your firm has to purchase one of the Ext JS licenses. But for studying, you can download the complete commercial version of Ext JS for free for a 45-day evaluation period.
Note
The materials presented in this chapter were tested only with the current version of Ext JS, which at the time of this writing was 4.2.
After downloading the Ext JS framework, unzip it to any directory of your choice. Later the framework will be copied either into your project directory (see Generating Applications with the Sencha CMD Tool) or in the document root of your web server.
After unzipping the Ext JS distribution, you’ll find some files and folders there. There are several JavaScript files containing various packages of the Ext JS framework. You’ll need to pick just one of these files. The files that include the word all in their names contain the entire framework, and if you choose one of them, all the classes will be loaded to the user’s browser even though your application may never use most of them.
- ext-all.js
- Minimized version of the source code of Ext JS, which looks like one line of 1.4 million characters (it’s still JavaScript, of course). Most likely you won’t deploy this file on your production server.
- ext-all-debug.js
- Human-readable source code of Ext JS with no comments. If you like to read comments, use ext-all-debug-w-comments.js.
- ext-all-dev.js
-
Human-readable source code of Ext JS that includes
console.log()statements that generate and output debugging information in the browser’s console.
Similarly, there are files that don’t include all in their names: ext.js, ext-debug.js, and ext-dev.js. These are much smaller files that do not include the entire framework, but rather a minimum set of classes required to start the application. Later, the additional classes may be lazy-loaded on an as-needed basis.
Note
Typically, you shouldn’t use the all files. We recommend that you use the file ext.js and the Sencha CMD tool to create a customized version of the Ext JS library to be included with your application. You can find more details in Generating Applications with the Sencha CMD Tool.
The docs folder contains extensive documentation; just open the file index.html in your browser and start reading and studying.
The builds folder includes sandboxed versions of Ext JS in case you need to use, say, Ext JS 4.2 along with older versions of this framework. Browsing the builds folder reveals that the Ext JS framework consists of three parts:
- Ext Core
- A free-to-use JavaScript library for enhancing websites. It supports DOM manipulation with CSS selectors, events, and Ajax requests. It also offers syntax to define and create classes that can extend from one another. The functionality of Ext Core is comparable to Core jQuery.
- Ext JS
- A UI framework that includes a rich library of UI components.
- The Foundation
- A set of useful utilities.
Such code separation allowed the creators of Ext JS to reuse a large portion of the framework’s code in the mobile library Sencha Touch, which we cover in Chapter 12.
Note
The Ext JS framework is large, so be prepared for your application to be at least 1 MB in size. This is not an issue for enterprise applications that run on fast networks. But if you need to create a small consumer-oriented website, you might be better off using the lightweight, easy-to-learn, and free jQuery library or one of a dozen other JavaScript frameworks that either improve organizational structure of your project or offer a set of a la cart components to prettify your HTML5 application. On the other hand, if you have had a chance to develop or use rich Internet applications developed with such frameworks as Microsoft Silverlight or Apache Flex, you’ll quickly realize that Ext JS is the closest in terms of functionality, with its rich set of components and tools.
Becoming Familiar with Ext JS and Tooling
This section is not an Ext JS tutorial that gradually explains each and every feature and API of Ext JS. For that, we’d need to write a fat Ext JS book. Sencha publishes detailed documentation, multiple online examples, and videos. In this chapter, you’ll get an overview of the framework.
Creating the First Version of Hello World
Before we explain how things work in Ext JS, we’ll develop a Hello World application. Later, you’ll review the code of the Save The Child application as a hands-on way of learning the framework. You’ll read the code fragments followed by brief explanations. You’ll be able to run and debug this application on your own computer and see how various components and program layers work in practice. But first things first—let’s create a couple of versions of Hello World.
Create a new directory (for example, hello1). Inside hello1 create a subdirectory named ext and copy there the entire content of your Ext JS installation directory. Create yet another subdirectory named app inside hello1—this is where your application JavaScript files will go.
At a very minimum, every Ext JS application will contain one HTML and one JavaScript file—usually index.html and app.js. The file index.html will include the references to the CSS and JavaScript code of Ext JS and will include your app.js containing the code of the Hello World application:
<!DOCTYPE HTML><html><head><metacharset="UTF-8"><title>HelloWorld</title><linkrel="stylesheet"href="ext/resources/ext-all-gray.css"><scriptsrc="ext/ext.js"></script><scriptsrc="app/app.js"></script></head><body></body></html>
Next comes the content of app.js that you should place in the app directory of your project. This is what app.js might look like:
Ext.application({launch:function(){alert("Hello World");}});
This Ext.application() method gets a configuration object as an argument—a JavaScript literal—with a configured launch method that’s called automatically when the web page has completely loaded. In our case, this object literal mandates launching the anonymous function that displays the “Hello World” message. In Ext JS, you’ll be using such configuration objects a lot.
Open the file index.html in your web browser and you’ll see this greeting. But this was a plain vanilla Hello World. In the next section, we’ll automate the process of creating a fancier Hello World (or the initial version of any other application) by using the Sencha CMD tool.
In the next section, we’ll automate the process of creating the Hello World application.
Generating Applications with the Sencha CMD Tool
Sencha CMD is a handy command-line tool that automates your work, from scaffolding your application to minimizing, packaging, and deploying it.
Download Sencha CMD. Run the installer, and when it’s complete, open the terminal or command window and enter the command sencha. You should see a prompt with all possible commands and options that CMD understands.
For example, to generate the initial project structure for the Hello World application, enter the following command, specifying the absolute path to your Ext JS SDK directory (we keep it in the /Library directory) and to the output folder, where the generated project should reside:
sencha -sdk /Library/ext-4.2 generate app HelloWorld /Users/yfain11/hello
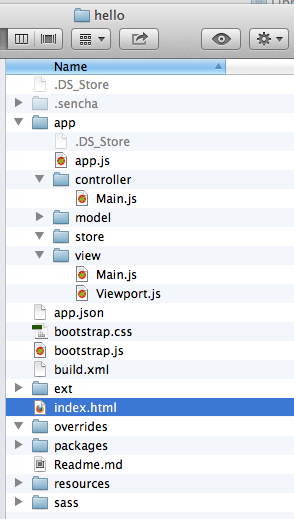
After the code generation is complete, you’ll see the folder hello with the structure shown in Figure 4-1.
The generated project is created with the assumption that your application will be built using the MVC paradigm discussed in Best Practice: MVC. The JavaScript is located in the app folder, which includes the view subfolder with the visual portion of your application, the controller folder with controller classes, and the model folder for data. The ext folder contains multiple distributions of the Ext JS framework. The sass folder contains your application’s CSS files (see SASS and CSS).
The entry point to your application is index.html, which contains the references to the main application file app.js, the Ext JS framework extdev-js, the CSS file bootstrap.css (imports the classic theme), and the supporting script bootstrap.js, which contains the mapping of the long names of the framework and application classes to their shorter names (xtypes). Here’s how the generated index.html file looks:
<!DOCTYPE HTML><html><head><metacharset="UTF-8"><title>HelloWorld</title><!-- <x-compile> --><!-- <x-bootstrap> --><linkrel="stylesheet"href="bootstrap.css"><scriptsrc="ext/ext-dev.js"></script><scriptsrc="bootstrap.js"></script><!-- </x-bootstrap> --><scriptsrc="app/app.js"></script><!-- </x-compile> --></head><body></body></html>
The content of the generated app.js is shown next. This script just calls the method Ext.application(), passing as an argument a configuration object that specifies the application name, and the names of the classes that play roles of views and controller. We’ll go into details a bit later, but at this point let’s concentrate on the big picture:
Ext.application({name:'HelloWorld',views:['Main','Viewport'],controllers:['Main'],autoCreateViewport:true});
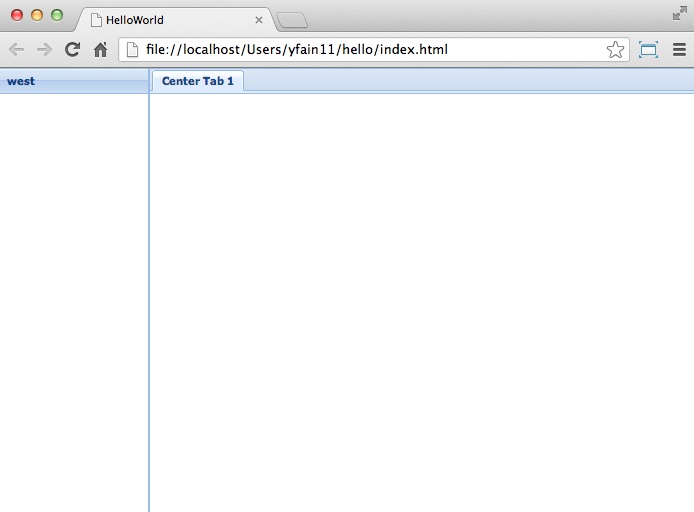
Finally, if you open index.html in your web browser, you’ll see our Hello World initial web page that looks like Figure 4-2. This view uses a so-called border layout and shows a panel on the west and a tabpanel in the central region of the view.
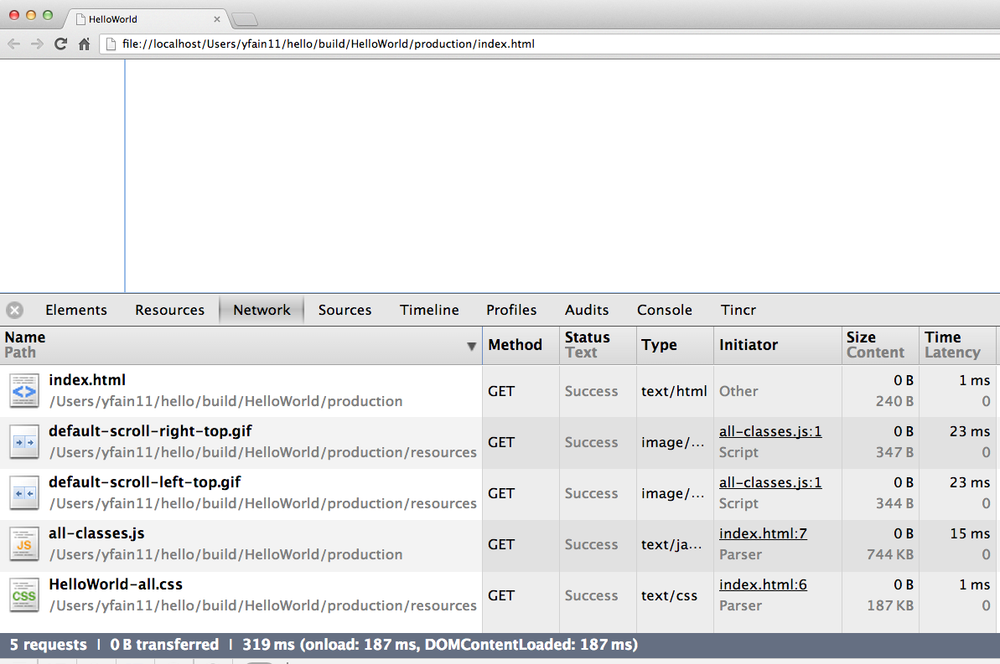
The total size of this version of the Hello World application is pretty large: 4 MB. The browser makes 173 requests to the server by the time the user sees the application shown in Figure 4-2. But Sencha CMD knows how to build the production version of the Ext JS application. It minimizes and merges the application’s and required framework’s JavaScript code into one file. The application’s CSS file is also minimized, and the references to the image resources become relative, hence shorter. Besides, the images may be automatically sliced—cut into smaller rectangular pieces that can be downloaded by the browser simultaneously.
To create an optimized version of your application, go to the terminal or a command window and change to the root directory of your application (in our case, it’s /Users/yfain11/hello) and run the following command:
sencha app build
After the build is finished, you’ll see a newly generated version of the application in the directory build/HelloWorld/production. Open the file index.html while running Chrome Developer Tools, and you’ll see that the total size of the application is substantially lower (about 900 KB) and that the browser had to make only five requests to the server (see Figure 4-3). Using Gzip will reduce the size of this application to 600 KB, which is still a lot, but the Ext JS framework is not the right choice for writing Hello World types of applications or light websites.
For more details about code generation, refer to the section Using Sencha Cmd with Ext JS in the product documentation.
Tip
Sencha Desktop Packager allows you to take an existing Ext JS web application (or any other HTML5 application) and package it as a native desktop application for Windows and Mac OS X. Your application can also integrate with native menus and file dialog boxes and access the filesystem.
We’ll use the Sencha CMD tool again in Building a production version of Save The Child to create an optimized version of the Save The Child application.
Tip
Sencha CMD comes with an embedded web server. To start the server on the default port 1841, open the terminal or command window in your application directory and run the command sencha web start. To serve your web application on another port (for example, 8080) and from any directory, run it as follows: sencha fs web -port8080 start -map /path/to/app/docrootdir.
If your organization is developing web applications with Ext JS without using Sencha CMD, it’s a mistake. Sencha CMD is a useful code generator and optimizer that also enforces the MVC principles of application design.
Choosing Which Ext JS Distribution to Use
First, you need to select the packaging of the Ext JS framework that fits your needs. You can select its minimized version to be used in production or a larger and commented version with detailed comments and error messages. As we mentioned earlier in this chapter, you can select a version of Ext JS that includes either all or only the core classes. The third option is to create a custom build of Ext JS that includes only those framework classes that are used by your application.
The files with the minimized production version of Ext JS are called ext-all.js (all classes) and ext.js (just the core classes plus the loader of required classes). We usually pick ext-all.js for development, but for production use the distribution fine-tuned for our application, as described in Generating Applications with the Sencha CMD Tool.
If this application will be used on high-speed networks and size is not an issue, simply add it to your index.html from your local servers or see if Sencha offers the CDN for the Ext JS version you need, which might look similar to the following:
<linkrel="http://cdn.sencha.io/ext-4.2.0-gpl/resources/css/ext-all.css"/><scripttype="text/javascript"charset="utf-8"src="http://cdn.sencha.io/ext-4.2.0-gpl/ext.js"></script>
Declaring, Loading, and Instantiating Classes
Pure JavaScript doesn’t have classes; constructor functions are the closest components it has to classes-language elements. Ext JS extends the JavaScript language and introduces classes and a special way to define and instantiate them with the functions Ext.define() and Ext.create(). Ext JS also allows us to extend one class from another by using the property extend and to define class constructors by using the property constructor. With Ext.define(), you declare a class declaration, and Ext.create() instantiates it. Basically, define() serves as a template for creating one or more instances.
Usually, the first argument you specify to define() is a fully qualified class name, and the second argument is an object literal that contains the class definition. If you use null as the first argument, Ext JS creates an anonymous class.
The next class Header has a 200-pixel height, uses the hbox layout, has a custom config property logo, and extends Ext.panel.Panel:
Ext.define("SSC.view.Header",{extend:'Ext.panel.Panel',title:'Test',height:200,renderTo:'content',
config:{logo:'sony_main.png'
},layout:{type:'hbox',align:'middle'}});
You can optionally include a third argument for define(), which is a function to be called when the class definition is created. Now you can create one or more instances of the class. For example:
varmyHeader=Ext.create("SSC.view.Header");
The values of custom config properties from the config{} section of the class can be reassigned during the class instantiation. For example, the next code snippet will print sony.png for the first instance of the header, and sony_small.png for the second one. Please note that Ext JS automatically generates getters and setters for all config properties, which allows us to use the method getLogo():
Ext.onReady(function(){varmyHeader1=Ext.create("SSC.view.Header");//varmyHeader2=Ext.create("SSC.view.Header",{logo:'sony_small.png'});console.log(myHeader1.getLogo());console.log(myHeader2.getLogo());});
Tip
Don’t forget about the online tool JSFiddle, which allows you to test and share JavaScript code snippets. JSFiddle knows about Ext JS 4.2 already. For example, you can run the preceding code snippet by following this JSFiddle link. If it doesn’t render the styles properly, check the URL of ext-all.css in the section External Resources.
If a class has dependencies on other classes that must be preloaded, use the requires parameter. For example, the next code snippet shows that the class SSC.view.Viewport requires the Panel and the Column classes. So the Ext JS loader will check whether Panel and/or Column are loaded yet and will dynamically lazy-load them first (see Example 4-1).
Ext.define('SSC.view.Viewport',{extend:'Ext.container.Viewport',requires:['Ext.tab.Panel','Ext.layout.container.Column']// the rest of the class definition is omitted});
Ext.create() is a preferred way of instantiation because it does more than the new operator that is also allowed in Ext JS. But Ext.create() can perform additional functionality—for example, if Ext.Loader is enabled, create() will attempt to synchronously load dependencies (if you haven’t used the option require). But with requires, you preload all dependencies asynchronously in parallel, which is a preferred way of specifying dependencies. Besides, the async mode allows loading from different domains, whereas sync loading doesn’t.
Tip
Ed Spencer published some useful recommendations on improving performance of Ext JS applications in his blog titled SenchaCon 2013: Ext JS Performance Tips.
For each class, Ext JS creates one instance of the special class Ext.Class, which will be shared by all objects instantiated from this class.
Tip
The instance of any object has access to its class via the special variable self.
Prior to creating a class, Ext JS will run some preprocessors and some postprocessors based on the class definition. For example, the class SSC.view.Viewport from the preceding code sample uses extend: 'Ext.container.Viewport', which will engage the extend preprocessor that will do some background work to properly build a subclass of extend: Viewport. If your class includes the config section, the config preprocessor will be engaged.
xtype: An efficient way to create class instances
One of the interesting preprocessors is xtype, which is an alternative to the invocation of the create() method for creating the instance of the class. Every Ext JS component has an assigned and documented xtype. For example, Ext.panel.Panel has an xtype of panel. Online documentation displays the name of the corresponding xtype in the header of each component, as shown in Figure 4-4.
Using xtype instead of create() leads to more-efficient memory management. If the object is declared with the xtype attribute, it won’t be instantiated until a container uses it. You are encouraged to assign xtype to your custom classes, and Ext JS will instantiate if for you without the need to call create(). You can find many examples of using the xtype property in Developing Save The Child with Ext JS later in this chapter. For example, the following class definition includes many components with the xtype property:
Ext.define("SSC.view.LoginBox",{extend:'Ext.Container',xtype:'loginbox',layout:'hbox',items:[{xtype:'container',flex:1},{xtype:'textfield',emptyText:'username',name:'username',hidden:true},{xtype:'textfield',emptyText:'password',inputType:'password',name:'password',hidden:true},{xtype:'button',text:'Login',action:'login'}]});
Most of these components use the standard Ext JS xtype values, so the fact that you have included them in the class SSC.view.LoginBox is a command for Ext JS to instantiate all these buttons and text fields.
But the class SSC.view.LoginBox also includes xtype: 'loginbox'—we decided to assign the value loginbox to serve as the xtype of our class. Now, you can use the statement xtype: 'loginbox' in any other container, and it will know how to instantiate it. For example, later in this chapter, you’ll see the complete code of the main window SSC.view.ViewPort, which includes (and instantiates) our login box as shown in Example 4-2.
Supporting multiple inheritance by uisng mixins
The object-oriented languages Java and C# can be considered simpler versions of C++. One of the C++ features that didn’t make it into Java and C# was support of multiple inheritance: in these languages, a class can extend only one other class. This was done for a good reason: debugging of the C++ programs that were written with multiple inheritance was difficult.
Ext JS supports multiple inheritance via JavaScript mixins. A class constructor can get any object as an argument, and Ext JS will use its property values to initialize the corresponding properties defined in the class, if they exist, and the rest of the properties will be created on the fly. The following code snippet shows how to define a classB that will have features defined in the classes classA, classC, and classD:
Ext.define("MyApp.classB",{extend:"MyApp.classA",mixins:{classC:"MyApp.classC"classD,"MyApp.classD"}}// The rest of the classB code goes here});
Warning
If more than one mixin has a method with the same name, the first method that was applied to the resulting class wins. To avoid collisions, Ext JS allows you to provide the fully qualified name of the method—for example, this.mixins.classC.conflictingName(); this.mixins.classD.conflictingName();.
Best Practice: MVC
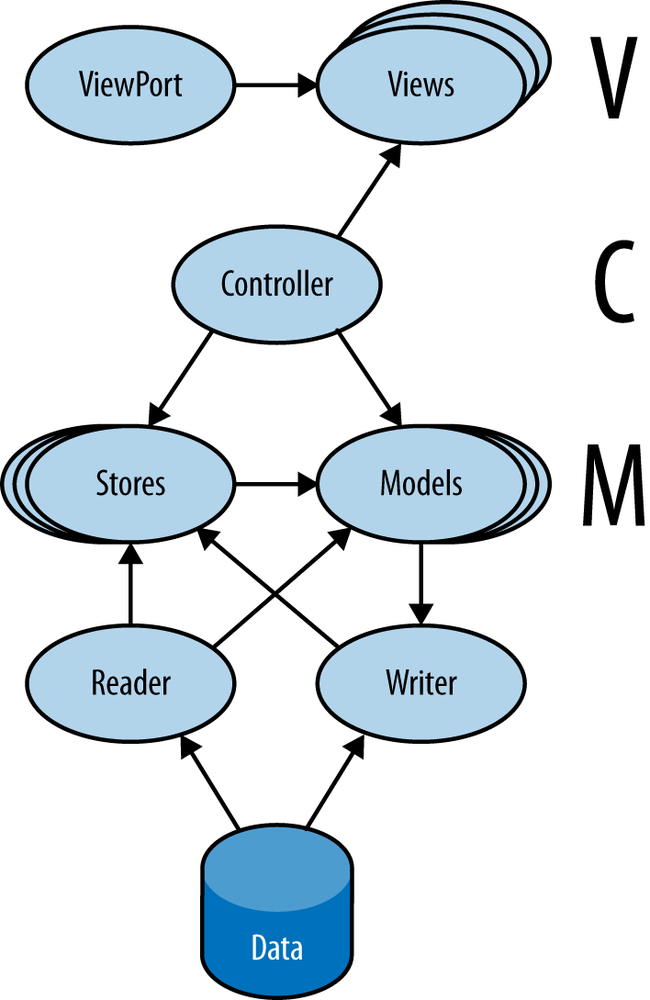
Even though Ext JS doesn’t force you to architect your application based on the MVC paradigm, it’s a really good idea to do so. Earlier in Generating Applications with the Sencha CMD Tool, you saw how this tool generates a project, which separates model, views, controllers, and stores into separate directories (as shown earlier in Figure 4-1, which depicted the structure of the Hello World project). But later in this chapter, we’ll build our Save The Child application the same way. Figure 4-5 presents a diagram illustrating the Ext JS application that contains all Model-View-Controller tiers.
The MVC tier comprises the following:
- Controller
- An object that serves as an intermediary between the data and the views. The data has arrived at your application, and the controller has to notify the appropriate view. The user changed the data on the view, and the controller should pass the changes to the model (or stores, in the Ext JS world). The controller is the place to write event listeners’ reaction to some important events of your application (for example, a user clicked a button). In other words, the controller maps the events to actions to be performed on the data or the view.
- View
- A certain portion of the UI that the user sees. The view is populated with the data from the model (or stores).
- Model
- Represents some business entity (for example, Donor, Campaign, Customer, or Order). In Ext JS, models are accessed via stores.
- Store
- Contains one or more model instances. Typically, a model is a separate class that is instantiated by the store object, but in simple cases, a store can have the model data embedded in its own class. A store can use more than one model if need be. Both stores and model can communicate with the data feed that in a web application is usually provided by a server-side data feed.
The application object defines its controllers, views, models, and stores. When Save The Child is ready, the code of its app.js will look as follows:
Ext.application({name:'SSC',views:['CampaignsMap','DonateForm','DonorsPanel','Header','LoginBox','VideoPanel','Viewport'],stores:['Campaigns','Donors'],controllers:['Donate']});
This code is clean and simple to read/write and helps Ext JS to generate additional code required for wiring views, models, controllers, and stores together. There is no explicit models section, because in our implementation, the models were defined inside the stores. For better understanding of the rest of this chapter, you should read the MVC Architecture section from the Ext JS documentation. We don’t want to repeat the content of the Sencha product documentation, but rather will be giving you brief descriptions while reviewing the Save The Child application.
Models and stores
When you create a class to be served as a model, it must be a subclass of Ext.data.Model. A model has the fields property. For example, you can represent a Donor entity by using just two fields—name and location:
Ext.define('HR.model.Donor',{extend:'Ext.data.Model',requires:['Ext.data.Types'],fields:[{name:'donors',type:Ext.data.Types.INT},{name:'location',type:Ext.data.Types.STRING}]});
Think of an instance of a model as one record representing a business entity—for example, Donor. Ext JS generates getters and setters for models, so if an instance of the model is represented by the variable sscDonor, you can set or get its value as follows:
sscDonor.set('name','Farata Systems');vardonorName=sscDonor.get('name');
A store in Ext JS holds a collection of instances of a model. For example, if your application has retrieved the information about 10 donors, it will be represented in Ext JS as a collection of 10 instances of the class Donor. A custom store in your application has to extend from the class Ext.data.Store.
If you need to quickly create a mock store for testing purposes, you can declare a store with inline data that you can specify using the config option data. The next code sample shows a declaration of the store for providing information about the donors as inline data:
Ext.define('SSC.store.Donors',{extend:'Ext.data.Store',fields:[{name:'donors',type:'int'},{name:'location',type:'string'}],data:[{donors:48,location:'Chicago, IL'},{donors:60,location:'New York, NY'},{donors:90,location:'Dallas, TX'}]});
It’s a good idea to have a mock store with the test data located right on your computer. This way, you won’t depend on the readiness and availability of the server-side data. But usually, a store makes an Ajax call to a server and retrieves the data via the object Ext.data.reader.Reader or one of its descendants. For example:
Ext.define('SSC.store.Donors',{extend:'Ext.data.Store',model:'SSC.model.Donor',
proxy:{
type:'ajax',url:'donors.json',
reader:{
type:'json'}}});

The model
SSC.model.Donorhas to be described in your application as a separate class and contain only the fields defined, no data.
Unless you need to load some raw data from a third-party server provider, wrap your reader into a Proxy object. Server proxies are used for implementing create, read, update, and destroy (CRUD) operations and include the corresponding methods
create(),read(),update(), anddestroy().
For the mockup mode, we use a JavaScript Object Notation (JSON)–formated file that contains an array of object literals (each object represents one donor). The donors.json file should look like the content of the
dataattribute in the code ofSSC.store.Donors.
The
Readerobject will consume JSON. Read the Ext JS documentation to decide how to properly configure your JSON reader. The reader knows how to convert the data into the model.
Populating a store with external data is usually done via a Proxy object, and Ext JS offers several server-side proxies: Ajax, JsonP, Rest, and Direct. To retrieve the data from the server, you call the method load() on your Store object. To send the data to the server, call the method sync().
The most frequently used proxy is Ajax, which uses XMLHttpRequest to communicate with the server. The following code fragment shows another way of defining the store Donors. It specifies via the config api the server-side URIs responsible for the four CRUD operations. We’ve omitted the reader section here because the default data type is JSON anyway. Because we’ve specified the URIs for the CRUD operations, there is no need to specify the url attribute, as in the preceding code sample:
Ext.define('SSC.store.Donors',{extend:'Ext.data.Store',model:'SSC.model.Donor',proxy:{type:'ajax',api:{create:'/create_donors',read:'/read_donors',update:'/update_donors',destroy:'/destroy_donors'}}});
When you create an instance of the data store, you can specify the autoload parameter. If it’s true, the store will be populated automatically. Otherwise, explicitly call the method load() whenever the data retrieval is needed. For example, you can call the method myStore.load({callback:someCallback}), passing it some callback to be executed.
Tip
In Appendix A, we discuss the HTML5 local storage API. Ext JS has a class Ext.data.proxy.LocalStorage that saves the model data locally if the web browser supports it.
Controllers and views
Your application controller is a liaison between the data and the views. This class has to extend Ext.app.Controller, and will include references to the views and, possibly, stores. The controller will automatically load every class mentioned in its code, create an instance of each store, and register each instance with the class Ext.StoreManager.
A controller class has the config properties stores, models, and views, where you can list stores, models, and views that the controller should know about. Example 4-3 shows that the controller SSC.controller.Donate includes the names of two stores: SSC.store.Campaigns and SSC.store.Donors.
Ext.define('SSC.controller.Donate',{extend:'Ext.app.Controller',stores:['SSC.store.Campaigns','SSC.store.Donors']
refs:[{
ref:'donatePanel',selector:'[cls=donate-panel]'}// more views can go here],init:function(){
this.control({'button[action=showform]':{click:this.showDonateForm}// more event listeners go here});},showDonateForm:function(){
this.getDonatePanel().getLayout().setActiveItem(1);}});

List stores in your controller. Actually, in most cases, you’d list stores in the
Ext.applicationsingleton as we did earlier. But if you need to dynamically create controllers, you don’t have a choice but to declare stores in such controllers.
List one or more views of your application in the
refsproperty, which simplifies the search of the component globally or within some container. The controller generates getters and setters for each object listed in therefs.
Register event listeners in the function
init(). In this case, we’re registering the event handler functionshowDonateFormthat will process clicks of the button, which has an attributeaction=showform.
The getter
getDonatePanel()will be autogenerated by Ext JS becausedonatePanelwas included in therefssection.
Ext.StoreManager provides a convenience method to look up the store by store ID. If stores were automatically injected into Ext.StoreManager by the controller, the default store ID is its name; for example, SSC.store.Donors:
vardonorsStore=Ext.data.StoreManager.lookup('SSC.store.Donors');// An alternative syntax to use StoreManager lookupvardonorsStore=Ext.getStore('SSC.store.Donors');
The preceding SSC.controller.Donate doesn’t use the config property views, but if it did, Ext JS would generate getters and setters for every view (the same is true for stores and models). It uses refs instead to reference components, and getters and setters will be generated for each component listed in refs; for example, getDonatePanel(). Lookup of such components is done based on the value in selector using the syntax compatible with ComponentQuery. The difference between refs and the config property views is that the former generates references to instances of specific components
from views, whereas the latter generates getters and setters only to the “class” (not the instance) of the entire view for further instance creation.
Tip
You can view and test Ext JS components against bundled themes by browsing the Theme Viewer at the Ext JS 4.2 Examples page.
Exploring a Component’s Life Cycle
In previous versions of our Save The Child application, CSS was responsible for all layouts of the UI components. In Chapter 10, you’ll learn about responsive web design techniques and CSS media queries, which allow you to create fluid layouts that automatically adjust to the size of the viewport. But this section is about the Ext JS proprietary way of creating and adding UI components to web pages. Before the user will see a component, Ext JS will go through the following phases for each component:
- Load
- Load the required (or all) Ext JS classes and their dependencies.
- Initialization
- Initialize components when the DOM is ready.
- Layout
- Measure and assign sizes.
- Rendering
- Convert components to HTML elements.
- Destruction
- Remove the reference from the DOM, remove event listeners, and unregister from the component manager.
Rendering and layout are the most time-consuming phases. The rendering does a lot of preparation to give the browser’s rendering engine HTML elements and not Ext JS classes. The layout phase is slow because the calculation of sizes and positions (unless they are in absolute coordinates) and applying of cascading stylesheets takes time.
There’s also the issue of reflows, which happen when the code reads-measures-writes to the DOM and makes dynamic style modifications. Fortunately, Ext JS 4.1 was redesigned to minimize the number of reflows; now a large portion of recalculations is done in a batch before modifying the DOM.
Components as containers
If a component can contain other components, it’s a container (for example, Ext.panel.Panel) and will have Ext.container.Container as one of its ancestors. In the Ext JS class hierarchy, Container is a subclass of Component, so all methods and properties defined for a component are available for a container, too. Each web page consists of one or more containers, which include some children components (in Ext JS, they are subclasses of Ext.Component), for example, Ext.button.Button.
You’ll be defining your container class as a subclass of a container by including extend: Ext.container.Container. The child elements of a container are accessible via its property items. In the Ext.define() statement of the container, you may specify the code that will loop through this items array and, say, style the components, but actual instances of the children will be provided during the Ext.create() call via the configuration object.
The process of adding a component to a container will typically consist of invoking Ext.create() and specifying in a configuration object where to render the component to; for example, renderTo: Ext.getBody().
But under the hood, Ext JS will do a lot more work. The framework will autogenerate a unique ID for the component, assign some event listeners, instantiate component plug-ins if specified, invoke the initComponent(), and add the component to Ext.ComponentManager.
Warning
Even though you can manually assign an ID to the component via a configuration object, it’s not recommended because it could result in duplicate IDs.
Working with Events
Events in Ext JS are defined in the mixin Ext.util.Observable. Components interested in receiving events can subscribe to them by using one of the following methods:
-
By calling the method
addListener() -
By using the method
on() - Declaratively
The next code snippet shows two ways by which a combo box can subscribe to the event change. The handler function is a callback that will be invoked if the event change is dispatched on this combo box:
combobox.addListener('change',myEventHandlerFunction);combobox.on('change',myEventHandlerFunction);
To unsubscribe from the event, call the method removeListener() or its shorter version, un():
combobox.removeListener('change',myEventHandlerFunction);combobox.un('change',myEventHandlerFunction);
You can also declaratively subscribe to events by using the listeners config property of the component:
Ext.create('Ext.button.Button',{listeners:{click:function(){// handle event here }}}
JavaScript supports event bubbling (see the online bonus chapter). In Ext JS, an event-bubbling mechanism enables events dispatched by components that include Ext.util.Observable to bubble up through all enclosing containers. For components, it means that you can handle a component’s event on the container level. It can be handy to subscribe and handle multiple similar events in one place. To enable bubbling for selected events, use the enableBubble() method. For example:
this.enableBubble(['textchange','validitychange']);
To define custom events, use the method addEvents(), where you can provide one or more of the custom event names:
this.addEvents('messagesent','updatecompleted');
For components, you have to define custom events inside the initComponent() method. For controllers—inside init(), and for any other class—inside its constructor.
Specifying Layouts
The container’s layout property controls how its children are laid out. It does so by referring to the container’s items property, which lists all of the child components. If you don’t explicitly set the layout property, its default value is Auto, which places components inside the container, top to bottom, regardless of the component size.
Usually, you explicitly specify the layout. For example, the hbox layout arranges all components inside the container horizontally next to each other, but the vbox layout arranges them vertically. The card layout places the components one under another, but only the top component is visible (think of a tabbed folder, for which the content of only one tab is visible at any given time).
The border layout is often used to arrange components in the main viewport (a.k.a. home page) of your application. This layout allows you to split the container’s real estate into five imaginary regions: north, east, west, south, and center. If you need to allocate the top menu items, place them into the region north. The footer of the page is in the south, as shown in the following code sample:
Ext.define('MyApp.view.Viewport',{extend:'Ext.container.Viewport',layout:'border',items:[{width:980,height:200,title:"Top Menu",region:"north",xtype:"panel"},{width:980,height:600,title:"Page Content",region:"center",xtype:"panel"},},{width:980,height:100,title:"The footer",region:"south",xtype:"panel"},}]});
Setting proportional layouts by using the flex property
Ext JS has a flex property that allows you to make your layout more flexible. Instead of specifying the width or height of a child component in absolute values, you can split the available space proportionally. For example, if the space has to be divided between two components having the flex values 2 and 1, this means that 2/3 of the container’s space will be allocated to the first component, and 1/3 to the second one, as illustrated in the following code snippet:
layout:'vbox',items:[{xtype:'component',html:'Lorem ipsum dolor',flex:2},{xtype:'button',action:'showform',text:'DONATE NOW',flex:1}]
Note
The format of this book doesn’t allow us to include detailed descriptions of major Ext JS components. If you plan to use Ext JS to develop enterprise web applications, allocate some extra time to learn the data grid Ext.grid.Panel that’s used to render tabular data. You should also master working with forms with Ext.form.Panel.
In the next section, you’ll see Ext JS layouts in action while working on the Save The Child application.
Developing Save The Child with Ext JS
In this section, we’ll do a code walk-through of the Ext JS version of our Save The Child application. Ext JS is often used in enterprise applications that communicate with the Java-based server side. The most popular IDE among Java enterprise developers is called Eclipse. That’s why we decided to switch from WebStorm to Eclipse. Apache Tomcat is one of the most popular servers among Java developers.
We’ve prepared two separate Eclipse projects:
- SSC_Top_ExJS contains the code required to render the top portion of the UI.
- SSC_Complete_ExtJS contains the complete version.
To test these applications in Eclipse, you need to install it and configure it with Apache Tomcat, as described next.
Note
If you are not planning to work with Java servers, you can continue using WebStorm. Just open in WebStorm the WebContent directory from the preceding project (as you did in the previous chapters) and open the index.html file in the browser. WebStorm will run the web application by using its internal web server.
Tip
To make WebStorm work faster, exclude the directories ext, packages, build, and WEB-INF from the project (click the wrench icon on the toolbar and then select Directories→Excluded). This way, WebStorm won’t index these directories.
Setting Up the Eclipse IDE and Apache Tomcat
Eclipse is the most popular IDE among Java developers. You can use it for developing JavaScript, too, although this would not be the best choice. But we’ll need it to demonstrate the HTML/Java application generation in the next chapter, so let’s set it up.
Tip
Sencha offers an Eclipse plug-in (not covered in this book) for those who purchase a license for Sencha Complete.
We’ll use the Eclipse IDE for Java EE Developers version, which is available free of charge at the Eclipse Downloads site. The installation comes down to unzipping the downloaded archive. Then, double-click the Eclipse executable to start this IDE.
Apache Tomcat
In Chapter 3, we used an XAMPP server that was running PHP scripts. Because this chapter includes server-side code written in Java, we’ll use Apache Tomcat, which is one of the popular servers used by Java developers for deploying web applications. Besides being a web server, Tomcat also contains a Java Servlet container that will be used in Generating a CRUD Application. But for most examples, we’ll use Tomcat as a web server where Ext JS code will be deployed.
Get the latest version of Apache Tomcat from the Download section at Apache website. At the time of this writing, Tomcat 7 is the latest production-quality build, so download the ZIP file with Tomcat’s Binary Distributions (Core). Unzip the file in the directory of your choice.
Even though you can start Tomcat from a separate command window, the more productive way is to configure Tomcat right in the Eclipse IDE. This will allow you to deploy your applications and start/stop Tomcat without the need to leave Eclipse. To add a server to Eclipse, open the Eclipse Java EE perspective (by choosing Window→Open Perspective), choose File→New→Other→Server→Server→Apache→Tomcat v7.0 Server, select your Tomcat installation directory, and then click Finish. If you don’t see Tomcat 7 in the list of Apache servers, click “Download additional server adapters.”
You’ll see the Tomcat entry in the Eclipse Project Explorer. From the Eclipse menu, choose Windows→Show View and open the Servers view. Start Tomcat by using the right-click menu.
Tip
By default, the Eclipse IDE keeps all required server configuration and deployment files in its own hidden directory. To see where exactly they are located in your computer, just double-click Tomcat in the Server view. The server path field contains the path. Keep in mind that whereas Tomcat documentation defines webapps as a default deployment directory, Eclipse uses the wtpwebapps directory instead. If you prefer to deploy your Eclipse projects under your original Tomcat installation path, select the option Use Tomcat Installation.
In the next section, you’ll learn how to create dynamic web projects in Eclipse for which you’ll need to specify the target runtime for deployment of your web applications. This newly installed and configured Tomcat server will serve as a deployment target for our sample projects.
Dynamic web projects and Ext JS
Eclipse for Java EE developers comes with a Web Tools Platform that simplifies development of web applications by allowing you to create a so-called dynamic web project. This is an Eclipse preconfigured project that already knows where its Java server is located, and deployment to the server is greatly simplified. Sample projects from this chapter will be specifically created for deployment under the Apache Tomcat server.
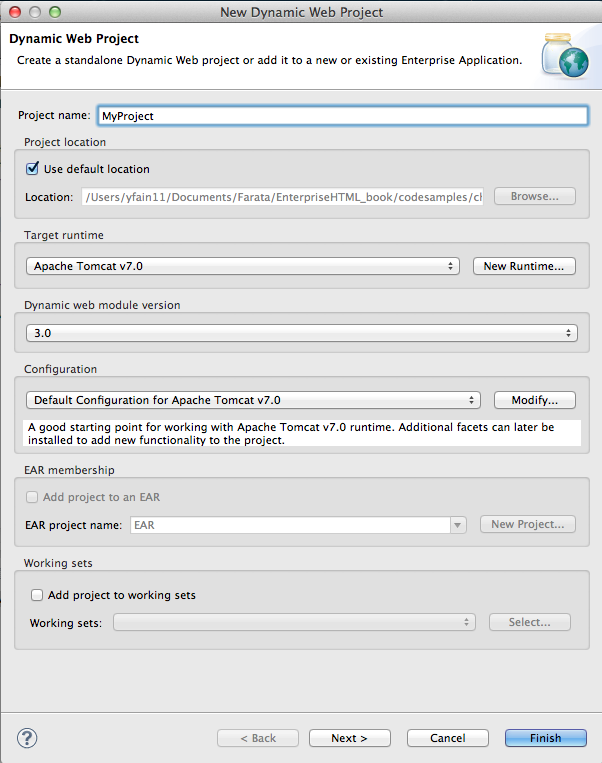
To create such a project, from the Eclipse menu, choose File→New→Other→Web→Dynamic Web Project. It will pop up a window similar to Figure 4-6. Note that the target runtime is Apache Tomcat v7.0 that we configured in the previous section.
Upon creation, this project will include several directories, including one called WebContent. This directory serves as a document root of the web server in Eclipse dymamic web projects. This is the place to put your index.html and one possible place to keep the Ext JS framework. Create a subdirectory named ext under WebContent and copy there all files from the Ext JS distribution. The app directory should also go under WebContent.
Unfortunately, the Eclipse IDE is infamous for slow indexing of JavaScript files, and given the fact that Ext JS has hundreds of JavaScript files, your work may be interrupted by Eclipse trying to unnecessarily revalidate these files. Developers of the Sencha Eclipse plug-in decided to solve this problem by creating a special type of library file (ext.ser) supporting code assistance in Eclipse. This solution will work until some of the Ext JS API changes; after that, Sencha should update the type library file.
If you don’t have the Sencha Eclipse plug-in, there are a couple of solutions to this problem (we’ll use the first one):
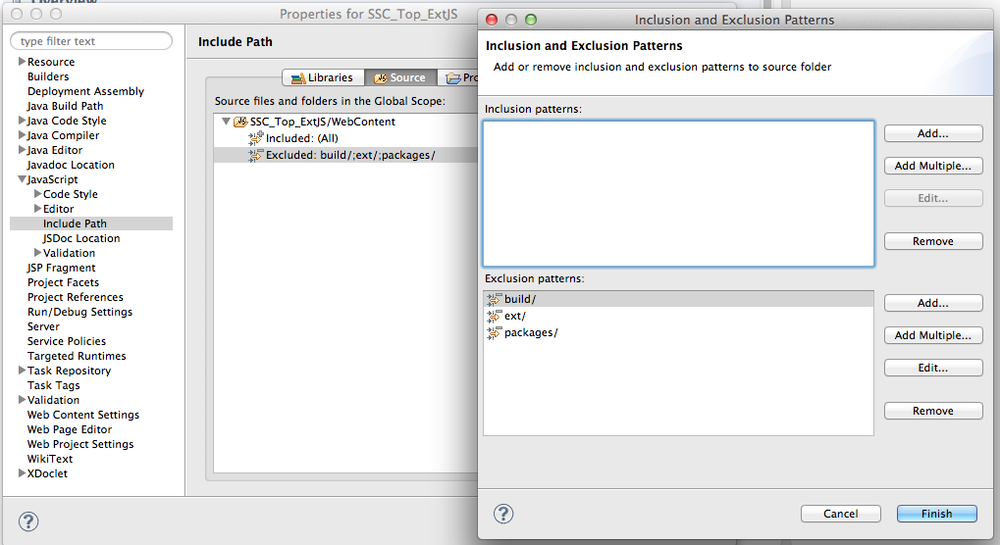
- Exclude from the Eclipse build the following Ext JS directories: ext, build, and packages.
- Don’t copy the Ext JS framework into your Eclipse project. Keep it in the place known for Tomcat, and configure as a loadable module.
To implement the first solution, right-click the properties of your project and choose JavaScript→Include Path. Then, switch to the Source tab, expand the project’s web content, click the Edit button, and then click Add. One by one, add ext, build, and packages directories as exclusion patterns (add the slash at the end), as shown in Figure 4-7.
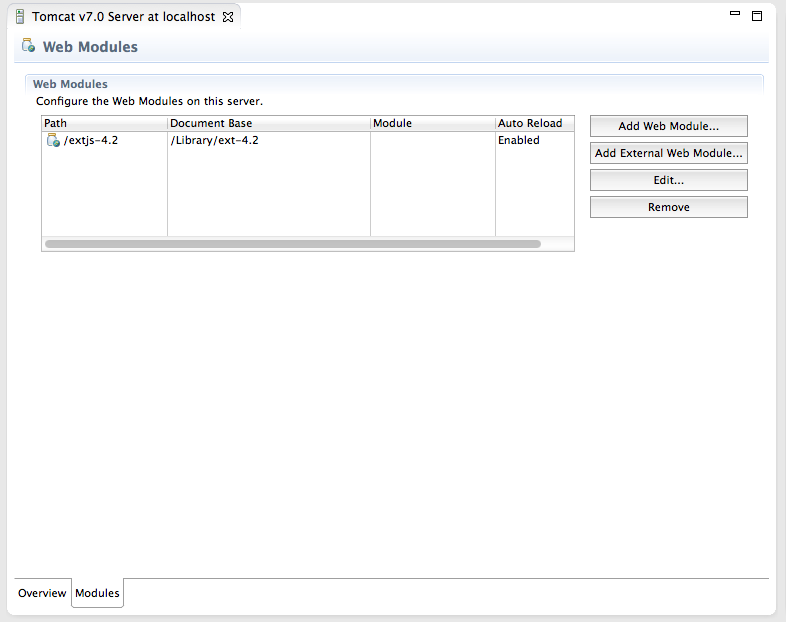
For the second solution, you’ll need to add your Ext JS folder as a static Tomcat module. Double-click the Tomcat name in the Servers view and then click the bottom tab, Modules. Then, click Add External Web Module. In the pop-up window, find the folder containing Ext JS (in my computer, it’s inside the Library folder, as shown in Figure 4-8) and give it a name (for example, /extjs-4.2). Now Tomcat will know that on each start, it has to load another static web module known as /extjs-4.2. If you’re interested in details of that deployment, open the file server.xml located in your Eclipse workspace in the hidden directory .metadata/.plugins/org.eclipse.wst.server.core/tmp0/conf.
To ensure that you did everything right, enter in your browser the URL http://localhost:8080/extjs-4.2, and you should see the welcome screen of Ext JS.
In both of these solutions, you’ll lose the Ext JS context-sensitive help, but at least you will eliminate the long pauses caused by Eclipse’s internal indexing processes. Developing with ExtJS in the WebStorm or IntelliJ IDEA IDEs would spare you from all these issues because these IDEs are smart enough to produce context-sensitive help from an external JavaScript library.
Note
If you decide to stick with WebStorm, you can skip the Eclipse-related instructions that follow and just open in your browser index.html located in the WebContent directory of the SSC_Top_ExtJS project. In any case, the browser will render the page that looks like Figure 4-10.
In this section, we brought together three pieces of software: the Eclipse IDE, Apache Tomcat server, and Ext JS framework. Let’s bring one more program to the mix: Sencha CMD. We already went through the initial code generation of Ext JS applications. If you already have a dynamic web project in the Eclipse workspace, run Sencha CMD, specifying the WebContent directory of your project as the output folder, where the generated project will reside. For example, if the name of your dynamic web project is hello2, the Sencha CMD command will look as follows:
sencha -sdk /Library/ext-4.2 generate app HelloWorld /Users/yfain11/myEclipseWorkspace/hello2/WebContent
Running the Top Portion of the Save The Child UI
To run the top portion of the UI, from the Eclipse menu, choose File→Import→General→Existing Projects into Workspace and click the Next button. Then select the option “Select root directory” and click Browse to find SSC_Top_ExtJS on your disk. This will import the entire dynamic web project, and most likely you’ll see one error in the Problems view indicating that the target runtime with so-and-so name is not defined. This may happen because the name of the Tomcat configuration in your Eclipse project is different from the one in the directory SSC_Top_ExtJS.
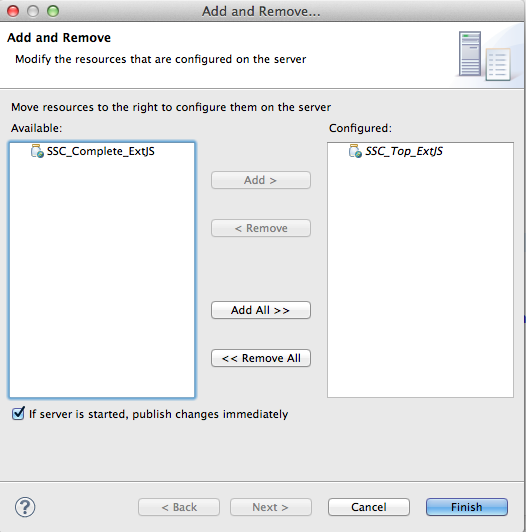
To fix this issue, right-click the project name and choose Properties→Targeted runtimes. Then, deselect the Tomcat name that was imported from our archive and select the name of your Tomcat configuration. This action makes the SSC_Top_ExtJS project deployable under your Tomcat server. Right-click the server name in the Servers view and choose Add and Remove. You’ll see a pop-up window similar to Figure 4-9, which depicts a state when the SSC_Top_ExtJS project is configured (deployed), but SSC_Complete_ExtJS isn’t yet.
Right-click the project name SSC_Top_ExtJS, and choose Run as→Run on server. Eclipse may offer to restart the server; accept it, and you’ll see the top portion of the Save The Child application running in the internal browser of Eclipse that will look as shown in Figure 4-10. You can either configure Eclipse to use your system browser or enter the URL http://localhost:8080/SSC_Top_ExtJS/ in the browser of your choice. The web page will look the same.
Tip
Apache Tomcat runs on port 8080 by default. If you want to change the port number, double-click the Tomcat name in the Servers view and change the port there.
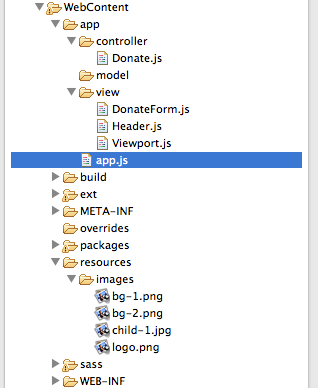
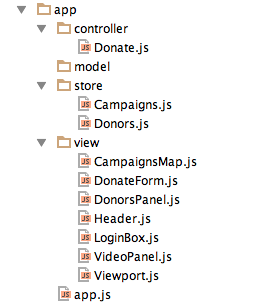
It’s time for a code review. The initial application was generated by Sencha CMD, so the directory structure complies with the MVC paradigm. This version has one controller (Donate.js) and three views (DonateForm.js, Viewport.js, and Header.js), as shown in Figure 4-11. The images are located under the folder resources.
The app.js file is pretty short—it just declares SSC as the application name, views, and controllers. By adding the property autoCreateViewport: true, we requested the application to automatically load the main window, which must be called Viewport.js and be located in the view directory:
Ext.application({name:'SSC',views:['DonateForm','Header','Viewport'],controllers:['Donate'],autoCreateViewport:true});
In this version of the application, the Donate.js controller is listening to the events from the view DonateForm. It’s responsible just for showing and hiding the Donate form panel. We’ve implemented the same behavior as in the previous version of the Save The Child application—clicking the Donate Now button reveals the donation form. If the application needs to make Ajax calls to the server, such code would also be placed in the controller. The code of the Donate controller is shown in Example 4-4.
Ext.define('SSC.controller.Donate',{extend:'Ext.app.Controller',refs:[{ref:'donatePanel',selector:'[cls=donate-panel]'}],init:function(){
this.control({'button[action=showform]':{
click:this.showDonateForm},'button[action=hideform]':{click:this.hideDonateForm},'button[action=donate]':{click:this.submitDonateForm}});},showDonateForm:function(){
this.getDonatePanel().getLayout().setActiveItem(1);
},hideDonateForm:function(){this.getDonatePanel().getLayout().setActiveItem(0);},submitDonateForm:function(){varform=this.getDonatePanel().down('form');
form.isValid();}});

The
init()method is invoked only once on instantiation of the controller.
The
control()method of the controller takes selectors as arguments to find components with the corresponding event listeners to be added. For example,button[action=showform]means “find a button that has a propertyactionwith the valueshowform“—it has the same meaning as in CSS selectors.
Event handler functions to process show, hide, and submit events.

In containers with a card layout, you can make one of the components visible (the top one in the card deck) by passing its index to the method
setActiveItem(). Viewport.js includes a container with the card layout (seecls: 'donate-panel'in the next code sample).
Finding the children of the container can be done by using the
down()method. In this case, we are finding the child<form>element of a donate panel. If you need to find the parents of the component, useup().
Tip
Because the MVC paradigm splits the code into separate layers, you can unit-test them separately—for example, test your controllers separately from the views. Chapter 7 is dedicated to JavaScript testing; it contains the sections Testing the Models and Testing the Controllers that illustrate how to arrange for separate testing of the models and controllers in the Ext JS version of the Save The Child application.
The top-level window is SSC.view.Viewport, which contains the Header and the Donate form views, as shown in Example 4-5.
Ext.define('SSC.view.Viewport',{extend:'Ext.container.Viewport',requires:['Ext.tab.Panel','Ext.layout.container.Column'],cls:'app-viewport',layout:'column',
defaults:{xtype:'container'},items:[{columnWidth:0.5,html:' '// Otherwise column collapses},{width:980,cls:'main-content',layout:{type:'vbox',
align:'stretch'},items:[{xtype:'appheader'},{xtype:'container',minHeight:350,flex:1,cls:'donate-panel',
layout:'card',items:[{xtype:'container',layout:'vbox',items:[{xtype:'component',html:'Lorem ipsum dolor sit amet, consectetur elit. Praesent ...',maxWidth:550,padding:'80 20 0'},{xtype:'button',action:'showform',text:'DONATE NOW',scale:'large',margin:'30 230'}]},{xtype:'donateform',margin:'80 0 0 0'}]},{xtype:'container',flex:1}]},{columnWidth:0.5,html:' '}]});

Our viewport has a
columnlayout, which is explained after Figure 4-12.
The vertical box layout displays components from the items array one under another, the
appheaderand thecontainer, which is explained next.
The container with the class selector
donate-panelincludes two components, but because they are laid out ascard, only one of them is shown at a time: either the one with the “Lorem ipsum” text, ordonateform. Which one to show is mandated by theDonatecontroller, by invoking the methodsetActiveItem()with the appropriate index.
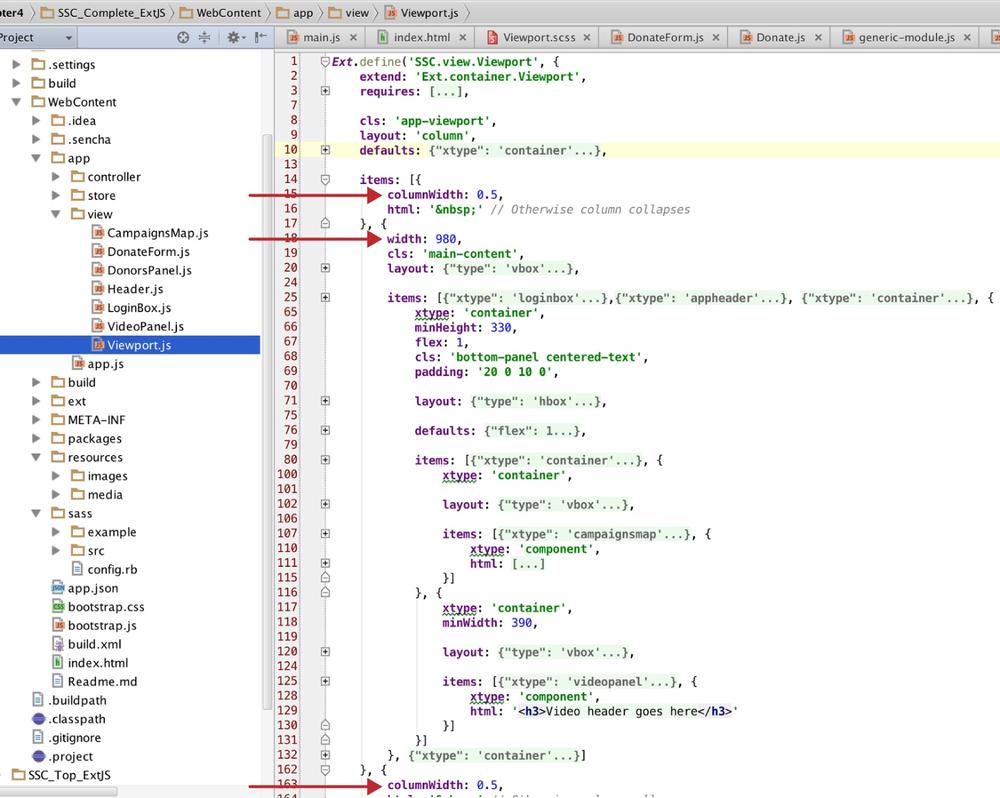
Figure 4-12 shows a snapshot from WebStorm, with a collapsed code section just so that you can see the big picture of the columns in the column layout—they are marked with arrows.
Tip
Choose Preferences→JavaScript→Libraries and add the file ext-all-debug-w-comments.js as a global library. Press F1 to display available comments about a selected Ext JS element. Configuring Ext JS as an external library allows you to remove Ext JS files from a WebStorm project without losing context-sensitive help.
In Ext JS, the column layout is used when you are planning to present the information in columns, as explained in the product documentation. Even though there are three columns in this layout, the entire content on this page is located in the middle column having the width of 980. The column on the left and the column on the right just hold one nonbreakable space each to provide centering of the middle column in monitors with high resolutions wider than 980 pixels (plus the browser’s chrome).
The width of 0.5, 980, 0.5 means to give the middle column 980 pixels and share the remaining space equally between empty columns.
Note
You also can lay out this screen by using the horizontal box (hbox) with the pack configuration property, but we decided to keep the column layout for illustration purposes.
Tip
Consider using Ext Designer for creating layouts in WYSIWYG mode.
Now let’s look at the child elements of SSC.view.Viewport. The SSC.view.Header is the simplest view. Because Save The Child does not include a bunch of forms and grids, we’ll use the lightest top-level container class Container where possible. The class Container gives you the most freedom in what to put inside and how to lay out its child elements. Our SSC.view.Header view extends Ext.Container and contains child elements, some of which have the xtype: component, and others have container, as shown in Example 4-6.
Ext.define("SSC.view.Header",{extend:'Ext.Container',xtype:'appheader',
cls:'app-header',
height:85,layout:{
type:'hbox',align:'middle'},items:[{
xtype:'component',cls:'app-header-logo',width:75,height:75},{xtype:'component',cls:'app-header-title',html:'Save The Child',flex:1},{xtype:'container',
defaults:{scale:'medium',margin:'0 0 0 5'},items:[{xtype:'button',text:'Who We Are'},{xtype:'button',text:'What We Do'},{xtype:'button',text:'Where We Work'},{xtype:'button',text:'Way To Give'}]}]});

We assign
appheaderas thextypevalue of this view, which will be used as a reference inside theSSC.view.Viewport.
clsis a class attribute of a DOM element. In this case, it is the same as writingclass=app-headerin the HTML element.
The header uses the
hboxlayout with center alignment.
Child components of the top container are the logo image, the text “Save The Child,” and another container with buttons.

A container with button components.
Let’s review the DonateForm view next, which is a subclass of Ext.form.Panel and contains the form with radio buttons, fields, and labels. This component named donateform will be placed under SSC.view.Header inside SSC.view.Viewport. We’ve removed some of the lines of code to make it more readable, but its full version is included in the source code samples accompanying this book. Example 4-7 shows first part of the SSC.view.DonateForm.
Ext.define('SSC.view.DonateForm', {
  extend: 'Ext.form.Panel',
  xtype: 'donateform',
  requires: [
    'Ext.form.RadioGroup',
    'Ext.form.field.*',
    'Ext.form.Label'
  ],

  layout: {
    type: 'hbox'
  },

  items:[{
    xtype: 'container',
    layout: 'vbox',

    items: [{
      xtype: 'container',

      items: [{
        xtype: 'radiogroup',
        fieldLabel: 'Please select or enter donation amount',
        labelCls: 'donate-form-label',

        vertical: true,
        columns: 1,

        defaults: {
          name: 'amount'
        },

        items: [
          { boxLabel: '10',  inputValue: '10'  },
          { boxLabel: '20',  inputValue: '20'  }
           // more choices 50, 100, 200 go here
        ]
      }]
    }, {
      xtype: 'textfield',
      fieldLabel: 'Other amount',
      labelCls: 'donate-form-label'
    }]
  },
DonateFormdepends on several classes listed in therequiresproperty. Ext JS checks to see whether these classes are present in memory, and if not, the loader loads all dependencies first, and only after theDonateFormclass.
Our
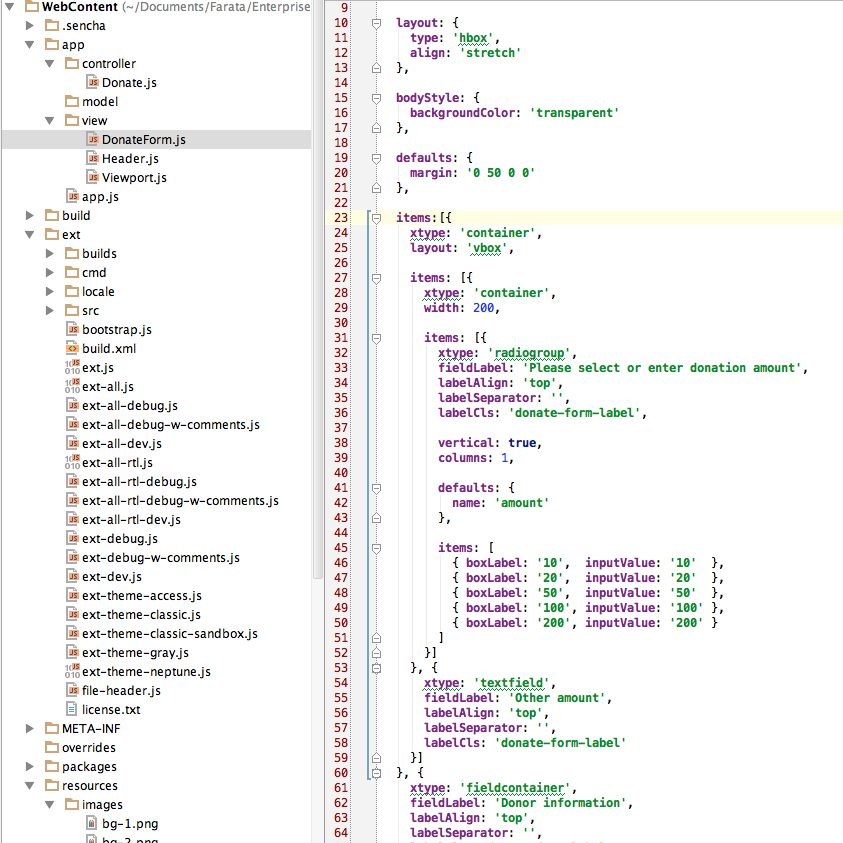
DonateFormuses the horizontal box (hbox) layout, which means that certain components or containers will be laid out next to each other horizontally. But which ones? The children of the container located in theitems[]arrays will be laid out horizontally in this case. But the preceding code contains severalitems[]arrays with different levels of nesting. How to identify those that belong to the topmost containerDonateForm? This is a case that clearly demonstrates how having a good IDE can be of great help.Figure 4-13 shows a snapshot from the WebStorm IDE illustrating how can you find matching elements in long listings. The top-level
items[]arrays starts from line 23, and we see that the first element to be laid out inhboxhas thextype: container, which in turn has some children. If you move the blinking cursor of the WebStorm editor right after the first open curly brace in line 23, you’ll see a thin, blue vertical line that goes down to line 60. This is where the first object literal ends.Hence, the second object to be governed by the
hboxlayout starts on line 61. You can repeat the same trick with the cursor to see where that object ends and thefieldcontainerstarts. This might seem like a not overly important tip, but it really saves a developer’s time.
The first element of the
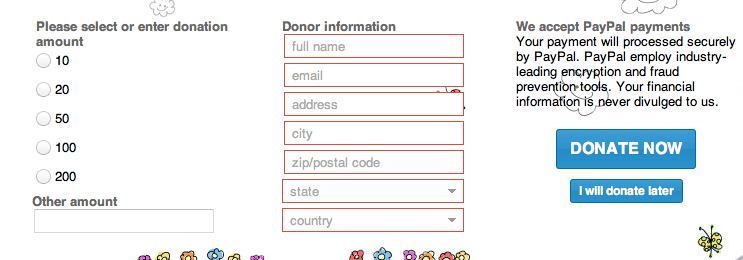
hboxis a container that is internally laid out as avbox(see Figure 4-14). Theradiogroupis on top, and thetextfieldfor entering Other amount is at the bottom.
The second part of the SSC.view.DonateForm comes next, as shown in Example 4-8.
{xtype:'fieldcontainer',
fieldLabel:'Donor information',labelCls:'donate-form-label',items:[{xtype:'textfield',name:'donor',emptyText:'full name'},{xtype:'textfield',emptyText:'email'}// address,city,zip code,state and country go here]},{xtype:'container',
layout:{type:'vbox',align:'center'},items:[{xtype:'label',text:'We accept PayPal payments',cls:'donate-form-label'},{xtype:'component',html:'Your payment will be processed securely by PayPal...'},{xtype:'button',action:'donate',text:'DONATE NOW'},{xtype:'button',action:'hideform',text:'I will donate later'}]}]});

The
fieldcontaineris a lightweight Ext JS container useful for grouping components—the donor information, in this case. It’s the central element in thehboxcontainer shown in Figure 4-14.
The right side of the
hboxis another container with thevboxinternal layout to show the “We accept PayPal” message, Donate Now, and “I will donate later” buttons (see Figure 4-14). You can find event handlers for these buttons in the Donate.js controller.
Tip
Debugging frameworks that are extensions of JavaScript in web browsers can be difficult, because although you might be operating with, say, Ext JS classes, the browser will receive regular <div>, <p>, and other HTML tags and JavaScript. Illuminations is a Firebug add-on that allows you to inspect elements showing not just their HTML representations, but the corresponding Ext JS classes that were used to create them.
The code review of the top portion of the Save The Child application is finished. Run the SSC_Top_ExtJS project and turn on the Chrome Developer Tools. Scroll to the bottom of the Network tab, and you’ll see that the browser made about 250 requests to the server and downloaded 4.5 MB in total. Not too exciting, is it?
On the next runs, these numbers will drop to about 30 requests and 1.7 MB transferred, as the browser’s caching kicks in. These numbers would be better if instead of ext-all.js we’d link ext.js, and even better if we created a custom build (see Generating Applications with the Sencha CMD Tool) for the Save The Child application, merging the application code into one file to contain only those framework classes that are actually used.
Completing Save The Child
In this section, we’ll review the code supporting the lower half of the Save The Child UI, which you should import into the Eclipse IDE from the directory SSC_Complete_ExtJS.
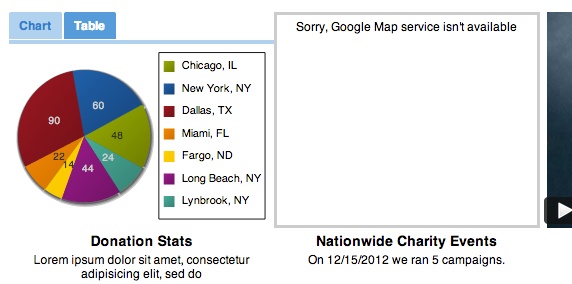
If you see the target runtime error, read the beginning of Running the Top Portion of the Save The Child UI for the cure. Stop the Tomcat server if it’s running, and deploy SSC_Complete_ExtJS under the Tomcat server in the Servers view (from the right-click menu, choose Add and Remove). Start Tomcat in Eclipse, right-click the project, and then run it on the server. It will open a web browser pointing at http://localhost:8080/SSC_Complete_ExtJS showing a window similar to the one depicted in Figure 4-15.
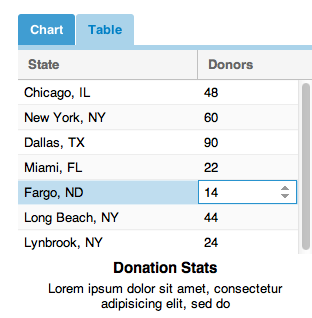
This version has some additions compared to the previous ones. Notice the lower-left panel with charts. First, the charts are placed inside the panel with the tabs Charts and Table. The same data can be rendered either as a chart or as a grid. Second, the charts became live thanks to Ext JS. We took a snapshot of the window shown in Figure 4-15 while hovering the mouse over the pie slice representing New York, and the slice has extended from the pie showing a tool tip.
SSC_Complete_ExtJS has more Ext JS classes than SSC_Top_ExtJS. You can see more views in Figure 4-16. Besides, we’ve added two classes, Donors.js and Campaigns.js, to serve as data stores for the panels with charts and maps.
Adding the login box
The Login Box view is pretty small and self-explanatory:
Ext.define("SSC.view.LoginBox",{extend:'Ext.Container',xtype:'loginbox',layout:'hbox',items:[{xtype:'container',flex:1},{xtype:'textfield',emptyText:'username',name:'username',hidden:true},{xtype:'textfield',emptyText:'password',inputType:'password',name:'password',hidden:true},{xtype:'button',text:'Login',action:'login'}]});
The code to process the user’s logins is added to the Donate.js controller.
'button[action=login]':{click:this.showLoginFields}...showLoginFields:function(){this.getUsernameBox().show();this.getPasswordBox().show();}
Adding the video
The bottom portion of the window includes several components. The video view simply reuses the HTML <video> tag we used in Chapter 4 and Chapter 5. Ext JS 4.2 doesn’t offer any other solutions for embedding videos. On one hand, subclassing Ext.Component is the lightest way of including any arbitrary HTML markup. On the other hand, turning HTML into an Ext JS component allows us to use it the same way as any other Ext JS component (for example, participate in layouts). Here’s the code for VideoPanel.js:
Ext.define("SSC.view.VideoPanel",{extend:'Ext.Component',xtype:'videopanel',html:['<video controls="controls" poster="resources/media/intro.jpg"width="390px" height="240px" preload="metadata">','<source src="resources/media/intro.mp4" type="video/mp4"/>','<source src="resources/media/intro.webm" type="video/webm"/>','<p>Sorry, your browser doesn\'t support the video element</p>','</video>']});
Tip
Ext JS has a wrapper for the HTML5 <video> tag. It’s called Ext.Video, and we use it in Chapter 12.
Adding the maps
Adding the map takes considerably more work on our part. The mapping part is located in the view CampaignsMap.js. Initially, we tried to use Ext.ux.GMapPanel, but it didn’t work as expected. As a workaround, we’ve added the HTML <div> element to serve as a map container. The first part of the content of CampaignsMap.js is shown in Example 4-9.
Ext.define("SSC.view.CampaignsMap",{extend:'Ext.Component',xtype:'campaignsmap',html:['<div class="gmap"></div>'],renderSelectors:{
mapContainer:'div'},listeners:{
afterrender:function(comp){varmap,mapDiv=comp.mapContainer.dom;
if(navigator&&navigator.onLine){
try{map=comp.initMap(mapDiv);comp.addCampaignsOnTheMap(map);}catch(e){this.displayGoogleMapError();}}else{this.displayGoogleMapError();}}},

Because we’ve added the map container just by including the HTML
<div>component, Ext JS creates a generated ID for this<div>. It’s just not a good way to reference an element on the page, because the ID should be unique, and we can easily run into conflicting situations. We didn’t want to create an ID manually, and so we used the propertyrenderSelectorsto map an arbitrary name to a DOM selector. When we reference this element somewhere inside the Ext JS code by using thisrenderSelector, for example,this.mapContainer(mapContaineris an arbitrary name here), it returns anExt.dom.Elementobject—an abstraction over the plain HTML element—that eliminates cross-browser API differences.
Sencha documentation states that declaring
listenersduringExt.define()is a bad practice, and doing it duringExt.create()should be preferred. This is an arguable statement. Yes, there is a possibility that the handler function will be created duringdefine()but never used duringcreate(), which will lead to unnecessary creation of the handler’s instance in memory. But the chances are slim. The other consideration is that if listeners are defined duringcreate(), each instance can handle the same event differently. We’ll leave it up to you to determine the right place for defining listeners. The good part about keeping listeners in the class definition is that the entire code of the class is located in one place.
Query the DOM to find the
mapContainerdefined in therenderSelectorsproperty. Note that we are getting the reference to this DOM element after the view is rendered in the event handler functionafterrender. The objectcompwill be provided to this handler, and it points at the instance of the current component, which isSSC.view.CampaignsMap. Think ofcompasthisfor the component.
If Google Maps is not available, display an error message, as shown in Figure 4-17. This code was added after one of the authors was testing this code while sitting on a plane with no Internet connection. But checking the status of
navigator.onLinemay not be a reliable indicator of the offline status, so we’ve wrapped it into atry/catchblock just to be sure.
Next comes the second part of CampaignsMap.js, as shown in Example 4-10.
initMap:function(mapDiv){
// latitude = 39.8097343 longitude = -98.55561990000001// Lebanon, KS 66952, USA Geographic center of the contiguous United States// the center point of the mapvarlatMapCenter=39.8097343,lonMapCenter=-98.55561990000001;varmapOptions={zoom:3,center:new.maps.LatLng(latMapCenter,lonMapCenter),mapTypeId:.maps.MapTypeId.ROADMAP,mapTypeControlOptions:{style:.maps.MapTypeControlStyle.DROPDOWN_MENU,position:.maps.ControlPosition.TOP_RIGHT}};returnnew.maps.Map(mapDiv,mapOptions);},addCampaignsOnTheMap:function(map){varmarker,infowindow=new.maps.InfoWindow(),geocoder=new.maps.Geocoder(),campaigns=Ext.StoreMgr.get('Campaigns');
campaigns.each(function(campaign){vartitle=campaign.get('title'),
location=campaign.get('location'),description=campaign.get('description');geocoder.geocode({address:location,country:'USA'},function(results,status){if(status==.maps.GeocoderStatus.OK){// getting coordinatesvarlat=results[0].geometry.location.lat(),lon=results[0].geometry.location.lng();// create markermarker=new.maps.Marker({position:new.maps.LatLng(lat,lon),map:map,title:location});// adding click event to the marker// to show info-bubble with data from json.maps.event.addListener(marker,'click',(function(marker){returnfunction(){varcontent=Ext.String.format('<p class="infowindow"><b>{0}</b><br/>{1}<br/><i>{2}</i></p>',title,description,location);infowindow.setContent(content);infowindow.open(map,marker);};})(marker));}else{console.error('Error getting location data for address: '+location);}});});},displayGoogleMapError:function(){console.log('Error is successfully handled while rendering Google map');this.mapContainer.update('<p class="error">Sorry, Google Map service isn\'t available</p>');}});

The rest of the code in this class has the same mapping functionality as described in Adding Geolocation Support.

The data for the campaign information is coming from the store Campaigns.js located in the folder store. The store manager can find the reference to the store either by assigned
storeIdor by the nameCampaignslisted in thestoresarray in app.js.
We configure the mapping panel to get the information about the campaign title, location, and description from the fields with corresponding names from the store
SSC.store.Campaigns, which is shown here in app.js:
Ext.application({name:'SSC',views:['CampaignsMap','DonateForm','DonorsPanel','Header','LoginBox','VideoPanel','Viewport'],stores:['Campaigns','Donors'],controllers:['Donate'],autoCreateViewport:true});
In Chapter 2 the information about campaigns was taken from a file with JSON-formatted data. In this version, the data will be taken from the class SSC.store.Campaigns that’s shown next. This class extends Ext.data.JsonStore, which is a helper class for creating stores based on the JSON data. The class JsonStore is a subclass of the more generic Ext.data.Store, which implements client-side caching of model objects, can load the data via the Proxy object, and supports sorting and filtering.
Later, in Chapter 12, you’ll see another version of our Save The Child application, in which all stores are inherited from Ext.data.Store. But in the version presented in Example 4-11, we are not reading the code from external JSON sources, and inheriting from Ext.data.Store would suffice.
Ext.define('SSC.store.Campaigns',{extend:'Ext.data.JsonStore',fields:[
{name:'title',type:'string'},{name:'description',type:'string'},{name:'location',type:'string'}],data:[{
title:'Lorem ipsum',description:'Lorem ipsum dolor sit amet, consectetur adipiscing elit.',location:'Chicago, IL'},{title:'Donors meeting',description:'Morbi mollis ante at ante posuere tempor.',location:'New York, NY'},{title:'Sed tincidunt magna',description:'Donec ac ligula sit amet libero vehicula laoreet',location:'Dallas, TX'},{title:'Fusce tellus dui',description:'Sed accumsan nibh sapien, interdum ullamcorper velit.',location:'Miami, FL'},{title:'Aenean lorem quam',description:'Pellentesque habitant morbi tristique senectus',location:'Fargo, ND'}]});
Adding the chart and table panels
The lower-left area of the Save The Child window is occupied by a subclass of Ext.tab.Panel. The name of our view is SSC.view.DonorsPanel, and it contains two tabs: Chart and Table. Accordingly, the class definition starts by declaring dependencies for the Ext JS classes that support charts and a data grid.
Charting is an important part of many enterprise applications, and Ext JS offers solid chart-drawing capabilities without the need to install any plug-ins. We’d like to stress that both Chart and Table panels use the same data—they just provide different views of the data. Let’s review the code in Example 4-12.
Ext.define("SSC.view.DonorsPanel",{extend:'Ext.tab.Panel',xtype:'donorspanel',requires:['Ext.chart.Chart','Ext.chart.series.Pie','Ext.grid.Panel','Ext.grid.column.Number','Ext.grid.plugin.CellEditing'],maxHeight:240,plain:true,
items:[{title:'Chart',
xtype:'chart',store:'Donors',animate:true,legend:{position:'right'},theme:'Base:gradients',series:[{type:'pie',
angleField:'donors',showInLegend:true,tips:{
trackMouse:true,renderer:function(storeItem){varstore=storeItem.store,total=0;store.each(function(rec){total+=rec.get('donors');
});this.update(Ext.String.format('{0}: {1}%',storeItem.get('location'),
Math.round(storeItem.get('donors')/total*100)));}},highlight:{segment:{margin:20}},label:{
field:'location',display:'horizontal',contrast:true,renderer:function(label,item,storeItem){returnstoreItem.get('donors');}}}]},{title:'Table',
xtype:'gridpanel',store:'Donors',columns:[
{text:'State',dataIndex:'location',flex:1},{text:'Donors',dataIndex:'donors',xtype:'numbercolumn',format:'0',editor:'numberfield'}],plugins:[{ptype:'cellediting'}]}]});

By default, the top portion of the tab panel shows a blue background, which we didn’t like, so we turned this style off to give these tabs a little cleaner look.

The first panel is an instance of the
xtype: 'chart', which gets the data from the store objectDonors.
Configuring and creating a pie chart. The width of each sector is controlled by the
angleFieldproperty, which is mapped to the fielddonorsdefined in the storeSSC.store.Donors(see the code listing that follows).
We’ve overriden the config
rendererto provide custom styling for each element. In particular, we’ve configuredtipsto be displayed on mouse hover.
Calculating total for proper display of the percentages on mouse hover.

The label for each pie sector is retrieved from the field
locationdefined in the storeSSC.store.Donorsshown in the code listing that follows.
Displaying the chart legend on the right side. If the user moves the mouse over the legend, the pie sectors start to animate.

The second tab contains an instance of
xtype. Note that the store object is the same as the Chart panel uses.gridpanel
The grid has two columns. One is simple text, but the other is rendered as a
numbercolumnthat displays the data according to a format string.
The store Donors contains the hardcoded data for our pie chart as well as for the table. In the real world, the data would be retrieved from the server side. Because we were getting ready to consume JSON data (not implemented), our Donors class extends JsonStore:
Ext.define('SSC.store.Donors',{extend:'Ext.data.JsonStore',fields:[{name:'donors',type:'int'},
{name:'location',type:'string'}],data:[
{donors:48,location:'Chicago, IL'},{donors:60,location:'New York, NY'},{donors:90,location:'Dallas, TX'},{donors:22,location:'Miami, FL'},{donors:14,location:'Fargo, ND'},{donors:44,location:'Long Beach, NY'},{donors:24,location:'Lynbrook, NY'}]});
The data located in the store SSC.store.Donors can be rendered not only as a chart, but in a tabular form as well. To switch to the table view shown in Figure 4-18, the user has to click the Table tab.
The following code fragment from DonorsPanel is all it takes to render the donors’ data as a grid. The xtype of this component is gridpanel. For illustration purposes, we made the Donors column editable—double-click a cell with a number and it will turn this field into a numeric field, as shown in Figure 4-18 for the location Fargo, ND:
{title:'Table',xtype:'gridpanel',store:'Donors',
columns:[{text:'City/State',dataIndex:'location',flex:1},{text:'Donors',dataIndex:'donors',xtype:'numbercolumn',format:'0',editor:'numberfield'}],plugins:[{ptype:'cellediting'
}

Reusing the same store as in the Chart panel.

We are using one of the existing Ext JS plug-ins here, namely,
Ext.grid.plugin.CellEditing, to allow editing the cells of theDonorscolumn. In this example, we are using an existing Ext JS editornumberfieldin theDonorscolumn. Because we don’t work with decimal numbers here, the editor usesformat:0. To make the entire row of the grid editable, use the plug-inExt.grid.plugin.RowEditing. If you want to create a custom plug-in for a cell, you need to define it by the rules for writing Ext JS plug-ins.
Tip
Modify any value in the Donor’s cell and switch to the Chart panel. You’ll see that the size of the corresponding pie sector changes accordingly.
The total number of code lines in DonorsPanel and in the store Donors is under 100. Being able to create a tab panel with a chart and grid with almost no manual coding is quite impressive, isn’t it?
Adding a footer
To complete the Save The Child code review, we need to mention the icons located at the bottom of ViewPort.js, shown in Figure 4-19. Usually, links at the bottom of the page statically refer to the corresponding social network’s account. Integration with social networks is out of this book’s scope. But you can study, say, the Twitter API and implement functionality to let donors tweet about their donations. The Facebook icon can either have a similar functionality or you might consider implementing automated login to the Save The Child application by using OAuth2, which is briefly discussed in Chapter 9.
This footer is implemented in the following code snippet. We’ve implemented these little icons as regular images:
items:[{xtype:'component',flex:1,html:'<strong>Project SSC_Complete_ExtJS:</strong>'},{src:'resources/images/facebook.png'},{src:'resources/images/google_plus.png'},{src:'resources/images/twitter.png'},{src:'resources/images/rss.png'},{src:'resources/images/email.png'}]
Tip
A more efficient way to do this is by using a numeric character code that renders as an image (see the glyph config property). The Pictos library offers more than 300 tiny images in both vector and PNG form. You’ll see the example of using Pictos fonts in Chapter 12.
The Ext JS library contains lots of JavaScript code, but it allows developers to produce nice-looking applications with a fraction of the code compared to other frameworks. Also, even though this version of Save The Child offers more functionality than those from the previous chapters, we’ve had to write only a bare minimum of CSS code, thanks to Ext JS theming.
Building a production version of Save The Child
Run the completed version of our application in a Chrome browser with Developer Tools turned on. Go to the Network tab and scroll to the bottom. You’ll see a message reporting that the browser made 365 requests to the server and downloaded 6.4 MB of content, as shown in Figure 4-20.
Now let’s create a production version with all JavaScript merged into one file. Open the terminal or command window and change the directory to the Eclipse workspace directory where your project was created (for example, …/SSC_Complete_ExtJS/WebContent) and enter the command described in Generating Applications with the Sencha CMD Tool:
sencha app build
The production version of the Save The Child application generates in the directory …/SSC_Complete_ExtJS/WebContent/build/SSC/production. All your application JavaScript code merges with the required classes of the Ext JS framework into one file, all-classes.js, which in our case amounts to 1.2 MB. The generated CSS file SSC-all.css will be located in the directory resources. All images are there, too. This is what the production version of index.html looks like:
<!DOCTYPEHTML><html><head><metacharset="UTF-8"><title>SSC</title><scriptsrc="http://maps.googleapis.com/maps/api/js?sensor=false"></script><linkrel="stylesheet"href="resources/SSC-all.css"/><scripttype="text/javascript"src="all-classes.js"></script></head><body></body></html>
Deploy the content of production under any web server and load this version of the application in Chrome with Developer Tools turned on. This time, the number of downloaded bytes is three times lower (2.3 MB). Ask your web server administrator to enable Gzip or Deflate, and the size of the JavaScript will go down from 1.2 MB to 365 KB. The size of other resources will decrease even more. Don’t forget that we are loading a 500 KB video file intro.mp4. The number of server requests went down to 55, but more than 30 of them were Google Maps API calls.
Summary
Creating enterprise web applications involves many steps that need to be done by developers. But with the right set of tools, repetitive steps can be automated. Besides, the Ext JS class-rich component library and themes allow you to reduce the amount of manual programming.
Remember the DRY principle: don’t repeat yourself. Try to do more with less effort. This rather long chapter will help you get started with Ext JS. It’s an extensive framework, which doesn’t allow an easy way out should you decide to switch to another one. But for the enterprise applications that require a rich UI, dashboards with fancy charts, and advanced data grids, Ext JS can be a good choice.
Get Enterprise Web Development now with the O’Reilly learning platform.
O’Reilly members experience books, live events, courses curated by job role, and more from O’Reilly and nearly 200 top publishers.
