Indiana Jones is one of my favorite movie trilogies of all time, and Harrison Ford was a hero to me when I was growing up. Something I always loved about Indy was how he cracked his whip. In fact, I first learned what a bullwhip was watching Raiders of the Lost Ark.
The first two movies—Raiders of the Lost Ark, and Indiana Jones and the Temple of Doom—dealt with Indiana Jones the adult, already fully hardened and cranky. As I watched one movie after another, I wondered about his trademark hat and whip—why the fedora and why on earth a whip?
Finally, all was answered in the third movie of the trilogy, Indiana Jones and the Last Crusade. It was one of those satisfying aha moments that—although not at all that important in the overall scheme of things—gave Indy an origin, explaining the hat and the whip and why he did what he did.
So what does this have to do with a programming book? Just as the hat and the whip were indispensable tools for Indy, Ruby and R will be our two main tools in the rest of this book. And just as the hat and whip were not conventional tools for archaeology professors doing field work, neither are Ruby and R conventional tools for exploring the world around us. They just make things a whole lot more fun.
Each of these tools will need its own chapter. We’ll start off first with Ruby and then discuss R in the next chapter. Obviously, there is no way I can explain the entire Ruby programming language in a single chapter of a book, so I will give enough information to whet your appetite and hopefully entice you to proceed to the juicier books that discuss Ruby in more depth.
One of the first questions you might ask (unless you’re a Ruby enthusiast and you already know, in which case you can just nod along) is why did I choose Ruby as one of the two tools used in this book? There are a number of very good reasons. However, there are a couple that I want to focus on, specific to the goals of this book.
First, Ruby is a programming language for human beings. Yukihiro “Matz” Matsumoto, the creator of Ruby, often said that he tried to make Ruby natural, not simple, in a way that mirrors life. Ruby programming is a lot like talking to your good friend, the computer. Ruby was designed to make programming fun and to put the human back into the equation for programming. For example, to print “I love Ruby” 10 times on the screen, simply tell the computer to do exactly that:
10.times do
  puts "I love Ruby"
end
If you’re familiar with C programming and its ilk, like Java,
you’ll already know that to check whether the variable
a_statement is true, you need to do something like
this (note that in C you will need to use the integer
1 instead of true, since C doesn’t
have a Boolean type):
a_statement = true;
if (a_statement == true) {
  do_something();
}
While you can certainly do the same in Ruby, it also allows you to do something like this:
do_something if a_statement
This results in code that is very easy to read and therefore to maintain. While Ruby can have its esoteric moments, it’s generally a programming language that can allow someone else to read and understand it easily. As you can imagine, this is a feature that is very useful for this book.
Secondly, Ruby is a dynamic language, and what that means for you as a reader of this book is that you can copy the code from this book, plop it in a file (or the Interactive Ruby shell, as you will see later), and run it directly. There is no messy setting up of makefiles or getting the correct paths for libraries or compiling the compiler before running the examples. Cut, paste, and run—that’s all there is to it.
While these are the two primary reasons I used Ruby in this book, if you’re keen to understand why many other programmers have turned to Ruby, you can take a look at the Ruby website (http://www.ruby-lang.org) or search around the Internet, and you’ll find plenty of people gushing over it.
Of course, before we can even start using Ruby, we need to get it into our machines. This is generally a simple exercise. There are three main ways of getting Ruby in your platform of choice, depending on how gung-ho you are.
If you’re feeling pretty ambitious, you can try compiling Ruby. This mostly means that you need to have the tools to compile Ruby in your platform, so unless you really want to get serious with Ruby, I suggest that you install it from a precompiled binary, either through a third-party tool or your platform’s usual package management tool.
To compile Ruby from source, go to http://www.ruby-lang.org/en/downloads and download the source, then compile it using your platform compiler. You can get more information from the same site.
Alternatively, you can use one of these popular third-party tools. The recommended approach is to go with the first, which is Ruby Version Manager if you’re running on OS X or Linux, and RubyInstaller if you’re on Windows.
RVM is probably the most popular third-party tool around for non-Windows platforms. A distinct advantage of using RVM is that you will be able to install multiple versions of Ruby and switch to any of them easily. Installing RVM, while not very difficult, is not a single-liner. As of today at least, this is the way to install RVM.
First, you need to have Git and curl installed. Then, issue this command in your console:
$ curl -L get.rvm.io | bash -s stableThen, reload your shell by issuing this (or a similar command, depending on your shell):
$ source ~/.profileThis will allow you to run rvm. The next
thing you should do is to check whether you have all you need to
install Ruby:
$ rvm requirementsOnce you have that, use rvm to install the
version of Ruby you want. In our case, we’ll be using Ruby
1.9.3:
$ rvm install 1.9.3After this, check whether the Ruby version you wanted is correctly installed:
$ rvm listYou should see a list (or at least one) of RVM Rubies installed. If this is your first time installing, there will not be any default Ruby, so you will need to set one by issuing the following command:
$rvm alias create defaultruby_version
Replace ruby_version with the
version you’ve just installed (such as ruby
1.9.3p125), and you’re done! Check out the RVM website at https://rvm.io/ for more installation instructions in
case you’re stuck at any point in time.
If you’re using Windows, you can’t install RVM. In that case, you can either create a virtual machine, install your favorite GNU/Linux distro, and then proceed; or just use RubyInstaller, which is frankly a lot easier. Simply go to http://rubyinstaller.org/downloads, download the correct version, and then install it. RubyInstaller includes many native C-based extensions, so that’s a bonus. It is a graphical installer, so it’s pretty simple to get a fresh installation set up quickly.
If none of the approaches listed so far suits you, then you can opt to use your system’s package management tool. For Debian systems (and this includes Ubuntu), you can use this command:
$ sudo apt-get install ruby1.9.1This will install Ruby 1.9.2. Yes, it’s weird.
For Macs, while Ruby comes with OS X, it’s usually an older version (Lion comes with Ruby 1.8.7, and the previous versions come with even older versions of Ruby). There is a popular package management tool in OS X named Homebrew, which helps you to replace this with the latest version of Ruby. As you would guess, you’ll need to install Homebrew first. Run this command on your console:
$ /usr/bin/ruby -e "$(curl -fsSL https://raw.github.com/gist/323731)"Then install Ruby with this simple command:
$ brew install rubyOnce you have installed Ruby with any of the preceding methods, it’s time to start using it! Unlike compiled languages such as C, C++, or Java, you don’t need to have an intermediate step to generate executable files before running Ruby.
There are a few ways of running Ruby code, but the easiest way to get started is probably using the interactive Ruby tool that’s built into your Ruby installation. irb is a Ruby REPL (read-eval-print loop) application, an interactive programming environment that allows you to type in Ruby commands and have them evaluated in real time:
$irbruby-1.9.3-p125 :001 >puts "hello world!"hello world! => nil ruby-1.9.3-p125 :002 >
Note that once you have typed in a Ruby statement (in this case,
we are placing the string “hello world!” to the standard output), the
statement is evaluated immediately, resulting in “hello world!” being
printed on the screen. After that, irb tells you
the statement evaluates to nil, because the Ruby puts statement returns a nil. If you have put
in a statement like this:
$irbruby-1.9.3-p125 :001 >1 + 1=> 2 ruby-1.9.3-p125 :002 >
This statement returns 2, which
is the result of the evaluation. irb
is a tool you will quickly get used to and will be using whenever you’re
not sure what the result is going to be.
Another common method of running Ruby is to save your code in a
file and then run your file through the Ruby interpreter. For example,
you could save puts "hello world!" to a file named
hello_world.rb. After that, you can
try this command at the console:
$ ruby hello_world.rb
hello world!While you can probably get away with writing simpler Ruby programs without any other libraries than the ones built into Ruby itself, most of the time you’ll need some external libraries to make life easier. Two sets of Ruby libraries come preinstalled with Ruby.
- Core
This is the default set of classes and modules that comes with Ruby, including
String,Array, and so on.- Standard
These libraries, found in the /lib folder of the Ruby source code, are distributed with Ruby but are not included by default when you run it. These include libraries such as Base64, Open URI, and the Net packages (HTTP, IMAP, SMTP, and so on).
To use the standard libraries and any other libraries other than the Ruby core, you will need to require them in your program:
require 'base64'
In addition to the standard libraries, you will often need to use external libraries developed by the Ruby community or yourself. The most common way to distribute Ruby libraries is through RubyGems, the package manager for Ruby. It’s distributed as part of Ruby in the standard library, so you can use it out of the box once Ruby is installed.
Just as apt-get and yum manage packages on a Linux distribution, RubyGems allows you to easily install or remove libraries and Ruby applications. To be distributed through RubyGems, the library or application needs to be packaged in something called a gem, which is a package of files to install as well as self-describing metadata about the package.
Gems can be distributed locally (passed around in a .gem file) or remotely through a gem server. A few public gem servers provided gem hosting in the past, including RubyForge, GitHub, and GemCutter, but recently they have been more or less replaced by RubyGems. In RubyGems lingo, gem servers are also known as sources. You can also deploy a private gem server where you publish private gems that you pre-package for internal use.
To add sources to your RubyGems installation, you can do this:
$gem sources -addhttp://your.gemserver.org
To install a local gem, you can do the following at the console:
$gem installsome.gem-local
You can do away with the -local option, but
doing so will add a bit of time because the command will search the
remote sources. Setting the local option tells RubyGems to skip that. To
add a gem from a remote source, you can generally do this:
$gem installsome_gem
You can also install specific versions of a gem like so:
$gem installsome_gem-version 1.23
To list the gems that you have installed locally, you can do this:
$ gem list -localWith the setup complete, let’s get started with Ruby!
Manipulating strings is one of the most basic things you normally do in a program. Any programming language worth its salt has a number of ways to manipulate strings, and Ruby is no exception. In fact, Ruby has an embarrassment of riches in terms of its capability to manipulate strings.
Ruby strings are simply sequences of characters. There are a
few ways of defining strings. The most common ways are probably
through the single(') and double(") quotes. If you define a string with double quotes, you can use
escape sequences in the string and also perform substitution of Ruby
code into the string using the expression #{}. You
can’t do this inside single-quoted strings:
"There are #{24 * 60 * 60} seconds in a day"=> "There are 86400 seconds in a day"'This is also a string'=> "This is also a string"
Strings can also be defined using %q and
%Q. %q is the same as
single-quoted strings, and %Q is
the same as double-quoted strings, except that in these cases the
delimiters can be anything that follows %q or %Q:
%q/This is a string/=> "This is a string"%q{This is another string}=> "This is another string"%Q!#{'Ho! ' * 3} Merry Christmas\!!=>"Ho! Ho! Ho! Merry Christmas!"
Finally, you can also define a string using a here-document. A here-document is a way of specifying a string in command-line shells (sh, csh, ksh, bash, and so on) and in programming or scripting languages such as Perl, PHP, Python, and, of course, Ruby. A here-document preserves the line breaks and other whitespace (including indentation) in the text:
string = <<END_OF_STRING
   The quick brown fox jumps
   over the lazy dog.
END_OF_STRING
=> "   The quick brown fox jumps\n   over the lazy dog.\n"
Take note that the delimiter is the string after the << characters—in this case, END_OF_STRING.
Although I can’t list everything that Ruby provides for string manipulation in this section, here are a few things it can do:
a = "hello " b = "world" a + b=> "hello world" # string concatenation (this adds b to a # to create a new string)a << b=> "hello world" # append to string (this modifies a)a * 3=> "hello hello hello" # you can repeat strings by simply # multiplying themc = "This is a string"# splitting a string according to a delimiter, # any space being the default delimiter c.split => ["This", "is", "a", "string"]
Just as important as strings, and perhaps sometimes even more so, is being able to manipulate data structures. The two most important data structures, which you’ll meet very often in this book (and also in Ruby programming), are arrays and hashes.
Arrays are indexed containers that hold a sequence of objects.
You can create arrays using square brackets ([]) or using the Array class. Arrays are indexed through a
running integer starting with 0, using the [] operator:
a = [1, 2, 'this', 'is', 3.45]a[0]# 1a[1]# 2a[2]# "this"
There are other ways of indexing arrays, including the use of ranges:
a[1..3] # [2. 'this', 'is']You can also set items in the array using the same operator:
a[4] = 'an'
a   # [1, 2, 'this', 'is', 'an']
Arrays can contain anything, including other arrays:
a[5] = ['another', 'array']
a   # [1, 2, 'this', 'is', 'an', ['another', 'array']]
If you’re used to manipulating data structures, you might be wondering why I’m discussing only arrays and hashes in this section. What about the other common data structures, like stacks, queues, sets, and so on? Well, arrays can be used for them as well:
stack = [] stack.push 1 stack.push 2 stack.push 'hello' stack# [1, 2, 'hello']stack.pop # 'hello' stack# [1, 2]
Tons of other methods can be used on arrays; you can find them
through the reference documentation on the Ruby website, or even
better, by firing up irb and
playing around with it a bit. A common way of iterating through arrays
is using the each method:
a = ['This', 'is', 'an', 'array']

a.each do |item|
  puts item
end
This will result in each item in the array being printed out at
the standard output (i.e., the console). In the preceding code, the
loop starts with do and ends with
end. It runs for each of the four
items in the array; here, we chose the variable item to represent the item within the loop.
We use vertical bars to surround the variable name
item. Sometimes, for brevity, we can replace the
do … end with a pair of curly braces {}. This
code produces the following results:
This
is
an
array
Notice that the items in the array are printed in the same sequence in which they are defined.
While arrays have a lot of methods, you should also be aware
that Array inherits from the Enumerable
module, so it also implements those methods. We’ll get to Enumerable shortly.
Hashes are dictionaries or maps, data structures that index
groups of objects. The main difference is that instead of having an
integer index, hash indices can be any object. Hashes are defined
using curly braces {} or the Hash
class, and indexed using square brackets:
h = { 'a' => 'this', 'b' => 'is', 'c' => 'hash'}

h['a']      # "this"
h['b']      # "is"
h['c']      # "hash"
Setting an item in a hash also uses the square brackets:
h['some'] = 'value'
h   # { 'a' => 'this', 'b' => 'is', 'c' => 'hash', 'some' => 'value'}
The hash rocket style of assigning values to keys in hashes was changed in Ruby 1.9. While that still works, the new syntax is simpler and more crisp. The following lines of code do exactly the same thing:
h = { canon: 'camera', nikon: 'camera', iphone: 'phone'}
# is the same as
h = { :canon => 'camera', :nikon => 'camera', :iphone => 'phone'}
There are many ways of iterating through hashes, but here’s a common way of doing it:
h = { canon: 'camera', nikon: 'camera', iphone: 'phone'}

h.each do |key, value|
  puts "#{key} is a #{value}"
end
Just as we used vertical bars earlier to name item as the variable to represent items from
an array, here we use vertical bars to name two variables. The first
represents each key in the hash, and the second represents its
associated value. This code produces the following results:
canon is a camera
nikon is a camera
iphone is a phone
Both Array and Hash inherit from—that is, are subclasses
of—Enumerable. Enumerable is a module that provides
collection classes with a number of capabilities, including several
traversal and searching methods, and the ability to sort. A very
useful method (we’ll get to methods in a bit) in Enumerable is the map method, which runs through each item in
the collection, performs the action given by the block, and then
returns a new array with the new values. The input to map in the following example is a range of
digits (1, 2, 3, and 4), and its output is the square of each
input:
(1..4).map do |i|
  i*i
end   #[1, 4, 9, 16]
The max_by and min_by methods are also useful. These, as
you might have guessed, return the maximum or minimum item in the
array:
a = ["cat", "horse", "monkey"]
a.min_by {|i| i.length}   # "cat"
a.max_by {|i| i.length}   # "monkey"
As before, read up on the available methods in
Enumerable and try them out in irb.
Ruby includes the concept of symbols,
which are constant names. Symbols start with a colon, followed by some
kind of name. For example, :north
and :counter are symbols. Symbols
are often useful in situations where you need some kind of identifier.
Using strings would be overkill since each string you create is a new
object. Symbols, once defined, always refer to the same object that
was originally created.
If you have done any sort of programming, conditionals and loops in Ruby should look very familiar to you. Ruby has direct and indirect ancestry of C, so its conditional syntax is very similar to C’s syntax.
The if expression in
Ruby is pretty similar to that of other languages:
if pet.is_a? Dog then
  wag :tail
elsif pet.is_a? Cat then
  meow
else
  do_nothing
end
The keyword then is
optional if every statement is on a new line. The negated and
opposite of if is unless:
unless visitor.friend?
  bark :loudly
else
  wag :tail
end
Sometimes, when you don’t have an else statement, you can use if and unless as statement
modifiers. Statement modifiers are just that—they modify
the statements given that the conditional is satisfied.
wag(:tail) if pet.is_a? Dog

bark(:loudly) unless visitor.friend?
In the preceding code, the method wag will be called if the
pet object is of the class Dog. The method bark will be called unless the visitor is
a friend.
Finally, just as in C, Ruby recognizes the ternary conditional expression:
visitor.friend? ? wag(:tail) : bark(:loudly)
if visitor.friend? then
  wag(:tail)
else
  bark(:loudly)
end
In Ruby, there are two ways to use a case expression. The first is similar to a
series of if and elsif statements:
case
when visitor.friend?
  wag :tail
when visitor.postman?
  chase
when visitor.carries :big_juicy_bone
  jump_on visitor
else
  bark :loudly
end
The second way is more common, though. Specify a target along
with the case, and each when
clause does a comparison with the target:
case visitor.name
  when "Harry" then greet("Hello and welcome!")
  when "Sally" then greet("Welcome my dear!")
  when "Joseph" then greet("They are not here yet")
  else do_not_open_door
endThe two main looping mechanisms in Ruby are while and its negated form, until. while loops through the block zero or more
times as long as its condition is true, and until does the opposite—it loops through
the block until the condition becomes true:
while visitor.hungry?
  offer food
end
# is the same as
until visitor.full?
  offer food
end
As you can see, both forms do exactly the same thing. So why would you have both ways and not just one? Remember that Ruby can be expressive and often tries to make programs more intelligible. Although both forms are the same, sometimes it’s just more natural to do it one way or the other.
Like if and unless, both while and until can be used as statement
modifiers:
offer(food) while visitor.hungry?
# is the same as
offer(food) until visitor.full?
Something you will often hear about Ruby is that everything in Ruby is an object. That sounds a bit extreme and is not technically true. Certainly keywords, such as the if-else conditional syntax, are not objects. However, everything that you manipulate within Ruby is an object. Even classes are objects, and so are methods. And everything actually evaluates to an object. Let’s see how this works.
The classic way of creating objects is to instantiate one from a class:
class Dog
  attr :breed, :color, :name

  def initialize(name, color, breed)
    @name, @color, @breed = name, color, breed
  end

  def bark(volume=:softly)
    make_a_ruckus(volume)
  end
end
If you have done any form of object-oriented programming in
other languages, this should be familiar to you. If you haven’t done
this before, this seems like a bit of a puzzle, but it’s easily
explainable. The previous code defines a class, which is somewhat like
a template from which you create instances or objects. In this
example, I defined a Dog class,
which has attributes like breed and
color, as well as a name for each instance of the
class. The keyword attr is a
method call that helps me create three instance variables (breed, color, and name) along with some standard methods that
access these variables. Instance variables in Ruby start with @.
The lines that start with def define methods. Methods are functions
that belong to objects and are called on that object. The example has
two methods: initialize and
bark.
initialize is a convenience method. Whenever Ruby creates a new
object, it will always look for a method named initialize and call it. In our initialize method, we set up each of the
instance variables with a value from the parameter.
The bark method, well, simply
makes a ruckus. Its definition shows how to assign a default value
(softly) to an argument if the
argument is not passed by the calling method.
So how do we create an object from this Dog class?
my_dog = Dog.new('Rover', :brown, 'Cocker Spaniel')my_dog is a variable that
contains an object that has just been instantiated from the Dog class, with values sent to the initialize method to give the name, color,
and breed.
As mentioned, you can define methods using the def keyword, followed by the method name.
Method definitions can take in zero or more parameters. If you don’t
need parameters for your method, you can do away with the brackets
altogether:
def growl
  make_a_ruckus(:very_softly)
end
As you might have noticed from the Dog class, you can also set default values
to method parameters:
def bark(volume=:softly)
  make_a_ruckus(volume)
end
In the preceding code, the default value for the volume, which
is a parameter, is the symbol :softly. If you include a default value in
the parameter, when you call the method you can either include the
parameter or omit it:
my_dog.bark           # in this case dog barks softly
my_dog.bark(:loudly)
For methods with multiple parameters, it’s common practice to place the parameters with defaults after the ones that do not have defaults. If the parameters without defaults came after the ones with defaults, setting the default would become meaningless because each time the method is called, the parameter must always be given.
Methods always return a value, which can be an array in order
to incorporate multiple values. To return a value, you can either
specify it directly with the return
keyword, or simply let the method end, in which case it will return
the last evaluated value.
So far we’ve been talking about instances of a class. An
earlier example instantiated the my_dog object from the Dog class. Variables and methods really
belong to the my_dog object and are
called on the my_dog object only.
For example, given the previous definition of the Dog class, you can’t really do this:
Dog.bark
Logically speaking, since Dog
is the template by which dogs are created, calling the bark method on Dog means asking all dogs to bark! However,
in many cases (and if you’ve done object-oriented programming before,
you’ll understand what I’m referring to), you will need to call upon
methods and even variables that belong to the class instead of the
object. How can we do this?
Earlier I said that even classes are objects. What we’re doing
next is really nothing more than treating a class as an object. To
define a class method, simply prefix the name of the method with
self:
class Dog
  attr :breed, :color, :name

  def self.total_count
    # return the total number of dogs in the system
  end

  # other methods
end
self is a keyword that
represents the current object (like this in C++ or Java). While we’re defining a
class, the current object is the class that’s being defined. By
defining a method with self in the
class definition, we’re saying we want to add this method to the class
itself, not to an instance of the class. In this case, we’re adding a
method to the Class object that’s
an instance of the Class class.
You’ll see a lot of this when we need to define methods that will work
on the class itself.
Defining class variables is quite straightforward. Simply prefix
the name of variable with @@:
class Dog
  @@count = 0
  attr :breed, :color, :name

  def self.total_count
    @@count
  end

  def initialize
    @@count += 1
    # other initialization
  end


  # other methods
end
Notice that the @@count class
variable is initialized to zero during the class definition. This is
done once only. It would normally be a mistake to initialize a class
variable in the initialize method, because the initialize method is
called every time a new object is instantiated. This means that the
class variable is reset every time a new object is created!
Inheritance is one of the cornerstones of object-oriented programming. Inheritance in Ruby is pretty conventional. To subclass from another class, do this at the class definition:
class Spaniel < Dog
  # other definitions
end
This creates a subclass named Spaniel that inherits everything from the
Dog class, including methods and
variables. This begs the question: if Spaniel is the subclass of Dog, Dog
is the subclass of what? You can find out by calling the superclass method on the
Dog class itself. Remember that Dog is actually an object, so you can call
methods directly on it:
Spaniel.superclass      # Dog
Dog.superclass          # Object
Object.superclass       # BasicObject
BasicObject.superclass  # nil
As you can see, Dog is a
subclass of the Object class (which
is an object—does your head hurt yet?) and Object is the subclass of BasicObject. As it turns out, that’s the end
of the line—and it’s not turtles all the way
down.[2]
Now that we have defined the Spaniel class, what happens if we call the
bark method? Since bark is not defined in Spaniel, it will reach out to its
superclass—in this case, Dog—and
call the same method on Dog. Of
course, if Ruby can’t find bark in
the Dog class, it will continue
bubbling up the object hierarchy until it hits BasicObject, and then finally throw a
NoMethodError.
You cannot subclass from more than one superclass. While some languages allow multiple inheritance, Ruby supports single inheritance only. However, Ruby has a mechanism you can use to mimic multiple inheritance: the mixin mechanism, using modules.
Modules are simply a way to group methods, classes, and constants to provide a namespace and prevent name clashes. In addition, Ruby enables mixins if you include modules in the class. Because we can include more than one module in a class, we can simulate the effects of multiple inheritance.
Let’s take the example of the Dog class further by defining a superclass
for Dog called Canine:
class Canine
  # some definitions
end

class Wolf < Canine
  # some definitions
end

class Dog < Canine
  # some definitions
end
Now, dogs are pets too, so if we want to bunch together some
methods and variables for a Pet
class, how do we make Dog inherit
methods or variables from Pet? We
can’t do this in Ruby because it is single inheritance. Instead, we
can convert Pet into a
module:
module Pet
  def scratch_stomach
    # there's a good boy!
  end
end

class Dog < Canine
  include Pet
  # some definitions
end
This way, Dog can inherit the
methods in Pet and Canine without violating single inheritance.
An example of a mixin, which you may remember from Arrays and hashes, is that both Array and Hash classes include the Enumerable module.
Ruby and languages like Python, PHP, and Smalltalk, are well known to be dynamically typed, versus languages like C and Java that are statically typed. Essentially, a language is statically typed if the programmer needs to specify the data type in the code, and the compiler will check and complain if the types don’t match. Dynamically typed languages, on the other hand, don’t need to specify the data type in the code, and leave type checking to the runtime.
For example, in Java, you need to first declare a variable, then assign it to a value:
int count = 100;
However, in Ruby, you only need to do this:
count = 100
You are expected to use the variable properly—that is, if you
placed an integer into the variable, you’re expected to use it as an
integer in your code. When you use count, Ruby knows that it’s an integer and
you’re expected to use it as such. However, if you don’t, Ruby will
automatically cast it to whatever you’re trying to use it for.
This process is known as duck
typing.
The idea behind duck typing comes from the duck test: “if it walks like a duck, and quacks like a duck, then it is a duck.” What this means is that the type of the object is not determined by the class of the object. Instead, the type depends on what the object can do.
A simple example goes like this. Let’s say we define a method
named op:
def op(a,b)
  a << b
end
The method takes two parameters and returns a single value.
Nowhere in this definition are the parameter types specified. The
returned value’s type is not specified either. A potential infestation
of bugs? Let’s see how we use this method. If x and y
are both strings, the return result is also a string. No problem
here:
x = 'hello '
y = 'world'

op(x,y)
=> 'hello world'
If x is an array and y is a string, the method appends y into the x, returning an array:
x = ['hello']
y = 'world'

op(x,y)
=> ["hello", "world"]
If x and y are integers, the method will perform a
left-shift bitwise operation, moving binary 1 two positions to the
left, resulting in 4:
x = 1
y = 2

op(x,y)
=> 4
So what does this mean? There are both benefits and drawbacks to duck typing. The most obvious drawback is that we have a method that is inconsistent: if we put different values into the method, we can get wildly different results, and this is not checked anytime before the actual running of the program.
However, the major benefit of this approach is that it results in much simpler code. If you know what you’re doing, it can lead to code that is easier to read and to maintain.
Ultimately, duck typing is more of a philosophy than a fixed way
of coding in Ruby. If you want to ensure that the op method you defined can be used only for
strings, for example, you can always do this:
def op(a,b)
  throw "Input parameters to op must be string"
    unless a.is_a? String and b.is_a? String
  a << b
end
This will throw an exception if either a or b is
not a string.
The second part of this chapter will introduce Shoes, a Ruby-based user interface toolkit. Shoes is not commonly used as a UI toolkit, and Ruby itself doesn’t have significant strength for building desktop graphical user interfaces. Among the other more popular Ruby UI toolkits (in case you want to get serious later on) are FXRuby, WxRuby, qtRuby, and Tk. If you’re looking for something totally cross-platform, JRuby with Swing is a good option, although there are other alternatives to Swing, like SWT and Limelight. For Macs, a good alternative is MacRuby.
However, in this book, we’ll be using Shoes.
Shoes is a cross-platform toolkit for writing graphical applications with Ruby. It’s entirely and purely Ruby, quite unlike most other toolkits, which are usually Ruby bindings of existing UI toolkits. It’s also dead easy, and that’s a primary motivation for using Shoes in this book.
Shoes was originally created by why the lucky stiff (yes, that’s his name), a rather famous if mysterious Ruby programmer who also draws cartoons and plays music. He is probably most famous for writing Why’s (poignant) Guide to Ruby, a totally un-programming-book-like book that teaches Ruby programming.
For unknown reasons, _why (as he is also known) removed his Twitter and GitHub accounts suddenly in August 2009 and shut down his personal sites, many of which were popular haunts for Ruby programmers. However, many of his projects, including Shoes, were collected and continued by the Ruby community.
Ruby is red and so is Shoes. Red Shoes is based on C and is the original version of Shoes written by _why. When the community took over after _why left, there were experiments to try out different types of Shoes, and each was “colored” differently.
- Red Shoes
This is the original written by _why, based on C.
- White Shoes
This is called the meta-Shoes, the most generic of all Shoes. It’s basically a set of RSpec tests to make sure that all other Shoes are compliant to a standard.
- Blue Shoes
This is built on top of the Qt framework, which is written in C++ and is the original UI framework for Ruby.
- Green Shoes
This is the closest in spirit to Red Shoes because it uses GTK and Cairo’s Ruby bindings. It’s also one of the most advanced (as of this writing).
- Brown Shoes
This is the version of Shoes written in JRuby and is based on Swing.
In this book, when I refer to Shoes, I am referring to Red Shoes, which in fact is the only version of Shoes that I’ve run my code against. The standard disclaimer is that the code might not necessarily run properly in any other color Shoes. You’re more than welcome to try them out, though!
Installing Shoes is usually really easy. If you’re using a Mac or Windows, just download it from the Shoes website (http://shoesrb.com/downloads) and install it on your platform of choice. Using Shoes, however, is not conventional. Unlike most Ruby programs, which can be run through a console, you need to open the Shoes application, then use it to open and run your Shoes program. Alternatively, you can do the following on a Mac, or the equivalent on Windows:
$ /Applications/Shoes.app/Contents/MacOS/shoes test_shoes.rbIf you’re using a variant of Linux, installing Shoes can be a bit more involved. As of this writing, the best way of getting Shoes on the Linux variant of your choice is to build it entirely from source. It’s not as difficult as it seems. You do, however, need to install some other libraries it depends on. Here are the steps that are common to all Linux variants:
$git clone git://github.com/shoes/shoes.git$cd shoes$gem install bundler$bundle install$rake
For more detailed information, you can refer to https://github.com/shoes/shoes/wiki/Building-Shoes-on-Linux.
One of the main reasons I picked Shoes as the UI toolkit for this book is that it’s really simple to create reasonably good graphical interfaces. Because it’s Ruby (as opposed to a Ruby binding for another toolkit), the code is typically very readable and easy to understand.
A simple Shoes program looks like this:
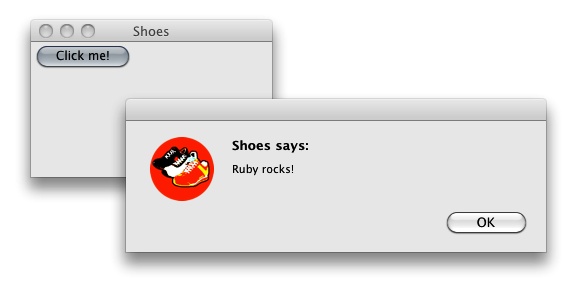
Shoes.app do
  button("Click me!") do
    alert("Ruby rocks!")
  end
end
This produces a simple window with a single button labeled “Click me!” When the button is clicked, an alert dialog box pops up (Figure 1-1).
While Shoes is a simple UI toolkit, there’s still lots of stuff in there that is impossible to describe completely in a few sections of a chapter. I’ll just go through a couple of basic examples. Let’s start by building a simple stopwatch application.
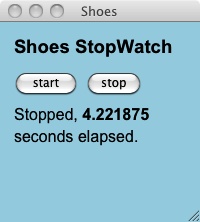
In this example, I’ll show how Shoes can be used to build the very simple stopwatch in Example 1-1.
Example 1-1. Shoes stopwatch
Shoes.app height: 200, width: 200 do
  background lightblue
  stack margin: 10 do
    caption strong "Shoes StopWatch"
    flow do      button "start" do
        @time = Time.now
        @label.replace "Started at #{@time.strftime '%l:%M:%S %p'}"
      end
      button "stop" do
        @label.replace "Stopped, ", strong("#{Time.now - @time}"),
          " seconds elapsed."
      end
    end
    @label = para "Press ", strong("start"), " to begin timing."
  end
end
All Shoes apps must be wrapped by a call to Shoes.app. You can optionally set a
configuration for the window that starts up. In this example, we set
the height and width of the window. The first line in the example sets
a background color for the window. This is not always necessary, but
notice that the color lightblue is
predefined in Shoes. There is a list of default colors from the X11
and HTML palette that Shoes predefines with intuitively simple names.
If you are inclined to build your own custom colors, you can use the
rgb method to create them.
Elements in Shoes applications are laid out using slots, which are simply containers for elements and other slots. Slots can be also be nested, so you can build quite a complicated layout by nesting slots and elements. There are two common types of slots: stacks and flows.
- Stack
A stack is a collection of elements that are laid out one on top of another in a column. The stopwatch in Example 1-1 places three items in the stack: a caption text block, a flow slot, and a para text block.
- Flow
A flow slot lays out its elements in a horizontal sequence, one after another, packed tightly. The stopwatch in Example 1-1 places two buttons in a flow, one labeled “start” and the other labeled “stop.”
You can also set configuration parameters in the slots. The stack in the stopwatch example uses a margin of 10 pixels.
The button element creates a
button for the application. If you send in a block of code as shown in
the example, the code will be executed when the button is clicked.
Alternatively, you can also set the button’s click behavior using the
click method shown later.
Run the previous code, and you’ll see the stopwatch in Figure 1-2.
That was quite a conventional user interface application. Let’s do something more arty.
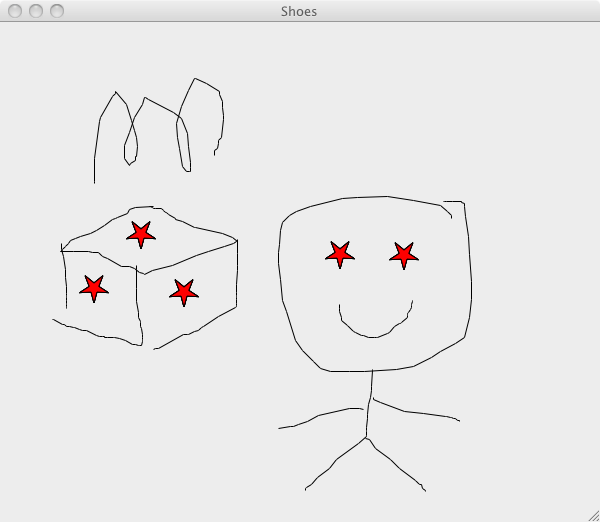
Let’s write a simple doodling application. Example 1-2 is a standard demo application type and not very useful, but it illustrates some basic concepts in Shoes.
Example 1-2. Shoes doodler
Shoes.app do
  fill red
  orig_left, orig_top = nil, nil
  animate 24 do
   button, left, top = self.mouse
   line(orig_left, orig_top, left, top) if button == 1
   star(orig_left, orig_top, 5, 15, 5)  if button == 3
   orig_left, orig_top = left, top
  end
 end
If anything, this application looks even simpler than the stopwatch!
Let’s start by describing the animate method. This method starts an
animation timer that runs in parallel with the rest of the
application. We specify the number of frames per second the loop will
be called, so the application will loop endlessly. As you might have
guessed, this is an excellent method that can be used in running
simulations.
The self.mouse method returns
an array of three numbers. The first is the number of the mouse button
that is clicked. If the mouse button is not clicked, this will be 0.
The second and third numbers indicate the left and top positions of
the cursor. We take these numbers and assign them according to the
variables button, left, and top.
Now when the left button (or button 1) is clicked, we draw a
line from where the cursor was positioned originally to where it is
now. Because we’re looping in an animate loop, if we move the mouse around,
this will produce the effect of drawing something on the
screen.
Similarly, if we click button 3 (usually the wheel button), we will draw a star. And because we specified that all shapes that we draw will be filled with red, we’ll be drawing red stars at the position of the cursor. See Figure 1-3 for a sample run.
It’s impossible to stuff everything about Ruby into a single book, much less a single chapter. What I hope I’ve done here is introduce you to the language and provide you with a glimpse of what Ruby is able to do. I’ve skipped many of its more exciting features, including the much-talked-about metaprogramming capabilities. That topic could be and is a whole book on its own. I’ve also given you a quick introduction to Shoes, a simple but powerful UI toolkit for Ruby, and provided a couple of examples of how to program graphical user interface applications with it. What I’ve described in this chapter is a good start, and should provide you with enough foundation to explore the rest of the code in this book.
Onward!
[2] From Stephen Hawking’s book, A Brief History of Time (Bantam):
A well-known scientist (some say it was Bertrand Russell) once gave a public lecture on astronomy. He described how the earth orbits around the sun and how the sun, in turn, orbits around the center of a vast collection of stars called our galaxy. At the end of the lecture, a little old lady at the back of the room got up and said: “What you have told us is rubbish. The world is really a flat plate supported on the back of a giant tortoise.” The scientist gave a superior smile before replying, “What is the tortoise standing on?” “You’re very clever, young man, very clever,” said the old lady. “But it’s turtles all the way down!”
Get Exploring Everyday Things with R and Ruby now with the O’Reilly learning platform.
O’Reilly members experience books, live events, courses curated by job role, and more from O’Reilly and nearly 200 top publishers.

