You’ve already learned enough to start doing productive work with JDS. If you are in a work environment, the JDS installation probably connected you to your organization’s network, and through this internal network to the larger Internet. If so, you can jump right to Chapter 6 to try out email, web browsing, and instant messaging.
If you are at home or in a small office and have a connection through an Internet service provider, you may need to perform a few more steps to use your Internet connection. You may also need to do more work to use a wireless connection or share resources on your system with others. JDS comes with a Configuration Assistant that can have you up and running with an Internet connection in just a few minutes. You need a Linux compliant modem and/or network card for this to work. Some of the questions this chapter can answer include:
How do I set up an Internet connection?
How do I share documents, resources, and/or my Internet connection?
What if I have different operating systems running on my network; how do I make them work together?
JDS and Linux exist as children of the Internet. Unlike other operating systems, Linux developers built Linux from the ground up as an Internet OS. All a computer needs to work in almost any Internet capacity comes with Linux.
JDS works well with DSL or cable. If you have a high-speed connection, you belong to a group of millions of people who will not need a conventional dial-up modem. Instead, your computer needs a network card. Most newer computers have network facilities and dial-up modems built into the main circuit board or motherboard. JDS can recognize the chipmaker of the cards and pre-configure its network connection.
The network card of the PC needs to communicate with your DSL or cable modem. If you have a broadband connection, your provider probably furnished you with a modem. Your provider also gave you an Internet identification number. Every computer on the Internet requires a unique ID number that we commonly call an IP address. Your provider set your system to get one automatically each time you connect to the provider.
Figure 4-1 shows that two options are available when you use a network card. The first option, called automatic address setup, uses a method known as Dynamic Host Configuration Protocol (DHCP). It’s extremely simple for you to configure and works well for nearly all home and small office users. The ISP’s DHCP server provides you an IP address and other networking information without your intervention.
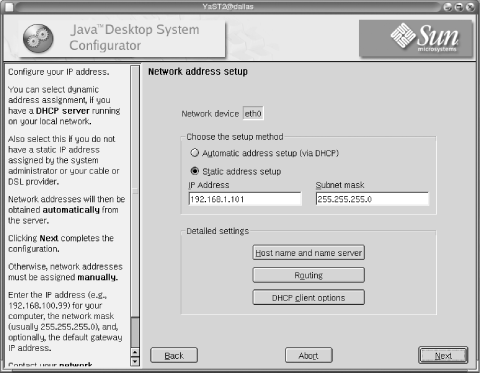
The second configuration method allows for static addresses. This is for more advanced users who want to run servers on their systems, and requires you to do more work. (The sidebar Configuring a Static Address summarizes what an advanced user needs for this type of configuration.)
Your Internet provider will furnish you with the information you need to set up your connection. You do not need to become a networking guru to use JDS.
To configure the network card of your PC or laptop, follow these steps:
Select Launch → Preferences → System, which opens a Nautilus browser window showing the location system-settings:///.
In this window, double-click the Hardware icon.
In the Hardware window, double click the Network Card icon and provide the password of the root user if prompted for it.
Now you’re in the Yast2 configuration window. Select the Change buttons below the “Already configured devices” section.
In the Network cards configuration overview window, select the Edit button.
Select the “Static address setup” option and fill out the IP address in the IP Address text field. In the “Subnet mask” field, fill out the value (usually 255.255.255.0).
Click the Next button and then the Finish button.
Completely log out from the Sun Java Desktop System and then log back in. If your network does not appear to be active, you can reboot your PC to make the changes effective.
To set up the Sun Java Desktop System with a broadband Internet connection, follow these steps:
Select Launch → Preferences → System to open the system-settings:// window.
In this window, double-click Network Settings.
In the Network Settings window select DSL Network.
Provide the root password, if asked.
In the DSL configuration screen, perform the following actions:
Enter the user name and password for the broadband account.
Make sure the PPP mode is set to PPP over Ethernet, or PPP over ATM, depending on your country of residence.
Choose the appropriate setting for the Ethernet card or VPI/VCI field. If the PC has only one Ethernet card, eth0 is the correct value.
If the Internet connection needs to start automatically when browsing begins, enable the Dial on demand setting.
A dial-up connection using a dial-up PC modem is not only much slower than a DSL or cable connection, but more complex to set up. If you have access to DSL or cable Internet service, we recommend that you use it. This section is for JDS users who need to set up the slower dial-up access.
A large number of different PC modems exists, and JDS does not recognize all of them. Usually, however, it will work out of the box with your modem unless you have a WinModem.
If you have a regular modem, setting up your dial-up connection should go smoothly.
Get Exploring the JDS Linux Desktop now with the O’Reilly learning platform.
O’Reilly members experience books, live events, courses curated by job role, and more from O’Reilly and nearly 200 top publishers.

