In the previous chapter, you created a custom database for storing Lease Documents. You learned how to create fields of the appropriate type to store your data, and then you customized two layouts—one for viewing the data as a form and a second for viewing the data in a list.
If you never went any further than that, you’d still have a database that tracks documents. But now that your business is more efficient, it’s time to teach the database some new tricks. You’re already storing the signing date and lease duration data for each lease. In this chapter, you’ll create a field that lets you know when each lease is ending. Then you’ll create a new table and all the supporting mechanisms for recording monthly payments.
On Managing Field Types, you learned about field types as you created them in Table view. You chose a field type based on the kind of data you wanted to enter into each field. But calculation fields can create data under their own power. For instance, your database already stores monthly Rental Fee and Lease Duration data. If you wanted to figure out the value of that lease over its life, you could enter your data into a calculator, and then manually enter the result. But a calculation field calculates and enters data automatically, and can even update if the data in either field changes. All you have to do is write a formula that tells the calculation field how to get the answer you want.
Note
This tutorial picks up where Chapter 3 left off. If you didn’t complete those tutorials, or you want to start with a clean file that’s already got some data in it, download the samples from this book’s Missing CD page at www.missingmanuals.com/cds.
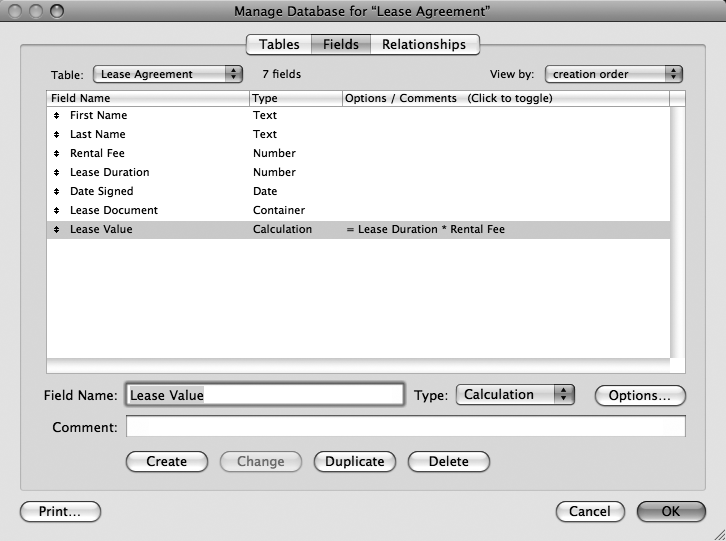
In the last chapter, you created fields in Table View using the + button (Creating and Managing Fields in Table View). Like Table view, that’s a bare-bones approach. When you need to harness all the control FileMaker gives you, call up the Manage Database window (Figure 4-1). That’s how you’ll create your first calculation field:
Tip
In the Manage Database window, you can delete a field by clicking the Delete button. There’s a caveat though: calculation fields (like Lease Value) make reference to other fields. That is, the formula for Lease Value is “Lease Duration * Rental Fee.” If you try to delete either Lease Duration or Rental Fee, FileMaker shows you a warning dialog box and refuses to delete the field. If you absolutely, positively have to delete either field you have a choice: Either change Lease Value’s formula so it doesn’t refer to the field you want to delete, or delete Lease Value first. Either way, FileMaker just deletes it with no warning. There’s a fallback position if you delete or change fields, and then change your mind. Just click Cancel. FileMaker asks whether you want to “Discard ALL the changes made in this dialog to tables, fields, and relationships?”. Click Discard, and FileMaker performs none of the changes.
Choose File→Manage→Database, and then click the Fields tab (if it isn’t already active).
The Fields tab is where most of your field creation takes place. (See the box on Use the Keyboard for more information about using this window.)
In the Field Name field, type Lease Value.
As with other database elements, it’s best to use simple, descriptive names for your new calculation field.
From the Type pop-up menu, choose Calculation, and then click Create.
The Specify Calculation window appears. Here’s where you’ll write the formula that gives you the Lease Value. It’s based on data in the Lease Duration and Rental Fee fields.
In the Current Table list, double-click the Lease Duration field.
The field’s name appears in the calculation area of the window. You could type the field’s name, but if you make a typing error, FileMaker will bark at you, so it’s usually easier to point and double-click.
In the Operators section of the window, click the * sign.
The asterisk means multiplication.
In the Current Table list, double-click the Rental Fee field.
The formula now reads Lease Duration * Rental Fee.
From the “Calculation result is” pop-up menu (it’s below the calculation area), choose Number.
Your calculation should look like Figure 4-2.
Figure 4-1. The Manage Database window gives you everything you need to create and manage fields. You can rename a field by selecting it from the list, typing the new name, and then clicking the Change button.
Note
Forgetting to choose Number from the “Calculation result” pop-up menu is a common mistake. Some calculations don’t work as you intend if you forget to set the calculation result type properly. But the fix is easy. Just return to the Manage Database dialog box, double-click the field to show the Specify Calculation dialog box, and then change the calculation result type as appropriate.
Click OK, and then OK again to close both windows.
Depending on the settings in your Preferences window, you may not see the new calculation field appear immediately on your layout.
If the new calculation field appears on your layout, switch to Layout mode, and then move the field into place. Switch back to Browse mode to see the calculation in action. Change the data in the Lease Duration and Rental Fee fields to see the calculation work dynamically. If the field doesn’t appear automatically, read the next section to place the field on the layout, and then try editing the data.
Tip
Now that you’ve created fields using the Manage Database window, you may never want to go back to creating them in Table view (Creating and Managing Fields in Table View). Change FileMaker’s Preferences by choosing FileMaker Pro→Preferences (Mac) or Edit→Preferences (Windows). Then turn on “Use Manage Database dialog to create files”. The next time you create a new database, you’ll get the Manage Database dialog box instead of a table.
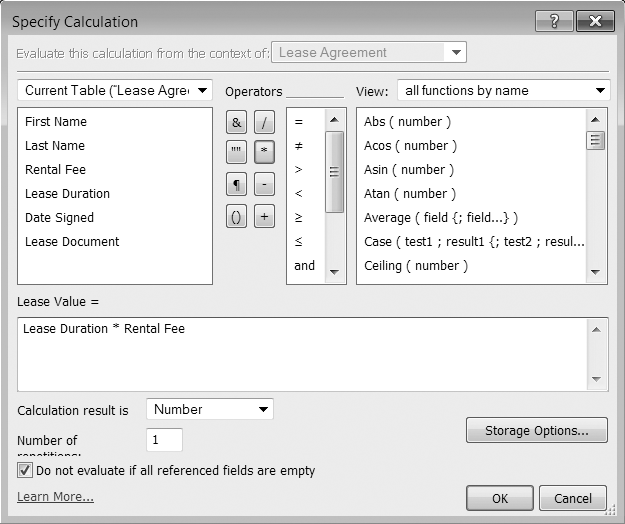
Figure 4-2. The Specify Calculation window lets you write a formula that’s attached to a calculation field. You can perform calculations on text, number, date, time, timestamp, or container fields and get results of each of those types, too. The option “Do not evaluate if all referenced fields are empty” can speed up your database, because FileMaker doesn’t have to try to calculate a value if data’s missing from all the fields that make up the calculation.
You determine whether or not newly created fields appear automatically on your layout when they’re created using the Manage Database dialog box. In Windows, choose Edit→Preferences; in Mac OS X, choose FileMaker Pro→Preferences and then select the Layout tab to see the “Add newly defined fields to current layout” option. When this option is turned on, FileMaker just plops the field down at the bottom of your layout and, if necessary, increases the Body part to accommodate the new field. Since developers invest a lot of time making layouts look just so, you’ll usually work with this option turned off. That means you have to place any newly created fields on your layout manually.
FileMaker provides two ways to add a field to a layout, both require you to be in Layout mode. First, you can choose Insert→Field. When you do, FileMaker asks which field you want, and then drops it in the middle of the layout for you to move into place. Because you get more control with the Status toolbar’s Field tool, most people prefer to use it (Figure 4-3).
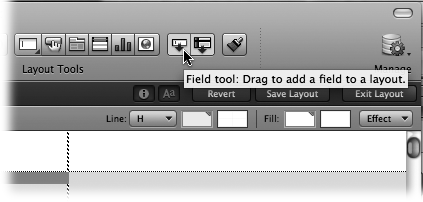
Figure 4-3. The arrow points to the Field tool, and a tooltip identifies the tool and adds a usage tip. The Field tool works a little different from most tools. You have to drag the tool down onto the layout where you want the field to land. A blue (Mac) or dotted (Windows) outline shows you the size and shape of the field you’ll create. The dotted horizontal line represents the field’s baseline. Use it to line the new field up with existing fields on the layout.
To add the Lease Value field to the layout, follow these steps:
Drag the Field tool down onto the layout.
As you drag, FileMaker shows a border and baseline that represents the new field.
Drag to where you want the field to land, and then release the mouse button.
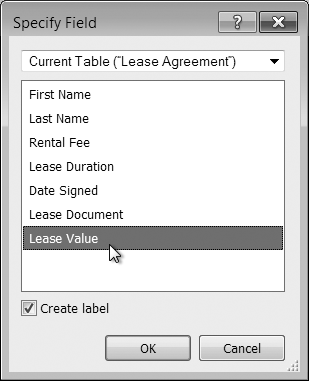
The Specify Field window appears (Figure 4-4), showing a list of the fields in your current table.
Choose the Lease Value field, and then select the “Create label” option (if it’s not already selected).
Although you could copy and paste an existing field label, and then change the text, it’s usually easier to have FileMaker create the label for you, and then use the Format Painter to change the font and size (if the label doesn’t appear in the same format used for your field labels).
Figure 4-4. When you add a field to the layout, FileMaker asks which field you want by showing you the Specify Field dialog box. Another way to quickly create a field with the formatting you want already on it is to copy/paste an existing field and its label. Double-click the new field to show the Specify Field dialog box. Select the field you want, turn off the Create label option, and then change the field’s label.
The field and its label appear on the layout.
If necessary, adjust the field’s format to match the other fields on your layout. Don’t forget to use the Inspector’s Data tab to apply Currency formatting. Use the Arrange, Resize, and Align commands if the field didn’t land exactly where it needs to be. Now you’re ready to switch to Browse mode to view the data in your new calculation field.
Now that you’ve got the basic information stored for your leases, you realize that you can centralize your data if you record rent payments in the same database as the Lease Documents. Your first thought might be to create a field or two (Date Paid and Amount Paid) to record each payment, but you quickly realize that since some leases last 36 months you’ll have to create 72 fields, and then place them on your layout. Worse yet, for your 12- and 24-month leases, most of those fields are empty.
If you start signing 48-month leases, you have to create a whole new slew of fields and start rearranging your layout again. And what if your tenants make more than one payment each month? It’d be so much more efficient if each record could create only the fields it needed.
You’re on the right track—instead of adding fields in the Lease Agreement table, what you need is a set of new records in a related table (see the box on These Terms Are Relational for a definition of table and other terms you’ll need to know for this section). That’s where a relational database comes in. You need separate tables to store each type of information. Because when you think about it, monthly payments aren’t really part of a Lease Agreement table. Date Paid and Amount Paid data pertains to a specific Lease Agreement, but it doesn’t belong with the name of the tenant or the PDF of the lease agreement itself. What you need is a new Payment table, where you can add 12 records (one per month, of course) to the 12-month leases, or 24 records to the 24-month leases. With a separate table, even if you start offering 5-year leases, you’ll never have to add more fields or stretch a layout to accommodate a change in the way you do business.
And you don’t even have to create a new file for your new table. FileMaker lets you put dozens, even hundreds, of tables into the same file. There’s an art and science surrounding how to figure out which tables you need and how to relate them to one another. You’ll learn that in Chapter 5. For now, you’ll learn about the tools you need to create a related table and enter monthly payment records on the Lease Agreement layout.
Now that you’ve decided to store lease information in the Lease Agreement table and Payment information in a new Payment table, you need to make sure payments match the right Lease Agreement record? First, you start with a unique identifier called a key field, which uses the auto-enter field option to create a serial number that’s unique for each record in the table. Then you use the Relationships graph to match the two tables’ key fields. Finally you create a special layout object, called a portal, that lets you view, create and edit payment records on the same layout where you store data about each Lease Agreement.
To ensure that Lease Agreements and Payments records match properly, you need a unique identifier in the Lease Agreement table. One of FileMaker’s field options, called Serial Number, automatically assigns a unique number to each record when it’s created. Here’s how to create a key field, and then apply an Auto-Enter Serial number option to it:
Choose File→Manage→Database, and then if it’s not active, click the Fields tab.
The Manage Database window appears, with the Lease Agreement table’s fields in a list.
In the Field Name field, type agreementID.
This field name may seem odd (no spaces and a mix of upper- and lower-case letters), but it’s one of many naming conventions used by developers to help them quickly identify fields that they’ve created to make the database work. In this naming convention, the field name starts with the name (or one-word abbreviation) of the table for which it is the key field. The “ID” at the end confirms that that the field is used as a key.
From the Type pop-up menu, choose Number.
Key fields are most often number fields. (See Keys for more information on choosing and creating a good key field.)
Click the Create button, and then click the Options button.
The Options for Field “agreementID” window appears.
Turn on the “Serial number” checkbox, and then click OK until you’re back on the Lease Agreement layout.
A serial number appears in the agreementID field for each new record as it’s created. See Figure 4-5.
From now on, every record you create in the Lease Agreement table will be assigned a unique number that you can use to create relationships to other tables. However, the records you’ve already created don’t have serial numbers yet.
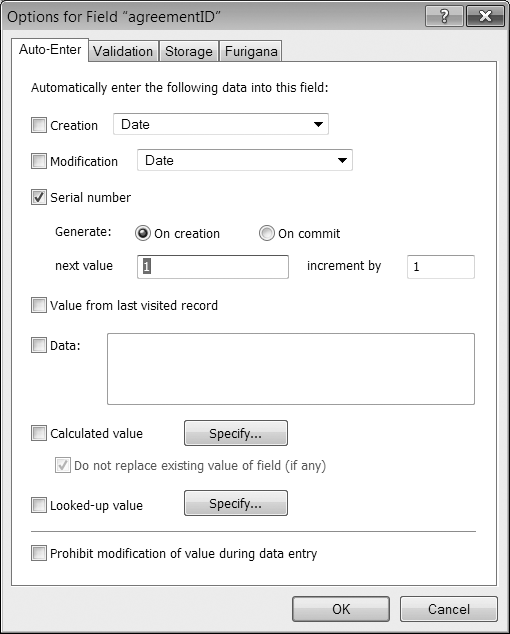
Figure 4-5. Auto-enter serial numbers are most often created as a record is created (“On creation”), but if you choose “On commit” instead, FileMaker doesn’t generate the number until the first time the user commits the record. Usually, you use this option when your database has multiple users (as you’ll learn on page 730). For instance, a user might create a record, but then delete it instead of filling out its data. In that case, there would be a gap in the serial numbers, because the numbers assigned to deleted records are never reused. The next value is a running tally of where you are in the database. When you first set up an auto-enter serial number field, the next value is always “1” unless you change it. If you’re importing data from another source, you should find the highest serial number in the imported data, and then set your field’s “next value” to one number higher than the imported data. And while the most common “increment by” value is 1, you can make the numbers increase by any other number you choose instead.
When you create a key field after data’s been entered, you don’t have to go to each record and manually enter a serial number. You can use the Replace Field Contents command (Using the Replace Command) to add in the missing serial numbers and reset the field option’s “next value” counter at the same time. Since you have to have a field on a layout in order to use the Replace Field Contents command, you may have to put the agreementID field on the Lease Agreement layout if isn’t already there.
In Browse mode, choose Records→Show All Records.
Every record has to have data in its key field in order to relate to another table, so make sure you aren’t looking at a found set of just some of your records.
Click in the agreementID field.
If you don’t click into a field first, the Replace Field Contents command will be dimmed.
Choose Records→Replace Field Contents.
The Replace Field Contents window appears. See Figure 4-6.
Select “Replace with serial numbers”, and then turn on “Update serial number in Entry Options”, if it isn’t already selected.
The first option tells FileMaker how you want the numbers created and the second option ensures that you don’t have to find the new highest number, and then return to the Manage Database dialog box to change the “next value” setting for the agreementID field manually after the replace is done.
Click Replace.
Serial numbers are created in all the records of your database.
Flip through the records to see the serial numbers. You can go back to the Manage Database dialog box and check the auto-entry options for the agreementID field to see that its “next value” has been updated. Create a new record to see the next value appear automatically in the agreementID field.
Tip
Because it can be cumbersome to create a key field and populate it with data months or even years later, it makes sense to create a key field in every table you create even if you have no immediate plans to relate the table to any other table. That way, you’re ready to go when needs change.
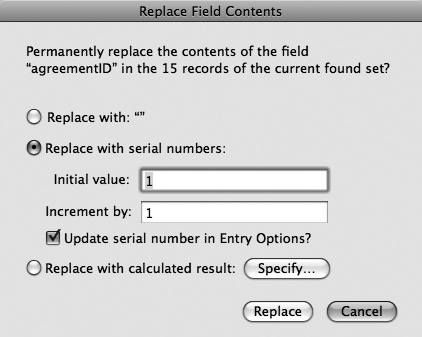
Figure 4-6. In the Replace Field Contents dialog box, the highlighted button is not the one that does the action you’ve just set up. The Replace command can’t be undone, so FileMaker is saving you from unintentionally destroying good data if you hit Enter too soon. Instead, Enter cancels the replacement and leaves everything as it was. Replace Field Contents is lifesaver when you have to retrofit a table with a key field after you’ve created records. However, replacing data after you’re created relationships between tables is risky—if the value in the key field in either table changes, the child record gets disconnected from its parent.
Your Payment table needs to store information about each monthly payment for a specific Lease Agreement. The Payment table’s attributes are the date the rent was paid and the amount paid. You also need a key field for hooking up Payments to the Lease Agreement table. And since it’s good practice to create a key field in every table, just in case, you’ll also add a paymentID field.
Two key fields in one table? It may sound crazy, but it’s not uncommon for a table to have 10 or more key fields that let it relate to that many other tables. The first key field you’ll create (called paymentID) uniquely identifies each Payment record, and could be used when you figure out a reason to link the Payments table (as a parent) to another table. (See Keys for information on primary and foreign keys.) The second key field (agreementID) will hold the value that matches the value in the key field of a specific record in the Lease Agreement table. That’s how a Payment record (the child) matches up with the proper Lease Agreement record (the parent).
Choose File→Manage→Database, and then click the Tables tab.
This tab is where you create, edit and manage your tables.
In the Table Name field, type Payment, and then click Create.
Remember: when you created the Lease Agreement table, you decided to use the singular case for your databases elements, so stay consistent. The Payment table appears in the Tables list.
Click the Fields tab.
You’re viewing the field list for the Payment table. FileMaker’s smart like that and switched to the selected table for you. But if you need to, you can switch between tables using the Table pop-up menu above the list of fields.
In the Field Name field, type paymentID, and then select Number from the Type pop-up menu. Click Create.
It’s a good habit to create a table’s key field first thing. That way, you won’t forget to do it.
Click the Options button and make the paymentID field an auto-enter serial number.
All your Payment records will have serial numbers because you’ve created a key field right at the beginning, before you create any records. And since you have no records yet, the next value should be “1”.
At the bottom of the Options window, turn on “Prohibit modification of value during data entry”.
This prevents users (even you, the developer) from changing the data in a field. Protecting the data in a key field is critical to keeping your records properly related to one another.
Note
You didn’t want to prohibit modification of the agreementID field when you created it because you still had to use the Replace Field Contents command to get the data into the field. Now that you know how critical this step is, don’t forget to go back and make that selection in the Lease Agreement table.
Click OK.
You’re ready to finish creating the rest of the fields for the Payment table.
Use the skills you learned earlier in this chapter to create these fields, with the following types:
Date Paid (Date)
Payment Amount (Number)
agreementID (Number)
Click OK when you’re done. Because you’re still viewing the Lease Agreement layout, you don’t see evidence of your new table yet. But it’s there.
If you click the Layout pop-up menu (in either Browse or Layout mode), you’ll see a new layout called Payment. FileMaker created it for you when it created your new table. And much like the boring layout you got when you created the Lease Agreement table, there’s nothing there except the standard lineup of layout parts and your newly created fields. In Browse mode you can see that unlike your first table, this new table doesn’t have any records yet. If you click the layout to see the fields’ borders, you’ll see the warning message in Figure 4-7.
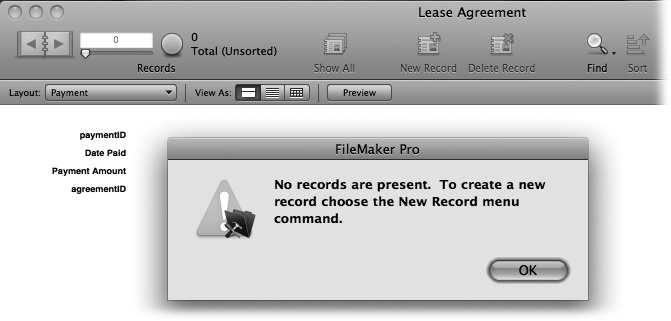
Figure 4-7. When you see this message, just click OK. But don’t bother creating a record. You’ll do that later—from the Lease Agreement layout. Every time you create a new table, you’ll also get a free layout just like this one. That’s because tables need a place to show their fields. But once you start relating tables to one another, you’ll often find that these automatically created layouts are just so much fluff. You can delete these utilitarian layouts (In Layout Mode, choose Layouts→Delete Layout), and then start from scratch using the Layout Assistant to get something more decorative.
You could dress this layout up any way you want to. For instance, you might turn it into a list layout so you can report on your payments. But since you’ll be creating Payment records and entering data from the Lease Agreement table, just note that the layout’s here, and go back to the Lease Agreement layout.
You just saw that when you create a table, and then add fields to it, FileMaker makes a bare bones layout for that table. It also makes a Table Occurrence for the new table on its Relationships Graph. That graph is found on the only tab of the Manage Database window that you haven’t seen yet. And true to its name, that’s where you create the relationship between the Lease Agreement and Payment tables.
Note
Your Relationships graph can have more than one instance of any table, and each instance is a different view into the table. Each instance of a table is called a table occurrence. It’s important to know whether you’re referring to the table itself or an occurrence of the table. A word of caution though, FileMaker isn’t all that consistent about using the term in its own windows and help files, so it’s not your fault if you’re confused.
Also true to its name, the Relationships Graph is a visual representation of your file’s tables and how they relate to one another. And you create relationships in perhaps the easiest way possible: you drag from one table to another to create a line. Here’s how to create a relationship between two tables, using their key fields.
Choose File→Manage→Database, and then click the Relationships tab. Or use the shortcut Ctrl+Shift+D (⌘-Shift-D)
You’ll see two table occurrences: one for the Lease Agreement table and the other for the Payment table. You need to draw a line between the agreementID fields in each table, but that field’s not visible in the Lease Agreement table occurrence.
Click and hold the tiny triangle at the bottom of the Lease Agreement table occurrence.
That scrolls the field names so that you can see the one you need. Or you can drag the bottom border of the table occurrence to make it tall enough to show all its fields.
In the Lease Agreement table occurrence, click the agreementID field, and then drag to the agreementID field in the Payment table occurrence. Release the mouse when it’s pointing to the proper field.
As you drag, you’ll see a line with a box in the middle (Figure 4-8 top). When you release the mouse, the two key fields jump above a new divider at the top of each table occurrence (Figure 4-8 bottom).
Double-click the box in the middle of the relationship line.
The Edit Relationship window appears (Figure 4-9). The window is divided into halves, showing Lease Agreement on the left and Payment on the right.
On the Payment side of the relationship, turn on “Allow creation of records in this table via this relationship” and “Delete related records in this table when a record is deleted in the other table”.
This setup is typical of the child side of a relationship. Here’s how to think about it: You’ll be creating Payment records from the Lease Agreement layout, so the relationship’s options need to allow record creation. And if you delete a Lease Agreement record, there probably isn’t much use for the Payment records, so that second option deletes Payment records that would otherwise be “orphaned” when the parent record is deleted.
Click OK until you return to the Lease Agreement layout.
Or whichever layout you were viewing at the start of this tutorial.
If naming fields in both tables with the same name seemed confusing as you were doing it, you’ve just seen why it’s a good idea. In a large or complex database, some tables can have many key fields for relating to other tables. But if you use the same name in the child table as the key field in the parent table, it’s very easy to find the proper key field, and then drag a line between the two tables.
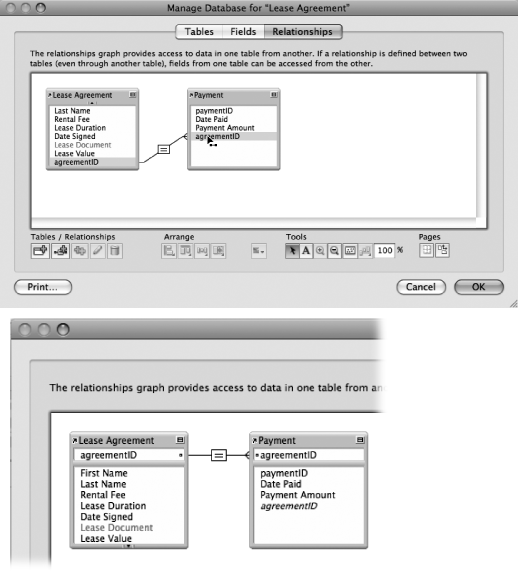
Figure 4-8. Top: As you drag, the two selected key fields stay highlighted to help you stay oriented. The pointer has changed shape to show that you’re creating a relationship. Notice that the line is straight on the Lease Agreement end and has a “fork” at the Payment end. This crow’s foot helps you know which is the parent and which is the child side of the relationship. But how does FileMaker know which is which? Lease Agreement’s agreementID field has the Auto-Enter Serial number option turned on, which is standard operating procedure for a field that’s meant to be used as a parent table key field. Bottom: When you release the mouse, the two key fields are listed at the top of each table occurrence with the relationship line drawn between them. Translated into plain English, this relationship means “For each Lease Agreement record, match all the Payment records where the agreementID value equals the value in the Lease Agreement’s agreementID field.”
Once your tables are related to each another, you can freely display related fields on layouts. For example, say you want the Date Paid and Amount Paid fields from the Payment table to appear on your Lease Agreement layout. You could simply add those fields to the layout, but you’d quickly find a big problem. There’s only a single instance of each field, and the point of a related table is to have multiple records from the child table related to the parent table.
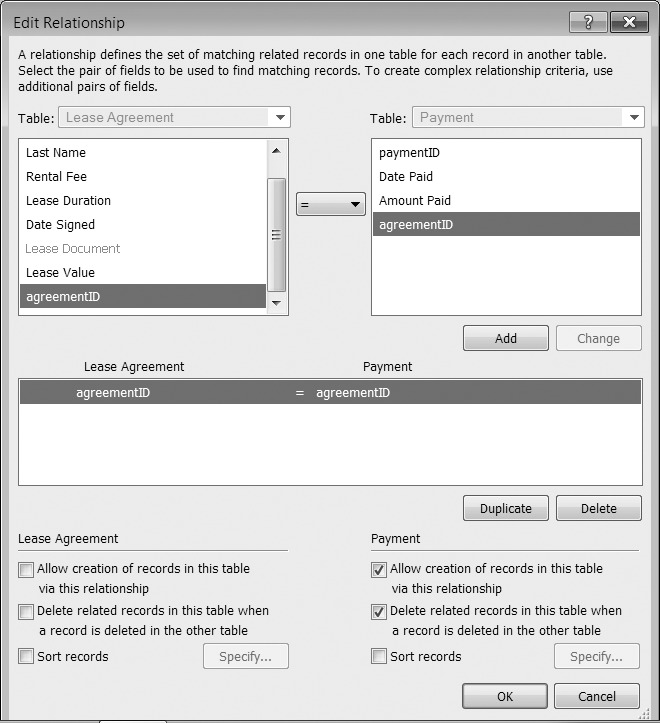
Figure 4-9. The Edit Relationship window lets you define everything about how a relationship works. It’s divided in half vertically, with one table’s information on the left, and the other table’s information on the right. For most people, it’s easiest to visualize a relationship when the parent table is on the left and the child table is on the right. If your window is flipped (Payment on the left and Lease Agreement on the right), it’s because your table occurrences are flipped on the Relationship graph. To change the display, close the Edit Relationship dialog box and then drag the table occurrences to rearrange them. In practice, it doesn’t matter which side the tables appear on because relationships are bidirectional (you’ll learn what that means on page 228). Just select your options very carefully.
The problem is solved with a portal, which is a layout object that displays multiple records from a related table. Not only can the portal display related records, you can use a portal to create, edit, and delete related records.
A portal can display as many related records as you want, limited primarily by the size of your layout and height of the portal. As with other layout objects, you can format portals to match your database, using fills and lines the way you would with other drawn objects. Here’s how to create a portal on the Lease Agreement layout:
In Layout mode, drag the bottom edge of your Body part to make room for your portal.
Use Figure 4-10 to judge how much space you’ll need.
Figure 4-10. In the upper right, you see the Portal tool. The finished portal, along with related fields and their field labels is at lower left. The portal displays information about its data along its lower-left edge. The related table’s name (Payment) appears, followed by “[1…12+].” That means that the portal is tall enough to display 12 rows of related records, starting with the first record. The “+” sign means that the portal will show a active scrollbar when it contains more than 12 child records.
Click the Portal tool to select it, and then drag on the layout to create a portal.
As with all drawn objects, it’s usually easiest to start in the upper-left corner and drag to the lower right corner where you want the portal to appear. When you release the mouse, the Portal Setup window appears (Figure 4-11).
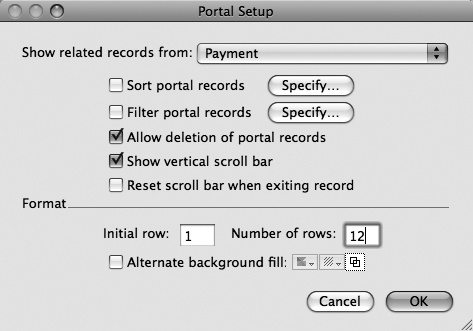
From the “Show related records from” pop-up menu, choose Payment.
This is the Payment table occurrence you saw when you hooked up the Lease Agreement and Payment tables in the Relationships graph (Creating a Relationship Between Two Table Occurrences).
Turn on “Show vertical scroll bar”.
A scrollbar lets you see more related records in a smaller space.
Turn on “Allow deletion of related portal records”.
When this option is turned off, you can’t delete Payment records using the portal and the regular Delete command.
Figure 4-11. Control a portal’s options using the Portal Setup dialog box. This window appears when you first create a portal. Double-click a portal to view this window. That’s how you check or change the portal’s options. Of course, you can also use the Inspector to change a portal’s size or position and appearance. Use the “Initial row” box to display data from a related table across multiple portals. If you need to display data that’s not suitable for a list, like a large container field with a graphic (which should be tall so the graphic is visible), make several tall, single-row portals and place them side by side. Set the first portal to have an initial row of 1, the second portal to an initial row of 2, and so on. See the box on page 150 for more info.
In the “Number of rows” box, type 12, and then click OK.
FileMaker adjusts the portal object you drew to fit the number of rows you specify, and then opens the “Add Fields to Portal” window.
Warning
If the layout isn’t tall enough to fit the adjusted portal, you’ll see a warning message that tells you that the layout size needs to be increased. If you click No in that warning dialog box, the portal will stay the height you drew it. When you’re done setting up the rest of your portal, you’ll have to increase the layout size manually, and then try to change the row display again.
From the list of Available fields on the left, select and move the Date Paid, Payment Amount, and agreementID fields.
Each field appears in the list on the right as you move it. It isn’t necessary to add a related table’s key field to a portal. In the real world, you don’t usually want to see that data. But while you’re learning about portals and relationships, it’s very helpful to display the key field so you can see how portals work.
Tip
Pay attention to the way the field name appears in the Available fields list. You’re seeing the fully-qualified field name. That is, the field is represented by its table name, followed by a pair of colons, and then the field name itself. It’s kind of like you being called by both your first and last names. This nomenclature helps you keep the Lease Agreement and the Payment tables’ agreementID fields straight.
Click OK.
The related fields appear in the portal.
![In the upper right, you see the Portal tool. The finished portal, along with related fields and their field labels is at lower left. The portal displays information about its data along its lower-left edge. The related table’s name (Payment) appears, followed by “[1…12+].” That means that the portal is tall enough to display 12 rows of related records, starting with the first record. The “+” sign means that the portal will show a active scrollbar when it contains more than 12 child records.](/api/v2/epubs/9781449390280/files/httpatomoreillycomsourceoreillyimages614302.png.jpg)
A portal has a few notable characteristics in Layout mode. First, no matter how many rows the portal is set to show, you only see one row of fields, and they’re always in the portal’s first row. Second, you can tell how high each row is because in addition to the border around the portal, there are lines between each row (unless you’ve turned lines off for the portal). Notice that the fields fit precisely in that top row. In fact, FileMaker used the automatic format of your fields to figure out how many rows it could fit in the space you drew with the portal tool.
The Payment fields are evenly divided within the width of your portal and their formats probably don’t match the rest of the fields on your layout. You may need to adjust the fields’ widths, change their text alignment and create field labels if you want your layout to match Figure 4-10.
Just like any other layout object, a portal shows selection handles when you click to select it. But its selection handles may not be at the edges of the portal as you’d expect. They’re at the bottom of the portal’s first row, and not at the bottom edge of the portal. If you drag either of the portal’s bottom selection handles downward, you change the row height and not the number of rows the portal will display. That’s useful where you want to show lots of data in a portal and a single row of fields for each related record won’t get the job done. You can change the width of a portal by dragging a handle or by using the Width boxes on the Inspector’s Position tab.
If you move a portal, make sure you select the fields inside the portal, too. Because if the portal and its fields move out of sync and the fields overlap the portal’s top row borders even a little bit you could get display problems—the fields may not show up at all, even when there are related records. If you delete a portal without deleting the related fields, they still show data (if there are related records), but you see data from just the first related record because without a portal, FileMaker can only show you one related record.
Back in Browse mode, the portal appears, but there’s no data in it. That’s because the Payment table doesn’t have any records yet. If you’re thinking about choosing the New Record command, don’t act on that thought, because it won’t work. At least it won’t create a new Payment record. It will continue to work as it always has, by creating a new Lease Agreement record. To understand why, backtrack just a bit to take a look at your layout’s setup. Switch to Layout mode, and then choose Layouts→Layout Setup (Figure 4-12).
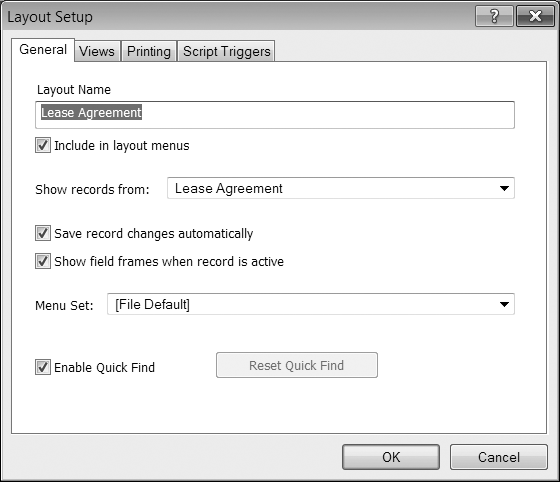
Figure 4-12. All layouts are tied to one, and only one, table occurrence. Fittingly, the Lease Agreement layout shows records from the Lease Agreement table occurrence. Why all this harping on the difference between a table and a table occurrence? Because you can create multiple instances of a table on your Relationships graph—that’s what a table occurrence is—an instance of a table. When you work with your data (specifying fields, creating portals, writing calculations, and other tasks), you need to use the table occurrence for the current context.
When you created a portal back on Adding a Portal to a Layout, you had to specify a table occurrence for the portal to know which records to show. But the Lease Agreement table was created for you when you created the database way back on Creating a New Database. FileMaker created the Lease Agreement table, along with a matching layout and table occurrence, because you need all that stuff to get started and it doesn’t want to bother you with details while you’re being creative. But when you start to create layouts from scratch, you need to tell each new layout which table occurrence to draw its records from.
This concept of where you are and what records you’re viewing, called context, is fundamental to many aspects of your database. The context of the Lease Agreement layout is the Lease Agreement table occurrence. In turn, the Lease Agreement layout contains a portal whose context is the Payment table occurrence. Keep context in mind as you’re reading the next section, which covers the things you can do with related records using a portal.
Once you’ve set up a portal on a layout, you can create records without going all the way back to the actual table. On a Lease Agreement record, in Browse mode, click in any field. All the fields, including the ones in the portal, show the dotted line that indicates they’re active. You can now tab into the Payment portal’s fields, just as if they were a part of the Lease Agreement table. The fields are active even though there aren’t any related records because when you defined the relationship between the Lease Agreement and Payment tables, you chose the option that allows related records to be created (Creating a Relationship Between Two Table Occurrences). View your related table by choosing Window→New Window. A new window appears that’s a duplicate of the original. Move the new window over to the side so you can see both windows, and then switch the new window to the Payment layout (Figure 4-13).
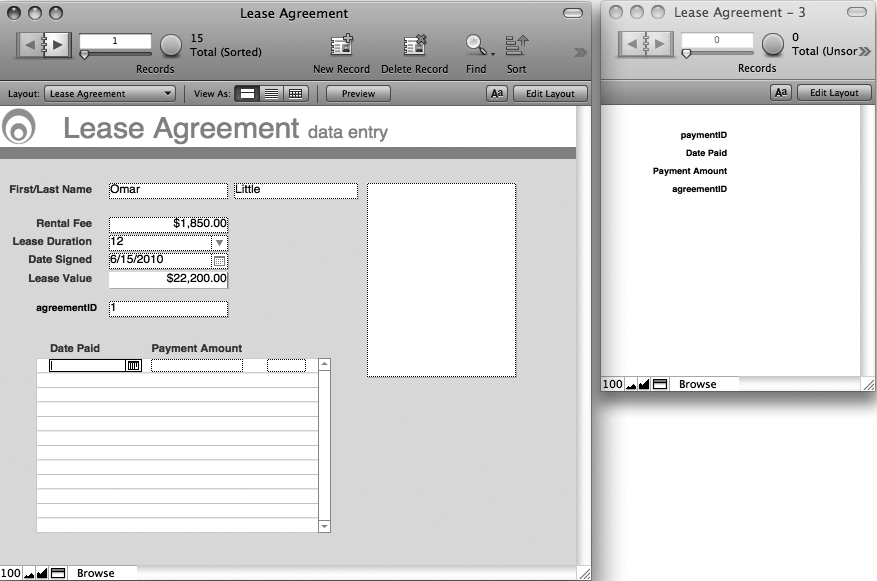
Figure 4-13. In the window on the left, the Omar Little record is active, and you can see that the portal shows field boundaries as if there’s a new record. But in the window on the right, you can see that the Payment table doesn’t have any records yet. Keep your screen set up like this for the next tutorials, so you can watch how and when related records are created, edited, and deleted. This is also a good troubleshooting tip when something’s wrong with a relationship and you’re trying to figure out how to fix it.
In your original window, in Browse mode, click in the Payment portal’s Date Paid field, type a date, and then press Tab. If you’ve added a calendar pop-up to the field, select a date from the calendar.
As soon as the insertion point moves to the next field, you’ll see the record appear in the Payment window. Even though you didn’t enter it, the new record’s agreementID field now has a value, and it matches the value in the Lease Agreement::agreementID field.
Type a number in the Payment Amount field, and then press Tab again.
The agreementID field in the portal is active. Because it’s a foreign key, it’s not set up to prohibit data entry. So you can change the ID. But if you do, the Payment record won’t be related to the Lease Agreement record when you commit the related record. It might even be related to the wrong parent record now. Luckily you have the Payment window open, and you can just change the key back to match the value in the parent record you’re viewing. When you commit the Payment record, it will show back up in the portal.
Use the portal to create a few more payment records just to watch how the process works behind the scenes. Notice how the Tab key travels through the rows in the portal, much like a spreadsheet.
Note
Normally, you wouldn’t put a foreign key field in a portal because if the value is changed, the child record disappears from the portal; it’s no longer related to the parent record you’re viewing. Plus it’s confusing to users, since the value in every record is, as it should be, exactly the same. Still, viewing an ID field in a portal, along with a second window opened to a layout that has the context of the related records, is a good way to learn about relationships and to troubleshoot.
You edit any related record by clicking in the field you want to change, and then typing the new info. Tab to the next row, or if you’re on the last row in the portal, click into blank space on the Lease Agreement record to commit the changes (see the box on Commitment, or On the Record).
Unlike the New Record command, the Delete Record command can work on a portal—if you’ve formatted the portal to allow related record deletion (as you did when you set up the portal on Adding a Portal to a Layout). But you have to select a portal row first to set up the context so FileMaker knows which related record you want to delete.
Select the portal row you want to delete, but without clicking in any of the portal’s fields.
Click the portal row itself (point between the fields in the portal, and then click). Figure 4-14 shows what selecting a portal without clicking in a field looks like.
Figure 4-14. The Payment record for May 4, 2010 is highlighted. No field in the portal row is active, but a highlight shows on the whole row. Selecting a row this way sets the context for a portal row delete. However, you can’t enter or edit data in a portal row that’s highlighted this way, because the insertion point isn’t in a specific field.
The Delete Related Record Warning appears (Figure 4-15).
Click Delete.
The related record is deleted.
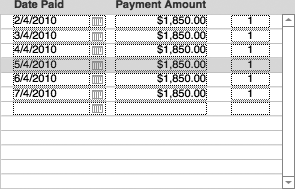
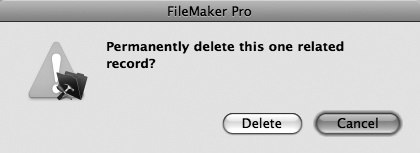
Figure 4-15. Because you can’t undo a record deletion, FileMaker gives you a chance to change your mind. Click Cancel to keep the record or Delete if you’re sure it’s the one you mean to delete.
If you’re in a field on the portal row when you choose the command, then FileMaker asks you which record you want to delete: the master record or the related record (Figure 4-16). The terms “master” and “related” are FileMaker-speak for “parent” and “child.” If you’re not on a portal row at all (neither an active field or a portal row highlight), the Delete Record command works exactly like it does on a layout that has no portals.
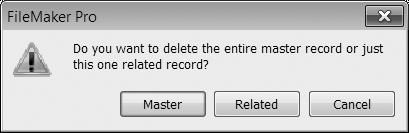
Figure 4-16. Just clicking in a field on a portal row doesn’t give FileMaker enough information about context, so it asks you which record you want to delete. Once you’ve made a selection (other than Cancel), you’ll get a second window asking if you’re sure you want to delete the record. It’s easier to highlight the portal row than to interact with two windows.
You can search in related fields just as easily as you can search in the “local” table’s fields. So if you wanted to find all Lease Agreements with June 2010 records for instance, just switch to Find mode, click in the Payment portal’s Date Paid field, enter your search criteria, and then perform the find (Finding Records). You get a found set of all the Lease Agreement records that have related records dated June 2010. Each Lease Agreement record will still show all its related records, and not just the ones that match your search criteria. As you flip through your found set, you might think that some records shouldn’t be in the found set. But remember, not all the related records may be showing in a portal. So if you think a record showed up when it shouldn’t have, scroll down in the portal. You’ll find the June 2010 Payment record in there somewhere.
But if what you wanted was a list of only the June 2010 payment records, you have to search using a layout that’s set to show records from the Payment table occurrence. That way, your found set will contain just the records that match.
Adding a portal to the Lease Agreement layout may streamline your workflow, but the portal’s size and position don’t make for a harmonious layout. Plus, the Lease Document container field would be more useful if it were larger. But if you make it too big, that field will dwarf all the other data on the screen, making it hard to focus on the text data.
That’s where Tab Controls come in. The name makes it seems as Tab Controls have something to do with the Tab key on your keyboard, but they don’t. They provide a way to organize data on a layout so you can focus on one chunk of data at a time. Tab Controls also let you put far more information on the same layout without making either a giant layout or one that’s crammed with data. You’ve seen similar objects in other software programs, even other places in FileMaker itself. For example, the Inspector has three tabs that are used for organizing all the information it has to hold. A Layout Tab Control works much the same way (although without the collapsible sections—that would be so cool). Figure 4-17 shows the Lease Agreement layout reorganized using a Tab Control.
Tab Controls are easy to draw, but since it can be tricky dividing the objects on an existing layout amongst the new tabs, you’ll need to do a little prep work. The process is easier on a larger monitor, but can be done even on a small one. First, expand the database’s window as large as your monitor will allow. If it’s not big enough to show you about double the width of space as you currently have showing, try Zooming out.
Next, follow these steps:
Drag all of your fields and field labels waaaay over to the right so they’re past the edge of the line that represents the edge of your layout. Use Figure 4-10 as a reference to see how far you need to move your fields.
If you don’t move your fields, the new Tab Control will be on top of them in the layout’s stacking order and it won’t be easy to select them afterwards. Although you’d think that the “Send to Back” command will fix things, it doesn’t always, so it’s just better to empty out the space first.
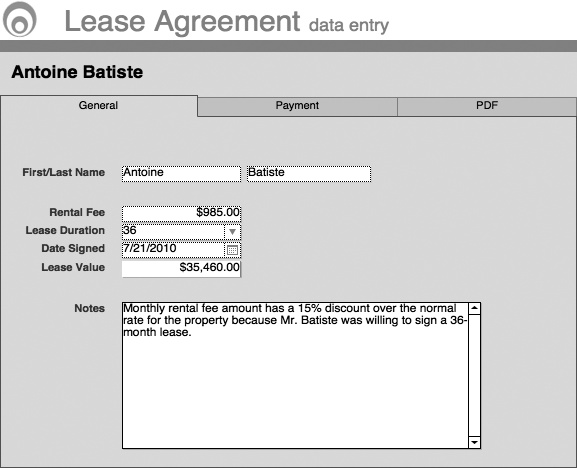
Figure 4-17. This version of the Lease Agreement layout has a giant Tab Control covering most of its area. The Tab Control has three tabs, with the existing fields divided among them. The General tab has the basic data, plus a big new field for storing notes about the Lease Agreement. The Payment portal has been moved to the Payment tab and the Lease Document container field has been moved to the PDF tab, where it can take up lots of space and not compete with other data.
In the Status toolbar, click the Tab Control tool. (It looks like a tiny tab.) Then, draw a large tab panel on the layout.
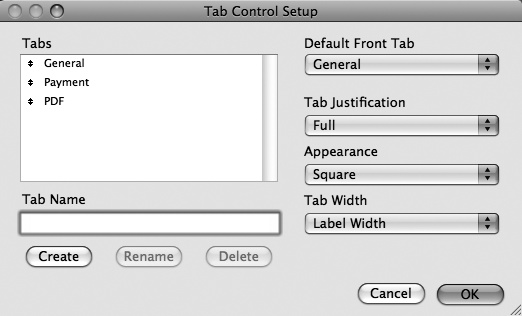
It should be as wide as the dividing line between the Header and the Body part and nearly the height of the Body. The Figure has the left edge of the Tab Control on the left edge of the layout, and its bottom edge is on the bottom edge of the Body part. When you finish drawing, the Tab Control Setup dialog box (Figure 4-18) appears.
In the Tab Name field, type General, and then click Create. Repeat this step for two more tabs: Payment and PDF.
FileMaker adds the three tab names to the Tabs list. The first tab you create is set as the Default Front Tab. That means the General tab will be the active one whenever you switch to the Lease Agreement layout—no matter which tab was active the last time you left it.
Select Full from the Tab Justification pop-up menu, and then select Square from the Appearance pop-up menu.
The Full option will make the tabs appear all the way across the top of the Tab Control itself. Square means the tabs won’t have rounded edges.
Figure 4-18. These are the settings for the Tab Control shown in Figure 4-17. Tab widths are automatically determined by the length of their names. But you can use the Tab Width pop-up menu to add extra space, set a minimum or fixed width, or make all tabs the width of the widest label. All Tab Width options are overridden if you select Full justification, though.
When you’re done, click OK to close the Tab Control Setup dialog box.
Your new tab panel, complete with three tabs, sits highlighted in place on your layout.
Notice four selection handles, one at each corner, and a dark box around each of the tabs. Any formatting changes you make with this selection will affect all three tabs. The Tab Control in Figure 4-18 has the same background color as the Body part and a 1 pt. dark grey line. Border effects have been turned off.
Switch to Browse mode, where you’ll see that your Tab Control is already working. You can click tabs, and each one comes to the front just as you’d expect. But a Tab Control without objects is pretty useless.
Switch back to Layout mode to divide your objects and move them onto their proper tabs. First, select the fields and field labels that belong on the General tab (refer back to Figure 4-17, if you need a refresher). Then drag those fields onto the General tab. Choose File→Manage→Database to create a Notes field (Text type), and then put it on the General tab, too. Use the Inspector to add a vertical scroll bar to the Notes field.
Repeat the process to move the Payment portal and its fields to the Payment tab. Double-click the portal to view the Portal Setup dialog box, and then increase the number of rows. Finally, move the Lease Document field to the PDF tab and make it larger. Try to maintain its proportions, after all it’s displaying an 8.5 x 11 inch document.
As you just saw, you can add a Tab Control any time you need to fit more stuff on a layout. And once it’s there, you can add or delete panels or change the control’s appearance. Edit a Tab Control by double-clicking it in Layout Mode to summon the Tab Control Setup dialog box.
In the Tab Control Setup dialog box, you can add new tabs by typing a name, and then clicking Create. The new tab appears at the end of the list of tabs, and to the right of the existing tabs in the control. You can also rename an existing tab: Select it in the list, enter a new name, and then click Rename.
To delete a tab, select it in the list, and then click Delete. When you delete a tab, you delete all the objects on that tab. (If the tab you select for deletion has any objects on it, FileMaker warns you first, and asks whether you’re sure you know what you’re doing.)
Finally, you can control the tab panels’ order. FileMaker draws the tabs in the order they appear in the Tabs list. The leftmost tab panel is the one that appears to the top of the list, and so on. Rearrange the list using the arrows to the left of each name. FileMaker’s smart enough to move the objects on each tab along with the tabs themselves when you reorder.
When you first switch to a layout but before you’ve clicked a tab, FileMaker needs to decide which tab to show automatically. You tell it which one by choosing the appropriate tab name from the Default Front Tab pop-up menu. While it’s possible to choose any of the tab panels, be aware that most places where tabs appear, the leftmost tab is usually the front tab. If there’s a compelling reason for a tab to always be in front when you first see a layout, it’s pretty likely that that tab should be on the left, too.
If the total width of all your tabs is less than the width of the Tab Control itself and you haven’t chosen Full justification, then FileMaker lets you choose where the grouping of tabs should be positioned. It’s a lot like aligning a paragraph of text: choose from Left, Center, or Right and the tabs will bunch up according to your selection.
FileMaker can draw tabs with Rounded or Square corners. This option is purely cosmetic, so choose whichever one you like from the Appearance pop-up menu.
Note
If you’re publishing your database on the web using Instant Web Publishing (Sharing over the Internet), rounded rectangles (tab panel tabs and buttons included) render with square corners. They work just fine though.
The Tab Width pop-up menu has several choices to influence the width of the tabs:
The standard setting, Label Width, makes each tab just wide enough to hold its label.
“Label Width + Margin of” adds the amount of additional space you specify around the label text. The label’s text will be centered within the tab.
If you prefer all your tabs to be the same width, choose “Width of Widest Label”. FileMaker figures out which label is biggest, sizes that tab appropriately, and then makes the others match. This setting may push some tabs out of view if they won’t all fit with the new width.
If you’d like all your tabs to be a nice consistent width, but with the ability to accommodate the odd long label, choose “Minimum of”. Enter a minimum width (75 pixels, say), and every tab will be that width, unless the label is too big to fit, in which case that one tab will widen enough so the label fits.
If you want the utmost in control and uniformity, choose "Fixed Width of”, and then enter a width in the box. Every tab is exactly that width. If the label’s text is too big, then FileMaker cuts it off at the edges.
Out of the box, Tab Controls are medium gray, embossed, with a thick black border. But you can change that institutional look to match your carefully crafted layouts. In the toolbar’s Formatting Bar, just use the fill and border tools to make your selections. You can even select each tab panel individually; the choices you make apply only to the currently selected tab. To select the whole Tab Control (all its tabs and all the objects on each tab), use the selection rectangle or Shift-click each tab panel.
Tip
If you accidentally format a single tab panel when you meant to format the whole tab control select your newly formatted tab and use the Format Painter (The Format Painter) to apply formats to each unformatted tab panel.
If you don’t want a Tab Control after all, just select it, and then choose Edit→Clear, or press Delete or Backspace. FileMaker warns you that it’s about to delete all unlocked objects on the tab panel as well. If that’s all right with you, click OK. If you need to keep fields or objects on the tab panels, though, click Cancel, and then move the keepers off the panel (way to the right of your layout, perhaps) for safekeeping.
Your First and Last Name fields are now down on the General tab (Figure 4-17), where you can’t see when you switch to the Payment or PDF tabs. It would be helpful to see which Lease Document you’re dealing with as you switch tabs. You could add copies of the name fields on each tab, but there’s a better way. You can create a text object that contains merge fields to display the data from each record’s First Name and Last Name field. A merge field is a text block containing the field’s name, surrounded by a pair of double angle brackets like this:
<<First Name>>
Besides being useful for displaying data on layouts, merge fields are often used for things like form letters, labels, or envelopes. Either way, merge fields expand and contract to use only the actual amount of space required by data inside the fields they represent. You can’t enter or edit data using a merge field, nor can they be searched in Find mode (but the Quick Find in Browse mode will search merge fields). But that’s no problem here—you’ll keep and use the normal First Name and Last Name fields for those purposes. In this case, a couple of merge fields help orient you as you switch tabs, and are a more attractive way to display data than using normal fields would be.
In Layout mode, select the Text tool, and then change the formatting to 18-pt Helvetica Bold.
By choosing formatting before you click to create a text block, you’re not only presetting the text block’s format, you’re changing your file’s default text format.
Click in the blank space above the tab control.
A blinking insertion point appears.
Choose Insert→Merge Field., Or use the shortcut Ctrl+M (Windows) or Option-⌘-M (Mac).
The Specify Field dialog box appears (Figure 4-19).
Double-click the First Name field, and then press the space bar.
The First Name merge field, “<<First Name>> “, appears inside your text block. You add the space so that the Last Name doesn’t run onto the First Name.
Tip
If you know the exact name of the field(s) you want, you can type it instead of using the Insert→Merge Field command. Just be careful to get the angle brackets and name of the field exactly right. If you make a mistake, all you’ll see in Browse mode is what you typed, and not the data you expect.
Make sure that the insertion point is still blinking after the First Name and space in the text block, and then Choose Insert→Merge Field again. Double-click the Last Name field.
The text “<<First Name>> <<Last Name>>” now appears inside the next block.
Adjust the placement of the text block if necessary. Switch to Browse mode to see that the field’s contents appear inside the merge fields there.
You can format merge fields just like any other text block. But since they also contain data, if you apply formatting from the Inspector’s data tab to text blocks that contain merge fields, FileMaker displays the data according to your formatting. So if you put a merge version of the Rental Fee field on the Payment tab (so you can see what the Rental Fee’s supposed to be as you record each payment), don’t forget to format the text block as currency.
You can use merge fields to create a form letter (you’ll get one copy for each record in the found set, with appropriate data for each record). Just type the text of the letter inside a large text block, and then insert merge fields within the text as appropriate. You’ll also see heavy use of merge fields if you use the Layout/Report Assistant to create label or envelope layouts.
Merge fields aren’t the only things FileMaker can use to show dynamic information. You use one of a handful of special symbols—stand-in characters that are replaced with info when you view your database in Browse or Preview mode. For example, see Figure 4-19, where each record on the Lease Agreement List layout is numbered. The record number symbol displays an automatic number for each record.
Note
FileMaker offers a host of other symbols besides the record number symbol. See the box on the next page for details.
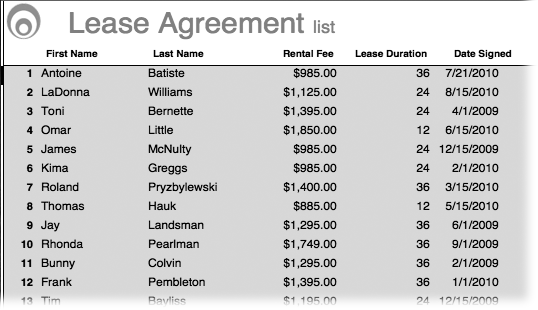
Figure 4-19. The number to the left of each record on the Lease Agreement List layout comes from a special symbol placed on the layout. Sort the list, and notice that the records change order, but the record numbers themselves stay in sequence. The record number is meant to help you figure out where you are in a list, but not to identify any specific record. See page 137 for a way to assign a permanent ID number, or key, to a record.
To add a record number to your Lease Agreement List layout, choose Insert→Record Number Symbol. You now have a text object that contains "@@”. You may need to format the record number merge field. Switch to Browse mode, where you see that FileMaker puts the current record number in place of the symbol.
You can also insert symbols into existing text objects. Just click into the text object first, as if to type. Then when you choose Insert→Record Number Symbol, FileMaker adds the record number symbol to the existing text.
Now that you have a record number on the Lease Agreement List layout, and have sorted the list, you can start to see how useful the layout really is. The Lease Agreement layout is great for revealing detail, but when the Lease Agreement List layout is sorted by Last Name, it’s a cinch to scroll to the record you need without entering Find mode, typing in search criteria, and then performing a find. But it could be easier sort the records on the layout. As it is, you’ve got to choose Records→Sort Records, select the field you want to sort by, and then click Sort. All this stuff is easy, but efficiency is king in your world. The solution is to write a script to do these things automatically.
If you’re familiar with macros in other programs, then you already get the idea of scripts in FileMaker—you set up scripts to perform tasks for you. The task at hand—sorting—is just one command, but it has several steps. They’re all quick steps, but when you have to repeat them several times a day and so does everyone else in your office, all that wasted time adds up to real inefficiency. Also, any manual process leaves room for human error. When you make a mistake, no matter how harmless, you have to undo or redo what you just did. A script that handles your sort is more efficient and less susceptible to error.
Here’s how to write a script that sorts the records on your list layout alphabetically by Last Name and then First Name:
Choose Records→Sort Records. Set up the window to sort by Last Name and then First Name (Sorting Records), and then click Sort.
Every time you open the Sort window, the last sort order is already in the window. It works the same way for scripts. So save yourself some time by performing the sort first. That way, when you write the script, the order will already be in the Sort window.
Choose Scripts→Manage Scripts.
The Manage Scripts dialog box appears.
Click New.
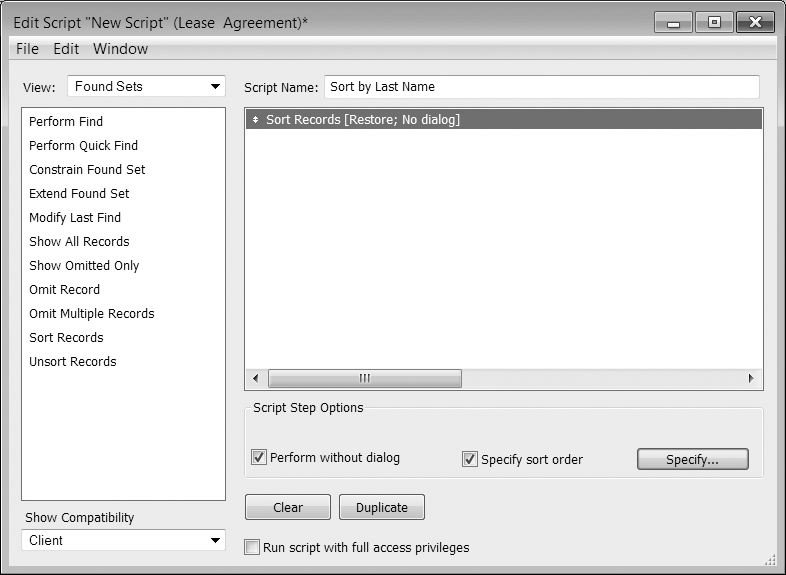
The Edit Script dialog box appears (Figure 4-20).
Figure 4-20. The Edit Script window contains everything you need to write a script, whether it’s a simple one-line script or a hundred-line monster. Here the list of available script steps is filtered by View: Found Sets, but you can also sort all the script steps alphabetically if you prefer. Many of the script steps available are the same as the commands in FileMaker’s menus. If you know how to use those commands manually, you know how they’ll behave as script steps. But there are some commands that you can only access through scripting, and the subject is so deep and wide that this book has three chapters, 10, 11, and 16, devoted to the subject.
In the Script Name field, type Sort by Last Name.
As always, give everything you name in FileMaker a descriptive name. Mature databases can have hundreds of scripts, so good naming is the first step in keeping things organized.
In the View pop-up menu, choose Found Sets.
The filters the list of script steps so you can easily pick the one you need.
Double-click the Sort Records script step.
The Sort Records script step appears in the window’s Script pane.
Turn on “Perform without dialog”.
Without this option selected, you’d see the regular Sort window every time you run the script. Don’t turn on this option when you’re writing a script that lets the user choose a custom sort as the script runs.
Turn on “Specify sort order”.
The regular Sort window appears, with Last Name and then First Name set up already. As you know, FileMaker remembers your most recent sort order, but it’s good practice to verify everything when you’re scripting. And if you wanted a different sort order, you can change it and the script will remember your changes.
Click OK to close the Sort window, and then, in the Edit Script window, click Close.
FileMaker asks if you want to save the script’s changes.
Click Save.
FileMaker saves the script and closes the Edit Script window.
Make sure “Include in Menu” is turned on for the Sort by Last Name script, and then close the Manage Scripts window.
Now that the Manage Scripts window is closed, you need some way to run the script you just wrote. Look in the Scripts menu. It appears there, along with a shortcut. You can run the script by choosing Scripts→Sort by Last Name or by using the shortcut.
Tip
Windows users can save scripts before closing the Edit Script window by choosing the Edit Script window’s File→Save Script command. Both PC and Mac fans can use the Save Script shortcut Ctrl+S (⌘-S).
Now that the script is ready to go, Unsort your records (choose Records→Unsort), and then run the script.
Running the script from the menu saved you a few steps, but you can make it even more convenient by attaching the script to a layout object, which then becomes a button. Then whenever you click the button in Browse mode, the script runs automatically. Here’s how:
In Layout mode, click the Last Name Field’s label to select it.
It’s a common convention to click a column label to sort a column, so help your users out by adopting that principle.
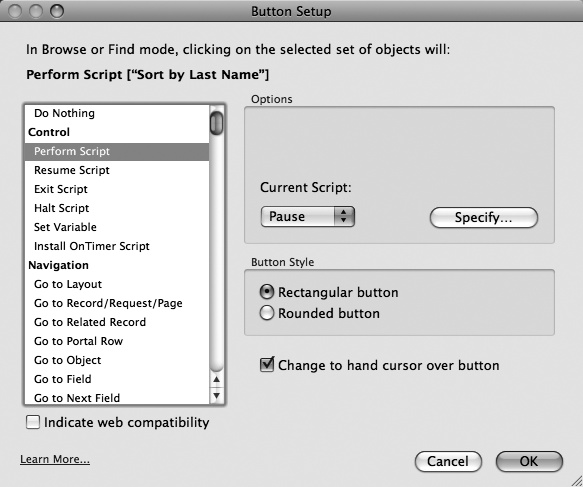
The Button Setup window appears (Figure 4-21).
Figure 4-21. The Button Setup window lets you choose from most of the same steps you see in the Edit Script window. The difference is that you can only choose a single script step when you define a button this way. Any time you need a process that requires two or more script steps, create a script and then attach it to the button. But even if the process is a single step, you may still want a script, so you can format it to appear in the Script menu. Even better, if you apply a script to several buttons throughout your database, you can change the script and all the buttons will run the edited script automatically. But if you had attached script actions to those buttons instead of a script, you’d have to change each one manually.
In the script step list, click Perform Script.
This “controller” script step lets you run any script you’ve written by attaching it to a button.
In the Options section of the window, click Specify.
The Specify Script window appears, showing a list off all the scripts in your database. You’ve only got one, but it’s not uncommon to have hundreds.
Click the “Sort by Last Name” script, and then click OK until you’re back on your layout.
Switch to Browse mode, and then Unsort your records, if they’re sorted. Finally, click the Last Name field label to see the script run. You haven’t put anything on your layout to indicate to your users that the field label does anything useful. FileMaker changes the pointer to a hand icon when it’s positioned over any button, but you have to give users a reason to wander up there with their mouses. So change the label’s formatting (make it a contrasting color, or put a border around it so that it looks like a button) to help users out. (Learn more about buttons on Buttons.)
Tip
Check out this chapter’s Lease Agreement Finished.fp7 file to look under the hood at some formatting options and a beefed up script that can sort by different fields, depending on a script parameter (explained on Script Parameters).
The script was nice, and the button improved things, but you’re still not done learning how useful and intuitive scripts can be. Since the point of going to the list layout is to quickly scan a list so you can find a particular Lease Agreement record, it’d been even more convenient if the list just knew to sort itself every time you switch to the layout. And that kind of thing is what Script Triggers are for.
You’ve just seen that you can run a script from the Scripts menu or from a button. But you can also tell a script to run when you do other things, like enter data in a field or go so a specific layout. Here’s how to make the Sort by Last Name script run every time you go to the Lease Agreement List layout:
If you’re not viewing the Lease Agreement List layout, switch to it. Then in Layout mode, choose Layouts→Layout Setup.
You’ll learn about this dialog box’s other options in Chapter 7. For now, you’re interested in the Script Triggers tab.
Click the Script Triggers tab.
The Script Triggers tab appears (Figure 4-22).
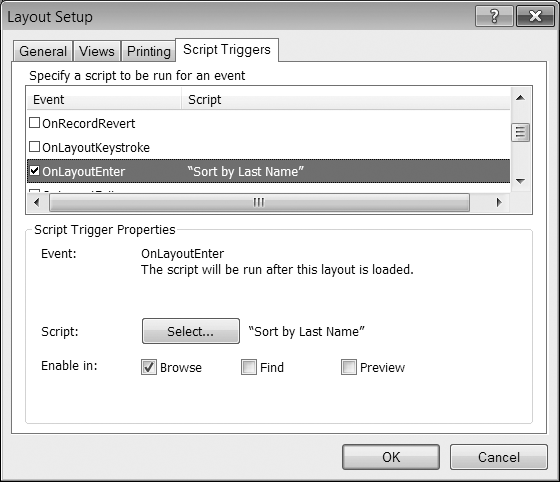
Figure 4-22. Script triggers give you a more automated way to run a script than by using the menu or creating a button. This script trigger will run a script called “Sort by Last Name” every time the layout is visited in Browse mode. When you apply a script trigger with the Layout Setup dialog box, it only affects the layout you apply it to. Script triggers are enormously powerful and they can be tricky. Learn more about them on page 430.
Select the OnLayoutEnter option in the Event list. Windows users may need to scroll the list to see that option.
Selecting an Event tells FileMaker when to run a script. Once you make a selection, the Specify Script window appears.
Click the “Sort by Last Name” script to select it, and then click OK.
The Script Trigger tab is now set up. Notice that you’re only enabling the script to run while you’re viewing the layout in Browse mode.
Click OK.
The script will run each time you switch to the Lease Agreement List layout.
To test the script trigger, Unsort your list, and then switch to the Lease Agreement layout. Then switch back to the Lease Agreement List layout. The script runs and sorts your list for you.
Your database is getting pretty smart now. It can do math and perform some housekeeping duties on its own. But one of the main purposes of storing data is learning how to analyze that data. You’re storing information about Lease Agreements, but so far, there’s no way to take a look at any trends that might show up. For instance, you offer leases of 12, 24, or 36 months. If you sort and count your leases by duration, you may be able to spot interesting trends, like people who are willing to sign longer leases are also willing to lease your more expensive properties, for example. Or, maybe the opposite is true and they’re less willing. If so, you’ll want to come up with some incentives to get the high rollers to sign longer leases. But you’ll never know until you create a report.
You’ve already seen how the Layout/Report Assistant makes it a breeze to create a new layout (Creating a New Layout). Many of the assistant’s panels are already familiar to you. But the assistant can also build some special layout parts and create fields for you that summarize your data. Better still, the report you’ll build is dynamic. If you add a new record to the list while you’re viewing the onscreen report, the record is automatically sorted into place and your summary data updates immediately. Here’s how to create a dynamic report:
In Layout mode, choose Layouts→New Layout/Report.
The New Layout/Report assistant starts up and the Create a Layout/Report panel appears.
In the “Show records from” pop-up menu, choose the Lease Agreement table. In the Layout Name box, type Lease Agreement Report and then choose Report from the “Select a layout type” list. If they’re not selected, choose “Include subtotals” and “Include grand totals.” Finally, click Next.
Watch the sample report as you make selections in the assistant’s windows. You’ll see clues about the type of report you’re designing. After you click Next, the Specify Fields panel appears.
Move the First Name, Last Name, Rental Fee, and Lease Duration fields to the “Fields shown on layout/report” box, and then click Next.
This should be familiar territory by now. Remember that you can use the arrow to the left of each field to move them up and down in the list on the right. After you click Next, the “Organize Records by Category” panel appears.
Move the Lease Duration field into the Report categories list, and then click Next.
The sample report changes as you move fields into the Report categories list. After you click Next, the Sort Records panel appears.
Move the Last Name and First Name fields into the Sort order list, and then click Next.
Lease Duration is already in the list because that’s how the report will categorize the list. But you want records with the same Lease Duration value to be sorted alphabetically by Last Name and then by First Name. After you click Next, the Specify Subtotals panel appears (Figure 4-23).
Figure 4-23. Choices you make in this window determine how many subtotals your report will have. You can also place the subtotal above or below the records it’s summarizing. You need to have at least one Subtotal line item in the bottom box for the summary to work, though, so make sure you click Add Subtotal after you create or chose a Summary field (you’ll learn about them later in this tutorial).
From the Subtotal Placement pop-up menu, choose “Above record group” and then click on Specify under the Summary field.
The Specify Field window appears.
Click Add.
The Options for Summary Field window appears (Figure 4-24). You’ll create a special field that counts the records in each category. The field will appear above the record group it summarizes because of the choice you made in the previous step.
In the Summary Field Name box, type Count, and then select Count of. Now choose Lease Duration from the “Choose field to summarize by” list, and then click OK until you’re back on the Specify Subtotals panel. Now click Add Subtotal. When your window looks like Figure 4-23, click Next.
FileMaker creates a new Count field (Summary type) and at the end of this process, you’ll see a Subsummary part (you’ll learn how to create them manually on Summary Fields) based on the options you just chose. The summary field counts each record in the sorted category group you selected above and displays a count of records for each group. After you click Next, the Specify Grand Totals window appears.
Figure 4-24. You’d see this same window if you used the Manage Database window to create a summary field. Summary fields do just what their name implies: they summarize groups of data. You can apply one of several mathematical operations to the fields, including Totals, Averages, and Counts. You can count any field, but you can’t apply math to text fields. So if you’re trying to select a field, but it’s grayed out, check the operation you’re trying to perform. It may not be the right option for the field you want to summarize (or the field’s definition may be set to the wrong type).
Click Specify.
The Specify Field window appears. The Count field you just created appears in the list.
Click the Count field to select it, and then click OK. Leave the Grand total placement pop-up menu set to “End of report”, and then click Add Grand Total. Finally, click Next.
Make sure the Lease Agreement::Count field appears in the Grand Totals list at the bottom of the window before you click Next. Summary fields are smart enough to display different data depending on the layout part they’re placed in. So you can use the same summary field in a Subsummary part and a Grand Total part, and it will display appropriate data in each part. This version of the Count field will appear at the end of the report and will give you a grand total count of all the records you’re viewing. After you click Next, the Select a Theme window appears.
If it isn’t already selected, select Default from the Layout Themes list, and then click Next.
The Header and Footer Information window appears.
From the Header’s Top left pop-up menu, choose Layout Name. From the Footer’s Bottom left pop-up menu, choose Current Date. Then click Next.
The Create a Script for this Report window appears.
Click the “Create a script” option, and then type Lease Agreement Report in the “Script name” box. Select the “Run script automatically” option, and then click Next.
FileMaker writes a script for you that sorts your records properly (the data in subsummary parts doesn’t show up unless the records are sorted by the field specified in their definition). The “Run script automatically” option attaches an OnLayoutEnter script trigger (explained on OnLayoutEnter) to the new report layout so that you don’t have to remember to run the script every time you switch to the report layout. After you click Next, the final window tells you that you’re finished. But actually, you aren’t quite done.
Click Finish.
Your sorted report appears (Figure 4-25).
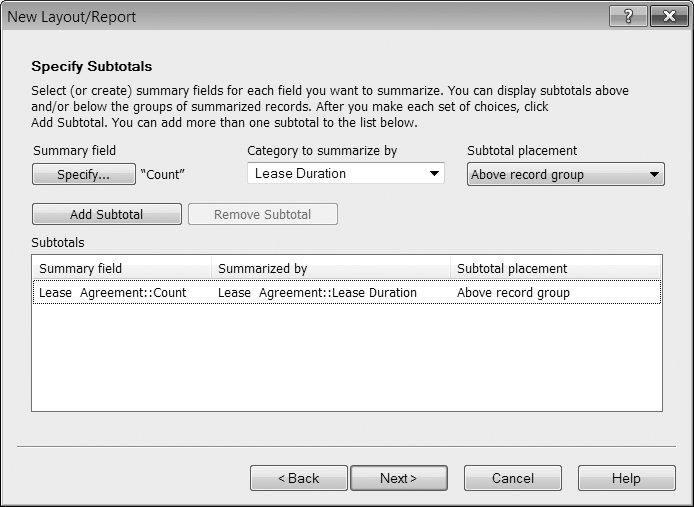
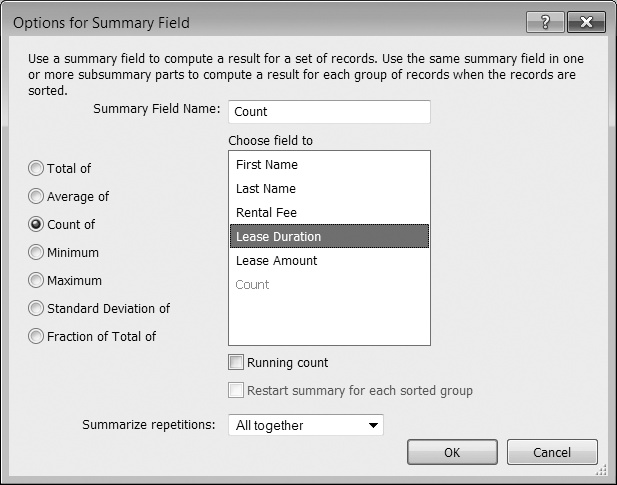
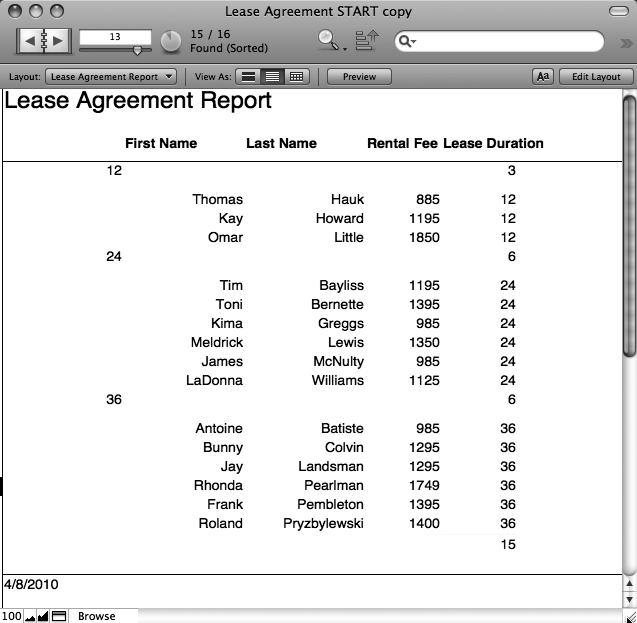
Figure 4-25. Graphically speaking, the report as created is nothing to write home about. You’ll need to put your layout design skills to use on this layout. However, the Layout Assistant gave you some nice tools to help you start analyzing your data. You can see that your current group of tenants trend toward longer leases. And it looks like your higher-priced properties are leased out, too. Except for that one guy with the $1,850 lease who’s only signing on for 12 months. (While you’re learning FileMaker, have your assistant find out what it’ll take to get that guy signed up for another couple of years.)
There were a lot of steps and a lot of selections to make. But the hard work’s been done for you. In Chapter 14, you’ll learn how to create a sorted subsummary report completely by hand. Once you’ve done that, you’ll appreciate how much easier it was to make selections in an assistant. However, you need to format your fields and generally beautify the layout so that it matches the rest of your database.
When you’ve got the layout looking fine, switch to Browse mode so you can see how the report updates dynamically. For example, click the New Record button in your Status toolbar, and then enter the following data in the new record:
First Name: Janette
Last Name: Desautel
Rental Fee: 1295
Lease Duration: 12
When you commit the record, it’s sorted into the proper group, and the Count field is updated immediately. The same thing’s true if you edit data in the field on which the sort is based (remember that this report is always sorted by the Lease Duration field). Change some data in a Lease Duration field, and then commit the record. It will sort into the proper group. If you add data that’s not in an existing group (say you type 48 in the Lease Duration field), a new group will be formed with a Count of “1.”
Subsummary layouts only show their summary data when your records are sorted by the field that’s attached to the subsummary part (explained on Summary Fields and Sub-summary Parts). So if you unsort your records, or do a sort that doesn’t include the subsummary part’s field (say you sorted by Last Name and First Name only), the groups and subtotals don’t show on the layout. To get them back, sort the records again, and this time, make sure you include the proper field (in this case, it’s Lease Duration) in the sort order.
Note
Sorted subsummary reports are great for looking at trends in your data, but you probably wouldn’t usually use them as the primary way to add new records or edit exiting ones. But on those occasions when it’s suitable (say the sorted report makes it clear that some data wasn’t entered correctly, it’s convenient that you don’t have to leave the report layout to make corrections).
The dynamic report you just created is perfect for printing out every time you want to analyze your data. Even if they don’t want to print the report, your users can just switch to the Lease Agreement Report layout and get an up-to-the-minute categorized report on your properties. But what if they need a quick analysis of the data using a category that you haven’t set up for them? Do they have to wait until you have time to add a new report? Or maybe you need a last-minute, one-time report that you won’t be printed (you don’t even have time—there’s a meeting in 5 minutes and you’ve been told to get the data), so you don’t want to bother creating a new layout and spending time making it match the rest of your database. Either way, FileMaker’s Trailing Group reporting feature is the solution.
A Trailing Group report requires a Table view on a layout that shows records from the table you want to report on. It accomplishes the same thing as a dynamic subsummary (sorts records automatically by the category you choose, with an optional summary field), but it’s temporary and doesn’t actually add a subsummary part to the layout.
Note
If you’re using the chapter’s sample files, the layout you need has already been created for you. If you continued working with the file you created in the last chapter, create a new layout that shows records using the Lease Agreement table, and then switch to Table view.
On the Lease Agreement Table layout’s Table view, click the triangle to the right of the Rental Fee’s column heading. (The triangle appears when you place your mouse over the heading.) Choose “Add Trailing Group by Rental Fee” (Figure 4-26).
The Rental Fee field’s pop-up menu appears when you click the triangle, and then when you choose the Trailing Group command, a gray summary row appears on the table and the records are automatically sorted by Rental Fee.
From the Rental Fee’s pop-up menu, choose Trailing Subtotals→Count.
The count appears in the summary row below each Trailing Group. Behind the scenes, a new summary field was created for you and its data will display on this layout.
From the Rental Fee’s pop-up menu, choose “Trailing Group Fill Color”, and then choose a color from the pop-up menu.
Choose a color that helps you see the summarized data better.
FileMaker sorts and groups the records for you, so you can get the information you need from the ad hoc report without fuss. As with the dynamic report in the previous section, you have to sort the records by the Trailing Group you chose for the summaries to show up. But unlike the dynamic report, FileMaker doesn’t sort the data automatically if you leave this layout and then come back to it later. Click the Rental Fee column head to sort the records and the trailing groups reappear.
If you switch to Layout mode, you’ll see that the layout doesn’t have a new part added to it. Nor does the Count field actually appear on the layout. That’s why this type of report is temporary. It’s meant to let you get a quick, bird’s-eye view of your data and then get right back into your other tasks (or to the meeting on time and with the data you were told to have at your fingertips).
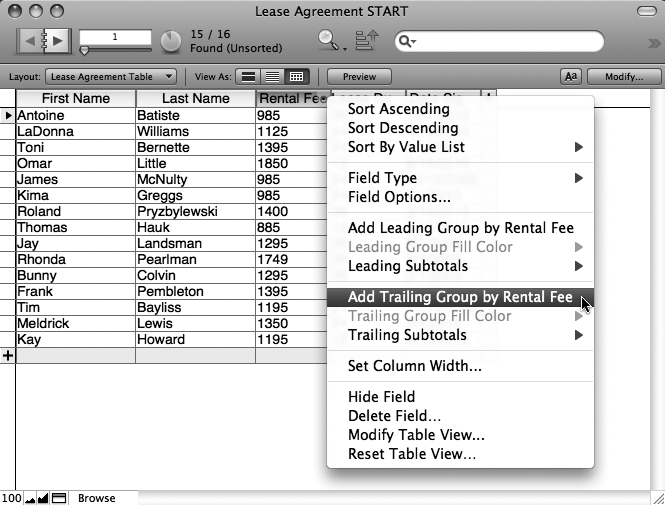
Figure 4-26. The contextual menu for fields in table view lets you create temporary Trailing Group reports, but it also lets you change the database’s schema (you can change the field’s type or options, delete the field or add new summary fields) or just sort the records you’re viewing. You can even change the way the Table view behaves by adding or deleting fields from the layout or changing a column’s width. Or if you’ve made a lot of changes you want to undo, you can restore the layout’s original appearance. In this case, the “Trailing Group by Rental Fee” field would disappear. But if you’ve created a summary field for the Trailing Group, the field isn’t deleted from the table.
You can get creative with your ad hoc reports by adding multiple trailing groups at the same time. In a small database like the one you’re working on, you may find that nearly every record gets its own group. But in a database with lots of records, you can use this technique to get fine-grained reports very quickly. Remove a Trailing Group by clicking the column head associated with that group. Choose “Remove Trailing Group by Rental Fee” and the group no longer shows up.
You know that FileMaker creates a lot of elements for you when you first create a new database. One thing you may not know is that it even created a login account for you and it assigned that account name to be entered automatically each time you open the file. You can see that setting, and then turn it off, by choosing File→File Options (Figure 4-27).
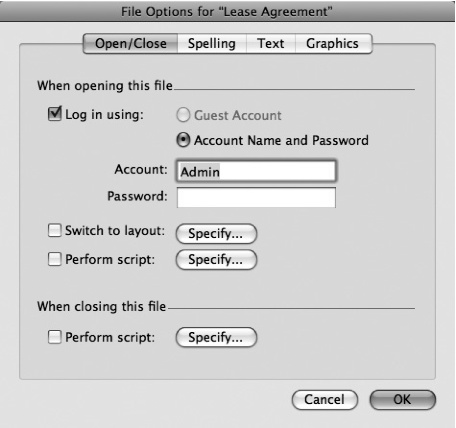
Figure 4-27. It’s not industrial-strength security, but FileMaker created an Admin account for you, and has been secretly using it every time you open the Lease Agreement database. Really it’s not that much of a secret, because you have to figure that at least half of FileMaker’s millions of users know about this account and the hackers amongst them would try the “Admin” account name (it doesn’t even have a password), if they wanted to break into your database. One of the first things you can do to make any database more secure is turn off Log in automatically.
This default account is created in every database FileMaker creates, so to protect your new database from prying eyes, turn off the option to log in using the automatic account, and then change the default account’s name and password. Here’s how to change the default account:
Choose File→Manage→Security.
The Manage Security window appears. It shows two built-in accounts, but only the Admin account is active, as shown by the checkmark in the Active column.
Click the Admin account, and then click Edit.
The Edit Account window appears (Figure 4-28).
Type your first name’s initial and your last name in the account box.
This first initial/last name scheme is standard for creating account names. But you can use whatever scheme you like, so long as you can remember it.
Type a password into the password box.
You know the drill by now: create a password that has a mix of letters and numbers and for extra strength, even a symbol or two. Just make sure you remember exactly what you typed, because you’re about to have to retype it.
Figure 4-28. Account Names appear in the Account Name box just as you type them, but characters in the password box are obscured by a password font. That keeps your typing safe from someone who may be looking at your computer screen over your shoulder, but it does mean that you have to be very careful as you type. Because once you add a password to an account, even you can never see what was entered in the box. (Go to Chapter 18 to read all about security.)
Click OK until you’ve dismissed all the windows.
Before you click OK for the last time, you’ll have to re-enter the new account and password you just created. And if you get it wrong, you can’t close the Manage Security window. If you can’t quite get the combination right, go back into the account you’ve just edited, and then retype your password. Once you get the combo correct, the window closes and you’re back on your layout.
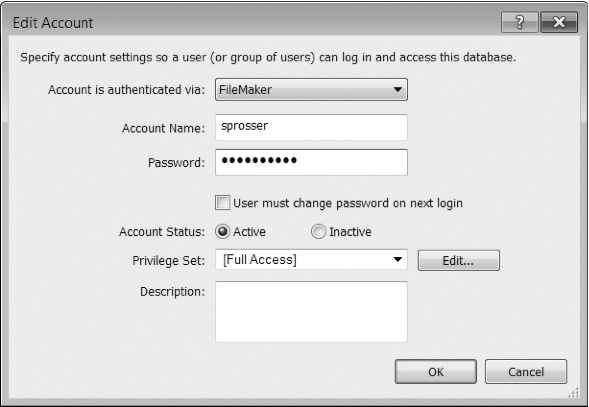
You know that you’ve got the account name and password right, because you were able to close the window. But you should test the new login account by closing the file (if you still have multiple windows open, make sure you close them all), and then opening the file again. This time, you’ll be asked to enter the new account name and password.
FileMaker guesses that the account name used for each file it opens is the same as the name you entered when you first installed FileMaker. But you can change this name in the program’s Preferences window. Choose Edit→Preferences (Windows) or FileMaker Pro→Preferences (Mac) to get the window shown in Figure 4-29.

Figure 4-29. Type the account name you want to appear in the User Name box and FileMaker will use that as the automatic account name from now on. On the Mac these options are a little different. You can choose from the System’s Admin Account name or choose Other, and then type a custom name. Either way, it saves you a few keystrokes every time you open the database.
Over the last two chapters you’ve created a database from scratch. In that process, you’ve learned the basics of FileMaker’s major features. You know how to create tables and fields, and you can create relationships between them. You can create layouts and layout objects and you can change the format of the most common layout objects. You’ve even tried your hand at writing a script, creating some data analysis reports, and adding security to your file. Before you delve deeper into these topics, it’s time to switch gears and learn more about planning a database. In the next part, you’ll learn how to think like a database developer.
Get FileMaker Pro 11: The Missing Manual now with the O’Reilly learning platform.
O’Reilly members experience books, live events, courses curated by job role, and more from O’Reilly and nearly 200 top publishers.

