Chapter 1. Presenting Your Presentation
I hate sitting in an audience and having to squint, crane my neck, or turn my head sideways just to make heads or tails of a slide. What’s the point of having slides if nobody can read them?
Whether you’re an audience member or a presenter, presentations are chock-full of annoying issues. In this chapter, you’ll learn how to set up your equipment and navigate your slides to keep your audience focused on your presentation—not on you. You’ll also tackle sound issues and other problems you may face when working with hyperlinks, hidden slides, and custom and self-running presentations.
SETTING UP YOUR EQUIPMENT
The Slides Look Crooked
THE ANNOYANCE: I got the projector up and running without any trouble, but I notice that my slides are cut off at the bottom of the screen.
THE FIX: You just need to adjust the height and distance of the projector. Either move the projector away from the screen, screw the projector feet out some, or do a combination of both.
If you can’t move the projector, or if the feet are as far out as they’ll go, prop the projector up on something—a folded piece of paper under each front foot will often do the trick.
The Slides Look All Skinny on the Bottom
THE ANNOYANCE: I got the projector set up, but the slide image looks like a trapezoid on the wall. I mean it’s wider at the top than at the bottom. What’s happening?
THE FIX: This trapezoidal look is called keystoning, and you can adjust it in the settings of most modern projectors. Simply hit the Menu button on your projector or its remote and look for the keystoning option.
If you don’t see a keystoning option on the projector, you’ll need to raise the height of the projector by mounting it on some books or other objects.
However, because keystoning is caused by tilting the projector away from a 90° angle to the screen, make sure you raise the entire projector, not just the front of it.
I Can’t Hear the Sound
THE ANNOYANCE: I can’t hear the audio. There’s supposed to be music on this slide.
THE FIX: If you’re showing the presentation through a projector, check to see if the projector has speakers and make sure they’re turned on. Also, make sure you have the proper audio cable with you to plug the laptop into the projector.
You also need to turn on the sound for your laptop. Most laptops have a Function (Fn) toggle key and an F key with an icon that looks like a speaker. Hold down the Fn key while you repeatedly press the speaker key.
Remember, there’s no point in having audio if nobody can hear it. So plan ahead: make sure the audio-visual staff knows your presentation contains audio.
And yes, you need not route the audio through the projector all the time. Often, the laptop output is routed through a sound mixer that in turn sends it to the sound system installed. This works best in dedicated conference venues and auditoriums.
Slides Won’t Move Forward
THE ANNOYANCE: When I press the Forward button on the remote during my presentation, the slide won’t move. How embarrassing!
THE FIX: Make sure you point the remote toward the remote receiver, not at the screen. For whatever reason, the tendency is always to point toward the screen. Most remotes have a limit on how far they can send remote signals, so also make sure you’re close enough to the receiver for the remote signal to be picked up.
Of course, always make sure you test and practice with the remote before your presentation. And don’t forget to put fresh batteries in the remote before you begin your presentation.
If all else fails, just use the keyboard to advance the slides. The right and up arrow keys, Enter key, spacebar, Page Up key, and the N (for Next) key all move the slides forward; left and down arrow keys, Backspace key, Page Down key, and the P (for Previous) key all move the slides backward.
Silence Is Golden
THE ANNOYANCE: Ugh, this presenter is driving me nuts! He keeps saying “Um” and walking in front of the projector!
THE FIX: Sorry, there’s not much that can be done about this type of thing. Poor presentation skills can be overcome through coaching, though, especially if the presenter’s willing to learn.
One of the most valuable lessons I learned during a presentation coaching session was not to be afraid of silence. It’s okay to look at your slide and gather your thoughts, but don’t keep talking when you’re doing it! The silent moment will seem long and awkward to you, but it will seem perfectly natural to your audience.
Image Doesn’t Show on Projector
THE ANNOYANCE: No matter what I do, I can’t get what I see on the laptop to show on the projector.
THE FIX: Use the appropriate keyboard combination to toggle your laptop/projector display. You can usually control the following three toggle states using Fn in combination with an F key: projector only, monitor only, and both projector and monitor. Look for the symbol on the keyboard F key row and hold down the Fn key while you press the key with the symbol. On a Dell Latitude, for example, press Fn+F8. On a Toshiba, it’s often Fn+F5.
Always make it a point to arrive at the venue a little early to test your hardware. If someone else is presenting immediately before you, try to check your laptop the day before, during lunch, or during another break.
VIEWING YOUR PRESENTATION
Presentation Keeps Locking Up
THE ANNOYANCE: Aaaarrrrgggghhhh! My presentation locks up when I try to view it in Slide Show mode. Help!
THE FIX: This problem is often related to the "fade through black” transition, which seems to be very hard on video drivers in PowerPoint 97 and 2000 especially. Switching to another transition will often cure the lockups.
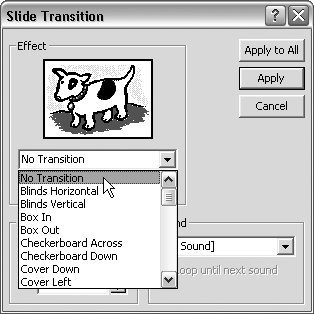
To change your slide transition in PowerPoint 97 or 2000, select Slide Show → Slide Transition, choose another transition from the Effect drop-down menu, and then click the Apply button. If you want this new transition to apply to all slides in your presentation, click the “Apply to All” button. If you don’t want a transition, choose No Transition, and each slide will simply appear on the screen with no change or movement between slides (see Figure 1-1).
If removing or changing the slide transition doesn’t resolve the problem, update your video drivers and change your hardware acceleration.
If you’re running Windows 98 or Me, do the following:
Choose Start → Settings → Control Panel.
In Control Panel, double-click the System icon.
Click the Performance tab and click the Graphics button.
Drag the Hardware Acceleration slider one notch to the left (see Figure 1-2).
Click OK to return to the desktop.
Restart the computer if necessary.
Test to see if this has resolved the problem. If not, drag the Hardware Acceleration slider one notch farther to the left each time. Your goal is to set the Hardware Acceleration slider to the highest possible setting without locking your presentation.
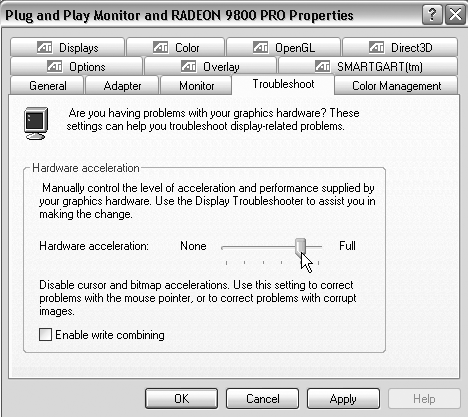
If you’re running Windows 2000 or XP, do the following:
Right-click the desktop and choose Properties.
Click the Settings tab and then click the Advanced button.
Click the Troubleshoot tab.
Under Hardware Acceleration, move the slider one notch to the left (see Figure 1-2).
Click OK to return to the desktop.
Test to see if this has resolved the problem. If not, drag the Hardware Acceleration slider one notch farther to the left each time. Your goal is to set the Hardware Acceleration slider to the highest possible setting without locking your presentation.
You might also want to upgrade your version of DirectX. The latest version of DirectX can be downloaded from http://www.microsoft.com/directx.
Video Doesn’t Show on Projector
THE ANNOYANCE: No matter what I do, I can’t get this video to play on the projector and laptop at the same time; it will only play on the laptop. What am I doing wrong?
THE FIX: You’re not doing anything wrong; this is an issue with the combination of hardware and software you’re using: the video card, the video driver, the video itself, and PowerPoint.
The most reliable resolution is to toggle the laptop display so that it shows only on the projector. Hold down the Fn button and press the appropriate F key to toggle the laptop display (see “Image Doesn’t Show on Projector”).
Because the video plays on the primary monitor (the laptop), but not on the secondary monitor (the LCD projector), you can try changing your primary monitor in Windows. This will make the LCD projector the primary monitor, which means you will see the black box on your laptop screen, but your audience will see the video.
To change your monitor, right-click your desktop and select Properties. Click the Settings tab, and then click the Advanced button. Look for a “Monitor” or “Adaptor” tab. You’re looking for an option to switch the “Primary” and “Secondary” output. Once you find it, click the Apply button, and then click OK to get back to your presentation. When you finish the presentation, make sure you restore your original monitor settings.
PowerPoint Opens Minimized
THE ANNOYANCE: I can’t get my presentation to open properly when I double-click it. I can see the PowerPoint icon on the taskbar, but it won’t maximize or restore. How can I view the presentation?
THE FIX: Your slide show is set to display on the secondary monitor, which is no longer attached to your computer. Open PowerPoint from Start → Program Files and select File → Open to open your presentation. Then select Slide Show → Set up Show and choose “Display slide show on primary monitor.”
Use White Backgrounds for Acetates
THE ANNOYANCE: I printed colored acetates of my presentation, but when I tried to write in the margins, the audience had trouble reading my notes.
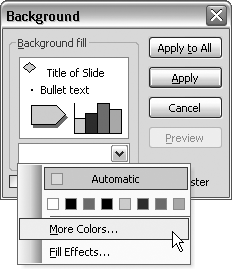
THE FIX: Set up your slides with white backgrounds, and then print the acetates. The colors in the slide text, objects, and charts will print, but you won’t have any background colors to contend with when you write on the acetates.
One way to make your slide backgrounds white is to choose Format → Background, select a white swatch from the drop-down menu, and then click the “Apply to All” button (see Figure 1-3). Make sure you haven’t used white for any other objects in your presentation; white objects won’t show up against a white background.
This is usually what clients really want when they ask for “full-color” acetates. They just don’t realize how a printed colored background will affect slides on acetate.
Use Contrasting Text and Backgrounds
THE ANNOYANCE: I had to design a new organizational chart using our company colors and ended up with white text on a yellow background. I can’t read a freakin’ thing!
THE FIX: Never use white text on yellow fills. Likewise, avoid dark font colors on dark backgrounds and fills. It may look fine on your monitor, but you will likely cause your audience consternation as they squint to read your slides. Instead, think contrast. Use dark backgrounds with light text or vice versa. Be careful with white and very light backgrounds, though—staring at too much glaring expanse of white tends to give people headaches. If you’re tired of the oh-so-common blue background with white text, check http://hubel.sfasu.edu/research/survreslts.html for some interesting readability information, and perhaps some inspiration for different background-text combinations.
Remember that subtle color changes simply get lost on most projectors, and an estimated 1 out of 12 men has some type of color perception problem. So don’t rely solely on color to get your point across. For example, if you’re working with a line graph, use line thickness and pattern, in addition to color, to help define the different lines.
Finally, most projectors seem to wash out the projected image. Make sure you test your presentation on the projector to alleviate any color visibility issues ahead of time. Also, check both the brightness and contrast settings on the projector. If your slides appear faded, look for a Reset button on the projector and readjust the brightness and contrast as necessary.
If you have control over the slide design, use colors that provide more saturated backgrounds. A saturated blue will appear much less washed out than a dull blue, even if the projector is not up to the mark.
Learn How to Navigate Your Presentation
THE ANNOYANCE: I put a specific slide in this presentation to use as backup information. Now I want to show it, but I can’t find it. I know I can close out of Slide Show view and use Slide Sorter view to find slides, but there’s gotta be a better way.
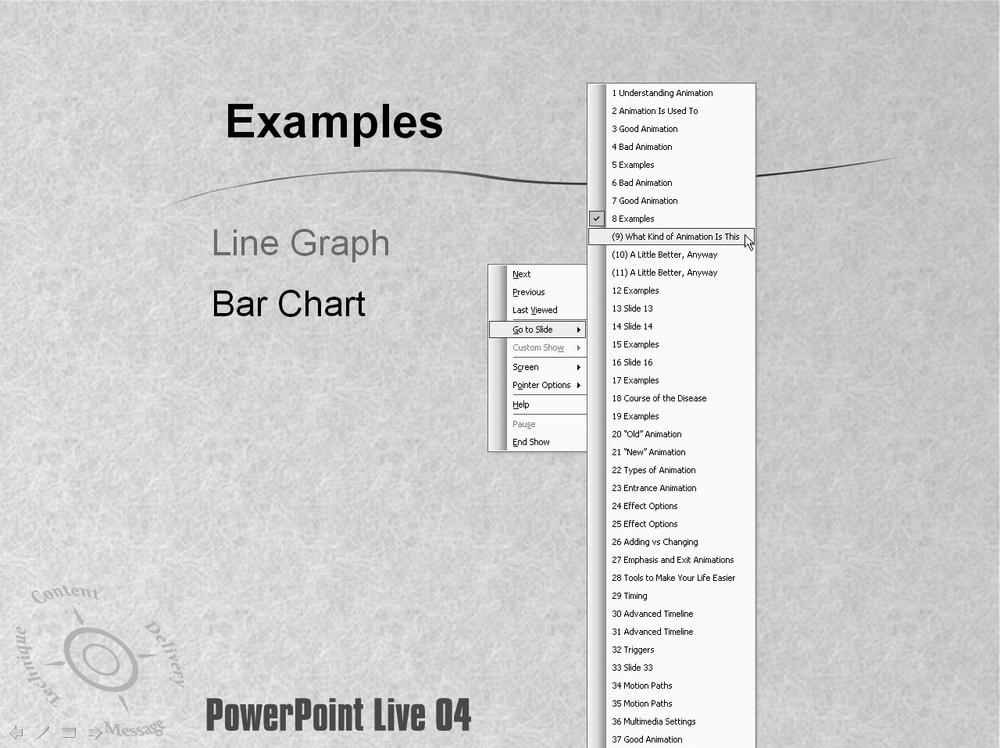
THE FIX: Select Tools → Options, click the View tab, and check the “Show menu on right mouse click” box (PowerPoint 2003 and 2002) or the “Popup menu on right mouse click” box (PowerPoint 2000 and 97). You can then right-click your slide, choose Go to Slide, and click the appropriate slide.
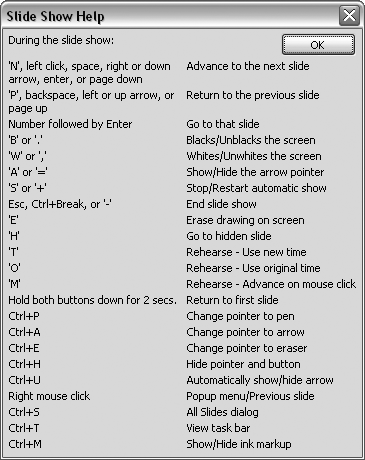
Alternatively, use a printout of your presentation and learn the basic navigation techniques. Hit F1 on your keyboard for help in Slide Show view (see Figure 1-4). Some of the basic navigation tools—type the number and hit Enter, right-click for menu, use the B or W key to blank the screen, etc.—will be very helpful to know.
Navigating to Hidden Slides
THE ANNOYANCE: I have a hidden slide with data included in my presentation. How do I show a hidden slide if I need it to help answer a question?
THE FIX: One way to navigate to a slide—even to a hidden slide—is to type in the slide number and then quickly hit Enter. Of course, you have to know the number of the slide you want to move to, so it may help to have a numbered printout handy.
If you’re using the right-click technique to display a list of slides (see “Learn How to Navigate Your Presentation”), hidden slides will show up with parentheses around the slide number (see Figure 1-5). You can also access this list by pressing Ctrl+S.
Back Up During the Presentation
THE ANNOYANCE: When I right-click during a slide show, I don’t get a list of slides in the presentation. Instead, I go backward one slide. What’s going on?
THE FIX: Select Tools → Options, click the View tab, and check the “Show menu on right mouse click” box (PowerPoint 2002 and 2003) or the “Popup menu on right mouse click” box (PowerPoint 97 and 2000) to view the list of slides when you right-click during the slide show. If you leave this box unchecked, PowerPoint turns the right-click into a “previous slide” button, as you discovered.
Get Rid of Slide Show Starting Screen
THE ANNOYANCE: Every time I start a presentation in PowerPoint 2002, I get this black screen that says, “Slide Show Starting.” How do I get rid of it?
THE FIX: Unfortunately, you can’t. This screen is hardwired into PowerPoint 2002 and there’s no way around it. Microsoft did remove this irritating intro screen in PowerPoint 2003, so if it really annoys you, an upgrade will resolve it.
Get Rid of End of Slide Show Screen
THE ANNOYANCE: At the end of every presentation, a screen says “End of slide show, click to exit.” How do I get rid of it?
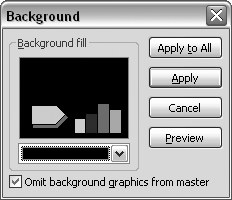
THE FIX: Select Tools → Options, click the View tab, and uncheck the “End with black slide” box. If you want the presentation to end with a plain black slide, you’ll have to add one yourself at the end of the presentation.
To insert a plain black slide, select Insert → New Slide. Select or go to the new slide, select Format → Background, check the “Omit background graphics from master” box, and choose a black color from the drop-down Background fill menu (see Figure 1-6).
Note that “End with black slide” is a computer-specific setting—it’s not part of the presentation. Even if you no longer see “End of slide show” on your computer, you may see it if you show your presentation on a different computer.
Hide the Arrow
THE ANNOYANCE: I just want to hide the arrow when I’m presenting. It’s too distracting.
THE FIX: Just press Ctrl+H when you’re in Slide Show view. The arrow and the little buttons in the lower-left corner of the screen will disappear. Press the A key to bring the arrow and buttons back.
Pressing A works as a toggle to show and temporarily hide the arrow during a presentation. If you press A to hide the arrow, it will display itself again when you move the mouse. Ctrl+H permanently hides the arrow, even when you move the mouse. You must press A to bring it back.
Draw Straight Lines with the Pen
THE ANNOYANCE: I used to be able to hold down the Shift key while drawing with the Pen tool to draw straight lines during a slide show. I upgraded to PowerPoint 2003, and I can’t draw straight lines anymore. What happened?
THE FIX: Unfortunately, Microsoft removed this feature in PowerPoint 2003. They did, however, introduce an option to save annotations created during a slide show, but the straight-line functionality was sacrificed in the process. If you’ve made any marks during a slide show, you’ll be prompted to keep annotations when the presentation finishes.
Access Files from Your Presentation
THE ANNOYANCE: I have to do a presentation on our new corporate branding. I know people will have questions about the brand guide, which is a 50-page PDF. Can I open it without exiting Slide Show view?
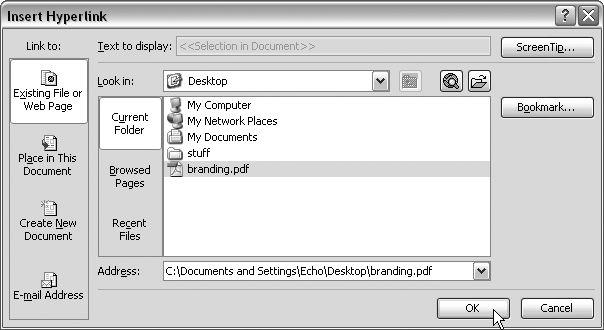
THE FIX: If you have to cover something not easily displayed on a slide (such as the 50-page branding guide), open the file, and then start your PowerPoint presentation as usual. The other application and file will run in the background on your system. When you’re ready to start using it, press Alt+Tab to switch over to it from your presentation. When you’re finished, use Alt+Tab to get back to PowerPoint.
You can also use hyperlinks to navigate to other files from your presentation. Right-click an object on your slide, choose Hyperlink, and then navigate to the appropriate file (see Figure 1-7). The file should open with whatever Windows uses as the default program to open that file.
Avoid the Hyperlinked Files Message
THE ANNOYANCE: I added a hyperlink to a file stored on my hard drive. Now when I click the link in my presentation, I get a stupid warning message. How do I make this annoying thing go away?
THE FIX: A new emphasis on security is the reason for this warning message, which happens in PowerPoint 2003 and PowerPoint Viewer 2003. The warning message says “Hyperlinks can be harmful to your computer and data…Do you want to continue?” (see Figure 1-8). Of course, if you or someone you trust created the file you’re linking to, then this warning is simply a nuisance.
Microsoft made it difficult to suppress this warning, even on your own computer with your own presentations. To do so, you need to either hack the registry using the instructions at http://support.microsoft.com/?kbid=829072, or download a utility that performs these same steps from Microsoft PowerPoint MVP Chirag Dalal (http://officeone.mvps.org/download/hyperlink_warning.html).
Note that these options only prevent the warning message from happening on your computer. You cannot prevent this message on other computers—unless, of course, you use Chirag’s utility or perform the registry changes described above on those systems as well.

THINGS THAT DRIVE PRESENTERS CRAZY
Change Note Size in Presenter View
THE ANNOYANCE: I’m using Presenter view, and I swear, I think I’m blind as a bat! How can I change the size of the notes area in Presenter view?
THE FIX: Presenter view on the PC cannot be changed. (It can be changed on PowerPoint 2004 for the Mac, though.)
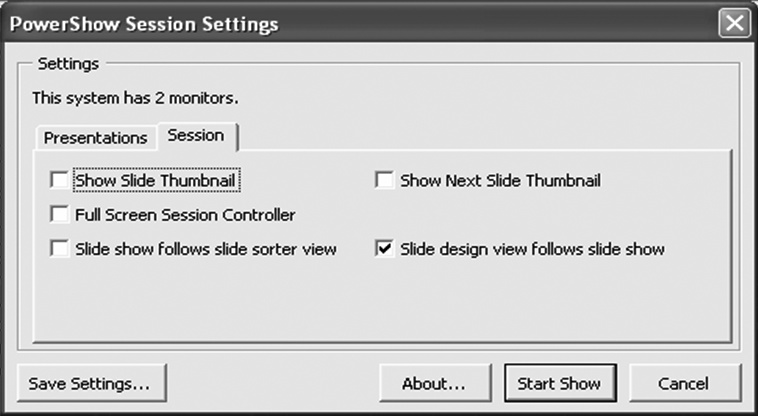
If you need this capability, download the PowerShow add-in from Microsoft PowerPoint MVP Chirag Dalal (http://officeone.mvps.org/powershow/powershow.html). This add-in lets you use PowerPoint’s views during a presentation, and it keeps the view on the “presenter monitor” synchronized with the view on the “presentation monitor.” To set it up, simply install the add-in, select Slide Show → PowerShow, click the Session tab, and check the “Slide design view follows slide show” box (see Figure 1-9).
Since PowerShow uses PowerPoint’s own design views, you can increase the size of your speaker notes by zooming in on them or increasing the font size in PowerPoint. You might also want to download the Shortcut Manager (http://officeone.mvps.org/ppsctmgr/ppsctmgr.html), which lets you assign the up and down arrow keys to navigate slides during a PowerShow session.
Practice with Only One Monitor
THE ANNOYANCE: I’d really like to practice with Presenter view, but PowerPoint won’t let me use it unless I have a second monitor attached. I don’t have a second monitor. Any suggestions?
THE FIX: Select View → Notes Page, and then hold down the Ctrl key while you click the Slide Show button in the lower-left corner of the screen (see Figure 1-10). This opens Slide Show view in 1/4 of the screen, so you can still see your speaker notes if you want. You’ll have to advance the notes pages independently from the small slide show, but it may be enough to let you practice without having to hook up another monitor.
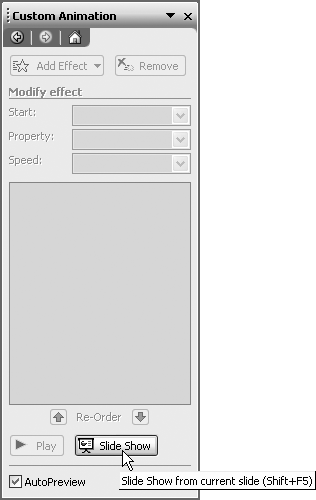
Start Slide Show from the Current Slide
THE ANNOYANCE: I’m working on creating a presentation, and it would sure be nice if there were a keyboard shortcut to start the presentation from the current slide! Otherwise, it takes forever to navigate to the slide I really want to see.
THE FIX: Plain ol’ F5 will still begin the slide show on the first slide, but Shift+F5 will, as of PowerPoint 2003, begin the presentation from the current slide.
As a matter of fact, if you happen to have the Custom Animation task pane open in either PowerPoint 2002 or 2003, you can press the Slide Show button at the bottom to start the show on the current slide (see Figure 1-11).
Create a Self-Running Presentation
THE ANNOYANCE: I want to have a presentation running in our booth at an upcoming trade show. How can I create a self-running presentation?
THE FIX: Select Slide Show → Set Up Show and choose the “Browsed at a kiosk” option.
Kiosk mode renders the keyboard useless, so make sure you provide some kind of navigation for the users. You can either set all the slide transitions to automatic, or you can provide buttons with Action Settings so the users can navigate through the presentation at their leisure.
You can add action buttons to the slide and title master so they’re available on every slide. Select View → Master → Slide Master, and then select AutoShapes → Action Buttons → Forward or Next on the Drawing toolbar and click the slide to create a “next slide” button. Repeat the sequence and select “Back or Previous” to add a “previous slide” button. Don’t forget to add the buttons to the Title Master also.
Did I say Kiosk mode makes the keyboard useless? Well, I lied. The Esc key will still work, so you’ll want to remove the keyboard from the trade show system after you get the kiosk going. Or you can use Microsoft PowerPoint MVP Shyam Pillai’s free No ESCape add-in (http://skp.mvps.org/noesc.htm) to disable the Esc key.
Kiosk Mode Is Broken
THE ANNOYANCE: I created a presentation to run at a kiosk, and it should return to the first slide after five minutes of inactivity. However, now it just sits there on the slide and never goes back to the beginning. How’d I manage to break my presentation?
THE FIX: Oh, you didn’t break anything, PowerPoint did. Kiosk mode is broken in PowerPoint 2002; it doesn’t reset after five minutes of inactivity. It does reset as expected in PowerPoint 97, 2000, and 2003, though.
If you need to use Kiosk mode in PowerPoint 2002, or if you simply want to extend the capabilities of Kiosk mode in PowerPoint 2000 or 2003, download the Kiosk Assistant (http://officeone.mvps.org/kioskassist/kioskassist.html) from Microsoft PowerPoint MVP Chirag Dalal. It lets you specify the time interval before the presentation resets, as well as which slide the presentation will reset to.
Loop Your Presentation Continuously
THE ANNOYANCE: I have this computer running a presentation in our lobby, but I want it to start over automatically when it gets to the end.
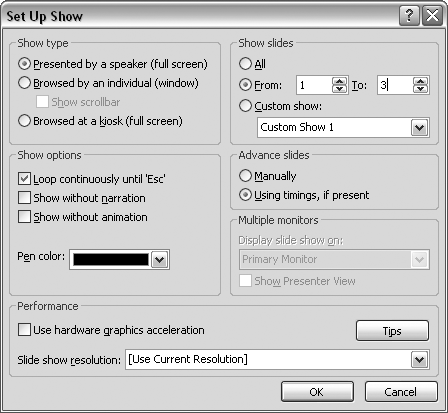
THE FIX: Select Slide Show → Set Up Show and check the “Loop continuously until ‘Esc’” box (see Figure 1-12). This setting is automatically enabled when you choose the “Browsed at a kiosk” option.
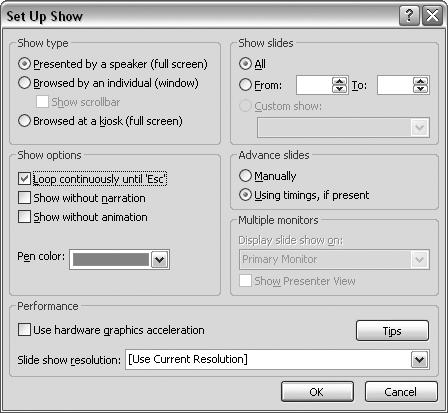
Show a Range of Slides
THE ANNOYANCE: My presentation has 20 slides in it, but it stops after showing only half the slides. What’s wrong?
THE FIX: There are two common culprits here: hidden slides or a specific slide range. The easiest way to check for hidden slides is to select View → Slide Sorter and look for a gray cross through the slide number.
If hidden slides aren’t the problem, select Slide Show → Set Up Show and make sure the All option is selected in the “Show slides” area (see Figure 1-12).
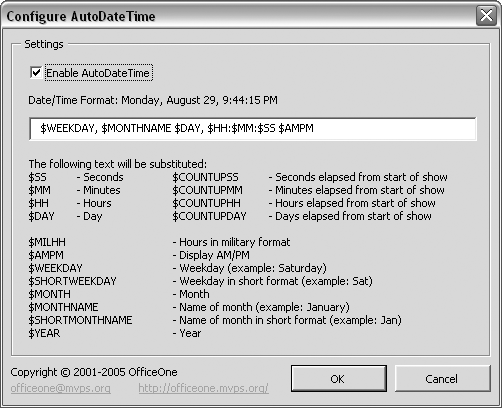
Add Current Date and Time
THE ANNOYANCE: I have a welcome presentation running continuously on a computer in our lobby. I’d like to add the current date and time, but I can’t find a way to do it. I tried using Insert → Date and Time, but it sticks at the time the presentation starts.
THE FIX: You need to download the free AutoDateTime add-in from Microsoft PowerPoint MVP Chirag Dalal (http://officeone.mvps.org/autodatetime/autodatetime.html). As with any add-in, before you can install it, you must select Tools → Macro → Security and choose the Medium option. Once installed, select Format → AutoDateTime to determine the format of the date and time (see Figure 1-13). Next, select View → Header and Footer, click the Slide tab, check the “Date and time” box, and choose the “Update automatically” option to display it. If you want to change the location, font, or size of the date and time text, select View → Master → Slide Master, and make the change to the Date Area placeholder.
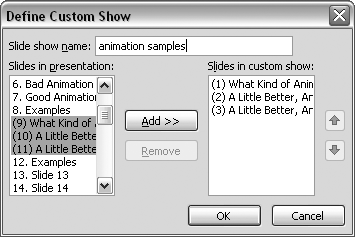
You already created your presentation, but now you want to add a three-slide, “side” presentation that goes into more depth on a particular subject, in case the audience asks questions.
One easy solution is to create a custom show within your presentation. Select Slide Show → Custom Shows and click the New button. Give the custom show a name, select the appropriate slides from the list on the left, and click the Add button to add the slides to the custom show (see Figure 1-14).
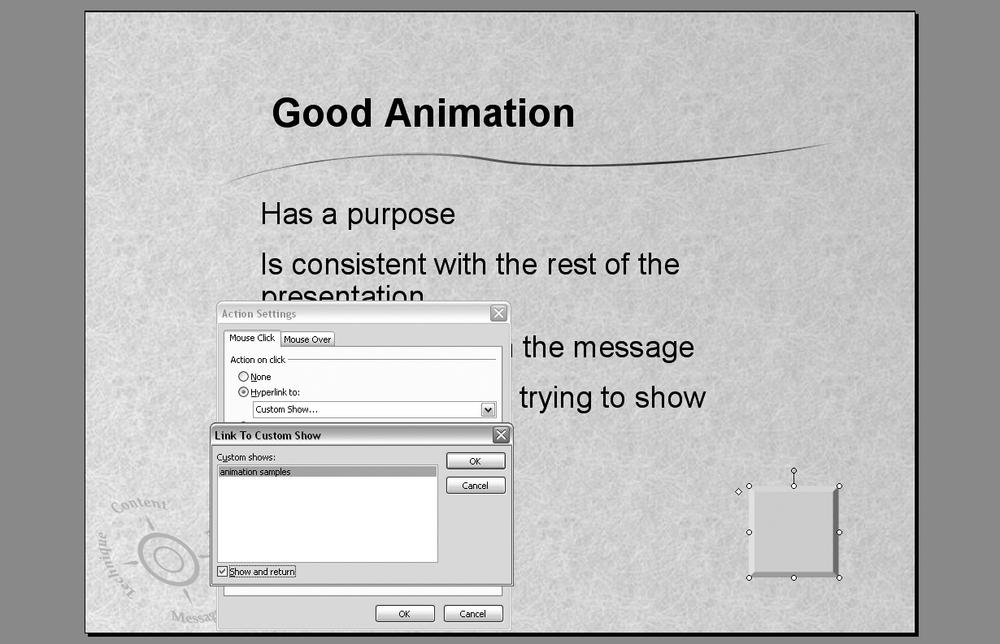
After you’ve created a custom show, use the following steps to enable access to it:
Right-click an object and choose Action Settings. (You’ll click this object to open the custom show.)
Choose the “Hyperlink to” option and select Custom Show from the drop-down list.
Select your custom show, check the “Show and return” box, and click OK to close the dialog boxes (see Figure 1-15).
The “Show and return” option returns you to the slide you started on when the custom show finishes. If you don’t check this box, the presentation will just end after you finish showing the slides in the custom show.
Many users need to have a couple of slides loop at the beginning of a presentation while the audience is seated. They then need to move to the main presentation easily without the audience noticing.
One way to create such an intro loop is to make a custom show that includes just the first few slides you need to loop. (You can even create a custom show containing just one slide.) Create another custom show that includes the slides in the main presentation. See the “Customize Your Presentation with Custom Shows” sidebar.
Next, select Slide Show → Set Up Show and check the “Loop continuously until ‘Esc’” box for the custom show with the initial looping slides (see Figure 1-16).
Finally, add a button to each of the slides in the intro loop; you’ll click this button to begin the main presentation. Draw an object on an intro slide, right-click it, and choose Action Settings. Choose the “Hyperlink to” option and select Custom Show from the drop-down list. Select the custom show representing the main presentation. Copy the button and paste it on all the intro slides.
Microsoft PowerPoint MVP Taj Simmons has an even more seamless method of looping slides. Check out his tutorial at http://www.awesomebackgrounds.com/powerpointlooping.htm.
Get Fixing PowerPoint Annoyances now with the O’Reilly learning platform.
O’Reilly members experience books, live events, courses curated by job role, and more from O’Reilly and nearly 200 top publishers.

