Part one of this book gets you started launching Flash, creating your own drawings, and transforming them into moving animations. Most animation work, though, takes place after you've got all the frames and layers in place. Like a film director slaving away in the cutting room, as an animator you spend most of your time testing, editing, and retesting your movie.
This chapter is your crash course in Flash animation editing. Here you'll learn how to reorganize your animation horizontally (over time) by cutting, pasting, and rearranging frames in the timeline. You'll also see how to reorganize your animation vertically by shuffling and restacking the layers you've added to it.
When you create an animation, you build it from frames and keyframes. Editing your document is a simple matter of moving, cutting, and pasting those frames until they look good and work well. You can perform these operations on individual frames or on multiple frames by combining them into groups, as you'll see at the end of this section.
Copy and Paste are the world's favorite computer commands for good reason. These functions let you create a piece of work once (a word, line, shape, drawing, or what have you) and then quickly recreate it to build something even more complex with a minimum of effort. Well, Flash lets you cut, copy, and paste not just the content of your frames but also your frames themselves from one part of your timeline to another.
Copying and pasting frames is a great way to cut down on your development time. Here's how it works. Say you have a series of frames showing a weasel unwrapping a stick of chewing gum. It's a gag scene, one you want to repeat throughout your animation for comic effect. Instead of having to insert all the keyframes and regular frames every time you want to slip in the weasel gag, all you need to do is copy the weasel frames once and then paste them into your timeline wherever you want them to go.
Furthermore, copying and pasting isn't just useful for those times when you want a carbon copy of a scene. If you want to change something in each pasted scene—the brand of chewing gum the weasel is unwrapping, for example—you can do that, too, after you've pasted the frames. Copying and pasting frames works almost exactly like copying and pasting words or drawn objects—with a few twists. Here are some points to keep in mind:
As usual, you have to select what you're going to copy before you set off the command. See Selecting Frames and Keyframes for a refresher on selecting frames in the timeline.
If the frames you're selecting span more than one layer, then make sure you select all the layers for each frame, as shown in Figure 4-1. (If the frames you're selecting are part of a Motion tween, then you need to use a different technique, as explained on Changing dimensions with the Transform tool. Ctrl-click (⌘-click) to select the first frame, and then drag to select adjacent frames.)
Figure 4-1. To select multiple frames, click the first frame of the series you want to select, and then Shift-click the last frame. Flash automatically selects the beginning and ending frames and all the frames in between. To copy and paste frames in the same document, press the Alt key (Windows) or the Option key (Mac) while you drag a copy of the selected frames to a new spot.
Copying and pasting tweened frames varies depending on the type of tween—Motion or Shape. While tweened frames are displayed as separate, distinct images, they're not; only keyframes contain distinct images. If you want to copy and paste an entire Shape tween, then you have to select the beginning and end keyframes. The Motion tween is much easier-going when it comes to copying and pasting frames. You can select any frames from the middle of a Motion tween and paste them (as a tween) into another layer.
Note
Classic tweens (Classic Tween) work more like Shape tweens. You have to select the beginning and ending keyframes of what you want to copy and paste. You can't take a chunk of frames from the middle.
Flash doesn't limit you to pasting within the same document. After you copy, you can open any other Flash animation and paste the frames right in.
Note
Although Cut, Copy, and Paste usually travel as a threesome, things work a little differently in Flash. The Cut Frames command on the Edit→Timeline submenu doesn't actually cut frames; instead, it cuts the contents of the selected frame. To get rid of the frame itself, you need to use Edit→Timeline→Remove Frames, as described in the box on Remove vs. Cut vs. Clear.
The process of copying and pasting frames follows the same basic steps every time:
In the timeline, select the frames you want to copy.
You probably want to make sure that the set of frames you choose begins with a keyframe, as described in the third bullet point above. Either way, Flash highlights the selected frames and moves the playhead to the last selected frame. You can select frames on more than one layer, as long as the layers are adjacent to each other.
Press Ctrl+Alt+C (Option-⌘-C).
Flash stores the frames so you can paste them at another spot on the timeline or even to a different Flash document.
Tip
There are three ways to use the Copy Frames and Paste Frames commands. For most Flash folk, the shortcut keys shown in these steps are the fastest method. You'll use the commands often enough that they'll become second nature. As an alternative, you can right-click (Control-click) the timeline to see a shortcut menu with the commands. Probably the least convenient method is the main menu (Edit→Timeline→Copy Frames).
Select the keyframe where you want to begin pasting the copied frames.
In other words, select the frame after which you want to add the copied frames.
Press Ctrl+Alt+V (Option-⌘-V on the Mac).
Flash pastes the copied frames, replacing the currently selected keyframe with the first copied frame. If you pasted frames into the middle of a timeline, Flash repositions your existing frames after the last pasted frame. If your selection in step 1 included more than one layer, then Flash adds extra layers as needed.
The timeline is serial: When you run your animation, Flash displays the content in Frame 1, followed by the content in Frame 2, followed by the content in Frame 3, and so on. If you change your mind about the order in which you want frames to appear, all you need to do is move them.
Simple in theory—but moving frames in Flash isn't quite as cut and dried as you might think. As you may recall if you've had a chance to read through Chapter 3, only keyframes can contain actual images; regular frames, technically called static frames, contain either tweened or "held over" copies of the images placed in the previous keyframe. So whether you move a frame or a keyframe, you end up with a keyframe. Here's how it works:
Moving a keyframe. When you move a keyframe, what Flash actually moves is the keyframe's content and keyframe designation; Flash leaves behind a static frame in the original keyframe's place. (And that static frame may or may not be empty, depending on what precedes it.)
Moving a static frame. Flash moves the static frame but turns the moved frame into a keyframe. (If you move a series of regular frames, then Flash turns just the first moved frame into a keyframe.)
Tip
There's another way to change the order in which Flash plays frames: by creating an ActionScript action, as described in Chapter 15. Creating an action lets you tell Flash how to play your frames: backward, for example, or by rerunning the first 10 frames three times and then moving on. You want to use ActionScript (as opposed to moving frames) when you want to give your audience the choice of viewing your animation in different ways.
Here are the steps in detail:
In the timeline, select the frame(s) you want to move.
Flash highlights the selected frame (or frames) and moves the playhead to the last selected frame.
Drag the selected frame(s) to the frame after which you want to place the selected frames.
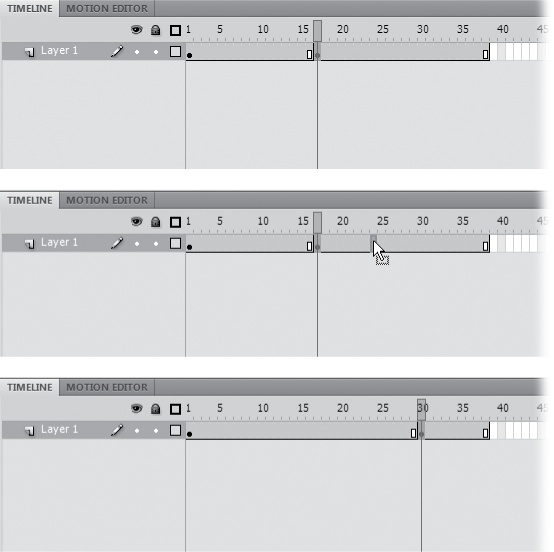
As you drag the selected frames, Flash highlights the frames you're moving to help you position them (Figure 4-2). If your selection includes a keyframe, then Flash clears the selected frames from their original position and then inserts them in their new location. If your selection doesn't include a keyframe, then Flash copies the content and creates a new keyframe at the point of insertion.
Tip
To select multiple frames, drag in the timeline. You have to release the mouse button to complete the selection. Then you can drag the selected frames to move the whole bunch of highlighted frames to a new location. If dragging your frames isn't working, you can always copy and paste the frames you want to move (Changing dimensions with the Transform tool). Then use Edit→Timeline→Remove Frames to delete them from their original location (see the box on Remove vs. Cut vs. Clear).
Figure 4-2. Top: Click to select the frame you want to move, and then let go of your mouse. Then drag to move the frame. Middle: As you make the move, Flash displays a highlighted frame, or a group of frames if you selected more than one. Bottom: Here, you can tell the frame moved to Frame 30 because the keyframe and end frame indicators have disappeared from their original locations (Frames 16 and 17) and reappeared in their new locations (Frames 29 and 30).
Imagine you've just completed a 250-frame animation showing a character in a red T-shirt demonstrating your company's latest product, an electronic egg slicer. Suddenly, your boss comes in and declares that red is out. (Red is the color your competitor is using for its egg slicer launch.) You have, your boss declares, until the end of the day to change all 250 frames.
Now, if you had to change all 250 frames one at a time, you'd never be able to meet your deadline, and even if you did, you'd probably make a few mistakes along the way, like accidentally repositioning the T-shirt in a couple of frames or missing a few frames altogether. But it's precisely this kind of en masse editing job that Flash's multiple-frame editing capability was designed to handle. (By the way, you can also edit multiple frames using Flash's Find and Replace commands. See the box on Editing Multiple Frames with Find and Replace for more.)
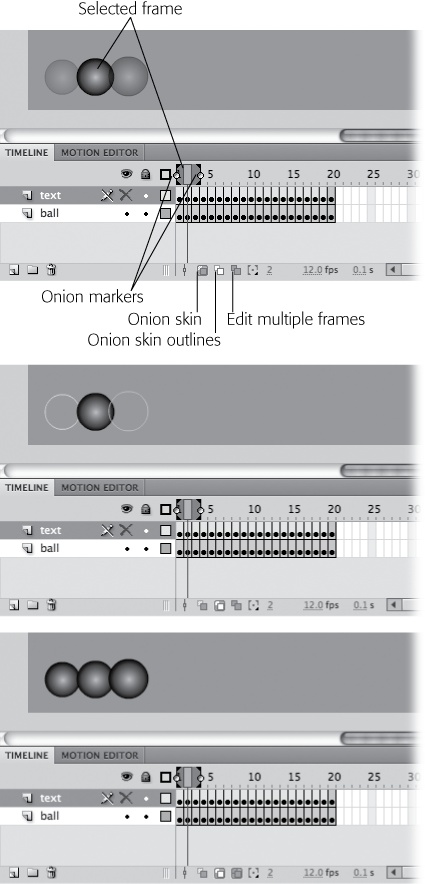
Using a technique called onion skinning, you can see the contents of several frames at once. There are three modes for onion skinning: Onion Skin, Onion Skin Outlines, and Edit Multiple Frames. Each is helpful for a different type of task. Use the buttons at the bottom of the timeline to choose an onion skin mode, as shown in Figure 4-3; use the onion markers in the timeline to choose which frames are displayed.
The Edit Multiple Frames mode makes it easy to deal with that red T-shirt issue, because you can quickly identify (and change) the frames containing red T-shirts. Onion skinning is also useful for those times when you want to hand-draw an "in-between" frame, because you can see both the preceding and succeeding frames on the stage at the same time.
Note
Technically speaking, when you edit multiple frames in Flash, you're actually editing multiple keyframes. Keyframes are the only frames that contain unique, editable art. (Regular frames just "hold over" the contents of the previous keyframe, and Flash stores tweened frames not as editable images, but a bunch of calculations.)
To edit multiple frames using onion skinning:
In the timeline, click the Edit Multiple Frames icon.
Flash displays multiple frames on the stage and adds onion markers to the frame display (Figure 4-3 bottom). These beginning and ending onion markers tell Flash which frames you want it to display on the stage.
Click the Modify Onion Markers icon.
Flash displays a pop-up menu.
From the pop-up menu, select Onion All (Figure 4-4).
Flash displays onion markers from the beginning of your timeline's frame span to the end and shows the contents of each of your frames on the stage. (If you don't want to edit all the frames in your animation, you can drag the onion markers independently to surround whatever subset frames you want.)
Figure 4-3. Top: Click the Onion Skin button, and the image for the selected frame appears bold. The images on the adjacent frames appear faded out. Middle: Click Onion Skin Outlines, and images on the unselected frames appear as outlines. Bottom: Click the Edit Multiple Frames button, and all the images within the onion markers appear 100 percent opaque.
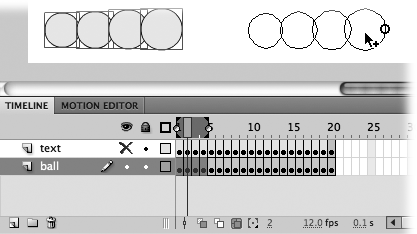
Because you can see and select all the content on a single stage, you can make your edits more easily than having to hunt and peck individually through every frame in your animation. In Figure 4-5 four frames are selected with the onion markers.
The contents are first recolored and then moved in one fell swoop. When the move is complete, your stage looks like Figure 4-6.
Click Edit Multiple Frames again.
Flash returns to regular one-frame-at-a-time editing mode and displays only the contents of the current frame on the stage.
Figure 4-4. Here you see the result of selecting Onion All. The onion markers surround the entire frame span (Frame 1 through Frame 20), and all 20 images appear on the same stage, ready for you to edit en masse.
Figure 4-5. You can work with multiple images just as easily as single images. For example, you can select several (or all of them) and apply whatever edits you like—moving them, coloring them, reshaping them, and so on.
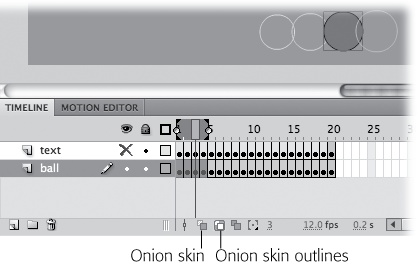
Figure 4-6. With onion skinning turned on, you can see multiple frames, but you can edit only the content of the selected frame. Use the Edit Multiple Frames mode when you want to see and edit several frames at once.
Note
You can't edit multiple frames on a locked layer (Locking and Unlocking Layers). In fact, when you click Edit Multiple Frames on a locked layer, Flash doesn't even show you the content of the frames in the locked layer (not even in onion skin form).
Get Flash CS5: The Missing Manual now with the O’Reilly learning platform.
O’Reilly members experience books, live events, courses curated by job role, and more from O’Reilly and nearly 200 top publishers.


