Imagine placing a sheet of red construction paper containing a cutout of a starover a piece of green construction paper. The result you see, when you look at the two sheets stacked on top of each other, is a green star on a red background. That's the concept behind mask layers, a special type of layer that lets you create shaped "portholes" through which an underlying (masked) layer appears.
At a masquerade ball, masks hide the important stuff—your face. It's a little different in Flash and other graphic arts endeavors. Masks hide part of a picture in order to reveal the important stuff—the subject. You use masks to direct the eye of your audience. And when you apply a classic tween to the porthole, you can create an effect that looks like a spotlight playing over an image—mighty cool, indeed.
Here's how you go about it:
Open the file 04-3_Mask_Layer.fla.
You can download this file, a working example of the file (04-4_Mask_Layer_done.fla), and all the other examples shown in this chapter from the Missing CD page at www.missingmanuals.com/cds.
Click Layer 1 to select it.
In the example file for this section (04-3_Mask_Layer.fla), Layer 1 contains a bitmap image.
Click the Insert Layer button. (The Insert Layer button is on the bar below the layer names and looks like a folded-over page.)
Flash creates a new layer named Layer 2 and places it above Layer 1.
Double-click the layer icon next to Layer 2.
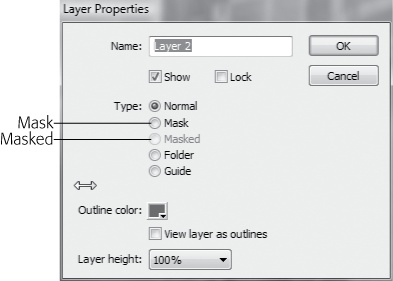
The Layer Properties window appears (Figure 4-24).
In the Layer Properties window, turn on the Mask checkbox, and then click OK.
Flash displays the mask icon next to Layer 2.
Double-click the layer icon next to Layer 1.
The Layer Properties window appears again.
This time, turn on the checkbox next to Masked, and then click OK.
Flash displays the masked icon next to Layer 1.
Tip
Flash gives you a bunch of ways to create masks and masked layers (by right-clicking an existing layer, and then choosing Mask or Masked, for example), but one thing doesn't change: Masked layers have to appear directly below mask layers in the Layers window for the effect to work. If you create a mask layer and a masked layer in the wrong order, just drag the mask layer above the masked layer, and you're all set.
Select Frame 20 in both Layer 1 and Layer 2, and then select Insert→Timeline→Frame.
Flash extends both layers to frame 20.
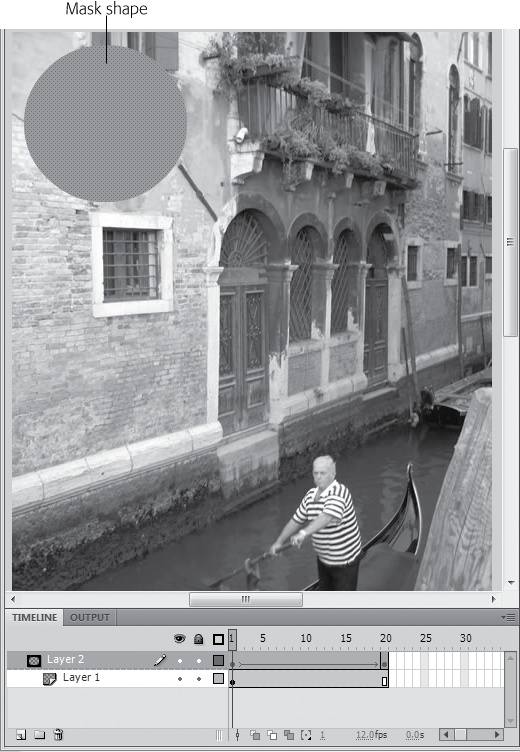
Click to select the first frame in Layer 2 (the mask layer). On the stage, click the Oval tool, and then draw a circle in the upper-right corner of the stage (Figure 4-25).
The oval can be any color you choose, since it won't appear in the finished effect; instead, it'll act as a see-through portal.
With the circle still selected, press F8.
A Convert to Symbol box appears. If you want to animate a mask with a Motion Tween, you need to use a symbol.
In the Name box, type Circle Mask. Choose Movie Clip for type and then press OK.
Now, the circle symbol on the stage is an instance of the Circle Mask movie clip symbol
Right-click Layer 2 and choose Create Motion Tween.
Layer 2 shows the blue motion tween highlight.
With the Select tool (V), drag the circle to the lower-right corner of the stage (Figure 4-26).
Right-click either layer and choose Show Masking.
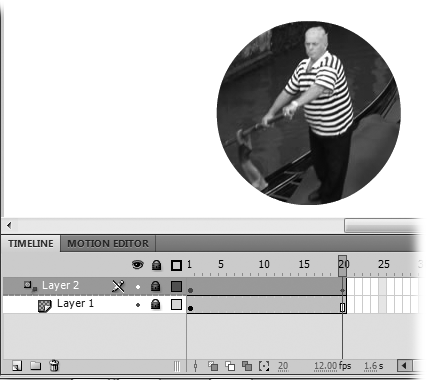
With the mask in effect, everything in the photo is hidden except the portion covered by the circle. Flash automatically locks both layers when you choose Show Masking.
Press Return to test your animation.
The circle mask moves across the photo revealing different portions of the image as shown in Figure 4-26.
Figure 4-26. In this example, you're creating a simple tween in Layer 2, so that the portal moves across the bitmap image showing only a circle's worth of image at any one time (a spotlight effect). But you can create static portals (masks), too. The simplest is a circle or a square, but nice thick letters also make a compelling effect.
You can animate your mask using the standard motion tween tricks described in Chapters Chapter 3 and Chapter 8. For example, filmmakers sometimes use an iris effect, where the visible part of an image shrinks down to a small circle.You can use the X/Y properties to change the size of the mask symbol as it moves. Keep in mind that before you can make changes to the mask's properties, you need to unlock the mask layer. When you click the padlock button to unlock the layer, Show Masking is turned off, so you see the entire photo as well as the circle mask.
Get Flash CS5: The Missing Manual now with the O’Reilly learning platform.
O’Reilly members experience books, live events, courses curated by job role, and more from O’Reilly and nearly 200 top publishers.


