Chapter 1. Getting Started
The best way to get started with Macromedia Flash is to jump right in, so let’s start with something you can show off immediately. We’ll get your brain moving by doing some drawing, creating some funky designs, and learning to reuse graphics. The concepts behind the fun stuff will be discussed at the end of each chapter, but right now, let’s get our hands dirty.
As explained in the Preface, the object of this book is to teach you to use Macromedia Flash to help you accomplish your goals, whatever they may be, and to give you a lot of good information on the basics without drowning you in details. Flash Out of the Box is much shorter than many other introductory books on Flash because it focuses on the information you need to know to accomplish your goals. It isn’t intended as an exhaustive reference of every feature, but rather concentrates on the features you’re likely to use and presents them in an engaging and digestible format. You’ll learn to do what you want to do with Flash, and by the end of this book, you’ll have the skills you need to explore further study or experiment more on your own.
Furthermore, you’ll learn through progressive disclosure, which means the book provides information in the context of an exercise, when and where it’s relevant. For example, this chapter doesn’t cover everything there is to know about Flash’s drawing tools. Instead, I’ll show you how to use a few drawing techniques to create your first design in Flash, add color, and make an image reusable. In later chapters, I’ll show you other ways to draw in Flash and expand on the skills gained here. Throughout the book, I’ll also offer suggestions about how to apply your new skills in other projects and a reason to learn each technique.
This approach avoids inundating you, the reader, with more information than you can assimilate. Instead, we’ll tackle Flash in small chunks so that you’ll be able to absorb each concept and the required actions, allowing you to build confidence and a larger skill set over time. Most people can remember only four or five new things at once, but by chunking them into larger operations, you have to remember fewer things. For example, instead of having to remember every twist and turn of a road, you might simply follow directions that tell you to drive to the next light. Of course, this assumes you have the fundamental abilities to see the road, depress the gas pedal or brake pedal, and steer the car. If so, you can pursue the overall goal by remembering just one instruction: drive to the next light. This book revisits certain techniques and provides reminders to help reinforce the operations learned earlier to help you transfer them to your long-term memory. Over time, you’ll master the mechanics of using Flash, allowing you to comfortably focus on your overall goal, such as creating a compelling application or animation.
I know you’re just dying to get started, so let’s do it. In this chapter, we’ll draw a box, fill it with color, and then push the box further by turning it into a psychedelic image of Jimi Hendrix. Later on, we’ll make a box graphic reusable to eliminate the need to re-create it.
The techniques used in this chapter are the first steps in learning to animate with Flash and are used in almost every Flash project you’ll take on. Even if you’re not into Jimi Hendrix, this chapter is a building block for the animations we’ll create in Chapter 3. To begin your journey of becoming a Flash “master of the universe,” let’s get started with some of Flash’s built-in tools.
Note
Refer to Appendix A for important tips on how to configure your workspace for maximum ease-of-use. The enclosed CD-ROM includes a samplepanel layout, as described in the appendix.
Drawing Your First Box
Many of Flash’s drawing tools are similar to those in other graphics programs, which means you can apply information here to other programs, but some of Flash’s tools behave in unique ways. Be aware that Flash’s drawing tools are vector based. Mastering Flash’s tools allows for precision drawing, so you’ll quickly be creating visual masterpieces worthy of international design awards (right?).
We’ll start with a method for drawing a box, which is one of the most commonly used shapes in design. If you are new to Flash, you’ll feel comfortable in no time. And if you’ve already cracked it open a few times, you’ll expand your horizons quickly.
Setting Up the File
Before we can start a design, we need to create a new Flash file:
Make sure you have copied the sample files (from the CD-ROM or web site) into a folder named FOTB (for Flash Out of the Box) on your hard drive, and make sure you have another folder, named 01, inside it.
Launch either Flash MX 2004 or Flash MX Professional 2004 (Flash Pro). The exercises in this book work the same in either version, as both share basic features.
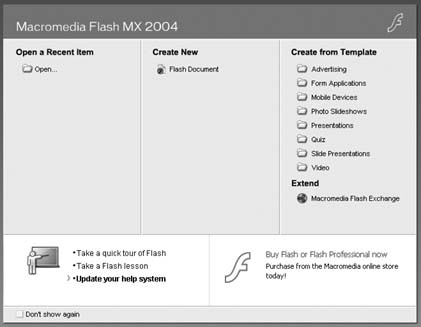
When you launch Flash, the Start screen appears, as shown in Figure 1-1. Start screens are used in all Studio MX 2004 products, including Flash and Flash Pro. One cool reason to use the Start screen is that it keeps track of the last 10 opened documents, so those files are handy when you come back from lunch. Figure 1-1 shows the Start screen from Flash MX 2004. If you’re using Flash Pro, the Start screen contains some additional templates and file types, which we’ll ignore for now. Regardless, your Start screen will show your recently used files and may reflect automatic online updates provided by Macromedia, so each user’s screen will vary slightly.
Under the Create New heading of the Start screen, click on Flash Document to create a new, blank Flash document (a .fla file, pronounced “flah”). Of course, you can use File → New → Flash Document to create a new document at any time.
Save your new document as box.fla in the 01 folder (inside the FOTB folder you created earlier) using the File → Save As menu option.
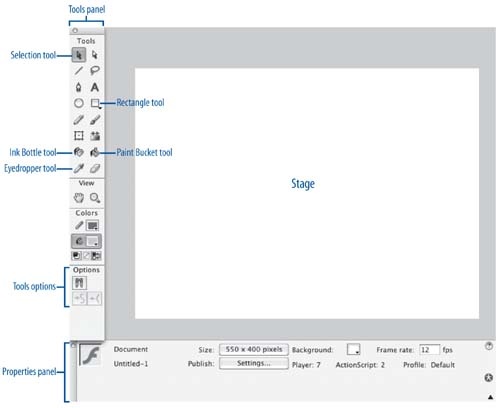
Now take a moment to look around the world of Flash. Notice the Tools panel, shown in Figure 1-2. (If your Tools panel isn’t visible, you can open it using Window → Tools.) Many of the tools will look familiar if you’ve worked with other graphics programs. As you roll your cursor over each icon in the Tools panel, a tool tip indicates the tool’s name and shows the shortcut key in parentheses. For example, you can select the Pencil tool by pressing Y. The Options portion at the bottom of the Tools panel reflects the options for the currently selected tool (i.e., this section changes depending on what tool is selected).
Creating A Rectangle
Let’s draw a rectangle shape as a starting point for a design. To draw a rectangle:
In the Tools panel, select the Rectangle tool, indicated in Figure 1-2.
With the Rectangle tool active, roll your cursor over to the Stage (the large white area in the Document window). Your cursor should look like a crosshair (a big + sign).
Click and drag somewhere on the Stage to create a rectangle, then pat yourself on the back for doing such a great job.
Creating A Square
Before you get too excited, try to draw a square box instead of a rectangular one:
Use the Edit → Undo menu command to get rid of the previous rectangle. Alternatively, you can press Ctrl-Z (Windows) or Cmd-Z (Mac) to undo the previous step. Now we’re back to square one! (You saw that joke coming a mile away, didn’t you?)
With the Rectangle tool active, click and drag on the Stage again to draw another box, but this time, try to make it perfectly square.
When you’re done, choose the Selection tool (shown in Figure 1-2) from the Tools panel.
Double-click inside the box you just drew to select both the box and its border.
With the box selected, locate the Properties panel (shown in Figure 1-3), which appears below the Stage by default. (If it’s not visible, choose Window → Properties to open it. It is also sometimes called the Property inspector or PI.) The Properties panel looks different in Figure 1-3 than it does in Figure 1-2 because its appearance and contents change depending on what item is selected (that is, it’s context-sensitive). At the bottom of Figure 1-2, the Properties panel displays the Stage’s properties. In Figure 1-3, it displays the selected rectangle’s properties.
The W and H fields in the Properties panel represent the width and height of the rectangle. If the width and height match, you’ve drawn a perfect square and deserve a snack (but you’ll have to get it yourself). More likely, the two numbers will be slightly different. You can make the rectangle a perfect square by entering the same value in the W and H fields.
Drawing A Perfect Square
There is a way to draw a perfect square without eyeballing it or setting the dimensions manually, so give this a shot instead:
Undo the previous steps to get rid of the box. (Remember, to undo, use Ctrl-Z or Cmd-Z. You can undo up to 1000 steps by default.)
Choose the Rectangle tool from the Tools panel again (or use the R keyboard shortcut).
This time, press and hold down the Shift key, then click on the Stage and drag the crosshair cursor to draw a box. Don’t release the Shift key until after you’ve released the mouse button (or lifted your stylus, if you are using a graphics tablet). The Shift key constrains the shape’s proportions to a perfect square as it is drawn.
Double-click inside the box to select both the box and its border, then consult the Properties panel again. The box’s width and height values are now identical.
Save your work using File → Save (Ctrl-S or Cmd-S). Leave the file open.

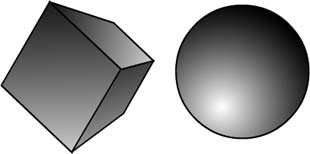
Constraining the shape of the box as it’s drawn is a great way to ensure your squares are actually square. The same rule applies to the Oval tool for drawing circles, and both of these shapes can be used as the basis for countless designs. There are several other ways to draw in Flash, but we’ll save those for other chapters. For now, let’s learn to manipulate the shape we’ve got.
Filling Shapes With Color
If you went through the exercises in the preceding section and didn’t change the default colors, you should now have a blue box with a black border sitting on the Stage. Flash draws new shapes using whatever colors are already chosen in the Tools panel or Properties panel, which represent the shape’s fill and stroke colors. See the “Fills and Strokes” sidebar for details.
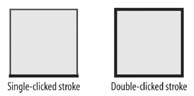
Figure 1-4 shows the strokes and fills of a simple rectangle and how the stroke appears when selected partially or in its entirety.
Solid Fills and Gradients
Next we’ll use new colors to create a gradient pattern. Gradients, which are a type of fill, are useful because they produce a smaller file size than bitmap images, while still creating interesting effects.
Let’s start by creating a solid fill:
Choose the Selection tool from the Tools panel, and click once inside the box on the Stage. The fill area inside the box should appear as a large collection of dots, indicating that it is selected.
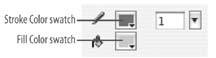
In the Properties panel (which you can open with Ctrl-F3 on Windows or Cmd-F3 on Mac), notice the Pencil and Paint Bucket icons shown in Figure 1-5. The Stroke Color swatch (next to the Pencil icon) represents the current stroke color, and the Fill Color swatch (next to the Paint Bucket icon) represents the current fill color. A white box with a red line through it indicates “no color.”
Click on the Fill Color swatch to open the color chooser. This reveals the Web 216 color palette, the default color palette for Flash.
Choose any color from the Web 216 color palette. Choosing a new color automatically changes the color for the selected fill. Your world is in full, living color, so go for something orange, just for fun.
Click once somewhere outside of the box to deselect it.
Select the box’s stroke. Since the stroke in this case consists of four lines, clicking once selects only one side of the box. Double-click any side to select the entire stroke (the box’s perimeter).
Click on the Stroke Color swatch in the Properties panel to change the color of the stroke. Choose something that will clash with orange, such as a nice shade of olive green. Knowing what colors look bad together is an important part of designing good color schemes, and this color choice is perfectly awful. Deselect the stroke when you’re done to see how it looks.
Save your work using Ctrl-S or Cmd-S.
Creating A Multicolor Gradient Fill
Gradient fills are more versatile than solid fills. Gradients can help you design a sunrise or sunset, lighting effects, and the illusion of depth in otherwise two-dimensional drawings (as shown in Figure 1-6), so don’t be afraid to experiment. Gradients can be applied only to fills, not to strokes.
We’re all done with bad colors, so let’s fix the color scheme from the previous exercise. This time, let’s use a multicolor gradient fill to create a psychedelic look for a 1960s-style poster for a Jimi Hendrix concert:
Select the fill again (by clicking once in the center of the box you’ve drawn on the Stage).
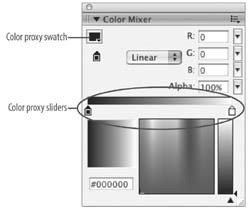
Choose Window → Design Panels → Color Mixer to open the Color Mixer panel, shown in Figure 1-7.
In the Color Mixer panel, change the Fill Type to Linear using the drop-down list. On the Stage, the solid fill automatically changes to a linear gradient, blending from black to white. A colored bar, which shows how the gradient looks, also appears in the Color Mixer.
Take a look at the Color Proxy sliders in the Color Mixer, shown in Figure 1-7. Notice that the Color Proxy slider on the left is black and the one on the right is white. Notice also that the Color Proxy swatch at the top of the panel is set to black.
You can change the gradient color as follows:
Click on the leftmost Color Proxy slider, as seen in Figure 1-7. Then click on the Color Proxy swatch to pick a color from the color palette. Changing this swatch changes the beginning color of the gradient. To keep going with the psychedelic look, choose bright green from the pop-up.
Click on the white (rightmost) Color Proxy slider to change the end color for the gradient. Again, use the color palette pop-up to choose pink as the ending gradient color.
Now, that’s one ugly gradient. Some additional steps are necessary to achieve the psychedelic effect we want.
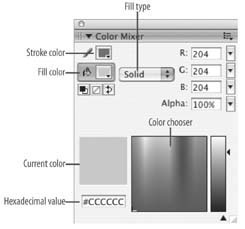
The Color Mixer panel, shown in Figure 1-8, gives us some great options for changing strokes and fills, and even enables us to change the fill completely by converting it to a gradient.
Here is a breakdown of the options for the Color Mixer:
- Stroke color
Changes the color of the stroke. The stroke color option appears only when the Fill Type is set to None or Solid.
- Fill color
Changes the color of the fill.
- Fill type (menu)
Changes the fill style. Options include None (which deletes the fill), Solid (for a solid, one-color fill), Linear (for a gradient that blends on a linear path), Radial (for a gradient that blends outward, in a circular path, from a focal point), and Bitmap (for a fill made of tiled bitmap images).
- RGB (three separate slider bars)
Changes the density of the red, green, and blue (RGB) colors in a fill.
- Alpha
Sets the percentage of opacity for a solid fill (or the currently selected Color Proxy slider for a gradient fill). Zero percent alpha makes it invisible, while 100% alpha makes it opaque.
- Current color
Displays the currently selected color.
- Color chooser
Provides a quick, visual way to choose any color. Simply click on the color chooser and drag the cursor around to locate the color you want. You can open a platform-specific color selector using the icon in the upper right of the pop-up palette (not shown). This allows you to specify colors other than RGB, such as hue, saturation, and brightness (HSB).
- Hexadecimal value
Displays the current color’s hexadecimal (a.k.a. hex) value, which you can manually override by entering a new one. Commonly used in HTML, hex values are six-digit number and/or letter (A–F) combinations that represent a color, such as #000000, which represents black, or #FFFFFF, which represents white.
Gradients On Lsd
To turn the gradient into a more psychedelic frenzy of color, try this:
With the gradient on the Stage selected, click once halfway between the two Color Proxy sliders below the gradient bar in the Color Mixer panel. This adds a third slider to the gradient. With the new slider selected, change its new color to aqua by using the pop-up palette accessible via the Color Proxy color chooser.
Move the aqua Color Proxy slider to the right a little bit by clicking and dragging (hence the name “Color Proxy slider“).
Click halfway between the leftmost and middle sliders in the gradient bar to add another new Color Proxy slider. (You can remove Color Proxy sliders, except for the beginning and ending ones, by dragging them off the slider area.) Make it red by choosing the red swatch in the lefthand column of the Color Proxy color chooser. Now green blends to red, red blends to aqua, and aqua blends to pink. Beautiful, and very strange. Jimi would be proud.
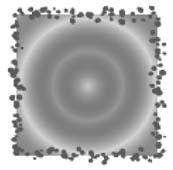
To create a background more like the psychedelic posters from the 1960s, change the Fill Type dropdown list choice in the Color Mixer panel to Radial. This changes the gradient so it blends outward from a central point, creating a “tripped-out” backlighting effect, as though the sun is shooting out acidic rays of light.
Save your work and leave this file open.
Strokes (and Other Medical Emergencies)
The stroke for this image could be improved to further induce flashbacks of Woodstock, so let’s change it from a solid line to something funkier:
Deselect the fill for the box, and select the entire stroke.
In the Properties panel, click on the Stroke Style drop-down list, shown back in Figure 1-3. Choose the fourth style down from Solid (Solid is the default stroke style). The styles aren’t named in the menu, so you’ll have to count down to the right one. (It looks a bit like splattered paint, and is known as Stipple.)
Use the Stroke Color swatch to change the stroke color. Choose the blue swatch in the lefthand column of the chooser.
Using the stroke weight text field or slider in the Properties panel, set the stroke weight to 10 to fatten it up.
Deselect the stroke to see what it looks like. You should now have a 10-pixel-wide stroke that appears as an array of spots that resemble paint splatters, as seen in Figure 1-9.
Things are looking good now, but the stroke doesn’t seal off the border as well as it could, so let’s modify the stroke to fix that:
Select the entire stroke again. In the Properties panel, click the Custom button to open the Stroke Style dialog box. The Type drop-down list is already set to Stipple (unless you chose a different type of stroke earlier).
Set Dot Size to Medium, Dot Variation to Varied Sizes, and Density to Dense. This tightens up the stroke to seal up the edges of the fill it surrounds.
Click OK and deselect the stroke to see your work by clicking somewhere outside of the box. Nice, huh?
Save the file, but leave it open.
Using the Pencil tool To Resurrect Hendrix
Adding a silhouette of Jimi Hendrix in the foreground of this gradient would finish this thing off nicely, so let’s do it. If your drawing skills aren’t that good, don’t sweat it. The silhouette of Jimi, just like the rest of this image, can be as psychedelic as you want. The objective is to see how the Pencil tool can be used to draw shapes freehand:
Choose the Pencil tool from the Tools panel (which changes the cursor to a pencil) and set the Pencil tool options to Smooth (instead of the default Straighten). In the Properties panel, set the stroke weight to 5, set the stroke color to black, and change the stroke style back to a solid line.
Click and drag inside the box to draw a silhouette of Jimi, like the one in Figure 1-10.

You can stop and start as much as you want using the Pencil tool, so feel free to use as many lines or curves as you need. If you make a mistake, either undo it or remember that mistakes can be just as cool as the lines you draw intentionally. (The trick is to know when to let go. The brilliance of artists like Picasso and Matisse is in their subjective interpretations, not in painting straight lines or rendering reality with fidelity.)
Note
If you prefer not to draw the silhouette yourself, open hendrix_silhouette.fla, located in the 01 folder (inside the FOTB folder on your hard drive, from the CD-ROM, or from the book’s web site). It contains the drawing shown in Figure 1-10. Select the stroke, choose Edit→Copy to copy it, return to box.fla, and choose Edit→Paste to paste it into box.fla. Close hendrix_silhouette.fla by choosing File→Close when you’re done
If your drawing skills are no better than your dog’s, then do what you can and tell your friends you took some “artistic liberties.”
If you’re not satisfied with your drawing, try smoothing the stroke with the Pencil tool options in the Tools panel:
Select the stroke you drew (Jimi’s silhouette) with the Selection tool. If the lines are all connected, double-clicking selects them all. If they are not all connected, press Shift and select each line individually until you have selected all of them.
Click once on the Smooth option at the bottom of the Tools panel. This makes the stroke smoother. If you’re happy with the new look, leave it alone. If not, click Smooth one or two more times until you are satisfied. The trick is remembering when to stop smoothing it. Making it too smooth will diminish the hand-drawn quality. Deselect the stroke when you’re done.
Choose the Paint Bucket tool, and change the fill color to solid black using the Properties panel.
With the Paint Bucket tool active, click once inside the outline to fill in the silhouette of Jimi.
Gotcha. The entire image turned black, huh? When you drew the silhouette, you didn’t draw a line at the bottom to complete the stroke, and the gap is large enough that it prevents the fill from knowing where to go, so it fills up the entire image. Let’s fix it by sealing off the fill area by closing the stroke:
Undo the last step to remove the black fill from the image.
Using the Pencil tool, draw a line from the lower-left corner of the Hendrix silhouette to the lower-right corner, connecting the stroke. When you’re done, the pencil stroke may disappear behind the stroke for the box.
Activate the Paint Bucket tool again, select the Gap Size icon from the Options section of the Tools panel, and choose Close Small Gaps from the menu. Then, click inside the shape to see if the fill is applied. If not, choose Close Medium Gaps and try again. If that doesn’t work, choose Close Large Gaps.
The Gap Size option dictates how large a gap can be bridged when applying a fill with the Paint Bucket tool.
Next, let’s try grouping shapes together so their fills can’t be accidentally deleted:
Activate the Selection tool and select the black fill you just applied to the silhouette, then delete it. Everything inside the fill area is removed, including the gradient that was once behind the silhouette’s fill!
Undo the last step. We’ll need the silhouette fill for something else in a minute.
Select the gradient fill and the box’s stroke (by double-clicking in the box but outside Jimi, or by holding down the Shift key while making multiple selections). Press Ctrl-G or Cmd-G. This creates a group of the fill and stroke so that they can be easily moved together (i.e., they cannot be edited separately). Everything is now grouped except for the black fill inside the silhouette. A line appears around the box, indicating it is a grouped image.
Note
Groups are typically used to make a semipermanent selection when animating or creating content. For example, you might group together a gaggle of geese for an animation in which they fly in a V pattern, then ungroup them at a later time so you can animate each bird separately. To create a permanent grouping, you can group the items inside a symbol instead (see the “Symbols” sidebar on the next page).
Drag the group to the right. You see that the inside of the box where the silhouette overlapped is empty.
In the Color Mixer panel, change the Fill Type from Solid to Radial. The gradient that appears in the gradient bar is the same as the one we last used.
Use the Paint Bucket tool to apply the gradient to the black silhouette fill on the left side of the Stage. Notice that the radial gradient’s center point is determined by the position of your click. Click several times inside the silhouette area to change the center point for the gradient until you are happy with the look.
Activate the Lock Fill option at the bottom of the Tools panel and try to apply the fill again. The Lock Fill option prevents the fill from being changed. When you’re done, disable the Lock Fill option by clicking it again.
Save your work.
To compare your work to the preceding exercises, open box_2.fla, located in the 01 folder. It contains a version of the image as it should appear at this point of the chapter.
Scaling Images
You often can’t tell when starting a drawing how big or small it needs to be. In this case, the gradient image should fill up the Stage, so let’s resize it. We’ll experiment a bit to get you familiar with Flash drawing tools. The Stage is rectangular, but the image is square, so we’ll need to make some changes to the image as well:
Select the silhouette image on the left side of the Stage (using the Selection tool), and activate the Ink Bottle tool from the Tools panel, shown in Figure 1-2.
Click inside of the fill. The Ink Bottle tool adds a stroke to the silhouette fill. Use the Selection tool (which you can activate by simply pressing V) to select the stroke, and change the stroke weight to 5.
Double-click to select both the silhouette’s fill and its stroke, and group them (using Ctrl-G or Cmd-G). Then move the group offstage to get it out of the way for a moment.
Select every part of the box except for the stroke (by holding down the Shift key and making multiple selections) and delete it (using the Delete or Backspace key). You may need to break apart the box first by choosing Ctrl/Cmd-B.
Select the box’s stroke and, using the Properties panel, set the width (W) to 550 and the height (H) to 400. The stroke now matches the dimensions of the Stage (550 x 400 is the default Stage size for new Flash documents). You may need to unlock the padlock icon to change the box’s width and height independently.
Also in the Properties panel, change the X (horizontal) and Y (vertical) positions to 0. The registration point for objects is in the center by default. So change the registration point of the box to the upper-left corner using the Info palette (Window → Design Panels → Info). This aligns the stroke to the upper-left corner of the Stage, which is its origin. We’ll discuss more about Flash’s coordinate system in Chapter 2.
In the Color Mixer panel, set the Fill Type to Radial (if it’s not already). The gradient that appears is the same one we used earlier.
Activate the Paint Bucket tool and apply the gradient fill to the area inside the box stroke. This time, click near the upper-left corner of the area to start the radial gradient from that point, giving the illusion of sunlight made of multicolored rays.
Select both the fill and stroke of the Stage-sized box and group them by pressing Ctrl-G or Cmd-G.
Break apart the silhouette image off stage by selecting it (with the Selection tool) and pressing Ctrl-B or Cmd-B, then delete the stroke. It’s not necessary to keep it as part of the silhouette.
Select the fill for the silhouette and change its fill color to black. When you’re done, group the image again (you can use Modify → Group instead of Ctrl-G or Cmd-G).
Move the silhouette onto the Stage and place it on the right side of the gradient-filled box.
To compare your work to the figures shown in this chapter, open box_3.fla, located in the 01 folder. It contains the final version of the Hendrix image.
Stacking Graphics
The image’s composition is good, but the silhouette appears in front of the stroke for the box. Let’s fix that, so that the stroke appears as a frame for the image:
Drag the silhouette back off stage, and break apart the box. We need these two elements split apart so we can put the background in the back, the silhouette in front of that, and the stroke in front of both.
Select the stroke and choose Edit → Cut to remove it temporarily.
Drag the silhouette back into place on the Stage.
Right-click in Windows (Cmd-click on Mac) off stage somewhere and choose Paste in Place from the contextual menu. This command pastes the stroke back into its original position and leaves it selected.
Group the stroke (this doesn’t group the stroke with another element; it simply makes the stroke noneditable).
The stroke appears in front of the silhouette, so it looks like a frame for the image. This occurs because Flash creates a visual stacking order when new graphics are added or drawn within a single layer (we’ll discuss layers in Chapter 3). If you draw a box, then draw a second box, the second box will appear in front of the first. If you then group the first box, it appears in front of the second box. Grouped objects appear in front of ungrouped objects, in the order that they were grouped.
Undo (Ctrl-Z or Cmd-Z) to place the silhouette image in front of the frame. There is another way to organize the stacking order that you may prefer:
Choose the Modify → Arrange → Send Backward menu option. This sends the silhouette image back one step in the stacking order, so it appears behind the frame (you may need to do this more than once). The four options in this menu (Bring to Front, Bring Forward, Send Backward, and Send to Back) enable us to stack objects in any order we want.
Save your work, and close the box.fla file.
Note
If you are having trouble achieving the desired results with the Modify→ Arrange menu options, remember that grouped objects are always drawn in front of ungrouped objects. If necessary, ungroup the box and stroke before using Modify→Arrange→Bring to Front to place the silhouette in front.
Perfect! It’s hard to believe now that this image started as a simple box, but it did. Making use of a few drawing tools, fill and stroke options, and some ingenuity turned this simple shape into a background for a 1960s poster for a rock concert.
Creating Reusable Graphics
You may often need to use a graphic several times in one movie, whether it’s a box, logo, or character. To avoid adding substantial file size to the finished project as a result, we use symbols. See the earlier “Symbols” sidebar for the scoop on symbols and their benefits.
Creating Symbols
Let’s create a reusable box symbol that we can use in our designs. To create the symbol:
Create a new, blank document using File → New. Activate the Rectangle tool in the Tools panel and, using the Properties panel, set the stroke weight to 1, the stroke color to dark gray, and the fill color to light
Before drawing anything, double-click on the Rectangle tool icon in t he Tools panel. This opens the Rectangle Settings dialog box. (I f you click and hold on the Rectangle icon, it lets you choose between the Rectangle and PolyStar tools, so be sure to double-click.)
Set the Corner Radius to 10 and click OK. The Corner Radius option sets the roundness of the corners drawn with the Rectangle tool. Setting the Corner Radius to 0 gives our box sharp corners, while setting it to 10 gives our box a more rounded look.
Draw a square box (remember to hold down the Shift key to constrain the shape). You now have a nice, light gray box on the Stage with a dark gray stroke and rounded corners. Very stylish.
Select both the fill and stroke for the box (using the Selection tool).
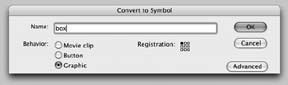
Choose Modify → Convert to Symbol (F8). This opens the Convert to Symbol dialog box, shown in Figure 1-11.
In the Name field, type the word
box.For the Behavior type, choose Graphic, then click OK to close the dialog box. You should see a blue line around the box you just drew. This indicates that it is now a symbol and is currently selected.
It’s important to understand that a grouped image is not the same as a symbol. A grouped image is raw graphic data on the Stage, whereas a symbol is the defined blueprint for one or more instances of the same graphic.
Reusing Symbols
Now that we have a symbol, we can reuse it as many times as we want without re-creating the drawing or adding significant file size to a project. To create an instance of a symbol:
Open the Library (Window → Library or Ctrl-L or Cmd-L). The box symbol, created in the previous exercise, is stored there so you can find it easily.
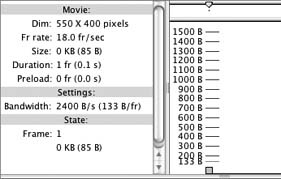
Choose the Control → Test Movie menu option to open the Preview window (sometimes called Test Movie mode), which shows you how your movie will look when it’s published. Right now, you just have a box sitting there doing nothing.
With the Preview window open, choose View → Bandwidth Profiler. The third line down in the Bandwidth Profiler (shown in Figure 1-12) displays the file size of your movie. It says 0 KB (85 B), but this may vary depending on your computer’s operating system. This means your movie is very small, and that’s great, because the smaller a file is, the faster it downloads (some developers refer to a file’s size as its “weight,” so lightweight files are a good thing).
Close the Preview window.
Click on the box symbol in the Library and drag it out to the Stage. This adds an instance of the box symbol to the movie. Position it wherever you want.
Test the movie again (using Control → Test Movie). The movie size should say something similar to 0 KB (92 B). Adding a second box increased the file by only 7 bytes, which is a trivial amount.
Close the Preview window and drag 10 more instances of the box symbol out of the Library, placing them randomly around the Stage. If dragging instances to the Stage is too monotonous for you, press the Alt key (on Windows) or the Option key (on Macintosh), then click and drag an instance that is already on the Stage. Alt-clicking (or Option-clicking) duplicates the instance (remember to release your mouse button before letting go of the Alt or Option key).
Test the movie again. The size is still only 0 KB (193 B). You have 12 instances of the box symbol on the Stage, and your movie still fits into less than 1 KB!
Close this file, but don’t bother saving it. We won’t need it again.
We’ve only just begun, but we’ve already covered many fun and useful techniques. So far, you’ve learned about:
Basic Flash terminology such as Stage and movie
The Tools panel and its drawing tools, including the Rectangle tool, Pencil tool, and Selection tool
Gradients, strokes, and fills
The Properties panel
Symbols and how to reuse them
You may notice that many Flash terms and concepts, such as t he Stage and movie, sound as if they came from a movie studio. Flash often use s a film making metaphor. Much like a film, anything that appears on the Stage appears in the finished movie. A graphic appearing off stage is not seen in the published movie unless it moves onto the Stage at some point.
You also learned that the Properties panel (which is common to all Studio MX 20 04 products) is useful for checking and changing the properties of objects and options for tools. The Properties panel is context-sensitive, so its options change depending on which tool or object you have selected. For example, if you select the Text tool, the Properties panel displays options for text, such as font size, bold, text field type, and so forth. If you activate the Rectangle tool, the Properties panel shows options for the fill color, stroke color, type of stroke, and stroke weight. The Properties panel can also be used to change the properties of the movie itself if the Stage is selected, and to set component parameters when a particular component is selected (you’ ll work with components in Chapter 10).
If you want to experiment for a while, try using some of the other drawing tools. Which operations can be constrained by holding down the Shift key? Try finishing off the Hendrix poster image, perhaps by adding some text (using the Text tool) or brightly colored flowers. Use the Oval tool to create a circle for the center of a flower, and use the Pencil tool to draw the petals. Fill them in with funky gradients and spread them all over the image to see how crazy it can get. If you want a more realistic-looking flower, see Hack #12, “Borrow Color Schemes from Nature,” in Flash Hacks (O’Reilly).
With your new knowledge of the drawing tools in Flash, you can start drawing everything from cartoon characters and backgrounds to logos and layouts, so get to it. This book is all about playing around, so have some fun. Chapter 2 will be waiting for you when you’re done.

Get Flash Out of the Box now with the O’Reilly learning platform.
O’Reilly members experience books, live events, courses curated by job role, and more from O’Reilly and nearly 200 top publishers.

