Chapter 4. Databases
Like spreadsheets, databases are ubiquitous in business. Companies use databases to store data on customers, inventory, and employees. Databases are vital to tracking operations, sales, financials, and more. What sets a database apart from a simple spreadsheet or a workbook of spreadsheets is that a database’s tables are linked such that a row in one spreadsheet can be linked to a row or column in another. To give a standard example, customer data—name, address, and so on—may be linked (using a customer ID number) to a row in an “orders” spreadsheet that contains items ordered. Those items are in turn linked up to data in your “suppliers” spreadsheet, enabling you to track and fulfill orders—and also to perform deeper analytics. While CSV and Excel files are common, important data sources that you can process automatically and at scale with Python, and building skills to handle these files has been important both from a learning perspective (to learn common programming operations) and from a practical perspective (a great deal of business data is stored in these types of files), databases truly leverage the power of computers to execute tasks hundreds, thousands, or even millions of times.
One thing you’ll need to learn how to interact with a database in Python is a database, and a table in the database filled with data. If you don’t already have access to such a database and table, this requirement could be a stumbling block. Fortunately, there are two resources at our disposal that will make it quick and easy to get up and running with the examples in this chapter.
First, Python has a built-in sqlite3 module that enables us to create an in-memory database. This means that we can create a database and table filled with data directly in our Python code without having to download and install database-specific software. We’ll use this feature in the first half of this chapter to get up and running quickly so that the focus can be on interacting with the database, table, and data instead of downloading and installing a database.
Second, you may already work with MySQL, PostgreSQL, or Oracle, some common database systems. The companies that make these database systems available have made it relatively easy to download and install their systems. While you may not work with a database system on a daily basis, they are very common in business, so it’s critically important for you to be familiar with some common database operations and how to carry out those operations in Python. Therefore, we’ll download and install a database system in the second half of this chapter so that you can use what you’ve learned in the first half of the chapter to become comfortable interacting with and manipulating data in an actual database system.
Python’s Built-in sqlite3 Module
As already mentioned, we’ll get up and running quickly by using Python’s built-in sqlite3 module to create an in-memory database and table filled with data directly in our Python code. As in Chapter 2 and Chapter 3, the focus of this first example will be to demonstrate how to count the number of rows output by a SQL query. This capability is important in any situation where you are unsure how many rows your query will output, so that you know how many rows of data you’ll be processing before you begin computation. This example will also be helpful because we will use a lot of the syntax associated with interacting with databases in Python in order to create the database table, insert data into the table, and fetch and count the number of rows in the output. We’ll see much of this syntax repeated in examples throughout this chapter.
Let’s begin. To create a database table, insert data into the table, and fetch and count the number of rows in the output, type the following code into a text editor and save the file as 1db_count_rows.py:
1#!/usr/bin/env python32importsqlite33 4# Create an in-memory SQLite3 database5# Create a table called sales with four attributes6con=sqlite3.connect(':memory:')7query="""CREATE TABLE sales8(customer VARCHAR(20),9product VARCHAR(40),10amount FLOAT,11date DATE);"""12con.execute(query)13con.commit()14 15# Insert a few rows of data into the table16data=[('Richard Lucas','Notepad',2.50,'2014-01-02'),17('Jenny Kim','Binder',4.15,'2014-01-15'),18('Svetlana Crow','Printer',155.75,'2014-02-03'),19('Stephen Randolph','Computer',679.40,'2014-02-20')]20statement="INSERT INTO sales VALUES(?, ?, ?, ?)"21con.executemany(statement,data)22con.commit()23 24# Query the sales table25cursor=con.execute("SELECT * FROM sales")26rows=cursor.fetchall()27 28# Count the number of rows in the output29row_counter=030forrowinrows:31(row)32row_counter+=133('Number of rows:%d'%(row_counter))
Figure 4-1, Figure 4-2, and Figure 4-3 show what the script looks like in Anaconda Spyder, Notepad++ (Windows), and TextWrangler (macOS), respectively.
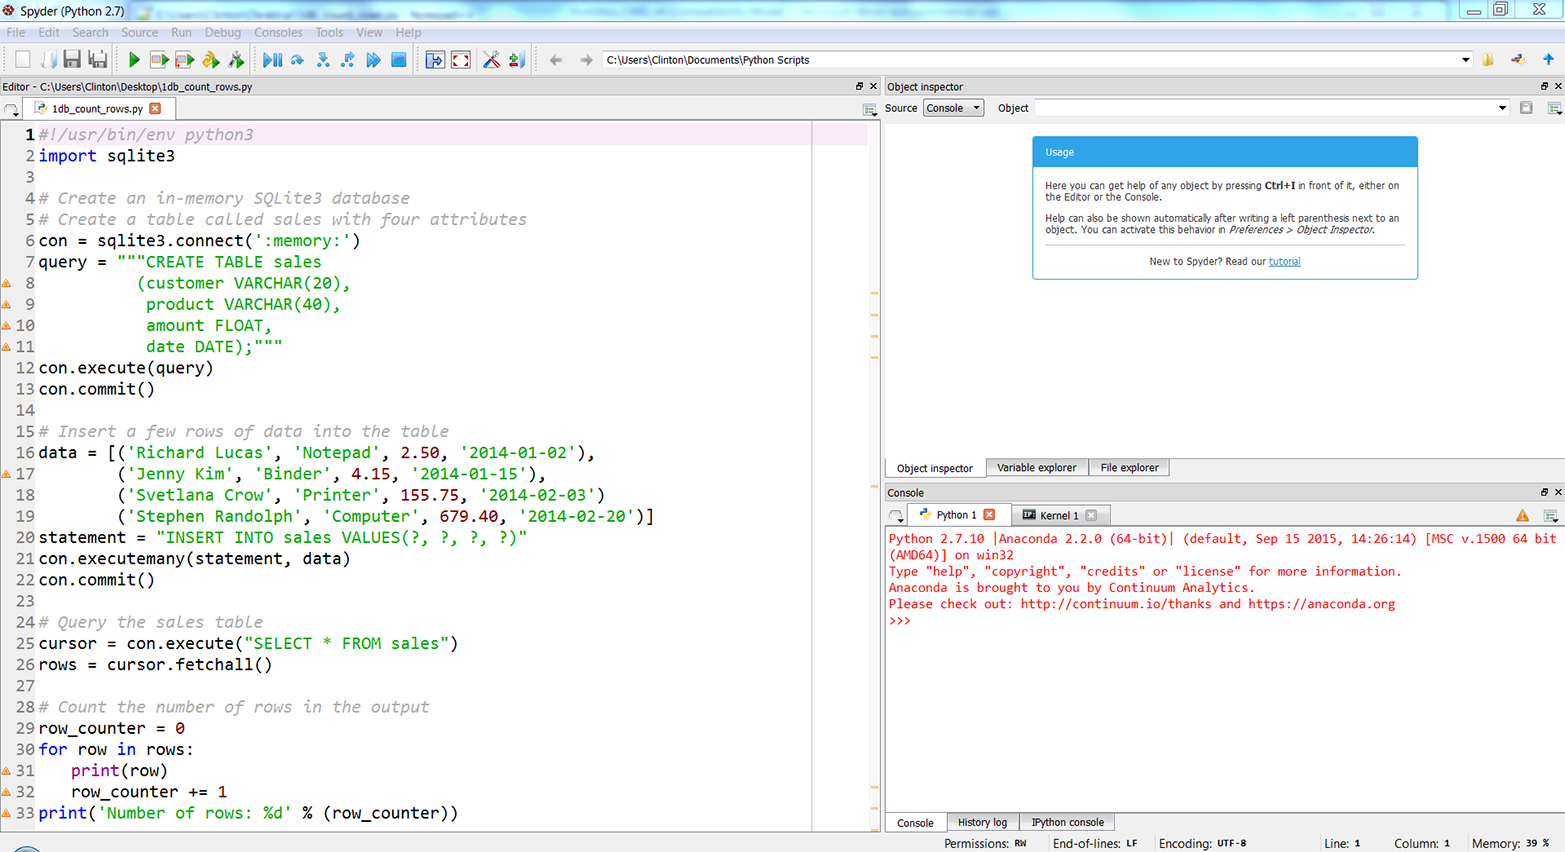
Figure 4-1. The 1db_count_rows.py Python script in Anaconda Spyder
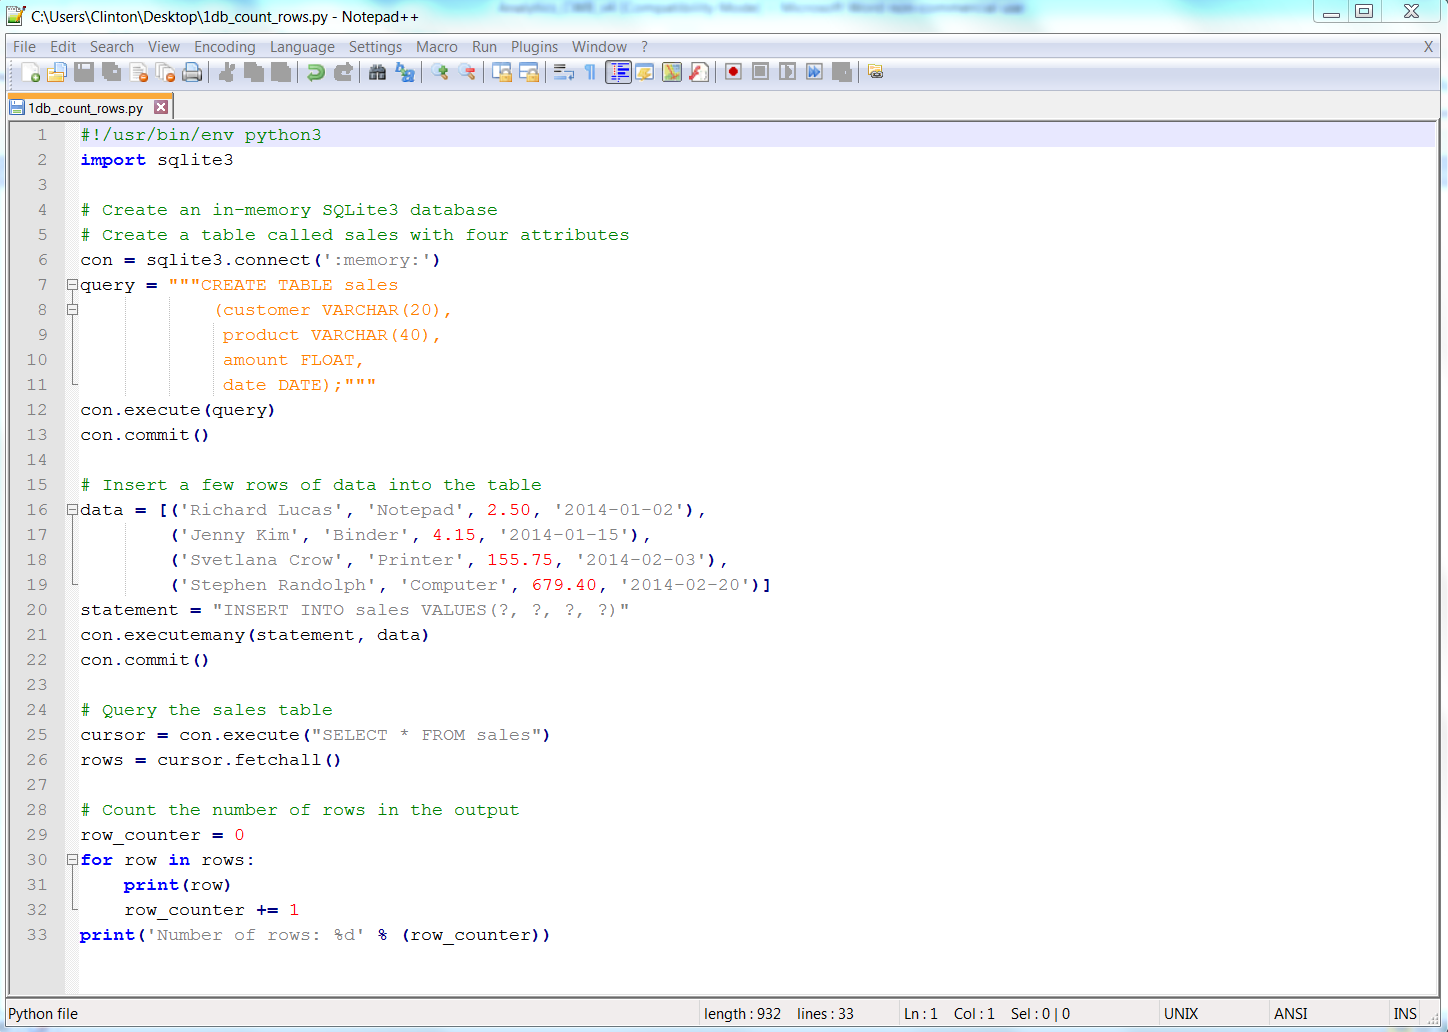
Figure 4-2. The 1db_count_rows.py Python script in Notepad++ (Windows)
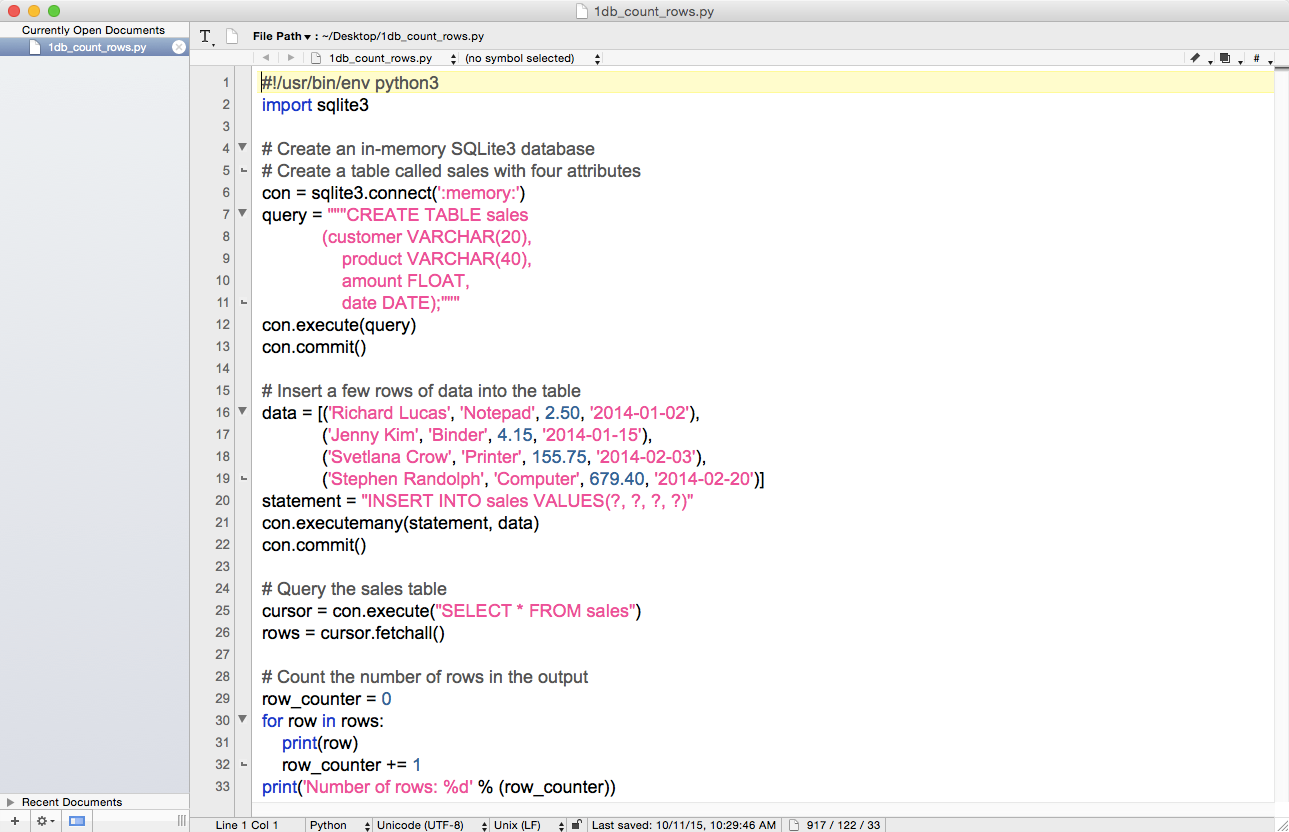
Figure 4-3. The 1db_count_rows.py Python script in TextWrangler (macOS)
In these figures, you can already see some of the additional syntax we need to learn in order to interact with databases instead of CSV files or Excel workbooks.
Line 2 imports the sqlite3 module, which provides a lightweight disk-based database that doesn’t require a separate server process and allows accessing the database using a variant of the SQL query language. SQL commands appear in all caps in the code examples here. Because this chapter is about interacting with databases in Python, the chapter covers the majority of the common CRUD (i.e., Create, Read, Update, and Delete) database operations.1 The examples cover creating a database and table (Create), inserting records into the table (Create), updating records in the table (Update), and selecting specific rows from the table (Read). These SQL operations are common across relational databases.
In order to use this module, you must first create a connection object that represents the database. Line 6 creates a connection object called con to represent the database. In this example, I use the special name ':memory:' to create a database in RAM. If you want the database to persist, you can supply a different string. For example, if I were to use the string 'my_database.db' or 'C:\Users\Clinton\Desktop\my_database.db' instead of ':memory:', then the database object would persist in my current directory or on my Desktop.
Lines 7–11 use triple double-quotation marks to create a single string over multiple lines and assign the string to the variable query. The string is a SQL command that creates a table called sales in the database. The sales table has four attributes: customer, product, amount, and date. The customer attribute is a variable character length field with a maximum of 20 characters. The product attribute is also a variable character length field with a maximum of 40 characters. The amount attribute is a floating-point formatted field. The date attribute is a date-formatted field.
Line 12 uses the connection object’s execute() method to carry out the SQL command, contained in the variable query, to create the sales table in the in-memory database.
Line 13 uses the connection object’s commit() method to commit (i.e., save) the changes to the database. You always have to use the commit() method to save your changes when you make changes to the database; otherwise, your changes will not be saved in the database.
Line 16 creates a list of tuples and assigns the list to the variable data. Each element in the list is a tuple that contains four values: three strings and one floating-point number. These four values correspond by position to the four table attributes (i.e., the four columns in the table). Also, each tuple contains the data for one row in the table. Because the list contains four tuples, it contains the data for four rows in the table.
Line 20 is like line 7 in that it creates a string and assigns the string to the variable statement. Because this string fits on one line, it’s contained in one pair of double quotes instead of the pair of triple double quotes used in line 7 to manage the multi-line string. The string in this line is another SQL command, an INSERT statement we’ll use to insert the rows of data in data into the table sales. The first time you see this line you may be curious about the purpose of the question marks (?). The question marks serve as placeholders for values you want to use in your SQL commands. Then you provide a tuple of values in the connection object’s execute() or executemany() method, and the values in the tuple are substituted by position into your SQL command. This method of parameter substitution makes your code less vulnerable to a SQL injection attack,2 which actually sounds as harmful as it can be, than assembling your SQL command with string operations.
Line 21 uses the connection object’s executemany() method to execute (i.e., run) the SQL command contained in statement for every tuple of data contained in data. Because there are four tuples of data in data, this executemany() method runs the INSERT statement four times, effectively inserting four rows of data into the tables sales.
Remember that when discussing line 13 we noted that you always have to use the commit() method when you make changes to the database; otherwise, your changes will not be saved in the database. Inserting four rows of data into the table sales definitely constitutes a change to the database, so in line 22 we once again use the connection object’s commit() method to save the changes to the database.
Now that we have the table sales in our in-memory database and it has four rows of data in it, let’s learn how to extract data from a database table. Line 25 uses the connection object’s execute() method to run a one-line SQL command and assigns the result of the command to a cursor object called cursor. Cursor objects have several methods (e.g., execute, executemany, fetchone, fetchmany, and fetchall). However, because you’re often interested in viewing or manipulating the entire result set of the SQL command you ran in the execute() method, you’ll commonly want to use the fetchall() method to fetch (i.e., return) all of the rows in the result set.
Line 26 implements this code. It uses the cursor object’s fetchall() method to return all of the rows in the result set of the SQL command executed in line 25 and assigns the rows to the list variable rows. That is, the variable rows is a list that contains all of the rows of data resulting from the SQL command in line 25. Each row of data is a tuple of values, so rows is a list of tuples. In this case, because we know the table sales contains four rows of data and the SQL command selects all rows of data from the sales table, we know that rows is a list of four tuples.
Finally, in lines 29–33, we return to the now basic operations of creating a row_counter variable to count the number of rows in rows, creating a for loop to iterate over each row in rows, incrementing the value in row_counter by one for each row in rows, and finally, after the for loop has completed iterating over all of the rows in rows, printing the string Number of rows: and the value in row_counter to the Command Prompt (or Terminal) window. As I’ve said, we expect that there are four rows of data in rows.
To see this Python script in action, type one of the following commands on the command line, depending on your operating system, and then hit Enter:
- On Windows:
-
python 1db_count_rows.py
- On macOS:
-
chmod +x 1db_count_rows.py
./1db_count_rows.py
You should see the output shown in Figure 4-4 (on Windows) or Figure 4-5 (on macOS) printed to the screen.
This output shows that there are four records in the sales table. More generally, the output also shows that we created an in-memory database, created the table sales, populated the table with four records, fetched all of the rows from the table, and counted the number of rows in the output.
Now that we understand the basic operations for creating an in-memory database, creating a table, loading data into the table, and fetching data from the table, let’s broaden our capabilities by learning how to insert data into a table and update records in a table at scale with CSV input files.
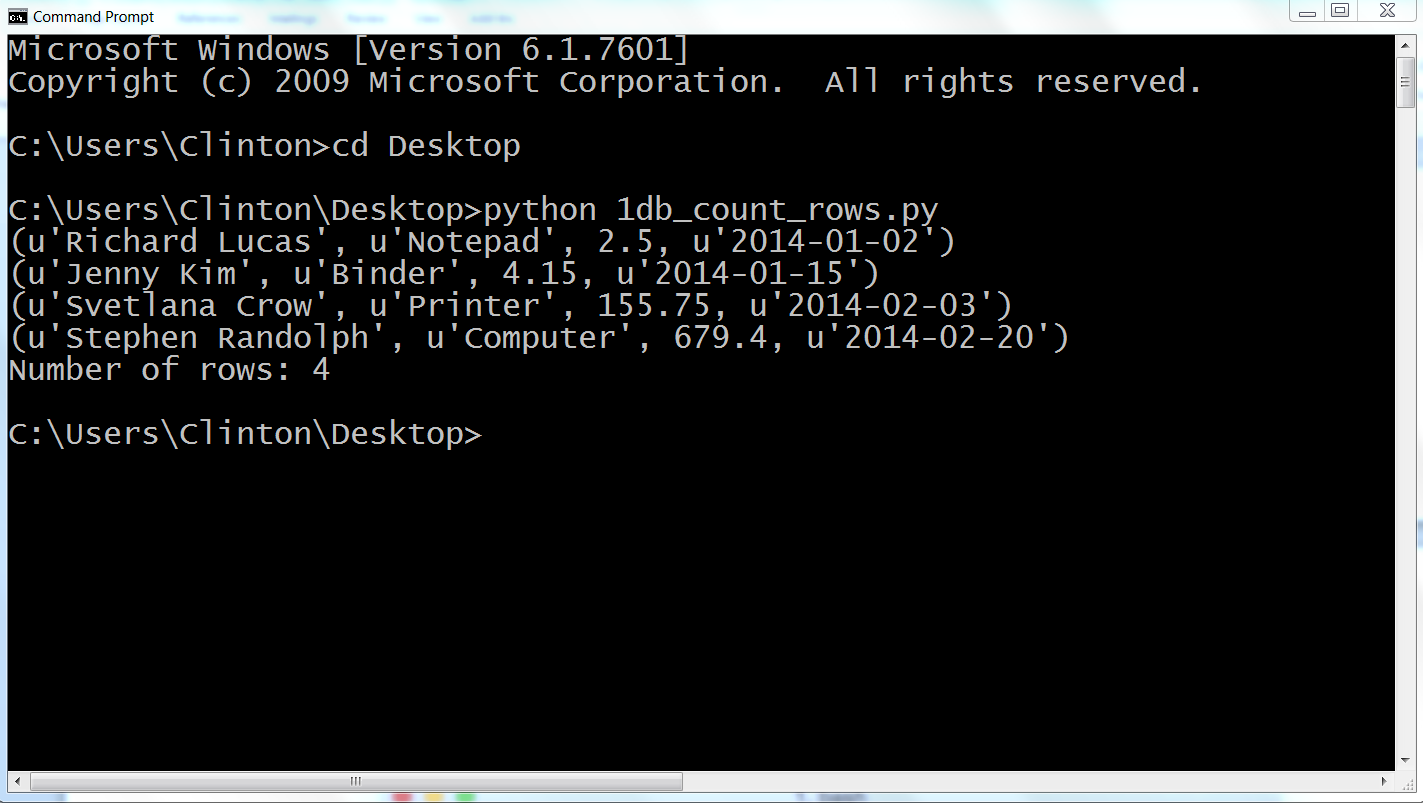
Figure 4-4. Output from 1db_count_rows.py showing the result of creating a SQLite3 database table, inserting four rows of data into the table, querying for all of the data in the table, and printing the results to the screen on a Windows computer
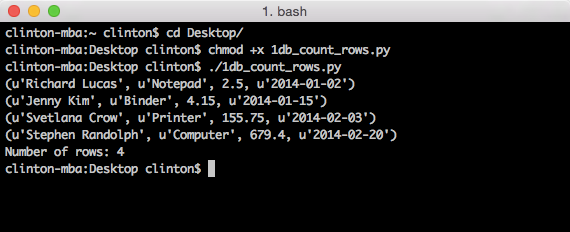
Figure 4-5. Output from 1db_count_rows.py on a Mac computer
Insert New Records into a Table
The previous example explained the basic operations for loading data into a table, but it included a severe limitation in that we handwrote the values to be loaded into the table. What happens if we need to load 10,000 records, each with 20 to 30 column attributes, into a table? Needless to say, manual data entry doesn’t scale.
In many cases, the data that needs to be loaded into a database table is the result of a database query or already resides in one or more Excel or CSV files. Because it is relatively easy to export the result of a database query to a CSV file for all major databases, and we’ve already learned how to process Excel and CSV files, let’s learn how to go the other way and load data into a database table at scale with a CSV input file.
Let’s create a new Python script. The script will create a database table, insert data from a CSV file into the table, and then show us the data that is now in the table. This third step, printing the data to the Command Prompt/Terminal window, isn’t necessary (and I wouldn’t recommend printing records to the window if you’re loading thousands of records), but I’ve included this step to illustrate one way to print all of the columns for each record without needing to specify individual column indexes (i.e., this syntax generalizes to any number of columns). To begin, type the following code into a text editor and save the file as 2db_insert_rows.py:
1#!/usr/bin/env python32importcsv3importsqlite34importsys5# Path to and name of a CSV input file6input_file=sys.argv[1]7# Create an in-memory SQLite3 database8# Create a table called Suppliers with five attributes9con=sqlite3.connect('Suppliers.db')10c=con.cursor()11create_table="""CREATE TABLE IF NOT EXISTS Suppliers12(Supplier_Name VARCHAR(20),13Invoice_Number VARCHAR(20),14Part_Number VARCHAR(20),15Cost FLOAT,16Purchase_Date DATE);"""17c.execute(create_table)18con.commit()19# Read the CSV file20# Insert the data into the Suppliers table21file_reader=csv.reader(open(input_file,'r'),delimiter=',')22header=next(file_reader,None)23forrowinfile_reader:24data=[]25forcolumn_indexinrange(len(header)):26data.append(row[column_index])27(data)28c.execute("INSERT INTO Suppliers VALUES (?, ?, ?, ?, ?);",data)29con.commit()30('')31# Query the Suppliers table32output=c.execute("SELECT * FROM Suppliers")33rows=output.fetchall()34forrowinrows:35output=[]36forcolumn_indexinrange(len(row)):37output.append(str(row[column_index]))38(output)
This script, like the scripts we wrote in Chapter 2, relies on the csv and sys modules. Line 2 imports the csv module so we can use its methods to read and parse the CSV input file. Line 4 imports the sys module so we can supply the path to and name of a file on the command line for use in the script. Line 3 imports the sqlite3 module so we can use its methods to create a simple, local database and table and execute SQL queries.
Line 6 uses the sys module to read the path to and name of a file on the command line and assigns that value to the variable input_file.
Line 9 creates a connection to a simple, local database called Suppliers.db. I’ve supplied a name for the database instead of using the special keyword ':memory:' to demonstrate how to create a database that will persist and not be deleted when you restart your computer. Because you will be saving this script on your Desktop, Suppliers.db will also be saved on your Desktop. If you want to save the database in a different location you can use a path of your choosing, like 'C:\Users\<Your Name>\Documents\Suppliers.db', instead of 'Suppliers.db'.
Lines 10–18 create a cursor and a multi-line SQL statement to create a table called Suppliers that has five column attributes, execute the SQL statement, and commit the changes to the database.
Lines 21–29 deal with reading the data to be loaded into the database table from a CSV input file and executing a SQL statement for each row of data in the input file to insert it into the database table. Line 21 uses the csv module to create the file_reader object. Line 22 uses the next() method to read the first row from the input file, the header row, and assign it to the variable header. Line 23 creates a for loop for looping over all of the data rows in the input file. Line 24 creates an empty list variable called data. For each row of input, we’ll populate data with the values in the row needed for the INSERT statement in line 28. Line 25 creates a for loop for looping over all of the columns in each row. Line 26 uses the list’s append() method to populate data with all of the values in the input file for that row. Line 27 prints the row of data that’s been appended into data to the Command Prompt/Terminal window. Notice the indentation. This line is indented beneath the outer for loop, rather than the inner for loop, so that it occurs for every row rather than for every row and column in the input file. This line is helpful for debugging, but once you’re confident the code is working correctly you can delete it or comment it out so you don’t have a lot of output printed to the window.
Line 28 is the line that actually loads each row of data into the database table. This line uses the cursor object’s execute() method to execute an INSERT statement to insert a row of values into the table Suppliers. The question marks ? are placeholders for each of the values to be inserted. The number of question marks should correspond to the number of columns in the input file, which should correspond to the number of columns in the table. Moreover, the order of the columns in the input file should correspond to the order of the columns in the table. The values substituted into the question mark positions come from the list of values in data, which appears after the comma in the execute() statement. Because data is populated with values for each row of data in the input file and the INSERT statement is executed for each row of data in the input file, these lines of code effectively read the rows of data from the input file and load the rows of data into the database table. Finally, line 29 is another commit statement to commit the changes to the database.
Lines 32 to 38 demonstrate how to select all of the data from the table Suppliers and print the output to the Command Prompt/Terminal window. Lines 32 and 33 execute a SQL statement to select all of the data from the Suppliers table and fetch all of the rows in “output” to the variable “rows”. Line 34 creates a for loop for looping over each row in “rows”. Line 36 creates a for loop for looping over all of the columns in each row. Line 37 appends each of the column values into a list named “output”. Finally, the print statement in line 38 ensures that each row of output is printed on a new line (notice the indentation, it’s in the row, not column, for loop).
Now all we need is a CSV input file that contains all of the data we want to load into our database table. For this example, let’s use the supplier_data.csv file we used in Chapter 2. In case you skipped Chapter 2 or don’t have the file, the data in the supplier_data.csv file looks as shown in Figure 4-6.
Now that we have our Python script and CSV input file, let’s use our script to load the data in our CSV input file into our Suppliers database table. To do so, type the following on the command line and then hit Enter:
python 2db_insert_rows.py supplier_data.csv
Figure 4-7 shows what the output looks like when printed to a Command Prompt window. The first block of output is the data rows as they’re parsed from the CSV file, and the second block of output is the same rows as they’re extracted from the sqlite table.
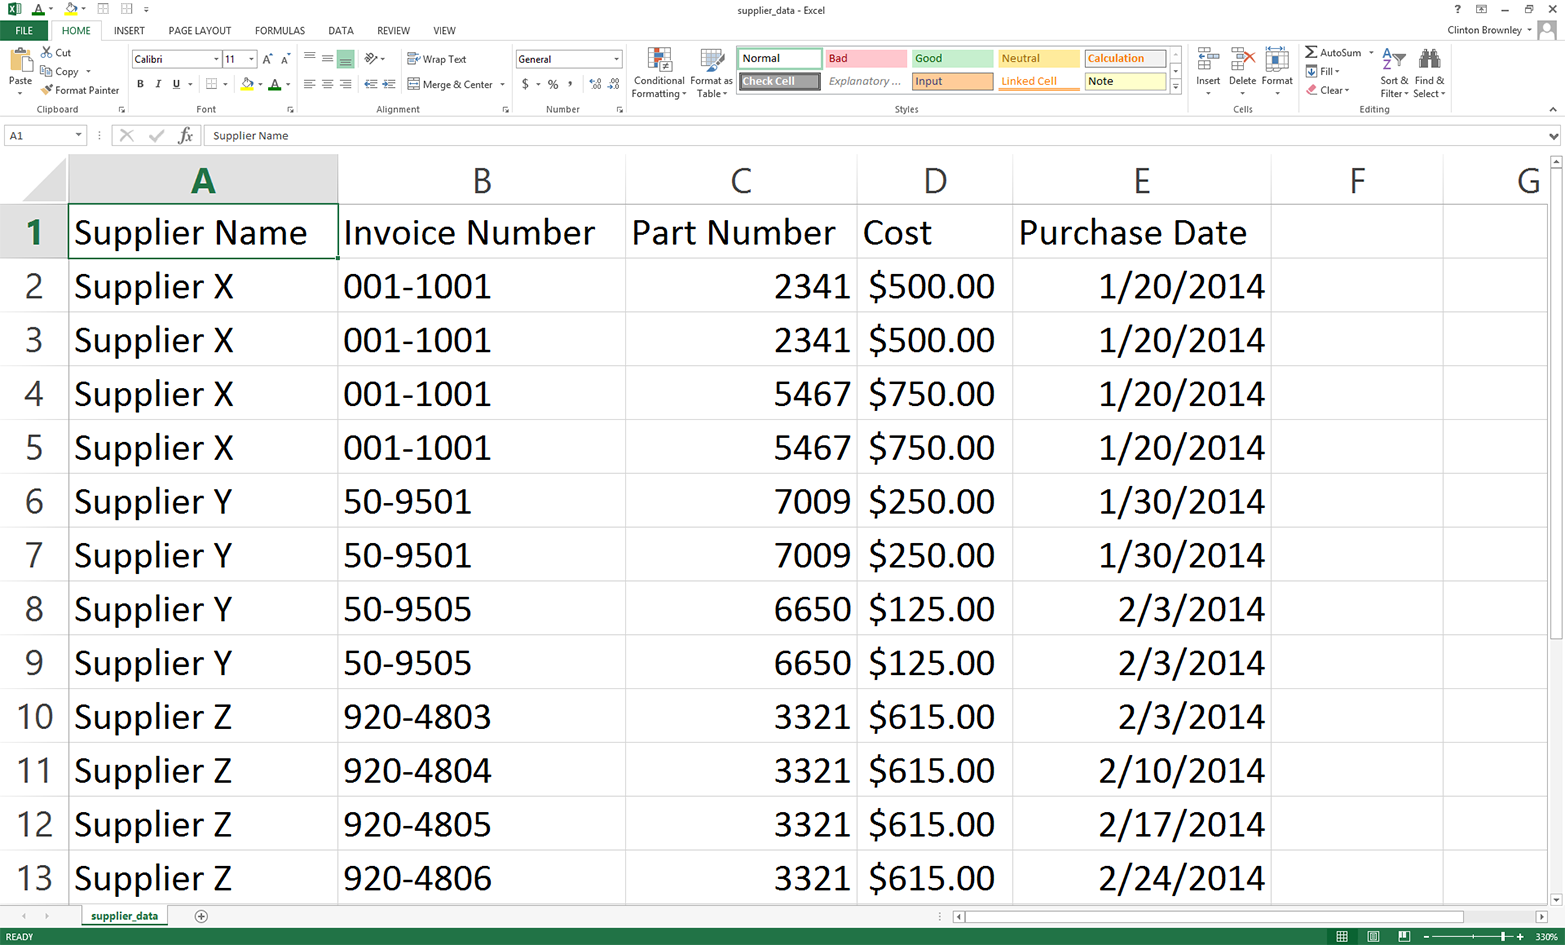
Figure 4-6. Example data for a CSV file named supplier_data.csv, displayed in an Excel worksheet
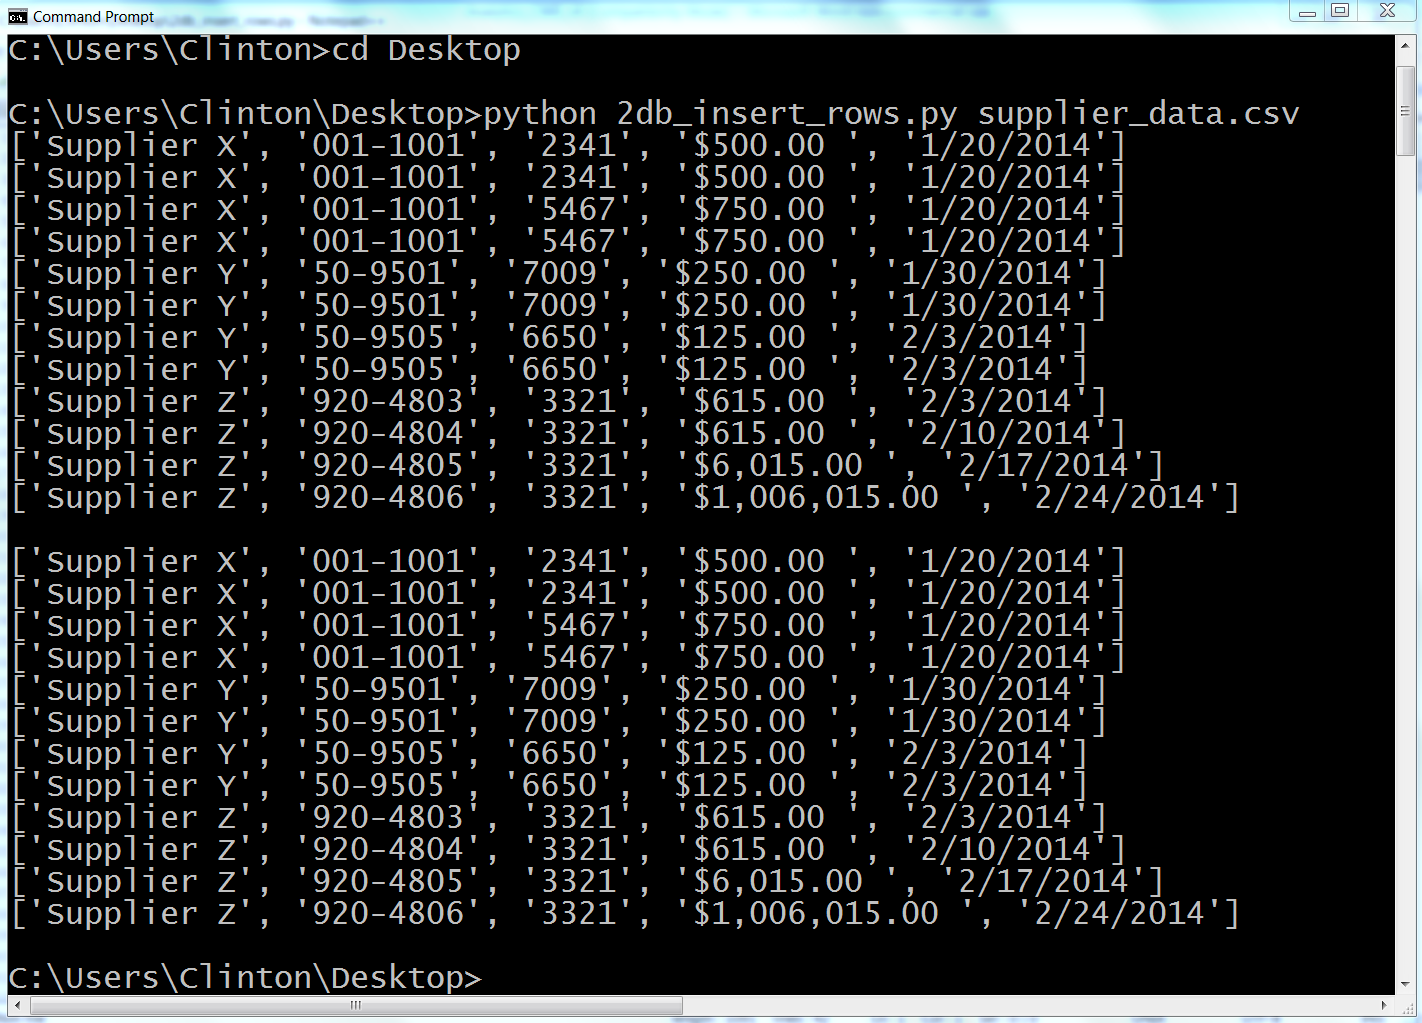
Figure 4-7. Output from 2db_insert_rows.py on a Windows computer
This output shows the 12 lists of values created for the 12 rows of data, excluding the header row, in the CSV input file. Beneath the 12 lists created from the input data there is a space, and then there are the 12 lists for the rows fetched from the database table.
This example demonstrated how to load data into a database table at scale by reading all of the data to be loaded into the table from a CSV input file and inserting the data in the file into the table. This example covers situations in which you want to add new rows to a table, but what if instead you want to update existing rows in a table? The next example covers this situation.
Update Records in a Table
The previous example explained how to add rows to a database table using a CSV input file—an approach that, because you can use loops and glob, you can scale to any number of files. But sometimes, instead of loading new data into a table you need to update existing rows in a table.
Fortunately, we can reuse the technique of reading data from a CSV input file to update existing rows in a table. In fact, the technique of assembling a row of values for the SQL statement and then executing the SQL statement for every row of data in the CSV input file remains the same as in the previous example. The SQL statement is what changes. It changes from an INSERT statement to an UPDATE statement.
We’re already familiar with how to use a CSV input file to load data into a database table, so let’s learn how to use a CSV input file to update existing records in a database table. To do so, type the following code into a text editor and save the file as 3db_update_rows.py:
1#!/usr/bin/env python32importcsv3importsqlite34importsys5# Path to and name of a CSV input file6input_file=sys.argv[1]7# Create an in-memory SQLite3 database8# Create a table called sales with four attributes9con=sqlite3.connect(':memory:')10query="""CREATE TABLE IF NOT EXISTS sales11(customer VARCHAR(20),12product VARCHAR(40),13amount FLOAT,14date DATE);"""15con.execute(query)16con.commit()17# Insert a few rows of data into the table18data=[('Richard Lucas','Notepad',2.50,'2014-01-02'),19('Jenny Kim','Binder',4.15,'2014-01-15'),20('Svetlana Crow','Printer',155.75,'2014-02-03'),21('Stephen Randolph','Computer',679.40,'2014-02-20')]22fortupleindata:23(tuple)24statement="INSERT INTO sales VALUES(?, ?, ?, ?)"25con.executemany(statement,data)26con.commit()27# Read the CSV file and update the specific rows28file_reader=csv.reader(open(input_file,'r'),delimiter=',')29header=next(file_reader,None)30forrowinfile_reader:31data=[]32forcolumn_indexinrange(len(header)):33data.append(row[column_index])34(data)35con.execute("UPDATE sales SET amount=?, date=? WHERE customer=?;",data)36con.commit()37# Query the sales table38cursor=con.execute("SELECT * FROM sales")39rows=cursor.fetchall()40forrowinrows:41output=[]42forcolumn_indexinrange(len(row)):43output.append(str(row[column_index]))44(output)
All of the code should look familiar. Lines 2–4 import three of Python’s built-in modules so we can use their methods to read command-line input, read a CSV input file, and interact with an in-memory database and table. Line 6 assigns the CSV input file to the variable input_file.
Lines 9–16 create an in-memory database and a table called sales that has four column attributes.
Lines 18–24 create a set of four records for the sales table and insert the four records into the table. Take a moment to look at the records for Richard Lucas and Jenny Kim. These are the two records that we’ll update later in this script. At this point, with its four records, the sales table is similar to (albeit probably much smaller than) any table you will face when you want to update existing records in a database table.
Lines 28–36 are nearly identical to the code in the previous example. The only significant difference is in line 35, where an UPDATE statement has replaced the previous INSERT statement. The UPDATE statement is where you have to specify which records and column attributes you want to update. In this case, we want to update the amount and date values for a specific set of customers. Like in the previous example, there should be as many placeholder question marks as there are values in the query, and the order of the data in the CSV input file should be the same as the order of the attributes in the query. In this case, from left to right the attributes in the query are amount, date, and customer; therefore, the columns from left to right in the CSV input file should be amount, date, and customer.
Finally, the code in lines 39–44 is basically identical to the same section of code in the previous example. These lines of code fetch all of the rows in the sales table and print each row to the Command Prompt/Terminal window with a single space between column values.
Now all we need is a CSV input file that contains all of the data we need to update some of the records in our database table. To create the file:
-
Open a spreadsheet.
-
Add the data shown in Figure 4-8.
-
Save the file as data_for_updating.csv.
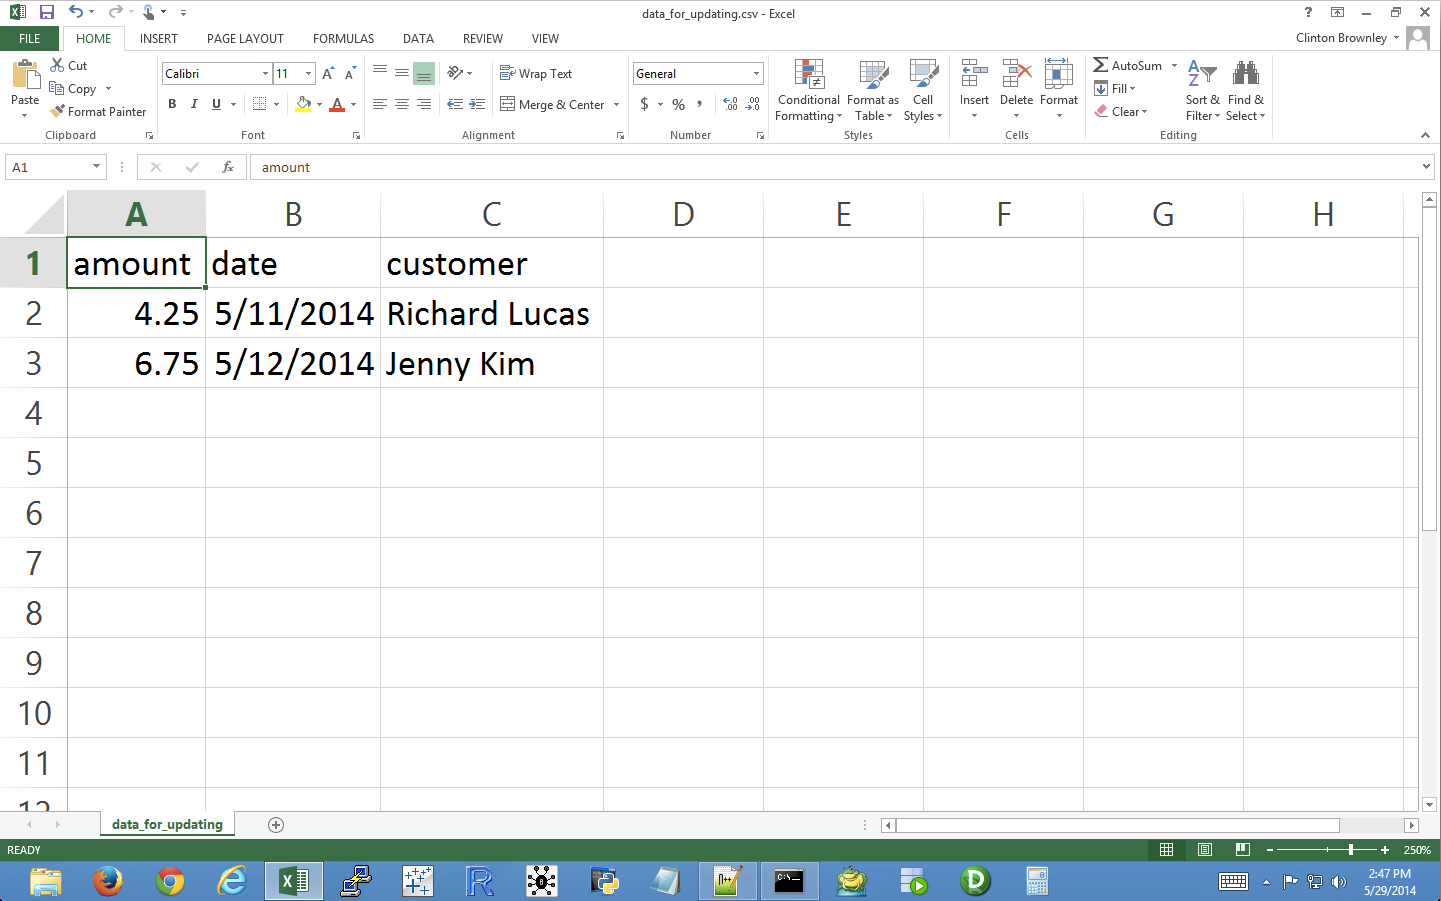
Figure 4-8. Example data for a CSV file named data_for_updating.csv, displayed in an Excel worksheet
Now that we have our Python script and CSV input file, let’s use our script and input file to update specific records in our sales database table. To do so, type the following on the command line and then hit Enter:
python 3db_update_rows.py data_for_updating.csv
Figure 4-9 shows what the output looks like when printed to a Command Prompt window. The first four rows of output (tuples) are the initial data rows, the next two rows (lists) are the data from the CSV file, and the last four rows (lists) are the data from the database table after the rows have been updated.
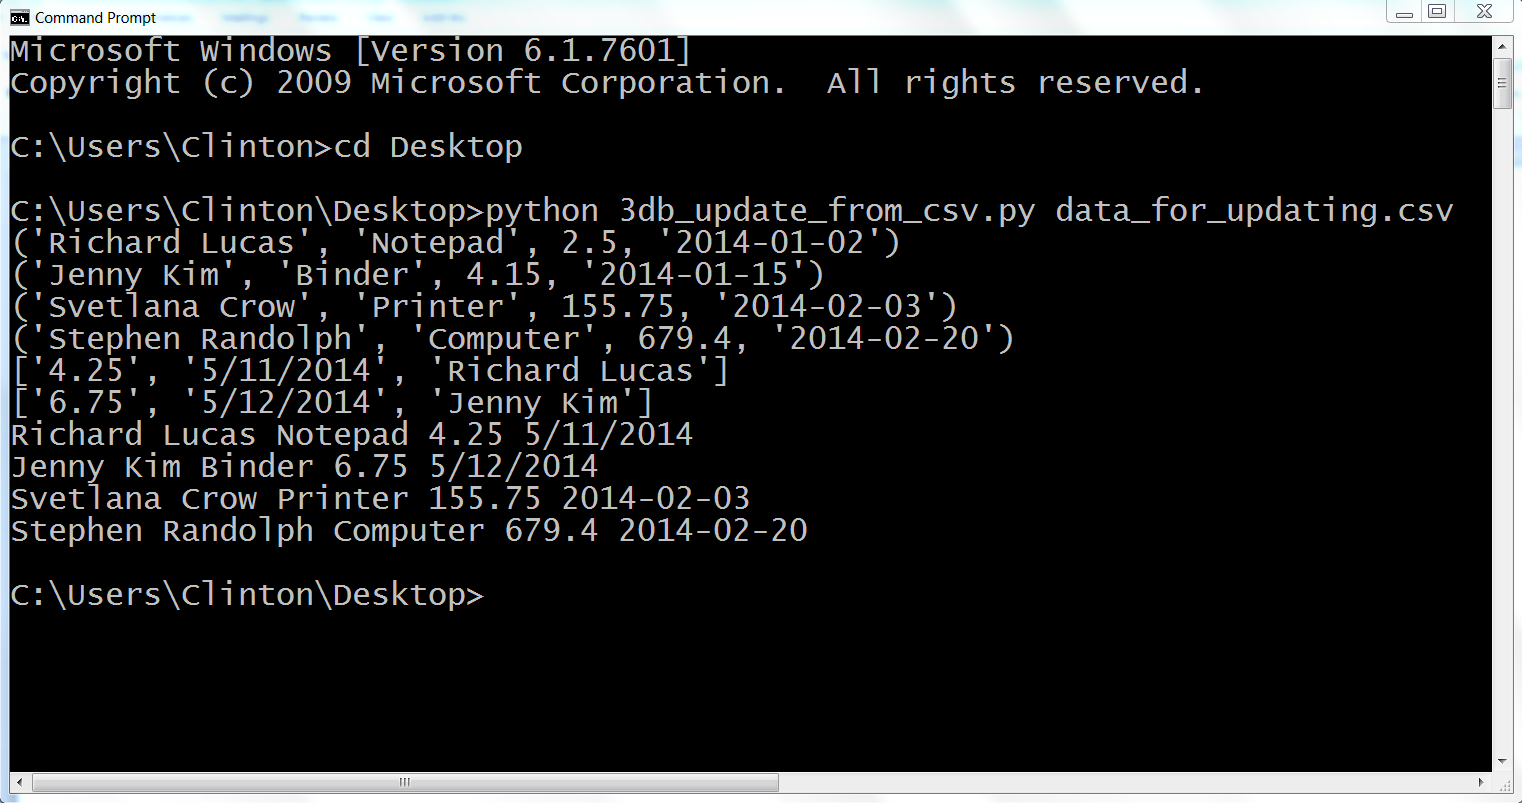
Figure 4-9. Output from 3db_update_rows.py on a Windows computer
This output shows the four initial rows of data in the database, followed by the two lists of values to be updated in the database. The two lists of values to be updated show that the new amount value for Richard Lucas will be 4.25 and the date value will be 5/11/2014. Similarly, the new amount value for Jenny Kim will be 6.75 and the date value will be 5/12/2014.
Beneath the two update lists, the output also shows the four rows fetched from the database table after the updates were executed. Each row is printed on a separate line and the values in each row are separated by single spaces. Recall that the original amount and date values for Richard Lucas were 2.5 and 2014-01-02, respectively. Similarly, the original amount and date values for Jenny Kim were 4.15 and 2014-01-15, respectively. As you can see in the output shown in Figure 4-9, these two values have been updated for Richard Lucas and Jenny Kim to reflect the new values supplied in the CSV input file.
This example demonstrated how to update records in an existing database table at scale by using a CSV input file to supply the data needed to update specific records. Up to this point in the chapter, the examples have relied on Python’s built-in sqlite3 module. We’ve used this module to be able to quickly write scripts that do not rely on a separate, downloaded database like MySQL, PostgreSQL, or Oracle. In the next section, we’ll build on these examples by downloading a database program, MySQL, and learning how to load data into a database table and update records in a database program, as well as write query output to a CSV file. Let’s get started.
MySQL Database
To complete the examples in this section, you need to have the MySQLdb package, a.k.a. MySQL-python (Python v2) or mysqlclient (Python v3).3 This package enables Python to interact with databases and their respective tables, so we will use it to interact with the MySQL database table we create in this section. If you installed Anaconda’s Python, then you already have the package because it’s bundled into the installation. If you installed Python from the Python.org website, then you need to follow the instructions in Appendix A to download and install the package.
As before, in order to work with a database table, we first need to create one:
-
Download the MySQL database program as described in Appendix A.
After you download the MySQL database program, you’ll have access to the MySQL command-line client.
-
Open the MySQL command-line client by entering
mysqlat the command line.Now you are interacting with your MySQL database program with a command-line interface. To begin, let’s view the existing databases in your MySQL database program.
-
To do so, type the following and then hit Enter. Figure 4-10 shows the results on a Windows computer.
SHOW DATABASES;
Notice that the command ended with a semicolon. That’s how MySQL knows that you’re done with the command—if you hit Enter without the semicolon, then MySQL will expect another line of command (you’ll see multi-line commands shortly). If you forget that semicolon, don’t worry; you can type just the semicolon and Enter on the next line and MySQL will execute your command.
The output from this command shows that there are already four databases in the MySQL database program. These databases enable the MySQL database program to run and also contain information about the access rights of the users of the program. To create a database table, we first have to create a database of our own.
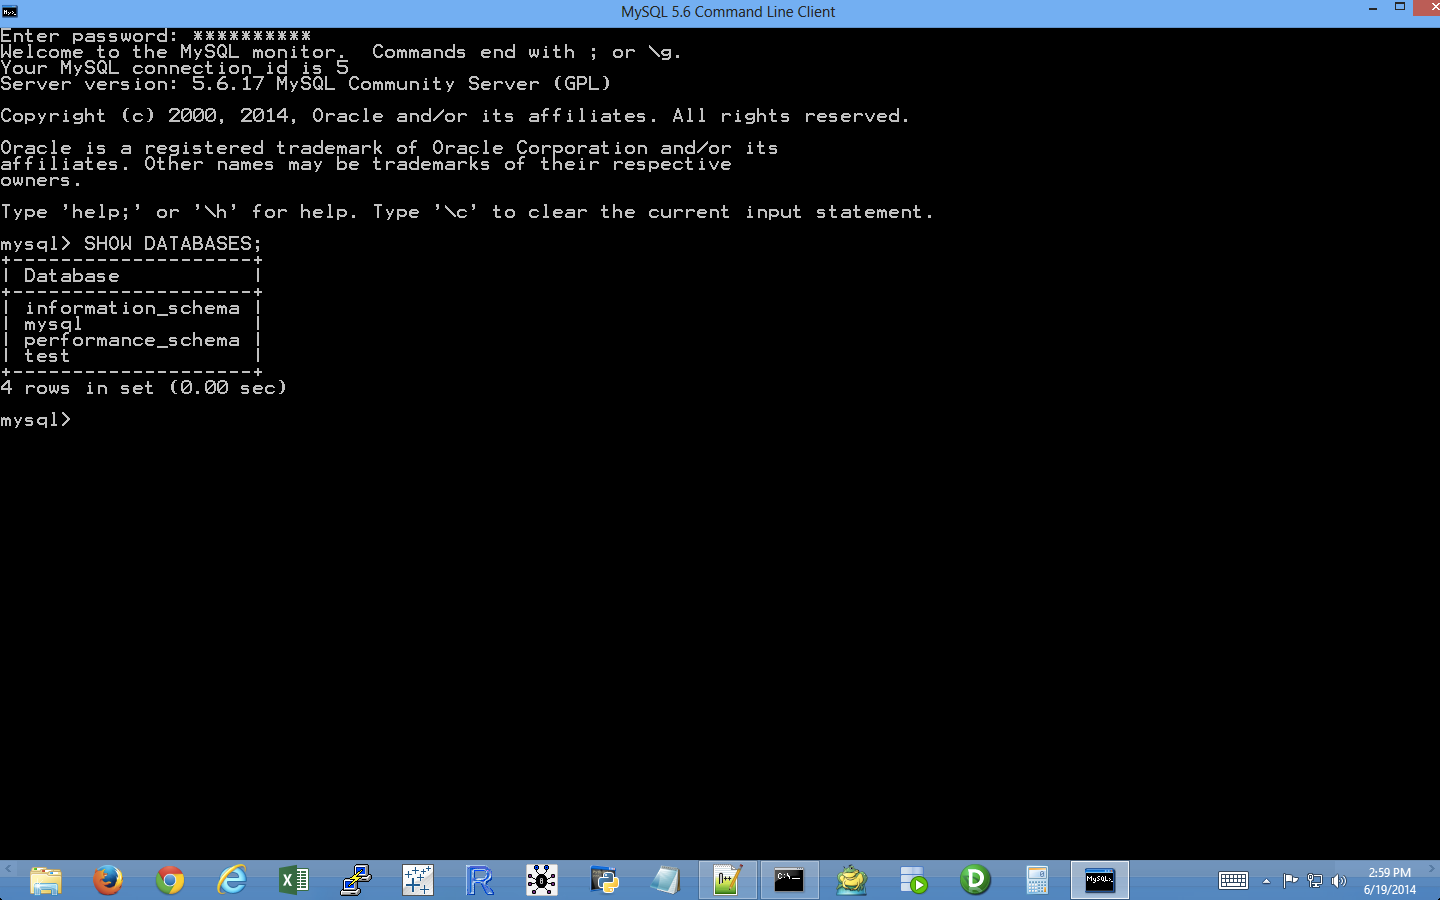
Figure 4-10. After you install MySQL, the SHOW DATABASES; command displays the default databases in MySQL
-
To create a database, type the following and then hit Enter:
CREATE DATABASE my_suppliers;
After you hit Enter, you can run the
SHOW DATABASES;command again to see that you’ve created a new database. To create a database table in themy_suppliersdatabase, we first have to choose to work in themy_suppliersdatabase. -
To work in the
my_suppliersdatabase, type the following and then hit Enter (see Figure 4-11):USE my_suppliers;
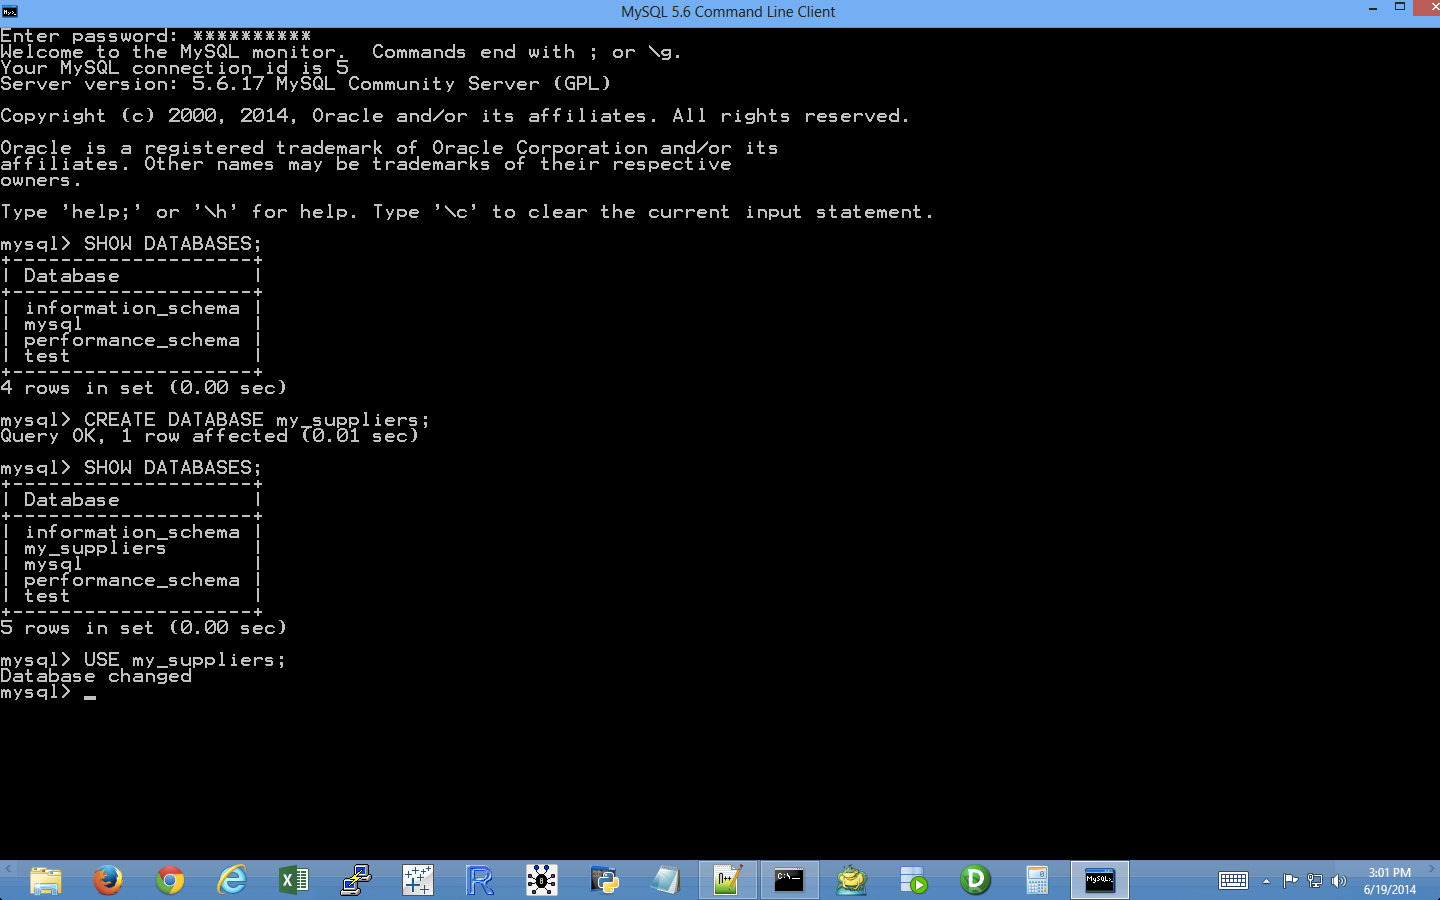
Figure 4-11. The result of creating a new database named my_suppliers, checking that the new database is now included in the list of existing databases, and switching to the database to begin using it
After you hit Enter, you’ll be in the
my_suppliersdatabase. Now we can create a database table to store data on our suppliers. -
To create a database table called
Suppliers, type the following and then hit Enter:CREATE TABLE IF NOT EXISTS Suppliers (Supplier_Name VARCHAR(20), Invoice_Number VARCHAR(20), Part_Number VARCHAR(20), Cost FLOAT, Purchase_Date DATE);
This command creates a database table called
Suppliersif a table calledSuppliersdoes not already exist in the database. The table has five columns (a.k.a.fieldsorattributes):Supplier_Name,Invoice_Number,Part_Number,Cost, andPurchase_Date.The first three columns are variable character
VARCHARfields. The20means we’ve allocated 20 characters for data entered into the field. If the data entered into the field is longer than 20 characters, then the data is truncated. If the data is shorter than 20 characters, then the field allocates the smaller amount of space for the data. UsingVARCHARfor fields that contain variable-length strings is helpful because the table will not waste space storing more characters than is necessary. However, you do want to make sure that the number in parentheses is large enough to allocate enough characters so that the longest string in the field isn’t truncated. Some alternatives toVARCHARareCHAR,ENUM, andBLOB. You might consider these alternatives when you want to specify a specific number of characters for the field and have values in the field right-padded to the specified length, specify a list of permissible values for the field (e.g.,small,medium,large), or permit a variable and potentially large amount of text to go into the field, respectively.The fourth column is a floating-point number
FLOATfield. A floating-point number field holds floating-point, approximate values. Because in this case the fourth column contains monetary values, an alternative toFLOATisNUMERIC, a fixed-point exact value type of field. For example, instead ofFLOAT, you could useNUMERIC(11,2). The11is the precision of the numeric value, or the total number of digits stored, including the digits after the decimal point, for the value. The2is the scale, or the total number of digits after the decimal point. We useFLOATinstead ofNUMERICin this case for maximum code portability.The final column is a date
DATEfield. ADATEfield holds a date, with no time part, in 'YYYY-MM-DD' format. So a date like 6/19/2014 is stored in MySQL as'2014-06-19'. Invalid dates are converted to'0000-00-00'. -
To ensure that the database table was created correctly, type the following and then hit Enter:
DESCRIBE Suppliers;
After you hit Enter, you should see a table that lists the names of the columns you created, the data type (e.g.,
VARCHARorFLOAT) for each of the columns, and whether values in the columns can beNULL.Now that we’ve created a database,
my_suppliers, and a table in the database,Suppliers, let’s create a new user and give the user privileges to interact with the database and the table. -
To create a new user, type the following and then hit Enter (make sure to replace
usernamewith the username you’d like to use; you should also change the password,secret_password, to something more secure):CREATE USER '
username'@'localhost' IDENTIFIED BY 'secret_password';Now that we’ve created a new user, let’s grant the user all privileges on our database,
my_suppliers. By granting the user all privileges on the database, we enable the user to perform many different operations on the tables in the database. These privileges are useful because the scripts in this section involve loading data into the table, modifying specific records in the table, and querying the table. -
To grant all privileges to the new user, type the following two commands and hit Enter after each one (again, make sure to replace
usernamewith the username you created in the previous step):GRANT ALL PRIVILEGES ON my_suppliers.* TO '
username'@'localhost'; FLUSH PRIVILEGES;You can now interact with the
Supplierstable in themy_suppliersdatabase from localhost (i.e., your local computer). See Figure 4-12.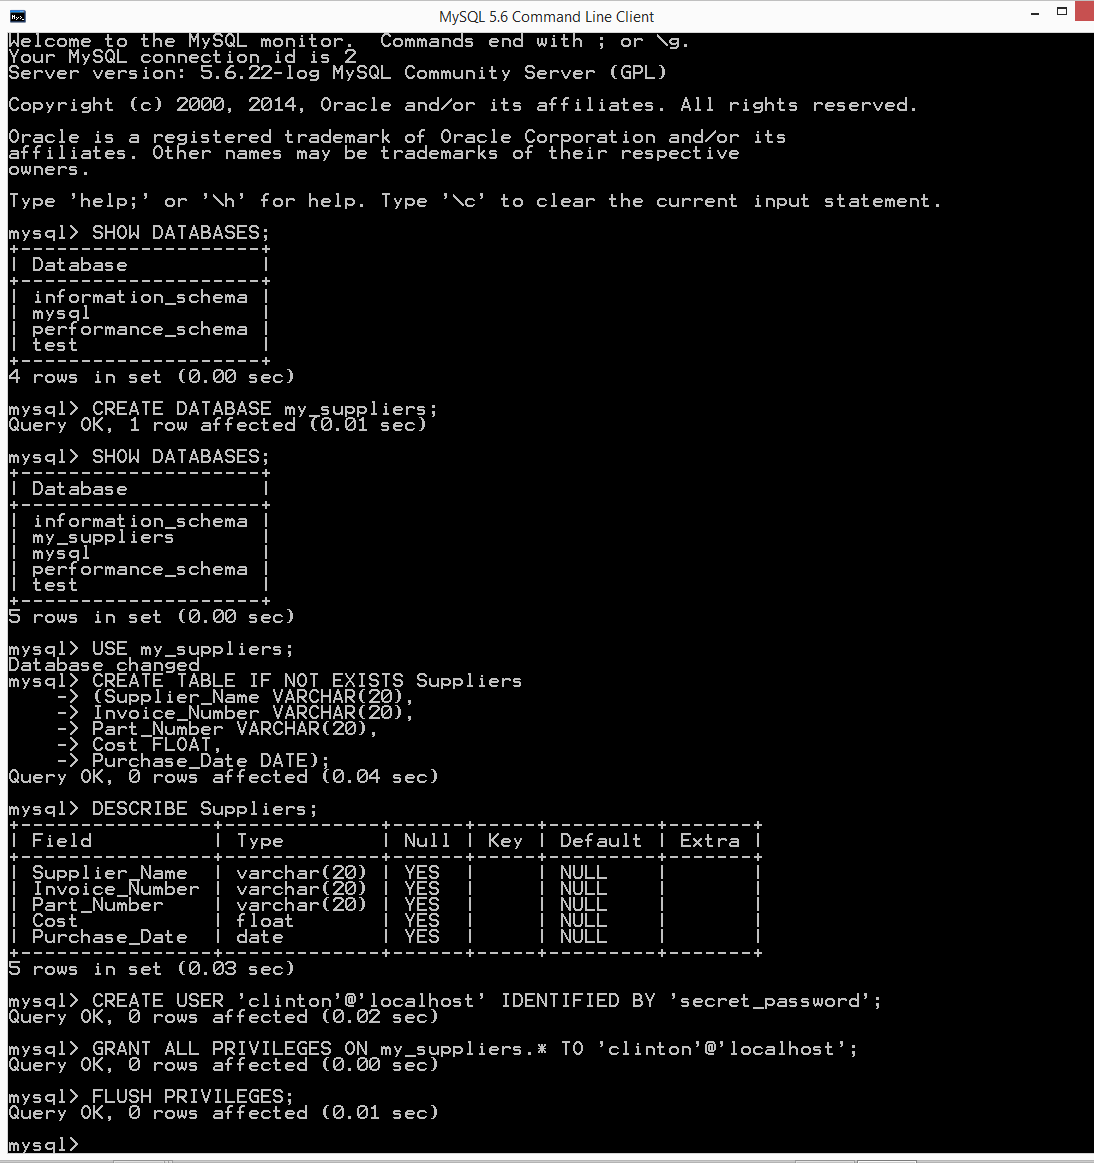
Figure 4-12. The result of creating a new table named Suppliers in the my_suppliers database, creating a new user, and granting the new user all privileges on the my_suppliers database and the tables it will contain
Now that we have a database and table in which to store data, let’s learn how to load data into the table with Python.
Insert New Records into a Table
Now we’re ready to load records from a CSV file into a database table. You can already output records from Python scripts or Excel files into a CSV file, so this will enable you to create a very versatile data pipeline.
Let’s create a new Python script. The script will insert data from a CSV file into our database table and then show us the data that is now in the table. This second step, printing the data to the Command Prompt/Terminal window, isn’t necessary (and I wouldn’t recommend printing records to the window if you’re loading thousands of records!), but I’ve included this step to illustrate one way to print all of the columns for each record without needing to specify individual column indexes (i.e., this syntax generalizes to any number of columns).
To begin, type the following code into a text editor and save the file as 4db_mysql_load_from_csv.py:
1#!/usr/bin/env python32importcsv3importMySQLdb4importsys5fromdatetimeimportdatetime,date6 7# Path to and name of a CSV input file8input_file=sys.argv[1]9# Connect to a MySQL database10con=MySQLdb.connect(host='localhost',port=3306,db='my_suppliers',\ 11user='root',passwd='my_password')12c=con.cursor()13# Insert the data into the Suppliers table14file_reader=csv.reader(open(input_file,'r',newline=''))15header=next(file_reader)16forrowinfile_reader:17data=[]18forcolumn_indexinrange(len(header)):19ifcolumn_index<4:20data.append(str(row[column_index]).lstrip('$')\ 21.replace(',','').strip())22else:23a_date=datetime.date(datetime.strptime(\ 24str(row[column_index]),'%m/%d/%Y'))25# %Y: year is 2015; %y: year is 1526a_date=a_date.strftime('%Y-%m-%d')27data.append(a_date)28data29c.execute("""INSERT INTO Suppliers VALUES (%s,%s,%s,%s,%s);""",data)30con.commit()31("")32# Query the Suppliers table33c.execute("SELECT * FROM Suppliers")34rows=c.fetchall()35forrowinrows:36row_list_output=[]37forcolumn_indexinrange(len(row)):38row_list_output.append(str(row[column_index]))39(row_list_output)
This script, like the scripts we wrote in Chapter 2, relies on the csv, datetime, string, and sys modules. Line 2 imports the csv module so we can use its methods to read and parse the CSV input file. Line 4 imports the sys module so we can supply the path to and name of a file on the command line for use in the script. Line 5 imports the datetime and date methods from the datetime module so we can manipulate and format the dates in the last column of the input file. We need to strip the dollar sign off of the value and remove any embedded commas so it can enter the column in the database table that accepts floating-point numbers. Line 3 imports the add-in MySQLdb module that we downloaded and installed so that we can use its methods to connect to MySQL databases and tables.
Line 8 uses the sys module to read the path to and name of a file on the command line and assigns that value to the variable input_file.
Line 10 uses the MySQLdb module’s connect() method to connect to my_suppliers, the MySQL database we created in the previous section. Unlike when working with CSV or Excel files, which you can read, modify, or delete in place, MySQL sets up a database as though it were a separate computer (a server), which you can connect to, send data to, and request data from. The connection specifies several common arguments, including host, port, db, user, and passwd.
The host is the hostname of the machine that holds the database. In this case, the MySQL server is stored on your machine, so the host is localhost. When you’re connecting to other data sources, the server will be on a different machine, so you will need to change localhost to the hostname of the machine that holds the server.
The port is the port number for the TCP/IP connection to the MySQL server. The port number we’ll use is the default port number, 3306. As with the host argument, if you are not working on your local machine and your MySQL server administrator set up the server with a different port number, then you’ll have to use that port to connect to the MySQL server. However, in this case we installed MySQL server with the default values, so localhost is a valid hostname and 3306 is a valid port number.
The db is the name of the database you want to connect to. In this case, we want to connect to the my_suppliers database because it holds the database table into which we want to load data. If in the future, you create another database on your local computer, such as contacts, then you’ll have to change my_suppliers to contacts as the db argument to connect to that database.
The user is the username of the person making the database connection. In this case, we are connecting as the “root” user, with the password we created when we installed the MySQL server. When you install MySQL (which you may have done by following the instructions in Appendix A), the MySQL installation process asks you to provide a password for the root user. The password I created for the root user, which I’m supplying to the passwd argument in the code shown here is 'my_password'. Of course, if you supplied a different password for the root user when you installed MySQL, then you should substitute your password for 'my_password' in the code in this script.
During the database, table, and new user setup steps, I created a new user, clinton, with the password secret_password. Therefore, I could also use the following connection details in the script: user='clinton' and passwd='secret_password'. If you want to leave user='root' in the code, then you should substitute the password you actually supplied when you set up the MySQL server for 'my_password'. Alternatively, you can use the username and password you supplied when you created a new user with the CREATE USER command. With these five inputs, you create a local connection to the my_suppliers database.
Line 12 creates a cursor that we can use to execute SQL statements against the Suppliers table in the my_suppliers database and to commit the changes to the database.
Lines 14–29 deal with reading the data to be loaded into the database table from a CSV input file and executing a SQL statement for each row of data in the input file to insert it into the database table. Line 14 uses the csv module to create the file_reader object. Line 15 uses the next() method to read the first row from the input file—the header row—and assigns it to the variable header. Line 16 creates a for loop for looping over all of the data rows in the input file. Line 17 creates an empty list variable called data. For each row of input, we’ll populate data with the values in the row needed for the INSERT statement in line 28. Line 18 creates a for loop for looping over all of the columns in each row. Line 19 creates an if-else statement to test whether the column index is less than four. Because the input file has five columns and the dates are in the last column, the index value for the column of dates is four. Therefore, this line evaluates whether we’re dealing with the columns that precede the last column of dates. For all of the preceding columns, with index values 0, 1, 2, and 3, line 20 converts the value to a string, strips off a dollar sign character from the lefthand side of the string if it exists, and then appends the value into the list variable, data. For the last column of dates, line 23 converts the value to a string, creates a datetime object from the string based on the input format of the string, converts the datetime object into a date object (retaining only the year, month, and day elements), and assigns the value to the variable a_date. Next, line 26 converts the date object into a string with the new format we need to load the date strings into a MySQL database (i.e., YYYY-MM-DD) and reassigns the newly formatted string to the variable a_date. Finally, line 27 appends the string into data.
Line 28 prints the row of data that’s been appended into data to the Command Prompt/Terminal window. Notice the indentation. This line is indented beneath the outer for loop, rather than the inner for loop, so that it occurs for every row rather than for every row and column in the input file. This line is helpful for debugging, but once you’re confident the code is working correctly you can delete it or comment it out so you don’t have a lot of output printed to your Command Prompt window.
Line 29 is the line that actually loads each row of data into the database table. This line uses the cursor object’s execute() method to execute an INSERT statement to insert a row of values into the table Suppliers. Each %s is placeholder for a value to be inserted. The number of placeholders should correspond to the number of columns in the input file, which should correspond to the number of columns in the table. Moreover, the order of the columns in the input file should correspond to the order of the columns in the table. The values substituted into the %s positions come from the list of values in data, which appears after the comma in the execute() statement. Because data is populated with values for each row of data in the input file and the INSERT statement is executed for each row of data in the input file, this line of code effectively reads the rows of data from the input file and loads the rows of data into the database table. Once again, notice the indentation. The line is indented beneath the outer for loop, so it occurs for every row of data in the input file. Finally, line 30 is another commit statement to commit the changes to the database.
Lines 33 to 39 demonstrate how to select all of the data from the table Suppliers and print the output to the Command Prompt/Terminal window. Lines 33 and 34 execute a SQL statement to select all of the data from the Suppliers table and fetch all of the rows of output into the variable rows. Line 35 creates a for loop for looping over each row in rows. Line 36 creates an empty list variable, row_list_output, that will contain all of the values in each row of output from the SQL query. Line 37 creates a for loop for looping over all of the columns in each row. Line 38 converts each value to a string and then appends the value into row_list_output. Finally, once all of the values from a row are in row_list_output, line 39 prints the row to the screen.
Now that we have our Python script, let’s use our script to load the data in supplier_data.csv into our Suppliers database table. To do so, type the following on the command line and then hit Enter:
python 4db_mysql_load_from_csv.py supplier_data.csv
On Windows, you should see the output shown in Figure 4-13 printed to the Command Prompt window. The first block of output is the data as it’s parsed from the CSV file, and the second block of output is the same data as it’s queried from the database table.
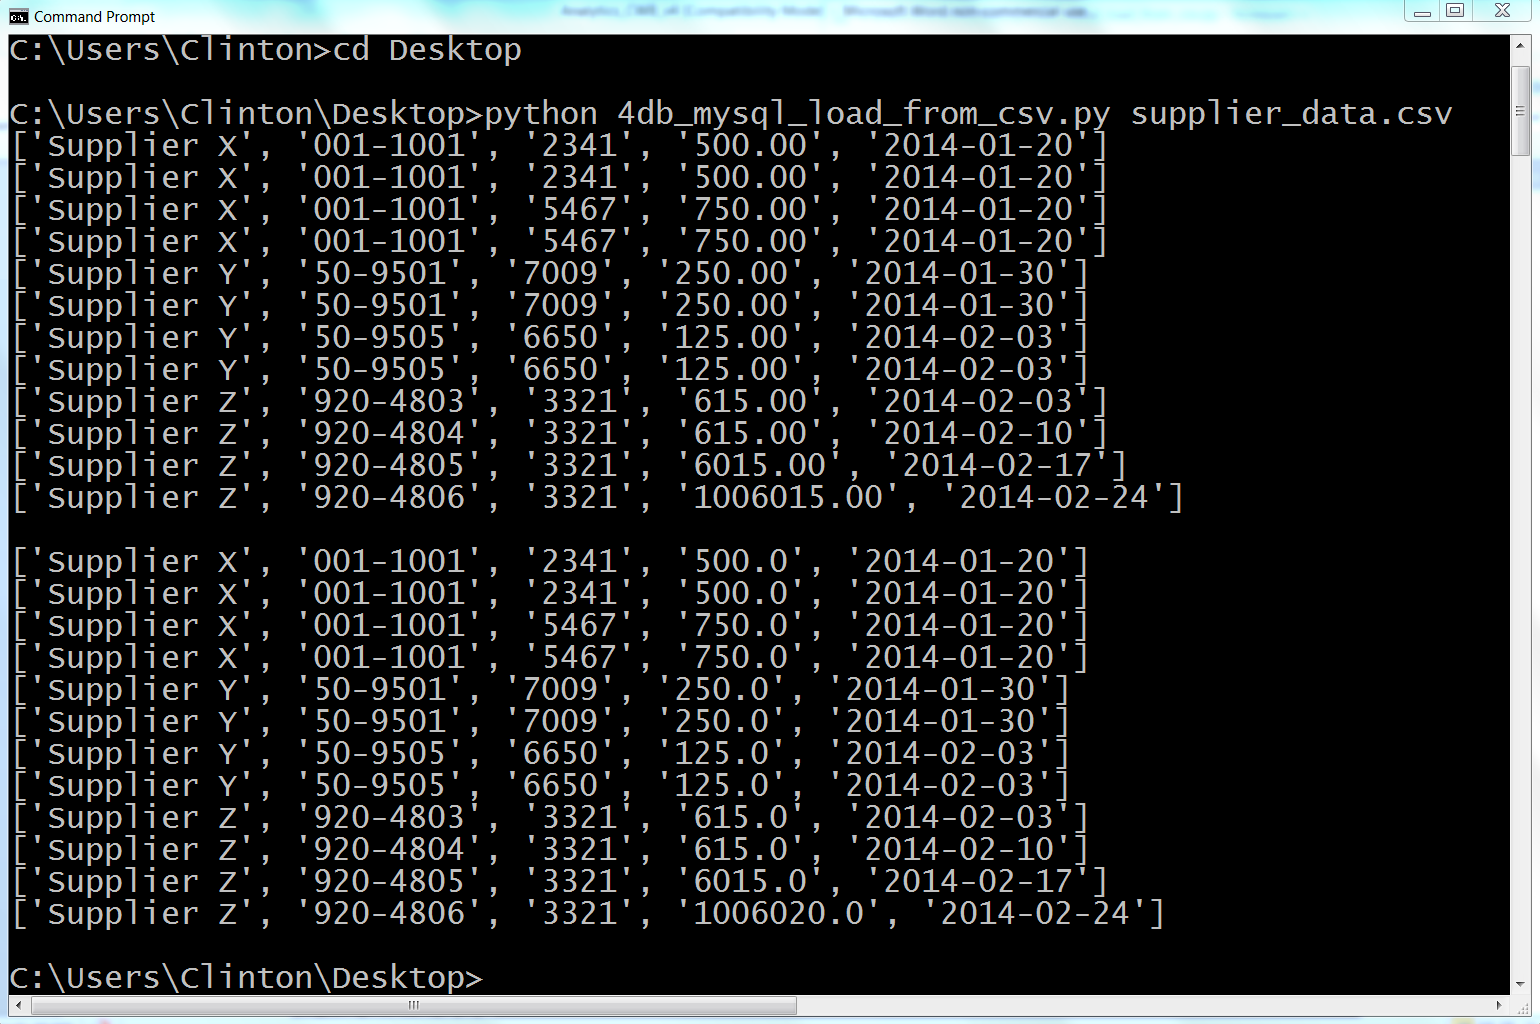
Figure 4-13. The output showing the data in the CSV file, supplier_data.csv, that is inserted into the MySQL table, Suppliers
This output shows the 12 lists of values created for the 12 rows of data, excluding the header row, in the CSV input file. You can recognize the 12 lists because each list is enclosed in square brackets ([]) and the values in each list are separated by commas.
Beneath the 12 lists of input data read from the CSV file, there is a space, and then there are the 12 rows of output that were fetched from the database table with the query, SELECT * FROM Suppliers. Again, each row is printed on a separate line and the values in each row are separated by commas. This output confirms that the data was successfully loaded into and then read from the Suppliers table.
To confirm the results in a different way, type the following into the MySQL command-line client and then hit Enter:
SELECT * FROM Suppliers;
After you hit Enter, you should see a table that lists the columns in the Suppliers database table and the 12 rows of data in each of the columns, as shown in Figure 4-14.
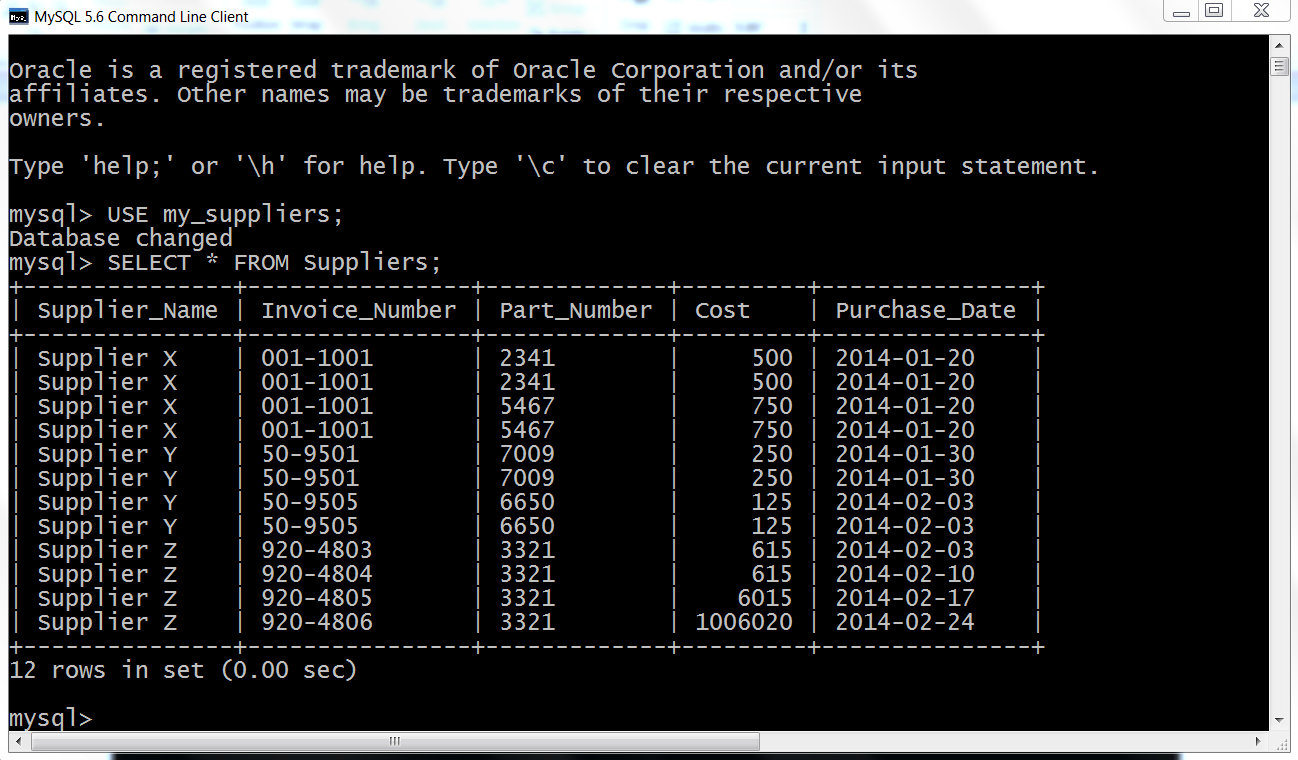
Figure 4-14. The result of querying for the data in the Suppliers table using MySQL’s command-line client
Now that we have a database table full of data, let’s learn how to query the database table and write the query output to a CSV output file with Python instead of printing the results to the screen.
Query a Table and Write Output to a CSV File
Once you have data in a database table, one of the most common next steps is to query the table for a subset of data that is useful for an analysis or answers a business question. For example, you may be interested in the subset of customers who are providing the most profit, or you may be interested in the subset of expenses that exceed a particular threshold.
Let’s create a new Python script. The script will query the Suppliers database table for a specific set of records and then write the output to a CSV output file. In this case, we want to output all of the columns of data for records where the value in the Cost column is greater than 1,000.00. To begin, type the following code into a text editor and save the file as 5db_mysql_write_to_file.py:
#!/usr/bin/env python3importcsvimportMySQLdbimportsys# Path to and name of a CSV output fileoutput_file=sys.argv[1]# Connect to a MySQL databasecon=MySQLdb.connect(host='localhost',port=3306,db='my_suppliers',\user='root',passwd='my_password')c=con.cursor()# Create a file writer object and write the header rowfilewriter=csv.writer(open(output_file,'w',newline=''),delimiter=',')header=['Supplier Name','Invoice Number','Part Number','Cost','Purchase Date']filewriter.writerow(header)# Query the Suppliers table and write the output to a CSV filec.execute("""SELECT *FROM SuppliersWHERE Cost > 700.0;""")rows=c.fetchall()forrowinrows:filewriter.writerow(row)
The lines of code in this example are nearly a subset of the lines of code in the previous example, so I will emphasize the new lines.
Lines 2, 3, and 4 import the csv, MySQLdb, and sys modules, respectively, so we can use their methods to interact with a MySQL database and write query output to a CSV file.
Line 6 uses the sys module to read the path to and name of a file on the command line and assigns that value to the variable output_file.
Line 8 uses the MySQLdb module’s connect() method to connect to my_suppliers, the MySQL database we created earlier in this chapter. Line 10 creates a cursor that we can use to execute SQL statements against the Suppliers table in the my_suppliers database and to commit the changes to the database.
Line 12 uses the csv module’s writer() method to create a writer object called file_writer.
Line 13 creates a list variable called header that contains five strings that correspond to the column headings in the database table. Line 14 uses the filewriter’s writerow() method to write this list of strings, separated by commas, to the CSV-formatted output file. The database query will only output the data, not the column headings, so these lines of code ensure that the columns in our output file have column headings.
Lines 16 to 18 are the query that selects all of the columns for the subset of rows where the value in the Cost column is greater than 700.0. The query can flow over multiple lines because it is contained between triple double quotation marks. It is very useful to enclose your query in triple double quote so that you can format your query for readability.
Lines 19 to 21 are very similar to the lines of code in the previous example, except instead of printing the output to the Command Prompt/Terminal window, line 21 writes the output to a CSV-formatted output file.
Now that we have our Python script, let’s use our script to query specific data from our Suppliers database table and write the output to a CSV-formatted output file. To do so, type the following on the command line and then hit Enter:
python 5db_mysql_write_to_file.py output_files\5output.csv
You won’t see any output printed to the Command Prompt or Terminal window, but you can open the output file, 5output.csv, to review the results.
As you’ll see, the output file contains a header row with the names of the five columns, as well as the four rows in the database table where the value in the Cost column is greater than 700.0. Excel reformats the dates in the Purchase Date column to M/DD/YYYY, and the values in the Cost column do not contain commas or dollar signs, but it is easy to reformat these values if necessary.
Loading data into a database table and querying a database table are two common actions you take with database tables. Another common action is updating existing rows in a database table. The next example covers this situation, explaining how to update existing rows in a table.
Update Records in a Table
The previous examples explained how to add rows to a MySQL database table at scale using a CSV input file and write the result of a SQL query to a CSV output file. But sometimes, instead of loading new data into a table or querying a table you need to update existing rows in a table.
Fortunately, we can reuse the technique of reading data from a CSV input file to update existing rows in a table. In fact, the technique of assembling a row of values for the SQL statement and then executing the SQL statement for every row of data in the CSV input file remains the same as in the earlier example. The SQL statement is what changes. It changes from an INSERT statement to an UPDATE statement.
Because we’re already familiar with how to use a CSV input file to load data into a database table, let’s learn how to use a CSV input file to update existing records in a MySQL database table. To do so, type the following code into a text editor and save the file as 6db_mysql_update_from_csv.py:
1#!/usr/bin/env python32importcsv3importMySQLdb4importsys5 6# Path to and name of a CSV input file7input_file=sys.argv[1]8# Connect to a MySQL database9con=MySQLdb.connect(host='localhost',port=3306,db='my_suppliers',\ 10user='root',passwd='my_password')11c=con.cursor()12 13# Read the CSV file and update the specific rows14file_reader=csv.reader(open(input_file,'r',newline=''),delimiter=',')15header=next(file_reader,None)16forrowinfile_reader:17data=[]18forcolumn_indexinrange(len(header)):19data.append(str(row[column_index]).strip())20(data)21c.execute("""UPDATE Suppliers SET Cost=%s, Purchase_Date=%s\22WHERE Supplier_Name=%s;""",data)23con.commit()24# Query the Suppliers table25c.execute("SELECT * FROM Suppliers")26rows=c.fetchall()27forrowinrows:28output=[]29forcolumn_indexinrange(len(row)):30output.append(str(row[column_index]))31(output)
All of the code in this example should look very familiar. Lines 2–4 import three of Python’s built-in modules so we can use their methods to read a CSV input file, interact with a MySQL database, and read command line input. Line 7 assigns the CSV input file to the variable input_file.
Line 10 makes a connection to the my_suppliers database with the same connection parameters we used in the previous examples, and line 12 creates a cursor object that can be used to execute SQL queries and commit changes to the database.
Lines 15–24 are nearly identical to the code in the first example in this chapter. The only significant difference is in line 22, where an UPDATE statement has replaced the previous INSERT statement. The UPDATE statement is where you have to specify which records and column attributes you want to update. In this case, we want to update the Cost and Purchase Date values for a specific set of Supplier Names. Like in the previous example, there should be as many placeholder %s as there are values in the query, and the order of the data in the CSV input file should be the same as the order of the attributes in the query. In this case, from left to right, the attributes in the query are Cost, Purchase_Date, and Supplier_Name; therefore, the columns from left to right in the CSV input file should be Cost, Purchase Date, and Supplier Name.
Finally, the code in lines 27–32 is basically identical to the same section of code in the earlier example. These lines of code fetch all of the rows in the Suppliers table and print each row to the Command Prompt or Terminal window, with a single space between column values.
Now all we need is a CSV input file that contains all of the data we need to update some of the records in our database table:
-
Open Excel.
-
Add the data in Figure 4-15.
-
Save the file as data_for_updating_mysql.csv.

Figure 4-15. Example data for a CSV file named data_for_updating_mysql.csv, displayed in an Excel worksheet
Now that we have our Python script and CSV input file, let’s use our script and input file to update specific records in our Suppliers database table. To do so, type the following on the command line and then hit Enter:
python 6db_mysql_update_from_csv.py data_for_updating_mysql.csv
On windows, you should see the output shown in Figure 4-16 printed to the Command Prompt window. The first two rows are the data in the CSV file, and the remaining rows are the data in the table after the records have been updated.
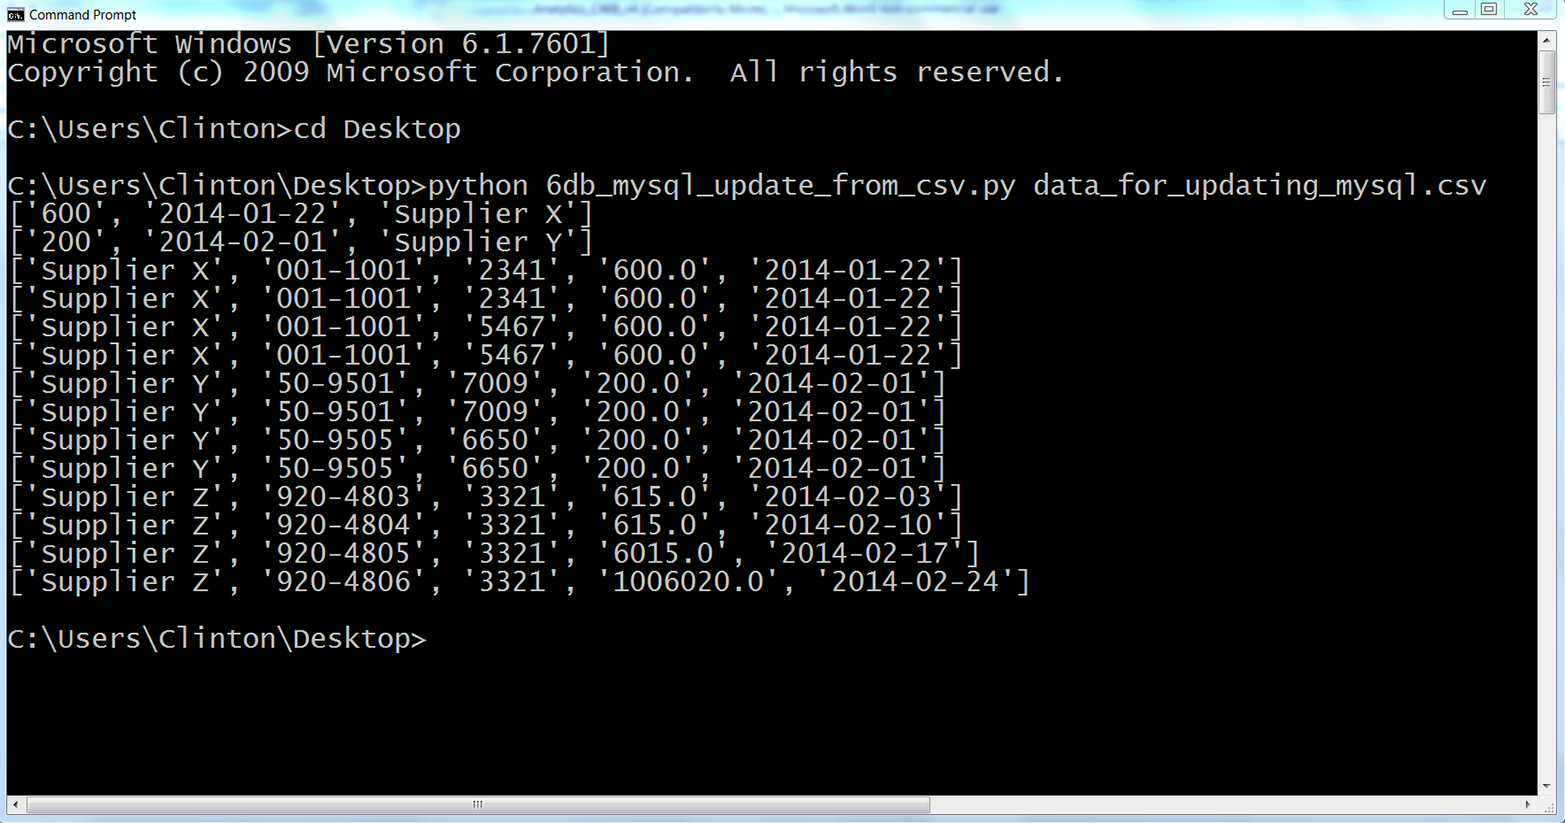
Figure 4-16. The result of using data from a CSV file to update rows in a MySQL database table
This output shows the two lists of values created for the two rows of data, excluding the header row, in the CSV input file. You can recognize the two lists because each list is enclosed in square brackets ([]) and the values in the lists are separated by commas. For Supplier X, the Cost value is 600 and the Purchase Date value is 2014-01-22. For Supplier Y, the Cost value is 200 and the Purchase Date value is 2014-02-01.
Beneath the two lists, the output also shows the 12 rows fetched from the database table after the updates were executed. Each row is printed on a separate line, and the values in each row are separated by single spaces. Recall that the original Cost and Purchase Date values for Supplier X were 500 and 750 and 2014-01-20, respectively. Similarly, the original Cost and Purchase Date values for Supplier Y were 250 and 125 and 2014-01-30 and 2013-02-03, respectively. As you can see in the output printed to the Command Prompt window, these values have been updated for Supplier X and Supplier Y to reflect the new values supplied in the CSV input file.
To confirm that the eight rows of data associated with Supplier X and Supplier Y have been updated in the MySQL database table, return to the MySQL command-line client, type the following, and then hit Enter:
SELECT * FROM Suppliers;
After you hit Enter, you should see a table that lists the columns in the Suppliers database table and the 12 rows of data in each of the columns, as in Figure 4-17. You can see that the eight rows associated with Supplier X and Supplier Y have been updated to reflect the data in the CSV input file.
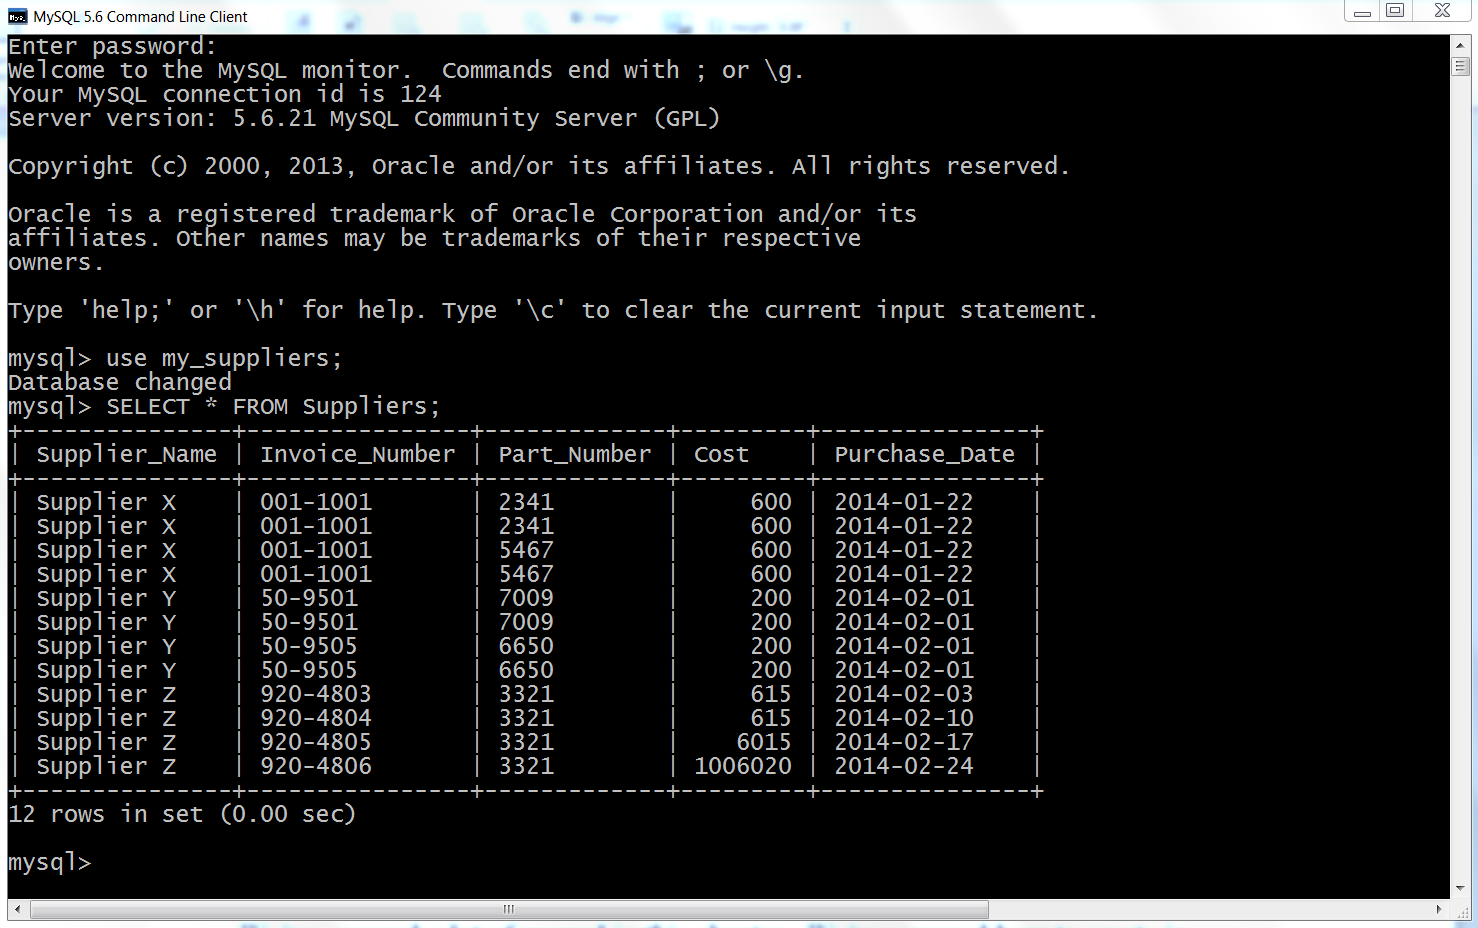
Figure 4-17. The result of querying for the data in the Suppliers table after the records have been updated using MySQL’s command-line client
We’ve covered a lot of ground in this chapter. We discussed how to create in-memory and persistent databases with sqlite3 and interact with tables in those databases, and we saw how to create MySQL databases and tables, access MySQL databases and tables with Python, load data from a CSV file into a MySQL database table, update records in a MySQL database table with data from a CSV file, and write query output to a CSV output file. If you’ve followed along with the examples in this chapter, you have written six new Python scripts!
The best part about all of the work you have put into working through the examples in this chapter is that you are now well equipped to access data in databases, one of the most common data repositories in business. This chapter focused on the MySQL database system, but as we discussed at the beginning of this chapter, there are many other database systems used in business today. For example, you can learn about the PostgreSQL database system, and you can find information about a popular Python connection adapter for PostgreSQL at both the Psycopg and PyPI websites. Similarly, you can learn about the Oracle database system, and there is information about an Oracle connection adapter at SourceForge and PyPI. In addition, there is a popular Python SQL toolkit called SQLAlchemy that supports both Python 2 and 3 and includes adapters for SQLite, MySQL, PostgreSQL, Oracle, and several other database systems.
At this point, you’ve learned how to access, navigate, and process data in CSV files, Excel workbooks, and databases, three of the most common data sources in business. The next step is to explore a few applications to see how you can combine these new skills to accomplish specific tasks. First, we’ll discuss how to find a set of items in a large collection of files. The second application demonstrates how to calculate statistics for any number of categories in an input file. Finally, the third application demonstrates how to parse a text file and calculate statistics for any number of categories. After working through these examples, you should have an understanding of how you can combine the skills you’ve learned throughout the book to accomplish specific tasks.
Chapter Exercises
-
Practice loading data from a CSV file into a database table by creating a new table, creating a new input file, and writing a new Python script that loads the input data into the table, either in SQLite3 or MySQL.
-
Practice querying a database table and writing the results to a CSV output file, either in SQLite3 or MySQL. Create a new Python script that has a new query to extract data from one of the tables you’ve created. Incorporate and modify the code from the MySQL script that demonstrates how to write to an output file to write a relevant header row and the data from your query.
-
Practice updating records in a database table with data from a CSV file, either in SQLite3 or MySQL. Create a new database table and load data into the table. Create a new CSV file with the data needed to update specific records in the table. Create a new Python script that updates specific records in your table with the data from the CSV file.
1 You can learn more about CRUD operations at http://en.wikipedia.org/wiki/Create,_read,_update_and_delete.
2 SQL injection attacks are malicious SQL statements that an attacker uses to obtain private information or damage data repositories and applications. You can learn more about SQL injection attacks at http://en.wikipedia.org/wiki/SQL_injection.
3 These packages are available at the Python Package Index.
Get Foundations for Analytics with Python now with the O’Reilly learning platform.
O’Reilly members experience books, live events, courses curated by job role, and more from O’Reilly and nearly 200 top publishers.

