Chapter 1. Getting Started
Google Compute Engine is a service that provides virtual machines (VMs) that run on Google’s infrastructure. You can create VMs with a variety of configurations using a number of available operating systems. The instance’s data is stored and maintained on persistent block storage that is replicated for redundancy and persists beyond the life cycle of the VM. Network access can be configured to allow your virtual machines to talk to each other, the Internet, or your own private network.
Google Compute Engine provides a variety of tools you can use to interact with and manage your Compute Engine instances and configurations; for example, you can start and stop instances, attach disk storage, and configure network access using each of these access points. The tools include the Google Developers Console (http://console.developers.google.com), which provides a web-based user interface (UI) with HTML forms for instance creation and configuration; gcloud compute, a command-line interface that can be used interactively or in scripts for simple automation; and the Compute Engine API, a RESTful API for integration into your own code and cloud-management applications.
To start working with Google Compute Engine, you first need to create a Compute Engine project in the Developers Console. A Compute Engine project is a collection of information about your application and acts as a container for your Compute Engine resources and configurations. Disks, firewalls, networks, and instances are all associated with and contained within a single project. Billing is applied to a project based on the amount of resources used. Team members can be added to the project with specific permissions for access to the project’s Compute Engine resources.
In this chapter, we’ll show you how to use the Developers Console to create a new Compute Engine project, enable billing on the project, and add team members to the project. We’ll then take a high-level look at Compute Engine’s resources. Finally, we’ll show you how to get started working with Compute Engine’s tools and API.
Creating a Compute Engine Project
To access the Google Developers Console, first open up your favorite browser and go to the following URL:
http://console.developers.google.com
Note
This book does not cover all features of the Developers Console. To learn more about the console, see the online documentation: https://developers.google.com/console/help/new/.
Log in with your Gmail account if prompted, and read and accept the terms of use.
If this is your first time visiting the Developers Console, your project list will be empty. Create a new project by clicking on the Create Project button. This new project will be your Compute Engine project. The Developers Console opens a dialog box asking for a project name and project ID (see Figure 1-1). These fields default to My Project and a random, unique Project ID. Specify a new name and ID or keep the defaults, read and accept any terms of service, and click Create. Your new project will now be created.
Note
Please note that the Developer Console’s UI may change over time, and the screenshots in this book might not exactly match the UI.

Figure 1-1. Form displayed when creating a new project via the Developers Console
If you’ve worked with Google’s APIs before and are familiar with the Google Developers Console, feel free to use an existing project. Note that billing must be enabled on the project before you can start using Compute Engine, which we’ll cover in the next section.
Enabling Billing
Now that you have a project, billing must be enabled before you can start working with Compute Engine.
Note
Completing the examples in this book may incur charges. Please review the pricing documentation of the various products used in the examples. To limit your expenses, make sure to delete any resources you do not need.
To enable billing, select Billing in the lefthand navigation. Then, follow the steps in the UI to create a new billing account.
Adding Team Members
All new projects have three existing members: one member associated with your Google Account and two special identities called service accounts, which are useful when developing server-to-server applications. Using a service account, an application can identify itself to a Google API on behalf of itself without any end-user involvement. Service accounts will be covered in more detail in Chapter 2, and you can also learn more online: https://developers.google.com/accounts/docs/OAuth2ServiceAccount.
The console allows you to add team members to your project with view, edit, or ownership permissions. To add team members, select Permissions in the lefthand navigation.
Click the Add Member button at the top of the screen. Enter the email address of the team member you want to add, and select the appropriate permission level for that member (see Figure 1-2). “Can view” gives the team member read access to your project settings and Compute Engine resources. “Can edit” gives the team member write access to your project settings and Compute Engine resources (including adding and deleting resources). “Is owner” gives the team member all edit permissions, plus the ability to manage project settings and team members.
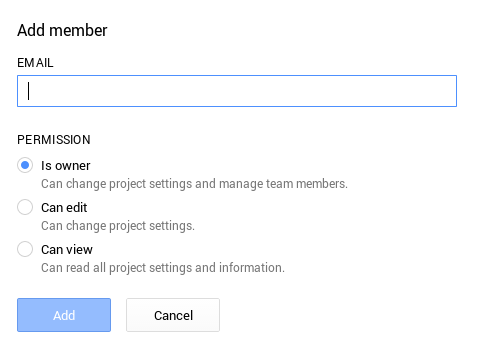
Figure 1-2. Add member form
Compute Engine Resources
Now that you created a Compute Engine project, let’s take a look at the Compute Engine resources with which you’ll be working.
To understand Compute Engine’s resources, you must first understand the instance resource (i.e., your virtual machine, or VM). The instance resource utilizes all of Compute Engine’s other resources, such as disks, networks, and images, for additional functionality. For example, disk resources provide storage to your instance, and network resources route traffic to and from your instance. Resources available for instance configuration include:
- Image
- The base software for a hosted virtual machine, including the operating system and all associated system and application software
- Disk
- A disk provides storage for your Compute Engine instances
- Snapshot
- A copy of the contents of an existing persistent disk (i.e., an image copy)
- Network
- Set of rules defining how an instance interacts with other instances, other networks, and the Internet
- Firewall
- A single rule defining how an instance can accept incoming traffic1
- Route
- A table which determines how traffic destined for a certain IP should be handled
- Address
- A static IP address for your instances
- Machine type
- A hardware configuration dictating the number of cores and available memory for a given instance
All resources are owned by a single project. Within that project, resources are available at different hierarchical levels (a.k.a. scopes). Currently, there are three scopes: global, regional, and zonal. Resources within the global scope are available to resources within the same project (in other words, they are globally available within that project). Resources within the regional scope are available to other resources within the same region. Finally, resources within the zonal scope are available to other resources within the same zone. The current breakdown of resource levels is as follows:
- Global resources
- Image, snapshot, network, firewall, route
- Regional resources
- Address
- Zone resources
- Instance, machine type, disk
Manage Compute Engine Resources
Now that you have an understanding of Compute Engine’s resources, let’s take a look at the tools and access points available for managing these resources. Compute Engine offers several options for resource management that fit your specific needs. If you prefer using a rich user interface, the Google Developers Console offers a web UI to start, configure, and stop your VMs. If bash scripting is your preference, gcloud compute provides a command-line interface to manage your GCE resources. Finally, the Compute Engine API provides a RESTful interface for all your programming needs. In this section, we’ll take a look at how to get started using each tool.
Google Developers Console
The Google Developers Console provides a web interface (see Figure 1-3) through which you can manage your Compute Engine instances and resources. To get started, click Compute > Compute Engine > “VM instances” in the lefthand navigation.

Figure 1-3. Compute Engine UI in the Developers Console
The lefthand navigation should now be displaying links to various Compute Engine resources. We’ll take a closer look at the VM instances, zones, operations, and quotas sections.
VM Instances
Once you have started your first instance, you will have the option to view usage graphs showing your instances’ CPU utilization, network traffic, and disk traffic (see Figure 1-4). You can also create a new instance by clicking the “New instance” button at the top of the screen. We’ll cover instances in more detail in Chapter 2, including how to create a new instance using the Developers Console.
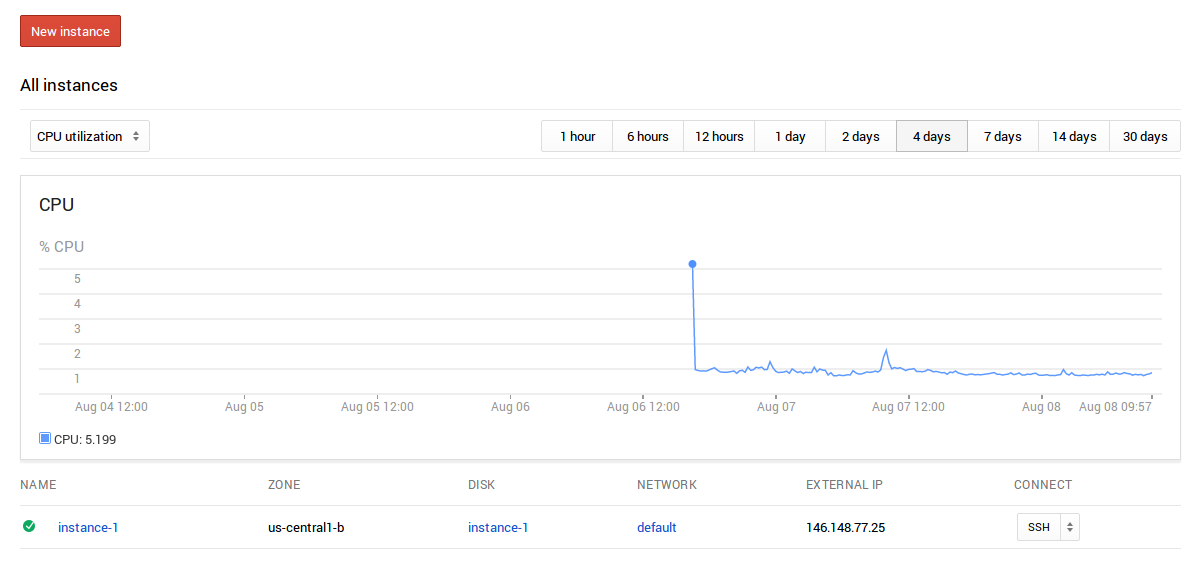
Figure 1-4. VM instances section in the Developers Console
Zones
The Zones section provides valuable information about planned outages for the zones available to your project (see Figure 1-5). You can also see how many instances you have running in each zone to help you manage your resources appropriately.
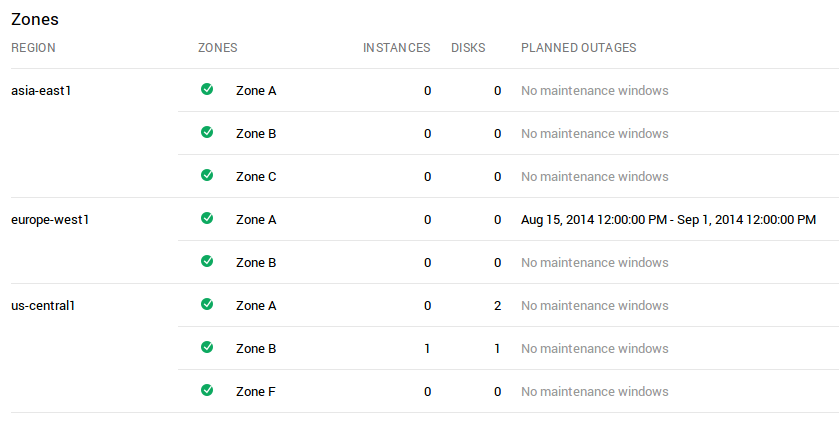
Figure 1-5. Zones section in the Developers Console
Operations
Every request submitted via the API generates an asynchronous transaction, called an operation. Examples include adding or deleting instances, reserving static IP addresses, or attaching persistent disks instances. The Operations tab of the Developers Console can be used to examine your completed and in-progress operations, which can be useful for debugging. If an operation failed for any reason, a red exclamation mark is displayed next to the operation, and the status will display the error message (see Figure 1-6).
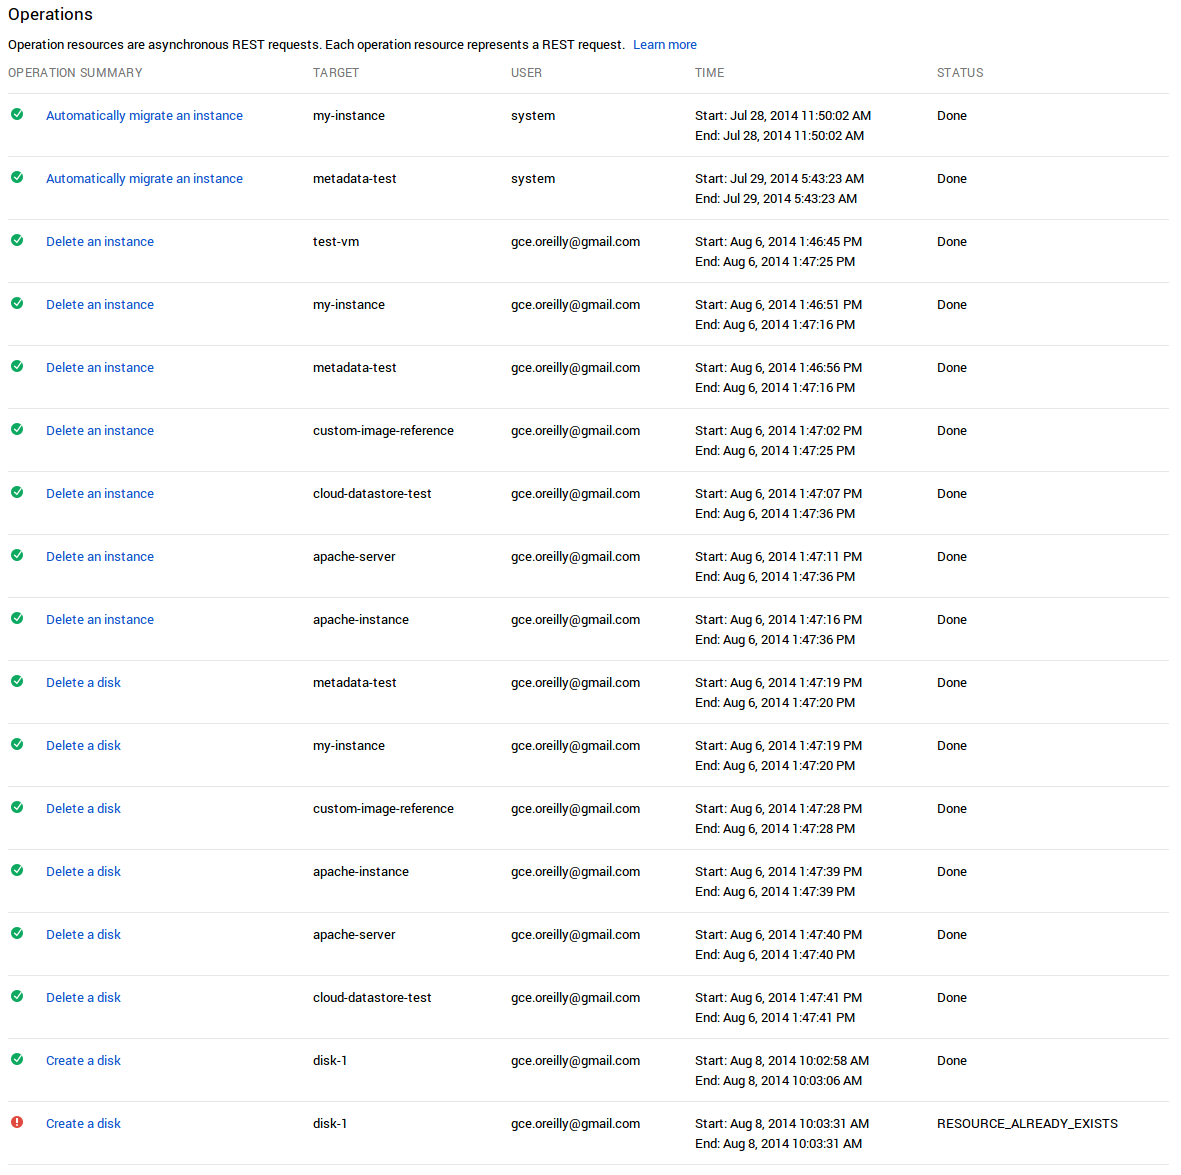
Figure 1-6. Operations tab in the Developers Console
You can click the operation to get more details about its status (see Figure 1-7). The resulting page shows the progress of the operation, the user who performed the operation, and any errors that occurred during the operation (see Figure 1-8).
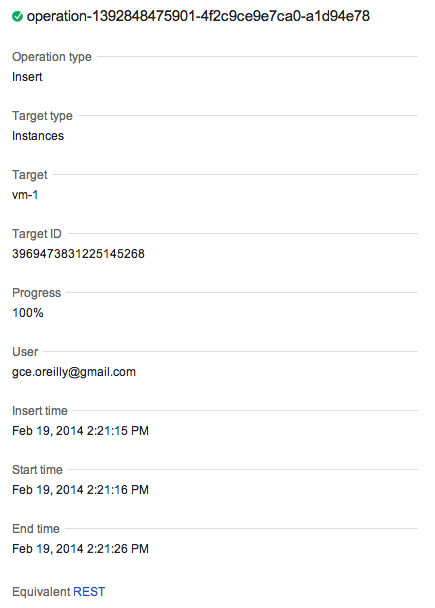
Figure 1-7. Operation information
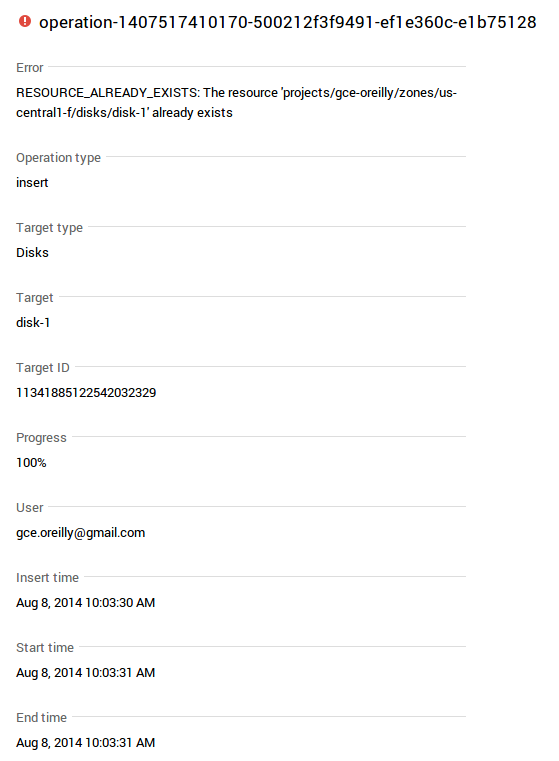
Figure 1-8. Operation information for an operation that failed
Quotas
The Quotas section provides a summary of the number of resources available for your project and the number of resources in use (see Figure 1-9).
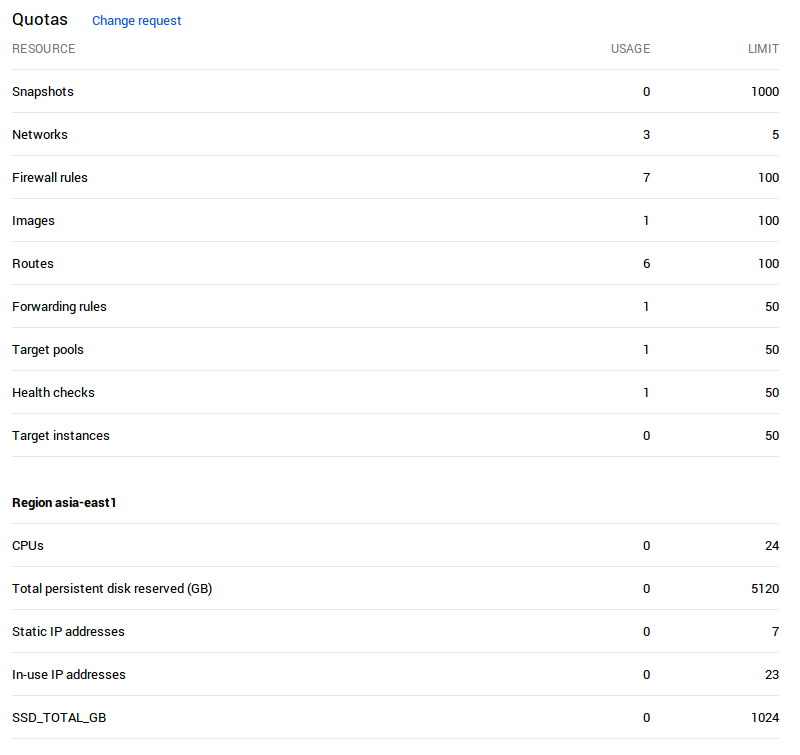
Figure 1-9. Quotas tab in the Developers Console
The Change request link at the top of the page links to a form where you can request increased quota.
Cloud SDK
The Cloud SDK (https://cloud.google.com/sdk/) contains multiple tools and libraries that allow you to interact with Google Cloud Platform. For example, the Cloud SDK contains gsutil, a command-line tool for managing your Cloud Storage buckets and objects, and bq, a command-line tool for working with and querying your BigQuery datasets.
Similar to gsutil and bq, the Cloud SDK also contains a tool called gcloud compute that provides a command-line interface for managing your Compute Engine resources. Similar to the UI, gcloud compute allows you to start or stop instances, add or remove persistent disks, and create or destroy firewalls. gcloud compute is useful for learning how Compute Engine works and also for writing bash scripts to control your Compute Engine resources.
We’ll use gcloud compute and gsutil throughout the remainder of this book, so let’s take a look at how to download and install the Cloud SDK.
Install on Windows
Download the Google Cloud SDK installer for Windows from here:
https://dl.google.com/dl/cloudsdk/release/GoogleCloudSDKInstaller.exe
Launch the downloaded GoogleCloudSDKInstaller.exe installer and follow the prompts.
When the installation finishes, open a command prompt (cmd.exe) or the Google Cloud SDK Shell from the Desktop or Start Menu to start using the tools provided in the Cloud SDK.
Authorize
Once the SDK is downloaded and installed, you must go through the authorization flow in order to give the Cloud SDK access to your account. Use the gcloud auth login command to perform authorization:
$ gcloud auth login
The gcloud auth login command uses the OAuth 2.0 authorization flow to authorize your account to Google’s Cloud services. You can revoke the credentials at any time using the gcloud auth revoke command, replacing <account> with the account name:
$ gcloud auth revoke <account>
Set the project ID
After completing the authorization flow, make sure to enter the ID of your Cloud project using the following command:
$ gcloud config set project <project>
The project ID is equivalent to the project ID you entered when creating the project via the Developers Console. You can find the project ID in the Developers Console on the project list page under the PROJECT ID column. You will be using this project ID for exercises throughout the remainder of this book, so make sure to take note of its value.
Use gcloud compute
Now that you have gone through the OAuth 2.0 flow and set the project ID, you can start using gcloud compute to access your Compute Engine resources. Let’s start with a simple example. We’ll use gcloud compute to retrieve information about our newly created project. Open a shell or Terminal window and run the following command:
$ gcloud compute project-info describe --format=json
The output will be similar to the following:
{"commonInstanceMetadata":{"fingerprint":"Arv4IW4Njmk=","items":[{"key":"sshKeys","value":"gce_oreilly..."}],"kind":"compute#metadata"},"creationTimestamp":"2014-01-10T13:04:30.298-08:00","description":"","id":"8306025255376467278","kind":"compute#project","name":"gce-oreilly","quotas":[{"limit":1000.0,"metric":"SNAPSHOTS","usage":0.0},{"limit":5.0,"metric":"NETWORKS","usage":3.0},{"limit":100.0,"metric":"FIREWALLS","usage":7.0},{"limit":100.0,"metric":"IMAGES","usage":1.0},{"limit":100.0,"metric":"ROUTES","usage":6.0},{"limit":50.0,"metric":"FORWARDING_RULES","usage":1.0},{"limit":50.0,"metric":"TARGET_POOLS","usage":1.0},{"limit":50.0,"metric":"HEALTH_CHECKS","usage":1.0},{"limit":50.0,"metric":"TARGET_INSTANCES","usage":0.0}],"selfLink":"https://www.googleapis.com/compute/v1/projects/gce-oreilly"}
The output contains information about your Compute Engine project, including quotas and creation time. Because the --format flag was set to JSON, the results were printed as JSON. You can also specify a format of YAML or text.
gcloud compute has a comprehensive help library available that provides valuable information about its usage. To see the full list of available commands and their functions, run the gcloud compute command with the --help flag:
$ gcloud compute --help
We’ll use gcloud compute throughout the remainder of this book to manage your Compute Engine resources, including starting and stopping instances, but first let’s take a look at the Compute Engine API.
Compute Engine API
Compute Engine’s API allows you to build a multitude of tools and applications to manage your Compute Engine resources. It provides an access point for integration with Cloud Management solutions, open source Cloud service libraries, and/or your own Cloud tooling libraries. In fact, both gcloud compute and the Compute Engine portion of the Developers Console are built using this API.
The Compute Engine API has a RESTful interface. HTTP requests are used to list, start, and stop instances, add firewalls and networks, and update instance metadata or tags. The base URL of the API is:
https://www.googleapis.com/compute/<version>/
A version of the API needs to be specified in the URL. As of the writing of this book, the current version is v1. The API version is subject to change with new releases. Check online for the latest version: https://developers.google.com/compute/docs/reference/latest/.
The Compute Engine API Compute Engine Resources are represented as JSON objects in the API. The keys and values of the JSON object provide information about the resource it represents. For example, the JSON object representing an instance contains fields for the machine type, zone, tags, and disks. Here’s the structure of a full instance JSON object, along with the available fields and data type of each field:
{"kind":"compute#instance","id":unsignedlong,"creationTimestamp":string,"zone":string,"status":string,"statusMessage":string,"name":string,"description":string,"tags":{"items":[string],"fingerprint":bytes},"machineType":string,"canIpForward":boolean,"networkInterfaces":[{"network":string,"networkIP":string,"name":string,"accessConfigs":[{"kind":"compute#accessConfig","type":string,"name":string,"natIP":string}]}],"disks":[{"kind":"compute#attachedDisk","index":integer,"type":string,"mode":string,"source":string,"deviceName":string,"boot":boolean,"initializeParams":{"diskName":string,"sourceImage":string,"diskSizeGb":long,"diskType":string},"autoDelete":boolean,"licenses":[string]}],"metadata":{"kind":"compute#metadata","fingerprint":bytes,"items":[{"key":string,"value":string}]},"serviceAccounts":[{"email":string,"scopes":[string]}],"selfLink":string,"scheduling":{"onHostMaintenance":string,"automaticRestart":boolean}}
Using the API, your application can perform many actions on Compute Engine resources, such as inserting a new resource, listing the available resources within your project, updating a particular resource, or deleting a resource. There are also custom actions that can be performed on specific resources, such as adding a disk to an instance. These actions are performed via HTTP requests to the Compute Engine API. Each resource has its own unique URL to which HTTP requests are made to perform these actions.
There are two URL parameters to consider when making HTTP requests to interact with your Compute Engine resources. The first parameter is the project name. Because all Compute Engine resources are contained within a project, the project name must be specified in the URL. The URL syntax is as follows (substitute <project> with your project ID):
https://www.googleapis.com/compute/v1/projects/<project>
The second URL parameter is the hierarchical level (scope) at which the resource is available. As described earlier in this chapter, all Compute Engine resources are contained within one of three scopes: global, regional, and zonal. When making an HTTP request to the Compute Engine API to interact with your resources, the scope is specified in the URL. The URL syntax for global resources is as follows:
https://www.googleapis.com/compute/v1/projects/<project>/global
The URL for regional resources is as follows (substitute <region> with the name of the region in which the resource resides, for example, us-central1):
https://www.googleapis.com/compute/v1/projects/<project>/regions/<region>
The URL for zonal resources is as follows (substitute <zone> with the name of the zone in which the resource resides, for example, us-central1-a):
https://www.googleapis.com/compute/v1/projects/<project>/zones/<zone>
Let’s take a look at the instance resource for an example of the types of HTTP requests that can be made using the API. Instances are a zonal resource, so the URL must be scoped according to the zone in which the instance resides or will reside. To work with instances in the zone us-central1-a owned by a project called my-compute-project, use the following URL endpoint:
https://www.googleapis.com/compute/v1/projects/my-compute-project/zones/us-central1-a/instances
To start a new instance in the project my-compute-project, issue a POST HTTP request to this URL, sending an Instance JSON resource as the body of the request. To list all instances in my-compute-project and running in zone us-central1-a, send a GET HTTP request to the same URL.
To perform actions on a specific instance, the instance name is appended to the end of the URL. For example, if we have an instance named my-instance, the URL endpoint would look as follows:
To retrieve the JSON document representing the VM named “my-instance,” send a GET HTTP request to this URL. To destroy the VM named “my-instance,” send a DELETE HTTP request to the same URL.
So far, we’ve been using standard HTTP methods to perform actions on Compute Engine instances. Some resources have custom actions that require the addition of the method (i.e., verb) to the end of the resource URL. As an example, attaching a disk to an instance requires a custom verb called attachDisk. The URL for this action is as follows (using my-instance as our example):
A POST HTTP request is made to this URL with a Disk JSON resource sent as the body of the request.
You can find a full API reference for all Compute Engine resources within the online documentation: https://developers.google.com/compute/docs/reference/latest/. You can also test out the API online using the Google APIs Explorer: https://developers.google.com/apis-explorer/#p/compute/v1/.
Authorization
Authorization is required when interacting with Compute Engine resources via the API. The Compute Engine API uses OAuth 2.0 for authorization, which is the standard authorization mechanism used by most Google APIs. At its most basic level, OAuth 2.0 provides an access token to your application so it can access your or your users’ Compute Engine resources. The access token is obtained via the OAuth “flow.” The general steps of the flow vary according to the type of application you’re building. Application types include client side (JavaScript), installed (such as an Android app or command-line interface), or server to server.
Let’s take a look at the OAuth 2.0 flow for installed applications, as the majority of the samples in this book are installed apps. The basic steps for this type of OAuth flow are as follows:
-
A user accesses your application.
-
Your application redirects the user to the Google Authorization Server via a web browser, sending a variety of parameters along with the request. These parameters include:
-
A client ID, which the application uses to identify itself to Google, and
-
The scope(s), which indicate(s) what API and what level of access is being requested (most frequently either read or read/write).
-
-
The Google Authorization Server prompts the user to first log in (if not already logged in) and then asks the user to grant your application access to their Compute Engine resources.
-
When access is granted, the Google Authorization Server provides your application with an authorization code.
-
The application exchanges the authorization code for an access token by sending an HTTP request to the Google Authorization Server. Parameters for this request include:
-
The authorization code obtained in step 4,
-
The client ID, and
-
The client secret, which is a secret string shared between your application and Google that proves your application is allowed to make requests on behalf of the user (make sure to keep the secret a secret!).
-
-
The access token acquired in step 5 is then sent as an
Authorization: BearerHTTP header when making Compute Engine API calls. -
The access token is short-lived. Once expired, the user will have to go through steps 1–4 again. If long-term access is required without user intervention, a refresh token can also be retrieved from the Google Authorization Server. The refresh token lasts indefinitely (until revoked by the user) and can be used to programmatically request new access tokens from the Authorization Server.
Notice that a client ID and secret are required for requests that your application sends to the Google Authorization Server. Let’s create a client ID and secret now, which you will use for the samples in this book.
Point your browser to the Developers Console URL:
http://console.developers.google.com
Select your project from the list. In the lefthand navigation, expand the APIS & AUTH section, and select Credentials from the list. The Credentials section of the Developers Console displays all client IDs and API keys that have been created for your project (see Figure 1-10).
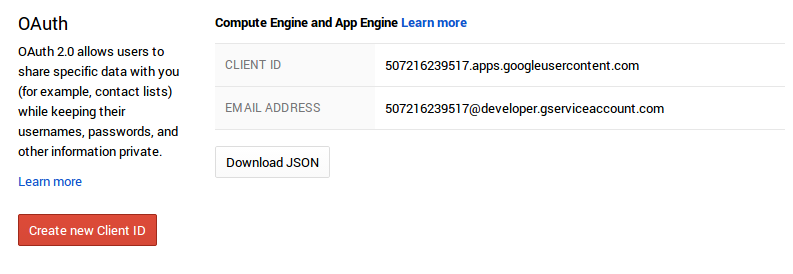
Figure 1-10. Credentials section of the Developers Console
Create a new client ID by clicking the “Create new Client ID” button. A dialog box will open with several options that reflect the type of application you’re building (see Figure 1-11).
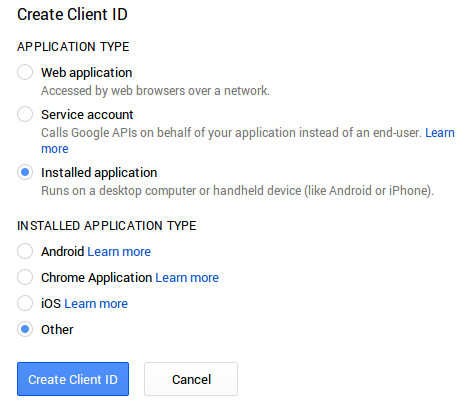
Figure 1-11. Create client ID dialog box
Select “Installed application” from the list of Application Types and Other from the list of Installed Application Types. Click the Create Client ID button. A new client ID for a native application will show up in your list of OAuth Client IDs.
Because this client ID will be used in the samples throughout this book, let’s download the associated JSON file. To do so, click the Download JSON button, and then rename the downloaded file to client_secret.json. The downloaded file contains a JSON dictionary with your client ID, secret, redirect URIs, and some other OAuth 2.0 information. The JSON dictionary is structured so that can be used directly with Google’s API Client Libraries, which will be discussed in the next sections.
There’s a lot more information about OAuth 2.0 that will not be covered in this book, including different OAuth 2.0 flows and service accounts. See the online documentation to learn more: https://developers.google.com/accounts/docs/OAuth2 or check out Ryan Boyd’s book Getting Started with OAuth 2.0 (ISBN: 9781449311605, http://shop.oreilly.com/product/0636920021810.do).
Google API libraries
Google has developed a convenient set of libraries that simplify both the OAuth 2.0 flow and the HTTP requests to all of Google’s APIs, including the Compute Engine API. The libraries are available in a variety of languages, such as Java, Python, JavaScript, and Ruby. The libraries are available from the Google APIs Client Library page in the Compute Engine online documentation (https://developers.google.com/compute/docs/api/libraries).
My first Compute Engine application
Let’s take a look at how to use the Python Google API Client Library to make an HTTP request to the Compute Engine API to retrieve information about your project.
Note
Python is normally natively available on Linux and Mac OS X systems, but Microsoft Windows users will need to download and install the Python interpreter (from http://www.python.org) before running the Python code samples throughout this book.
For the first part of this exercise, we’ll review and run the code in the ch1-1.py file in the gce-oreilly GitHub repository (https://github.com/GoogleCloudPlatform/gce-oreilly/blob/master/ch1-1.py). Get a copy of this file however you like, and then make sure to copy your client_secret.json file to the same directory.
Note
All the code samples in this book are available online in the GoogleCloudPlatform gce-oreilly GitHub repository: https://github.com/GoogleCloudPlatform/gce-oreilly. You can download the entire repository using the URL https://github.com/GoogleCloudPlatform/gce-oreilly/archive/master.zip.
As mentioned earlier in this chapter, OAuth 2.0 authorization is required for your application to gain access to your user’s Compute Engine resources. To run through the OAuth 2.0 flow, we start by defining the path to the client_secret.json file. An OAuth 2.0 flow is then created using the client secret file, a list of scopes, and a message to display if the client secret file is missing:
# CLIENT_SECRET is the name of a file containing the OAuth 2.0 information# for this application, including client_id and client_secret.CLIENT_SECRET=os.path.join(os.path.dirname(__file__),'client_secret.json')# Set up a Flow object to be used for authentication. PLEASE ONLY# ADD THE SCOPES YOU NEED. For more information on using scopes please# see <https://developers.google.com/compute/docs/api/how-tos/authorization>.FLOW=client.flow_from_clientsecrets(CLIENT_SECRET,scope=['https://www.googleapis.com/auth/compute'],message=tools.message_if_missing(CLIENT_SECRET))
The following lines of code run through the previously defined flow and store the resulting OAuth 2.0 credentials, including the access token, in a local file called sample.dat:
# If the credentials don't exist or are invalid run through the native client# flow. The Storage object will ensure that if successful the good# credentials will get written back to the file.storage=file.Storage('sample.dat')credentials=storage.get()ifcredentialsisNoneorcredentials.invalid:credentials=tools.run_flow(FLOW,storage,flags)
The credentials are used to authorize an httplib2.Http object. An authorized httplib2.Http object applies the access token to the HTTP requests as an Authorization: Bearer HTTP header:
# Create an httplib2.Http object to handle our HTTP requests and authorize it# with our Credentials.http=httplib2.Http()http=credentials.authorize(http)
After authorization, a service object is created by passing in the name of the Google API we want to use (“compute,” in our case), the version of the API (currently “v1”), and the authorized httplib2.Http instance. The service object uses the authorized httplib2.Http instance to make HTTP requests to the Compute Engine API. You use this service object to perform various actions on your Compute Engine resources:
# Construct the service object for the interacting with the# Compute Engine API.service=discovery.build('compute','v1',http=http)
Now try running the ch1-1.py file from a shell or Terminal window as follows:
$ python ch1-1.py
You should see a web browser pop up, prompting you to authorize this sample app to access your Compute Engine resources. Return to the shell or Terminal window. You should see, “Success! Now add code here.” printed on the screen.
Congratulations! You now have a working skeleton app, which handles OAuth 2.0 authorization and provides access to the Compute Engine API.
Let’s make this script do something a bit more interesting. You can start with the complete code in the gce-oreilly GitHub repository (https://github.com/GoogleCloudPlatform/gce-oreilly/blob/master/ch1-2.py). If you prefer to do some typing, copy ch1-1.py and rename it as ch1-2.py. Open the ch1-2.py source file using your favorite text editor and comment out this line (by prepending the line with the Python comment character #):
# print 'Success! Now add code here.'
Insert the following code directly below the commented-out print statement making sure to preserve indentation consistently with the containing file:
PROJECT_ID = 'your-project-id' # Build a request to get the specified project using the Compute Engine API.request = service.projects().get(project=PROJECT_ID)try: # Execute the request and store the response.response = request.execute()except Exception, ex:print 'ERROR: ' + str(ex)sys.exit() # Print the response.print response
Whether you downloaded the complete code from GitHub or manually typed it, substitute your project ID for the string your-project-id. Run the sample app from a shell or Terminal window using the command:
$ python ch1-2.py
The result should look something like the following (pretty-printed here for legibility):
{u'kind':u'compute#project',u'description':u'',u'commonInstanceMetadata':{u'kind':u'compute#metadata'},u'quotas':[{u'usage':0.0,u'metric':u'SNAPSHOTS',u'limit':1000.0},{u'usage':1.0,u'metric':u'NETWORKS',u'limit':5.0},{u'usage':2.0,u'metric':u'FIREWALLS',u'limit':100.0},{u'usage':0.0,u'metric':u'IMAGES',u'limit':100.0},{u'usage':2.0,u'metric':u'ROUTES',u'limit':100.0},{u'usage':0.0,u'metric':u'FORWARDING_RULES',u'limit':50.0},{u'usage':0.0,u'metric':u'TARGET_POOLS',u'limit':50.0},{u'usage':0.0,u'metric':u'HEALTH_CHECKS',u'limit':50.0},{u'usage':0.0,u'metric':u'TARGET_INSTANCES',u'limit':50.0}],u'creationTimestamp':u'2013-10-28T10:54:02.016-07:00',u'id':u'8306025255376467278',u'selfLink':u'https://www.googleapis.com/compute/v1/projects/gce-oreilly',u'name':u'gce-oreilly'}
Let’s take a look at what the code is doing. In the following line:
request=service.projects().get(project=PROJECT_ID)
the service object generates an apiclient.http.HttpRequest object, which is used to make calls to the Compute Engine API. The apiclient.http.HttpRequest object is created by first specifying the resource we want to access (in this case, “projects”), then specifying what action to perform on that resource (in this case, “get”). We pass in any parameters required for this request (in this case, the project ID).
Note
To find the list of all available resources and methods, check out the Compute Engine API in the Google APIs Explorer: https://developers.google.com/apis-explorer/#p/compute/v1/. Clicking any of the methods in the list displays what parameters are available for that particular action.
Our apiclient.http.HttpRequest object makes the HTTP GET request to the project URL2 using the execute method:
response=request.execute()
The response returned from the Compute Engine API consists of the Project JSON resource.
Summary
In this chapter, you set up all the components required to start working with Compute Engine: you created a Compute Engine project using the Google Developers Console and enabled billing on the project. You also learned how to manage Compute Engine’s resources using the console, gcloud compute, and the API.
Up Next
In the next chapter, you will start working with Compute Engine’s VMs.
1 A Compute Engine “firewall” setting consists of a single rule defining how an instance accepts incoming traffic. This is a bit different than a typical firewall, which is usually the entire collection of rules around which ports can accept or reject traffic. Be sure to note that your configuration in GCE will have multiple firewalls, with each firewall being a single rule.
2 The Compute Center API details, including resource URLs, query parameters, and JSON elements are all documented online at https://developers.google.com/compute/docs/api/getting-started.
Get Google Compute Engine now with the O’Reilly learning platform.
O’Reilly members experience books, live events, courses curated by job role, and more from O’Reilly and nearly 200 top publishers.

