Working with Layers
SketchUp layers are another way you can organize your model. You may have used layers before in a CAD (computer aided design) program or in two-dimensional art programs like Adobe Photoshop or Illustrator. At the outset it's important to understand that SketchUp's layers are different from those programs. In other programs, you may use layers to group objects, and then you work on those objects in their respective layers. That may not be the best way for new SketchUp artisits to work, since layers don't protect parts of your model from accidentally changing.
Adding, Naming, and Deleting Layers
You can use two primary tools when it comes to working with layers: the Layers window and the Entity window. You use the Layers window to create, name, and remove layers. You use the Entity window to move entities (preferably groups or components) to a particular layer. Here are the simple steps for creating and naming a new layer.
Choose Window → Layers.
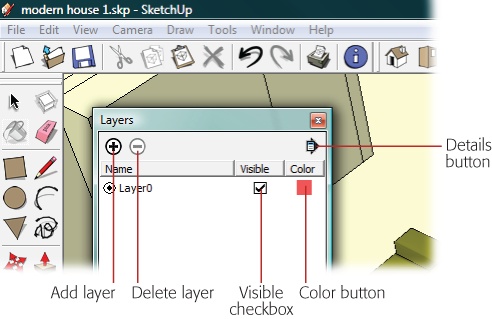
The Layers window appears, as shown in Figure 7-34. The first layer in SketchUp is always there and it's named Layer0.

Figure 7-34. The Layers window is pretty simple compared with some of the others in SketchUp. Use the + and – buttons to add and remove layers. Use the Visible checkbox to hide or show the contents of a layer.
Click the + (plus) button.
A new layer is created. As you create them, SketchUp numbers your layers sequentially, ...
Get Google SketchUp: The Missing Manual now with the O’Reilly learning platform.
O’Reilly members experience books, live events, courses curated by job role, and more from O’Reilly and nearly 200 top publishers.

