Chapter 1. Gradle for Android Basics
Android applications are built using the open source Gradle build system. Gradle is a state-of-the-art API that easily supports customizations and is widely used in the Java world. The Android plug-in for Gradle adds a wide range of features specific to Android apps, including build types, flavors, signing configurations, library projects, and more.
The recipes in this book cover the range of Gradle capabilities when applied to Android projects. Since the Android Studio IDE uses Gradle under the hood, special recipes are dedicated to it as well.
Hopefully the recipes in this book will help you configure and build whatever Android applications you desire.
1.1 Gradle Build Files in Android
Solution
Create a new Android project using Android Studio and review the files settings.gradle, build.gradle, and app/build.gradle.
Discussion
Android Studio is the only officially supported IDE for Android projects. To create a new Android project using Android Studio, use the “Start a new Android Studio project” wizard (Figure 1-1).
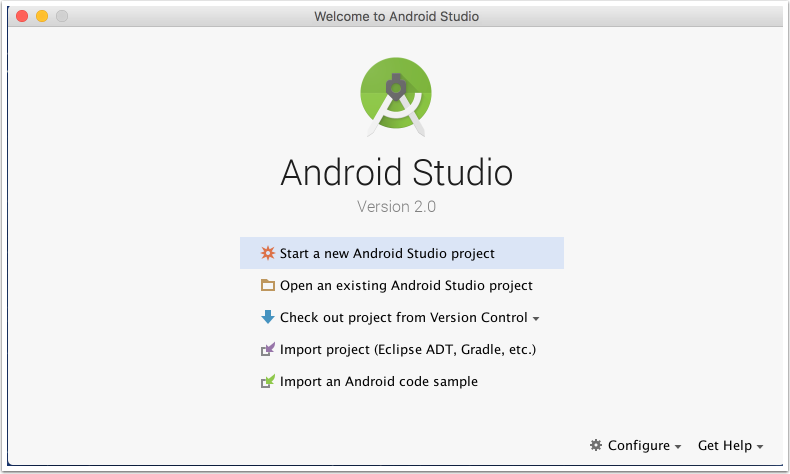
Figure 1-1. Android Studio Quick Start
The wizard prompts you for a project name and domain. You can use the Quick Start wizard to start a new Android Studio project named My Android App in the oreilly.com domain, as shown in Figure 1-2.
From here, select only the “Phone and Tablet” option and add a blank activity with the default name, MainActivity.
Note
The name and type of activity does not affect the Gradle build files.
The resulting “Project” view in “Android” mode is shown in Figure 1-3, where the relevant Gradle files are highlighted.
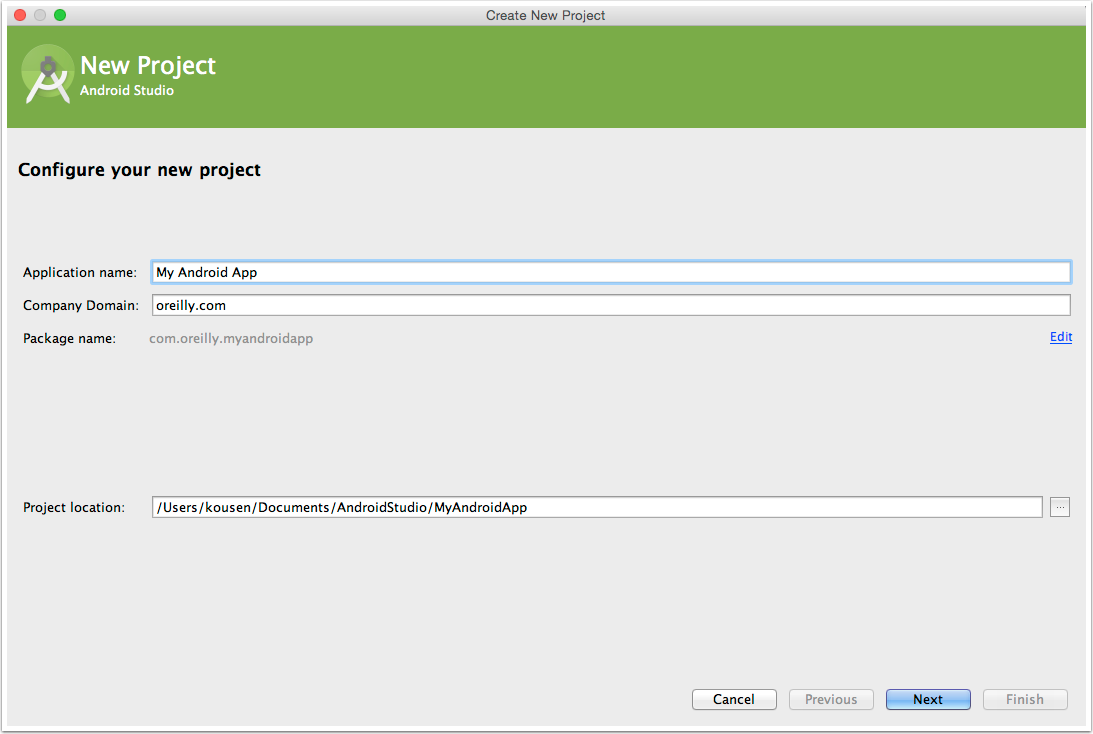
Figure 1-2. Create New Project wizard
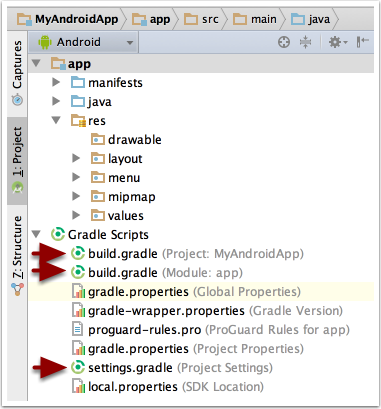
Figure 1-3. Project structure (Android view)
The project layout in the default (Project) view is shown in Figure 1-4.
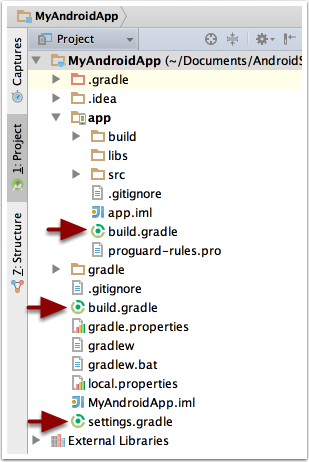
Figure 1-4. Project structure (Project view)
Android projects are multiproject Gradle builds. The settings.gradle file shows which subdirectories hold their own subprojects. The default file contents are shown in Example 1-1.
Example 1-1. settings.gradle
include':app'
The include statement indicates that the app subdirectory is the only additional subproject. If you add an Android Library project, it too will be added to this file.
The top-level Gradle build file is in Example 1-2.
Example 1-2. Top-level build.gradle file
// Top-level build file where you can add configuration options// common to all subprojects/modules.buildscript{repositories{jcenter()}dependencies{classpath'com.android.tools.build:gradle:2.0.0'// NOTE: Do not place your application dependencies here; they belong// in the individual module build.gradle files}}allprojects{repositories{jcenter()}}taskclean(type:Delete){deleterootProject.buildDir}
The Gradle distribution does not include Android functionality by default. Google provides an Android plug-in for Gradle, which allows easy configuration of Android projects. The buildscript block in the top-level build file tells Gradle where to download that plug-in.
As you can see, by default the plug-in is downloaded from jcenter, which means the Bintray JCenter Artifactory repository. Other repositories are supported (especially mavenCentral(), the default Maven repository), but JCenter is now the default. All content from JCenter is served over a CDN with a secure HTTPS connection. It also tends to be faster.
The allprojects section indicates that the top-level project and any subprojects all default to using the jcenter() repository to resolve any Java library dependencies.
Gradle allows you to define tasks of your own and insert them into the directed acyclic graph (DAG), which Gradle uses to resolve task relationships. Here, a clean task has been added to the top-level build. The type: Delete part indicates that the new task is a customized instance of the built-in Delete task from Gradle. In this case, the task removes the build directory from the root project, which defaults to a build folder at the top level.
The Gradle build file for the app subproject is shown in Example 1-3.
Example 1-3. Gradle build file for the app subproject
applyplugin:'com.android.application'android{compileSdkVersion23buildToolsVersion"23.0.3"defaultConfig{applicationId"com.kousenit.myandroidapp"minSdkVersion19targetSdkVersion23versionCode1versionName"1.0"}buildTypes{release{minifyEnabledfalseproguardFilesgetDefaultProguardFile('proguard-android.txt'),'proguard-rules.pro'}}}dependencies{compilefileTree(dir:'libs',include:['*.jar'])testCompile'junit:junit:4.12'compile'com.android.support:appcompat-v7:23.3.0'}
The apply functionality in Gradle adds the Android plug-in to the build system, which enables the android section Domain Specific Language (DSL) configuration. This section is discussed in detail in Recipe 1.2.
The dependencies block consists of three lines. The first, fileTree dependency, means that all files ending in .jar in the libs folder are added to the compile classpath.
The second line tells Gradle to download version 4.12 of JUnit and add it to the “test compile” phase, meaning that JUnit classes will be available in the src/androidTest/java source tree, as well as the (optional) src/test/java tree, which can be added for pure unit tests (i.e., those that do not involve the Android API).
The third line tells Gradle to add version 23.3.0 of the appcompat-v7 jar files from the Android Support Libraries. Note that the -v7 means support for Android applications back to version 7 of Android, not version 7 of the support library itself. The support library is listed as a compile dependency, so all of its classes are available throughout the project.
See Also
Links to all the relevant documentation sites are in Recipe 6.2. Dependencies are discussed in Recipe 1.5 and repositories are discussed in Recipe 1.7.
1.2 Configure SDK Versions and Other Defaults
Solution
In the module Gradle build file, set values in the android block.
Discussion
The top-level Android build file adds the Android plug-in for Gradle to your project, via the buildscript block. Module build files “apply” the plug-in, which adds an android block to the Gradle DSL.
Inside the android block, you can specify several project properties, as shown in Example 1-4.
Example 1-4. Android block in build.gradle
applyplugin:'com.android.application'android{compileSdkVersion23buildToolsVersion"23.0.3"defaultConfig{applicationId"com.kousenit.myandroidapp"minSdkVersion19targetSdkVersion23versionCode1versionName"1.0"}compileOptions{sourceCompatibilityJavaVersion.VERSION_1_7targetCompatibilityJavaVersion.VERSION_1_7}}
Regular Java projects use a java plug-in, but Android projects use the com.android.application plug-in instead.
Warning
Do not apply the Java plug-in. This will cause build errors. Use the Android plug-in instead.
The android block is the entry point for the Android DSL. Here you must specify the compilation target using compileSdkVersion and the build tools version via buildToolsVersion. Both of these values should be assigned to the most recent available version, as they are backward compatible and include all current bug fixes.
The defaultConfig block inside android shows several properties:
applicationId-
The “package” name of the application, which must be unique in the Google Play store. This value can never change during the life of your app; changing it will result in your app being treated as a brand new application, and existing users will not see changes as an update. Prior to the move to Gradle, this was the
packageattribute of the root element of the Android Manifest. The two can now be decoupled. minSdkVersion-
The minimum Android SDK version supported by this application. Devices earlier than this will not see this application when accessing the Google Play store.
targetSdkVersion-
The version of Android intended for this application. Android Studio will issue a warning if this is anything other than the latest version, but you’re free to use any version you like.
versionCode-
An integer representing this version of your app relative to others. Apps normally use this during the upgrade process.
versionName-
A string representing the release version of your app, shown to users. Normally in the form of a
<major>.<minor>.<version>string, like most projects.
Prior to the switch to Gradle, the minSdkVersion and buildToolsVersion properties were specified in the Android Manifest as attributes of a <uses-sdk> tag. That approach is now deprecated, as the values there are overridden by the values in the Gradle build file.
The compileOptions section shows that this app expects to use JDK version 1.7.
In Android Studio, the Project Structure dialog shows the values in graphical form, shown in Figure 1-5.
The defaultConfig values are on the Flavors tab in the Project Structure window (Figure 1-6).
Documentation for the defaultConfig block, as with other elements of the DSL, can be found in the DSL reference.

Figure 1-5. Project Structure view in Android Studio
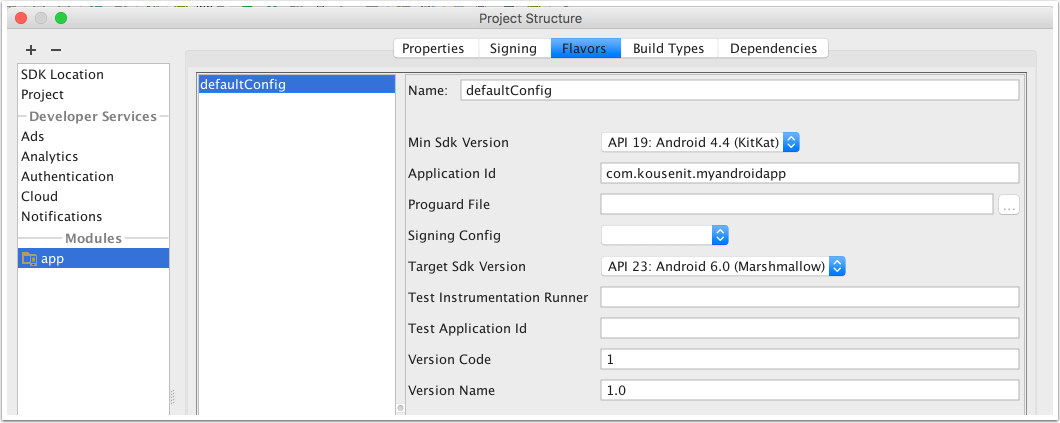
Figure 1-6. Properties inside the android block
See Also
Other child elements of android, like buildTypes or productFlavors, are discussed in Recipes 3.1, 3.2, 3.4, and more. The documentation links are given in Recipe 6.2.
1.3 Executing Gradle Builds from the Command Line
Solution
From the command line, either use the provided Gradle wrapper or install Gradle and run it directly.
Discussion
You do not need to install Gradle in order to build Android projects. Android Studio comes with a Gradle distribution (in the form of a plug-in) and includes dedicated features to support it.
The term “Gradle wrapper” refers to the gradlew script for Unix and gradlew.bat script in the root directory of an Android application, where the ending “w” stands for “wrapper.”
The purpose of the Gradle wrapper is to allow a client to run Gradle without having to install it first. The wrapper uses the gradle-wrapper.jar and the gradle-wrapper.properties files in the gradle/wrapper folder in the application root to start the process. A sample of the properties file is shown in Example 1-5.
Example 1-5. Keys and values in gradle-wrapper.properties
#MonDec2810:00:20PST2015distributionBase=GRADLE_USER_HOMEdistributionPath=wrapper/distszipStoreBase=GRADLE_USER_HOMEzipStorePath=wrapper/distsdistributionUrl=https\://services.gradle.org/distributions/gradle-2.10-all.zip
The distributionUrl property indicates that the wrapper will download and install version 2.10 of Gradle.1 After the first run, the Gradle distribution will be cached in the zipStorePath folder under the zipStoreBase directory and then be available for all subsequent executions of Gradle tasks.
The wrapper is used at the command line simply by executing the ./gradlew command on Unix or the gradlew.bat command on Windows (Example 1-6).
Example 1-6. Output from running the build task
> ./gradlew build
Downloading
https://services.gradle.org/distributions/gradle-2.10-all.zip
...................................................
....          (download of Gradle 2.10)        ....
...................................................
Unzipping /Users/kousen/.gradle/wrapper/dists/3i2gob.../gradle-2.10-all.zip
to /Users/kousen/.gradle/wrapper/dists/gradle-2.10-all/3i2gob...
Set executable permissions for:
/Users/kousen/.gradle/wrapper/dists/gradle-2.10-all/3i2gob.../gradle-2.10/bin/gradle
Starting a new Gradle Daemon for this build (subsequent builds will be faster).
:app:preBuild UP-TO-DATE
:app:preDebugBuild UP-TO-DATE
... lots of tasks ...
:app:compileLint
:app:lint
Wrote HTML report to file:.../MyAndroidApp/app/build/outputs/lint-results.html
Wrote XML report to .../MyAndroidApp/app/build/outputs/lint-results.xml
:app:preDebugUnitTestBuild UP-TO-DATE
:app:prepareDebugUnitTestDependencies
... lots of tasks ...
:app:test
:app:check
:app:build

BUILD SUCCESSFUL

Total time: 51.352 secs // most of which was the download
Note
In this book, examples show the ./gradlew command for Unix-based operating systems. For Windows, simply replace that with gradlew or gradlew.bat without the dot-slash.
The initial download can take a few minutes, depending on your Internet connection speed. It only needs to be done once, however. After that, subsequent builds will use the cached version.
You can run any supported Gradle task, including your own custom tasks, at the command line. Compiled code will be found in the app/build folder. Generated apk (Android package) files are found in the app/build/outputs/apk directory.
The tasks command from Gradle shows what tasks are available in the build, as shown in Example 1-7.
Example 1-7. Output from tasks
:tasks

------------------------------------------------------------
All tasks runnable from root project
------------------------------------------------------------

Android tasks
-------------
androidDependencies - Displays the Android dependencies of the project.
signingReport - Displays the signing info for each variant.
sourceSets - Prints out all the source sets defined in this project.

Build tasks
-----------
assemble - Assembles all variants of all applications and secondary packages.
assembleAndroidTest - Assembles all the Test applications.
assembleDebug - Assembles all Debug builds.
assembleRelease - Assembles all Release builds.
build - Assembles and tests this project.
buildDependents - Assembles and tests this project and all projects that depend on it.
buildNeeded - Assembles and tests this project and all projects it depends on.
compileDebugAndroidTestSources
compileDebugSources
compileDebugUnitTestSources
compileReleaseSources
compileReleaseUnitTestSources
mockableAndroidJar - Creates a version of android.jar that's suitable for unit tests.

Build Setup tasks
-----------------
init - Initializes a new Gradle build. [incubating]
wrapper - Generates Gradle wrapper files. [incubating]

Help tasks
----------
components - Displays the components produced by root project 'MyAndroidApp'.
dependencies - Displays all dependencies declared in root project 'MyAndroidApp'.
dependencyInsight - Displays the insight into a specific dependency in root
    project 'MyAndroidApp'.
help - Displays a help message.
model - Displays the configuration model of root project 'MyAndroidApp'. [incubating]
projects - Displays the subprojects of root project 'MyAndroidApp'.
properties - Displays the properties of root project 'MyAndroidApp'.
tasks - Displays the tasks runnable from root project 'MyAndroidApp'
    (some of the displayed tasks may belong to subprojects).

Install tasks
-------------
installDebug - Installs the Debug build.
installDebugAndroidTest - Installs the android (on device) tests for the Debug build.
uninstallAll - Uninstall all applications.
uninstallDebug - Uninstalls the Debug build.
uninstallDebugAndroidTest - Uninstalls the android (on device) tests for the build.
uninstallRelease - Uninstalls the Release build.

Verification tasks
------------------
check - Runs all checks.
clean - Deletes the build directory.
connectedAndroidTest - Installs and runs instrumentation tests for all flavors
    on connected devices.
connectedCheck - Runs all device checks on currently connected devices.
connectedDebugAndroidTest - Installs and runs the tests for debug connected devices.
deviceAndroidTest - Installs and runs instrumentation tests using all Providers.
deviceCheck - Runs all device checks using Device Providers and Test Servers.
lint - Runs lint on all variants.
lintDebug - Runs lint on the Debug build.
lintRelease - Runs lint on the Release build.
test - Run unit tests for all variants.
testDebugUnitTest - Run unit tests for the debug build.
testReleaseUnitTest - Run unit tests for the release build.

Other tasks
-----------
clean
jarDebugClasses
jarReleaseClasses
lintVitalRelease - Runs lint on just the fatal issues in the Release build.

To see all tasks and more detail, run gradlew tasks --all

To see more detail about a task, run gradlew help --task <task>

BUILD SUCCESSFUL
While this may seem like a lot of tasks, you actually use a small number in practice. When you add multiple build types and flavors to your project, the number will go up considerably.
Additional features and command-line flags
You can run multiple tasks by separating them by spaces, as in Example 1-8.
Example 1-8. Executing more than one task
> ./gradlew lint assembleDebug
Note that repeating the same task name only executes it once.
You can exclude a task by using the -x flag, as shown in Example 1-9.
Example 1-9. Excluding the lintDebug task
> ./gradlew assembleDebug -x lintDebug
The --all flag on the tasks command shows all the tasks in the project as well as the dependencies for each task.
Warning
The output from gradle tasks --all can be very long.
You can abbreviate task names from the command line by providing just enough letters to uniquely determine it (Example 1-10).
Example 1-10. The dependency tree for each configuration
> ./gradlew anDep
:app:androidDependencies
debug
\--- com.android.support:appcompat-v7:23.3.0
     +--- com.android.support:support-vector-drawable:23.3.0
     |    \--- com.android.support:support-v4:23.3.0
     |         \--- LOCAL: internal_impl-23.3.0.jar
     +--- com.android.support:animated-vector-drawable:23.3.0
     |    \--- com.android.support:support-vector-drawable:23.3.0
     |         \--- com.android.support:support-v4:23.3.0
     |              \--- LOCAL: internal_impl-23.3.0.jar
     \--- com.android.support:support-v4:23.3.0
          \--- LOCAL: internal_impl-23.3.0.jar

debugAndroidTest
No dependencies

debugUnitTest
No dependencies

release
\--- com.android.support:appcompat-v7:23.3.0
     +--- com.android.support:support-vector-drawable:23.3.0
     |    \--- com.android.support:support-v4:23.3.0
     |         \--- LOCAL: internal_impl-23.3.0.jar
     +--- com.android.support:animated-vector-drawable:23.3.0
     |    \--- com.android.support:support-vector-drawable:23.3.0
     |         \--- com.android.support:support-v4:23.3.0
     |              \--- LOCAL: internal_impl-23.3.0.jar
     \--- com.android.support:support-v4:23.3.0
          \--- LOCAL: internal_impl-23.3.0.jar

releaseUnitTest
No dependencies

BUILD SUCCESSFUL
The camel-case notation (anDep for androidDependencies) works well, as long as the resolution is unique (Example 1-11).
Example 1-11. Not enough letters to be unique
> ./gradlew pro

FAILURE: Build failed with an exception.

* What went wrong:
Task 'pro' is ambiguous in root project 'MyAndroidApp'. Candidates are:
'projects', 'properties'.
The error message shows exactly what went wrong: pro is ambiguous, since it matches both projects and properties. Just add another letter to make it unique.
Finally, if your build file is not called build.gradle, use the -b flag to specify the build filename (Example 1-12).
Example 1-12. Using a nondefault build filename
> ./gradlew -b app.gradle
See Also
Appendix B gives a summary of Gradle installation and features beyond Android projects. Recipe 1.5 discusses dependencies in the build file. Recipe 4.3 illustrates excluding tasks from the build process.
1.4 Executing Gradle Builds from Android Studio
Solution
Use the Gradle view to execute tasks.
Discussion
When you create an Android project, Android Studio generates Gradle build files for a multiproject build (discussed in Recipe 1.1). The IDE also provides a Gradle view that organizes all of its tasks, as shown in Figure 1-7.
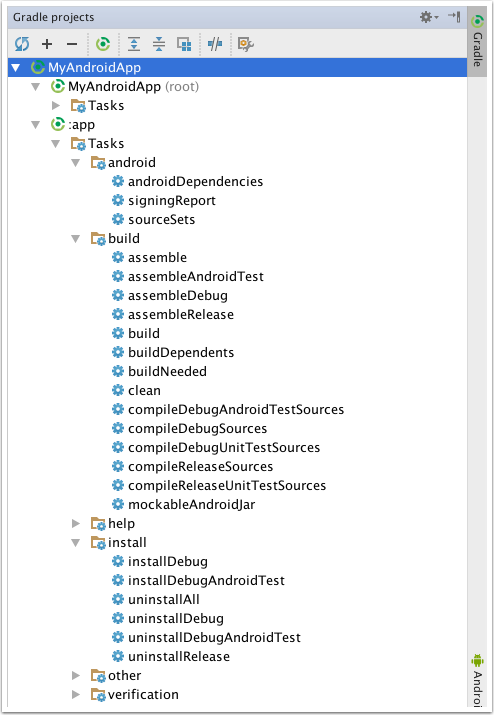
Figure 1-7. Gradle view inside Android Studio
Gradle tasks are organized into categories, like android, build, install, and other, as Figure 1-7 illustrates.
To execute a particular task, double-click the entry in the Gradle window. The result is shown in Figure 1-8.
Double-clicking any task executes that task on the command line, which is shown in the Run window. Every time you run a particular task, a run configuration is created and stored under the Run Configurations menu, so running it again simply requires another double-click.
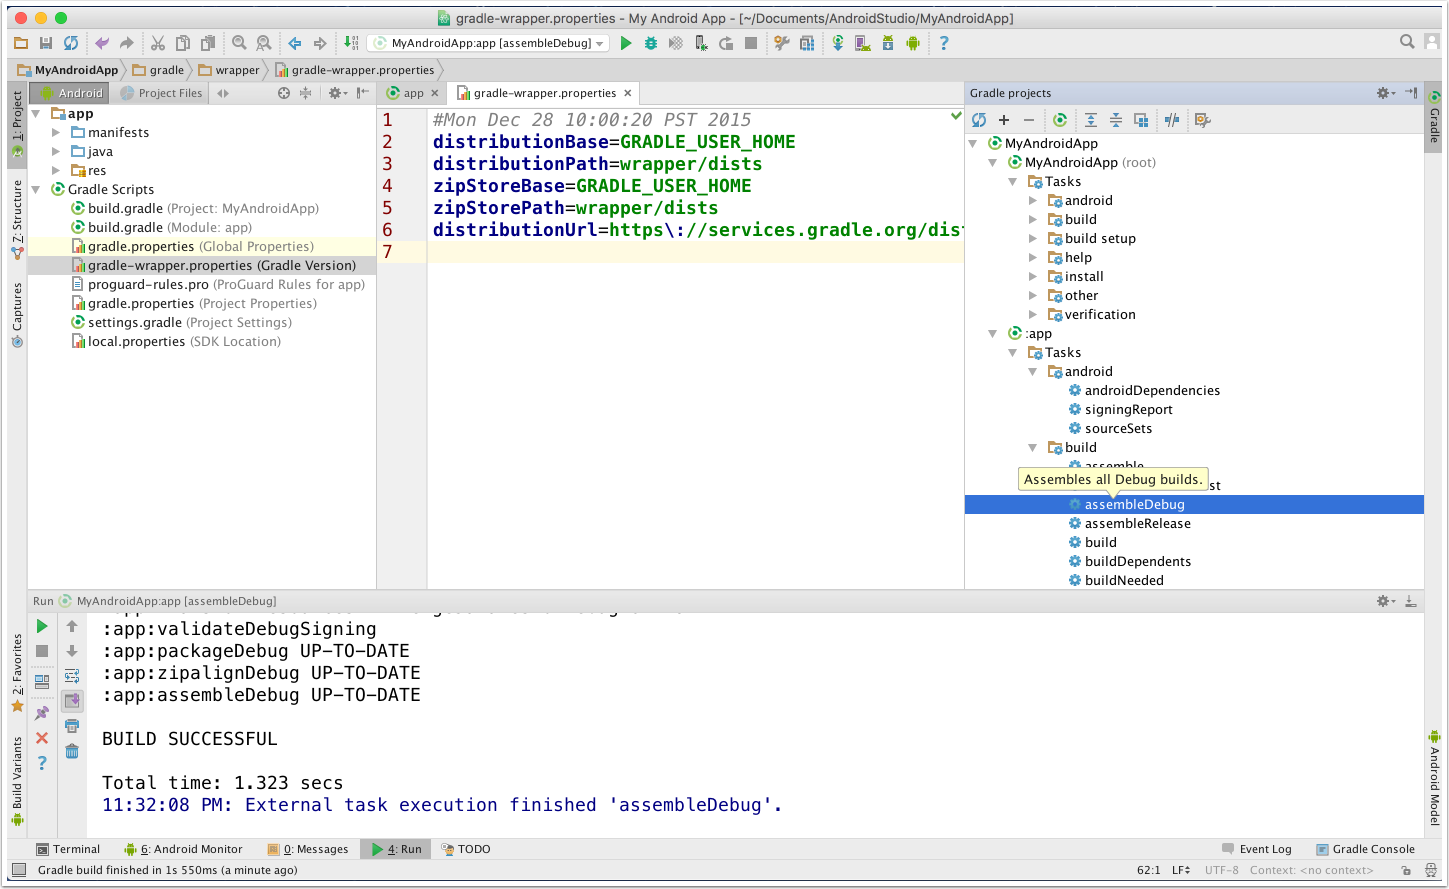
Figure 1-8. Running Gradle inside Android Studio
The execution seen in the Run window shows once again that the IDE is essentially just a frontend on Gradle. Any execution, from build to test to deployment, is actually executing Gradle tasks at the command line.
Android Studio also provides a Gradle Console view, as shown in Figure 1-9.
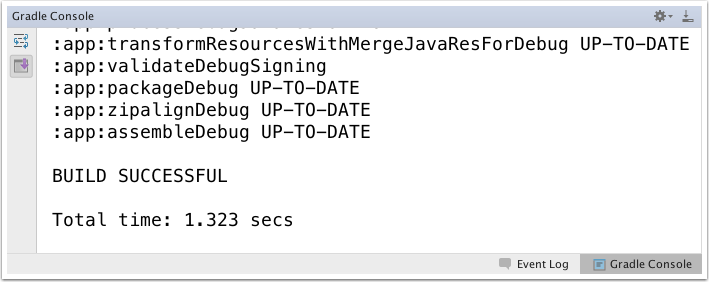
Figure 1-9. Gradle Console view in Android Studio
See Also
To run Gradle tasks from the command line using the included wrapper, refer to Recipe 1.3.
1.5 Adding Java Library Dependencies
Solution
Add the group, name, and version to the dependencies block in the build.gradle file included in your application module.
Discussion
By default, Android applications come with two build.gradle files: one at the top-level, and one for the application itself. The latter is normally stored in a subdirectory called app.
Inside the build.gradle file in the app directory, there is a block called dependencies. Example 1-13 shows a sample from a new Android application generated by Android Studio.
Example 1-13. Default dependencies in a new Android project
dependencies{compilefileTree(include:['*.jar'],dir:'libs')testCompile'junit:junit:4.12'compile'com.android.support:appcompat-v7:23.3.0'}
Basic syntax
Gradle supports several different ways of listing dependencies. The most common is to use quotes with colon-separated group, name, and version values.
Note
Gradle files use Groovy, which supports both single- and double-quoted strings. Double quotes allow interpolation, or variable substitution, but are otherwise identical. See Appendix A for details.
Each dependency is associated with a configuration. Android projects include compile, runtime, testCompile, and testRuntime configurations. Plugins can add additional configurations, and you can also define your own.
The full syntax for a dependency calls out the group, name, and version numbers explicitly (Example 1-14).
Example 1-14. Full syntax for dependencies
testCompilegroup:'junit',name:'junit',version:'4.12'
The result of Example 1-14 is entirely equivalent to that in Example 1-15.
Example 1-15. Shortcut syntax for dependencies
testCompile'junit:junit:4.12'
This is the shortcut form used in the default build file.
It is legal, though not recommended, to specify a version number with a plus sign, as shown in Example 1-16.
Example 1-16. Version number as a variable (not recommended)
testCompile'junit:junit:4.+'
This tells Gradle that any version of JUnit greater than or equal to 4.0 is required to compile the project’s tests. While this works, it makes the build less deterministic and therefore less reproducible. Explicit version numbers also protect you from changes in later versions of a particular API.
Warning
Favor explicit version numbers for dependencies. This protects you from later changes in dependent libraries and makes your build reproducible.
If you want to add a set of files to a configuration without adding them to a repository, you can use the files or fileTree syntax inside the dependencies block (Example 1-17).
Example 1-17. File and directory dependencies
dependencies{compilefiles('libs/a.jar','libs/b.jar')compilefileTree(dir:'libs',include:'*.jar')}
The last line uses the same syntax as that employed in the default Gradle build file.
Next, Gradle needs to know where to search to resolve dependencies. This is done through a repositories block.
Synchronizing the project
Android Studio monitors the Gradle build files and offers to synchronize new changes automatically.
For example, consider adding the Retrofit 2 project to build.gradle in the app project.
As Figure 1-10 shows, after any change to the build.gradle file, Android Studio offers to synchronize the project. This downloads any required libraries and adds them to the project.

Figure 1-10. Android Studio offering to synchronize project dependencies
After clicking the SycNow link, the downloaded libraries appear in the External Libraries section of the project window (Figure 1-11).
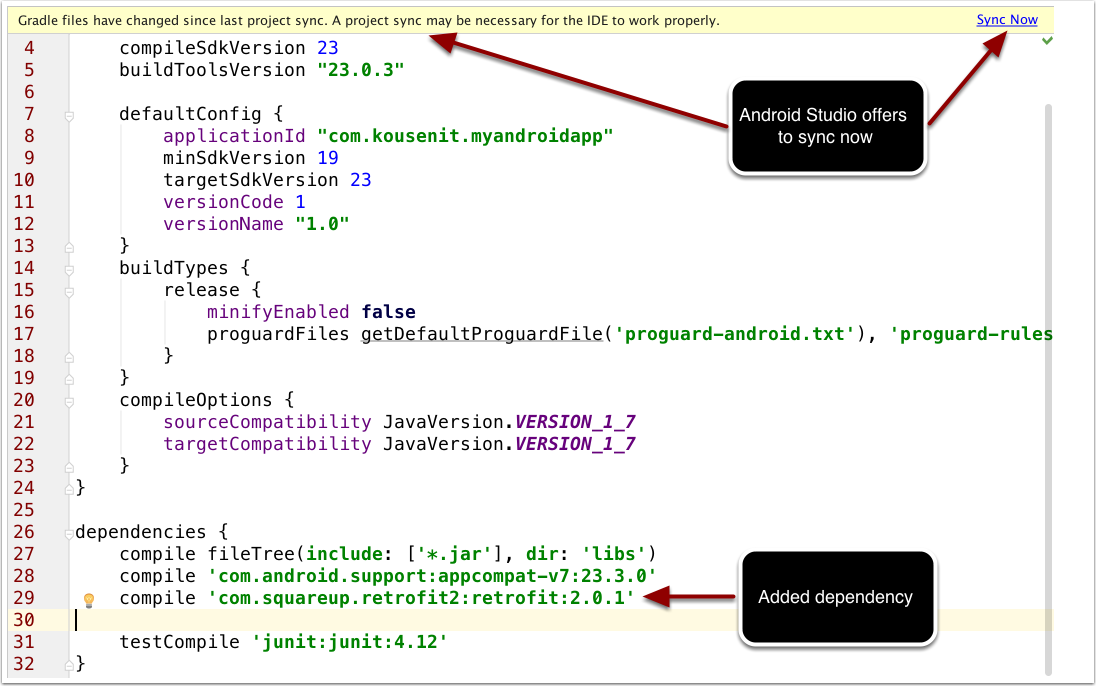
Figure 1-11. External Libraries
In this case, the retrofit dependency also added the okhttp and okio libraries as transitive dependencies, as shown in Figure 1-12.
If you miss your opportunity to click the Sync Now link, Android Studio provides a special icon in the toolbar for the same purpose, as well as a menu item.
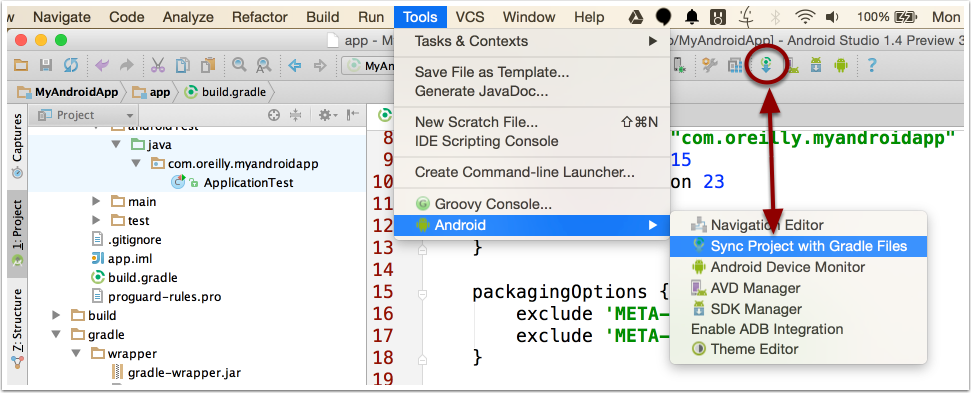
Figure 1-12. Sync Project with Gradle Files button and menu item
Transitive dependencies
There’s an old joke that defines Maven as a DSL for downloading the Internet. If that is true for Maven, it’s also true for Gradle. Both download transitive dependencies, which are libraries that themselves depend on other libraries.
In regular Java projects, the Gradle command dependencies can be used to see the transitive dependencies. Android projects use the androidDependencies command instead.
Consider the dependencies block from Example 1-13. Running the androidDependencies task gives the output shown in Example 1-18.
Example 1-18. Seeing Android dependencies
> ./gradlew androidDependencies

:app:androidDependencies
debug
\--- com.android.support:appcompat-v7:23.3.0
     +--- com.android.support:support-vector-drawable:23.3.0
     |    \--- com.android.support:support-v4:23.3.0
     |         \--- LOCAL: internal_impl-23.3.0.jar
     +--- com.android.support:animated-vector-drawable:23.3.0
     |    \--- com.android.support:support-vector-drawable:23.3.0
     |         \--- com.android.support:support-v4:23.3.0
     |              \--- LOCAL: internal_impl-23.3.0.jar
     \--- com.android.support:support-v4:23.3.0
          \--- LOCAL: internal_impl-23.3.0.jar

debugAndroidTest
No dependencies

debugUnitTest
No dependencies

release
\--- com.android.support:appcompat-v7:23.3.0
     +--- com.android.support:support-vector-drawable:23.3.0
     |    \--- com.android.support:support-v4:23.3.0
     |         \--- LOCAL: internal_impl-23.3.0.jar
     +--- com.android.support:animated-vector-drawable:23.3.0
     |    \--- com.android.support:support-vector-drawable:23.3.0
     |         \--- com.android.support:support-v4:23.3.0
     |              \--- LOCAL: internal_impl-23.3.0.jar
     \--- com.android.support:support-v4:23.3.0
          \--- LOCAL: internal_impl-23.3.0.jar

releaseUnitTest
No dependencies
The debug and release builds both use the appcompat-v7 library from the Android Support libraries. That library depends on the support-v4 library, among others, which uses an internal jar from the Android SDK.
Managing transitive dependencies manually sounds like a good idea until you actually try to do it. The complexity grows quickly and doesn’t scale well. Gradle is very good at resolving versioning issues among dependencies.
Still, Gradle does provide a syntax for including and excluding individual libraries.
Gradle follows transitive dependencies by default. If you want to turn that off for a particular library, use the transitive flag (Example 1-19).
Example 1-19. Disabling transitive dependencies
dependencies{runtimegroup:'com.squareup.retrofit2',name:'retrofit',version:'2.0.1',transitive:false}
Changing the value of the transitive flag to false prevents the download of transitive dependencies, so you’ll have to add whatever is required yourself.
If you only want a module jar, without any additional dependencies, you can specify that as well (Example 1-20).
Example 1-20. Full syntax for module jar only
dependencies{compile'org.codehaus.groovy:groovy-all:2.4.4@jar'compilegroup:'org.codehaus.groovy',name:'groovy-all',version:'2.4.4',ext:'jar'}
The shortcut notation uses the @ sign, while the full version sets an ext (for extension) value.
You can also exclude a transitive dependency in the dependencies block (Example 1-21).
Example 1-21. Excluding dependencies
dependencies{androidTestCompile('org.spockframework:spock-core:1.0-groovy-2.4'){excludegroup:'org.codehaus.groovy'excludegroup:'junit'}}
In this case, the spock-core project excludes the Groovy dependency and the JUnit library, both of which are includes by other means.
See Also
Recipe 1.6 shows how to add dependencies through the Android Studio IDE. Recipe 1.7 discusses repositories, which are used to resolve dependencies. Recipe 4.5 discusses the situation where one module depends on another, as with Android libraries.
1.6 Adding Library Dependencies Using Android Studio
Solution
Use the Project Structure section of Android Studio, with the Dependencies tab.
Discussion
Experienced Gradle developers are comfortable editing the build.gradle file directly, but the IDE does not give you a lot of code assistance in doing so. The Project Structure display, however, gives a graphical view of the build file contents.
Access the Project Structure menu item under the File menu to see the overall display. Then select the module containing your application (app by default) as shown in Figure 1-13.

Figure 1-13. Project Structure UI (shown earlier in Figure 1-5)
Selecting app in the Modules section shows the default page, with the Properties tab highlighted. This shows, among other things, the Compile SDK Version and Build Tools Version.
Click the Dependencies tab to see any existing dependencies, along with the ability to add new ones (Figure 1-14).

Figure 1-14. Dependencies tab in Project Structure
The “Scope” column allows you to specify the configuration where the dependency is needed. Current choices are:
-
Compile
-
Provided
-
APK
-
Test compile
-
Debug compile
-
Release compile
Clicking the plus button at the bottom of the window offers to add three different types of dependencies, as shown in Figure 1-15.
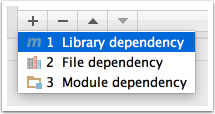
Figure 1-15. Adding dependencies pop-up
File dependencies allow you browse the filesystem for individual jar files. Module dependencies refer to other modules in the same project, which is discussed in the recipe for library projects.
The “Library Dependencies” option brings up a dialog box that allows you to search Maven Central for a particular dependency. By default it shows all the optional support libraries and Google Play services (Figure 1-16).

Figure 1-16. Choosing library dependencies
Enter a string in the search box and click the search icon (the magnifying glass in versions prior to 2.0 and the three dots in AS 2.0 and above) to find the full Maven coordinates of the dependency (Figure 1-17).
Clicking OK when you’re done triggers a Gradle project sync, which downloads the dependency and adds it to your project.
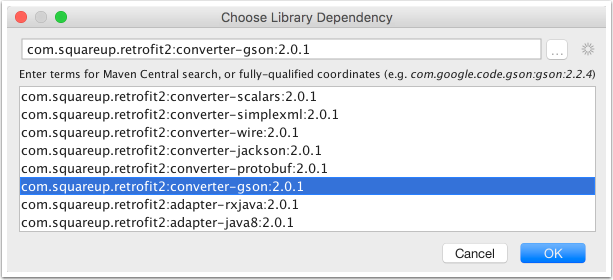
Figure 1-17. Finding the Gson library
See Also
Recipe 1.5 reviews how to add dependencies by editing the Gradle build files directly. Recipe 1.7 is about configuring Gradle repositories that are used to resolve the dependencies.
1.7 Configuring Repositories
Solution
Configure the repositories block in your Gradle build file.
Discussion
Declaring Repositories
The repositories block tells Gradle where to find the dependencies. By default, Android uses either jcenter() or mavenCentral(), which represent the default Bintray JCenter repository and the public Maven Central Repository, respectively (Example 1-22).
Example 1-22. The default JCenter repository
repositories{jcenter()}
This refers to the JCenter repository located at https://jcenter.bintray.com. Note that it uses HTTPS for the connection.
There are two shortcuts available for Maven repositories. The mavenCentral() syntax refers to the central Maven 2 repository at http://repo1.maven.org/maven2. The mavenLocal() syntax refers to your local Maven cache (Example 1-23).
Example 1-23. Built-in Maven repositories in the repositories block
repositories{mavenLocal()mavenCentral()}
Any Maven repository can be added to the default list using a maven argument with a url block (Example 1-24).
Example 1-24. Adding a Maven repo from a URL
repositories{maven{url'http://repo.spring.io/milestone'}}
Password-protected repositories use a credentials block, as Example 1-25 (taken from the Gradle user guide) shows.
Example 1-25. Accessing a Maven repo requiring credentials
repositories{maven{credentials{username'username'password'password'}url'http://repo.mycompany.com/maven2'}}
You can move the explicit username and password values to a file called gradle.properties. Recipe 2.1 discusses this in detail.
Ivy and local repositories are added using a similar syntax.
Example 1-26. Using an Ivy repository
repositories{ivy{url'http://my.ivy.repo'}}
If you have files on the local filesystem, you can use a directory as a repository with the flatDir syntax (Example 1-27).
Example 1-27. Using a local directory as a repository
repositories{flatDir{dirs'lib'}}
This is an alternative to adding the files explicitly to the dependencies block with files or fileTree.
You often will add multiple repositories to your build. Gradle will search each in turn, top down, until it resolves all of your dependencies.
See Also
Recipe 1.5 and Recipe 1.6 are about configuring the dependencies themselves.
1 At the time of this writing, the current version of Gradle is 2.12. You can change the distributionUrl to include any legal Gradle version number.
Get Gradle Recipes for Android now with the O’Reilly learning platform.
O’Reilly members experience books, live events, courses curated by job role, and more from O’Reilly and nearly 200 top publishers.

