There's more than one way to configure Greasemonkey user scripts: before, during, and after installation.
One of the most important pieces of information about a user script is where it should run. One page? Every page on one site? Multiple sites? All sites? This hack explains several different ways to configure where a user script executes.
As described in "Provide a Default Configuration"
[Hack #2]
, user scripts contain a section that describes what the script is and where it should run. Editing the @include and @exclude lines in this section is the first and easiest way to configure a user script, because the configuration travels with the script code. If you copy the file to someone else's computer or publish it online, other people will pick up the default configuration.
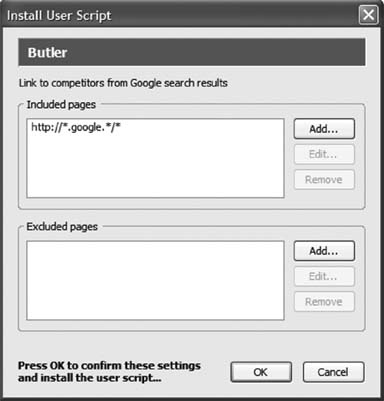
Another good time to alter a script's metadata is during installation. Remember in "Install a User Script" [Hack #1] when you first installed the Butler user script? Immediately after you select the Install User Script…menu item, Greasemonkey displays a dialog box titled Install User Script, which contains lists of the included and excluded pages, as shown in Figure 1-7.
The two lists are populated with the defaults that are defined in the script's metadata section (specifically, the @include and @exclude lines), but you can change them to anything you like before you install the script. Let's say, for example, that you like Butler, but you have no use for it on Froogle, Google's cleverly named product comparison site. Before you install the script, you can modify the configuration to exclude that site but still let the script work on other Google sites.
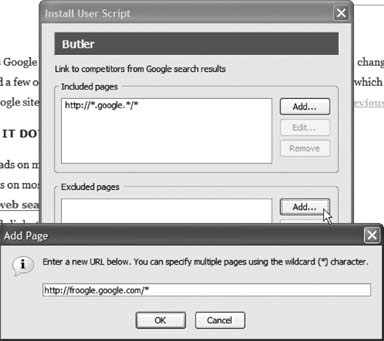
To ensure that Butler doesn't alter Froogle, click the Add…button under "Excluded pages" and type the wildcard URL for Froogle, as shown in Figure 1-8.
You can also reconfigure a script's included and excluded pages after the script is installed. Assuming you previously excluded Froogle from Butler's configuration (as described in the previous section), let's now change the configuration to include Froogle again:
From the Firefox menu, select Tools/Manage User Scripts…. Greasemonkey will pop up the Manage User Scripts dialog.
In the pane on the left, select Butler. In the pane on the right, Greasemonkey should show you two lists: one of included pages (http://*.google.*/*) and one of excluded pages (http://froogle.google.com/*).
In the "Excluded pages" list, select http://froogle.google.com/* and click the Remove button.
Click OK to exit the Manage User Scripts dialog.
Now, search for a product on Froogle to verify that Butler is once again being executed.
The last way to reconfigure a user script is to manually edit the config.xml file, which is located within your Firefox profile directory. (See "Install a User Script" [Hack #1] for the location.) The graphical dialogs Greasemonkey provides are just friendly ways of editing config.xml without knowing it.
Each installed user script is represented by a <Script> element, as shown in the following example:
<Script filename="helloworld.user.js" name="Hello World" namespace="http://www.oreilly.com/catalog/greasemonkeyhcks/" description="example script to alert "Hello world!" on every page" enabled="true"> <Include>*</Include> <Exclude>http://oreilly.com/*</Exclude> <Exclude>http://www.oreilly.com/*</Exclude> </Script>
You can make any changes you like to the config.xml file. You can add, remove, or edit the <Include> and <Exclude> elements to change where the script runs. You can change the enabled attribute to false to disable the script. You can even uninstall the script by deleting the entire <Script> element.
Get Greasemonkey Hacks now with the O’Reilly learning platform.
O’Reilly members experience books, live events, courses curated by job role, and more from O’Reilly and nearly 200 top publishers.


