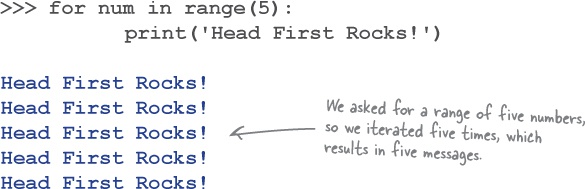
Chapter 1. The Basics: Getting Started Quickly
Get going with Python programming as quickly as possible.
In this chapter, we introduce the basics of programming in Python, and we do this in typical Head First style: by jumping right in. After just a few pages, you’ll have run your first sample program. By the end of the chapter, you’ll not only be able to run the sample program, but you’ll understand its code too (and more besides). Along the way, you’ll learn about a few of the things that make Python the programming language it is. So, let’s not waste any more time. Flip the page and let’s get going!
Breaking with Tradition
Pick up almost any book on a programming language, and the first thing you’ll see is the Hello World example.

No, we aren’t.
This is a Head First book, and we do things differently ’round here. With other books, there is a tradition to start by showing you how to write the Hello World program in the language under consideration. However, with Python, what you end up with is a single statement that invokes Python’s built-in print function, which displays the traditional “Hello, World!” message on screen. It’s almost too exciting...and it teaches you next to nothing.
So, no, we aren’t going to show you the Hello World program in Python, as there’s really nothing to learn from it. We’re going to take a different path...
Starting with a meatier example
Our plan for this chapter is to start with an example that’s somewhat larger and, consequently, more useful than Hello World.
We’ll be right up front and tell you that the example we have is somewhat contrived: it does do something, but may not be entirely useful in the long run. That said, we’ve chosen it to provide a vehicle with which to cover a lot of Python in as short a timespan as possible. And we promise by the time you’ve worked through the first example program, you’ll know enough to write Hello World in Python without our help.
Jump Right In
If you haven’t already installed a version of Python 3 on your computer, pause now and head on over to Appendix A for some step-by-step installation instructions (it’ll only take a couple minutes, promise).
With the latest Python 3 installed, you’re ready to start programming Python, and to help with this—for now—we’re going to use Python’s built-in integrated development environment (IDE).
Python’s IDLE is all you need to get going
When you install Python 3 on your computer, you also get a very simple yet usable IDE called IDLE. Although there are many different ways in which to run Python code (and you’ll meet a lot of them throughout this book), IDLE is all you need when starting out.
Start IDLE on your computer, then use the File...→New File... menu option to open a new editing window. When we did this on our computer, we ended up with two windows: one called the Python Shell and another called Untitled:
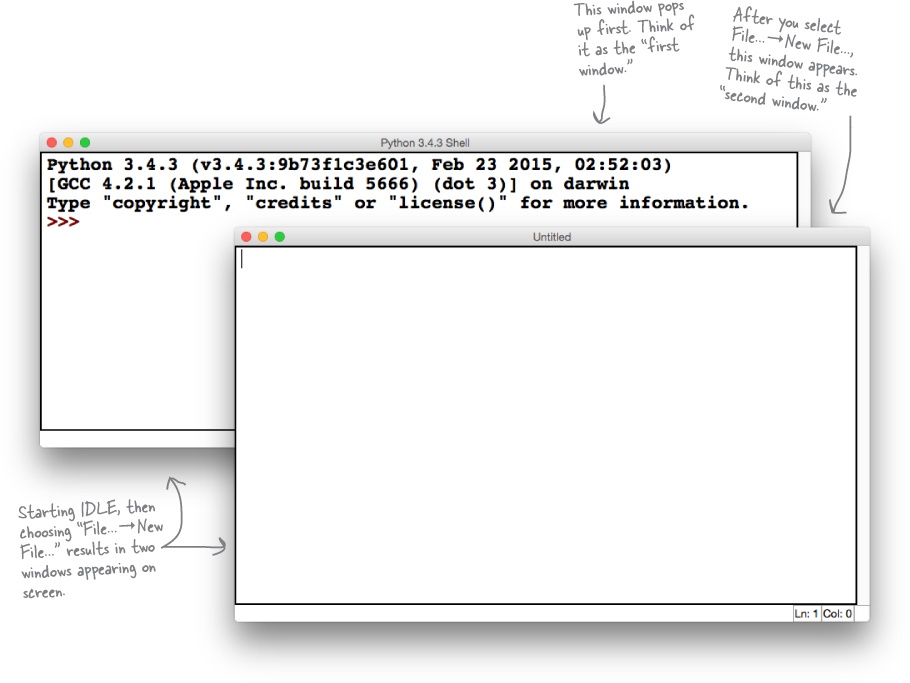
Understanding IDLE’s Windows
Both of these IDLE windows are important.
The first window, the Python Shell, is a REPL environment used to run snippets of Python code, typically a single statement at a time. The more you work with Python, the more you’ll come to love the Python Shell, and you’ll be using it a lot as you progress through this book. For now, though, we are more interested in the second window.
The second window, Untitled, is a text editing window that can be used to write complete Python programs. It’s not the greatest editor in the world (as that honor goes to <insert your favorite text editor’s name here>), but IDLE’s editor is quite usable, and has a bunch of modern features built right in, including color-syntax handling and the like.
Geek Bits

What does REPL mean?
It‘s geek shorthand for “read-eval-print-loop,” and describes an interactive programming tool that lets you experiment with snippets of code to your heart’s desire. Find out way more than you need to know by visiting http://en.wikipedia.org/wiki/Read-eval-print_loop.
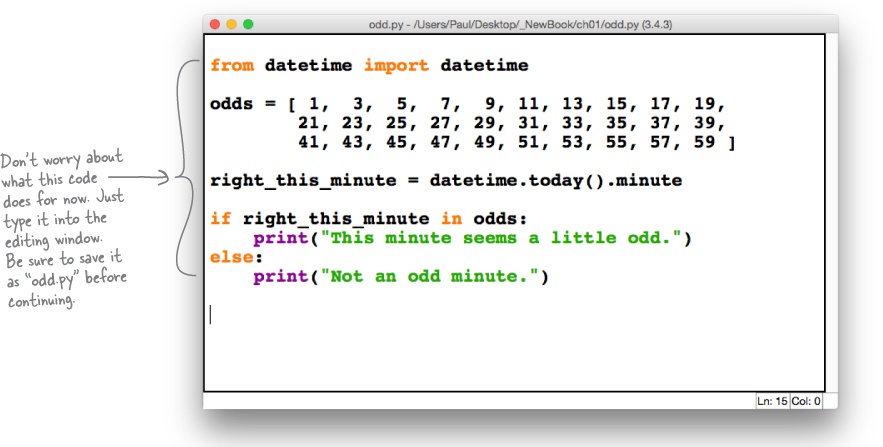
As we are jumping right in, let’s go ahead and enter a small Python program into this window. When you are done typing in the code below, use the File...→Save... menu option to save your program under the name odd.py.
Be sure to enter the code exactly as shown here:
So...now what? If you’re anything like us, you can’t wait to run this code, right? Let’s do this now. With your code in the edit window (as shown above), press the F5 key on your keyboard. A number of things can happen...
What Happens Next...
If your code ran without error, flip over to the next page, and keep going.
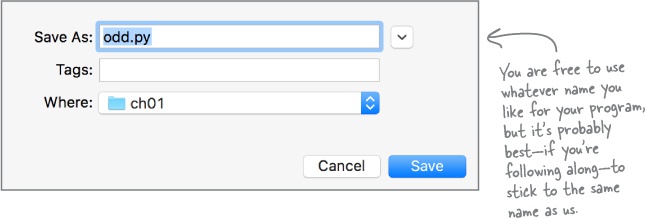
If you forgot to save your code before you tried to run it, IDLE complains, as you have to save any new code to a file first. You’ll see a message similar to this one if you didn’t save your code:

Click the OK button, then provide a name for your file. We’ve chosen odd as the name for our file, and we’ve added a .py extension (which is a Python convention well worth adhering to):
If your code now runs (having been saved), flip over to the next page, and keep going. If, however, you have a syntax error somewhere in your code, you’ll see this message:
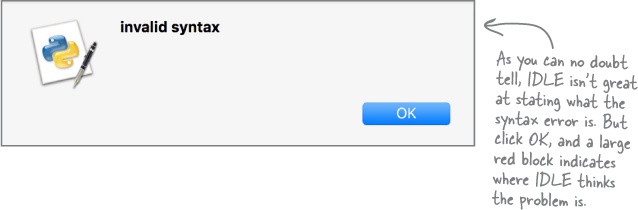
Click the OK button, then note where IDLE thinks the syntax error is: look for the large red block in the edit window. Make sure your code matches ours exactly, save your file again, and then press F5 to ask IDLE to execute your code once more.
Press F5 to Run Your Code
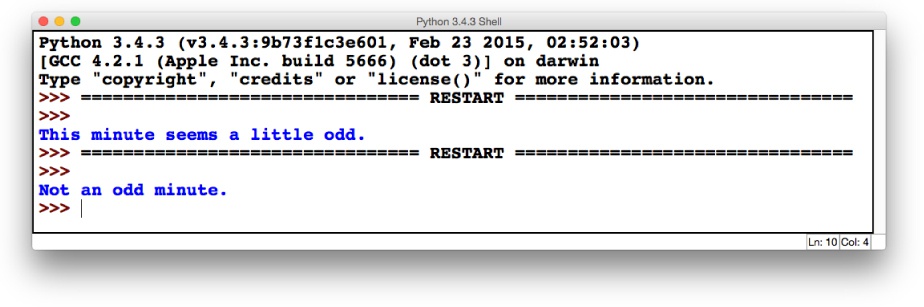
Pressing F5 executes the code in the currently selected IDLE text-editing window—assuming, of course, that your code doesn’t contain a runtime error. If you have a runtime error, you’ll see a Traceback error message (in red). Read the message, then return to the edit window to make sure the code you entered is exactly the same as ours. Save your amended code, then press F5 again. When we pressed F5, the Python Shell became the active window, and here’s what we saw:

Depending on what time of day it is, you may have seen the Not an odd minute message instead. Don’t worry if you did, as this program displays one or the other message depending on whether your computer’s current time contains a minute value that’s an odd number (we did say this example was contrived, didn’t we?). If you wait a minute, then click the edit window to select it, then press F5 again, your code runs again. You’ll see the other message this time (assuming you waited the required minute). Feel free to run this code as often as you like. Here is what we saw when we (very patiently) waited the required minute:

Let’s spend some time learning how this code runs.
Code Runs Immediately
When IDLE asks Python to run the code in the edit window, Python starts at the top of the file and begins executing code straightaway.
For those of you coming to Python from one of the C-like languages, note that there is no notion of a main() function or method in Python. There’s also no notion of the familiar edit-compile-link-run process. With Python, you edit your code and save it, and run it immediately.
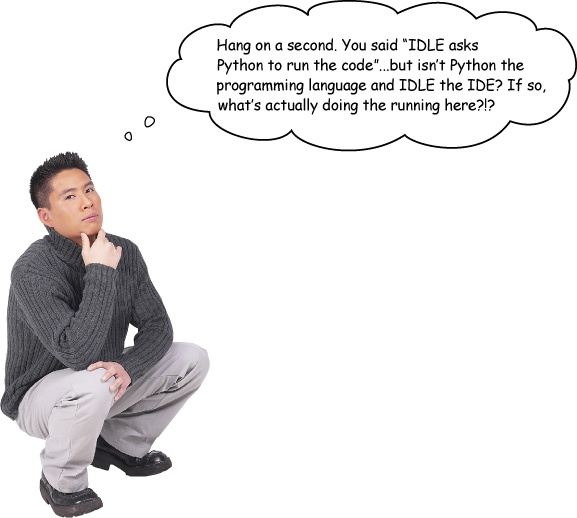
Oh, good catch. That is confusing.
Here’s what you need to know: “Python” is the name given to the programming language and “IDLE” is the name given to the built-in Python IDE.
That said, when you install Python 3 on your computer, an interpreter is installed, too. This is the technology that runs your Python code. Rather confusingly, this interpreter is also known by the name “Python.” By right, everyone should use the more correct name when referring to this technology, which is to call it “the Python interpreter.” But, alas, nobody ever does.
Starting this very second, in this book, we’ll use the word “Python” to refer to the language, and the word “interpreter” to refer to the technology that runs your Python code. “IDLE” refers to the IDE, which takes your Python code and runs it through the interpreter. It’s the interpreter that does all the actual work here.
Executing Code, One Statement at a Time
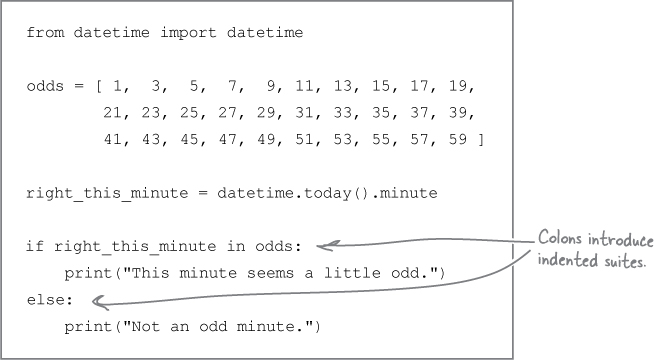
Here is the program code from page 4 again:
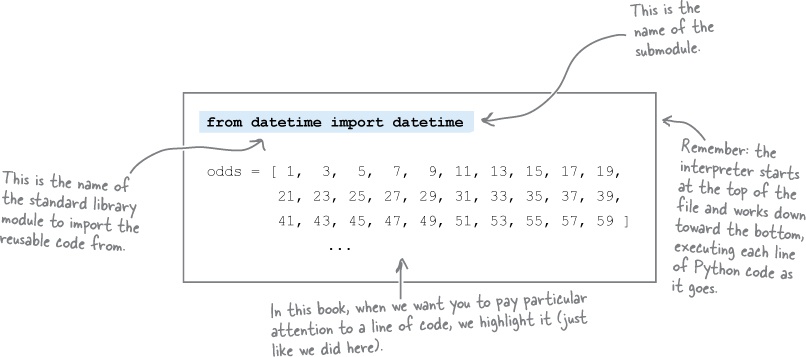
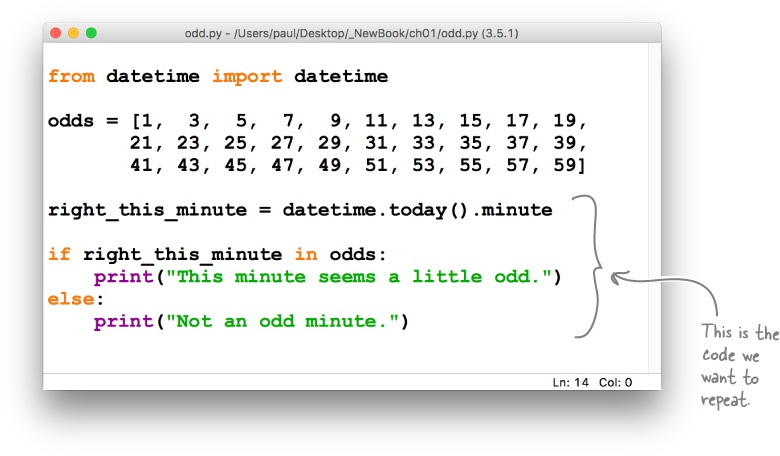
from datetime import datetime

odds = [ 1,  3,  5,  7,  9, 11, 13, 15, 17, 19,
        21, 23, 25, 27, 29, 31, 33, 35, 37, 39,
        41, 43, 45, 47, 49, 51, 53, 55, 57, 59 ]

right_this_minute = datetime.today().minute

if right_this_minute in odds:
    print("This minute seems a little odd.")
else:
    print("Not an odd minute.")
Let’s be the Python interpreter
Let’s take some time to run through this code in much the same way that the interpreter does, line by line, from the top of the file to the bottom.
Think of modules as a collection of related functions.
The first line of code imports some preexisting functionality from Python’s standard library, which is a large stock of software modules providing lots of prebuilt (and high-quality) reusable code.
In our code, we specifically request one submodule from the standard library’s datetime module. The fact that the submodule is also called datetime is confusing, but that’s how this works. The datetime submodule provides a mechanism to work out the time, as you’ll see over the next few pages.
Functions + Modules = The Standard Library
Python’s standard library is very rich, and provides a lot of reusable code.
Let’s look at another module, called os, which provides a platform-independent way to interact with your underlying operating system (we’ll return to the datetime module in a moment). Let’s concentrate on just one provided function, getcwd, which—when invoked—returns your current working directory.
Here’s how you’d typically import, then invoke, this function within a Python program:

A collection of related functions makes up a module, and there are lots of modules in the standard library:
Functions are inside modules inside the standard library.
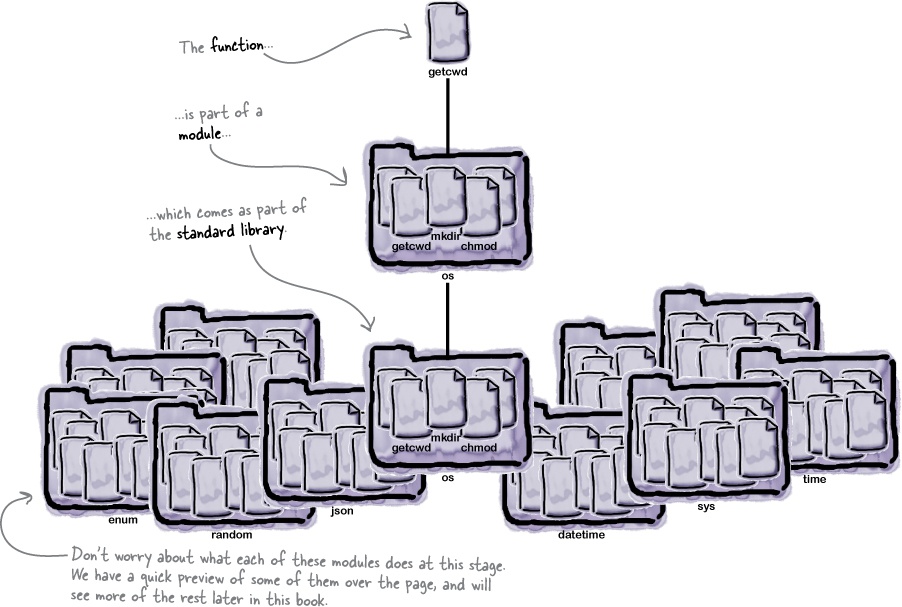

The standard library is the jewel in Python’s crown, supplying reusable modules that help you with everything from, for example, working with data, through manipulating ZIP archives, to sending emails, to working with HTML. The standard library even includes a web server, as well as the popular SQLite database technology. In this Up Close, we’ll present an overview of just a few of the most commonly used modules in the standard library. To follow along, you can enter these examples as shown at your >>> prompt (in IDLE). If you are currently looking at IDLE’s edit window, choose Run...→Python Shell from the menu to access the >>> prompt.
Let’s start by learning a little about the system your interpreter is running on. Although Python prides itself on being cross-platform, in that code written on one platform can be executed (generally unaltered) on another, there are times when it’s important to know that you are running on, say, Mac OS X. The sys module exists to help you learn more about your interpreter’s system. Here’s how to determine the identity of your underlying operating system, by first importing the sys module, then accessing the platform attribute:

The sys module is a good example of a reusable module that primarily provides access to preset attributes (such as platform). As another example, here’s how to determine which version of Python is running, which we pass to the print function to display on screen:

The os module is a good example of a reusable module that primarily yields functionality, as well as providing a system-independent way for your Python code to interact with the underlying operating system, regardless of exactly which operating system that is.
For example, here’s how to work out the name of the folder your code is operating within using the getcwd function. As with any module, you begin by importing the module before invoking the function:

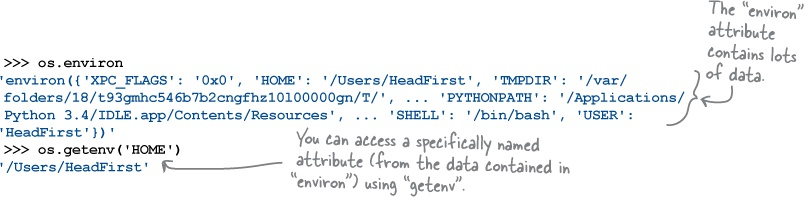
You can access your system’s environment variables, as a whole (using the environ attribute) or individually (using the getenv function):
Working with dates (and times) comes up a lot, and the standard library provides the datetime module to help when you’re working with this type of data. The date.today function provides today’s date:
That’s certainly a strange way to display today’s date, though, isn’t it? You can access the day, month, and year values separately by appending an attribute access onto the call to date.today:

You can also invoke the date.isoformat function and pass in today’s date to display a much more user-friendly version of today’s date, which is converted to a string by isoformat:
And then there’s time, which none of us seem to have enough of. Can the
standard library tell us what time it is? Yes. After importing the
time module, call the strftime function and specify how you
want the time displayed. In this case, we are interested in the current time’s hour
(%H) and minute (%M) values in 24-hour format:

How about working out the day of the week, and whether or not it’s before noon? Using the %A %p specification with strftime does just that:
As a final example of the type of reusable functionality the standard library provides, imagine you have some HTML that you are worried might contain some potentially dangerous <script> tags. Rather than parsing the HTML to detect and remove the tags, why not encode all those troublesome angle brackets using the escape function from the html module? Or maybe you have some encoded HTML that you’d like to return to its original form? The unescape function can do that. Here are examples of both:

Batteries Included

As the standard library is so rich, the thinking is all you need to be immediately productive with the language is to have Python installed.
Unlike Christmas morning, when you open your new toy only to discover that it doesn’t come with batteries, Python doesn’t disappoint; it comes with everything you need to get going. And it’s not just the modules in the standard library that this thinking applies to: don’t forget the inclusion of IDLE, which provides a small, yet usable, IDE right out of the box.
All you have to do is code.
Geek Bits
The standard library isn’t the only place you’ll find excellent importable modules to use with your code. The Python community also supports a thriving collection of third-party modules, some of which we’ll explore later in this book. If you want a preview, check out the community-run repository: http://pypi.python.org.
Data Structures Come Built-in
As well as coming with a top-notch standard library, Python also has some powerful built-in data structures. One of these is the list, which can be thought of as a very powerful array. Like arrays in many other languages, lists in Python are enclosed within square brackets ([]).
Like arrays, lists can hold data of any type.
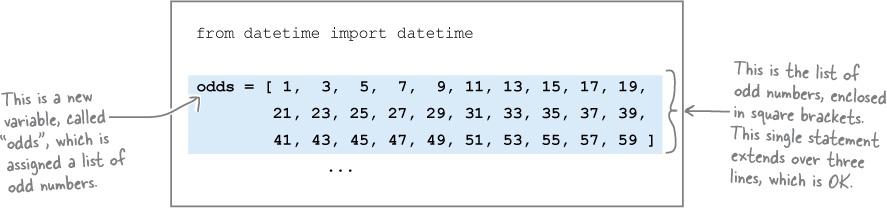
The next three lines of code in our program (shown below) assign a literal list of odd numbers to a variable called odds. In this code, odds is a list of integers, but lists in Python can contain any data of any type, and you can even mix the types of data in a list (if that’s what you’re into). Note how the odds list extends over three lines, despite being a single statement. This is OK, as the interpreter won’t decide a single statement has come to an end until it finds the closing bracket (]) that matches the opening one ([). Typically, the end of the line marks the end of a statement in Python, but there can be exceptions to this general rule, and multiline lists are just one of them (we’ll meet the others later).
There are lots of things that can be done with lists, but we’re going to defer any further discussion until a later chapter. All you need to know now is that this list now exists, has been assigned to the odds variable (thanks to the use of the assignment operator, =), and contains the numbers shown.
Python variables are dynamically assigned
Before getting to the next line of code, perhaps a few words are needed about variables, especially if you are one of those programmers who might be used to predeclaring variables with type information before using them (as is the case in statically typed programming languages).
Python comes with all the usual operators, including <, >, <=, >=, ==, !=, as well as the = assignment operator.
In Python, variables pop into existence the first time you use them, and their type does not need to be predeclared. Python variables take their type information from the type of the object they’re assigned. In our program, the odds variable is assigned a list of numbers, so odds is a list in this case.
Let’s look at another variable assignment statement. As luck would have it, this just so happens to also be the next line of code in our program.
Invoking Methods Obtains Results
The third line of code in our program is another assignment statement.
Unlike the last one, this one doesn’t assign a data structure to a variable, but instead assigns the result of a method call to another new variable, called right_this_minute. Take another look at the third line of code:
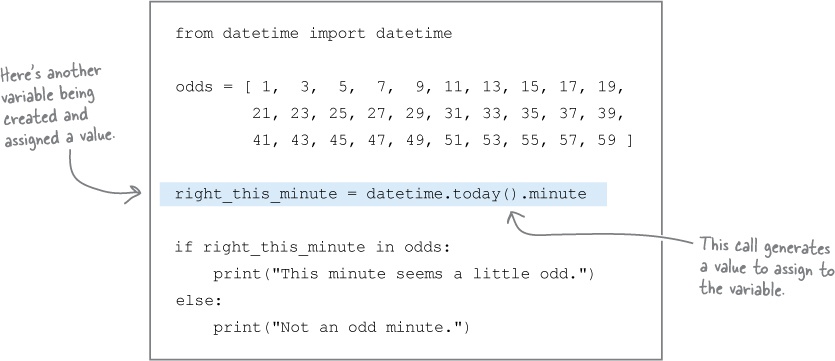
Invoking built-in module functionality
The third line of code invokes a method called today that comes with the datetime submodule, which is itself part of the datetime module (we did say this naming strategy was a little confusing). You can tell today is being invoked due to the standard postfix parentheses: ().
You’ll see more of the dot-notation syntax later in this book.
When today is invoked, it returns a “time object” (of type datetime.datetime, which
contains many pieces of information about the current time. These are the current time’s
attributes, which you can access via the customary dot-notation syntax. In this program, we are interested in the minute
attribute, which we can access by appending .minute to the method invocation, as
shown above. The resulting value is then assigned to the right_this_minute
variable. You can think of this line of code as saying: create an object that represents
today’s time, then extract the value of the minute attribute before assigning it to a
variable. It is tempting to split this single line of code into two
lines to make it “easier to understand,” as follows:

You can do this (if you like), but most Python programmers prefer not to create the temporary variable (time_now in this example) unless it’s needed at some point later in the program.
Deciding When to Run Blocks of Code
At this stage we have a list of numbers called odds. We also have a minute value called right_this_minute. In order to work out whether the current minute value stored in right_this_minute is an odd number, we need some way of determining if it is in the odds list. But how do we do this?
It turns out that Python makes this type of thing very straightforward. As well as including all the usual comparison operators that you’d expect to find in any programming language (such as >, <, >=, <=, and so on), Python comes with a few “super” operators of its own, one of which is in.
The in operator checks if one thing is inside another. Take a look at the next line of code in our program, which uses the in operator to check whether right_this_minute is inside the odds list:
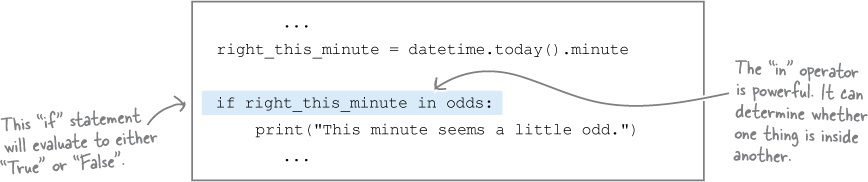
The in operator returns either True or False. As you’d expect, if the value in right_this_minute is in odds, the if statement evaluates to True, and the block of code associated with the if statement executes.
Blocks in Python are easy to spot, as they are always indented.
In our program there are two blocks, which each contain a single call to the print function. This function can display messages on screen (and we’ll see lots of uses of it throughout this book). When you enter this program code into the edit window, you may have noticed that IDLE helps keep you straight by indenting automatically. This is very useful, but do be sure to check that IDLE’s indentation is what you want:
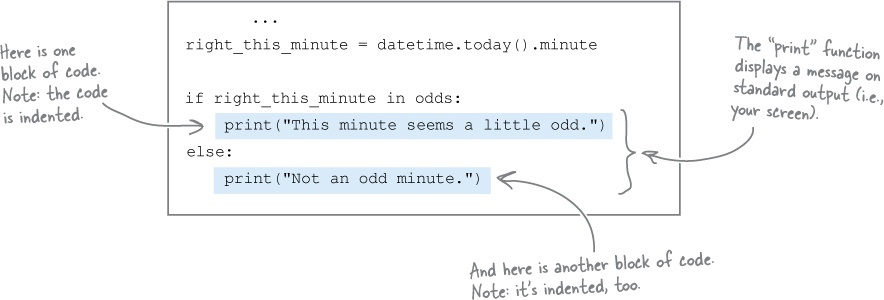
Did you notice that there are no curly braces here?
What Happened to My Curly Braces?
If you are used to a programming language that uses curly braces ({ and }) to delimit blocks of code, encountering blocks in Python for the first time can be disorienting, as Python doesn’t use curly braces for this purpose. Python uses indentation to demarcate a block of code, which Python programmers prefer to call suite as opposed to block (just to mix things up a little).
It’s not that curly braces don’t have a use in Python. They do, but—as we’ll see in Chapter 3—curly braces have more to do with delimiting data than they have to do with delimiting suites (i.e., blocks) of code.
Instead of referring to a code “block,” Python programmers use the word “suite.” Both names are used in practice, but the Python docs prefer “suite.”
Suites within any Python program are easy to spot, as they are always indented. This helps your brain quickly identify suites when reading code. The other visual clue for you to look out for is the colon character (:), which is used to introduce a suite that’s associated with any of Python’s control statements (such as if, else, for, and the like). You’ll see lots of examples of this usage as you progress through this book.
A colon introduces an indented suite of code
The colon (:) is important, in that it introduces a new suite of code that must be indented to the right. If you forget to indent your code after a colon, the interpreter raises an error.
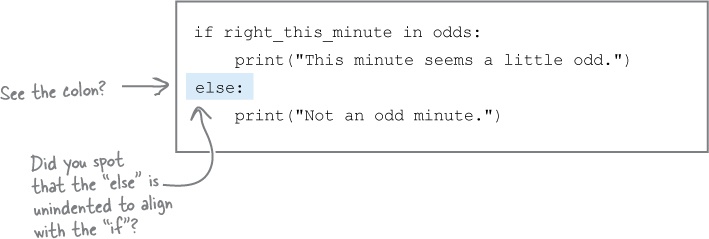
Not only does the if statement in our example have a colon, the else has one, too. Here’s all the code again:
We’re nearly done. There’s just one final statement to discuss.
What “else” Can You Have with “if”?
We are nearly done with the code for our example program, in that there is only one line of code left to discuss. It is not a very big line of code, but it’s an important one: the else statement that identifies the block of code that executes when the matching if statement returns a False value.
Take a closer look at the else part from our program code, which we need to
unindent to align with the if part of this statement:
It is a very common slip-up for Python newbies to forget the colon when first writing code.
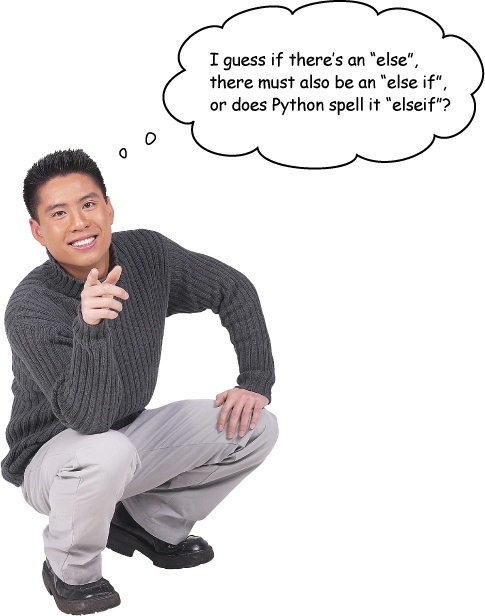
Neither. Python spells it elif.
If you have a number of conditions that you need to check as part of an if
statement, Python provides elif as well as else. You can have
as many elif parts (each with its own suite) as needed.
Here’s a small example that assumes a variable called today is previously assigned a string representing whatever today is:
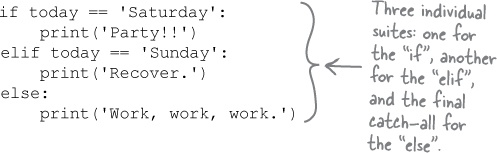
Suites Can Contain Embedded Suites
Any suite can contain any number of embedded suites, which also have to be indented. When Python programmers talk about embedded suites, they tend to talk about levels of indentation.
The initial level of indentation for any program is generally referred to as the first or (as is so common when it comes to counting with many programming languages) indentation level zero. Subsequent levels are referred to as the second, third, fourth, and so on (or level one, level two, level three, and so on).
Here’s a variation on the today example code from the last page. Note how an embedded if/else has been added to the if statement that executes when today is set to ‘Sunday’. We’re also assuming another variable called condition exists and is set to a value that expresses how you’re currently feeling. We’ve indicated where each of the suites is, as well as at which level of indentation it appears:
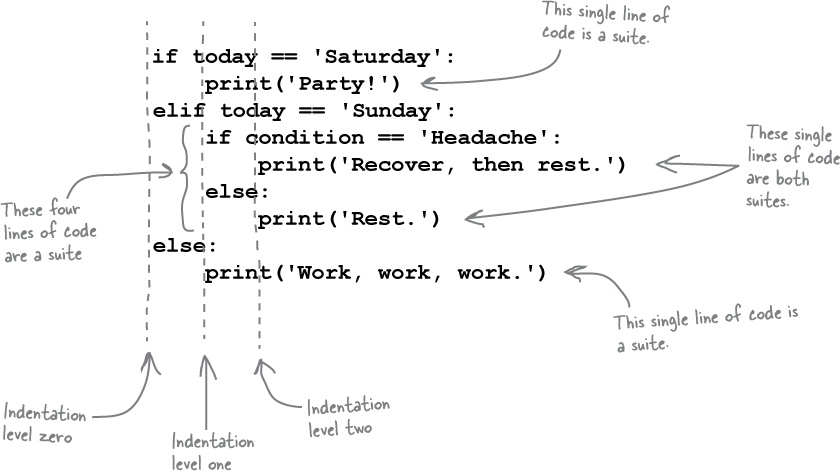
It is important to note that code at the same level of indentation is only related to other code at the same level of indentation if all the code appears within the same suite. Otherwise, they are in separate suites, and it does not matter that they share a level of indentation. The key point is that indentation is used to demarcate suites of code in Python.
What We Already Know
With the final few lines of code discussed, let’s pause to review what the odd.py program has told us about Python:

Python comes with a built-in IDE called IDLE, which lets you create, edit, and run your Python code—all you need to do is type in your code, save it, and then press F5.
IDLE interacts with the Python interpreter, which automates the compile-link-run process for you. This lets you concentrate on writing your code.
The interpreter runs your code (stored in a file) from top to bottom, one line at a time. There is no notion of a
main()function/method in Python.Python comes with a powerful standard library, which provides access to lots of reusable modules (of which
datetimeis just one example).There is a collection of standard data structures available to you when you’re writing Python programs. The list is one of them, and is very similar in notion to an array.
The type of a variable does not need to be declared. When you assign a value to a variable in Python, it dynamically takes on the type of the data it refers to.
You make decisions with the
if/elif/elsestatement. Theif,elif, andelsekeywords precede blocks of code, which are known in the Python world as “suites.”It is easy to spot suites of code, as they are always indented. Indentation is the only code grouping mechanism provided by Python.
In addition to indentation, suites of code are also preceded by a colon (:). This is a syntactical requirement of the language.
Let’s extend this program to do more.
It’s true that we needed more lines to describe what this short program does than we actually needed to write the code. But this is one of the great strengths of Python: you can get a lot done with a few lines of code.
Review the list above once more, and then turn the page to make a start on seeing what our program’s extensions will be.
Extending Our Program to Do More
Let’s extend our program in order to learn a bit more Python.
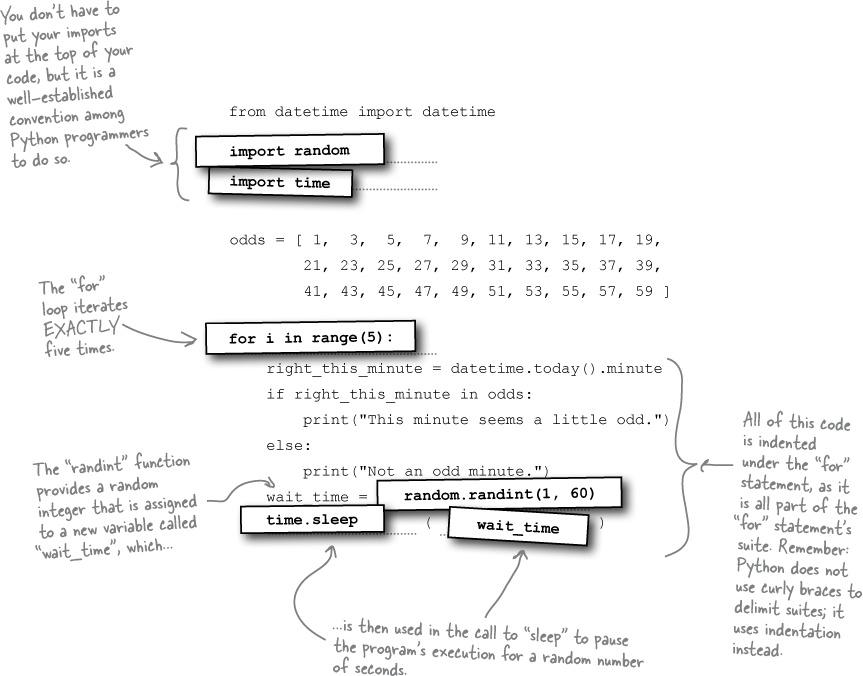
At the moment, the program runs once, then terminates. Imagine that we want this program to execute more than once; let’s say five times. Specifically, let’s execute the “minute checking code” and the if/else statement five times, pausing for a random number of seconds between each message display (just to keep things interesting). When the program terminates, five messages should be on screen, as opposed to one.
Here’s the code again, with the code we want to run multiple times circled:
What we need to do:
Loop over the encircled code.
A loop lets us iterate over any suite, and Python provides a number of ways to do just that. In this case (and without getting into why), we’ll use Python’s
forloop to iterate.Pause execution.
Python’s standard
timemodule provides a function calledsleepthat can pause execution for an indicated number of seconds.Generate a random number.
Happily, another Python module,
random, provides a function calledrandintthat we can use to generate a random number. Let’s userandintto generate a number between 1 and 60, then use that number to pause the execution of our program on each iteration.
We now know what we want to do. But is there a preferred way of going about making these changes?
What’s the Best Approach to Solving This Problem?

Both approaches work with Python
You can follow both of these approaches when working with Python, but most Python programmers favor experimentation when trying to work out what code they need for a particular situation.
Experimenting at the >>> prompt helps you work out the code you need.
Don’t get us wrong: we are not suggesting that Bob’s approach is wrong and Laura’s is right. It’s just that Python programmers have both options available to them, and the Python Shell (which we met briefly at the start of this chapter) makes experimentation a natural choice for Python programmers.
Let’s determine the code we need in order to extend our program, by experimenting at the >>> prompt.
Returning to the Python Shell
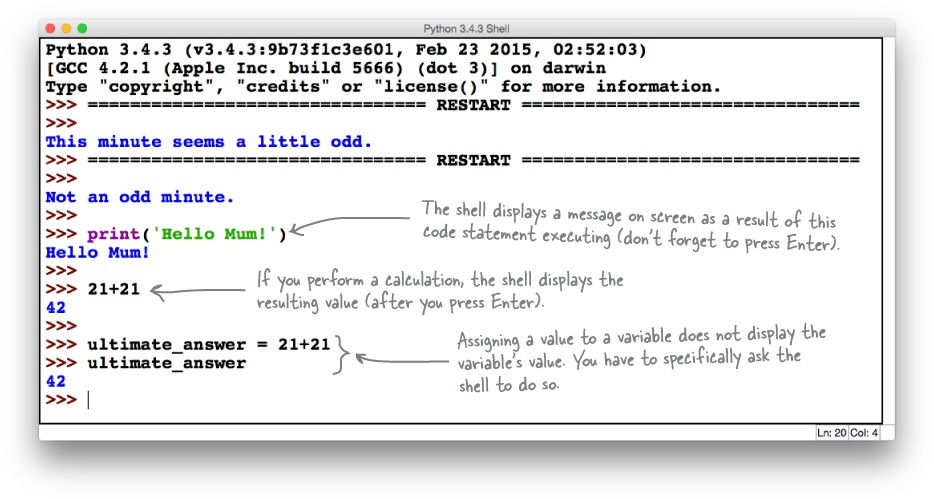
Here’s how the Python Shell looked the last time we interacted with it (yours might look a little different, as your messages may have appeared in an alternate order):
The Python Shell (or just “shell” for short) has displayed our program’s messages, but it can do so much more than this. The >>> prompt allows you to enter any Python code statement and have it execute immediately. If the statement produces output, the shell displays it. If the statement results in a value, the shell displays the calculated value. If, however, you create a new variable and assign it a value, you need to enter the variable’s name at the >>> prompt to see what value it contains.
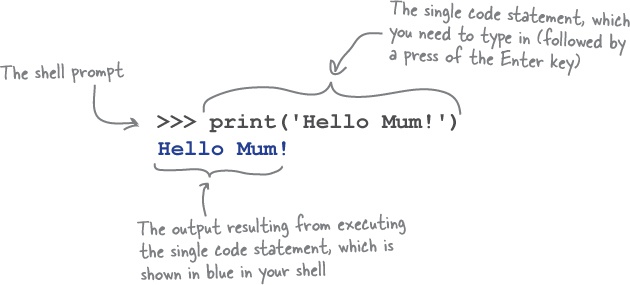
Check out the example interactions, shown below. It is even better if you follow along and try out these examples at your shell. Just be sure to press the Enter key to terminate each program statement, which also tells the shell to execute it now:
Experimenting at the Shell
Now that you know you can type a single Python statement into the >>> prompt and have it execute immediately, you can start to work out the code you need to extend your program.
Here’s what you need your new code to do:
Loop a specified number of times. We’ve already decided to use Python’s | |
Pause the program for a specified number of seconds. The | |
Generate a random number between two provided values. The |
Rather than continuing to show you complete IDLE screenshots, we’re only going to show you the >>> prompt and any displayed output. Specifically, from this point onward, you’ll see something like the following instead of the earlier screenshots:
Over the next few pages, we’re going to experiment to figure out how to add the three features listed above. We’ll play with code at the >>> prompt until we determine exactly the statements we need to add to our program. Leave the odd. py code as is for now, then make sure the shell window is active by selecting it. The cursor should be blinking away to the right of the >>>, waiting for you to type some code.
Flip the page when you’re ready. Let the experiments begin.
Iterating Over a Sequence of Objects
We said earlier that we were going to employ Python’s for loop here. The for loop is perfect for controlling looping when you know ahead of time how many iterations you need. (When you don’t know, we recommend the while loop, but we’ll save discussing the details of this alternate looping construct until we actually need it). At this stage, all we need is for, so let’s see it in action at the >>> prompt.
Use “for” when looping a known number of times.
We present three typical uses of for. Let’s see which one best fits our needs.
Usage example 1. This for loop, below, takes a list of numbers and iterates once for each number in the list, displaying the current number on screen. As it does so, the for loop assigns each number in turn to a loop iteration variable, which is given the name i in this code.
As this code is more than a single line, the shell indents automatically for you when you press Enter after the colon. To signal to the shell that you are done entering code, press Enter twice at the end of the loop’s suite:
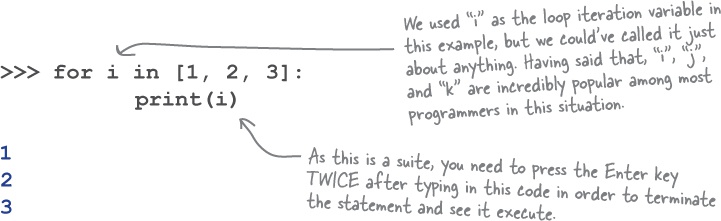
Note the indentation and colon. Like if statements, the code associated with a for statement needs to be indented.
A sequence is an ordered collection of objects.
Usage example 2. This for loop, below, iterates over a string, with each character in the string being processed during each iteration. This works because a string in Python is a sequence. A sequence is an ordered collection of objects (and we’ll see lots of examples of sequences in this book), and every sequence in Python can be iterated over by the interpreter.
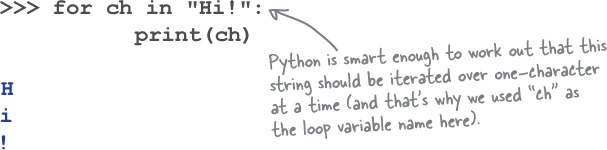
Nowhere did you have to tell the for loop how big the string is. Python is smart enough to work out when the string ends, and arranges to terminate (i.e., end) the for loop on your behalf when it exhausts all the objects in the sequence.
Iterating a Specific Number of Times
In addition to using for to iterate over a sequence, you can be more exact and specify a number of iterations, thanks to the built-in function called range.
Let’s look at another usage example that showcases using range.
Usage example 3. In its most basic form, range accepts a single integer argument that dictates how many times the for loop runs (we’ll see other uses of range later in this book). In this loop, we use range to generate a list of numbers that are assigned one at a time to the num variable:
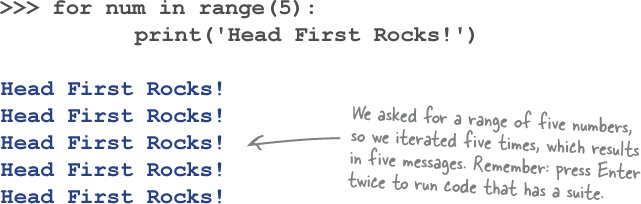
The for loop didn’t use the num loop iteration variable anywhere in the loop’s suite. This did not raise an error, which is OK, as it is up to you (the programmer) to decide whether or not num needs to be processed further in the suite. In this case, doing nothing with num is fine.

Indeed we are. Task #1 is complete.
The three usage examples show that Python’s for loop is what we need to use here, so let’s take the technique shown in Usage example 3 and use it to iterate a specified number of times using a for loop.
Applying the Outcome of Task #1 to Our Code
Here’s how our code looked in IDLE’s edit window before we worked on Task #1:
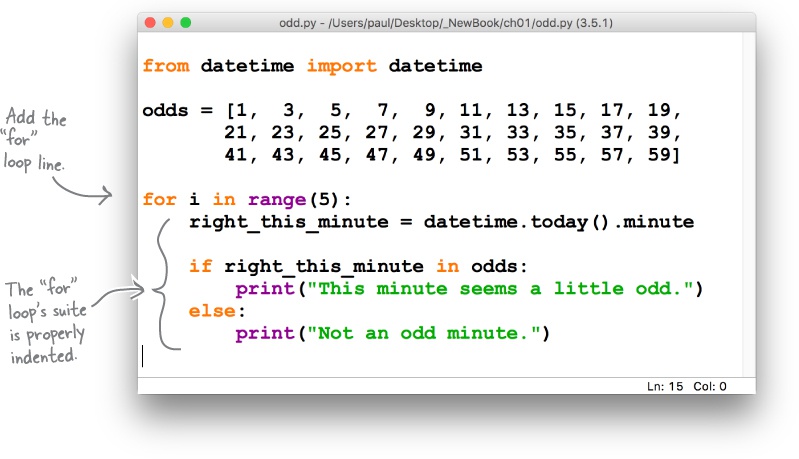
You now know that you can use a for loop to repeat the five lines of code at the bottom of this program five times. The five lines will need to be indented under the for loop, as they are going to form the loop’s suite. Specifically, each line of code needs to be indented once. However, don’t be tempted to perform this action on each individual line. Instead, let IDLE indent the entire suite for you in one go.
Begin by using your mouse to select the lines of code you want to indent:
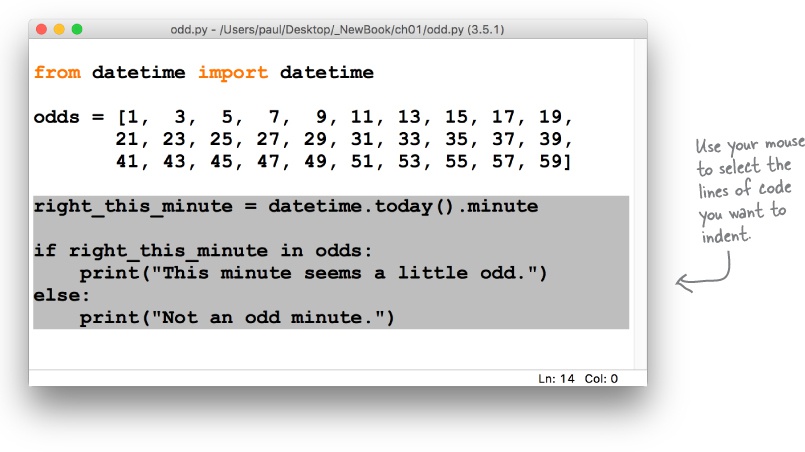
Indent Suites with Format...Indent Region
With the five lines of code selected, choose Indent Region from the Format menu in IDLE’s edit window. The entire suite moves to the right by one indentation level:
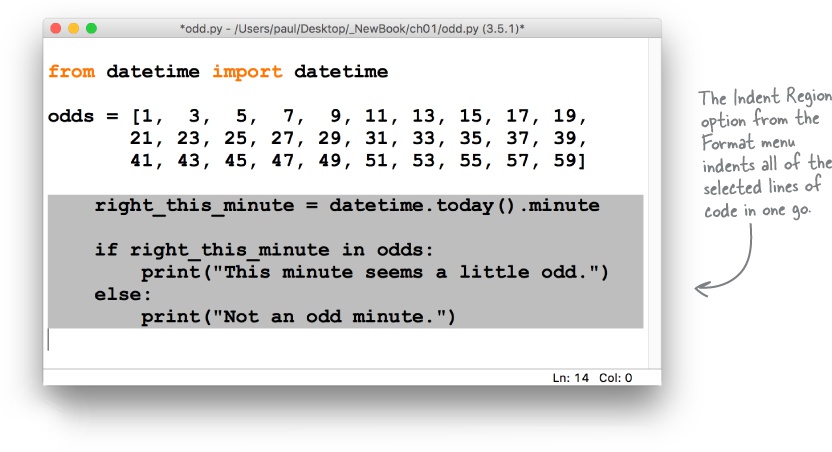
Note that IDLE also has a Dedent Region menu option, which unindents suites, and that both the Indent and Dedent menu commands have keyboard shortcuts, which differ slightly based on the operating system you are running. Take the time to learn the keyboard shortcuts that your system uses now (as you’ll use them all the time). With the suite indented, it’s time to add the for loop:
Arranging to Pause Execution
Let’s remind ourselves of what we need this code to do:
Loop a specified number of times. | |
Pause the program for a specified number of seconds. | |
Generate a random number between two provided values. |
We’re now ready to return to the shell and try out some more code to help with the second task: pause the program for a specified number of seconds.
However, before we do that, recall the opening line of our program, which imported a specifically named function from a specifically named module:
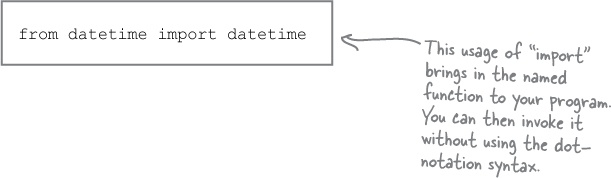
This is one way to import a function into your program. Another equally common technique is to import a module without being specific about the function you want to use. Let’s use this second technique here, as it will appear in many Python programs you’ll come across.
As mentioned earlier in this chapter, the sleep function can pause execution for a specified number of seconds, and is provided by the standard library’s time module. Let’s import the module first, without mentioning sleep just yet:

When the import statement is used as it is with the time module above, you get access to the facilities provided by the module without anything expressly named being imported into your program’s code. To access a function provided by a module imported in this way, use the dot-notation syntax to name it, as shown here:
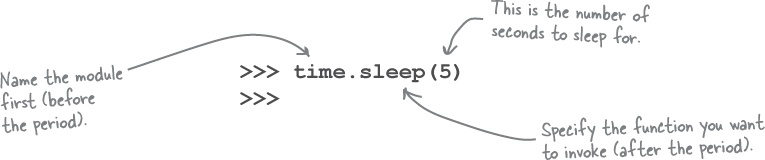
Note that when you invoke sleep in this way, the shell pauses for five seconds before the >>> prompt reappears. Go ahead, and try it now.
Importation Confusion
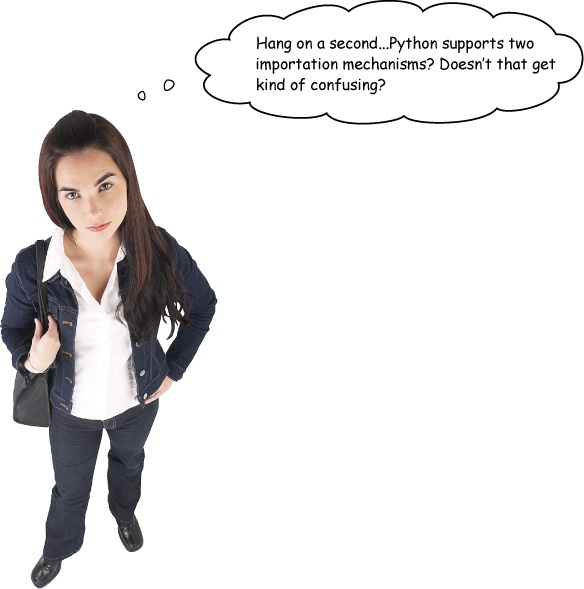
Just to be clear, there aren’t two importation mechanisms in Python, as there is only one import statement. However, the import statement can be used in two ways.
The first, which we initially saw in our example program, imports a named function into our program’s namespace, which then allows us to invoke the function as necessary without having to link the function back to the imported module. (The notion of a namespace is important in Python, as it defines the context within which your code runs. That said, we’re going to wait until a later chapter to explore namespaces in detail).
In our example program, we use the first importation technique, then invoke the datetime function as datetime(), not as datetime.datetime().
The second way to use import is to just import the module, as we did when experimenting with the time module. When we import this way, we have to use the dot-notation syntax to access the module’s functionality, as we did with time.sleep().
Generating Random Integers with Python
Although it is tempting to add import time to the top of our program, then call time.sleep(5) in the for loop’s suite, we aren’t going to do this right now. We aren’t done with our experimentations. Pausing for five seconds isn’t enough; we need to be able to pause for a random amount of time. With that in mind, let’s remind ourselves of what we’ve done, and what remains:
Loop a specified number of times. | |
Pause the program for a specified number of seconds. | |
Generate a random number between two provided values. |
Once we have this last task completed, we can get back to confidently changing our program to incorporate all that we’ve learned from our experimentations. But we’re not there yet—let’s look at the last task, which is to generate a random number.
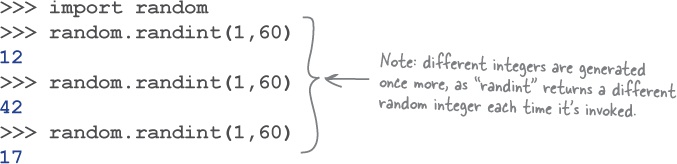
As with sleeping, the standard library can help here, as it includes a module called random. With just this piece of information to guide us, let’s experiment at the shell:
>>> import random
>>>
Use “dir” to query an object.
Now what? We could look at the Python docs or consult a Python reference book...but that involves taking our attention away from the shell, even though it might only take a few moments. As it happens, the shell provides some additional functions that can help here. These functions aren’t meant to be used within your program code; they are designed for use at the >>> prompt. The first is called dir, and it displays all the attributes associated with anything in Python, including modules:
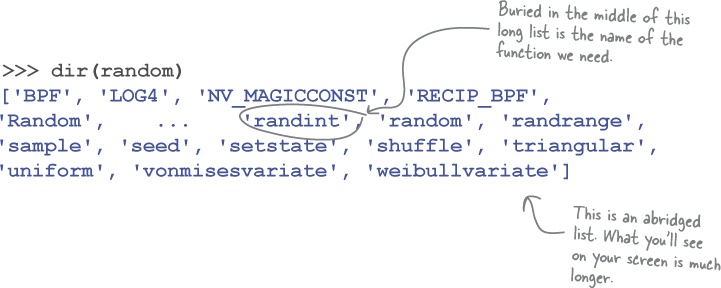
This list has a lot in it. Of interest is the randint() function. To learn more about randint, let’s ask the shell for some help.
Asking the Interpreter for Help
Once you know the name of something, you can ask the shell for help. When you do, the shell displays the section from the Python docs related to the name you’re interested in.
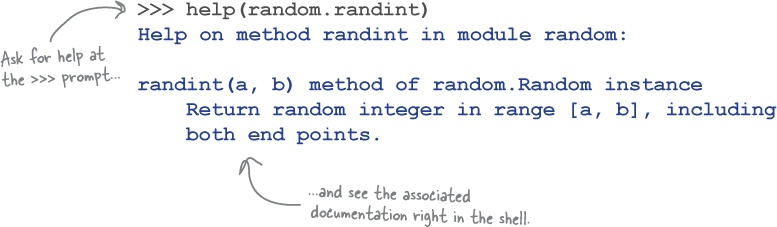
Let’s see this mechanism in action at the >>> prompt by asking for help with the randint function from the random module:
Use “help” to read the Python docs.
Geek Bits
You can recall the last command(s) typed into the IDLE >>> prompt by typing Alt-P when using Linux or Windows. On Mac OS X, use Ctrl-P. Think of the “P” as meaning “previous.”
A quick read of the displayed docs for the randint function confirms what we need to know: if we provide two integers to randint, we get back a random integer from the resulting inclusive range.
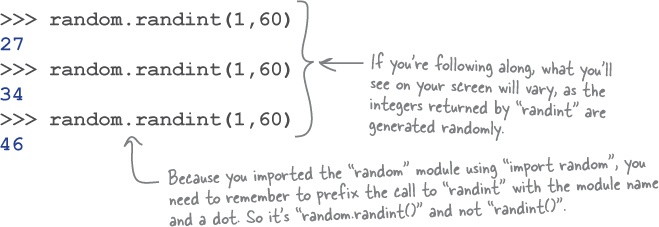
A few final experiments at the >>> prompt show the randint function in action:
With this, you are now in a position to place a satisfying check mark against the last of our tasks, as you now know enough to generate a random number between two provided values:
It’s time to return to our program and make our changes.
Reviewing Our Experiments
Before you forge ahead and change your program, let’s quickly review the outcome of our shell experiments.
We started by writing a for loop, which iterated five times:
Then we used the sleep function from the time module to pause execution of our code for a specified number of seconds:

And then we experimented with the randint function (from the random module) to generate a random integer from a provided range:
We can now put all of this together and change our program.
Let’s remind ourselves of what we decided to do earlier in this chapter: have our program iterate, executing the “minute checking code” and the if/else statement five times, and pausing for a random number of seconds between each iteration. This should result in five messages appearing on screen before the program terminates.
Based on the specification at the bottom of the last page, as well as the results of our experimentations, we went ahead and did some of the required work for you. But, as we were arranging our code magnets on the fridge (don’t ask) someone slammed the door, and now some of our code’s all over the floor.
Your job is to put everything back together, so that we can run the new version of our program and confirm that it’s working as required.
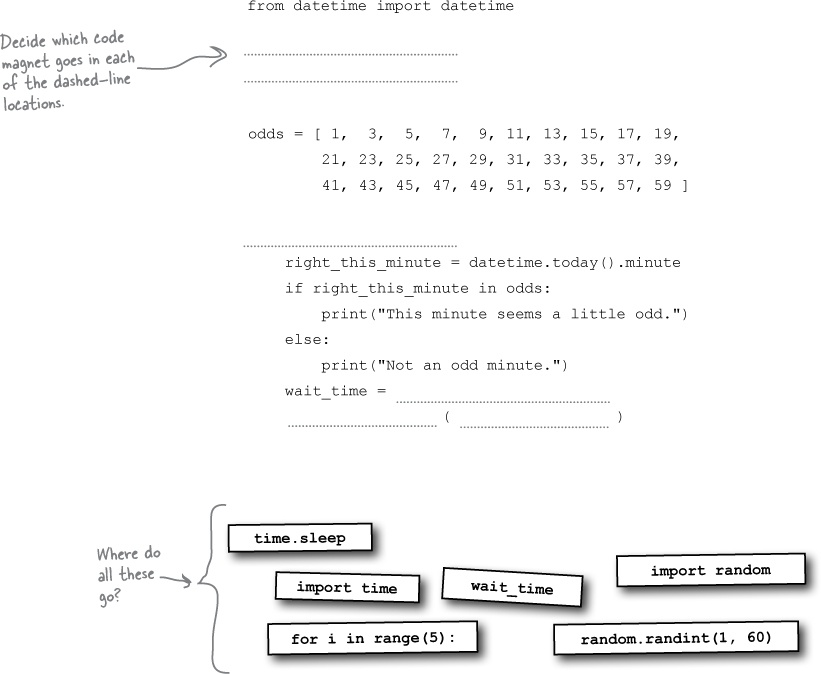
Based on the specification from earlier, as well as the results of our experimentations, we went ahead and did some of the required work for you. But, as we were arranging our code magnets on the fridge (don’t ask) someone slammed the door, and now some of our code’s all over the floor.
Your job was to put everything back together, so that we could run the new version of our program and confirm that it’s working as required.

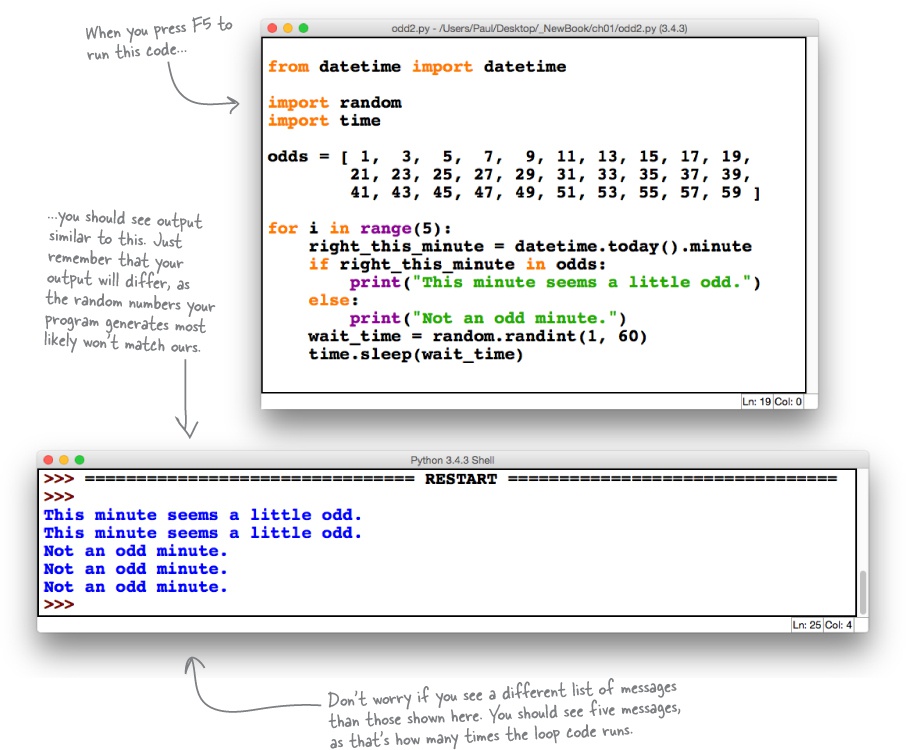
Updating What We Already Know
With odd2.py working, let’s pause once more to review the new things
we’ve learned about Python from these last 15 pages:
When trying to determine the code that they need to solve a particular problem, Python programmers often favor experimenting with code snippets at the shell.
If you’re looking at the
>>>prompt, you’re at the Python Shell. Go ahead: type in a single Python statement and see what happens when it runs.The shell takes your line of code and sends it to the interpreter, which then executes it. Any results are returned to the shell and are then displayed on screen.
The
forloop can be used to iterate a fixed number of times. If you know ahead of time how many times you need to loop, usefor.When you don’t know ahead of time how often you’re going to iterate, use Python’s
whileloop (which we have yet to see, but—don’t worry—we will see it in action later).The
forloop can iterate over any sequence (like a list or a string), as well as execute a fixed number of times (thanks to therangefunction).If you need to pause the execution of your program for a specified number of seconds, use the
sleepfunction provided by the standard library’stimemodule.You can import a specific function from a module. For example,
from time import sleepimports thesleepfunction, letting you invoke it without qualification.If you simply import a module—for example,
import time—you then need to qualify the usage of any of the module’s functions with the module name, like so:time.sleep().The
randommodule has a very useful function calledrandintthat generates a random integer within a specified range.The shell provides two interactive functions that work at the
>>>prompt. Thedirfunction lists an object’s attributes, whereashelpprovides access to the Python docs.
A Few Lines of Code Do a Lot

It is, but we are on a roll here.
It’s true we’ve only touched on a small amount of the Python language so far. But what we’ve looked at has been very useful.
What we’ve seen so far helps to demonstrate one of Python’s big selling points: a few lines of code do a lot. Another of the language’s claims to fame is this: Python code is easy to read.
In an attempt to prove just how easy, we present on the next page a completely different program that you already know enough about Python to understand.
Who’s in the mood for a nice, cold beer?
Coding a Serious Business Application
With a tip of the hat to Head First Java, let’s take a look at the Python version of that classic’s first serious application: the beer song.

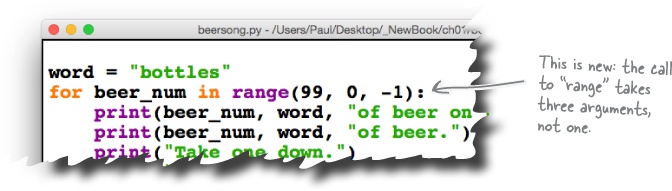
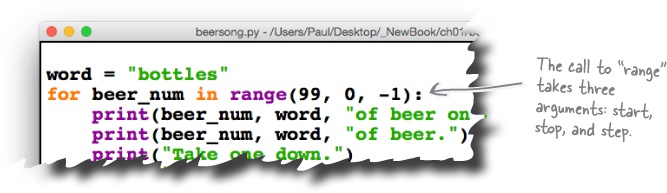
Shown below is a screenshot of the Python version of the beer song code. Other than a slight variation on the usage of the range function (which we’ll discuss in a bit), most of this code should make sense. The IDLE edit window contains the code, while the tail end of the program’s output appears in a shell window:
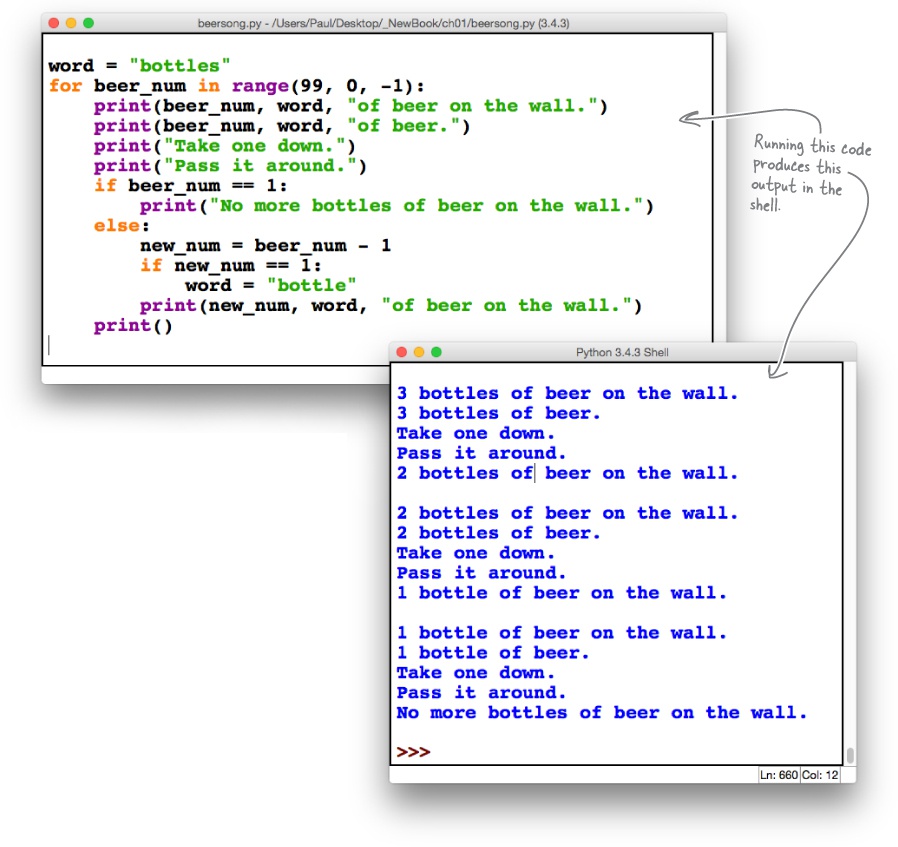
Dealing with all that beer...
With the code shown above typed into an IDLE edit window and saved, pressing F5 produces a lot of output in the shell. We’ve only shown a little bit of the resulting output in the window on the right, as the beer song starts with 99 bottles of beer on the wall and counts down until there’s no more beer. In fact, the only real twist in this code is how it handles this “counting down,” so let’s take a look at how that works before looking at the program’s code in detail.
Python Code Is Easy to Read
When most programmers new to Python first encounter code like that of the beer song, they assume that something’s got to give somewhere else.
There has to be a catch, doesn’t there?
No, there doesn’t. It’s not by accident that Python code is easy to read: the language was designed with that specific goal in mind. Guido van Rossum, the language’s creator, wanted to create a powerful programming tool that produced code that was easy to maintain, which meant code created in Python has to be easy to read, too.
Is Indentation Driving You Crazy?
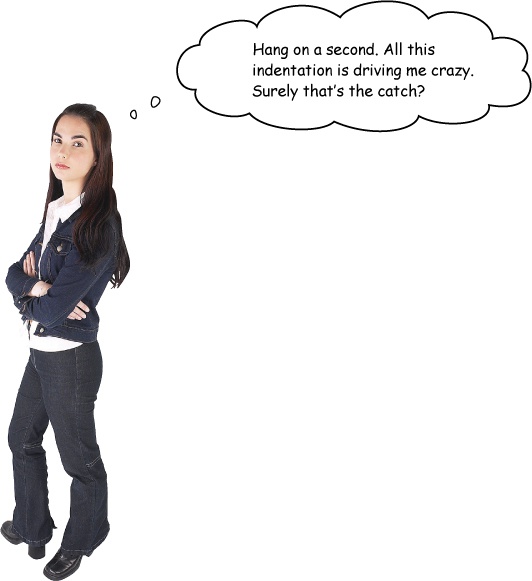
Indentation takes time to get used to.
Don’t worry. Everyone coming to Python from a “curly-braced language” struggles with indentation at first. But it does get better. After a day or two of working with Python, you’ll hardly notice you’re indenting your suites.
One problem that some programmers do have with indentation occurs when they mix tabs with spaces. Due to the way the interpreter counts whitespace, this can lead to problems, in that the code “looks fine” but refuses to run. This is frustrating when you’re starting out with Python.
Our advice: don’t mix tabs with spaces in your Python code.

In fact, we’d go even further and advise you to configure your editor to replace a tap of the Tab key with four spaces (and while you’re at it, automatically remove any trailing whitespace, too). This is the well-established convention among many Python programmers, and you should follow it, too. We’ll have more to say about dealing with indentation at the end of this chapter.
Getting back to the beer song code
If you take a look at the invocation of range in the beer song, you’ll notice that it takes three arguments as opposed to just one (as in our first example program).
Take a closer look, and without looking at the explanation on the next page, see if you can work out what’s going on with this call to range:
Asking the Interpreter for Help on a Function
Recall that you can use the shell to ask for help with anything to do with Python, so let’s ask for some help with the range function.
When you do this in IDLE, the resulting documentation is more than a screen’s worth and it quickly scrolls off the screen. All you need to do is scroll back in the window to where you asked the shell for help (as that’s where the interesting stuff about range is):
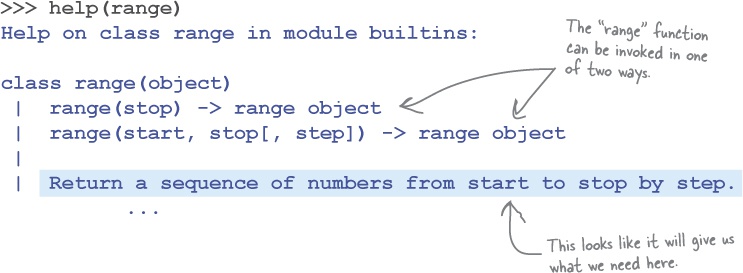
Starting, stopping, and stepping
As range is not the only place you’ll come across start, stop, and step, let’s take a moment to describe what each of these means, before looking at some representative examples (on the next page):
The START value lets you control from WHERE the range begins.
So far, we’ve used the single-argument version of
range, which—from the documentation—expects a value for stop to be provided. When no other value is provided,rangedefaults to using0as the start value, but you can set it to a value of your choosing. When you do, you must provide a value for stop. In this way,rangebecomes a multi-argument invocation.The STOP value lets you control WHEN the range ends.
We’ve already seen this in use when we invoked
range(5)in our code. Note that the range that’s generated never contains the stop value, so it’s a case of up-to-but-not-including stop.The STEP value lets you control HOW the range is generated.
When specifying start and stop values, you can also (optionally) specify a value for step. By default, the step value is
1, and this tellsrangeto generate each value with a stride of1; that is, 0, 1, 2, 3, 4, and so on. You can set step to any value to adjust the stride taken. You can also set step to a negative value to adjust the direction of the generated range.
Experimenting with Ranges
Now that you know a little bit about start, stop, and step, let’s experiment at the shell to learn how we can use the range function to produce many different ranges of integers.
To help see what’s going on, we use another function, list, to transform range’s output into a human-readable list that we can see on screen:
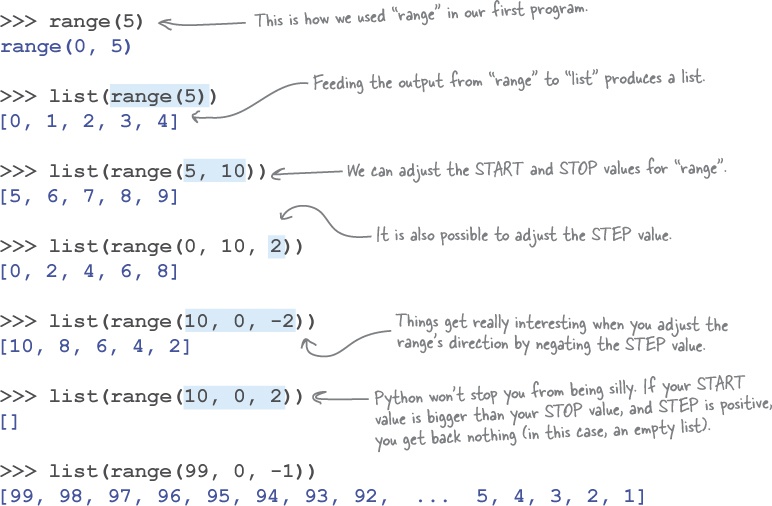
After all of our experimentations, we arrive at a range invocation (shown last, above) that produces a list of values from 99 down to 1, which is exactly what the beer song’s for loop does:

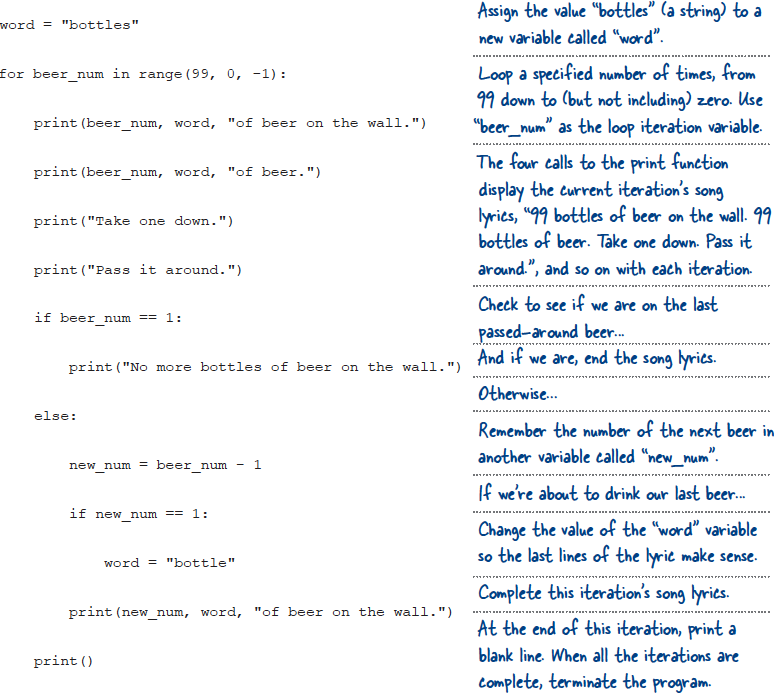
Here again is the beer code, which has been spread out over the entire page so that you can concentrate on each line of code that makes up this “serious business application.”
Grab your pencil and, in the spaces provided, write in what you thought each line of code does. Be sure to attempt this yourself before looking at what we came up with on the next page. We’ve got you started by doing the first line of code for you.
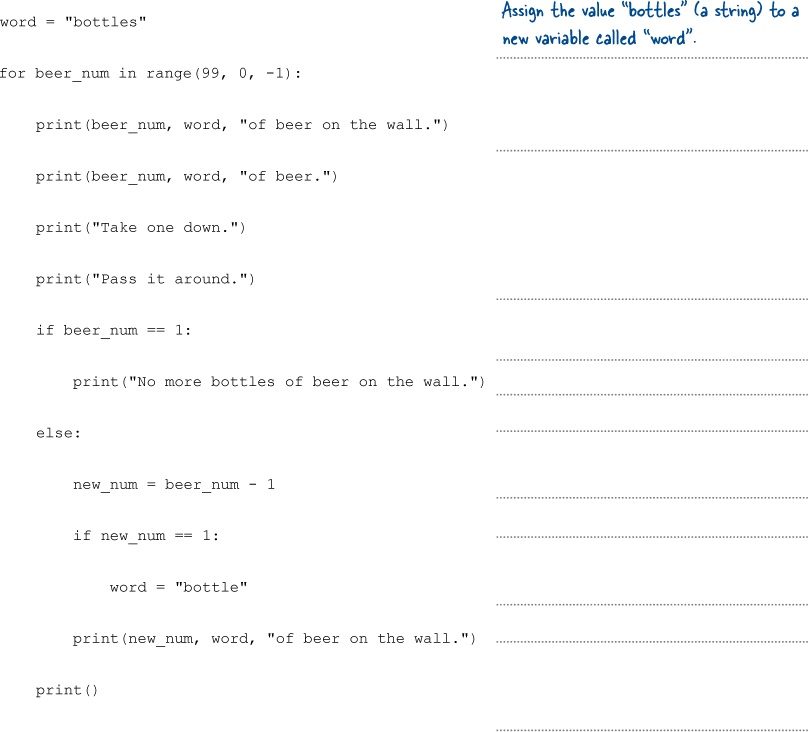
Here again is the beer code, which has been spread out over the entire page so that you can concentrate on each line of code that makes up this “serious business application.”
You were to grab your pencil and then, in the spaces provided, write in what you thought each line of code does. We did the first line of code for you to get you started.
How did you get on? Are your explanations similar to ours?
Don’t Forget to Try the Beer Song Code
If you haven’t done so already, type the beer song code into IDLE, save it as beersong.py, and then press F5 to take it for a spin. Do not move on to the next chapter until you have a working beer song.
Wrapping up what you already know
Here are some new things you learned as a result of working through (and running) the beer song code:
Indentation takes a little time to get used to. Every programmer new to Python complains about indentation at some point, but don’t worry: soon you’ll not even notice you’re doing it.
If there’s one thing that you should never, ever do, it’s mix tabs with spaces when indenting your Python code. Save yourself some future heartache, and don’t do this.
The
rangefunction can take more than one argument when invoked. These arguments let you control the start and stop values of the generated range, as well as the step value.The
rangefunction’s step value can also be specified with a negative value, which changes the direction of the generated range.
With all the beer gone, what’s next?
That’s it for Chapter 1. In the next chapter, you are going to learn a bit more about how Python handles data. We only just touched on lists in this chapter, and it’s time to dive in a little deeper.

Get Head First Python, 2nd Edition now with the O’Reilly learning platform.
O’Reilly members experience books, live events, courses curated by job role, and more from O’Reilly and nearly 200 top publishers.

