Chapter 1. More with Less: Code the Way You Want
You’re wondering what this crazy Ruby language is all about, and if it’s right for you. Let us ask you this: Do you like being productive? Do you feel like all those extra compilers and libraries and class files and keystrokes in your other language bring you closer to a finished product, admiring coworkers, and happy customers? Would you like a language that takes care of the details for you? If you sometimes wish you could stop maintaining boilerplate code and get to work on your problem, then Ruby is for you. Ruby lets you get more done with less code.
The Ruby philosophy
Back in the 1990s in Japan, a programmer named Yukihiro Matsumoto (“Matz” for short) was dreaming about his ideal programming language. He wanted something that:
Was easy to learn and use
Was flexible enough to handle any programming task
Let the programmer concentrate on the problem they were trying to solve
Gave the programmer less stress
Was object-oriented
He looked at the languages that were available, but felt that none of them was exactly what he wanted. So he set out to make his own. He called it Ruby.
After tinkering around with Ruby for his own work for a while, Matz released it to the public in 1995. Since then, the Ruby community has done some amazing things:
Built out a vast collection of Ruby libraries that can help you do anything from reading CSV (comma-separated value) files to controlling objects over a network
Written alternate interpreters that can run your Ruby code faster or integrate it with other languages
Created Ruby on Rails, a hugely popular framework for web applications
This explosion of creativity and productivity was enabled by the Ruby language itself. Flexibility and ease of use are core principles of the language, meaning you can use Ruby to accomplish any programming task, in fewer lines of code than other languages.
Once you’ve got the basics down, you’ll agree: Ruby is a joy to use!
Flexibility and ease of use are core principles of Ruby.
Get Ruby
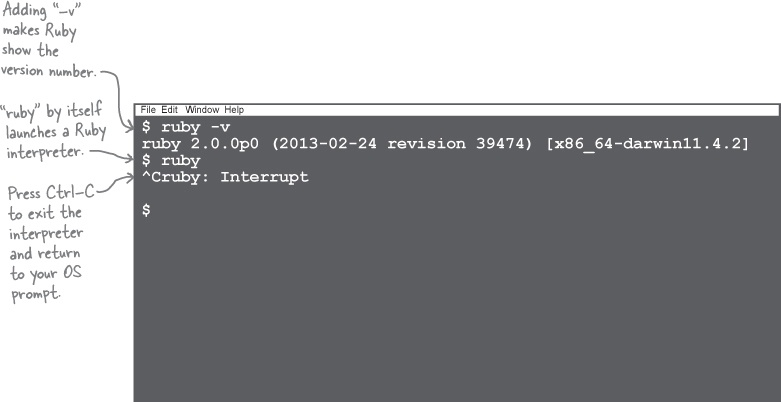
First things first: you can write Ruby code all day, but it won’t do you much good if you can’t run it. Let’s make sure you have a working Ruby interpreter installed. We want version 2.0 or later. Open up a new terminal window (also known as a command-line prompt) and type:
ruby -v
When you type ruby -v at a prompt, if you see a response like this, you’re in business:
Do this!
If you don’t have Ruby 2.0 or later, visit www.ruby-lang.org and download a copy for your favorite OS.
By the way, if you accidentally type ruby by itself (without the -v), Ruby will wait for you to enter some code. To exit this mode, just hold the Control key and press the C key on your keyboard. You can do this any time you need Ruby to exit immediately.
Use Ruby
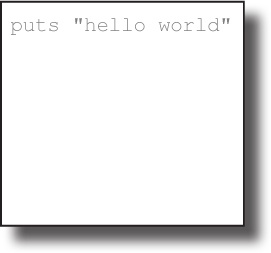
Ruby source files that you can execute are referred to as scripts, but they’re really just plain-text files. To run a Ruby script, you simply save your Ruby code in a file, and run that file with the Ruby interpreter.
You may be used to other languages (like C++, C#, or Java) where you have to manually compile your code to a binary format that a CPU or virtual machine can understand. In these languages, your code can’t be executed before you compile it.
Other languages:
With Ruby, you skip that step. Ruby instantly and automatically compiles the source code in your script. This means less time between writing your code and trying it out!
The Ruby way:
Type your source code. Save as: hello.rb
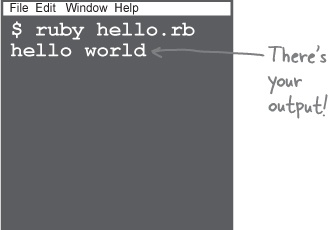
Run your source code with the Ruby interpreter.
Use Ruby—interactively
There’s another big benefit to using a language like Ruby. Not only do you not have to run a compiler each time you want to try out your code, but you don’t even have to put it in a script first.
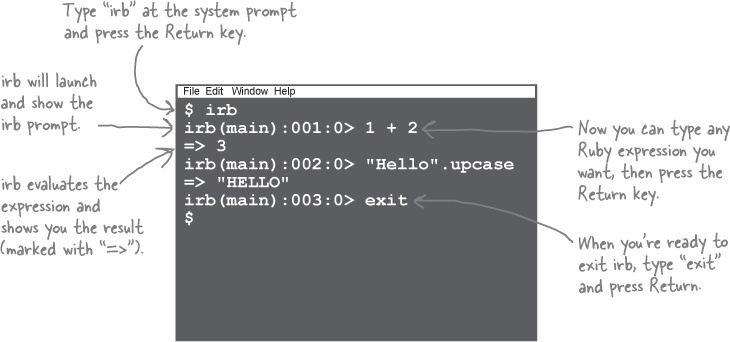
Ruby comes with a separate program, called irb (for Interactive Ruby). The irb shell lets you type any Ruby expression, which it will then immediately evaluate and show you the results. It’s a great way to learn the language, because you get immediate feedback. But even Ruby professionals use irb to try out new ideas.
Throughout the book, we’ll be writing lots of scripts to be run via the Ruby interpreter. But any time you’re testing out a new concept, it’s a great idea to launch irb and experiment a bit.
So what are we waiting for? Let’s get into irb now and play around with some Ruby expressions.
Using the irb shell
Open a terminal window, and type irb. This will launch the interactive Ruby interpreter. (You’ll know it’s running because the prompt will change, although it may not match exactly what you see here.)
From there, you can type any expression you want, followed by the Enter/Return key. Ruby will instantly evaluate it and show you the result.
When you’re done with irb, type exit at the prompt, and you’ll be returned to your OS’s prompt.
Your first Ruby expressions
Now that you know how to launch irb, let’s try out a few expressions and see what results we get!
Type the following at the prompt, then press Return: 1 + 2
You’ll be shown the result:
Math operations and comparisons
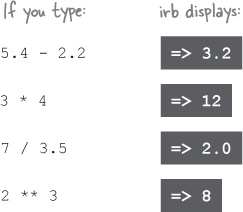
Ruby’s basic math operators work just like they do in most other languages. The + symbol is for addition, - for subtraction, * for multiplication, / for division, and ** for exponentiation.
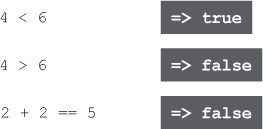
You can use < and > to compare two values and see if one is less than or greater than another. You can also use == (that’s two equals signs) to see if two values are equal.
Strings
A string is a series of text characters. You can use strings to hold names, email addresses, phone numbers, and a million other things. Ruby’s strings are special because even very large strings are highly efficient to work with (this isn’t true in many other languages).
The easiest way to specify a string is to surround it either with double quotes (") or single quotes ('). The two types of quotes work a little differently; we’ll cover that later in the chapter.
Variables
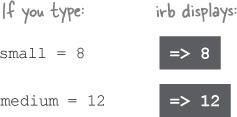
Ruby lets us create variables—names that refer to values.
You don’t have to declare variables in Ruby; assigning to them creates them. You assign to a variable with the = symbol (that’s a single equals sign).
A variable name starts with a lowercase letter, and can contain letters, numbers, and underscores.
Once you’ve assigned to variables, you can access their values whenever you need, in any context where you might use the original value.
Variables don’t have types in Ruby; they can hold any value you want. You can assign a string to a variable, then immediately assign a floating-point number to the same variable, and it’s perfectly legal.
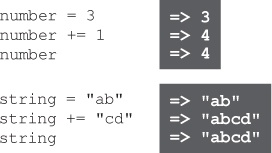
The += operator lets you add on to the existing value of a variable.
Everything is an object!
Ruby is an object-oriented language. That means your data has useful methods (fragments of code that you can execute on demand) attached directly to it.
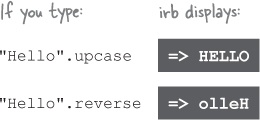
In modern languages, it’s pretty common for something like a string to be a full-fledged object, so of course strings have methods to call:
What’s cool about Ruby, though, is that everything is an object. Even something as simple as a number is an object. That means numbers have useful methods, too.
Calling a method on an object
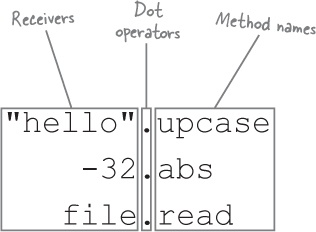
When you make a call like this, the object you’re calling the method on is known as the method receiver. It’s whatever is to the left of the dot operator. You can think of calling a method on an object as passing it a message—like a note saying, “Hey, can you send me back an uppercase version of yourself ?” or “Can I have your absolute value?”
Let’s build a game
In this first chapter, we’re going to build a simple game. If that sounds daunting, don’t worry; it’s easy when you’re using Ruby!
Let’s look at what we’ll need to do:
Input, storage, and output
Our first requirement is to greet the user by name. To accomplish that, we’ll need to write a script that gets input from the user, stores that input, and then uses that stored value to create some output.
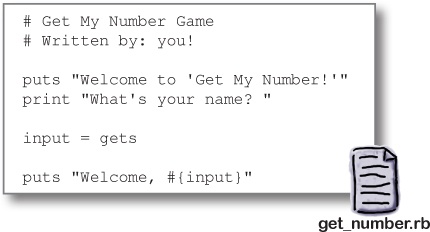
We can do all this in just a few lines of Ruby code:
We’ll go into detail on each component of this script over the next few pages. But first, let’s give it a try!
Running scripts
We’ve written a simple script that fulfills our first requirement: to greet the player by name. Now, you’ll learn how to execute the script so you can see what you’ve created.
Do this!
Step One:
Open a new document in your favorite text editor, and type in the following code.
Step Two:
Save the file as get_number.rb.
Step Three:
Open up a terminal window and change into the directory where you saved your program.
Step Four:
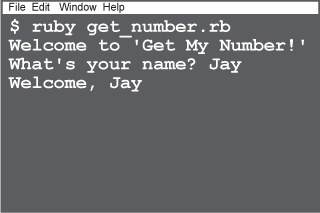
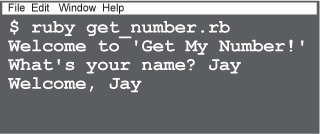
Run the program by typing ruby get_number.rb.
Step Five:
You’ll see a greeting and a prompt. Type your name and hit the Enter/Return key. You’ll then see a message that welcomes you by name.
Comments
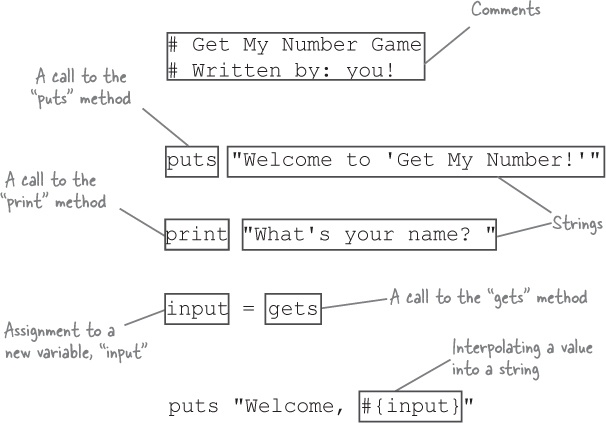
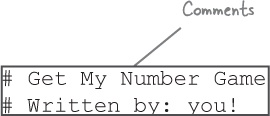
Our source file starts out with a couple of comments. Ruby ignores everything from a hash mark (#) up until the end of the line, so that you can leave instructions or notes for yourself and your fellow developers.
If you place a # in your code, then everything from that point until the end of the line will be treated as a comment. This works just like the double-slash (//) marker in Java or JavaScript.
i_am = "executed" # I'm not.
# Me neither.
“puts” and “print”
The actual code starts with a call to the puts method (“puts” is short for “put string”), which displays text on standard output (usually the terminal). We pass puts a string containing the text to display.
We pass another string to the print method on the following line, to ask the user their name. The print method works just like puts, except that puts adds a newline character at the end of the string (if it doesn’t already have one) to skip to the following line, whereas print doesn’t. For cosmetic reasons, we end the string that we pass to print with a space, so that our text doesn’t run up against the area where the user types their name.
Sometimes you don’t have to specify a receiver for method calls.
The puts and print methods are so important, and so commonly used, that they’re among a select few methods that have been included in Ruby’s top-level execution environment. Methods defined in the top-level environment are available for you to call anywhere in your Ruby code, without specifying a receiver. You’ll see how to define methods like this at the start of Chapter 2.
Method arguments
The puts method takes a string and prints it to standard output (your terminal window).
puts "first line"
The string passed to the puts method is known as the method argument.
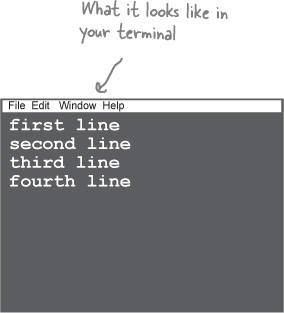
The puts method can take more than one argument; just separate the arguments with commas. Each argument gets printed on its own line.
puts "second line", "third line", "fourth line"
“gets”
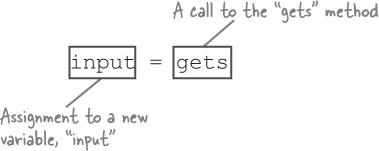
The gets method (short for “get string”) reads a line from standard input (characters typed in the terminal window). When you call gets, it causes the program to halt until the user types their name and presses the Enter key. It returns the user’s text to the program as another string.
As with puts and print, you can call the gets method from anywhere in your code without specifying a receiver.
Parentheses are optional on method calls
Method arguments can be surrounded with parentheses in Ruby:
puts("one", "two")But the parentheses are optional, and in the case of puts, most Rubyists prefer to leave them off.
puts "one", "two"
As noted above, the gets method reads a line from standard input. It doesn’t (usually) need any arguments:
gets
Rubyists are adamant that parentheses not be used if a method takes no arguments. So please, don’t do this, even though it’s valid code:
String interpolation
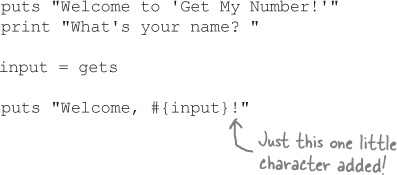
The last thing our script does is to call puts with one more string. This one is special because we interpolate (substitute) the value in the name variable into the string. Whenever you include the #{...} notation inside a double-quoted string, Ruby uses the value in the curly braces to “fill in the blank.” The #{...} markers can occur anywhere in the string: the beginning, end, or somewhere in the middle.
You’re not limited to using variables within the #{...} marker—you can use any Ruby expression.
Note that Ruby applies interpolation only in double-quoted strings. If you include a #{...} marker in a single-quoted string, it will be taken literally.
Ruby doesn’t require a bunch of ceremony for simple programs.
What’s in that string?
Well, that’s easy enough to add. Let’s throw an exclamation point on the end of the greeting string, after the interpolated value.
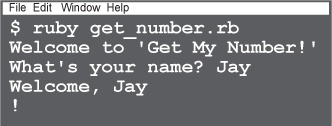
But if we try running the program again, we’ll see that rather than appearing immediately after the user’s name, the exclamation point jumps down to the next line!
Why is this happening? Maybe there’s something going on within that input variable...
Printing it via the puts method doesn’t reveal anything special about it, though. If we append this line to the code above, we’d see this output:
Inspecting objects with the “inspect” and “p” methods
Now let’s try again, using a method meant especially for troubleshooting Ruby programs. The inspect method is available on any Ruby object. It converts the object to a string representation that’s suitable for debugging. That is, it will reveal aspects of the object that don’t normally show up in program output.
Here’s the result of calling inspect on our string:
What’s that \n at the end of the string? We’ll solve that mystery on the next page...
Printing the result of inspect is so common that Ruby offers another shortcut: the p method. It works just like puts, except that it calls inspect on each argument before printing it.
This call to p is effectively identical to the previous code:
Remember the p method; we’ll be using it in later chapters to help debug Ruby code!
The “inspect” method reveals information about an object that doesn’t normally show up in program output.
Escape sequences in strings
Our use of the p method has revealed some unexpected data at the end of the user’s input:
These two characters, the backslash (\) and the n that follows it, actually represent a single character: a newline character. (The newline character is named thus because it makes terminal output jump down to a new line.) There’s a newline at the end of the user input because when the user hits the Return key to indicate their entry is done, that gets recorded as an extra character. That newline is then included in the return value of the gets method.
Commonly used escape sequences
If you include this in a double-quoted string... | ...you get this character... |
| newline |
| tab |
| double-quotes |
| single-quote |
| backslash |
The backslash character (\) and the n that follows it are an escape sequence—a portion of a string that represents characters that can’t normally be represented in source code.
The most commonly used escape sequences are \n (newline, as we’ve seen) and \t (a tab character, for indentation).
Normally, when you try to include a double-quotation mark (") in a double-quoted string, it gets treated as the end of the string, leading to errors:
If you escape the double-quotation marks by placing a backslash before each, you can place them in the middle of a double-quoted string without causing an error.
Lastly, because \ marks the start of an escape sequence, we also need a way to represent a backlash character that isn’t part of an escape sequence. Using \\ will give us a literal backslash.
Bear in mind that most of these escape sequences apply only in double-quoted strings. In single-quoted strings, most escape sequences are treated literally.
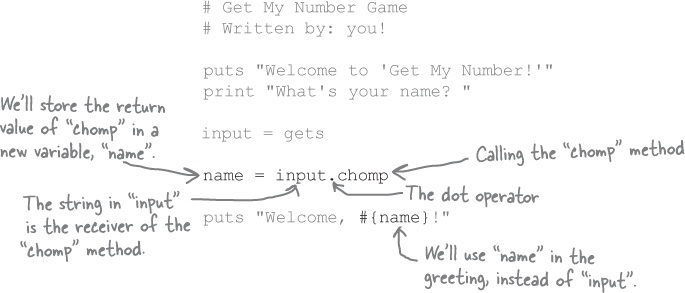
Calling “chomp” on the string object
We can use the chomp method to remove the newline character.
If the last character of a string is a newline, the chomp method will remove it. It’s great for things like cleaning up strings returned from gets.
The chomp method is more specialized than print, puts, and gets, so it’s available only on individual string objects. That means we need to specify that the string referenced by the input variable is the receiver of the chomp method. We need to use the dot operator on input.
The chomp method returns the same string, but without the newline character at the end. We store this in a new variable, name, which we then print as part of our welcome message.
If we try running the program again, we’ll see that our new, emphatic greeting is working properly now!
What methods are available on an object?
You can’t call just any method on just any object. If you try something like this, you’ll get an error:
Which, if you think about it, isn’t so wrong. After all, it doesn’t make a lot of sense to capitalize a number, does it?
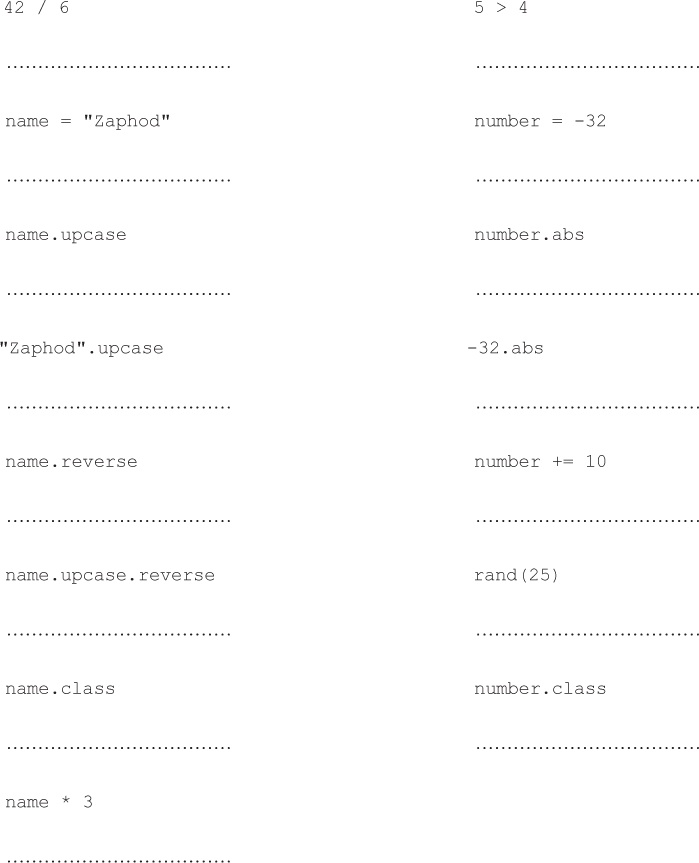
But, then, what methods can you call on a number? That question can be answered with a method called methods:
If you call methods on a string, you’ll get a different list: puts "hello".methods
Why the difference? It has to do with the object’s class. A class is a blueprint for making new objects, and it decides, among other things, what methods you can call on the object.
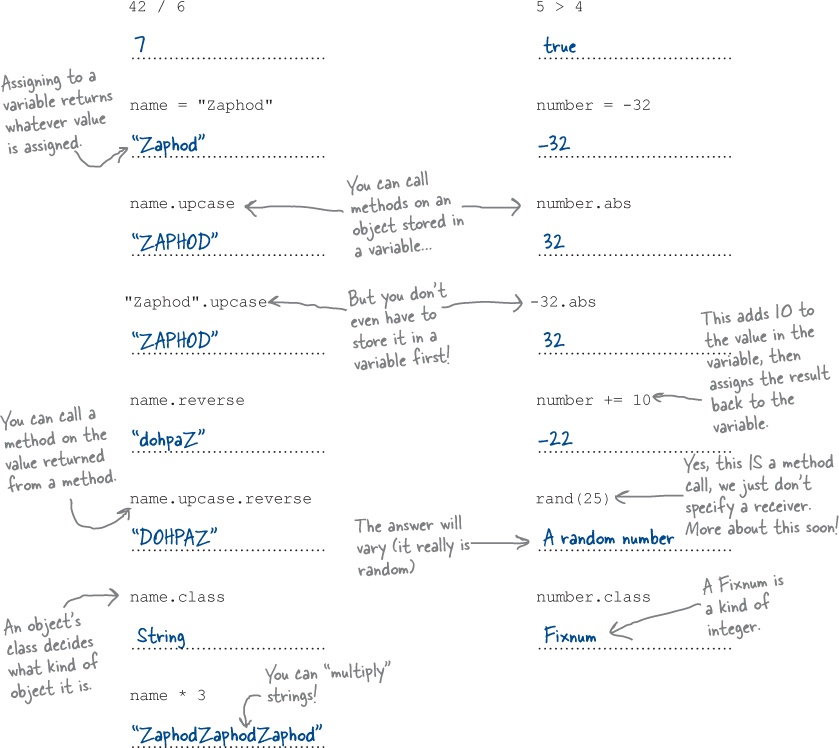
There’s another method that lets objects tell us what their class is. It’s called, sensibly enough, class. Let’s try it out on a few objects.
We’ll be talking more about classes in the next chapter, so stay tuned!
That’s all the code for our first requirement. You can check it off the list!
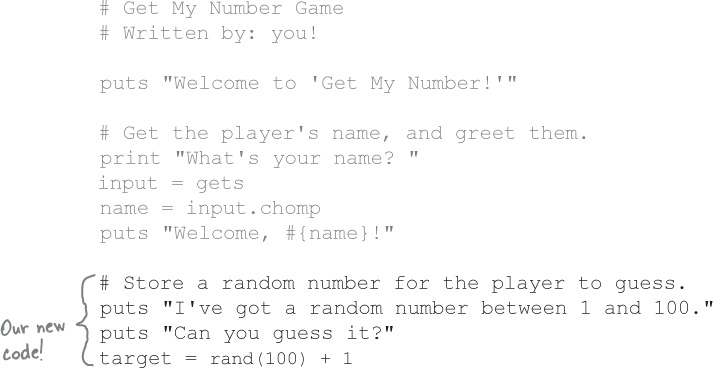
Generating a random number
Our player greeting is done. Let’s look at our next requirement.
The rand method will generate a random number within a given range. It should be able to create a target number for us.
We need to pass an argument to rand with the number that will be at the upper end of our range (100). Let’s try it out a couple of times:
Looks good, but there’s one problem: rand generates numbers between zero and just below the maximum value you specify. That means we’ll be getting random numbers in the range 0–99, not 1–100 like we need.
That’s easy to fix, though. We’ll just add 1 to whatever value we get back from rand. That will put us back in the range of 1–100!
rand(100) + 1
We’ll store the result in a new variable, named target.
Converting to strings
That’s another requirement down! Let’s look at the next one...
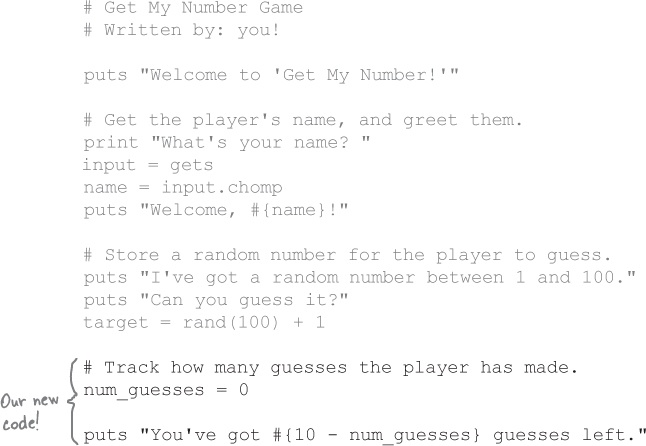
“Keep track of how many guesses the player has made...” Looks like we’ll need a variable for the number of guesses. Obviously, when the player first starts, they haven’t made any guesses, so we’ll create a variable named num_guesses that’s set to 0 initially.
num_guesses = 0
Now, the first thing you might attempt to do in order to display the number of guesses remaining is to concatenate (join) the strings together using the plus sign (+), as many other languages do. Something like this won’t work, however:
The + operator is used to add numbers as well as to concatenate strings, and since remaining_guesses contains a number, this plus sign looks like an attempt to add numbers.
What’s the solution? You need to convert the number to a string. Almost all Ruby objects have a to_s method you can call to do this conversion; let’s try that now.
That works! Converting the number to a string first makes it clear to Ruby that you’re doing concatenation, not addition.
Ruby provides an easier way to handle this, though. Read on...
Ruby makes working with strings easy
Instead of calling to_s, we could save ourselves the effort of explicitly converting a number to a string by using string interpolation. As you saw in our code to greet the user, when you include #{...} in a double-quoted string, code within the curly braces is evaluated, converted to a string if necessary, and interpolated (substituted) into the longer string.
The automatic string conversion means we can get rid of the to_s call.
Ruby lets us do operations directly within the curly braces, so we can also get rid of the remaining_guesses variable.
The #{...} can occur anywhere within the string, so it’s easy to make the output a little more user-friendly, too.
Now the player will know how many guesses they have left. We can check another requirement off our list!
Converting strings to numbers
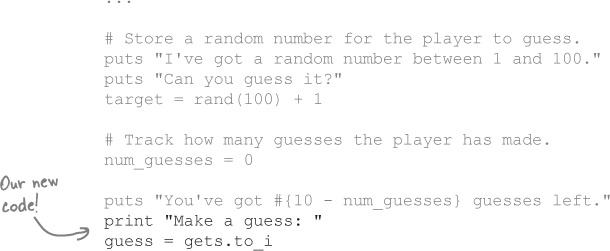
Our next requirement is to prompt the player to guess the target number. So we need to print a prompt, then record the user’s input as their guess. The gets method, as you may recall, retrieves input from the user. (We already used it to get the player’s name.) Unfortunately, we can’t just use gets by itself to get a number from the user, because it returns a string. The problem will arise later, when we try to compare the player’s guess with the target number using the > and < operators.
We need to convert the string returned from the gets method to a number so that we can compare the guess to our target number. No problem! Strings have a to_i method to do the conversion for us.
Common conversions
If you call this method on an object... | ...you get this kind of object back. |
| string |
| integer |
| floating-point number |
This code will call to_i on the string returned from gets. We don’t even need to put the string in a variable first; we’ll just use the dot operator to call the method directly on the return value.
guess = gets.to_i
When you call to_i on a string, it ignores any non-numeric characters that follow the number. So we don’t even need to remove the newline character left by gets.
If we want to test our changes, we can print out the result of a comparison.
Much better—we have a guess that we can compare to the target. That’s another requirement done!
Conditionals
Two more requirements for our game down, four to go! Let’s look at the next batch.
Now, we need to compare the player’s guess with the target. If it’s too high, we print a message saying so. Otherwise, if it’s too low, we print a message to that effect, and so on... Looks like we need the ability to execute portions of our code only under certain conditions.
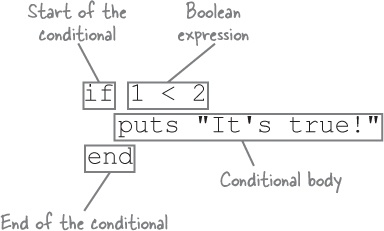
Like most languages, Ruby has conditional statements: statements that cause code to be executed only if a condition is met. An expression is evaluated, and if its result is true, the code in the conditional body is executed. If not, it’s skipped.
As with most other languages, Ruby supports multiple branches in the condition. These statements take the form if/elsif/else.
Conditionals rely on a Boolean expression (one with a true or false value) to decide whether the code they contain should be executed. Ruby has constants representing the two Boolean values, true and false.
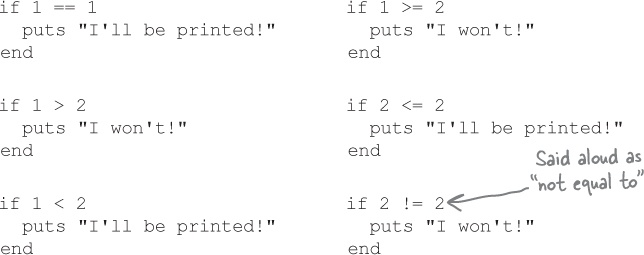
Ruby also has all the comparison operators you’re used to.
It has the Boolean negation operator, !, which lets you take a true value and make it false, or a false value and make it true. It also has the more-readable keyword not, which does basically the same thing.
if ! true puts "I won't be printed!" end if ! false puts "I will!" end | if not true puts "I won't be printed!" end if not false puts "I will!" end |
If you need to ensure that two conditions are both true, you can use the && (“and”) operator. If you need to ensure that either of two conditions is true, you can use the || (“or”) operator.
if true && true puts "I'll be printed!" end if true && false puts "I won't!" end | if false || true puts "I'll be printed!" end if false || false puts "I won't!" end |
No, Ruby doesn’t treat indentation as significant to the meaning of the program (unlike some other languages, such as Python).
But indenting code within if statements, loops, methods, classes, and the like is just good coding style. It helps make the structure of your code clear to your fellow developers (and even to yourself).
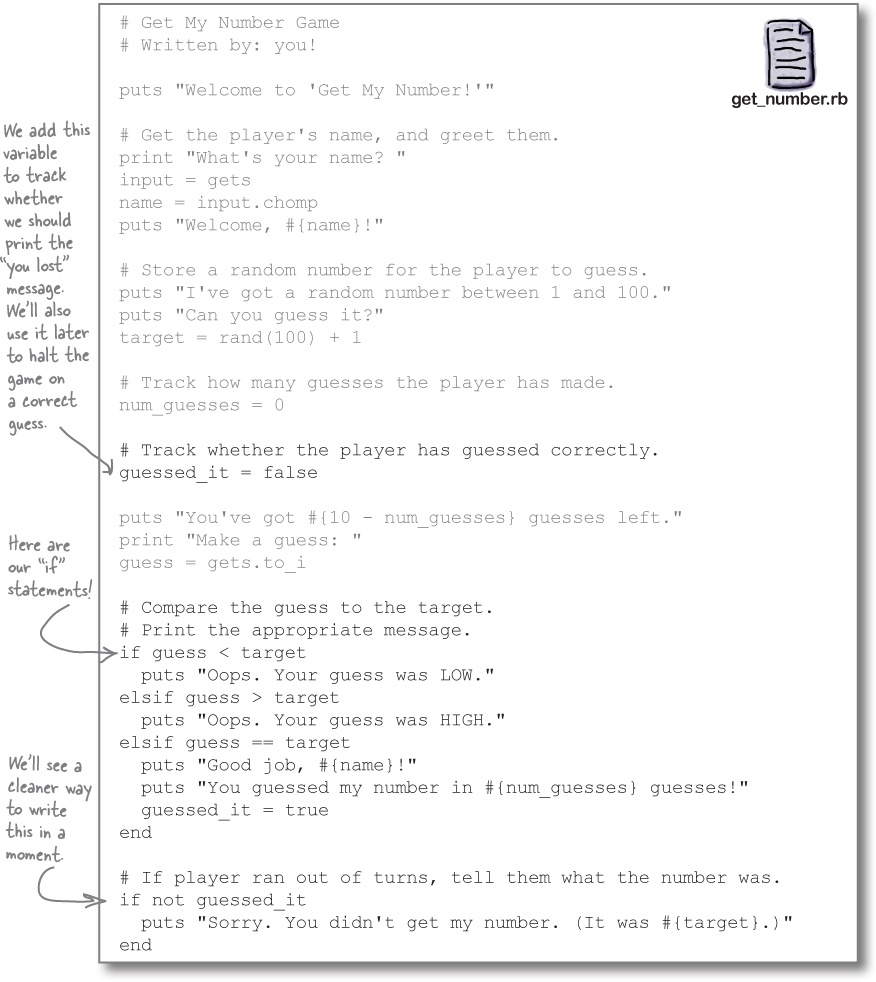
We need to compare the player’s guess to the random target number. Let’s use everything we’ve learned about conditionals to implement this batch of requirements.
The opposite of “if” is “unless”
This statement works, but it’s a little awkward to read:
if not guessed_it
  puts "Sorry. You didn't get my number. (It was #{target}.)"
end
Conventional Wisdom
It’s valid to use else and elsif together with unless in Ruby:
But it’s very hard to read. If you need an else clause, use if for the main clause instead!
In most respects, Ruby’s conditional statements are just like most other languages. Ruby has an additional keyword, though: unless.
Code within an if statement executes only if a condition is true, but code within an unless statement executes only if the condition is false.
The unless keyword is an example of how Ruby works hard to make your code a little easier to read. You can use unless in situations where a negation operator would be awkward. So instead of this:
if ! (light == "red")
  puts "Go!"
end
You can write this:
unless light == "red"
  puts "Go!"
end
We can use unless to clean up that last conditional.
unless guessed_it
  puts "Sorry. You didn't get my number. (It was #{target}.)"
end
Much more legible! And our conditional statements are working great!
As it stands right now, though, the player gets only one guess—they’re supposed to get 10. We’ll fix that next...
Loops
Great work so far! We have just one more requirement to go for our guessing game!
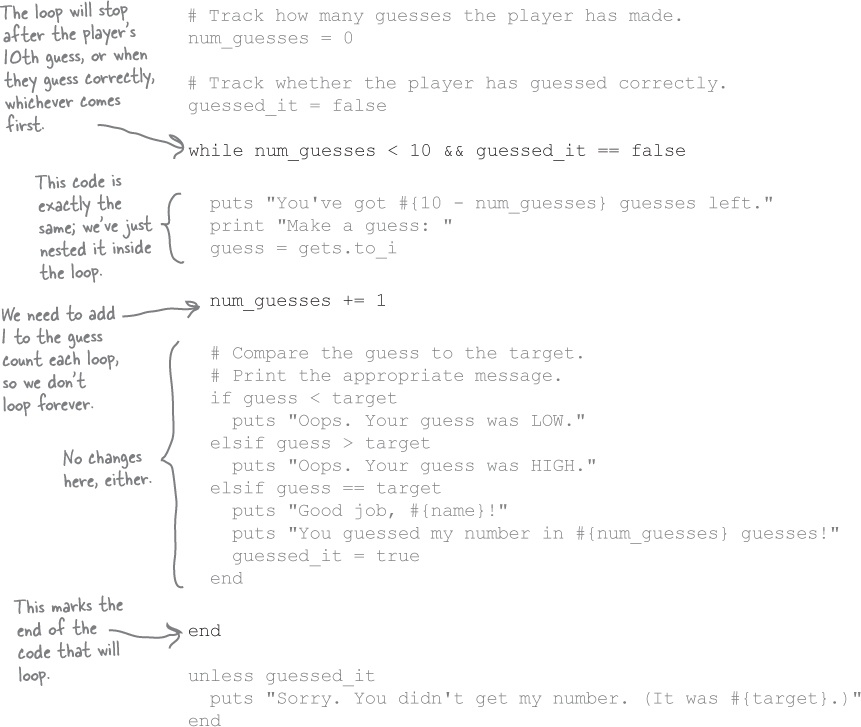
Currently, the player gets one guess. Since there’s 100 possible target numbers, those don’t seem like very fair odds. We need to keep asking the player 10 times, or until they get the right answer, whichever comes first.
The code to prompt for a guess is already in place, so we just need to run it more than once. We can use a loop to execute a segment of code repeatedly. You’ve probably encountered loops in other languages. When you need one or more statements to be executed over and over, you place them inside a loop.
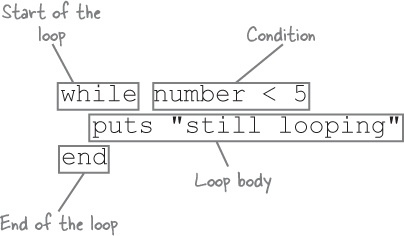
A while loop consists of the word while, a Boolean expression (just like in if or unless statements), the code you want to repeat, and the word end. The code within the loop body repeats while the condition is true.
Here’s a simple example that uses a loop for counting.
Just as unless is the counterpart to if, Ruby offers an until loop as a counterpart to while. An until loop repeats until the condition is true (that is, it loops while it’s false).
Here’s a similar example, using until.
Here’s our conditional code again, updated to run within a while loop:
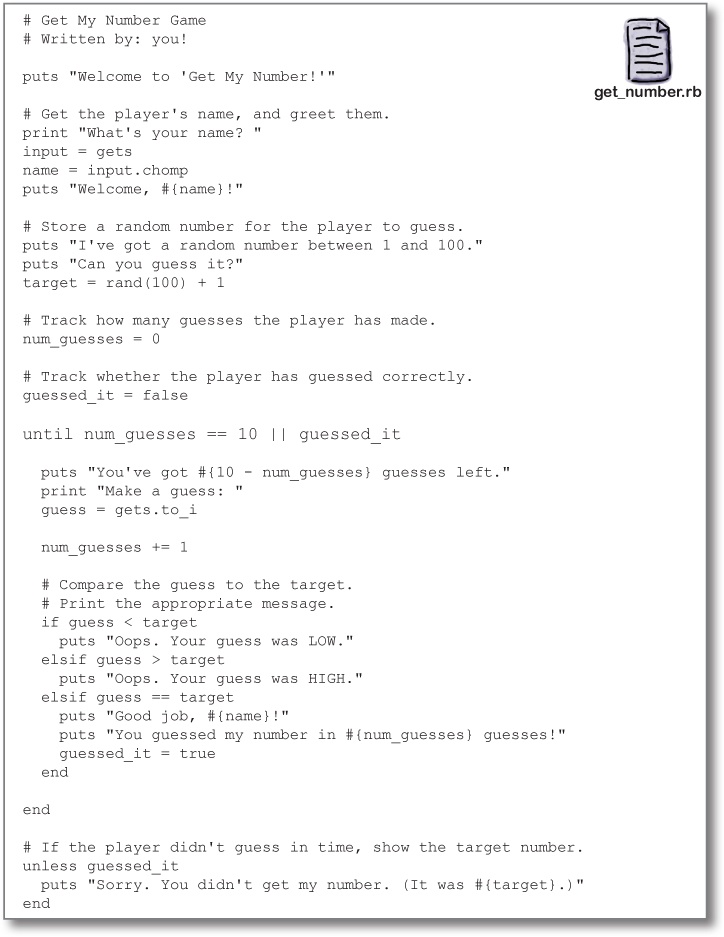
There’s one more readability improvement we can make. As with the if statement that we replaced with an unless, we can make this while loop read more clearly by replacing it with an until.
Before:
while num_guesses  <  10 && guessed_it == false
  ...
end
After:
until num_guesses == 10 || guessed_it
  ...
end
Here’s our complete code listing.
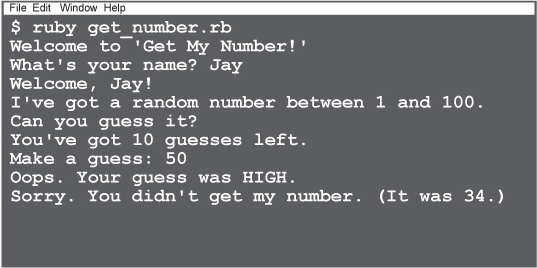
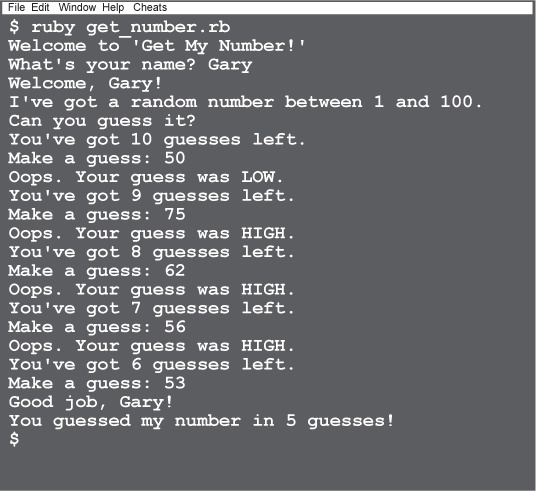
Let’s try running our game!
Our loop is in place—that’s the last requirement! Let’s open a terminal window and try running the program!
Using variables, strings, method calls, conditionals, and loops, you’ve written a complete game in Ruby! Better yet, it took fewer than 30 lines of code! Pour yourself a cold drink—you’ve earned it!
Your Ruby Toolbox
You’ve got Chapter 1 under your belt and now you’ve added method calls, conditionals, and loops to your toolbox.
Up Next...
All your code is in one big lump right now. In the next chapter, you’ll learn how to break your code into easily maintainable chunks, using classes and methods.
Get Head First Ruby now with the O’Reilly learning platform.
O’Reilly members experience books, live events, courses curated by job role, and more from O’Reilly and nearly 200 top publishers.
