Chapter 4. File-Sharing Annoyances
One of the most common activities of network users is accessing files across the network. Sometimes you need to move or copy files from one computer to another, and sometimes you need to use files on another computer when you’re working in a software application. In this chapter, I’ll discuss some of the annoying “features” in the networkwide file-sharing paradigm, and offer some workarounds that can help you create the perfect scenario for sharing files. I’ll explain how to use files from any computer on the network when you’re working in a software program, how to share datafiles among multiple users working on different computers, and how to set up your My Documents folder so that you can access its contents from any computer.
ACCESSING FILES ON REMOTE COMPUTERS
SHARE WINDOWS XP MY DOCUMENTS FOLDERS ON THE NETWORK
The Annoyance:
I usually work on a particular Windows XP computer, but sometimes one of my kids is at that computer and I have to do my work from another one. I can’t figure out how to get to my documents on the Windows XP computer. I know my My Documents folder isn’t marked “private” because my kids can access it when they are logged on to the computer. Why can’t I get to the folder from another computer on the network?
The Fix:
The fact that you didn’t configure your My Documents folder as private means its contents are accessible to other users, but only on the computer on which the folder resides. To access the folder over the network, you must specifically enable the option to share the folder on the network.
Right-click the folder icon and choose Properties.
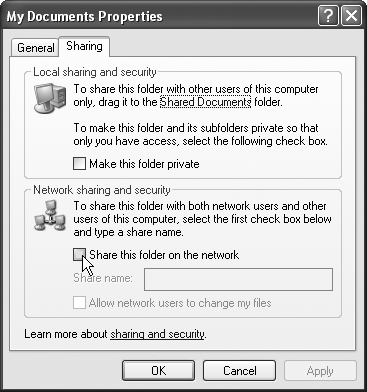
Click the Sharing tab and check the “Share this folder on the network” box (see Figure 4-1).
SHARE WINDOWS 98SE/ME MY DOCUMENTS FOLDERS ON THE NETWORK
The Annoyance:
I want to share my Windows 98SE My Documents folder on the network so that when I’m working at a different computer I can access my own files. When I right-click the folder’s icon on my desktop, the shortcut menu doesn’t have a Sharing command. It’s annoying that Windows won’t permit sharing of My Documents.
The Fix:
The My Documents icon on your desktop isn’t a folder—it’s a shortcut to a folder, and you can’t share a shortcut. The actual My Documents folder, which you can share, exists within your user profile at c:\ Windows\username (substitute your logon name for username).
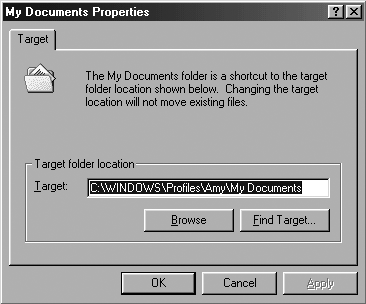
Luckily, you don’t have to go to all the trouble of opening Windows Explorer and navigating to the real folder because you can ask the shortcut to take you there. Right-click the desktop icon and choose Properties from the shortcut menu to open the shortcut’s Properties dialog box (see Figure 4-2).
Click the Find Target button and voilà, you’re transported to your user profile. Right-click the My Documents folder and you’ll see the Sharing command.
MANIPULATING FILES ON THE NETWORK
DRAG FILES BETWEEN COMPUTERS
The Annoyance:
I needed to copy a bunch of files from a shared folder on a remote computer to the computer I was working on. I got really annoyed by all the folder-opening and right-clicking involved in copying and pasting from one computer to the other. Is there a faster way?
The Fix:
It’s a drag—I mean the solution, not my sympathetic response to your annoyance. Open both folders and drag between them. You can also use Windows Explorer to drag files between the right pane of the shared folder to the left pane of the local folder (or the other way around).
WINDOWS EXPLORER DISPLAY IS ANNOYING
The Annoyance:
It’s annoying that the Windows Explorer program listing moved to the Accessories menu, causing an extra step to open it. But that pales compared to the real annoyance—the display it presents in the left pane. It takes several mouse clicks to get to Drive C and expand it. This is where Windows Explorer used to open, and where I almost always want to start.
The Fix:
Microsoft introduced the changes to Windows Explorer in Windows 2000, and kept them in Windows XP. I hate it, too. You can force Windows Explorer to open with Drive C selected and expanded. To do so, you have to change the properties of the shortcut to the program. The listing on the Accessories menu is a shortcut (all menu listings are shortcuts), so you could do it right on the submenu, but you might as well create a more convenient shortcut to the program and change that.
To create the more convenient shortcut, right-drag the listing on the Accessories submenu to your desktop (or to your Quick Launch toolbar). When you release the right mouse button, choose Copy Here. Now you’ve eliminated one annoyance—you no longer have to move to the Accessories submenu to open the program.
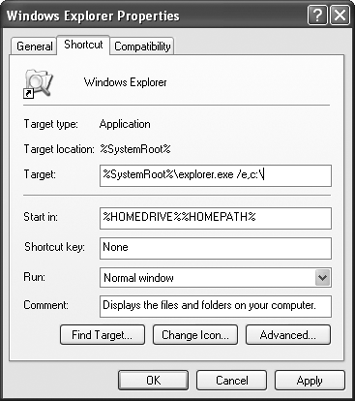
Right-click the icon for the shortcut you just created and choose Properties. In the Target text box, add the following parameter to the existing path: /e,c:\. Be sure to leave a space between the end of the current path and the new parameter (see Figure 4-3).
MOVING VERSUS COPYING
The Annoyance:
When I’m working on a computer that isn’t my “home base,” I like to move the files I want to work on to the current computer, and then move them back when I’m done. When I drag the files back, Windows always asks me if I want to replace the files that currently exist. Dragging files moves them, it doesn’t copy them, so why are the original files still there?
The Fix:
Dragging files between folders on the same computer moves those files. However, when you cross disks, dragging files results in a copy action, not a move. Dragging files between computers is, of course, a drag across different disks. The Cut and Paste functions are the simplest way to accomplish what you want.
USE THE SEND TO COMMAND TO COPY FILES AND FOLDERS
The Annoyance:
I think the Send To command on the right-click menu is nifty; I use it all the time to copy files to floppy disks. However, it’s annoying that the Send To command doesn’t include remote computers for fast transfers of files across the network.
The Fix:
The Send To command is niftier than you think. You can use it to copy files or folders to any shared folder on the network—you just need to know how. You merely add the target to the Send To command, which is quite easy to do. In Windows 2000 and XP, you can create discrete Send To targets for each user. In Windows 98SE and Me, you can only create global Send To targets for all users.
Add Send To targets in Windows XP/2000
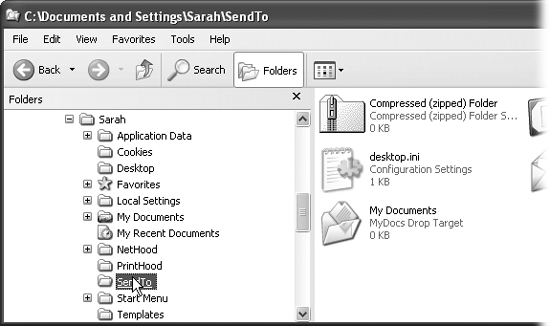
To add a target to the Send To menu in Windows 2000 and XP, expand Windows Explorer or My Computer to display your profile in the left pane. One of the folders in your profile is named SendTo, and selecting it displays the current targets of the Send To command in the right pane (see Figure 4-4).
Choose File → New → Shortcut to open the Create Shortcut Wizard. Either use the Location text box to enter the path to the remote folder or click the Browse button to navigate to the remote folder.
To enter text in the Location text box, use one of the following methods:
If the remote folder is a mapped drive, enter the drive letter followed by a colon (e.g., M:).
If the remote folder is not a mapped drive, enter its path in the format \\ComputerName\ShareName (the path is technically called the UNC, for Universal Naming Convention).
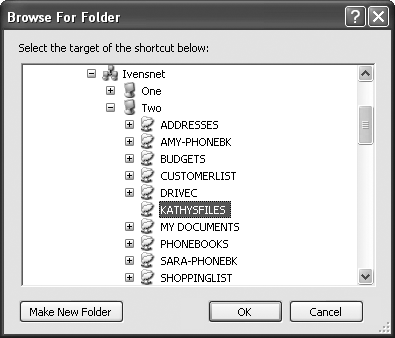
If you don’t know the path, or don’t want to bother typing it, click the Browse button to open the Browse for Folder dialog box. Expand My Network Places and expand the remote computer to display its shares (see Figure 4-5).
Select the share you want to use as the target of your Send To command, and click OK to enter the UNC in the Location text box.
Click Next and enter the name for this shortcut (which will be the text on the Send To submenu).
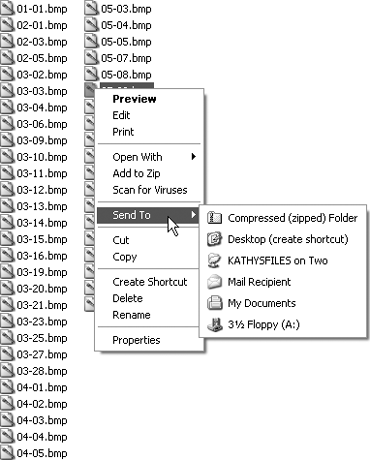
Click Finish. The new shortcut shows up on the Send To command’s submenu (see Figure 4-6).
Warning
When you expand My Network Places, you’ll see shortcuts to network places you’ve previously visited. You can select one of those items instead of expanding the remote computer’s object, but you face the risk of a nonexistent share. Windows doesn’t track the listings for network places you’ve previously visited to make sure they still exist. When you expand the listing for a remote computer, the shares listed for that computer are currently valid.
Add Send To targets in Windows 98SE/Me
To add another target to the Send To command in Windows 98 and Me:
Open Windows Explorer and expand the Windows folder.
Select the Send To subfolder and choose File → New → Shortcut to open the Create Shortcut Wizard.
Enter the UNC to the remote shared folder, or enter the drive letter if the share is mapped to a drive. For reasons known only to the folks who designed it, the Browse button in the Windows 98SE and Me Create Shortcut Wizard locates only files, not folders, so it’s useless for this task. After you enter the UNC or mapped drive letter, click Next.
Enter the name for the shortcut and click Finish. All users of the computer see this target on their Send To submenu.
MY SEND TO FOLDER IS MISSING
The Annoyance:
When I expand the folder for my username under Documents and Settings, I don’t see a Send To folder.
The Fix:
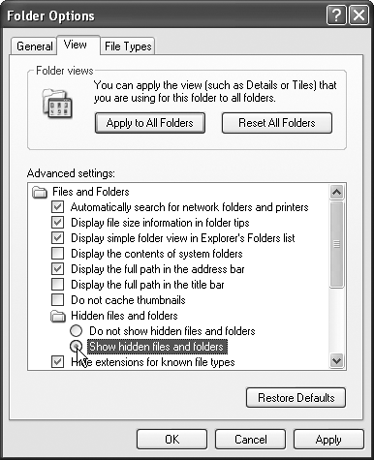
You’ve been victimized by one of the most annoying features in Windows. The Send To folder is a hidden folder, and by default, Windows doesn’t display hidden folders. To correct this annoying “feature,” open Windows Explorer or My Network Places. Choose Tools → Folder Options, click the View tab, and choose the “Show hidden files and folders” option (see Figure 4-7).
THE WEIRDNESS OF THE RECYCLE BIN
The Annoyance:
When I work at a computer other than my own, I occasionally need to access the Recycle Bin of my regular computer. I shared the drive, so it’s easy to see the Recycle Bin. However, if I want to restore a file I just realized I shouldn’t have deleted, I can’t find it.
The Fix:
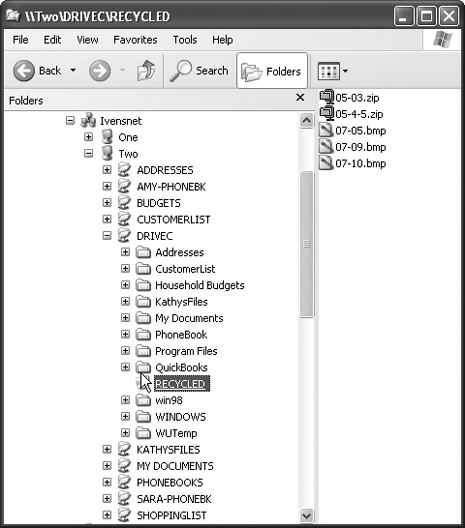
You’re not looking at the Recycle Bin of the remote computer. Instead, you’re looking at the local Recycle Bin. Even though you’re looking at a Recycle Bin that appears under the shared drive of a remote computer in Windows Explorer or My Computer (see Figure 4-8), you’re not really looking at the remote computer’s Recycle Bin. If you don’t believe me (and I wouldn’t blame you because there’s not much logic to what I’m saying), double-click the desktop icon for your local Recycle Bin. Compare the contents to the one under the shared drive of the remote computer—they’re identical.
USE REMOTE FILES IN SOFTWARE
The Annoyance:
When I open a software application and want to work on the files I created and stashed on a different computer, it’s annoying to have to copy the files to the computer I’m currently using and then copy them back when I’m finished.
The Fix:
You don’t have to copy the files you want to use in a software application because you can open them right from the software window:
In the software window, choose File → Open.
Select My Network Places and navigate to the file you need.
CAN’T SAVE FILES ON THE REMOTE COMPUTER?
The Annoyance:
While using a software application, I opened a file from my own My Documents folder on a remote computer and made changes. When I tried to save the file, I received an error message.
The Fix:
You didn’t change the default permission settings when you shared the folder. When you share a folder, all versions of Windows except Windows 2000 set a folder’s permissions to Read Only by default. Change the setting as follows:
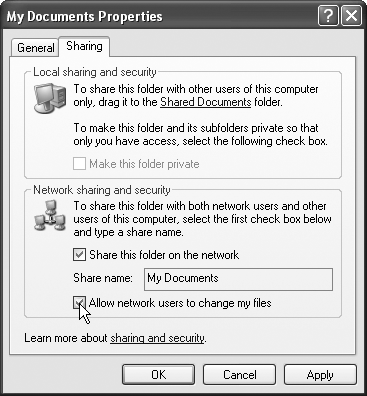
In Windows XP, right-click the folder and choose Properties, click the Sharing tab, and check the “Allow network users to change my files” box (see Figure 4-9).
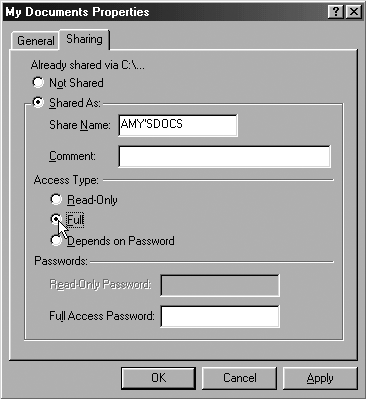
In Windows 98SE and Me, right-click the folder and choose Properties, click the Sharing tab, and select the Full option (see Figure 4-10).
FILE CONTENTS CHANGE MYSTERIOUSLY
The Annoyance:
Sometimes I add or change contents of a file, and when I open the file later, the contents don’t match what I entered. Then I find out that while I was working on the file, somebody else was working on the same file from a different computer. This is truly annoying.
The Fix:
It sure is annoying, and unless the software is designed to manage simultaneous users, there’s nothing you can do about it. Two annoying things are going on:
“The last save wins” rule is in effect.
Each user’s copy of the file is static except for the changes that user is making. As each user makes changes and saves them, the other user’s file doesn’t update with the changes being saved to the disk.
When you save and close the file and then reopen it, everything might look fine—the last save wins! However, if you’re the user who saved the file earlier than the last save, you’re probably rather surprised by the contents.
USE SOFTWARE THAT PERMITS SIMULTANEOUS USERS OF THE SAME FILE
The Annoyance:
Sometimes I open a file in a software application and I’m told that someone else is using the file. The message that appears explains the Notify option, but what’s the Read Only button for?
The Fix:
You’ll see this message if you use software designed to manage multiple users opening the same file (e.g., Microsoft Word). And you’re right, the message only explains what happens if you click the Notify button (see Figure 4-11).
The Read Only button lets you open the file as read-only, which means you can’t save the file under its original filename (you can’t click the Save button on the toolbar or select File → Save). When you want to save your work, you must choose File → Save As and save the file under a different name.
Tip
When you save the file with a different name, pick a name that connects the file to the original, such as Filename-2 (substitute the real filename for Filename).
If you click the Notify button, the file opens with the contents it had the last time it was saved by the user currently working on the file. You can begin working on the file, but if you want to save your work before you’re notified that the other user has closed the file, you must use a different filename (you’re working in read-only mode and creating a separate file, which won’t merge its contents with the original file).
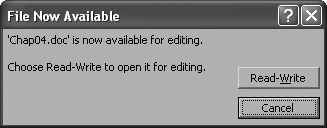
Windows tracks the other open copy of the file, and when it’s closed, you’re notified that the file is available for editing (see Figure 4-12), which means you can save it using the original filename. The file, of course, now contains any new or changed material inserted by the user who was working on it.
Warning
The next time the “other” user opens the file, your changes are there, which might be a surprise, and a surprising annoyance. You should tell the other user what you did, or make changes in a way that’s suitable for collaboration (see "Collaborating on Files“).
COLLABORATING ON FILES
The Annoyance:
We have several files on our network that multiple users work on. We keep shopping lists, calendars, and other family notes in those files. Everyone puts text in front of or behind their changes, such as “Mom, I changed the previous sentence from xxx to yyy.” This makes it more difficult to read the files, and it’s a rather complex task to create a final file.
The Fix:
Most software designed for Windows offers a way to track each person’s contribution to a document, and to accept or reject changes easily (to create a finished document). When the tracking feature is enabled, as each person opens the document and types, that person’s characters appear in a different color. When text is deleted, it remains on the screen with a special character to indicate that the document was changed by that deletion. You can accept or reject each person’s work, one change at a time, or all at once. See the Help files for your software to learn how to use this nifty feature.
Warning
After you’ve accepted or rejected all the changes and saved the document, turn off the collaboration features. Be sure to turn off the ability to see changes in the screen or print document, then test it by opening the document again and turning on the feature that shows changes (not the one that tracks changes). If you see any original text that was changed or deleted, delete it without the tracking feature to make sure it’s permanently deleted. Otherwise, if you send the document to anyone, they’ll be able to turn on the feature that shows the changes and see all the contributions, notes, and comments. This could be embarrassing to you and extremely interesting to the recipient. I’ve received documents from major corporations (including Microsoft) in which I was able to see notes, comments, and rejected text, at least some of which I’m sure they didn’t want me to see.
CREATE A FILE SERVER
The Annoyance:
We keep a number of files on our network for everyone in the family to access. As the number of files grows, we constantly lose track of where they are. At work, we have a file server that holds all the files that multiple employees need to use, but at home we have a peer-to-peer network with no file server.
The Fix:
You can add the services of a file server to your network simply by assigning one computer to that role:
Choose a computer with plenty of disk space, and make sure it’s a computer that’s either on all the time or easy to get to if you need to turn it on (a computer you keep in a locked room on the third floor isn’t a good choice). Create a user for that computer named Family, and share the My Documents folder for Family with full access (which lets other users change files).
Make sure the folder is shared on the network.
MAP LOCAL FOLDERS TO DRIVE LETTERS
The Annoyance:
Some of the files I create need to go into a folder other than My Documents. Most of the software I use opens the My Documents folder by default when I want to save or open a file. It’s annoying to go through all the mouse clicks needed to change the folder. Is there a faster way?
The Fix:
When you’re working in software, it’s much easier to change the drive letter in the Save or Open dialog box than to click your way through the computer’s hierarchy. If you have a specific folder on your drive that holds certain files, you can map a drive letter to that folder on the local computer. If you’re working remotely, share the folder and map a drive on the remote computer. If you use this folder often, save your sanity by using the same drive letter for the local and remote mappings.
Mapping a local folder is different from mapping a remote folder (read Chapter 3 for detailed instructions on mapping drives to remote folders). There’s no way to do this in the graphical Windows interface; you must use the command line. The format (the technical term is syntax) of the command is:
subst driveletter: pathIf you have a folder named Project-1 on Drive C of your computer, and you want to substitute the drive letter P, enter the following command: subst p: c:\project-1. You can use a longer path if the folder to which you want to assign a drive letter is a subfolder, or even a subfolder of a subfolder. For example: subst p: c:\project-1\budget\2005.
SAVING DATABASE DATAFILES
The Annoyance:
We have a database program to track our family budget and spending. Two of the computers on the network have a copy of the program. If each user saves the data to his or her own computer, we don’t have a complete record on either computer. This can’t be the way it’s supposed to work.
The Fix:
It certainly isn’t the way it’s supposed to work. Most database software for small businesses or home users is designed to hold all the data, from all computers, in one location. These database applications don’t have “merge” features that let you save multiple copies in different locations, then later merge the data. Larger, more robust databases usually have a merge feature that puts all the information into one file and checks for duplicate information.
The way to resolve this problem depends on the database application’s design. If the program you’re using is designed for multiuser access (e.g., QuickBooks), you must decide which computer holds the datafile, and then configure the software on all computers to use that datafile.
If the program isn’t designed for multiuser access (e.g., Quicken), you have two choices:
Designate one computer as the database computer and stop using the other computer.
Designate one computer as the database computer, and then configure the other computer to use the file on the first computer (use a mapped drive). Make sure only one computer at a time accesses the database file.
DATABASE FILE LOCKING
The Annoyance:
We use a multiuser database program to track our finances. Sometimes a user enters data and sees a message such as “access denied” or “file is locked.” We purchased this database because it can handle multiple users, so what’s the deal?
The Fix:
The database file-lock feature is kicking in. The solution is to wait a few seconds, then enter the data again. All databases have “file-lock” features to prevent users from entering different data in the same place simultaneously. Depending on the way the database is designed (programmed), the locking feature can kick in at any level of the hierarchy. The general hierarchy of a database (presented in an oversimplified manner) is as follows.
-
File The database datafile.
-
Record A particular record, such as a bank account or vendor name.
-
Field A particular field, such as the check number or the invoice number for a vendor’s bill.
The general rule of thumb is that the more robust (and expensive) a database, the lower the level of the lock. The only databases that lock the entire file are those that don’t permit simultaneous access by multiple users.
If your database locks at the record level, when any user is accessing a record, other users are locked out until the first user moves on to a different record. For example, if you’re using a vendor record to enter a bill, write a check, or change the vendor’s address, no other user can create a transaction involving that record.
If your database locks at the field level, when one user is entering a check for a particular vendor using the vendor’s invoice number, the other users are locked out of the field until the first user has moved on. For example, if you and someone else are both entering checks in the Check Number field, the first person to save the data (usually by pressing the Tab key or clicking the next field) wins. The second user is locked out for the few seconds it takes for the first user to move on before the Check Number field becomes available again.
TEMPORARY FILE LOCKING OF DATABASE DATAFILES
The Annoyance:
We have a financial database program designed for multiple simultaneous users. Every once in a while, no remote users can get into the file, and the error message says the file is not available for multiple users. This problem is sporadic, and it always goes away eventually, but it’s annoying to have an error that seems to occur randomly.
The Fix:
Most databases designed for multiple simultaneous users lock out remote users when certain activities are taking place, such as backups, major configuration changes, software updates, and other processes that involve the entire file. When the task ends, the database is once again available.
Warning
Some database programs (QuickBooks, for example) require the user who performs the file-locking task to manually put the file back into multiuser mode. If your database doesn’t automatically return the file to remote users, train everyone in the household to go back to multiuser mode manually after performing a file-locking task.
BACK UP DATABASE FILES TO REMOTE COMPUTERS
The Annoyance:
We run our family financial software on a Windows 98SE computer. We don’t want to reinstall the software on our new Windows XP computer, but we’d like to take advantage of the ability to burn CDs on the new computer. Is there a way to back up the datafile across the network?
The Fix:
I know this is possible in Quicken, Money, and QuickBooks (and surely in other financial software as well). Here are some guidelines:
Make sure you share the folder that will hold the backup; configure the share for network users and allow them to change the files.
Quicken and QuickBooks will both work with a network path, but your life will be easier if you map a drive to the remote shared folder before you make your backup.
Money will not work with a network path, so you have no choice but to map a drive to the remote shared folder before backing up the drive.
USING SOFTWARE ON A REMOTE COMPUTER
The Annoyance:
I have a software application installed on a computer, and I usually use a different computer to do my work (so that all my files are on that computer). Can I run the software remotely, from my usual computer, by double-clicking the software’s program file?
The Fix:
Almost certainly not. Software installations are rather complicated, and in addition to the executable file that launches the software, there are probably close to 100 related files scattered around the hard drive of the computer that holds the software. In addition, there are registry entries that control and manage the software on the registry of the computer that holds the software. Even all the old DOS software I still use on my Windows machine won’t run from a remote computer. DOS software doesn’t have an installation routine and doesn’t write to the registry, but it is hardcoded to use the local drive and doesn’t understand network paths—if it’s not launched from its own drive (usually C), it won’t run.
However, you do have some ways to accomplish this, all of which are much more complicated and expensive than getting up and moving to the computer that holds the software. You can subscribe to an Internet software sharing service, such as WebEx (http://www.webex.com/). Search the Internet (and magazine stories with reviews of services) for Internet support and training services. You can also buy remote computing software, which lets you enter a remote computer on the network and take over its screen, keyboard, and mouse controls and open software.
NETWORK ENTERTAINMENT CENTERS
CONNECT YOUR NETWORK TO GAMING DEVICES
The Annoyance:
We have an Xbox that everyone enjoys. Is there a way to connect the device to our network?
The Fix:
If you have gamers in the house, look for game adapters that let you attach PlayStation 2, Xbox, or GameCube devices to the network. Most network equipment manufacturers offer these adapters, and many of them support wireless communication.
Installation might seem a bit complicated, but that’s because you can’t configure the game adapter unless it’s connected to a computer via Ethernet cable. After you’ve configured the adapter, you can remove it from the computer and attach it to the game console. Complete directions come with the device.
MUSIC EVERYONE?
The Annoyance:
Everyone in our household has a music collection on his or her computer. Sometimes you can hear different music from every computer, which is incredibly annoying. On the other hand, sometimes someone is playing something everyone likes, but with computers on different floors, it’s hard for everyone to enjoy it. We need some suggestions for fixing our music problems.
The Fix:
For the first annoyance (the cacophony of multiple tunes echoing through the house), buy headsets. Every sound controller I’ve ever seen has a headset jack. For the second annoyance, the solution is a network music device. These nifty gadgets are available from almost any manufacturer of network hardware.
I’ve tested two different types of network music boxes: one that lets any network user send a tune to the family stereo system, and one that is self-contained (it’s a stereo system that comes with its own speakers). Both are wireless bridges, which means they can connect to a wired system and send/receive wireless signals. If you use the device that sends music to your home stereo system, think about adding speakers so that users all over the house can listen.
If you don’t collect music on your hard drives, you can send music from the Internet over the system. Don’t be silly enough to try this over dial-up, though—you need broadband Internet access to make this worthwhile. Keep in mind that music isn’t the only software in the world. Think about giving the kids history lessons or ask them to dig up a description of the places you’re going to visit on your next family vacation. Or simply send them on a fun and educational goose chase.
Get Home Networking Annoyances now with the O’Reilly learning platform.
O’Reilly members experience books, live events, courses curated by job role, and more from O’Reilly and nearly 200 top publishers.
