Chapter 5. Math, Physics, and Animation
Impressing users with animation involves more than knowing how to move objects—you also need to know how to move them in ways that users expect. That requires understanding some common algorithms for math-based movement and physics interactions. Simple movement based on points and vectors provides a foundation, and then it’s time to create objects that bounce off walls and one another with a bit of friction added to the mix. After that, we will step back and talk about movement that goes beyond straight lines: circles, spirals, and complex Bezier curves. We will then cover how adding gravity can affect movement. Finally, we will finish this chapter by discussing easing and how it can have a positive effect on math-based animations.
Moving in a Straight Line
For the simplest kinds of animations—moving objects in a straight
line up and down the canvas—this can take the form of adding a constant
value to the x or y position of an object every time it is
drawn.
So, to animate graphics, we will need to create an interval and then
call a function that will display
our updated graphics on every frame. Each example in this chapter will be built in a similar way. The first
step is to set up the necessary variables in our canvasApp() function. For this first, basic
example of movement, we will create a variable named speed. We will apply this value to the y position of our object on every call to
drawScreen(). The x and y
variables set up the initial position of the object (a filled circle) we
will move down the canvas:
var speed = 5;
var y = 10;
var x = 250;
After we create the variables, we set up an interval to call the
drawScreen() function every 33
milliseconds. This is the loop we need to update our objects and move them
around the canvas:
setInterval(drawScreen, 33);
In the drawScreen() function, we
update the value of y by adding to it
the value of the speed variable:
y += speed;
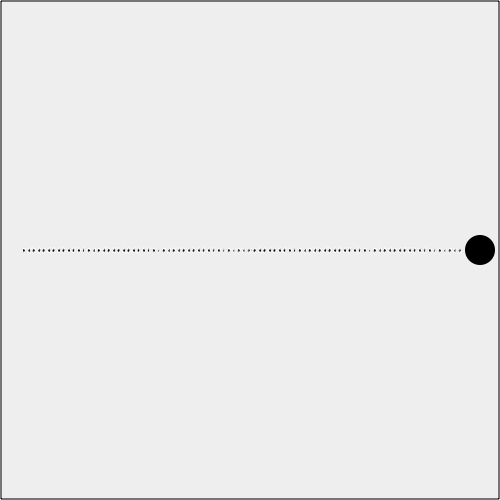
Finally, we draw our circle on the canvas. We position it using the
current value of x and y. Since y is
updated every time the function is called, the circle effectively moves
down the canvas:
context.fillStyle = "#000000";
context.beginPath();
context.arc(x,y,15,0,Math.PI*2,true);
context.closePath();
context.fill();
To move the circle up the screen, we would make speed a negative number. To move it left or
right, we would update the x instead of
the y variable. To move the circle
diagonally, we would update both x and
y at the same time.
Example 5-1 shows the complete code needed to create basic movement in a straight line.
<!doctype html>
<html lang="en">
<head>
<meta charset="UTF-8">
<title>CH5EX1: Moving In A Straight Line</title>
<script src="modernizr-1.6.min.js"></script>
<script type="text/javascript">
window.addEventListener('load', eventWindowLoaded, false);
function eventWindowLoaded() {
   canvasApp();

}

function canvasSupport () {
     return Modernizr.canvas;
}

function canvasApp() {

  if (!canvasSupport()) {
          return;
        }

    function  drawScreen () {

      context.fillStyle = '#EEEEEE';
      context.fillRect(0, 0, theCanvas.width, theCanvas.height);
      //Box
      context.strokeStyle = '#000000';
      context.strokeRect(1,  1, theCanvas.width-2, theCanvas.height-2);


      // Create ball

      y += speed;

      context.fillStyle = "#000000";
      context.beginPath();
      context.arc(x,y,15,0,Math.PI*2,true);
      context.closePath();
      context.fill();

   }

   theCanvas = document.getElementById("canvasOne");
   context = theCanvas.getContext("2d");

   var speed = 5;
   var y = 10;
   var x = 250;

   setInterval(drawScreen, 33);

}

</script>

</head>
<body>
<div style="position: absolute; top: 50px; left: 50px;">

<canvas id="canvasOne" width="500" height="500">
 Your browser does not support HTML5 Canvas.
</canvas>
</div>

</body>
</html>
Note
The basic structure of the HTML for all of the examples in this chapter will follow these rules. In the interest of saving space, we will refrain from discussing this code further, but it will appear in the examples provided.
Moving Between Two Points: The Distance of a Line
Movement based on constant changes to the x or y
position of an object works well for some applications, but other times
you will need to be more precise. One such instance is when you need to
move an object from point A to point B at a constant rate of
speed.
In mathematics, a common way to find the length of an unknown line is to use the Pythagorean theorem:
| A2 + B2 = C2 |
In this equation, C is the unknown side of a triangle when A and B are already known. However, we need to translate this equation into something we can use with the points and pixels we have available on the canvas.
This is a good example of using a mathematical equation in your application. In this case, we want to find the distance of a line, given two points. In English, this equation reads like this:
The distance equals the square root of the square of the difference between the x value of the second point minus the x value of the first point, plus the square of the difference between the y value of the second point minus the y value of the first point.
You can see this in Equation 5-1. It’s much easier to understand in this format.

In the second example, we need to create some new variables in the
canvasApp() function. We will still
use a speed variable, just like in
the first example, but this time we set it to 5, which means it will move 5 pixels on every call to drawScreen():
var speed = 5;
We then create a couple dynamic objects—each with an x and a y
property—that will represent the two points we want to move between. For
this example, we will move our circle from 20,250 to
480,250:
var p1 = {x:20,y:250};
var p2 = {x:480,y:250};
Now it is time to re-create the distance equation in Equation 5-1. The first step is to calculate the
differences between the second and first x and y
points:
var dx = p2.x - p1.x;
var dy = p2.y - p1.y;
To determine the distance, we
square both the values we just created, add them, and then use the
Math.sqrt() function to get the
square root of the number:
var distance = Math.sqrt(dx*dx + dy*dy);
Next, we need to use that calculated distance in a way that will allow us to move
an object a uniform number of pixels from p1 to p2.
The first thing we do is calculate how many moves (calls to drawScreen()) it will take the object to move
at the given value of speed. We get
this by dividing the distance by the
speed:
var moves = distance/speed;
Then we find the distance to move both x and y on
each call to drawScreen(). We name
these variables xunits and yunits:
var xunits = (p2.x - p1.x)/moves;
var yunits = (p2.y - p1.y)/moves;
Finally, we create a dynamic object named ball that holds the x and y
value of p1…
var ball = {x:p1.x, y:p1.y};…and create the interval to call drawScreen() every 33 milliseconds:
setInterval(drawScreen, 33);
Drawing the ball
Let’s draw the ball on the screen. In the drawScreen() function, we first check to see
whether the moves variable is
greater than zero. If so, we are still supposed to move the ball
across the screen because we have not yet reached p2. We decrement moves (moves--) and then update the x and y
properties of the ball object by adding the xunits to x and yunits to y:
if (moves > 0 ) {
   moves--;
   ball.x += xunits;
   ball.y += yunits;
}
Now that our values have been
updated, we simply draw the ball at the x and y
coordinates specified by the x and
y properties, and we are done…that
is, until drawScreen() is called 33
milliseconds later:
context.fillStyle = "#000000";
context.beginPath();
context.arc(ball.x,ball.y,15,0,Math.PI*2,true);
context.closePath();
context.fill();
Let’s try the example by executing it in a web browser. You can find it in the code distribution as CH5EX2.html, or you can type in Example 5-2. Watch the ball move from one point to another. If you update the x and y values of each point, or change the speed, watch the results. You can do a lot with this very simple example.
Tracing movement: A path of points
For many of the examples in this chapter, we will create a way to trace an object’s movement on the canvas by drawing points to show its path. We have done this to help illustrate how objects move. However, in the real world, you would need to remove this functionality so that your application would perform to its potential. This is the only place we will discuss this code, so if you see it listed in any of the later examples in this chapter, refer back to this section to refresh your memory on its functionality.
First, we create an array in canvasApp() to hold the set of points we
will draw on the canvas:
var points = new Array();
Next, we load a black 4×4 pixel image, point.png, that we will use to display the points on the canvas:
var pointImage = new Image();
pointImage.src = "point.png";
Whenever we calculate a point for an object we will move, we
push that point into the points
array:
points.push({x:ball.x,y:ball.y});On each call to drawScreen(),
we draw the set of points we have put into the points array. Remember, we have to redraw
every point each time because the canvas is an immediate-mode display
surface that does not retain any information about the images drawn
onto it:
for (var i = 0; i< points.length; i++) {
   context.drawImage(pointImage, points[i].x, points[i].y,1,1);
}
In Figure 5-1,
you can see what the ball looks like when moving on a line from one
point to another, and also what the points path looks like when it is
drawn.
Note
This is the only time in this chapter where we will discuss
the points path in depth. If you
see the points being drawn, you will know how and why we have added
that functionality. You should also have enough information to
remove the code when necessary.
Example 5-2 is the full code listing for CH5EX2.html.
<!doctype html>
<html lang="en">
<head>
<meta charset="UTF-8">
<title>CH5EX2: Moving On A Simple Line</title>
<script src="modernizr-1.6.min.js"></script>
<script type="text/javascript">
window.addEventListener('load', eventWindowLoaded, false);
function eventWindowLoaded() {
   canvasApp();

}

function canvasSupport () {
     return Modernizr.canvas;
}

function canvasApp() {

  if (!canvasSupport()) {
          return;
        }

  var pointImage = new Image();
  pointImage.src = "point.png";

  function  drawScreen () {


      context.fillStyle = '#EEEEEE';
      context.fillRect(0, 0, theCanvas.width, theCanvas.height);
      //Box
      context.strokeStyle = '#000000';
      context.strokeRect(1,  1, theCanvas.width-2, theCanvas.height-2);

      // Create ball

      if (moves > 0 ) {
         moves--;
         ball.x += xunits;
         ball.y += yunits;
      }

      //Draw points to illustrate path

      points.push({x:ball.x,y:ball.y});

      for (var i = 0; i< points.length; i++) {
         context.drawImage(pointImage, points[i].x, points[i].y,1,1);

      }

      context.fillStyle = "#000000";
      context.beginPath();
      context.arc(ball.x,ball.y,15,0,Math.PI*2,true);
      context.closePath();
      context.fill();

   }
   var speed = 5;
   var p1 = {x:20,y:250};
   var p2 = {x:480,y:250};
   var dx = p2.x - p1.x;
   var dy = p2.y - p1.y;
   var distance = Math.sqrt(dx*dx + dy*dy);
   var moves = distance/speed;
   var xunits = (p2.x - p1.x)/moves;
   var yunits = (p2.y - p1.y)/moves;
   var ball = {x:p1.x, y:p1.y};
   var points = new Array();

   theCanvas = document.getElementById("canvasOne");
   context = theCanvas.getContext("2d");

   setInterval(drawScreen, 33);

}

</script>

</head>
<body>
<div style="position: absolute; top: 50px; left: 50px;">

<canvas id="canvasOne" width="500" height="500">
 Your browser does not support HTML5 Canvas.
</canvas>
</div>
</body>
</html>
Moving on a Vector
Moving between two points is handy, but sometimes you don’t have a
point to move to, only a point to start from. In cases like this, it can
be very useful to create a vector as
a means to move your object.
A vector is a quantity in physics that has
both magnitude and direction. For our purposes, the magnitude will be
the speed of the moving object, and
the direction will be an angle that
the object will move upon.
The good news is that moving on a vector is very similar to moving
between two points. In canvasApp(),
we first set our speed (magnitude).
This is the number of pixels the object will move on every call to
drawScreen(). We will set this to
5. We will also set the starting
point (p1) for the object to 20,20:
var speed = 5;
var p1 = {x:20,y:20};
Now, we will set the angle
(direction) of movement for our object to 45 degrees. In mathematics, a flat, straight
line usually represents the 0 angle, which means a vector with an angle
of 45 degrees would be down and to the right on the canvas.
With our angle set, we now need to convert it to radians. Radians are a standard unit of angle measurement, and most mathematical calculations require you to convert an angle into radians before you can use it.
So why not just use radians and forget degrees altogether? Because
it is much easier to understand movement in degrees when working with
vectors and moving objects on a 2D surface. While a circle has 360
degrees, it has just about 6 radians, which are calculated
counterclockwise. This might make perfect sense to mathematicians, but
to move objects on a computer screen, angles are much easier. So, we
will work with angles, but we still need to convert our 45-degree angle
into radians. We do that with a standard formula: radians = angle * Math.PI/ 180. And in the
code:
var angle = 45;
var radians = angle * Math.PI/ 180;
Before we can discuss how we calculate the movement of our object
along our vector, we need to review a couple trigonometric concepts.
These are cosine and sine, and both relate to the arc created by
our angle (now converted to radians), if it was drawn outward from the
center of the circle.
You can see how these values relate to a 45-degree angle in Figure 5-2.
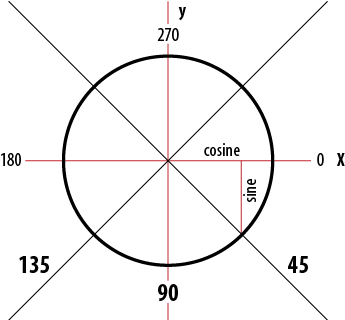
This might seem complicated, but there is a very simple way to
think about it: cosine usually deals with the x value, and sine usually deals with the
y value. We can use sine and cosine
to help us calculate movement along our vector.
To calculate the number of pixels to move our object on each call
to drawScreen() (xunits and yunits), we use the radians (direction) we calculated and speed (magnitude), along with the Math.cos() (cosine) and Math.sin() (sine) functions of the JavaScript
Math object:
var xunits = Math.cos(radians) * speed;
var yunits = Math.sin(radians) * speed;
In drawScreen(), we simply add
xunits and yunits to ball.x and ball.y. We don’t check to see whether moves has been exhausted because we are not
moving to a particular point—we are simply moving along the vector,
seemingly forever. In the next section, we will explore what we can do
if we want the moving object to change direction when it hits something
such as a wall:
ball.x += xunits;
ball.y += yunits;
Figure 5-3 shows what Example 5-3 looks like when it is executed in a web browser. Recall that the points are drawn for illustration only.

Example 5-3 gives the full code listing.
<!doctype html>
<html lang="en">
<head>
<meta charset="UTF-8">
<title>CH5EX3: Moving On A Vector</title>
<script src="modernizr-1.6.min.js"></script>
<script type="text/javascript">
window.addEventListener('load', eventWindowLoaded, false);
function eventWindowLoaded() {
   canvasApp();
}

function canvasSupport () {
     return Modernizr.canvas;
}

function canvasApp() {

  if (!canvasSupport()) {
          return;
        }

  var pointImage = new Image();
  pointImage.src = "point.png";

  function  drawScreen () {

      context.fillStyle = '#EEEEEE';
      context.fillRect(0, 0, theCanvas.width, theCanvas.height);
      //Box
      context.strokeStyle = '#000000';
      context.strokeRect(1,  1, theCanvas.width-2, theCanvas.height-2);

      ball.x += xunits;
      ball.y += yunits;

      //Draw points to illustrate path

      points.push({x:ball.x,y:ball.y});

      for (var i = 0; i< points.length; i++) {
         context.drawImage(pointImage, points[i].x, points[i].y,1,1);
      }

      context.fillStyle = "#000000";
      context.beginPath();
      context.arc(ball.x,ball.y,15,0,Math.PI*2,true);
      context.closePath();
      context.fill();

   }
   var speed = 5;
   var p1 = {x:20,y:20};
   var angle = 45;
   var radians = angle * Math.PI/ 180;
   var xunits = Math.cos(radians) * speed;
   var yunits = Math.sin(radians) * speed;
   var ball = {x:p1.x, y:p1.y};
   var points = new Array();

   theCanvas = document.getElementById("canvasOne");
   context = theCanvas.getContext("2d");

   setInterval(drawScreen, 33);

}

</script>

</head>
<body>
<div style="position: absolute; top: 50px; left: 50px;">

<canvas id="canvasOne" width="500" height="500">
 Your browser does not support HTML5 Canvas.
</canvas>
</div>
</body>
</html>
Bouncing Off Walls
While it’s neat that we can create a vector with magnitude and direction and then move an object along it infinitely, it’s probably not something you will need to do all that often. Most of the time, you will want to see that object react to the world around it by bouncing off horizontal and vertical walls, for example.
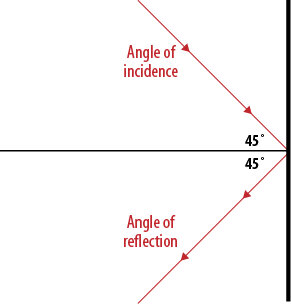
To help you understand how to do this, there is a simple rule in physics. Although this rule is usually applied to rays of light, it can be very useful when animating 2D objects—especially when they are bouncing off horizontal and vertical walls. This rule is known as the angle of reflection:
The angle of incidence is equal to the angle of reflection.
The angle of incidence is the angle an object is traveling when it hits the walls, and the angle of reflection is the angle it travels after it bounces off the wall.
Figure 5-4 illustrates that when an object hits a wall on a line that forms a 45-degree angle with a perpendicular line drawn to the point of impact, it will bounce off (reflect) at a similar 45-degree angle.
In the next section, we will create a series of examples using this rule to animate objects. The first, Example 5-4, will simply allow a single ball to bounce off the edges of the canvas.
Bouncing a Single Ball
In this first example, we will create a ball traveling on a
vector. We will set the speed
(magnitude) to 5 and the angle (direction) to 35 degrees. The rest of the variables are
identical to those in Example 5-3. We are
still moving on a vector, but now we will test to see whether the ball
hits a “wall” (the edges of the canvas), in which case it will bounce
off, using the rule of the angle of reflection. One big change from the
previous vector example is the location in which we initialize the
values for radians, xunits, and yunits. Instead of setting them up when we
initialize the application in canvasApp(), we save that for a call to a new
function named updateBall():
var speed = 5;
var p1 = {x:20,y:20};
var angle = 35;
var radians = 0;
var xunits = 0;
var yunits = 0;
var ball = {x:p1.x, y:p1.y};
updateBall();
The updateBall() function is
called every time we set a new angle
for the ball, because we need to recalculate the radians and find new values for xunits and yunits. A new angle is generated when the app starts, as
well as every time the ball bounces off a wall:
function updateBall() {
   radians = angle * Math.PI/ 180;
   xunits = Math.cos(radians) * speed;
   yunits = Math.sin(radians) * speed;
}
In drawScreen(), we update the
position of the ball, and then draw it on the canvas:
ball.x += xunits;
ball.y += yunits;
context.fillStyle = "#000000";
context.beginPath();
context.arc(ball.x,ball.y,15,0,Math.PI*2,true);
context.closePath();
context.fill();
Next, we test to see whether the ball has hit a wall before we
draw it to the canvas. If the ball hits the right side (ball.x > the Canvas.width) or the left side
of the canvas (ball.x < 0), we set
the angle to 180 degrees minus the angle of the vector on which the ball
is traveling. This gives us the angle of reflection. Alternatively, if
the ball hits the top (ball.y < 0)
or bottom (ball.y >
theCanvas.height) of the canvas, we calculate the angle of
reflection with 360 degrees minus the angle of the vector on which the
ball is traveling:
if (ball.x > theCanvas.width || ball.x < 0 ) {
       angle = 180 - angle;
       updateBall();
    } else if (ball.y > theCanvas.height || ball.y < 0) {
       angle = 360 - angle;
       updateBall();
    }
That’s it. Example 5-4 demonstrates a ball that bounces off walls using the rules of physics. Figure 5-5 illustrates the code.
<!doctype html>
<html lang="en">
<head>
<meta charset="UTF-8">
<title>CH5EX4: Ball Bounce</title>
<script src="modernizr-1.6.min.js"></script>
<script type="text/javascript">
window.addEventListener('load', eventWindowLoaded, false);
function eventWindowLoaded() {
   canvasApp();
}

function canvasSupport () {
     return Modernizr.canvas;
}

function canvasApp() {

  if (!canvasSupport()) {
          return;
        }

  function  drawScreen () {
      context.fillStyle = '#EEEEEE';
      context.fillRect(0, 0, theCanvas.width, theCanvas.height);
      //Box
      context.strokeStyle = '#000000';
      context.strokeRect(1,  1, theCanvas.width-2, theCanvas.height-2);
      ball.x += xunits;
      ball.y += yunits;
      context.fillStyle = "#000000";
      context.beginPath();
      context.arc(ball.x,ball.y,15,0,Math.PI*2,true);
      context.closePath();
      context.fill();

      if (ball.x > theCanvas.width || ball.x < 0 ) {
         angle = 180 - angle;
         updateBall();
      } else if (ball.y > theCanvas.height || ball.y < 0) {
         angle = 360 - angle;
         updateBall();
      }

   }

   function updateBall() {
      radians = angle * Math.PI/ 180;
      xunits = Math.cos(radians) * speed;
      yunits = Math.sin(radians) * speed;
   }

   var speed = 5;
   var p1 = {x:20,y:20};
   var angle = 35;
   var radians = 0;
   var xunits = 0;
   var yunits = 0;
   var ball = {x:p1.x, y:p1.y};
   updateBall();

   theCanvas = document.getElementById("canvasOne");
   context = theCanvas.getContext("2d");

   setInterval(drawScreen, 33);

}

</script>

</head>
<body>
<div style="position: absolute; top: 50px; left: 50px;">

<canvas id="canvasOne" width="500" height="500">
 Your browser does not support HTML5 Canvas.
</canvas>
</div>
</body>
</html>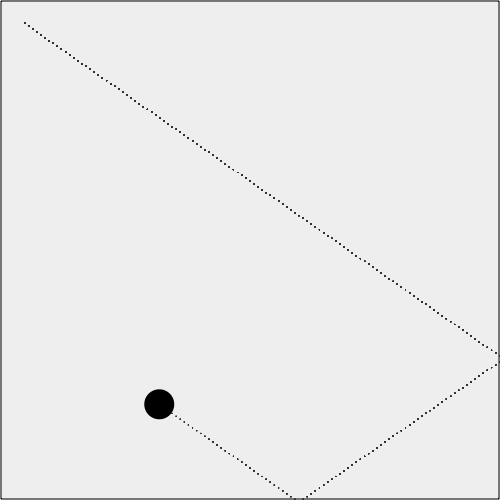
Note
The points on the line are not drawn when executed in the web browser because they slowed down the ball far too much. We left them in Figure 5-5 to illustrate the angles of incidence and reflection.
Multiple Balls Bouncing Off Walls
One ball is cool, but what about 100? Is the code 100 times more
complicated? No, not at all. In fact, the code is only slightly more
complicated, but it is also more refined. Most programming tasks that
require only a single object of a type tend to allow you to be a bit
lazy. However, when you need to build an application that must support
n number of objects, you need to make sure
the code will work in many different cases.
In the case of 100 balls bouncing on the canvas, we will need to
create a ball object with a few more properties. Recall that the ball
object we created previously had only x and y
properties, and looked like this:
var ball = {x:p1.x, y:p1.y};All the other variables that represented the ball (speed, angle, xunits, yunits) were global in scope to the canvasApp(). We used global variables because
we could get away with it. However, because we need to make sure
everything works the same way in this app, we make all those values
properties of each ball object.
For the multiple-ball-bounce application, we will create an object
that holds all the pertinent information about each bouncing ball:
x, y, speed,
angle, xunits, and yunits. Because we are going to create 100
balls of various sizes, we also add a property named radius, which represents the size of the ball
(well, half the size since it is a radius):
tempBall = {x:tempX,y:tempY,radius:tempRadius, speed:tempSpeed,
    angle:tempAngle, xunits:tempXunits, yunits:tempYunits}
Inside canvasApp(), we define
some new variables to help manage the multiple balls that will bounce
around the canvas:
numBallsThe number of balls to randomly create
maxSizeThe maximum radius length for any given ball
minSizeThe minimum radius length for any given ball
maxSpeedThe maximum speed any ball can travel
ballsAn array to hold all of the ball objects we will create
The following code shows the newly defined variables:
var numBalls = 100 ;
var maxSize = 8;
var minSize = 5;
var maxSpeed = maxSize+5;
var balls = new Array();
We also create a set of temporary variables to hold the values for
each ball before we push it into the balls array:
var tempBall;
var tempX;
var tempY;
var tempSpeed;
var tempAngle;
var tempRadius;
var tempRadians;
var tempXunits;
var tempYunits;
Next, in canvasApp(), we
iterate through a loop to create all the ball objects. Notice how
tempX and tempY are created below. These values
represent the ball’s starting location on the canvas. We create a random
value for each, but we offset it by the size of the ball (tempRadius*2). If we did not do that, some of
the balls would get “stuck” in a wall when the app starts because their
x or y location would be “through” the wall, but
their speed would not be enough so
that a “bounce” would get them back on the playfield. They would be
stuck in bouncing limbo forever (which is kind of sad when you think
about it).
Note
When you try this app, you will see that occasionally a ball still gets stuck in a wall. There is a further optimization we need to make to prevent this, but it is a bigger subject than this little iteration. We will talk about it in the section Multiple Balls Bouncing and Colliding.
The tempSpeed variable is
created by subtracting the value of tempRadius from the value of maxSpeed, which we created earlier. The
speed is not random, but it is
inversely proportional to the size (radius) of the ball. A larger ball
has larger radius, so the value you subtract from tempSpeed will be larger, thus making the ball
move slower:
Note
When you run CH5EX4.html in your web browser, you will notice that this little trick makes the ball appear more “real” because your brain expects larger objects to move slower.
for (var i = 0; i < numBalls; i++) {
    tempRadius = Math.floor(Math.random()*maxSize)+minSize;
    tempX = tempRadius*2 + (Math.floor(Math.random()*theCanvas.width)-tempRadius*2);
    tempY = tempRadius*2 + (Math.floor(Math.random()*theCanvas.height)-tempRadius*2);
    tempSpeed = maxSpeed-tempRadius;
    tempAngle = Math.floor(Math.random()*360);
    tempRadians = tempAngle * Math.PI/ 180;
    tempXunits = Math.cos(tempRadians) * tempSpeed;
    tempYunits = Math.sin(tempRadians) * tempSpeed;

    tempBall = {x:tempX,y:tempY,radius:tempRadius, speed:tempSpeed, angle:tempAngle,
        xunits:tempXunits, yunits:tempYunits}
    balls.push(tempBall);
}
Now we need to draw the balls onto the canvas. Inside drawScreen(), the code to draw the balls
should look very familiar because it is essentially the same code we
used for one ball in Example 5-4. We just need to
loop through the balls array to
render each ball object:
for (var i = 0; i <balls.length; i++) {
ball = balls[i];
ball.x += ball.xunits;
ball.y += ball.yunits;
context.beginPath();
context.arc(ball.x,ball.y,ball.radius,0,Math.PI*2,true);
context.closePath();
context.fill();
if (ball.x > theCanvas.width || ball.x < 0 ) {
ball.angle = 180 - ball.angle;
updateBall(ball);
} else if (ball.y > theCanvas.height || ball.y < 0) {
ball.angle = 360 - ball.angle;
updateBall(ball);
}
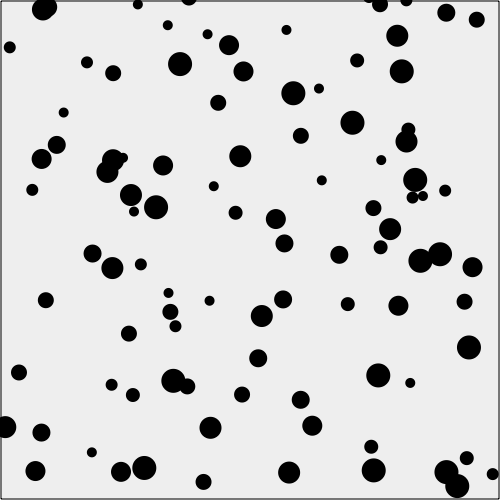
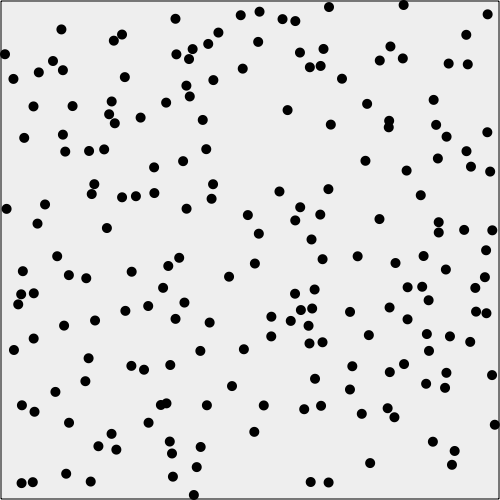
}When you load Example 5-5 in your web
browser, you will see a bunch of balls all moving around the screen
independently, as shown in Figure 5-6. For the fun of
it, why not change the numBalls
variable to 500 or 1,000? What does the canvas look like then?
<!doctype html>
<html lang="en">
<head>
<meta charset="UTF-8">
<title>CH5EX5: Multiple Ball Bounce</title>
<script src="modernizr-1.6.min.js"></script>
<script type="text/javascript">
window.addEventListener('load', eventWindowLoaded, false);
function eventWindowLoaded() {
   canvasApp();
}

function canvasSupport () {
     return Modernizr.canvas;
}

function canvasApp() {

   if (!canvasSupport()) {
          return;
        }

  function  drawScreen () {

      context.fillStyle = '#EEEEEE';
      context.fillRect(0, 0, theCanvas.width, theCanvas.height);

      //Box
      context.strokeStyle = '#000000';
      context.strokeRect(1,  1, theCanvas.width-2, theCanvas.height-2);

      //Place balls
      context.fillStyle = "#000000";
      var ball;

      for (var i = 0; i <balls.length; i++) {
         ball = balls[i];
         ball.x += ball.xunits;
         ball.y += ball.yunits;

         context.beginPath();
         context.arc(ball.x,ball.y,ball.radius,0,Math.PI*2,true);
         context.closePath();
         context.fill();

         if (ball.x > theCanvas.width || ball.x < 0 ) {
            ball.angle = 180 - ball.angle;
            updateBall(ball);
         } else if (ball.y > theCanvas.height || ball.y < 0) {
            ball.angle = 360 - ball.angle;
            updateBall(ball);
         }
      }

   }

   function updateBall(ball) {

      ball.radians = ball.angle * Math.PI/ 180;
      ball.xunits = Math.cos(ball.radians) * ball.speed;
      ball.yunits = Math.sin(ball.radians) * ball.speed;

   }

   var numBalls = 100 ;
   var maxSize = 8;
   var minSize = 5;
   var maxSpeed = maxSize+5;
   var balls = new Array();
   var tempBall;
   var tempX;
   var tempY;
   var tempSpeed;
   var tempAngle;
   var tempRadius;
   var tempRadians;
   var tempXunits;
   var tempYunits;

   theCanvas = document.getElementById("canvasOne");
   context = theCanvas.getContext("2d");

   for (var i = 0; i < numBalls; i++) {
      tempRadius = Math.floor(Math.random()*maxSize)+minSize;
      tempX = tempRadius*2 + (Math.floor(Math.random()*theCanvas.width)-tempRadius*2);
      tempY = tempRadius*2 + (Math.floor(Math.random()*theCanvas.height)-tempRadius*2);
      tempSpeed = maxSpeed-tempRadius;
      tempAngle = Math.floor(Math.random()*360);
      tempRadians = tempAngle * Math.PI/ 180;
      tempXunits = Math.cos(tempRadians) * tempSpeed;
      tempYunits = Math.sin(tempRadians) * tempSpeed;

      tempBall = {x:tempX,y:tempY,radius:tempRadius, speed:tempSpeed, angle:tempAngle,
          xunits:tempXunits, yunits:tempYunits}
      balls.push(tempBall);
   }

   setInterval(drawScreen, 33);

   }


</script>

</head>
<body>
<div style="position: absolute; top: 50px; left: 50px;">

<canvas id="canvasOne" width="500" height="500">
 Your browser does not support HTML5 Canvas.
</canvas>
</div>
</body>
</html>
Multiple Balls Bouncing with a Dynamically Resized Canvas
Before we move on to some more complex interaction among balls, let’s try one more thing. Back in Chapter 3, we resized the canvas with some HTML5 form controls to display text in the center of the canvas. Well, let’s do the same thing now with the ball example. This will give you a better idea of how we can make objects interact with a dynamically resizing canvas.
First, in the HTML, we create two HTML5 range controls, one for width and one for height, and set their maximum values to
1000. We will use these controls to
set the width and height of the canvas at runtime:
<form>

 Canvas Width:  <input type="range" id="canvasWidth"
       min="0"
       max="1000"
       step="1"
       value="500"/>
 <br>
 Canvas Height:  <input type="range" id="canvasHeight"
       min="0"
       max="1000"
       step="1"
       value="500"/>
 <br>

</form>
In canvasApp(), we create the
event listeners for the HTML5 form controls. We listen for the change event, which means any time the
range control is moved, the event
handlers will be called:
formElement = document.getElementById("canvasWidth")
formElement.addEventListener('change', canvasWidthChanged, false);

formElement = document.getElementById("canvasHeight")
formElement.addEventListener('change', canvasHeightChanged, false);
The event handler functions capture the changes to the range, set
theCanvas.width or theCanvas.height, and then call drawScreen() to render the new size. Without a
call to drawScreen() here, the canvas
will blink when the new size is applied in drawScreen() on the next interval:
function canvasWidthChanged(e) {
      var target = e.target;
      theCanvas.width = target.value;
      drawScreen();
   }

function canvasHeightChanged(e) {
      var target = e.target;
      theCanvas.height = target.value;
      drawScreen();
}
Note
All of this is explained in gory detail in Chapter 3.
One last thing—let’s increase the number of balls set in canvasApp() to 500:
var numBalls = 500 ;
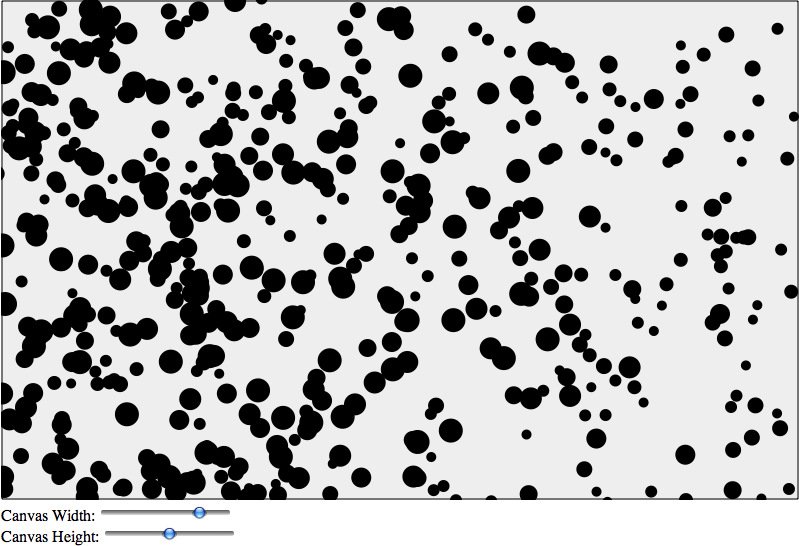
Now, check out Example 5-6 (CH5EX6.html from the code distribution). When
you run the code in a web browser, you should see 500 balls bounce
around the canvas, as shown in Figure 5-7. When you increase
the width or height using the range
controls, they continue moving until they hit the new edge of the
canvas. If you make the canvas smaller, the balls will be contained
within the smaller space. If you adjust the size too rapidly, some balls
will be lost off the canvas, but they will reappear when the canvas is
resized. Neat, huh?
<!doctype html>
<html lang="en">
<head>
<meta charset="UTF-8">
<title>CH5EX6: Multiple Ball Bounce With Resize</title>
<script src="modernizr-1.6.min.js"></script>
<script type="text/javascript">
window.addEventListener('load', eventWindowLoaded, false);
function eventWindowLoaded() {
   canvasApp();
}

function canvasSupport () {
     return Modernizr.canvas;
}

function canvasApp() {

  if (!canvasSupport()) {
          return;
        }

   formElement = document.getElementById("canvasWidth")
   formElement.addEventListener('change', canvasWidthChanged, false);

   formElement = document.getElementById("canvasHeight")
   formElement.addEventListener('change', canvasHeightChanged, false);

  function  drawScreen () {

      context.fillStyle = '#EEEEEE';
      context.fillRect(0, 0, theCanvas.width, theCanvas.height);
      //Box
      context.strokeStyle = '#000000';
      context.strokeRect(1,  1, theCanvas.width-2, theCanvas.height-2);

      //Place balls
      context.fillStyle = "#000000";
      var ball;

      for (var i = 0; i <balls.length; i++) {
         ball = balls[i];
         ball.x += ball.xunits;
         ball.y += ball.yunits;

         context.beginPath();
         context.arc(ball.x,ball.y,ball.radius,0,Math.PI*2,true);
         context.closePath();
         context.fill();

         if (ball.x > theCanvas.width || ball.x < 0 ) {
            ball.angle = 180 - ball.angle;
            updateBall(ball);
         } else if (ball.y > theCanvas.height || ball.y < 0) {
            ball.angle = 360 - ball.angle;
            updateBall(ball);
         }
      }

   }

   function updateBall(ball) {

      ball.radians = ball.angle * Math.PI/ 180;
      ball.xunits = Math.cos(ball.radians) * ball.speed;
      ball.yunits = Math.sin(ball.radians) * ball.speed;

   }

   var numBalls = 500 ;
   var maxSize = 8;
   var minSize = 5;
   var maxSpeed = maxSize+5;
   var balls = new Array();
   var tempBall;
   var tempX;
   var tempY;
   var tempSpeed;
   var tempAngle;
   var tempRadius;
   var tempRadians;
   var tempXunits;
   var tempYunits;

   theCanvas = document.getElementById("canvasOne");
   context = theCanvas.getContext("2d");

   for (var i = 0; i < numBalls; i++) {
      tempRadius = Math.floor(Math.random()*maxSize)+minSize;
      tempX = tempRadius*2 + (Math.floor(Math.random()*theCanvas.width)-tempRadius*2);
      tempY = tempRadius*2 + (Math.floor(Math.random()*theCanvas.height)-tempRadius*2);
      tempSpeed = maxSpeed-tempRadius;
      tempAngle = Math.floor(Math.random()*360);
      tempRadians = tempAngle * Math.PI/ 180;
      tempXunits = Math.cos(tempRadians) * tempSpeed;
      tempYunits = Math.sin(tempRadians) * tempSpeed;

      tempBall = {x:tempX,y:tempY,radius:tempRadius, speed:tempSpeed, angle:tempAngle,
          xunits:tempXunits, yunits:tempYunits}
      balls.push(tempBall);
   }

   setInterval(drawScreen, 33);

   function canvasWidthChanged(e) {
      var target = e.target;
      theCanvas.width = target.value;
      drawScreen();
   }

   function canvasHeightChanged(e) {
      var target = e.target;
      theCanvas.height = target.value;
      drawScreen();
   }

}

</script>

</head>
<body>
<div style="position: absolute; top: 50px; left: 50px;">

<canvas id="canvasOne" width="500" height="500">
 Your browser does not support HTML5 Canvas.
</canvas>
<form>

 Canvas Width:  <input type="range" id="canvasWidth"
       min="0"
       max="1000"
       step="1"
       value="500"/>
 <br>
 Canvas Height:  <input type="range" id="canvasHeight"
       min="0"
       max="1000"
       step="1"
       value="500"/>
 <br>

</form>
</div>
</body>
</html>
Multiple Balls Bouncing and Colliding
Now it’s time to step it up again. Testing balls bouncing off walls is one thing, but what about balls bouncing off one another? We will need to add some pretty intricate code to handle this type of interaction.
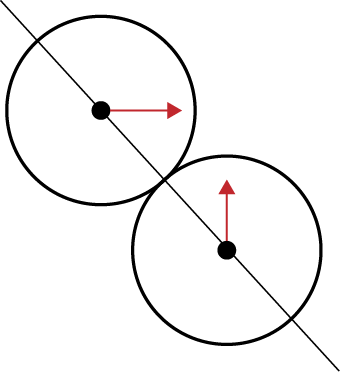
Ball interactions in physics
For this example, we are going to create an elastic collision, which means that the total kinetic energy of the objects is the same before and after the collision. This is known as the law of conservation of momentum (Newton’s third law). To do this, we will take the x and y velocities of two colliding balls, and draw a “line of action” between their centers. This is illustrated in Figure 5-8, which has been adapted from Jobe Makar and Ben Winiarczyk’s Macromedia’s Flash MX 2004 Game Design Demystified (Macromedia Press). Then we will create new x and y velocities for each ball based on this angle and the law of conservation of momentum.
To properly calculate conservation of momentum when balls
collide on the canvas, we need to add a new property: mass. Mass is the measurement of how much a
ball (or any object) resists any change in its velocity. Because
collisions tend to change the velocity of objects, this is an
important addition to the ball objects we will use on the
canvas.
Making sure the balls don’t start on top of each other
We will work from the code we created for Example 5-6 (CH5EX6.html). The first big change to that code is to make sure the balls don’t randomly start on top of one another. If we let them start in the same location, they would be forever intertwined and would spin off into oblivion. To be honest, it looks pretty cool when that happens, but that’s not the result we are looking to achieve.
In canvasApp(), we set a
variable named tempRadius to
5. We will use this value as the
radius for each ball we create. Next, we create another new variable
named placeOK and set it to
false. When this is equal to
true, we know we have found a place
to put a ball that is not on top of another ball.
Next, we enter a while() loop
that will continue to iterate as long as placeOK is false. Then, we set all the values for our
new ball object:
tempRadius = 5;
var placeOK = false;
while (!placeOK) {
tempX = tempRadius*3 + (Math.floor(Math.random()*theCanvas.width)-tempRadius*3);
tempY = tempRadius*3 + (Math.floor(Math.random()*theCanvas.height)-tempRadius*3);
tempSpeed = 4;
tempAngle = Math.floor(Math.random()*360);
tempRadians = tempAngle * Math.PI/ 180;
tempvelocityx = Math.cos(tempRadians) * tempSpeed;
tempvelocityy = Math.sin(tempRadians) * tempSpeed;
Now, we need to make a dynamic object out of the values we just
created and place that object into the tempBall variable. This is where we create a
mass property for each ball. Again,
we do this so that we can calculate the effect when the balls hit one
another. For all the balls in this example, the mass will be the same—the value of tempRadius. We do this because, in our 2D
environment, the relative size of each ball is a very simple way to
create a value for mass. Since the
mass and speed of each ball will be the same, they
will affect each other in a similar way. Later, we will show you what
happens when we create ball objects with different mass values.
Finally, we create nextX and
nextY properties that are equal to
x and y. We will use these values as “look ahead”
properties to help alleviate collisions that occur “between” our
iterations, which lead to overlapping balls and other oddities:
tempBall = {x:tempX,y:tempY, nextX: tempX, nextY: tempY, radius:tempRadius,
    speed:tempSpeed, angle:tempAngle, velocityx:tempvelocityx,
    velocityy:tempvelocityy, mass:tempRadius};
Now that we have our new dynamic ball object represented by the
tempBall variable, we will test to
see whether it can be placed at the tempX and tempY we randomly created for it. We will do this with a call to a new
function named canStartHere(). If
canStartHere() returns
true, we drop out of the while() loop; if not, we start all over
again:
         placeOK = canStartHere(tempBall);
      }
The canStartHere() function
is very simple. It looks through the ball array, testing the new tempBall against all existing balls to see
whether they overlap. If they do, the function returns false; if not, it returns true. To test the overlap, we have created
another new function: hitTestCircle():
function canStartHere(ball) {
      var retval = true;
      for (var i = 0; i <balls.length; i++) {
         if (hitTestCircle(ball, balls[i])) {
            retval = false;
         }
      }
      return retval;
   }
Circle collision detection
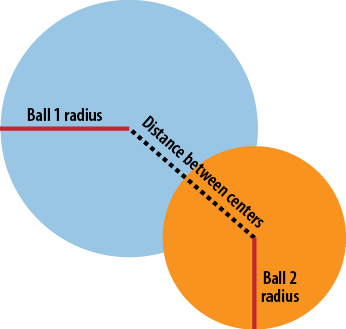
The hitTestCircle() function
performs a circle/circle collision-detection test to see whether the
two circles (each representing a ball) passed as parameters to the
function are touching. Because we have been tracking the balls by the
center x and y of their location, this is quite easy to
calculate. First, the function finds the distance of the line that
connects the center of each circle. We do this using our old friend
the Pythagorean theorem
(A2+B2 =
C2). We use the nextx and nexty properties of the ball because we want
to test the collision before it occurs. (Again, if we test after by
using the current x and y locations, there is a good chance the
balls will get stuck together and spin out of control.) We then
compare that distance value to the
sum of the radius of each ball. If the distance is less than or equal
to the sum of the radii, we have a collision. This is a very simple
and efficient way to test collisions, and it works especially well
with collisions among balls in 2D:
function hitTestCircle(ball1,ball2) {
   var retval = false;
   var dx = ball1.nextx - ball2.nextx;
   var dy = ball1.nexty - ball2.nexty;
   var distance = (dx * dx + dy * dy);
   if (distance <= (ball1.radius + ball2.radius) * (ball1.radius + ball2.radius) ) {
      retval = true;
    }
   return retval;
}
Figure 5-9 illustrates this code.
Separating the code in drawScreen()
The next thing we want to do is simplify drawScreen() by separating the code into
controllable functions. The idea here is that to test collisions
correctly, we need to make sure some of our calculations are done in a
particular order. We like to call this an
update-collide-render cycle.
update()Sets the
nextxandnextyproperties of all the balls in theballsarray.testWalls()Tests to see whether the balls have hit one of the walls.
collide()Tests collisions among balls. If the balls collide, updates
nextxandnexty.render()Makes the
xandyproperties for each ball equal tonextxandnextyrespectively, and then draws them to the canvas.
And here is the code:
function  drawScreen () {

   update();
   testWalls();
   collide();
   render();

   }
Updating positions of objects
The update() function loops
through all the balls in the balls
array, and updates the nextx and
nexty properties with the x and y
velocity for each ball. We don’t directly update x and y
here, because we want to test collisions against walls and other balls
before they occur. We will use the nextx and nexty properties for this purpose:
function update() {
      for (var i = 0; i <balls.length; i++) {
         ball = balls[i];
         ball.nextx = (ball.x += ball.velocityx);
         ball.nexty = (ball.y += ball.velocityy);
      }
}
Better interaction with the walls
We discussed the interactions between balls and walls in the
last example, but there is still one issue. Since we move the balls by
the x and y location of their center, the balls would
move halfway off the canvas before a bounce occurred. To fix this, we
add or subtract the radius of the
ball object, depending on which
walls we are testing. For the right side and bottom of the canvas, we
add the radius of the ball when we test the walls. In this way, the
ball will appear to bounce exactly when its edge hits a wall.
Similarly, we subtract the radius when we test the left side and the
top of the canvas, so that the ball does not move off the side before
we make it bounce off a wall:
function testWalls() {
      var ball;
      var testBall;

      for (var i = 0; i <balls.length; i++) {
         ball = balls[i];

         if (ball.nextx+ball.radius > theCanvas.width) {
            ball.velocityx = ball.velocityx*−1;
            ball.nextx = theCanvas.width - ball.radius;

         } else if (ball.nextx-ball.radius < 0 ) {
            ball.velocityx = ball.velocityx*−1;
            ball.nextx = ball.radius;

         } else if (ball.nexty+ball.radius > theCanvas.height ) {
            ball.velocityy = ball.velocityy*−1;
            ball.nexty = theCanvas.height - ball.radius;

         } else if(ball.nexty-ball.radius < 0) {
            ball.velocityy = ball.velocityy*−1;
            ball.nexty = ball.radius;
         }

      }

   }
Collisions with balls
The collide() function tests
to see whether any balls have hit one another. This function uses two
nested loops, both iterating through the balls array to ensure we test each ball
against every other ball. We take the ball from the first loop of the
balls array, and place it into the
ball variable. Then we loop through
balls again, placing each ball in
the testBall variable, one at a
time. When we have both ball and
testBall, we make sure they are not
equal to one another. We do this because a ball will always have a
false positive collision if we test it against itself. When we are
sure they are not the same ball, we call hitTestCircle() to test for a collision. If
we find one, we call collideBalls(), and then all hell breaks
loose. (OK, not really, but the balls do collide, and some really
interesting code gets executed.) See that code here:
function collide() {
       var ball;
       var testBall;
       for (var i = 0; i <balls.length; i++) {
           ball = balls[i];
           for (var j = i+1; j < balls.length; j++) {
                 testBall = balls[j];
                if (hitTestCircle(ball,testBall)) {
                    collideBalls(ball,testBall);
                 }
              }
        }
     }
Ball collisions in depth
So now we get to the most interesting code of this example. We
are going to update the properties of each ball so they appear to
bounce off one another. Recall that we use the nextx
and nexty properties
because we want to make sure to test where the balls will be after
they are drawn—not where they are right now. This helps keep the
balls from overlapping in a way
that will make them stick together.
Note
Sometimes the balls will still stick together. This is a common problem when creating collisions among balls. This happens when balls overlap one another before the collision test, and the reaction bounce is not enough to split them apart completely. We have made every attempt to optimize this function for the canvas, but we are sure further optimizations are possible.
The collideBalls() function
takes two parameters: ball1 and
ball2. Both parameters are the
ball objects that we want to make
collide:
function collideBalls(ball1,ball2) {First, we need to calculate the difference between the center
points of each ball. We store this as dx and dy
(difference x and difference y). This should look familiar because we
did something similar when we tested for a collision between the
balls. The difference is that now we know they have collided, and we
want to know how that collision occurred:
var dx = ball1.nextx - ball2.nextx;
var dy = ball1.nexty - ball2.nexty;
To do this, we need to find the angle of the collision using the
Math.atan2() function. This
function gives us the angle in radians of the collisions between the
two balls. This is the line of action or angle of collision. We need
this value so that we can determine how the balls will react when they
collide:
var collisionAngle = Math.atan2(dy, dx);
Next, we calculate the velocity vector for each ball given the
x and y velocities that existed before the
collision occurred:
var speed1 = Math.sqrt(ball1.velocityx * ball1.velocityx +
    ball1.velocityy *   ball1.velocityy);
var speed2 = Math.sqrt(ball2.velocityx * ball2.velocityx +
    ball2.velocityy * ball2.velocityy);
Then, we calculate angles (in radians) for each ball given its current velocities:
var direction1 = Math.atan2(ball1.velocityy, ball1.velocityx);
var direction2 = Math.atan2(ball2.velocityy, ball2.velocityx);
Next, we need to rotate the vectors counterclockwise so that we can plug those values into the equation for conservation of momentum. Basically, we are taking the angle of collision and making it flat so we can bounce the balls, similar to how we bounced balls off the sides of the canvas:
var velocityx_1 = speed1 * Math.cos(direction1 - collisionAngle);
var velocityy_1 = speed1 * Math.sin(direction1 - collisionAngle);
var velocityx_2 = speed2 * Math.cos(direction2 - collisionAngle);
var velocityy_2 = speed2 * Math.sin(direction2 - collisionAngle);
We take the mass values of
each ball and update their x and
y velocities based on the law of
conservation of momentum. To find the final velocity for both balls,
we use the following formulas:
velocity1 = ((mass1 - mass2) * velocity1 + 2*mass2 * velocity2) / mass1 + mass2
velocity2 = ((mass2 - mass1) * velocity2 + 2*mass1 * velocity1)/ mass1+ mass2
Actually, only the x velocity
needs to be updated; the y velocity
remains constant:
var final_velocityx_1 = ((ball1.mass - ball2.mass) * velocityx_1 +
    (ball2.mass + ball2.mass) * velocityx_2)/(ball1.mass + ball2.mass);
var final_velocityx_2 = ((ball1.mass + ball1.mass) * velocityx_1 +
    (ball2.mass - ball1.mass) * velocityx_2)/(ball1.mass + ball2.mass);

var final_velocityy_1 = velocityy_1;
var final_velocityy_2 = velocityy_2
After we have our final velocities, we rotate our angles back again so that the collision angle is preserved:
ball1.velocityx = Math.cos(collisionAngle) * final_velocityx_1 +
    Math.cos(collisionAngle + Math.PI/2) * final_velocityy_1;
ball1.velocityy = Math.sin(collisionAngle) * final_velocityx_1 +
    Math.sin(collisionAngle + Math.PI/2) * final_velocityy_1;
ball2.velocityx = Math.cos(collisionAngle) * final_velocityx_2 +
    Math.cos(collisionAngle + Math.PI/2) * final_velocityy_2;
ball2.velocityy = Math.sin(collisionAngle) * final_velocityx_2 +
    Math.sin(collisionAngle + Math.PI/2) * final_velocityy_2;
Now, we update nextx and
nexty for both balls so can use
those values in the render()
function—or, for another collision:
   ball1.nextx = (ball1.nextx += ball1.velocityx);
   ball1.nexty = (ball1.nexty += ball1.velocityy);
   ball2.nextx = (ball2.nextx += ball2.velocityx);
   ball2.nexty = (ball2.nexty += ball2.velocityy);
}
Note
If this is confusing to you, you are not alone. It took some serious effort for us to translate this code from other sources into a working example on HTML5 Canvas. The code here is based on “Flash Lite Effort - Embedded Systems and Pervasive Computing Lab” by Felipe Sampaio, available here: http://wiki.forum.nokia.com/index.php/Collision_for_Balls. It is also partly based on Jobe Makar and Ben Winiarczyk’s work in Macromedia Flash MX 2004 Game Design Demystified, and Keith Peters’ books on ActionScript animation.
Here is the full code listing for Example 5-7.
<!doctype html>
<html lang="en">
<head>
<meta charset="UTF-8">
<title>CH5EX7: Balls With Simple Interactions</title>
<script src="modernizr-1.6.min.js"></script>
<script type="text/javascript">
window.addEventListener('load', eventWindowLoaded, false);
function eventWindowLoaded() {
   canvasApp();

}

function canvasSupport () {
     return Modernizr.canvas;
}

function canvasApp() {

  if (!canvasSupport()) {
          return;
        }

  function  drawScreen () {

      context.fillStyle = '#EEEEEE';
      context.fillRect(0, 0, theCanvas.width, theCanvas.height);
      //Box
      context.strokeStyle = '#000000';
      context.strokeRect(1,  1, theCanvas.width-2, theCanvas.height-2);

      update();
      testWalls();
      collide();
      render();

   }

   function update() {
      for (var i = 0; i <balls.length; i++) {
         ball = balls[i];
         ball.nextx = (ball.x += ball.velocityx);
         ball.nexty = (ball.y += ball.velocityy);
      }

   }

   function testWalls() {
      var ball;
      var testBall;

      for (var i = 0; i <balls.length; i++) {
         ball = balls[i];

         if (ball.nextx+ball.radius > theCanvas.width) {
            ball.velocityx = ball.velocityx*−1;
            ball.nextx = theCanvas.width - ball.radius;

         } else if (ball.nextx-ball.radius < 0 ) {
            ball.velocityx = ball.velocityx*−1;
            ball.nextx =ball.radius;

         } else if (ball.nexty+ball.radius > theCanvas.height ) {
            ball.velocityy = ball.velocityy*−1;
            ball.nexty = theCanvas.height − ball.radius;

         } else if(ball.nexty-ball.radius < 0) {
            ball.velocityy = ball.velocityy*−1;
            ball.nexty = ball.radius;
         }


      }

   }

   function render() {
      var ball;
      context.fillStyle = "#000000";
      for (var i = 0; i <balls.length; i++) {
         ball = balls[i];
         ball.x = ball.nextx;
         ball.y = ball.nexty;

         context.beginPath();
         context.arc(ball.x,ball.y,ball.radius,0,Math.PI*2,true);
         context.closePath();
         context.fill();
      }

   }

   function collide() {
       var ball;
       var testBall;
       for (var i = 0; i <balls.length; i++) {
           ball = balls[i];
           for (var j = i+1; j < balls.length; j++) {
                 testBall = balls[j];
                if (hitTestCircle(ball,testBall)) {
                    collideBalls(ball,testBall);
                 }
              }
        }
     }

   function hitTestCircle(ball1,ball2) {
       var retval = false;
       var dx = ball1.nextx - ball2.nextx;
       var dy = ball1.nexty - ball2.nexty;
       var distance = (dx * dx + dy * dy);
       if (distance <= (ball1.radius + ball2.radius) * (ball1.radius + ball2.radius) ) {
              retval = true;
       }
       return retval;
     }

   function collideBalls(ball1,ball2) {

      var dx = ball1.nextx - ball2.nextx;
      var dy = ball1.nexty - ball2.nexty;

      var collisionAngle = Math.atan2(dy, dx);

      var speed1 = Math.sqrt(ball1.velocityx * ball1.velocityx +
          ball1.velocityy * ball1.velocityy);
      var speed2 = Math.sqrt(ball2.velocityx * ball2.velocityx +
          ball2.velocityy * ball2.velocityy);

      var direction1 = Math.atan2(ball1.velocityy, ball1.velocityx);
      var direction2 = Math.atan2(ball2.velocityy, ball2.velocityx);

      var velocityx_1 = speed1 * Math.cos(direction1 - collisionAngle);
      var velocityy_1 = speed1 * Math.sin(direction1 - collisionAngle);
      var velocityx_2 = speed2 * Math.cos(direction2 - collisionAngle);
      var velocityy_2 = speed2 * Math.sin(direction2 - collisionAngle);

      var final_velocityx_1 = ((ball1.mass - ball2.mass) * velocityx_1 +
         (ball2.mass + ball2.mass) * velocityx_2)/(ball1.mass + ball2.mass);
      var final_velocityx_2 = ((ball1.mass + ball1.mass) * velocityx_1 +
         (ball2.mass - ball1.mass) * velocityx_2)/(ball1.mass + ball2.mass);

      var final_velocityy_1 = velocityy_1;
      var final_velocityy_2 = velocityy_2;

      ball1.velocityx = Math.cos(collisionAngle) * final_velocityx_1 +
          Math.cos(collisionAngle + Math.PI/2) * final_velocityy_1;
      ball1.velocityy = Math.sin(collisionAngle) * final_velocityx_1 +
          Math.sin(collisionAngle + Math.PI/2) * final_velocityy_1;
      ball2.velocityx = Math.cos(collisionAngle) * final_velocityx_2 +
          Math.cos(collisionAngle + Math.PI/2) * final_velocityy_2;
      ball2.velocityy = Math.sin(collisionAngle) * final_velocityx_2 +
          Math.sin(collisionAngle + Math.PI/2) * final_velocityy_2;

      ball1.nextx = (ball1.nextx += ball1.velocityx);
      ball1.nexty = (ball1.nexty += ball1.velocityy);
      ball2.nextx = (ball2.nextx += ball2.velocityx);
      ball2.nexty = (ball2.nexty += ball2.velocityy);
   }

   var numBalls = 200 ;
   var maxSize = 15;
   var minSize = 5;
   var maxSpeed = maxSize+5;
   var balls = new Array();
   var tempBall;
   var tempX;
   var tempY;
   var tempSpeed;
   var tempAngle;
   var tempRadius;
   var tempRadians;
   var tempvelocityx;
   var tempvelocityy;

   theCanvas = document.getElementById("canvasOne");
   context = theCanvas.getContext("2d");

   for (var i = 0; i < numBalls; i++) {
      tempRadius = 5;
      var placeOK = false;
      while (!placeOK) {
         tempX = tempRadius*3 + (Math.floor(Math.random()*theCanvas.width)-tempRadius*3);
         tempY = tempRadius*3 + (Math.floor(Math.random()*theCanvas.height)-tempRadius*3);
         tempSpeed = 4;
         tempAngle = Math.floor(Math.random()*360);
         tempRadians = tempAngle * Math.PI/ 180;
         tempvelocityx = Math.cos(tempRadians) * tempSpeed;
         tempvelocityy = Math.sin(tempRadians) * tempSpeed;

         tempBall = {x:tempX,y:tempY, nextX: tempX, nextY: tempY, radius:tempRadius,
             speed:tempSpeed, angle:tempAngle, velocityx:tempvelocityx,
             velocityy:tempvelocityy, mass:tempRadius};
         placeOK = canStartHere(tempBall);
      }
      balls.push(tempBall);
   }

   function canStartHere(ball) {
      var retval = true;
      for (var i = 0; i <balls.length; i++) {
         if (hitTestCircle(ball, balls[i])) {
            retval = false;
         }
      }
      return retval;
   }
   setInterval(drawScreen, 33);

}

</script>

</head>
<body>
<div style="position: absolute; top: 50px; left: 50px;">

<canvas id="canvasOne" width="500" height="500">
 Your browser does not support HTML5 Canvas.
</canvas>
</div>
</body>
</html>
Now, when you execute Example 5-7 (CH5EX7.html), you will see a bunch of balls of the same size and mass bumping off of each other and the walls of the canvas, as shown in Figure 5-10. When you look at this demo, imagine all the ways you could modify it to do different things. You could create balls with different masses and different speeds, or even create balls that don’t move but simply alter the direction of other balls that hit them. In Example 5-8, we will take a slightly different look at this same code and add some new properties to make it more interesting.
Multiple Balls Bouncing with Friction
If we want the balls to slow down and eventually stop, we need to add friction to Example 5-7. For our purposes, simple friction is a value we use to modify the velocity of our objects every time they are drawn to the canvas.
In canvasApp(), we now want to
create balls of various sizes. In the previous example, the balls were
all the same size. It worked, but having balls of different sizes with
different masses will create more interesting effects. To do this, we
set minSize to
3 and maxSize to 12, meaning the radii for our balls will range
from 3 to 12 pixels. We also add a new property named
friction. This is a global property,
so it will not be applied to each individual ball. We set it to .01, which means our balls will degrade their
x and y velocities by .01 pixels per frame (every time drawScreen() is called):
var numBalls = 50 ;
var maxSize = 12;
var minSize = 3;
var maxSpeed = maxSize+5;
var friction = .01;
We will now allow for various ball sizes. The mass of each ball
will be different, and balls will have different effects on one another
depending on their sizes. Recall that in Example 5-7 we needed a mass property so we could calculate
conservation of momentum when the balls collided. We are doing the same
thing here, but now the masses are different depending on the
size:
for (var i = 0; i < numBalls; i++) {
   tempRadius = Math.floor(Math.random()*maxSize)+minSize;
In update(), we apply the
friction value by calculating the
product of the current velocity multiplied by friction, and then
subtracting that value from the current velocity. We do this for both
the x and y velocities. Why must we do this instead of
simply subtracting the friction value from the x and y
velocities? Because the x and
y velocities are not always
proportional to each other. If we simply subtract the friction, we may
alter the velocity unintentionally. Instead, we need to subtract a value
for the friction that is proportional to the velocity itself, and that
value is the product of the velocity multiplied by the friction value. This method will give you a
smooth degradation of the velocity when the friction value is applied:
function update() {
for (var i = 0; i <balls.length; i++) {
ball = balls[i];
//Friction
ball.velocityx = ball.velocityx - ( ball.velocityx*friction);
ball.velocityy = ball.velocityy - ( ball.velocityy*friction);
ball.nextx = (ball.x += ball.velocityx);
ball.nexty = (ball.y += ball.velocityy);
}
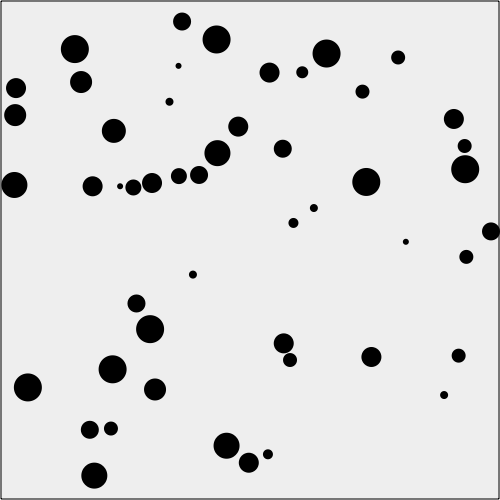
}You can see the full version of this code by executing CH5EX8.html from the code distribution, or by typing in Example 5-8. You should notice that the smaller balls have less of an effect on the larger balls when they collide, and vice versa. Also, the balls slow down as they move due to the applied friction.
<!doctype html>
<html lang="en">
<head>
<meta charset="UTF-8">
<title>CH5EX8: Balls With Friction</title>
<script src="modernizr-1.6.min.js"></script>
<script type="text/javascript">
window.addEventListener('load', eventWindowLoaded, false);
function eventWindowLoaded() {
   canvasApp();

}

function canvasSupport () {
     return Modernizr.canvas;
}

function canvasApp() {

    if (!canvasSupport()) {
        return;
        }

  function  drawScreen () {

      context.fillStyle = '#EEEEEE';
      context.fillRect(0, 0, theCanvas.width, theCanvas.height);
      //Box
      context.strokeStyle = '#000000';
      context.strokeRect(1,  1, theCanvas.width-2, theCanvas.height-2);

      update();
      testWalls();
      collide();
      render();

   }

   function update() {
      for (var i = 0; i <balls.length; i++) {
         ball = balls[i];
         //Friction
         ball.velocityx = ball.velocityx - ( ball.velocityx*friction);
         ball.velocityy = ball.velocityy - ( ball.velocityy*friction);

         ball.nextx = (ball.x += ball.velocityx);
         ball.nexty = (ball.y += ball.velocityy);
      }

   }

   function testWalls() {
      var ball;
      var testBall;

      for (var i = 0; i <balls.length; i++) {
         ball = balls[i];

         if (ball.nextx+ball.radius > theCanvas.width) {
            ball.velocityx = ball.velocityx*−1;
            ball.nextx = theCanvas.width - ball.radius;

         } else if (ball.nextx-ball.radius < 0 ) {
            ball.velocityx = ball.velocityx*−1;
            ball.nextx = ball.radius;

         } else if (ball.nexty+ball.radius > theCanvas.height ) {
            ball.velocityy = ball.velocityy*−1;
            ball.nexty = theCanvas.height − ball.radius;

         } else if(ball.nexty-ball.radius < 0) {
            ball.velocityy = ball.velocityy*−1;
            ball.nexty = ball.radius;
         }

      }

   }

   function render() {
      var ball;

      context.fillStyle = "#000000";
      for (var i = 0; i <balls.length; i++) {
         ball = balls[i];
         ball.x = ball.nextx;
         ball.y = ball.nexty;

         context.beginPath();
         context.arc(ball.x,ball.y,ball.radius,0,Math.PI*2,true);
         context.closePath();
         context.fill();
      }

   }

   function collide() {
       var ball;
       var testBall;
       for (var i = 0; i <balls.length; i++) {
           ball = balls[i];
           for (var j = i+1; j < balls.length; j++) {
                 testBall = balls[j];
                if (hitTestCircle(ball,testBall)) {
                    collideBalls(ball,testBall);
                 }
              }
        }
     }

   function hitTestCircle(ball1,ball2) {
       var retval = false;
       var dx = ball1.nextx - ball2.nextx;
       var dy = ball1.nexty - ball2.nexty;
       var distance = (dx * dx + dy * dy);
       if (distance <= (ball1.radius + ball2.radius) * (ball1.radius + ball2.radius) ) {
              retval = true;
        }
        return retval;
     }

   function collideBalls(ball1,ball2) {

      var dx = ball1.nextx - ball2.nextx;
      var dy = ball1.nexty - ball2.nexty;

      var collisionAngle = Math.atan2(dy, dx);

      var speed1 = Math.sqrt(ball1.velocityx * ball1.velocityx +
          ball1.velocityy * ball1.velocityy);
      var speed2 = Math.sqrt(ball2.velocityx * ball2.velocityx +
          ball2.velocityy * ball2.velocityy);

      var direction1 = Math.atan2(ball1.velocityy, ball1.velocityx);
      var direction2 = Math.atan2(ball2.velocityy, ball2.velocityx);

      var velocityx_1 = speed1 * Math.cos(direction1 - collisionAngle);
      var velocityy_1 = speed1 * Math.sin(direction1 - collisionAngle);
      var velocityx_2 = speed2 * Math.cos(direction2 - collisionAngle);
      var velocityy_2 = speed2 * Math.sin(direction2 - collisionAngle);

      var final_velocityx_1 = ((ball1.mass - ball2.mass) * velocityx_1 +
          (ball2.mass + ball2.mass) * velocityx_2)/(ball1.mass + ball2.mass);
      var final_velocityx_2 = ((ball1.mass + ball1.mass) * velocityx_1 +
          (ball2.mass - ball1.mass) * velocityx_2)/(ball1.mass + ball2.mass);

      var final_velocityy_1 = velocityy_1;
      var final_velocityy_2 = velocityy_2;

      ball1.velocityx = Math.cos(collisionAngle) * final_velocityx_1 +
          Math.cos(collisionAngle + Math.PI/2) * final_velocityy_1;
      ball1.velocityy = Math.sin(collisionAngle) * final_velocityx_1 +
          Math.sin(collisionAngle + Math.PI/2) * final_velocityy_1;
      ball2.velocityx = Math.cos(collisionAngle) * final_velocityx_2 +
          Math.cos(collisionAngle + Math.PI/2) * final_velocityy_2;
      ball2.velocityy = Math.sin(collisionAngle) * final_velocityx_2 +
          Math.sin(collisionAngle + Math.PI/2) * final_velocityy_2;

      ball1.nextx = (ball1.nextx += ball1.velocityx);
      ball1.nexty = (ball1.nexty += ball1.velocityy);
      ball2.nextx = (ball2.nextx += ball2.velocityx);
      ball2.nexty = (ball2.nexty += ball2.velocityy);
   }
   var numBalls = 50 ;
   var maxSize = 12;
   var minSize = 3;
   var maxSpeed = maxSize+5;
   var balls = new Array();
   var tempBall;
   var tempX;
   var tempY;
   var tempSpeed;
   var tempAngle;
   var tempRadius;
   var tempRadians;
   var tempvelocityx;
   var tempvelocityy;
   var friction = .01;

   theCanvas = document.getElementById("canvasOne");
   context = theCanvas.getContext("2d");

   for (var i = 0; i < numBalls; i++) {
      tempRadius = Math.floor(Math.random()*maxSize)+minSize;
      var placeOK = false;
      while (!placeOK) {
         tempX = tempRadius*3 + (Math.floor(Math.random()*theCanvas.width)-tempRadius*3);
         tempY = tempRadius*3 + (Math.floor(Math.random()*theCanvas.height)-tempRadius*3);
         tempSpeed = maxSpeed-tempRadius;
         tempAngle = Math.floor(Math.random()*360);
         tempRadians = tempAngle * Math.PI/ 180;
         tempvelocityx = Math.cos(tempRadians) * tempSpeed;
         tempvelocityy = Math.sin(tempRadians) * tempSpeed;

         tempBall = {x:tempX,y:tempY,radius:tempRadius, speed:tempSpeed, angle:tempAngle,
             velocityx:tempvelocityx, velocityy:tempvelocityy, mass:tempRadius*8,
             nextx: tempX, nexty:tempY};
         placeOK = canStartHere(tempBall);
      }
      balls.push(tempBall);
   }

   function canStartHere(ball) {
      var retval = true;
      for (var i = 0; i <balls.length; i++) {
         if (hitTestCircle(ball, balls[i])) {
            retval = false;
         }
      }
      return retval;
   }
   setInterval(drawScreen, 33);

}

</script>

</head>
<body>
<div style="position: absolute; top: 50px; left: 50px;">

<canvas id="canvasOne" width="500" height="500">
 Your browser does not support HTML5 Canvas.
</canvas>
</div>
</body>
</html>
Figure 5-11 illustrates how this code will look in the browser.
Curve and Circular Movement
Whew! Moving and colliding balls on vectors can create some cool effects. However, moving in straight lines is not the only way you might want to move objects. In this section, we will show you some ways to animate objects using circles, spirals, and curves.
Uniform Circular Motion
Uniform circular motion occurs when we move an object along the
distinct radius of a defined circle. Once we know the radius, we can use
our old friends cosine and sine to find the x and y
locations of the moving object. The equations to find the locations of
an object moving uniformly on a defined circle are:
x = radius * cosine(angle)
y = radius * sine(angle)
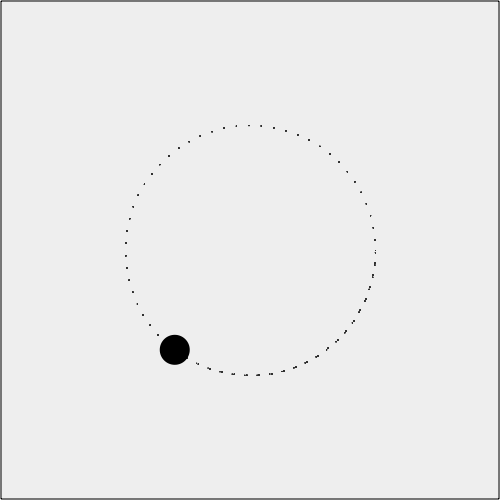
We will create an example of uniform circular movement with a
circle that has a radius of 125, with
its center position at 250,250 on the canvas. We will move a ball along
that circle, starting at an angle of
0.
In canvasApp(), we will define
this circle path as a dynamic object stored in the circle variable. While
this object defines the properties of a circle, we will not actually
draw this circle on the canvas; rather, it defines only the path on
which we will move our ball
object:
var circle = {centerX:250, centerY:250, radius:125, angle:0}
var ball = {x:0, y:0,speed:.1};
In drawScreen(), we will
incorporate the equations for uniform circular movement. To do this, we
will set the x and y properties of the ball object to the products of the
equations, added to the center location of the circle path on
the canvas (circle.centerX, circle.centerY):
ball.x = circle.centerX + Math.cos(circle.angle) * circle.radius;
ball.y = circle.centerY + Math.sin(circle.angle) * circle.radius;
We then add the speed of the ball to the angle of the circle path.
This effectively sets the ball to move to a new location the next time
drawScreen() is called:
circle.angle += ball.speed;
Finally, we draw the ball onto the canvas:
context.fillStyle = "#000000";
context.beginPath();
context.arc(ball.x,ball.y,15,0,Math.PI*2,true);
context.closePath();
context.fill();
You can see what the circle path looks like in Figure 5-12. We have drawn the points on the canvas to illustrate the circle path.
You can easily alter the location and size of the circle path by
altering the radius, centerX, and centerY properties of the circle path
object.
Example 5-9 shows the code for CH5EX9.html.
<!doctype html>
<html lang="en">
<head>
<meta charset="UTF-8">
<title>CH5EX9: Moving In A Circle</title>
<script src="modernizr-1.6.min.js"></script>
<script type="text/javascript">
window.addEventListener('load', eventWindowLoaded, false);
function eventWindowLoaded() {
   canvasApp();

}

function canvasSupport () {
     return Modernizr.canvas;
}

function canvasApp() {

  if (!canvasSupport()) {
          return;
        }

  function  drawScreen () {

      context.fillStyle = '#EEEEEE';
      context.fillRect(0, 0, theCanvas.width, theCanvas.height);
      //Box
      context.strokeStyle = '#000000';
      context.strokeRect(1,  1, theCanvas.width-2, theCanvas.height-2);

      ball.x = circle.centerX + Math.cos(circle.angle) * circle.radius;
      ball.y = circle.centerY + Math.sin(circle.angle) * circle.radius;

      circle.angle += ball.speed;

      context.fillStyle = "#000000";
      context.beginPath();
      context.arc(ball.x,ball.y,15,0,Math.PI*2,true);
      context.closePath();
      context.fill();

   }

   var radius = 100;
   var circle = {centerX:250, centerY:250, radius:125, angle:0}
   var ball = {x:0, y:0,speed:.1};

   theCanvas = document.getElementById("canvasOne");
   context = theCanvas.getContext("2d");

   setInterval(drawScreen, 33);

}

</script>

</head>
<body>
<div style="position: absolute; top: 50px; left: 50px;">

<canvas id="canvasOne" width="500" height="500">
 Your browser does not support HTML5 Canvas.
</canvas>
</div>
</body>
</html>
Moving in a Simple Spiral
There are many complicated ways to move an object on a spiral path. One such way would be to use the Fibonacci sequence, which describes a pattern seen in nature that appears to create perfect spirals. The Fibonacci sequence starts with the number 0, and continues with each subsequent number calculated as the sum of the two previous numbers in the sequence. Each subsequent rotation of the spiral is the sum of the two previous numbers (1, 2, 3, 5, 8, 13, 21, 34, 55, 89...). However, as you might imagine, the math used to create this sequence is quite involved, and it is also difficult to translate to object movement.
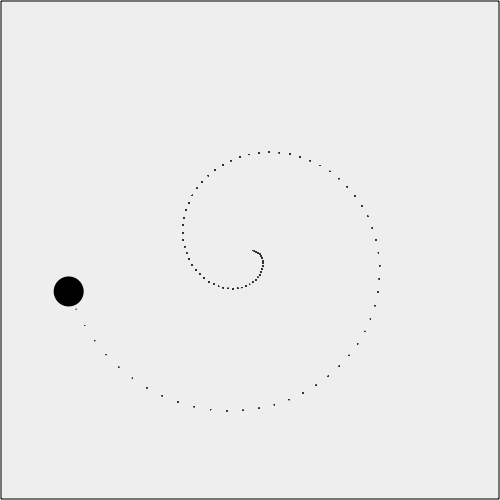
For our purposes, we can create a simple spiral by increasing the
radius of the circle path on each call to drawScreen(). If we take the code from Example 5-9, we would add a radiusInc variable, which we will use as the
value to add the radius movement path of the circle. We create this new
variable in canvasApp():
var radiusInc = 2;
Then, in drawScreen(), we add
the following code to increase the radius of the circle every time we
move the object:
circle.radius += radiusInc;
In Figure 5-13, you can see what the resulting spiral looks like (to illustrate the path, this example includes the points).
If you want a tighter spiral, decrease the value of radiusInc. Conversely, if you want a wider
spiral, increase the value of radiusInc.
Example 5-10 shows the code for CH5EX10.html from the code distribution.
<!doctype html>
<html lang="en">
<head>
<meta charset="UTF-8">
<title>CH5EX10: Moving In A Simple Geometric Spiral </title>
<script src="modernizr-1.6.min.js"></script>
<script type="text/javascript">
window.addEventListener('load', eventWindowLoaded, false);
function eventWindowLoaded() {
   canvasApp();

}

function canvasSupport () {
     return Modernizr.canvas;
}


function canvasApp() {

  if (!canvasSupport()) {
          return;
        }

  var pointImage = new Image();
  pointImage.src = "point.png";
  function  drawScreen () {


      context.fillStyle = '#EEEEEE';
      context.fillRect(0, 0, theCanvas.width, theCanvas.height);
      //Box
      context.strokeStyle = '#000000';
      context.strokeRect(1,  1, theCanvas.width-2, theCanvas.height-2);

      ball.x = circle.centerX + Math.cos(circle.angle) * circle.radius;
      ball.y = circle.centerY + Math.sin(circle.angle) * circle.radius;
      circle.angle += ball.speed;
      circle.radius += radiusInc;

      //Draw points to illustrate path

      points.push({x:ball.x,y:ball.y});

      for (var i = 0; i< points.length; i++) {
         context.drawImage(pointImage, points[i].x, points[i].y,1,1);
      }

      context.fillStyle = "#000000";
      context.beginPath();
      context.arc(ball.x,ball.y,15,0,Math.PI*2,true);
      context.closePath();
      context.fill();

   }

   var radiusInc = 2;
   var circle = {centerX:250, centerY:250, radius:2, angle:0, radiusInc:2}
   var ball = {x:0, y:0,speed:.1};
   var points = new Array();

   theCanvas = document.getElementById("canvasOne");
   context = theCanvas.getContext("2d");

   setInterval(drawScreen, 33);

}

</script>

</head>
<body>
<div style="position: absolute; top: 50px; left: 50px;">

<canvas id="canvasOne" width="500" height="500">
 Your browser does not support HTML5 Canvas.
</canvas>
</div>
</body>
</html>
Cubic Bezier Curve Movement
Cubic Bezier curves can be used to define a movement path for an object. Pierre Bezier first popularized these curves in the 1960s. They are widely used in 2D vector graphics to define smooth curves for drawing, but they can also be used in animation to define a path for motion.
A cubic Bezier curve is created using four distinct
points—p0, p1, p2, and
p3:
p0The starting point of the curve. We will refer to these
xandyvalues asx0andy0.p3The ending point of the curve. We will refer to these
xandyvalues asx3andy3.p1andp2The control points for the curve. The curve does not pass through these points; instead, the equation uses these points to determine the arc of the curve. We will refer to these
xandyvalues asx0,x1,x2,x3,y0,y1,y2, andy3.
Note
The usage of the p1 and
p2 points is the biggest stumbling
block for understanding Bezier curves. The easiest way to understand
the relationship between these points and the curve is to draw them on
a bitmapped canvas, which we
will do several times in this chapter.
After you have the four points, you need to calculate six
coefficient values that you will use to find the x and y
locations as you move an object on the curve. These coefficients are
known as ax, bx, cx,
ay, by, and cy.
They are calculated as follows:
cx = 3 (x1 - x0)
bx = 3 (x2 - x1) - cx
ax = x3 - x0 - cx - bx
cy = 3 (y1 - y0)
by = 3 (y2 - y1) - cy
ay = y3 - y0 - cy - by
After you’ve calculated the six coefficients, you can find the
x and y locations based on the changing t value using the following equations. The
t value represents movement over
time:
x(t) = axt3 + bxt2 + cxt + x0
y(t) = ayt3 + byt2 + cyt + y0
For our purposes, the t value
will be increased by the speed at
which we want the object to move. You will notice, though, that this
value does not easily equate to the speed values we used elsewhere in this
chapter. The reason is that the t
value was not created with movement over time for animation in mind. The
speed we specify must be smaller than 1 so the movement on the curve will be
incremental enough for us to see it as part of the animation. For our
example, we will increase t by a
speed of .01, so that we will see
100 points on the movement curve
(1/100 = .01). This is advantageous because we will know our object has
finished moving when the t value is
equal to 1.
For Example 5-11 (CH5EX11.html), we will start by creating the
four points of the Bezier curve in the canvasApp() function:
var p0 = {x:60, y:10};
var p1 = {x:70, y:200};
var p2 = {x:125, y:295};
var p3 = {x:350, y:350};
We then create a new ball
object with a couple differing properties from those in the other
examples in this chapter. The speed
is .01, which means the object will
move 100 points along the curve before it is finished. We start the
t value at 0, which means the ball will begin at p0:
var ball = {x:0, y:0, speed:.01, t:0};Next, in the drawScreen()
function, we calculate the Bezier curve coefficient values (ax, bx,
cx, ay, by,
cy) based on the four points
(p0, p1, p2,
p3):
var cx = 3 * (p1.x - p0.x)
var bx = 3 * (p2.x - p1.x) - cx;
var ax = p3.x - p0.x - cx - bx;

var cy = 3 * (p1.y - p0.y);
var by = 3 * (p2.y - p1.y) - cy;
var ay = p3.y - p0.y - cy - by;
Then, we take our t value and
use it with the coefficients to calculate the x and y
values for the moving object. First, we get the t value from the ball object, and store it locally so we can
use it in our calculations:
var t = ball.t;
Next, we add the speed to the
t value so that we can calculate the
next point on the Bezier path:
ball.t += ball.speed;
Then, we use the t value to
calculate the x and y values (xt, yt)
using the Bezier curve equations:
var xt = ax*(t*t*t) + bx*(t*t) + cx*t + p0.x;
var yt = ay*(t*t*t) + by*(t*t) + cy*t + p0.y;
We add the speed to the
t value of ball, then check to see whether t is greater than 1. If so, we don’t increase it any further
because we have finished moving on the curve:
ball.t += ball.speed;

if (ball.t > 1) {
   ball.t = 1;
}
Finally, when we draw the ball
object on the canvas, we use the xt
and yt values:
context.arc(xt,yt,5,0,Math.PI*2,true);
Figure 5-14 shows what
Example 5-11 (CH5EX11.html) looks like when it is executed
in a web browser. In addition to drawing the points of the path using
the points array, we also draw the
four points of the Bezier curve. These illustrate the relationship of
the points to the curve itself. Notice that the curve does not pass
through p1 or p2.
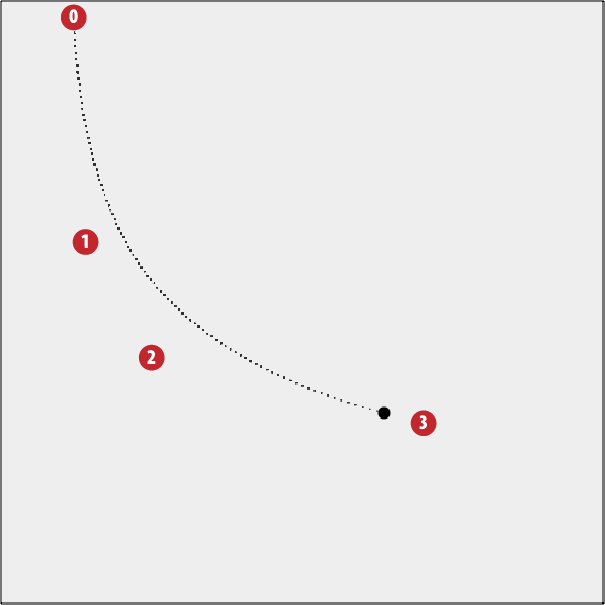
Example 5-11 gives the full
code listing for CH5EX11.html,
including the code to draw the Bezier curve points on the canvas. You
can find that code in the drawScreen() function following the //draw the points comment.
<!doctype html>
<html lang="en">
<head>
<meta charset="UTF-8">
<title>CH5EX11: Moving On A Cubic Bezier Curve </title>
<script src="modernizr-1.6.min.js"></script>
<script type="text/javascript">
window.addEventListener('load', eventWindowLoaded, false);
function eventWindowLoaded() {
   canvasApp();

}
function canvasSupport () {
     return Modernizr.canvas;
}

function canvasApp() {

  if (!canvasSupport()) {
          return;
        }

  var pointImage = new Image();
  pointImage.src = "point.png";

  function  drawScreen () {

      context.fillStyle = '#EEEEEE';
      context.fillRect(0, 0, theCanvas.width, theCanvas.height);
      //Box
      context.strokeStyle = '#000000';
      context.strokeRect(1,  1, theCanvas.width-2, theCanvas.height-2);

      var t = ball.t;

      var cx = 3 * (p1.x - p0.x)
      var bx = 3 * (p2.x - p1.x) - cx;
      var ax = p3.x - p0.x - cx - bx;

      var cy = 3 * (p1.y - p0.y);
      var by = 3 * (p2.y - p1.y) - cy;
      var ay = p3.y - p0.y - cy - by;

      var xt = ax*(t*t*t) + bx*(t*t) + cx*t + p0.x;
      var yt = ay*(t*t*t) + by*(t*t) + cy*t + p0.y;

      ball.t += ball.speed;

      if (ball.t > 1) {
         ball.t = 1;
      }

      //draw the points

      context.font ="10px sans";
      context.fillStyle = "#FF0000";
      context.beginPath();
      context.arc(p0.x,p0.y,8,0,Math.PI*2,true);
      context.closePath();
      context.fill();
      context.fillStyle = "#FFFFFF";
      context.fillText("0",p0.x-2,p0.y+2);

      context.fillStyle = "#FF0000";
      context.beginPath();
      context.arc(p1.x,p1.y,8,0,Math.PI*2,true);
      context.closePath();
      context.fill();
      context.fillStyle = "#FFFFFF";
      context.fillText("1",p1.x-2,p1.y+2);

      context.fillStyle = "#FF0000";
      context.beginPath();
      context.arc(p2.x,p2.y,8,0,Math.PI*2,true);
      context.closePath();
      context.fill();
      context.fillStyle = "#FFFFFF";
      context.fillText("2",p2.x-2, p2.y+2);

      context.fillStyle = "#FF0000";
      context.beginPath();
      context.arc(p3.x,p3.y,8,0,Math.PI*2,true);
      context.closePath();
      context.fill();
      context.fillStyle = "#FFFFFF";
      context.fillText("3",p3.x-2, p3.y+2);

      //Draw points to illustrate path

      points.push({x:xt,y:yt});

      for (var i = 0; i< points.length; i++) {
         context.drawImage(pointImage, points[i].x, points[i].y,1,1);
      }

      context.closePath();

      //Draw circle moving

      context.fillStyle = "#000000";
      context.beginPath();
      context.arc(xt,yt,5,0,Math.PI*2,true);
      context.closePath();
      context.fill();

   }

   var p0 = {x:60, y:10};
   var p1 = {x:70, y:200};
   var p2 = {x:125, y:295};
   var p3 = {x:350, y:350};
   var ball = {x:0, y:0, speed:.01, t:0};
   var points = new Array();

   theCanvas = document.getElementById("canvasOne");
   context = theCanvas.getContext("2d");

   setInterval(drawScreen, 33);

}

</script>

</head>
<body>
<div style="position: absolute; top: 50px; left: 50px;">

<canvas id="canvasOne" width="500" height="500">
 Your browser does not support HTML5 Canvas.
</canvas>
</div>
</body>
</html>
Moving an Image
Moving an image on a cubic Bezier curve path is just as easy as moving a circular drawing object, as we’ll demonstrate in the next two examples. Suppose you are making a game where bullseyes move across the canvas and the player must shoot at them. You could use cubic Bezier curve paths to create new and interesting patterns for the bullseyes to move along.
For this example, we first create a global variable named bullseye, which we will use to hold the
bullseye.png image that we will
load to display on the canvas:
var bullseye;
function eventWindowLoaded() {
   bullseye = new Image();
   bullseye.src = "bullseye.png"
   bullseye.onload = eventAssetsLoaded;
}
In canvasApp(), we will create
a different path for the curve from the one in the first example by
setting new values for p0, p1, p2, and
p3. Using these values, the bullseye will move on a parabola-like path
(Figure 5-15 shows the
path of the curve):
var p0 = {x:60, y:10};
var p1 = {x:150, y:350};
var p2 = {x:300, y:375};
var p3 = {x:400, y:20};
We also need to create a player
object that represents the bullseye on the canvas:
var player = {x:0, y:0, speed:.01, t:0};In drawImage(), after we
calculate t, xt, and yt,
we draw the image on the canvas:
player.x = xt-bullseye.width/2;
      player.y = yt-bullseye.height/2;

      context.drawImage(bullseye,player.x,player.y);
The rest of Example 5-12 works just like Example 5-11.
<!doctype html>
<html lang="en">
<head>
<meta charset="UTF-8">
<title>CH5EX12: Moving An Image </title>
<script src="modernizr-1.6.min.js"></script>
<script type="text/javascript">
window.addEventListener('load', eventWindowLoaded, false);

var bullseye;
function eventWindowLoaded() {
   bullseye = new Image();
   bullseye.src = "bullseye.png"
   bullseye.onload = eventAssetsLoaded;
}

function eventAssetsLoaded() {

   canvasApp();
}

function canvasSupport () {
     return Modernizr.canvas;
}

function canvasApp() {

  if (!canvasSupport()) {
          return;
        }

  var pointImage = new Image();
  pointImage.src = "point.png";
  function  drawScreen () {

      context.fillStyle = '#EEEEEE';
      context.fillRect(0, 0, theCanvas.width, theCanvas.height);
      //Box
      context.strokeStyle = '#000000';
      context.strokeRect(1,  1, theCanvas.width-2, theCanvas.height-2);

      var t = player.t;

      var cx = 3 * (p1.x - p0.x)
      var bx = 3 * (p2.x - p1.x) - cx;
      var ax = p3.x - p0.x - cx - bx;

      var cy = 3 * (p1.y - p0.y);
      var by = 3 * (p2.y - p1.y) - cy;
      var ay = p3.y - p0.y - cy - by;

      var xt = ax*(t*t*t) + bx*(t*t) + cx*t + p0.x;

      var yt = ay*(t*t*t) + by*(t*t) + cy*t + p0.y;

      player.t += player.speed;

      if (player.t > 1) {
         player.t = 1;
      }      //draw the points

      context.font = "10px sans";

      context.fillStyle = "#FF0000";
      context.beginPath();
      context.arc(p0.x,p0.y,8,0,Math.PI*2,true);
      context.closePath();
      context.fill();
      context.fillStyle = "#FFFFFF";
      context.fillText("0",p0.x-2,p0.y+2);

      context.fillStyle = "#FF0000";
      context.beginPath();
      context.arc(p1.x,p1.y,8,0,Math.PI*2,true);
      context.closePath();
      context.fill();
      context.fillStyle = "#FFFFFF";
      context.fillText("1",p1.x-2,p1.y+2);

      context.fillStyle = "#FF0000";
      context.beginPath();
      context.arc(p2.x,p2.y,8,0,Math.PI*2,true);
      context.closePath();
      context.fill();
      context.fillStyle = "#FFFFFF";
      context.fillText("2",p2.x-2, p2.y+2);

      context.fillStyle = "#FF0000";
      context.beginPath();
      context.arc(p3.x,p3.y,8,0,Math.PI*2,true);
      context.closePath();
      context.fill();
      context.fillStyle = "#FFFFFF";
      context.fillText("3",p3.x-2, p3.y+2);

      //Draw points to illustrate path

      points.push({x:xt,y:yt});

      for (var i = 0; i< points.length; i++) {
         context.drawImage(pointImage, points[i].x, points[i].y,1,1);
      }

      context.closePath();

      player.x = xt-bullseye.width/2;
      player.y = yt-bullseye.height/2;

      context.drawImage(bullseye,player.x,player.y);

   }

   var p0 = {x:60, y:10};
   var p1 = {x:150, y:350};
   var p2 = {x:300, y:375};
   var p3 = {x:400, y:20};
   var player = {x:0, y:0, speed:.01, t:0};
   var points = new Array();

   theCanvas = document.getElementById("canvasOne");
   context = theCanvas.getContext("2d");

   setInterval(drawScreen, 33);

}

</script>

</head>
<body>
<div style="position: absolute; top: 50px; left: 50px;">

<canvas id="canvasOne" width="500" height="500">
 Your browser does not support HTML5 Canvas.
</canvas>
</div>
</body>
</html>
Creating a Cubic Bezier Curve Loop
You can create some very interesting paths using the four points
in a cubic Bezier curve. One such effect is a loop. To create a loop,
you need to make sure the points form an X, with p0 diagonal from p1, and p2
and p3 on an opposite diagonal from
the other two points. p0 and p3 must be closer to the center of the canvas
than p1 or p2. Below are the points we will use to create
this effect in Example 5-13:
var p0 = {x:150, y:440;
var p1 = {x:450, y:10};
var p2 = {x:50, y:10};
var p3 = {x:325, y:450};
Since it is much easier to show than tell when it comes to cubic Bezier curves, look at Figure 5-16. It shows what the looping curve looks like when Example 5-13 is executed in a web browser.
Note
This effect can only be created with the four points of a cubic Bezier curve. There is also a three-point Bezier curve known as a quadratic Bezier curve. You cannot create loops or S curves with quadratic Bezier curves because the three points are not as precise as the four points of a cubic Bezier curve.
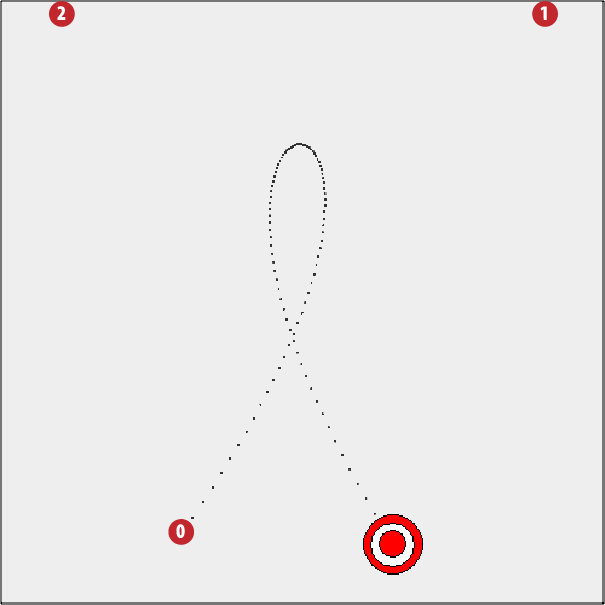
Since the code for this example is essentially the same as in Example 5-12 (besides the four points), we have highlighted in bold the changed code in Example 5-13. We have done this to show you that—with relatively simple changes—you can create dramatic animation effects using cubic Bezier curves.
<!doctype html>
<html lang="en">
<head>
<meta charset="UTF-8">
<title>CH5EX13: Bezier Curve Loop </title>
<script src="modernizr-1.6.min.js"></script>
<script type="text/javascript">
window.addEventListener('load', eventWindowLoaded, false);

var bullseye;
function eventWindowLoaded() {
   bullseye = new Image();
   bullseye.src = "bullseye.png"
   bullseye.onload = eventAssetsLoaded;
}

function eventAssetsLoaded() {

   canvasApp();
}

function canvasSupport () {
    return Modernizr.canvas;
}

function canvasApp() {

    if (!canvasSupport()) {
            return;
        }

  var pointImage = new Image();
  pointImage.src = "point.png";
  function  drawScreen () {

      context.fillStyle = '#EEEEEE';
      context.fillRect(0, 0, theCanvas.width, theCanvas.height);
      //Box
      context.strokeStyle = '#000000';
      context.strokeRect(1,  1, theCanvas.width-2, theCanvas.height-2);

      var t = player.t;

      var cx = 3 * (p1.x - p0.x)
      var bx = 3 * (p2.x - p1.x) - cx;
      var ax = p3.x - p0.x - cx - bx;

      var cy = 3 * (p1.y - p0.y);
      var by = 3 * (p2.y - p1.y) - cy;
      var ay = p3.y - p0.y - cy - by;

      var xt = ax*(t*t*t) + bx*(t*t) + cx*t + p0.x;

      var yt = ay*(t*t*t) + by*(t*t) + cy*t + p0.y;

      player.t += player.speed;

      if (player.t > 1) {
         player.t = 1;
      }
      //draw the points

      context.font = "10px sans";

      context.fillStyle = "#FF0000";
      context.beginPath();
      context.arc(p0.x,p0.y,8,0,Math.PI*2,true);
      context.closePath();
      context.fill();
      context.fillStyle = "#FFFFFF";
      context.fillText("0",p0.x-2,p0.y+2);

      context.fillStyle = "#FF0000";
      context.beginPath();
      context.arc(p1.x,p1.y,8,0,Math.PI*2,true);
      context.closePath();
      context.fill();
      context.fillStyle = "#FFFFFF";
      context.fillText("1",p1.x-2,p1.y+2);

      context.fillStyle = "#FF0000";
      context.beginPath();
      context.arc(p2.x,p2.y,8,0,Math.PI*2,true);
      context.closePath();
      context.fill();
      context.fillStyle = "#FFFFFF";
      context.fillText("2",p2.x-2, p2.y+2);

      context.fillStyle = "#FF0000";
      context.beginPath();
      context.arc(p3.x,p3.y,8,0,Math.PI*2,true);
      context.closePath();
      context.fill();
      context.fillStyle = "#FFFFFF";
      context.fillText("3",p3.x-2, p3.y+2);

      points.push({x:xt,y:yt});

      for (var i = 0; i< points.length; i++) {
         context.drawImage(pointImage, points[i].x, points[i].y,1,1);
      }

      context.closePath();

      player.x = xt-bullseye.width/2;
      player.y = yt-bullseye.height/2;

      context.drawImage(bullseye,player.x,player.y);

   }

   var p0 = {x:150, y:440};
   var p1 = {x:450, y:10};
   var p2 = {x:50, y:10};
   var p3 = {x:325, y:450};
   var player = {x:0, y:0, speed:.01, t:0};

   var points = new Array();

   theCanvas = document.getElementById("canvasOne");
   context = theCanvas.getContext("2d");

   setInterval(drawScreen, 33);

}

</script>

</head>
<body>
<div style="position: absolute; top: 50px; left: 50px;">

<canvas id="canvasOne" width="500" height="500">
 Your browser does not support HTML5 Canvas.
</canvas>
</div>
</body>
</html>
Simple Gravity, Elasticity, and Friction
Adding simulated gravity, elasticity, and friction to your objects adds a sense of realism that otherwise would not exist in 2D. These properties are major forces in nature that people feel and understand at nearly every moment of their lives. This means that people who play games expect objects to act in a particular way when these properties are applied. Our job is to simulate those effects as closely as possible, while minimizing the processing power necessary to create them. While there are some very complicated physics equations we could use to create these effects, we will use simplified versions that work well with the limited resources available to HTML5 Canvas in a web browser.
Simple Gravity
A very simple, yet seemingly realistic gravitational effect can be
achieved by applying a constant gravity value to the y velocity of an object moving on a vector. To
do this, select a value for gravity, such as .1, and then add that value to the y velocity of your object on every call to
drawScreen().
For this example, let’s simulate a ball with a radius of 15 pixels being shot from a cannon that rests
near the bottom of the canvas. The ball will move at a speed of 4
pixels per frame, with an angle of
305 degrees. This means it will move
up and to the right on the canvas. If we did not apply any gravity, the
ball would simply keep moving on that vector until it left the canvas
(actually, it would keep moving, we just would not see it any
longer).
You have seen the code to create an effect like this already. In
the canvasApp() function, we would
create the starting variables like this:
var speed = 4;
var angle = 305;
var radians = angle * Math.PI/ 180;
var radius = 15;
var vx = Math.cos(radians) * speed;
var vy = Math.sin(radians) * speed;
Next, we create the starting point for the ball as p1, and then create a dynamic object that
holds all the values we created for the ball object:
var p1 = {x:20,y:theCanvas.width-radius};
var ball = {x:p1.x, y:p1.y, velocityx: vx, velocityy:vy, radius:radius};
If we want to add gravity to the application, we would first
create a new variable named gravity
and set it to a constant value of .1:
var gravity = .1;
Next, in the drawScreen()
function, we apply this gravity value to the ball object when it is drawn to the canvas
(ball.velocityy += gravity). We want
the ball to stop moving when it hits the “ground” (the bottom of the
canvas), so we test to see whether the y position of the ball plus the radius of the ball (the outer edge) has passed
the bottom of the canvas (ball.y + ball.radius
<= theCanvas.height). If so, we stop the ball’s
movement:
if (ball.y + ball.radius <= theCanvas.height) {
   ball.velocityy += gravity;
} else {
   ball.velocityx = 0;
   ball.velocityy = 0;
   ball.y = theCanvas.height - ball.radius;

}
Next, we apply the constant x
velocity and the new y velocity to
ball, and draw it to the
canvas:
ball.y += ball.velocityy;
ball.x += ball.velocityx;

context.fillStyle = "#000000";
context.beginPath();
context.arc(ball.x,ball.y,ball.radius,0,Math.PI*2,true);
context.closePath();
context.fill();
Figure 5-17 shows what the path looks like when simple gravity is applied to a ball moving on a vector. We have added the points to illustrate the path.
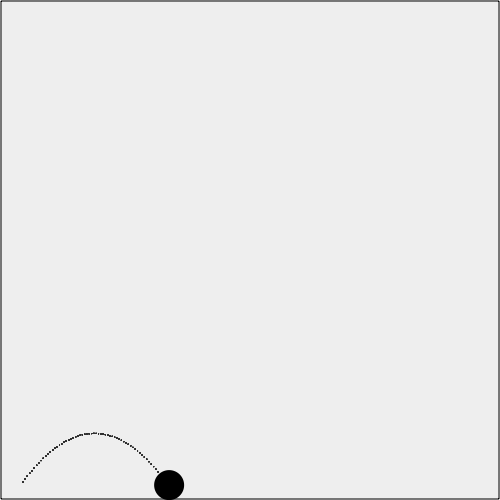
You can test out Example 5-14 with the file CH5EX14.html in the code distribution, or type in the full code listing below.
a<!doctype html>
<html lang="en">
<head>
<meta charset="UTF-8">
<title>CH5EX14: Simple Gravity</title>
<script src="modernizr-1.6.min.js"></script>
<script type="text/javascript">
window.addEventListener('load', eventWindowLoaded, false);
function eventWindowLoaded() {
   canvasApp();
}

function canvasSupport () {
     return Modernizr.canvas;
}

function canvasApp() {

    if (!canvasSupport()) {
            return;
        }

  function  drawScreen () {

      context.fillStyle = '#EEEEEE';
      context.fillRect(0, 0, theCanvas.width, theCanvas.height);
      //Box
      context.strokeStyle = '#000000';
      context.strokeRect(1,  1, theCanvas.width-2, theCanvas.height-2);

      if (ball.y + ball.radius <= theCanvas.height) {
         ball.velocityy += gravity;
      } else {
         ball.velocityx = 0;
         ball.velocityy = 0;
         ball.y = theCanvas.height - ball.radius;

      }

      ball.y += ball.velocityy;
      ball.x += ball.velocityx;

      context.fillStyle = "#000000";
      context.beginPath();
      context.arc(ball.x,ball.y,ball.radius,0,Math.PI*2,true);
      context.closePath();
      context.fill();

   }
   var speed = 4;

   var gravity = .1;
   var angle = 305;
   var radians = angle * Math.PI/ 180;
   var radius = 15;
   var vx = Math.cos(radians) * speed;
   var vy = Math.sin(radians) * speed;

   theCanvas = document.getElementById("canvasOne");
   context = theCanvas.getContext("2d");

   var p1 = {x:20,y:theCanvas.width-radius};
   var ball = {x:p1.x, y:p1.y, velocityx: vx, velocityy:vy, radius:radius};

   setInterval(drawScreen, 33);

}

</script>

</head>
<body>
<div style="position: absolute; top: 50px; left: 50px;">

<canvas id="canvasOne" width="500" height="500">
 Your browser does not support HTML5 Canvas.
</canvas>
</div>
</body>
</html>
Simple Gravity with a Bounce
The last example showed what a cannonball might look like if it was shot out, landed on a surface, and stuck there with no reaction. However, even a heavy cannonball will bounce when it hits the ground.
To create a bouncing effect we do not have to change the code very
much at all. In drawScreen(), we
first apply gravity on every frame;
then, instead of stopping the ball if it hits the bottom of the canvas,
we simply need to reverse the y
velocity of ball when it hits the
ground.
In CH5EX14.html you would replace this code…
if (ball.y + ball.radius <= theCanvas.height) {
   ball.velocityy += gravity;
} else {
   ball.velocityx = 0;
   ball.velocityy = 0;
   ball.y = theCanvas.height - ball.radius;
}
…with this:
ball.velocityy += gravity;
if ((ball.y + ball.radius) > theCanvas.height) {
   ball.velocityy = -(ball.velocityy)
}
This code will send the ball bouncing back “up” the canvas. Since
it is still traveling on the vector, and gravity is applied every time
drawScreen() is called, the ball will
eventually come down again as the applied gravity overtakes the reversed y velocity.
Figure 5-18 shows what the cannonball looks like when the bounce is applied.
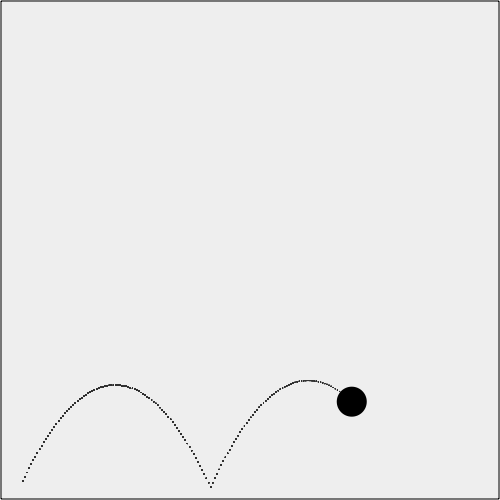
Note
To achieve a nice-looking bounce for this example, we also
changed the angle of the vector in
canvasApp() to 295:
var angle = 295;
Example 5-15 offers the full code.
<!doctype html>
<html lang="en">
<head>
<meta charset="UTF-8">
<title>CH5EX15: Gravity With A Bounce</title>
<script src="modernizr-1.6.min.js"></script>
<script type="text/javascript">
window.addEventListener('load', eventWindowLoaded, false);
function eventWindowLoaded() {
   canvasApp();

}

function canvasSupport () {
     return Modernizr.canvas;
}

function canvasApp() {

    if (!canvasSupport()) {
            return;
        }

  function  drawScreen () {

      context.fillStyle = '#EEEEEE';
      context.fillRect(0, 0, theCanvas.width, theCanvas.height);
      //Box
      context.strokeStyle = '#000000';
      context.strokeRect(1,  1, theCanvas.width-2, theCanvas.height-2);

      ball.velocityy  += gravity;

      if ((ball.y + ball.radius) > theCanvas.height) {
         ball.velocityy = -(ball.velocityy)
      }
      ball.y += ball.velocityy;
      ball.x += ball.velocityx;

      context.fillStyle = "#000000";
      context.beginPath();
      context.arc(ball.x,ball.y,ball.radius,0,Math.PI*2,true);
      context.closePath();
      context.fill();

   }
   var speed = 5;

   var gravity = .1;
   var angle = 295;
   var radians = angle * Math.PI/ 180;
   var radius = 15;

   var vx = Math.cos(radians) * speed;
   var vy = Math.sin(radians) * speed;

   theCanvas = document.getElementById("canvasOne");
   context = theCanvas.getContext("2d");

   var p1 = {x:20,y:theCanvas.width-radius};
   var ball = {x:p1.x, y:p1.y, velocityx: vx, velocityy:vy, radius:radius};

   setInterval(drawScreen, 33);

}

</script>

</head>
<body>
<div style="position: absolute; top: 50px; left: 50px;">

<canvas id="canvasOne" width="500" height="500">
 Your browser does not support HTML5 Canvas.
</canvas>
</div>
</body>
</html>
Gravity with Bounce and Applied Simple Elasticity
In physics, the elasticity of a bouncing ball refers to how much energy is conserved when a ball bounces off a surface. We already covered a bit about conservation of energy when we discussed balls colliding, but when we are simulating objects falling, we need to take a slightly different path with our code. In Example 5-15, we applied 100% elasticity and the ball bounced forever (actually, this was only implied since we did not consider elasticity at all). However, in real life, balls usually lose some of their energy every time they bounce off a surface. The amount of energy conserved depends on the material the ball is made from, as well as the surface it is bouncing on. For example, a rubber Super Ball is much more elastic than a cannonball and will bounce higher on the first bounce off a surface. Both will bounce higher off a concrete surface than a surface made of thick mud. Eventually, both will come to rest on the surface as all the energy is transferred away from the ball.
We can simulate simple elasticity by applying a constant value to
the ball when it bounces off the ground. For this example, we will set
the speed of the ball to 6 pixels per frame, and the angle to 285. We will keep our gravity at .1, but set a new variable named elasticity to .5. To make this more straightforward, we will
also assume that the surface the ball is bouncing on does not add or
subtract from the elasticity of the ball.
In canvasApp() we would set the
new properties like this:
var speed = 6;
var gravity = .1;
var elasticity = .5;
var angle = 285;
We then add the new elasticity
property to the ball object because,
unlike gravity, elasticity describes
a property of an object, not the entire world it resides within. This
means that having multiple balls with different values for elasticity
would be very easy to implement:
var ball = {x:p1.x, y:p1.y, velocityx: vx, velocityy:vy, radius:radius,
    elasticity: elasticity};
In the drawScreen() function,
we still add the gravity value to the
y velocity (velocityy). However, instead of simply
reversing the y velocity when the
ball hits the bottom of the canvas,
we also multiply the y velocity by
the elasticity value stored in the
ball.elasticity property. This
applies the elasticity to the bounce, preserving the y velocity by the percentage value of elasticity for the object:
ball.velocityy += gravity;
if ((ball.y + ball.radius) > theCanvas.height) {
   ball.velocityy = -(ball.velocityy)*ball.elasticity;
}
ball.y += ball.velocityy;
ball.x += ball.velocityx;
In Figure 5-19 you can see what this application looks like when executed in a web browser.
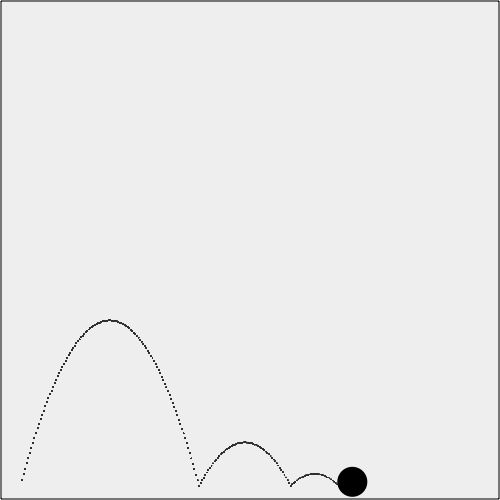
Note
With gravity applied, the
bounce is not exactly as you might expect. Gravity is always pulling
down on our object, so the effect of a loss of y velocity due to an elastic bounce is
pronounced.
The full code is shown in Example 5-16.
<!doctype html>
<html lang="en">
<head>
<meta charset="UTF-8">
<title>CH5EX16: Gravity With A Vector With Bounce And Elasticity</title>
<script src="modernizr-1.6.min.js"></script>
<script type="text/javascript">
window.addEventListener('load', eventWindowLoaded, false);
function eventWindowLoaded() {
   canvasApp();

}

function canvasSupport () {
     return Modernizr.canvas;
}

function canvasApp() {

    if (!canvasSupport()) {
            return;
        }

  function  drawScreen () {

      context.fillStyle = '#EEEEEE';
      context.fillRect(0, 0, theCanvas.width, theCanvas.height);
      //Box
      context.strokeStyle = '#000000';
      context.strokeRect(1,  1, theCanvas.width-2, theCanvas.height-2);

      ball.velocityy += gravity;

      if ((ball.y + ball.radius) > theCanvas.height) {
         ball.velocityy = -(ball.velocityy)*ball.elasticity;
      }
      ball.y += ball.velocityy;
      ball.x += ball.velocityx;

      context.fillStyle = "#000000";
      context.beginPath();
      context.arc(ball.x,ball.y,ball.radius,0,Math.PI*2,true);
      context.closePath();
      context.fill();

   }
   var speed = 6;
   var gravity = .1;
   var elasticity = .5;
   var angle = 285;
   var radians = angle * Math.PI/ 180;
   var radius = 15;

   var vx = Math.cos(radians) * speed;
   var vy = Math.sin(radians) * speed;

   theCanvas = document.getElementById("canvasOne");
   context = theCanvas.getContext("2d");

   var p1 = {x:20,y:theCanvas.width-radius};
   var ball = {x:p1.x, y:p1.y, velocityx: vx, velocityy:vy, radius:radius,
       elasticity: elasticity};

   setInterval(drawScreen, 33);

}

</script>

</head>
<body>
<div style="position: absolute; top: 50px; left: 50px;">

<canvas id="canvasOne" width="500" height="500">
 Your browser does not support HTML5 Canvas.
</canvas>
</div>
</body>
</html>
Simple Gravity, Simple Elasticity, and Simple Friction
Now that we have a ball traveling on a vector that is affected by
both gravity and elasticity, we have one more element to add to make the
animation more realistic. In the previous example, the y velocity was affected by gravity and
elasticity, but the ball still traveled on the x-axis without any
degradation in velocity. We will fix this issue now by adding friction
into the equation.
In physics, friction is a force that resists
the motion of an object. We have already discussed friction as it
applies to colliding balls, and this implementation is similar except
that it affects only the x velocity.
For our purposes, we will achieve simple friction by degrading the
x velocity as gravity degrades the
y velocity.
Taking the code from Example 5-16, in canvasApp() we create a new variable named
friction. This is the amount of
pixels to degrade the x velocity on
every frame:
var friction = .008;
Notice that the amount is quite small. Friction does not have to
be a large value to look realistic—it just needs to be applied uniformly
each time drawScreen() is called. In
drawScreen(), we apply friction to the x velocity like this:
ball.velocityx = ball.velocityx - ( ball.velocityx*friction);
This is the same type of proportional application of friction we
used with the colliding balls, but again, this time we applied it only
to the x velocity.
Figure 5-20 shows what this final version of our application looks like when executed in a web browser.
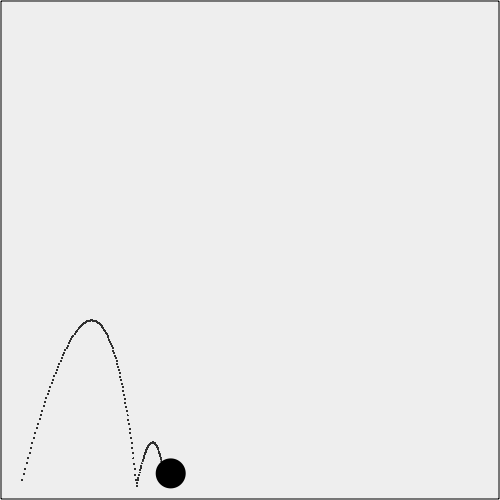
Example 5-17 gives the full code for CH5EX17.html, the final code of our simple gravity, simple elasticity, and simple friction example.
<!doctype html>
<html lang="en">
<head>
<meta charset="UTF-8">
<title>CH5EX17: Gravity With A Vector With Bounce Friction</title>
<script src="modernizr-1.6.min.js"></script>
<script type="text/javascript">
window.addEventListener('load', eventWindowLoaded, false);
function eventWindowLoaded() {
   canvasApp();
}

function canvasSupport () {
     return Modernizr.canvas;
}

function canvasApp() {

    if (!canvasSupport()) {
            return;
        }

  function  drawScreen () {

      context.fillStyle = '#EEEEEE';
      context.fillRect(0, 0, theCanvas.width, theCanvas.height);
      //Box
      context.strokeStyle = '#000000';
      context.strokeRect(1,  1, theCanvas.width-2, theCanvas.height-2);

      ball.velocityx = ball.velocityx - ( ball.velocityx*friction);

      ball.velocityy += gravity;

      if ((ball.y + ball.radius) > theCanvas.height) {
         ball.velocityy = -(ball.velocityy)*ball.elasticity;
      }
      ball.y += ball.velocityy;
      ball.x += ball.velocityx;

      context.fillStyle = "#000000";
      context.beginPath();
      context.arc(ball.x,ball.y,ball.radius,0,Math.PI*2,true);
      context.closePath();
      context.fill();

   }
   var speed = 6;
   var gravity = .1;
   var friction = .008;
   var elasticity = .5;
   var angle = 285;
   var radians = angle * Math.PI/ 180;
   var radius = 15;

   var vx = Math.cos(radians) * speed;
   var vy = Math.sin(radians) * speed;

   theCanvas = document.getElementById("canvasOne");
   context = theCanvas.getContext("2d");

   var p1 = {x:20,y:theCanvas.width-radius};
   var ball = {x:p1.x, y:p1.y, velocityx: vx, velocityy:vy, radius:radius,
       elasticity: elasticity};

   setInterval(drawScreen, 33);

}

</script>

</head>
<body>
<div style="position: absolute; top: 50px; left: 50px;">

<canvas id="canvasOne" width="500" height="500">
 Your browser does not support HTML5 Canvas.
</canvas>
</div>
</body>
</html>
Easing
Easing is a technique used in animation to make an object smoothly enter or leave a location. The idea of easing is that instead of uniformly applying movement to every frame of animation, you instead increase (easing in) or decrease (easing out) the number of pixels you move on each frame. The result is that movement appears to be more realistic and smooth. There are many different ways to create easing animations. We will concentrate on two simple examples that will help pave the way for you to further explore the subject on your own.
Easing Out (Landing the Ship)
The process of easing out refers to easing at the end of an animation: an object moving from one point to another, starting out fast, and slowing down as it reaches the second point. To illustrate the concept, we will use the example of a spaceship landing. A spaceship starts out very fast, applies negative thrust to slow down, and, by the time it reaches the ground, is moving slowly enough to land without incident. If you’ve ever played the video game Lunar Lander, you will understand exactly the type of movement we are trying to accomplish.
To create this easing-out effect, we need to find two distinct
points and then move an object between them, slowing down the object in
linear fashion as it nears the second point. To achieve this effect, we
first calculate the distance between the points. Next, we select a
percentage value (easeValue) that we
will use to move the object across that distance on each frame. As the
distance gets shorter, the amount we move gets shorter as well. This
gives the object the appearance of traveling slower and slower as it
moves from the starting point to the ending point, as illustrated in
Figure 5-21. We have
drawn the points to show the easing values as the ship nears the bottom
of the screen. Notice that the points get closer and closer until there
is almost no distance between them.
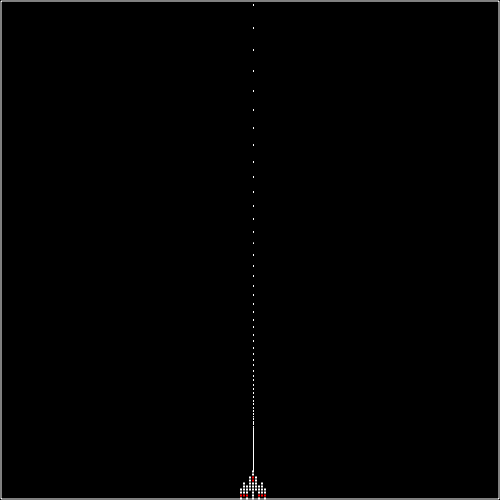
Figure 5-21 displays the results of CH5EX18.html. Now, let’s look at how this example works in detail. First, we will load in the ship.png image the same way we have loaded images previously in this chapter:
var shipImage;
function eventWindowLoaded() {
   shipImage = new Image();
   shipImage.src = "ship.png"
   shipImage.onload = eventAssetsLoaded;
}

function eventAssetsLoaded() {

   canvasApp();
}
Then in canvasApp(), we create
a variable named easeValue, which
represents the percentage to move the ship across the remaining distance
between the two points. In our example, it is 5% (.05):
var easeValue = .05;
Next, we create our two points. The first point, p1, is close to the middle of the canvas on
the y-axis, and just above the top (-20) on the x-axis. The final point, p2, is in the same place on the x-axis, but
near the bottom of the canvas (470)
on the y-axis:
var p1 = {x:240,y:-20};
var p2 = {x:240,y:470};
Finally, we create a dynamic object for the ship that holds these values:
var ship = {x:p1.x, y:p1.y, endx: p2.x, endy:p2.y, velocityx:0, velocityy:0};In drawScreen(), on every
frame, we first find out the distance between the ship and the endpoint
by subtracting the current x and
y values for the ship from the endpoint x and y
values. The distance will get shorter on each call to drawScreen() as the ship moves farther away
from p1 and gets closer to p2. We do this for both x and y
even though, in our example, only the y value will change as the spaceship gets
closer to p2:
var dx = ship.endx - ship.x;
var dy = ship.endy - ship.y;
Once we have the distances, we multiply those values by easeValue to get the x and y
velocities for the ship on this call
to drawScreen():
ship.velocityx = dx * easeValue;
ship.velocityy = dy * easeValue;
Finally, we apply those values and draw the spaceship to the canvas:
ship.x += ship.velocityx;
ship.y += ship.velocityy;
context.drawImage(shipImage,ship.x,ship.y);
You can test this example by executing CH5EX18.html from the code distribution in your web browser, or by typing in the full code listing shown in Example 5-18.
<!doctype html>
<html lang="en">
<head>
<meta charset="UTF-8">
<title>CH5EX18:  Easing Out (Landing The Ship)</title>
<script src="modernizr-1.6.min.js"></script>
<script type="text/javascript">
window.addEventListener('load', eventWindowLoaded, false);
var shipImage;
function eventWindowLoaded() {
   shipImage = new Image();
   shipImage.src = "ship.png"
   shipImage.onload = eventAssetsLoaded;
}

function eventAssetsLoaded() {

   canvasApp();
}

function canvasSupport () {
     return Modernizr.canvas;
}

function canvasApp() {

   if (!canvasSupport()) {
           return;
}

  var pointImage = new Image();
  pointImage.src = "pointwhite.png";
  function  drawScreen () {

      context.fillStyle = '#000000';
      context.fillRect(0, 0, theCanvas.width, theCanvas.height);
      //Box
      context.strokeStyle = '#ffffff';
      context.strokeRect(1,  1, theCanvas.width-2, theCanvas.height-2);
      var dx = ship.endx - ship.x;
      var dy = ship.endy - ship.y;

      ship.velocityx = dx * easeValue;
      ship.velocityy = dy * easeValue;

      ship.x += ship.velocityx;
      ship.y += ship.velocityy;

      //Draw points to illustrate path

      points.push({x:ship.x,y:ship.y});

      for (var i = 0; i< points.length; i++) {
         context.drawImage(pointImage, points[i].x+shipImage.width/2, points[i].y,1,1);
      }

      context.drawImage(shipImage,ship.x,ship.y);

   }   var easeValue = .05;
   var p1 = {x:240,y:-20};
   var p2 = {x:240,y:470};

   var ship = {x:p1.x, y:p1.y, endx: p2.x, endy:p2.y, velocityx:0, velocityy:0};
   var points = new Array();

   theCanvas = document.getElementById("canvasOne");
   context = theCanvas.getContext("2d");

   setInterval(drawScreen, 33);

}

</script>

</head>
<body>
<div style="position: absolute; top: 50px; left: 50px;">

<canvas id="canvasOne" width="500" height="500">
 Your browser does not support HTML5 Canvas.
</canvas>
</div>
</body>
</html>
Note
We are showing the points in this example but because the background is black, we load in a white bitmap point image named pointwhite.png instead of the all-black image, point.png.
Easing In (Taking Off)
Easing in is the opposite of easing out. When an animation eases in, it starts slowly and then gets faster and faster. If you have ever seen a video of a space shuttle taking off, you will understand this much better. The thrust builds up as the craft moves slowly, and then gets faster and faster as it moves through the sky. We are going to use this “taking off” example as a way to develop code for an easing-in animation on HTML5 Canvas.
In canvasApp(), we start our
code much the same way as in the last example—by creating a variable
named easeValue:
var easeValue = .05;
However, for easing in, instead of this being a percentage of the remaining distance between two points, it is simply a constant value added to the velocity of the ship on each frame. Figure 5-22 shows what this would look like. We have added the points again to illustrate how the animation speeds up as the ship takes off.
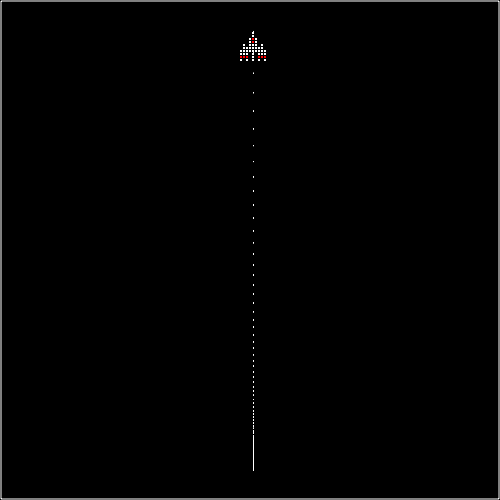
First, we set the beginning position of the ship (p1)
to the bottom center of the canvas. Then, we set the beginning speed of the ship very low (.5 pixels per frame), and set the angle to 270 (straight up the canvas). We then
calculate the x and y velocity values for the ship:
var p1 = {x:240,y:470};
var tempSpeed = .5;
var tempAngle = 270 ;
var tempRadians = tempAngle * Math.PI/ 180;
var tempvelocityx = Math.cos(tempRadians) * tempSpeed;
var tempvelocityy  = Math.sin(tempRadians) * tempSpeed;

var ship = {x:p1.x, y:p1.y, velocityx:tempvelocityx, velocityy:tempvelocityy};
In drawScreen(), instead of
finding the distance between two points, we add the easeValue to the x and y
velocities on each frame, and then apply it to the ship x and y values before drawing it to the canvas. This
creates a linear increase in speed, resulting in the easing-in effect we
want to see:
ship.velocityx = ship.velocityx + ( ship.velocityx*easeValue);
ship.velocityy = ship.velocityy + ( ship.velocityy*easeValue);

ship.x += ship.velocityx;
ship.y += ship.velocityy;

context.drawImage(shipImage,ship.x,ship.y);
You can see this example by executing CH5EX19.html from the code distribution, or by typing in the code listing shown in Example 5-19.
<!doctype html>
<html lang="en">
<head>
<meta charset="UTF-8">
<title>CH5EX19: Taking Off (Fake Ease In)</title>
<script src="modernizr-1.6.min.js"></script>
<script type="text/javascript">
window.addEventListener('load', eventWindowLoaded, false);
var shipImage;
function eventWindowLoaded() {
   shipImage = new Image();
   shipImage.src = "ship.png"
   shipImage.onload = eventAssetsLoaded;
}

function eventAssetsLoaded() {

   canvasApp();
}

function canvasSupport () {
    return Modernizr.canvas;
}

function canvasApp() {

    if (!canvasSupport()) {
          return;
        }

  var pointImage = new Image();
  pointImage.src = "pointwhite.png";
  function  drawScreen () {

      context.fillStyle = '#000000';
      context.fillRect(0, 0, theCanvas.width, theCanvas.height);
      //Box
      context.strokeStyle = '#ffffff';
      context.strokeRect(1,  1, theCanvas.width-2, theCanvas.height-2);

      ship.velocityx = ship.velocityx + ( ship.velocityx*easeValue);
      ship.velocityy = ship.velocityy + ( ship.velocityy*easeValue);

      ship.x += ship.velocityx;
      ship.y += ship.velocityy;

      //Draw points to illustrate path

      points.push({x:ship.x,y:ship.y});

      for (var i = 0; i< points.length; i++) {
         context.drawImage(pointImage, points[i].x+shipImage.width/2, points[i].y,1,1);
      }

      context.drawImage(shipImage,ship.x,ship.y);

   }

   var easeValue = .05;
   var p1 = {x:240,y:470};
   var tempX;
   var tempY;
   var tempSpeed = .5;
   var tempAngle = 270 ;
   var tempRadians = tempAngle * Math.PI/ 180;
   var tempvelocityx = Math.cos(tempRadians) * tempSpeed;
   var tempvelocityy  = Math.sin(tempRadians) * tempSpeed;

   var ship = {x:p1.x, y:p1.y, velocityx:tempvelocityx, velocityy:tempvelocityy};
   var points = new Array();

   theCanvas = document.getElementById("canvasOne");
   context = theCanvas.getContext("2d");

   setInterval(drawScreen, 33);

}

</script>

</head>
<body>
<div style="position: absolute; top: 50px; left: 50px;">

<canvas id="canvasOne" width="500" height="500">
 Your browser does not support HTML5 Canvas.
</canvas>
</div>
</body>
</html>
Note
For more information on easing, check out Robert Penner’s easing equations: http://www.robertpenner.com/easing/. These equations have been implemented in jQuery for JavaScript at http://plugins.jquery.com/files/jquery.animation.easing.js.txt.
What’s Next?
We have shown you a plethora of examples for how you can use HTML5 Canvas to animate objects using some basic principles of math and physics. However, we have really only begun to scratch the surface of the multitude of ways you can use math and physics in your applications. In the next couple chapters we will switch gears, discussing audio and video, before we start applying many of the concepts we have learned in this book to a couple of in-depth game projects.
Get HTML5 Canvas now with the O’Reilly learning platform.
O’Reilly members experience books, live events, courses curated by job role, and more from O’Reilly and nearly 200 top publishers.

