Chapter 4. Native Audio
Introduction
You already deal with embedded
content—content that is imported or inserted into a web page—almost every day (see http://www.w3.org/TR/html5/content-models.html#embedded-content-0).
Think about the img element. It inserts
content—the image—into your web page
via the src attribute.
With HTML5, we now have many more options for embedded content,
including native audio via the
new audio element (see
http://dev.w3.org/html5/markup/audio.html).
Native? Yes. That means no more ungainly object and embed. No more need to deliver audio with a
third-party plug-in and, as such, no more design headaches with dynamic
layouts or drop-down menus.
With audio in our arsenal, not
only can we deliver audio files directly through the browser, but we can
style and manipulate the element and its attributes via CSS and
JavaScript.
4.1. Adding HTML5 Audio
Solution
Add the audio element,
with the src attribute
referencing the location of your audio file and fallback content for
older browsers:
<audio src="audio.ogg" controls>
    Download <a href="audio.ogg">episode 42 of Learning to Love HTML5</a>
</audio>
Also be sure to include the controls attribute if you want browsers to display a default control
interface for your audio (see Figure 4-1):
<audio src="audio.ogg" controls>
The audio file in this example uses Ogg Vorbis (.ogg), which is a royalty-free, open source codec (see http://www.vorbis.com). However, there are many other audio formats for the Web (see Table 4-1), which is one of the biggest challenges in implementing HTML5 audio.
Note
A codec is a technology used for compressing and decompressing data. Audio codecs compress and/or decompress digital audio data into different formats that aim to retain the highest level of quality with the minimum bit rate.
Multiple audio codecs
The HTML5 specification does not dictate or make any recommendations about what audio codecs should be supported. And since it would make far too much sense for browser makers to agree (see http://lists.whatwg.org/pipermail/whatwg-whatwg.org/2009-June/020620.html), there isn’t a single format that works in all browsers, as you can see in Table 4-1.
Browser | AAC (.aac) | MP3 (.mp3) | Ogg Vorbis (.ogg) | WAV (.wav) | WebM (.webm) |
Chrome 6+ | X | X | X | ||
Firefox 3.6+ | X | X | X | ||
IE9+ | X | X | X | ||
Opera 10.5+ | X | X | |||
Safari 5+ | X | X | X |
Let’s take a closer look at these formats:
- .aac
Lossy compression scheme developed as an improvement over MP3, with similar bit rates but better sound quality
- .mp3
Patented yet popular format that uses lossy compression to achieve file sizes one-tenth of noncompressed
- .ogg
Open source alternative to .mp3 that also uses a lossy compression format
- .wav
Proprietary format for audio that does not utilize any compression
- .webm
Google’s open, royalty-free media format, which relies on the Vorbis audio codec for compression
Integrating multiple sources
In terms of which format to choose, the reality is that if you want your content to reach
the widest possible audience you have to encode and include
multiple audio files in your HTML5 audio element. Fortunately, HTML5 does allow
this.
Note
When using the source
element in audio, the src attribute is dropped. src only comes
into play (pun intended) if you are referencing a
single audio format.
In terms of best practices, it’s recommended that you minimally include the .ogg royalty-free format and either the .mp3 or .wav format. This type of approach should cover your bases with the latest browsers:
<audio controls>
    <source src="audio.ogg">
    <source src="audio.mp3">
    Download <a href="audio.ogg">episode 42 of Learning to Love HTML5</a>
</audio>
Preloading the audio
audio has several attributes that allow you to configure your
audio implementation.
Note
For a full description of the attributes available for HTML5 media elements, see the WHATWG standard: http://www.whatwg.org/specs/web-apps/current-work/multipage/video.html#media-element-attributes.
The preload attribute allows
you to hint to the browser when it should begin buffering the
audio:
<audio controls preload>While preload currently has
limited browser support, it seems useful for optimizing the download
process. You can simply specify preload and leave it to the browser to
decide the appropriate action, or you can choose from three defined
preload values:
preload="auto"Is the same as a Boolean
preload, and suggests that the browser should begin downloading the file but leaves the ultimate action up to the browser. So, if it is a mobile situation or a slow connection, the browser can decide not to preload in order to save bandwidth.preload="metadata"Hints that the browser shouldn’t buffer the audio itself until the user activates the controls, but that metadata like duration and tracks should be preloaded.
preload="none"Suggests that the audio shouldn’t be downloaded until the user activates the controls.
Discussion
In addition to the browser inconsistencies with audio formats,
there is a bit of inconsistency in
the support for audio itself. There
are browser bugs, quirks, and oddities that will hopefully be addressed
by the browser makers in the near future, but until they are it is up to
us designers and developers to remain informed.
Note
24Ways provides a list of some of these browser issues: http://24ways.org/2010/the-state-of-html5-audio.
Creating fallback content
As you saw in the first example of this recipe, audio allows us to include
fallback content. What this means is that if a
user is on a browser that doesn’t support HTML5 audio, he will instead see some replacement
content (see Figure 4-2).
The HTML5 specification says that all child elements of audio other than source should be ignored. This means that providing additional
fallback content won’t result in any negative consequences for a user
on an HTML5-capable browser.
For example, you could include fallback Flash:
<audio controls>
    <source src="audio.ogg">
    <source src="audio.mp3">
    <object data="player.swf?audio=audio.mp3">
        <param name="movie" value="player.swf?audio=audio.mp3">
        Video and Flash are not supported by your browser.
    </object>
</audio>
Or you could simply describe what the audio file contains and include a link to the file for a user to download and play on his device’s media player (along with some gentle encouragement to upgrade to a new browser):
<audio controls>
    <source src="audio.ogg">
    <source src="audio.mp3">
    Your browser does not support HTML5 audio. You should upgrade. In the
    meantime, download <a href="audio.ogg">episode 42 of Learning to Love
    HTML5</a>.
</audio>
Accessible alternatives
Another challenge with HTML5 audio is that alternative content for multimedia doesn’t quite exist in practice. Theoretically, accessibility would be delivered through two steps: first, multimedia authors include a subtitles file in the container .ogv or .mp3, and then browsers give users an interface to access those subtitles and captions.
Note
Using the alt attribute
with img isn’t a practical
solution. It isn’t what the HTML5 specification intends, and, more
important, assistive technologies don’t process audio fallback content in that
fashion.
For now, there’s not much more than a few experimental approaches you can try:
Accessible HTML5 Video with JavaScripted captions: http://dev.opera.com/articles/view/accessible-html5-video-with-javascripted-captions/
HTML5 and Timed Media: http://www.bbc.co.uk/blogs/rad/2009/08/html5.html
Demos of HTML5 Video and Audio Tag Accessibility: http://www.annodex.net/~silvia/itext/
You may note that some of these resources reference video.
That’s because HTML5 audio and
video are so similar that the
approaches described can be applied to both (as discussed in Chapter 5).
Beyond issues with captioning, audio support in general is inconsistent
among assistive technologies. For example, some screen readers don’t
recognize the element at all and simply skip it.
Further, audio accessibility,
like keyboard support, is inconsistent among browsers. As this is the
case for HTML5 across the board, we recommend staying updated at
http://html5accessibility.com.
Intellectual property rights
You may have already figured out that HTML5 audio isn’t a “one size fits all” solution.
But it isn’t just the need for multiple file formats or inconsistent
browser support that’s at issue: HTML5 does not offer any
copy protection.
audio (and video, see Chapter 5) is as easy to save
to a user’s hard drive as img and,
therefore, isn’t a good fit for all use cases. If Digital Rights
Management (DRM) is needed, a plug-in, not audio, is likely a better solution with how
copy protection stands today.
See Also
For more about HTML5 multimedia accessibility, the W3C wiki offers an in-depth view of known issues and proposed solutions: http://www.w3.org/html/wg/wiki/MultimediaAccessibilty.
4.2. Manipulating the Audio Stream
Solution
As part of the specification, audio has a few attributes that give you simple and instant control
over your playback:
autoplayTells the browser to start playing the audio as soon as the page loads.
Warning
I hesitate to even mention this attribute because it does exactly what it says, and is one of the most annoying, non-user-friendly things on websites (http://www.punkchip.com/2009/04/autoplay-is-bad-for-all-users). So, while
autoplayis available, don’t use it. Seriously. Don’t.loopAnother self-descriptive attribute,
looptells the browser to loop the audio when playing forward.Warning
This is less offensive than the
autoplayattribute, but it should still be used with discretion.
Like controls, both autoplay and loop are Boolean attributes, so you simply
include them in the opening audio tag
when you want them:
<audio controls loop>Discussion
What if you want more control than these basic attributes provide?
Fortunately, audio and video have attributes, events, and methods you
can manipulate with JavaScript to
create custom controls, including:
For example, suppose you want to include controls that allow the
user to jump to a specific time in the audio file. You can add this
functionality with a button
and a dash of JavaScript to manipulate the play() method based on the read/write property
currentTime:
<audio>
    <source src="audio.ogg">
    <source src="audio.mp3">
</audio>
<button title="Play at 30 seconds" onclick="playAt(30);">30 seconds</button>
<script>
    function playAt(seconds){
        var audio = document.getElementsByTagName("audio")[0];
        audio.currentTime = seconds;
        audio.play();
    }
</script>
There is no stop method, but using the same approach as in the
example above, stop functionality can be mimicked by using the pause(); method to return to the beginning of
the audio file via currentTime:
<audio>
    <source src="audio.ogg">
    <source src="audio.mp3">
</audio>
<button title="Play at 30 seconds" onclick="playAt(30);">30 seconds</button>
<button title="Stop Audio" onclick="stopAudio();">Stop Audio</button>
<script>
    function playAt(seconds){
        var audio = document.getElementsByTagName("audio")[0];
        audio.currentTime = seconds;
        audio.play();
    }
    function stopAudio(){
        var audio = document.getElementsByTagName("audio")[0];
        audio.currentTime = 0;
        audio.pause();
    }
</script>
Note
Note that when creating your own custom controls, you drop the
controls Boolean attribute from
audio.
For more information on creating custom controls, see Recipe 4.5.
See Also
For a much less rudimentary approach to manipulating the audio playback with custom controls, see Opera’s “Everything You Need to Know About HTML5 Video and Audio” at http://dev.opera.com/articles/view/everything-you-need-to-know-about-html5-video-and-audio/.
4.3. Generating <audio> Using JavaScript
Solution
You can generate audio on the browser without the src attribute or source elements by using methods defined by
the Mozilla Audio Data API (https://wiki.mozilla.org/Audio_Data_API#Writing_Audio):
Discussion
This particular implementation of audio has somewhat limited support. In fact, only Firefox 4+ and
Chrome Beta currently support it. As such, it is more an experimental
approach than something geared for mainstream use.
If you happen to be the experimental type, though, check out this short video presentation of what is possible with the Mozilla Audio Data API: http://www.youtube.com/watch?v=1Uw0CrQdYYg.
See Also
The transcript for the “jasmid—MIDI synthesis with JavaScript and HTML5 audio” talk from Barcamp London 8 provides a very high-level discussion about the challenges and practical implications of generating audio on the fly, in the browser: http://matt.west.co.tt/music/jasmid-midi-synthesis-with-javascript-and-html5-audio/.
4.4. Visualizing <audio> Using <canvas>
Solution
This example delivers a rudimentary canvas implementation that visualizes audio
with waveforms (see Figure 4-3):
<audio src="audio.ogg"></audio>
<canvas width="512" height="100"></canvas>
<button title="Generate Waveform" onclick="genWave();">Generate Waveform</button>

<script>
    function genWave(){
        var audio = document.getElementsByTagName("audio")[0];
        var canvas = document.getElementsByTagName("canvas")[0];
        var context = canvas.getContext('2d');
        audio.addEventListener("MozAudioAvailable", buildWave, false);
        function buildWave (event){
            var channels = audio.mozChannels;
            var frameBufferLength = audio.mozFrameBufferLength;
            var fbData = event.frameBuffer;
            var stepInc = (frameBufferLength / channels) / canvas.width;
            var waveAmp = canvas.height / 2;
            canvas.width = canvas.width;
            context.beginPath();
            context.moveTo(0, waveAmp - fbData[0] * waveAmp);
            for(var i=1; i < canvas.width; i++){
                context.lineTo(i, waveAmp - fbData[i*stepInc] * waveAmp);
            }
            context.strokeStyle = "#fff";
            context.stroke();
        }
        audio.play();
    }
</script>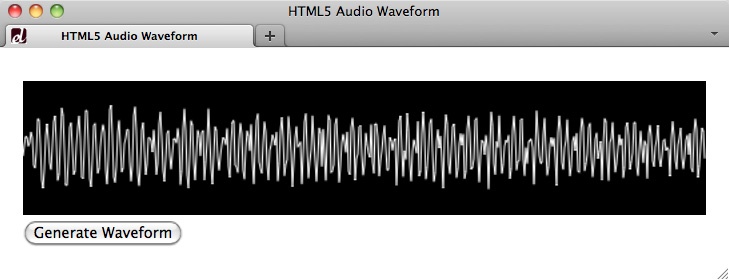
In this solution, we combine what is discussed about canvas in Chapter 9 with
some methods from the Mozilla Audio Data API. Let’s break it down piece
by piece, starting with the core audio element, canvas, and a button to trigger the visualization:
<audio src="audio.ogg"></audio>
<canvas width="512" height="100"></canvas>
<button title="Generate Waveform" onclick="genWave();">Generate Waveform</button>
Note
For brevity’s sake, I’m using the src attribute for audio in this example, but this would also
work with multiple source
elements.
Next, add a background color via CSS to indicate a simple
presentation for the canvas:
<style>
    canvas {background: #000;}
</style>
Note
Note that the width and
height values in canvas are DOM attributes, not style
attributes. As such, you need to specify them in the markup, not the
CSS, so that the browser knows the dimensions of its drawing space.
See Chapter 9 for more on canvas.
And now for the JavaScript. First, set up an overall function to generate the wave:
<script>
    function genWave(){
Inside that function, get both the audio and canvas elements:
        var audio = document.getElementsByTagName("audio")[0];
        var canvas = document.getElementsByTagName("canvas")[0];
Then set up canvas with its
drawing context (see http://diveintohtml5.info/canvas.html#shapes):
var context = canvas.getContext('2d');Next, add an event listener to gather data about the audio file using methods from the Mozilla Audio Data API (https://developer.mozilla.org/en/Introducing_the_Audio_API_Extension#section_2):
audio.addEventListener("MozAudioAvailable", buildWave, false);Then, include a private function to build the canvas wave drawing, and get the number of
channels and frameBufferLength:
        function buildWave (event){
            var channels = audio.mozChannels;
            var frameBufferLength = audio.mozFrameBufferLength;
Note
Note that you need to divide frameBufferLength by channels because frameBuffer contains an array of audio
samples that are not separated by channels, but are all delivered
together.
Get the frameBuffer
data:
var fbData = event.frameBuffer;
Set the step increment:
var stepInc = (frameBufferLength / channels) / canvas.width;
and set the wave amplitude:
var waveAmp = canvas.height / 2;
Next, reset canvas so the
strokes don’t build on top of each other:
canvas.width = canvas.width;
Finally, build the stroke and set stroke properties:
            context.beginPath();
            context.moveTo(0, waveAmp - fbData[0] * waveAmp);
            for(var i=1; i < canvas.width; i++){
                context.lineTo(i, waveAmp - fbData[i*stepInc] * waveAmp);
            }
            context.strokeStyle = "#fff";
Add the stroke to canvas:
            context.stroke();
        }
and play the audio:
        audio.play();
    }
</script>
Discussion
Just as generating real-time audio with JavaScript (see Recipe 4.3) is limited to Firefox
4+, so is this method of audio
visualization with canvas. This is
because only the Mozilla Audio Data API allows you to access the key
audio data (in this example, frameBuffer) necessary to create the canvas drawing.
Further, this method of audio visualization must run on a web server, and it requires that the audio file reside on that same server due to Firefox security measures (https://wiki.mozilla.org/Audio_Data_API#Security).
Note
While this recipe makes use of the Mozilla Audio Data API, browsers (including Firefox) may support the Web Audio API from the W3C. For more information, see the specification at https://dvcs.w3.org/hg/audio/raw-file/tip/webaudio/specification.html.
See Also
For a far more sophisticated and interactive use of audio and canvas, see the project from 9elements at http://9elements.com/io/projects/html5/canvas/.
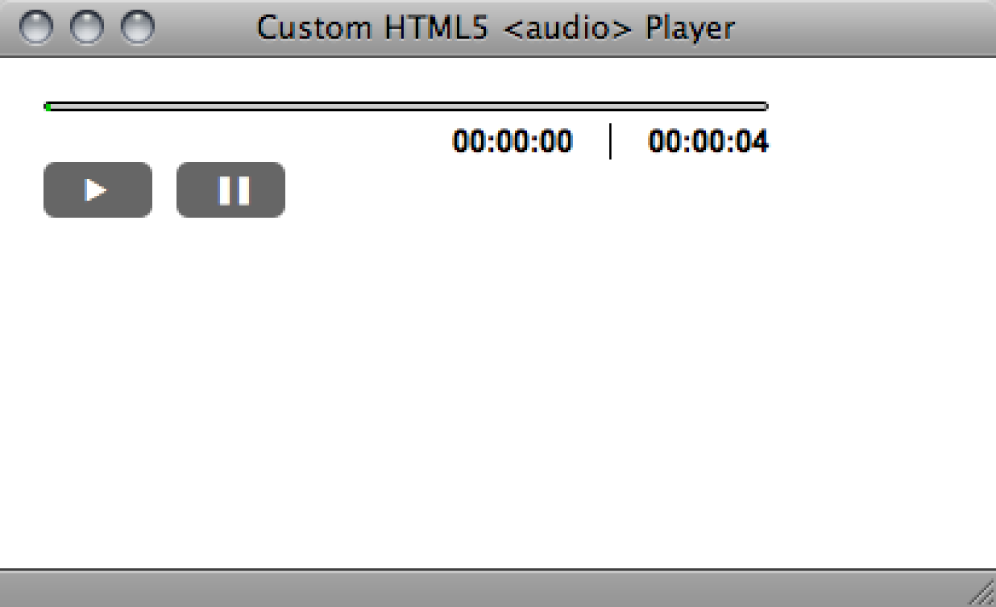
4.5. Sample Design: Custom Audio Player
Solution
In this sample design, we’ll extend the concepts of Recipe 4.2, to create a custom audio
player (see Figure 4-4), rather than
relying on the default controls
attribute.
Define <audio> and player structure
We’ll start with the markup for our HTML5 audio and player controls:
<div id="player">
<audio src="media/audio.mp3"></audio>
<div class="playerControls">
<button id="audioPlay" title="Play"
onclick="playPause();">►</button>
<button id="audioPause" class="hidden" title="Pause"
onclick="playPause();">▐▐</button>
<button id="audioStop" title="Stop" onclick="playStop();">■</button>
<div id="audioSeek">
<div id="audioLoaded"></div>
</div>
<ul id="audioTimes">
<li id="audioElapsed">00:00:00</li>
<li id="audioDuration">00:00:00</li>
</ul>
</div>
</div>For the purposes of simplicity, this example includes only a play/pause toggle, a stop button, and a progress bar.
Note
The choice of the button
element for the player controls is simply a semantic and
accessibility preference, not a requirement.
JavaScript API
Next, we turn to the powerful DOM API to deliver functionality to the player markup.
Note
For a more usable, accessible experience, you can also use
detection (see http://diveintohtml5.info/everything.html) for HTML5
audio. Then, only if it
is supported will the player markup and
audio element be inserted. This
means browsers that don’t support HTML5 audio won’t see a player they can’t use.
Modernizr (see http://modernizr.com) can aid
in this detection.
First, declare the audio
element and player controls, making sure the script appears after
the audio element in the
source:
<script>
    audio = document.getElementsByTagName("audio")[0];
    audioDuration = document.getElementById("audioDuration");
    audioElapsed = document.getElementById("audioElapsed");
    audioPlay = document.getElementById("audioPlay");
    audioPause = document.getElementById("audioPause");
    audioStop = document.getElementById("audioStop");
    audioLoaded = document.getElementById("audioLoaded");
Then determine eventful information about the audio file:
    audio.addEventListener("loadedmetadata", setDuration, false);
    audio.addEventListener("timeupdate", setElapsed, false);
Next, define the functions driving the progress bar:
    function setDuration(event) {
        audioDuration.innerHTML = timeFormatter(audio.duration);
    }

    function setElapsed(event) {
        audioElapsed.innerHTML = timeFormatter(audio.currentTime);
        amountLoaded = (audio.currentTime/audio.duration)*100;
        audioLoaded.style.width = amountLoaded + 'px';
    }
and the function to toggle play and pause:
    function playPause() {
        if (audio.paused){
            audio.play();
            audioPlay.className = 'hidden';
            audioPause.className = '';
        } else {
            audio.pause();
            audioPlay.className = '';
            audioPause.className = 'hidden';
        }
    }
Then define the function for the stop, which is based on Recipe 4.2:
    function playStop() {
        audio.pause();
        audio.currentTime=0;
        audioPlay.className = '';
        audioPause.className = 'hidden';
    }
and the function to format the time for the progress bar:
function timeFormatter(seconds){
function zeroPad(str) {
if (str.length > 2) return str;
for (i=0; i<(2-str.length); i++) {
str = "0" + str;
}
return str;
}
var minute = 60,
hour = minute * 60,
hStr = "",
mStr = "",
sStr = "";
var h = Math.floor(seconds / hour);
hStr = zeroPad(String(h));
var m = Math.floor((seconds - (h * hour)) / minute);
mStr = zeroPad(String(m));
var s = Math.floor((seconds - (h * hour)) - (m * minute));
sStr = zeroPad(String(s));
return (hStr + ":" + mStr + ":" + sStr);
}
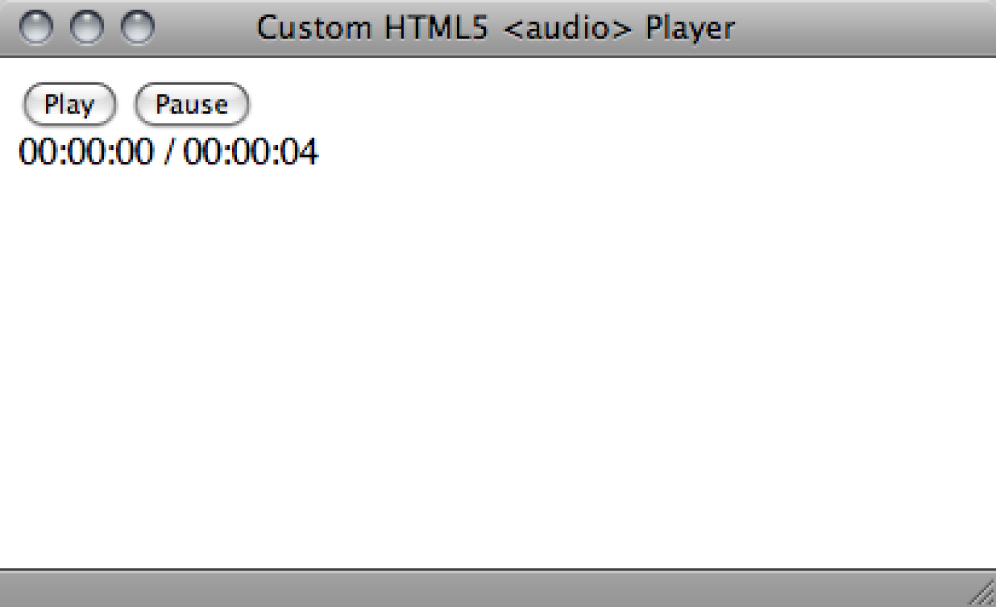
</script>CSS for style
Finally, we’ll style our player so it doesn’t look quite so plain (see
Figure 4-5). We’ll
start with styles for the dimensions of the player and how the buttons should
appear:
#player {
    height: 50px;
    padding: 10px;
    position:relative;
    width: 300px;
}

button {
    background: #666;
    border:1px;
    -moz-border-radius: 5px;
    border-radius: 5px;
    bottom: 10px;
    color: #fff;
    padding: 5px;
    position:absolute;
    width:45px;
}

#audioStop {
    font-size:22px;
    left: 65px;
    line-height: 11px;
}
Then we’ll add styles that help with the play/pause toggle:
#audioPlay.hidden,
#audioPause.hidden { display:none; }

#audioSeek {
    background: #ccc;
    border: 1px solid #000;
    -moz-border-radius: 10px;
    border-radius: 10px;
    display:block;
    height:2px;
}
and styles for the green progress bar:
#audioLoaded {
    background: #0c0;
    border: 1px solid #0c0;
    -moz-border-radius: 10px;
    border-radius: 10px;
    display:block;
    height:1px;
}
And, finally, styles for the time counters:
#audioTimes {
    float:right;
    list-style:none;
    margin: 5px 0 0;
}

#audioTimes li {
    font:bold 13px Arial, Helvetica sans-serif;
    float: left;
}

#audioTimes li:first-child {
    border-right: 1px solid #000;
    margin-right: 15px;
    padding-right: 15px;
}
Discussion
Not into rolling your own? There are a few prebuilt solutions you can consider for customized player controls, including playlist features:
jPlayer jQuery plug-in: http://www.jplayer.org
MooTools HTML5 Audio Player: http://simulacre.org/mootools-html5-audio-player
See Also
The “Creating Your Own Accessible HTML5 Media Player” tutorial at http://terrillthompson.blogspot.com/2010/08/creating-your-own-accessible-html5.html.
Get HTML5 Cookbook now with the O’Reilly learning platform.
O’Reilly members experience books, live events, courses curated by job role, and more from O’Reilly and nearly 200 top publishers.

