The majority of HTML5 media element use focuses on their primary purpose, which is to play media resources. We might use JavaScript to craft new controls or improve the accessibility of the content, and eventually we’ll see what we can do with media controllers and multiple tracks—but we’ll rarely go beyond these core capabilities.
However, some folks have looked beyond the basic boxes of the video and audio
element, and have demonstrated the use of these elements with other
technologies, including SVG (Scalable Vector Graphics) and the
canvas element. In addition, a couple of the browser
companies have expanded the capability of the audio
element so that it can generate sound as well as play it.
In this chapter, I’ll introduce you to some of these advanced experimentation efforts with the HTML5 media elements, and provide some background so that you can give these effects a try on your own.
Note
Most of the material in this chapter has very limited support among browsers. The only browser capable of working with all the examples (at this time) is Firefox. I’ll note browser support with each. Many of the examples are also very CPU-intensive. Use cautiously.
HTML5 not only gave us the media elements, it also formalized the
canvas element. The canvas element was introduced by Apple years
ago, and provided a way for us to draw into an area directly in the web
page. Most browsers supported the element and associated API. However, the
element was standardized in HTML5 and now all of our target browsers
support it.
You can combine the HTML5 media elements with
canvas to create some amazing effects. Mozilla
demonstrated one such effect by showing how the canvas element, combined with HTML5 video, could
be used to replace the plain greenscreen background of a video with the
Firefox logo. Doctor HTML5 demonstrated how to create a grayscale effect
using HTML5 video and canvas. Sebastian Deutsch combined HTML5 audio with
canvas and Twitter for a musical visual treat.
Note
Mozilla’s work with canvas and HTML5 video can be found at https://developer.mozilla.org/En/manipulating_video_using_canvas. You can see the HTML5 Doctor’s work at http://html5doctor.com/video-canvas-magic/. Deutsch’s beautiful work can be found at http://9elements.com/io/?p=153. A follow-up effort that generalized the canvas/audio combination, but without Twitter, can be found at http://nooshu.com/three-js-and-the-audio-data-api-visualisation.
I’m going to emulate the good HTML5 Doctor’s effort by creating a
video filter. First, though, I’m going to go through the steps to just get
the video playing in a canvas element.
To play the video in a canvas, we’ll need to add both the video element and the canvas element to the web page:
   <video id="videoobj" controls width="480" height="270">
      <source src="videofile.mp4" type="video/mp4" />
      <source src="videofile.webm" type="video/webm" />
   </video>
   <canvas id="canvasobj" width="480" height="270"></canvas>
In this example, both the canvas and video elements are the same size, specified in
the width and height attribute for both.
When we work with a canvas, we’re really working with two
different objects: the element and the context. The
canvas element supports more than one
context, but the one we’re more familiar with is the two-dimensional
(2D) context, created as follows:
var canvasObj = document.getElementById("canvasobj");
var ctx = canvasObj.getContext("2d");
To draw the video onto the canvas, we’re going to use the 2D
Canvas API method drawImage. This
method takes whatever is given in the first parameter, and draws it into
the canvas element. There are three versions of the
drawImage method:
drawImage(image, dx, dy); // draw image starting at canvas position dx,dy
drawImage(image, dx, dy, dw, dh); // draw image starting at dx,dz w/dimensions dw,dh

// draw from image given image dimensions to canvas given canvas dimensions
drawImage(image, sx, sy, sw, sh, dx, dy, dw, dh);
The image shown in the methods can be one of three different types of objects:
An
HTMLImageElementobject instance (animgelement)An
HTMLCanvasElementobject instance (anothercanvaselement)An
HTMLVideoElementobject instance (an HTML5videoelement)
We’re only interested in the last method, which takes a video element instance as its first
parameter.
Once we have access to the canvas element’s
context and a reference to the video object, all we need to do to draw a
single frame of a video object into the context (beginning at the
left/top of the canvas element) is add the following
JavaScript:
var videoObj = document.getElementById("videoobj");
ctx.drawImage(videoObj, 0,0);
The drawImage method isn’t a
live method, which means we have to call it every
time was want to draw a video frame into the canvas. My first
inclination is to use the video object’s timeupdate event handler function to invoke
the drawing action. After all, the custom control application in Chapter had success using the timeupdate event handler to manage the
playback indicator.
Incorporating the new event handler results in the application shown in Example 4-1.
Example 4-1. A first cut at drawing video data to a canvas element
<!DOCTYPE html>
<head>
<title>Grayscale a Video</title>
<meta charset="utf-8" />
<script>
window.onload=function() {
document.getElementById("videoobj").
addEventListener("timeupdate", drawVideo, false);
}
function drawVideo() {
var videoObj = document.getElementById("videoobj");
var canvasObj = document.getElementById("canvasobj");
var ctx = canvasObj.getContext("2d");
ctx.drawImage(videoObj,0,0);
}
</script>
</head>
<body>
<video id="videoobj" controls width="480" height="270">
<source src="videofile.mp4" type="video/mp4" />
<source src="videofile.webm" type="video/webm" />
</video>
<canvas id="canvasobj" width="480" height="270"></canvas>
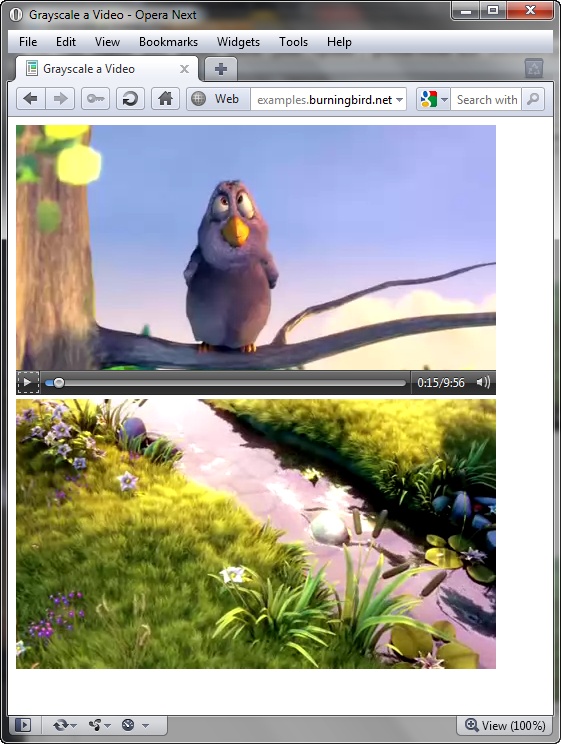
</body>The application works in IE10, Firefox, Opera, and WebKit Nightly,
but not Chrome (not even Canary), or Safari 5. However, in the browsers
where the application worked, the drawing action in the
canvas element was choppy, and lagged noticeably
behind the video, as shown in Opera in Figure 4-1.
One of the problems with timeupdate is that it didn’t fire quickly
enough. Searching about through online documentation, I found that
Firefox fires the timeupdate event
every 250 milliseconds, and I am assuming the other browsers do
something similar. Untold frames have flipped past in such a long
time!
Though timeupdate was
sufficient for our playback indicator, it isn’t sufficient for video
playback. A better approach, and one that was taken in the HTML5 Doctor
article, is to use the JavaScript function setTimeout, and a time frame of 20
milliseconds—over ten times faster than using timeupdate.
The script block in Example 4-1 is modified to now use
setTimeout, as shown in Example 4-2. Since
we’re no longer using an event that’s playback-related, we also have to
know when to stop drawing. The code tests to ensure that the video isn’t
paused or finished, first, before doing the draw.
Example 4-2. Updating the video/canvas application to improve performance
   <script>
      window.onload=function() {
         document.getElementById("videoobj").
                 addEventListener("play", drawVideo, false);
      }
      function drawVideo() {
        var videoObj = document.getElementById("videoobj");

        // if not playing, quit
        if (videoObj.paused || videoObj.ended) return false;

        // draw video on canvas
        var canvasObj = document.getElementById("canvasobj");
        var ctx = canvasObj.getContext("2d");
        ctx.drawImage(videoObj,0,0,480,270);
        setTimeout(drawVideo,20);
      }
   </script>
When we run the application with Firefox, Opera, IE10, and Webkit Nightly, we get a nice, smooth integration between the video play and the canvas drawing actions. Now we’re ready to add in the filter functionality.
To modify the presentation of the video data in the
canvas element, we’re actually going to need to
create a new canvas element as a
scratch, or temporary working object, place the
original video data into it, apply the filter, and then access the data
from the scratch canvas object and use it to update the displayed canvas
object. Yes, it seems like a lot of work, but it’s necessary. We can
modify canvas data, but we can’t directly modify video data. And we
don’t want to use our display canvas
element to perform all our manipulation.
Warning
Security protocols currently prohibit accessing the canvas data if the image used (regardless of whether it’s video or a still image) is accessed from a domain other than the one serving the web page with the canvas application.
The filter function we’re using is one that’s also been used with
still images and the canvas element. It’s basically a
desaturation of the color to create a grayscale effect. I modified a
filter for still images I found at the HTML5 Rocks web site. It’s very
similar to the same filter used in the HTML5 Doctor article:
      function grayScale(pixels) {
         var d = pixels.data;
         for (var i=0; i<d.length; i+=4) {
            var r = d[i];
            var g = d[i+1];
            var b = d[i+2];
            var v = 0.2126*r + 0.7152*g + 0.0722*b;
            d[i] = d[i+1] = d[i+2] = v
          }
        return pixels;
      }
The canvas pixel data is sent to the filter, which does the grayscale conversion and then returns the data. Example 4-3 shows the script block incorporating the new filter.
Example 4-3. Using a scratch canvas to create a grayscale of the video
<script>
// grayscale filter
function grayScale(pixels) {
var d = pixels.data;
for (var i=0; i<d.length; i+=4) {
var r = d[i];
var g = d[i+1];
var b = d[i+2];
var v = 0.2126*r + 0.7152*g + 0.0722*b;
d[i] = d[i+1] = d[i+2] = v
}
return pixels;
}
// event listeners
window.onload=function() {
document.getElementById("videoobj").
addEventListener("play", drawVideo, false);
}
// draw the video
function drawVideo() {
var videoObj = document.getElementById("videoobj");
// if not playing, quit
if (videoObj.paused || videoObj.ended) return false;
// create scratch canvas
var canvasObj = document.getElementById("canvasobj");
var bc = document.createElement("canvas");
bc.width=480;
bc.height=270;
// get contexts for scratch and display canvases
var ctx = canvasObj.getContext("2d");
var ctx2 = bc.getContext("2d");
// draw video on scratch and get its data
ctx2.drawImage(videoObj, 0, 0, 480, 270);
var pData = ctx2.getImageData(0,0,480,270);
// grayscale it and set to display canvas
pData = grayScale(pData);
ctx.putImageData(pData,0,0);
setTimeout(drawVideo,20);
}
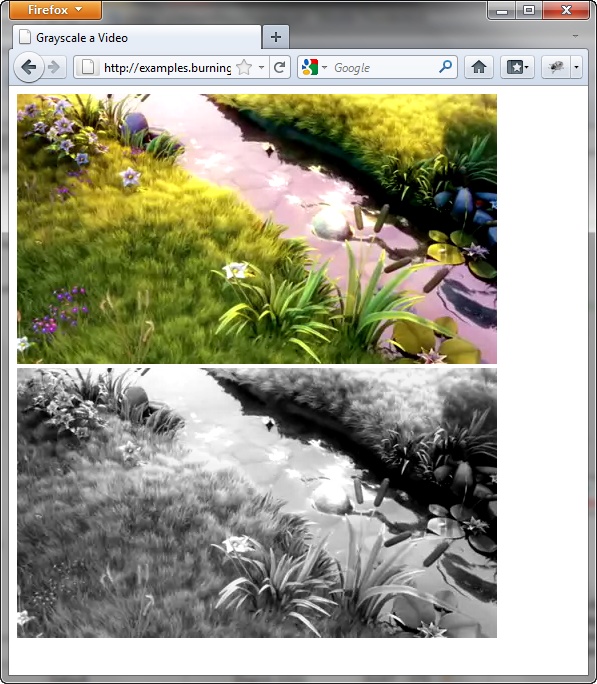
</script>Figure 4-2 shows the grayscale filter in action in Webkit Nightly. The grayscale effect also works with IE10, Firefox, and Opera.
The HTML5 Rocks site had some other interesting filters to apply against the video element (if you have the CPU for the task). One in particular, though, struck me as quite useful and a good justification for the use of such a filter: being able to increase or decrease the brightness of the video.
I created a global variable, brightness, used to track the current video’s
brightness setting. I also added two new buttons to the web page: one to
decrease the brightness level of the video, and one to increase
it.
Next, I added a new filter function, adjBrightness, that takes pixel data and an
adjustment indicator to increase or decrease the brightness of the
video:
      function adjBrightness(pixels, adjustment) {
         var d = pixels.data;
         for (var i=0; i<d.length; i+=4) {
            d[i] += adjustment;
            d[i+1] += adjustment;
            d[i+2] += adjustment;
         }
         return pixels;
      }
I also added event listeners to the button elements’ click events. In the click event handler functions, the code
increases or decreases the brightness variable accordingly. Example 4-4 contains the
complete web page.
Example 4-4. Video playback in canvas with brightness controls
<!DOCTYPE html>
<head>
<title>Adjust Video Brightness</title>
   <meta charset="utf-8" />
   <style>
      #backcanvas { display: none; }
   </style>
   <script>

      var brightness = 0;

      // adjust brightness
      function adjBrightness(pixels, adjustment) {
         var d = pixels.data;
         for (var i=0; i<d.length; i+=4) {
            d[i] += adjustment;
            d[i+1] += adjustment;
            d[i+2] += adjustment;
         }
         return pixels;
      }
      window.onload=function() {
         document.getElementById("videoobj").
                 addEventListener("play", drawVideo, false);

         // brighten video
         document.getElementById("increase").
                 addEventListener("click",function() {
                    brightness+=5;
                    },false);

         // darken video
         document.getElementById("decrease").
                 addEventListener("click",function() {
                    brightness-=5;
                    },false);
      }
      function drawVideo() {
        var videoObj = document.getElementById("videoobj");

        // if not playing, quit
        if (videoObj.paused || videoObj.ended) return false;

        // access draw canvas, create scratch canvas
        var canvasObj = document.getElementById("canvasobj");
        var bc = document.createElement("canvas");
        bc.width=480;
        bc.height=270;

        // get context for both canvas objects
        var ctx = canvasObj.getContext("2d");
        var ctx2 = bc.getContext("2d");

        // draw video on scratch canvas obj, get data
        ctx2.drawImage(videoObj, 0, 0);
        var pData = ctx2.getImageData(0,0,480,270);

        // adjust brightness and set to display canvas
        pData = adjBrightness(pData, brightness);
        ctx.putImageData(pData,0,0);

        setTimeout(drawVideo,20);
      }

   </script>
</head>
<body>
   <video id="videoobj" controls width="480" height="270">
      <source src="videofile.mp4" type="video/mp4" />
      <source src="videofile.webm" type="video/webm" />
   </video>
   <canvas id="canvasobj" width="480" height="270"></canvas>
<div>
<button id="increase">Increase brightness</button>
<button id="decrease">Decrease brightness</button>
</body>
The use of the brightness filter works with Firefox, Webkit Nightly, and IE10. You can adjust the filter in Opera but you get truly bizarre results if you do.
To incorporate this functionality as part of your custom control,
hide the video and display the canvas element,
instead. Figure 4-3
shows the brightness filter in action. The top picture is from the
video, and the bottom picture is the brightness-adjusted canvas. I
actually think the brightness-adjusted canvas is an improvement. Also
notice in the image a slight lag in the video playback, even with our
improved event handling.

Note
Access the different canvas image filters at HTML5 Rocks at http://www.html5rocks.com/en/tutorials/canvas/imagefilters/.
Get HTML5 Media now with the O’Reilly learning platform.
O’Reilly members experience books, live events, courses curated by job role, and more from O’Reilly and nearly 200 top publishers.

