You don’t have to log in to browse the store—only when you want to buy music or audiobooks. And music is everywhere you turn in the iTunes Music Store. Click any album cover or text link to zoom right to it. The upper left corner area of the Music Store home page offers a pop-up menu to jump straight to the Genres you want.
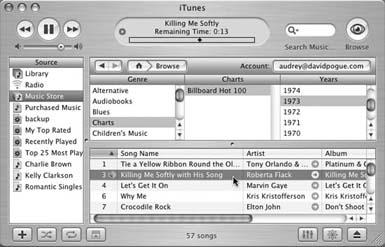
You can also use the Power Search tool, shown at top in Figure 4-3, to zero in on a specific song, artist, album, genre, or composer—or just peruse the text-based lists, as shown in Figure 4-3 at bottom.
When you find a performer you’re interested in, click the name to see a list of songs or albums on hand for purchase. If you click an album name, all of the songs available from it appear below in the Details window. Double-click a track to hear a 30-second snippet of it to see how it suits you, or to make sure that’s really the song you were thinking of, before buying it.
You navigate the iTunes Music Store aisles just like a Web browser. Most song and artist names are hyperlinked—that is, you can click their names, or album cover images, to see what tracks are included.
Click the Back button in the Store window to go back to the page you were just on, or click the button with the small house on it to return to the Music Store home page.
Tip
When browsing the store, you may see a small, gray, circular icon bearing a white arrow in some columns of the Details window. That’s the “More Info this way!” button. Click it to jump to a page bearing details about the subject, like a discography page next to a singer’s name in the Artist column, or to the main page of artists for the genre listed.
The main iTunes Music Store page also displays links to new releases, exclusive songs that can be purchased only from the Music Store, Apple staff favorites, songs scheduled to become available in the near future, sneak peeks at unreleased tunes, and the Billboard Top 100 charts going back to 1946.
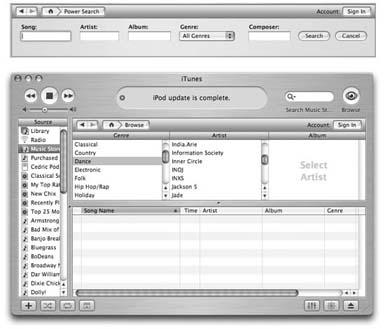
Figure 4-3. Top: Click the Power Search link on the Music Store’s home page to do some serious sleuthing for specific songs.Bottom: One click leads to another when browsing the iTunes Music Store. Click Browse, then pick a Genre and then click an Artist on the next list to see the albums available by that musician or group. Once you have settled on a genre, the store unfurls a list of all the artists in that category.
Just as you can modify the look and information displayed for your own music library in iTunes, you can customize your columns in the iTunes Music Store. See Figure 4-4 for an example of how to modify which columns of detail information to display.
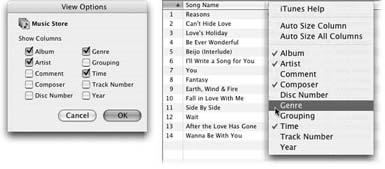
Figure 4-4. Left: When the Browser is open, choose Edit → View Options to specify which columns of information appear.Right: Or just right-click (Control-click) any column heading to produce this secret pop-up menu of available columns.
Remember, too, that you can drag column headings (like Time, Artist, or Price) horizontally to rearrange them, or drag the divider lines between them to adjust the column widths.
Making a purchase is as easy as clicking the Buy Song button next to a song (Figure 4-5).
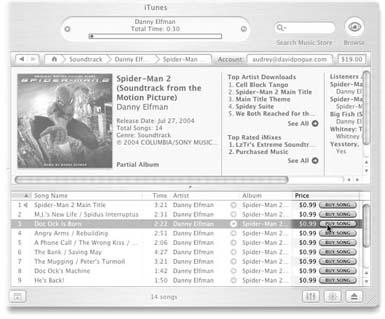
Figure 4-5. When you download an album, or even just one song from an album, you get music files in the AAC format. A color picture of the album cover is attached to the song file, which you can display in the artwork pane of the iTunes program window when you’re playing that song.
The songs for sale in the iTunes Music Store cost 99 cents each. Most albums cost $10 to $14, which is quite a bit cheaper than the $17 or so you’d pay to buy the same album on CD. Plus, you don’t have to worry about finding a parking space at the mall.
Tip
Many musicians in the Featured Artists area also have a free video that you can watch right in iTunes. Depending on your connection speed, it may take a few minutes for the video to download. Unfortunately, iTunes stops playing other songs, so that it can concentrate on snagging the clip. You’re forced to download in silence.
The solution: Double-click it in the Source list to open it in a separate window. Now the iTunes tunes can keep spinning away in the background, giving you something to listen to as the video download proceeds.
Once you click that Buy Song button, the iTunes Music Store comes to your service. Now you see an “Are you sure?” alert box. Click the glowing Buy button to confirm your purchase decision, or Cancel if you suddenly remember that your credit card is a bit close to the edge this month. (You can also turn on “Don’t warn me about buying songs” if you feel that there’s quite enough nagging in your life already.)
An iMix is a playlist that you publish on the Music Store, so everyone on earth can see your masterwork. You can name it, write your own liner notes explaining your mixing inspiration, and put it out there for everyone to see (Figure 4-6).
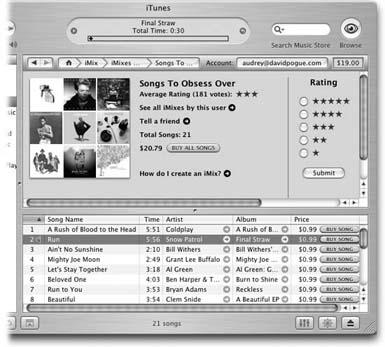
Figure 4-6. Here’s a typical iMix in the iTunes Music Store, posted by someone who listens to the same songs over and over again. If you like someone’s mixing skills, you can give the collection a 5-star rating, tell your friends about it, or even buy all the songs on the list.
Start by signing into your Music Store account. Then, in the iTunes Source list, select the playlist you want to publish. (If it contains any songs that Apple doesn’t sell, they’ll get knocked off the list—which may ruin your carefully constructed mix.)
When you click the playlist, a gray arrow appears next to its title. Click the arrow to begin the publishing process (or choose File → Publish Playlist to Music Store). In the warning box, click Publish (and turn on “Do not show this message again” if you’re sick of naggy little alerts in your face).
On the next screen, name your iMix and add your thoughts on making it.
Finally, in the iMix window, click Publish. Now other people can see your playlist, rate it, be inspired by it, or—and let’s face it, here’s the main thing—buy the songs for themselves.
To tell all your pals about your brand new iMix, click the Tell a Friend button on your new iMix page. iTunes sends a virtual birth announcement by email, complete with album-cover art.
Tip
Want to e-mail a friend a direct link to your brand new iMix, or anybody else’s? Control-click the playlist’s icon on the iMix page and, from the shortcut menu, choose “Copy iTunes Music Store URL.” Next, create a new message in your e-mail program and paste in the link you just copied.
GEM IN THE ROUGHCharting History
Quick! What was the Number One song during your senior year in high school? What tunes were topping the music charts during your college years? If you’ve ever paid attention to any sort of a Top Ten list, odds are you were looking at a Billboard chart.
Billboard, something of an industry bible among music professionals, is a weekly magazine that’s been tabulating and reporting lists of the popular songs and albums for over 50 years. These days, the company now uses high-tech methods to chart the hits in several music categories. SoundScan, for example, is a computerized system that tracks retail music sales. The tabulators also keep a close ear on what songs are spilling out of radio stations around the country. All these numbers get crunched together into a formula that’s part of the Billboard chart recipe.
In addition to all the other ways to find and buy your favorite songs, the iTunes Music Store lets you riffle through the Billboard top 100 charts going all the way back to 1946. (Missing entries in the song list—like the top three songs for 1968—reflect songs that iTunes doesn’t have for sale, usually because the record companies or the bands haven’t given permission for online sale yet.)
To see the charts, click the Charts link at the left side of the main page. Glancing at an old Billboard chart can serve as a sonic snap shot of a particular musical era: You see the songs listed, and you’re instantly transformed back to the time when you heard them first (if, that is, you were even alive then).
Check out charts from the early Sixties, and you learn just how hip the girl-group sound was. Go back a few years further, and you discover the hip-shaking Reign of Elvis. Jump forward several decades, and you see hip hop transforming the cultural airwaves.
Apple will send you an e-mail message congratulating you on your successful iMixing along with a link for your iMix. The Store keeps iMixes on its site for a year.
Gift certificates make perfect presents for People Who Have Everything, especially when purchased by People Who Are Lousy Shoppers. These redeemable email coupons are also an excellent way to save face in potentially unpleasant situations (“Honey, you may think I forgot our anniversary again, but…check your email!”).
With iTunes Music Store gift certificates, available both from the iTunes store or from Apple’s Web site, you can send your friends and family $10 to $200 worth of credit to go hog-wild in Apple’s music emporium.
To buy one, click Gift Certificates on the main page of the iTunes Music Store. After you choose delivery by either email or U.S. Mail, the process is like buying anything on the Web: You fill in your address, gift amount, personalized message, and so on.
If you already have an Apple ID, you can log in and request to have your credit card billed; if not, sign up for one. Once you complete all the pixel paperwork, your gift certificate will be on its way.
Tip
Before sending off a gift certificate, discreetly check whether your recipient’s computer meets the iTunes 4 requirements. People on Windows 98, Windows Me, and older operating systems may be in for an even bigger pang of disappointment than if you gave them a box of cheap tube socks.
Whether they come in the mailbox by the front door or the one on the computer, iTunes Music Store gift certificates are meant to be spent. Here’s how they work:
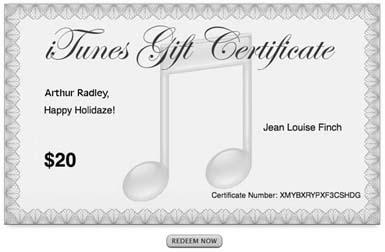
Figure 4-7. Receiving and redeeming an iTunes Music Store gift certificate is as easy as opening your email and clicking Redeem Now to add the gift credits to your account. You can also send paper gift certificates through the U.S. mail.
If you’re lucky enough to be the recipient of an iTunes email gift certificate (Figure 4-7), redemption is just a click away. The Redeem Now button at the bottom of the message takes you straight to the Music Store, where the certificate’s confirmation number pops up automatically. Click Redeem in the Music Store window to credit your account and start shopping.
If the gift arrived by postal mail, start up iTunes and click Music Store in the Source list. On the main Music Store page, click the link for Gift Certificates. On the next screen, click Redeem Now. Type in the confirmation number printed on the lower edge of the gift certificate and click Redeem.
If you already have an iTunes Music Store account, log in and start shopping. If you’ve never set your mouse pointer inside the store before, you’ll need to create an Apple Account. You have to provide your name and address, but you don’t have to surrender a credit card number. If you choose None, you can use your gift certificate as the sole payment method—and end your shopping experience once you’ve burned through it.
Allowance accounts are a lot like iTunes store gift certificates. You, the parent (or other financial authority), decide how many dollars’ worth of music or audiobooks you want to give to a family member or friend (from $10 to $200, in increments of $10). Unlike gift certificates, however, allowance accounts automatically replenish themselves on the first day of each month—an excellent way to keep your music-loving kids out of your wallet while teaching the little nippers how to budget their money throughout the month.
Both you and the recipient need to have Apple IDs. To set up a monthly allowance, click the Allowance link on the main page of the iTunes Music Store and fill out the form on the next screen. After you select the amount of credit you want to deposit each month, fill in your recipient’s Apple ID and password. (There’s also an option to create a new account for the monthly allowance.)
Once the giftee logs into the designated Apple Account, the spending can begin—no credit card required. Once the allowance amount has been spent, that’s it for music until the following month. (Of course, if the recipient does have a credit card on file, he can always put the difference on the card.) If you need to cancel an allowance account, go to your Account Info page (page 70) to take care of the matter.
If your computer crashes or you get knocked offline while you’re downloading your song purchases, iTunes is designed to pick up where it left off after you restart the program and reconnect to the Internet. If for some reason it doesn’t go back to downloading, choose Advanced → Check for Purchased Music to log back into the Music Store to resume your downloading business.
If other people have access to your computer when you’re not around, consider wrapping up your shopping session by clicking your name (next to the Account button on the Music Store window) and then Sign Out. Unless you’re one of those exceedingly benevolent types, you probably don’t want anyone else to come along and charge up your credit card with a music-buying marathon.
You can find your new tracks by clicking Purchased Music in the iTunes Source list (Figure 4-8). As the dialog box says, you can work with the Purchased Music playlist as though it were any other playlist. That is, even if you delete a track from it, the song itself still remains in the iTunes music library. And behind the scenes, the corresponding music file stays in your Home → Music → iTunes → iTunes Music folder.
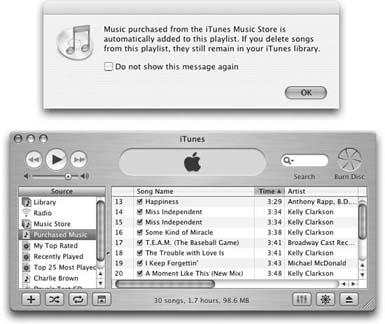
Figure 4-8. When you click the Purchased Music playlist after buying music, iTunes offers an explanation of how the playlist works (top) and fills out your list with the newly bought songs (bottom). From here, you can play the songs, drag them into other playlists, transfer them to your iPod, or burn them to a CD to play on the stereo.
Get iLife '04: The Missing Manual now with the O’Reilly learning platform.
O’Reilly members experience books, live events, courses curated by job role, and more from O’Reilly and nearly 200 top publishers.

