At its best, Apple has always focused on one particular mission: identifying powerful but complex technologies and distilling them into far simpler packages. You shouldn’t have to be a professional working for a media conglomerate, says Apple, to harness cutting-edge technology for your own creative expression and entertainment.
That’s the philosophy behind the iLife ’04 software suite. Each of the five programs in this $50 package is a streamlined, attractive, easy-to-use version of software that was once hopelessly complex (or hopelessly expensive).
Each of the five programs is designed to serve as the digital hub for a different kind of artistic expression:
iTunes, for managing, playing, buying, and sharing digital music.
iPhoto, for downloading photos from your digital camera, and organizing, sharing, and printing them.
iMovie, for editing footage from a digital camcorder, adding effects, sound, and credits, and then presenting the result.
GarageBand, for composing and recording terrific-sounding songs of your own.
iDVD, for burning DVDs containing the movies, music, and photos from iTunes, iPhoto, iMovie, and GarageBand. Professional DVDs in every way—except you get to make them yourself!
Technically speaking, you can perform all of the same tasks using other software brands and other kinds of computers. But not as easily, not as consistently, not as pleasurably, and certainly not for a grand total of $50 (or free with a new Mac).
Leaning the five programs of iLife isn’t really as difficult as learning, say, five Windows programs, because Apple has designed these programs to work alike—and to work together.
Now, as Figure I-1 illustrates, the integration of the five iLife programs isn’t quite as fluid as popular mythology would have it. You can’t move information from any program into any other; you can move it only in directions that make sense.
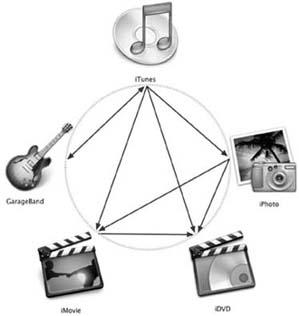
Figure 1. You can’t move photos into GarageBand or movies into iPhoto. But as the black arrows show, you can move iTunes music into any other iLife program, or material from any other iLife program into iDVD. (That’s right: There’s no arrow from GarageBand into iDVD, but you can get your GarageBand pieces there via iTunes.)
The real payoff of adopting Apple’s version of all five programs is that you save so much time learning them. Over and over again, Apple reuses the same elements: a color picker, a spell-checker, and so on. Learn once, use often.
Here are some of the most important iLife software conventions. You’ll see these controls and windows in many different circumstances, no matter which program you’re using at the time.
Three of the iLife programs—iMovie, iDVD, and iPhoto—come with a window into your iTunes music collection. (To see it in iMovie, click the Audio button. In iPhoto, click the Slideshow button. In iDVD, open the Customize panel, click the Media button, and choose iTunes from the pop-up menu.) Having direct access to your music files saves you a lot of hunting around on your hard drive when you want to use this or that song as the background music for a DVD, movie, or slideshow.
You can see the basic mini-iTunes window in Figure I-2.
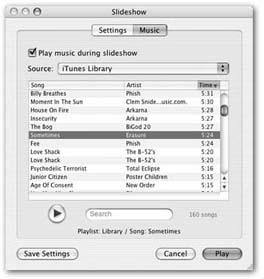
Figure 2. In general, the mini-iTunes window found in iMovie, iPhoto, and iDVD works a lot like the list of songs in the real iTunes. For example you can double-click a song to listen to it (or click once and then click the triangular Play button). Click the same button—now shaped like a square Stop button—when you’ve heard enough.Note that above the list, the pop-up menu lists all of your iTunes playlists (subsets of songs), for your browsing convenience.
Other tips:
Rather than scroll through a huge list, you can locate the tracks you want by using the capsule-shaped Search box near the bottom of the window. Click in the Search field, and then type a word (or part of a word) to filter your list. iPhoto searches the Artist, Song, and Album fields of the iTunes Library and displays only the matching entries. To clear the search and view your whole list again, click the X in the Search field.
Click one of the three headers—Artist, Song, or Time—to sort the iTunes music list alphabetically by that criterion.
You can also change the arrangement of the three columns by grabbing the headers and dragging them into a different order.
Better yet, if you place your cursor carefully on the vertical dividing line between the column headings, you’ll find that you can drag it sideways to change the relative sizes of the columns. That’s especially handy when all you can see of the Artist is, for example, Elect…estra.
You can use Mac OS X’s built-in spelling checker to proofread your prose in all kinds of useful places. You can check iPhoto’s text boxes (for the coffee-table books that you order), iMovie’s titles and credits, and iDVD’s onscreen text boxes.
As in a word processor, you can ask the Mac to check your spelling several ways:
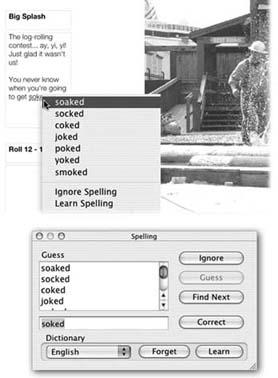
Figure 3. Top: Control-click any word that’s underlined with a red, dashed line. If the resulting shortcut menu contains the correct spelling, choose it. Otherwise, choose Ignore or Add (to teach Mac OS X that word for future spell checks).Bottom: If you prefer a more word processor–like spelling check, you can summon this box.The first “misspelled” word already appears. If the correct version appears in the list, double-click it (or single-click it and then click Correct). If not, type the correct word into the box below the list and then click Correct.On the other hand, if the word in your text box is fine as it is, click either Ignore (“I want this word spelled this way; stop underlining it and move on”) or Add (“Not only is this name or word spelled correctly, but I may use it again. Add it to your dictionary so you’ll never flag it again”).
Check a single word or selection. Highlight a word, or several, and then choose Edit → Spelling → Check Spelling (
-semicolon). If the word is misspelled in iPhoto’s opinion, a red, dashed line appears under the word. Proceed as shown in Figure I-3.
Check a whole text block. Click inside a title or comment box and then choose Edit → Spelling → Spelling (
-colon). The standard Mac OS X Spelling dialog box appears, also shown and described in Figure I-3.
Check as you type. The trouble with the spelling commands described here is that they operate on only a single, tiny text block at a time. To check your entire photo book, you must click inside each title or caption and invoke the spelling command again. There’s no way to have iPhoto sweep through your entire book at once.
Your eyes might widen in excitement, therefore, when you spot the Edit → Spelling → Check Spelling As You Type command. You’d expect it to make the Mac flag words it doesn’t recognize as you type them. Sure enough, when this option is turned on, whenever you type a word not in the Mac’s dictionary, a colorful dashed underline appears. To correct a misspelling, Control-click it. A shortcut menu appears. Proceed as shown in Figure I-3.
But don’t get too excited: This option turns itself off every time you click into a new text box. Using the mouse (there’s no keyboard shortcut), you have to turn it on again for every title and caption. The regular Check Spelling command looks positively effortless by comparison.
Here and there—in iMovie’s Title generator and iPhoto’s Web-page design dialog box, for example—Mac OS X offers you the opportunity to choose a color for the text, background, and so on.
The dialog box that appears (Figure I-4) offers a miniature color lab that lets you dial in any color in the Mac’s rainbow. There are actually several color labs, arrayed across the top, each designed to make color-choosing easier in certain circumstances:
Color Wheel. Drag the scroll bar vertically to adjust the brightness, and then drag your cursor around the ball to pick the shade.
Color Sliders. From the pop-up menu, choose the color-mixing method you prefer. CMYK stands for cyan, magenta, yellow, and black. People in the printing industry will feel immediately at home, because these four colors are the component inks for color printing. (These people may also be able to explain why K stands for black.)
RGB is how a TV or computer monitor thinks of colors: as proportions of red, green, and blue. And HSB stands for Hue, Saturation, and Brightness—a favorite color-specifying scheme in scientific circles.
In each case, just drag the sliders to mix up the color you want, or type in the percentages of each component.
Color Palettes presents canned sets of color swatches. They’re primarily for programmers who want quick access to the standard colors in Mac OS X. (The Web Safe Colors list is useful for Web designers, so they can tell whether a color will display properly on other computers.)
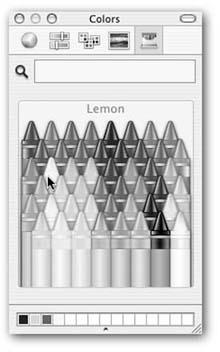
Figure 4. You can store frequently used (or frequently admired) colors in the mini-palette squares at the bottom of the Colors box. To do that, drag the big rectangular color swatch (next to the magnifying glass) directly down into one of the little squares, where it will stay fresh for weeks.If you don’t have space for all the colors you want, drag down the small circular dot at the bottom of the window to make room for more.
Image Palettes offers the visible rainbow arrayed yet another way: in cloudy, color-arranged streaks. (Cool tip: If you drag a graphics file directly into the dialog box, it will appear in the spectrum’s place. That’s a handy trick if you’re trying to identify the color of a certain spot of an image, for example. And don’t miss the pop-up button at the bottom of the dialog box, which offers a few other stunts).
Crayons. Now this is a good user interface. You can click each crayon to see its color name: “Mocha,” “Fern,” “Cayenne,” and so on. (Some interior decorator in Cupertino had a field day naming these crayons.)
In any of these color pickers, you can also “sample” a color that’s outside the dialog box—a color you found on a Web page, for example. Just click the magnifying-glass icon and then move your cursor around the screen. You’ll see the sliders and numbers change inside the dialog box automatically when you click.
Just about every Mac program has a Preferences command tucked into its application menu (the menu named after the program, like iPhoto or iMovie). What’s nice about the iLife suite, though, is that its keystroke is the same in every program:
-comma.
It’s also nice that the resulting dialog box is a separate window that you can leave open as you work (you don’t have to close it after making a selection). When you’re finally finished with the Preferences dialog box, just click its upper-left, red Close button (or press
-W).
Get iLife '04: The Missing Manual now with the O’Reilly learning platform.
O’Reilly members experience books, live events, courses curated by job role, and more from O’Reilly and nearly 200 top publishers.

