Chapter 13. Exporting to iPod, iPhone, iPad, Apple TV, or Front Row
If you hadn’t noticed, Apple thinks that the traditional destinations for your home movies—like sending your movie to a DVD or recording it back to tape—are ancient history. What Apple really wants you to do with your video is post it on the Web (see Chapter 14) or transfer it to another Apple machine, like an iPod, iPhone, iPad, Apple TV, or Front Row (to play on your Mac from across the room).
That’s what this chapter is all about: sending your finished masterpiece to another fine piece of Apple merchandise.
Exporting the Movie to iTunes
As it turns out, the steps for exporting a movie to Apple’s five video-playing machines (iPod, iPhone, iPad, AppleTV, and Front Row) are nearly identical. All of them involve exporting the movie to iTunes, which is the loading dock for your gadgets and Front Row. The only difference is the size of the movie you create.
So, for the sake of saving the Brazilian rainforest, the instructions appear here only once, with the necessary variations pointed out along the way:
When your project is ready for prime time, choose Share→iTunes.
The “Publish your project to iTunes” dialog box appears (Figure 13-1). You’ve probably never seen a dialog box quite like this one.
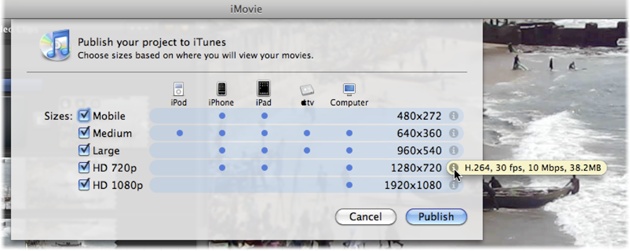 Figure 13-1. This unusual-looking dialog box is just Apple’s way of offering you some ready-made compression settings for typical ...
Get iMovie '11 & iDVD: The Missing Manual now with the O’Reilly learning platform.
O’Reilly members experience books, live events, courses curated by job role, and more from O’Reilly and nearly 200 top publishers.

