Chapter 1. Working with Objects
1.0. Introduction
Objective-C, the language in which you program the iOS SDK, is an object-oriented programming language. We create, use, work with, and extend objects; we construct them, customize them to our specific needs, and destroy them when they are no longer needed. Object-oriented programming languages also work with primary data types such as integers, strings, and enumerations. However, the distinctive feature of such languages is their ability to create and manage the lifetime of objects during execution.
Objects are defined in classes, and therefore these two terms are commonly used interchangeably. But actually, a class is just a specification for defining objects; each object is said to be an instance of its class. Each class—and therefore the objects that are created from that class—is a set of properties, tasks and methods, enumerations, and much more. In an object-oriented programming language, objects can inherit from each other much like a person can inherit certain traits and characteristics from his parents.
Note
Objective-C does not allow multiple inheritance. Therefore, every object is the direct descendant of, at most, one other object.
The root class of most Objective-C objects is the NSObject class. This class manages the runtime capabilities offered by iOS;
as a result, any class that directly or indirectly inherits from NSObject will inherit these capabilities as well. As we will see later in this
chapter, objects that inherit from NSObject can take advantage of Objective-C’s
distinguished memory management model.
1.1. Implementing and Using Custom Objects
Problem
You want to create a unique Objective-C class because none of the classes in the frameworks shipped with the iOS SDK offers the methods and properties you need.
Solution
Follow these steps:
In Xcode, while your project is open, choose the group (on the lefthand side of the screen) where you would like to create a new Objective-C class. This is normally the Classes group.
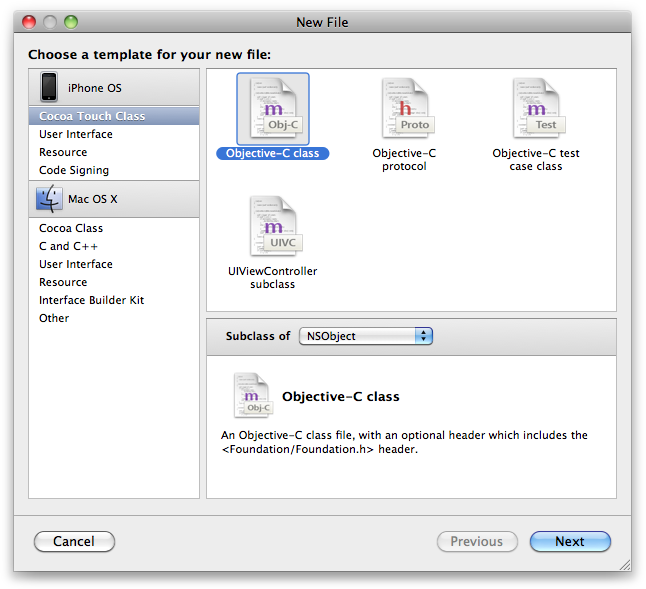
Select File→New File in Xcode. You will be presented with a dialog similar to that shown in Figure 1-1.
In the New File dialog, make sure Cocoa Touch Class is chosen on the lefthand side of the screen. Choose the Objective-C Class item on the righthand side of the New File dialog, and make sure
NSObjectis selected in the “Subclass of” drop-down menu. Click Next, as shown in Figure 1-1.Choose the name of the new class you are about to create and where it has to be stored. Make sure you enter
MyObject.min the File Name box and that the “Also create ‘MyObject.h’” checkbox is checked, as shown in Figure 1-2. In this dialog, you can also manage which project target your new class file will be added to.Click Finish in the New File dialog.
Discussion
If you take a close look at the New File dialog, you will notice that it is divided into two major sections. The section on the left is where you can browse various templates based on their categories, and the section on the right is where you can find the different types of files you can create in the selected category. For instance, by choosing the Cocoa Touch Class category, you will be able to create a new Objective-C class. The bottom-right pane of this dialog is where you can choose other options, if available, such as the superclass of the object you are creating. Not all templates have extra options.
When creating a new Objective-C class, Xcode will ask for the name you would like to assign to both the class and the object, as shown in Figure 1-2. You will also need to specify which target you would like to add your class to. By default, your current target is selected, so you will not need to change any further settings.
After you click Finish, Xcode will create the new class in the currently selected location in the project hierarchy:
#import <Foundation/Foundation.h>


@interface MyObject : NSObject {

}

@end
As you can see, the MyObject
object inside the MyObject class file
inherits from NSObject. Now you can import this class
into your other class files and instantiate an object of type MyObject:
#import "ObjectsAppDelegate.h"
#import "MyObject.h"

@implementation ObjectsAppDelegate

@synthesize window;

- (BOOL)            application:(UIApplication *)application
  didFinishLaunchingWithOptions:(NSDictionary *)launchOptions {

  MyObject *someObject = [[MyObject alloc] init];
  /* Do something with the object, call some methods, etc. */
  [someObject release];

  [window makeKeyAndVisible];

  return YES;
}

- (void)dealloc {
  [window release];
  [super dealloc];
}

@end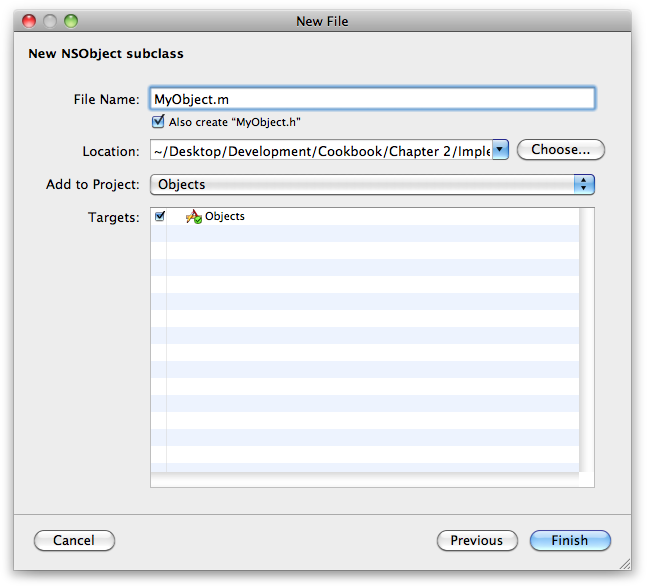
I am a big supporter of writing reusable code. In other words, I try to avoid writing the same line of code twice, if possible. Sometimes you have to write code here and there that feels like repeated code. But if you believe a block of code can be reused, you can put it in an object and keep it in a separate project. After you have built up a library of reusable code, you will want to, at some point, reuse that code in your new projects. In such cases, it’s best to keep your reusable code in one place and refer to it in your Xcode project instead of duplicating that code by copying it into your new project.
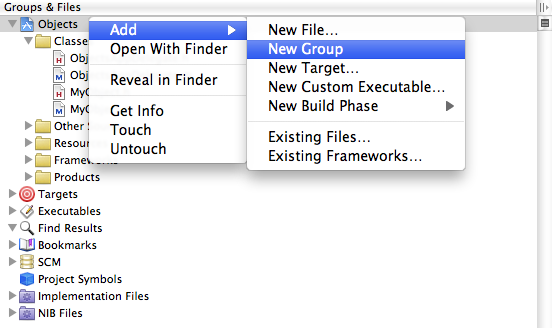
To reuse that code, you can create a new group in Xcode by right-clicking on your project in Xcode and choosing Add→New Group, as shown in Figure 1-3. You can then give this new virtual folder or group a name, such as “Shared Libraries” or “Shared Code.” Once you are done, locate your reusable code in the Finder and drag and drop it into the Shared Libraries group in Xcode. This way, Xcode will create the required paths so that you can instantiate new objects of your reusable classes.
See Also
1.2. Allocating and Initializing Objects
Problem
You want to create an instance of a new object, but you don’t understand the difference between allocation and initialization and why you should have to both allocate and initialize an object before you can use it.
Solution
You must both allocate and initialize an object before using it.
An object must be allocated using the alloc instance method. This class method will allocate memory to hold the object
and its instance variables and methods. Each object must have one
designated initializer, which is normally the initialization method with
the most parameters. For instance, the initWithFrame: method is the designated
initializer of objects of type
UIView. Always allocate and
initialize your objects, in that order, before using them.
When implementing a new object, do not override the alloc method. This method is declared in
NSObject. Instead, override the
init method and create custom
initialization methods that handle required parameters for the specific
object you are working on.
Discussion
An object that inherits from NSObject must be prepared for use in two
steps:
Allocation
Initialization
The allocation is done by invoking the alloc method, which is implemented in the
NSObject class. This method creates
the internal structure of a new object and sets all instance variables’
values to zero. After this step is done, the init method takes care of setting up the
default values of variables and performing other tasks, such as
instantiating other internal objects.
Let’s look at an example. We are creating a class named MyObject. Here is the .h file:
#import <Foundation/Foundation.h>

@interface MyObject : NSObject {

}

- (void) doSomething;

@end
The implementation of this class is as follows (the .m file):
#import "MyObject.h"

@implementation MyObject

- (void) doSomething{

  /* Perform a task here */
  NSLog(@"%s", __FUNCTION__);

}

@end
The doSomething instance method
of the MyObject object will attempt
to print the name of the current function to the console window. Now
let’s go ahead and invoke this method by instantiating an object of type
MyObject:
  MyObject *someObject = [[MyObject alloc] init];
  /* Do something with the object, call some methods, etc. */
  [someObject doSomething];
  [someObject release];
This code will work absolutely fine. Now try to skip initializing your object:
  MyObject *someObject = [MyObject alloc];
  /* Do something with the object, call some methods, etc. */

  [someObject doSomething];
  [someObject release];
If you run this code now, you will realize that it works absolutely fine, too. So, what has happened here? We thought we had to initialize the object before we could use it. Perhaps Apple can explain this behavior better:
An object isn’t ready to be used until it has been initialized. The init method defined in the NSObject class does no initialization; it simply returns self.
Simply put, this means the init
method is a placeholder for tasks that some classes need to perform
before they are used, such as setting up extra data structures or
opening files. NSObject itself—along
with many of the classes you will use—does not have to initialize
anything in particular. However, it is a good programming practice to
always run the init method of an
object after allocating it in case the parent of your class has
overridden this method to provide a custom initialization. Please bear
in mind that the return value for initializer methods of an object is of
type id, so the initializer method
might even return an object that is not the same object that the
alloc method returned to you. This
technique is called Two-Stage Creation and is extremely handy. However, discussing this
technique is outside the scope of this book. For more information about
Two-Stage Creation, please refer to Cocoa Design
Patterns by Erik M. Buck and Donald A. Yacktman
(Addison-Wesley Professional).
1.3. Defining Two or More Methods with the Same Name in an Object
Problem
You would like to implement two or more methods with the same name in one object. In object-oriented programming, this is called method overloading. However, in Objective-C, method overloading does not exist in the same way as it does in other programming languages such as C++.
Note
The techniques used and explained in this recipe’s Solution and Discussion are merely ways to create methods that have different numbers of parameters or have parameters with different names, just to give you an idea of how you can have methods whose first name segments are the same.
Solution
Use the same name for your method, but keep the number and/or the names of your parameters different in every method:
- (void) drawRectangle{

  [self drawRectangleInRect:CGRectMake(0.0f, 0.0f, 4.0f, 4.0f)];

}

- (void) drawRectangleInRect:(CGRect)paramInRect{

  [self drawRectangleInRect:paramInRect
                  withColor:[UIColor blueColor]];

}

- (void) drawRectangleInRect:(CGRect)paramInRect
             withColor:(UIColor*)paramColor{

  [self drawRectangleInRect:paramInRect
                  withColor:paramColor
                  andFilled:YES];

}

- (void) drawRectangleInRect:(CGRect)paramInRect
                   withColor:(UIColor*)paramColor
                   andFilled:(BOOL)paramFilled{

  /* Draw the rectangle here */

}
Discussion
Method overloading is a programming language feature supported by Objective-C, C++, Java, and a few other languages. Using this feature, programmers can create different methods with the same name, in the same object. However, method overloading in Objective-C differs from that which can be used in C++. For instance, in C++, to overload a method the programmer needs to assign a different number of parameters to the same method and/or change a parameter’s data type.
In Objective-C, however, you simply change the name of at least one parameter. Changing the type of parameters will not work:
- (void) method1:(NSInteger)param1{

  /* We have one parameter only */

}

- (void) method1:(NSString *)param1{

  /* This will not compile as we already have a
   method called [method1] with one parameter */

}
Changing the return value of these methods will not work either:
- (int) method1:(NSInteger)param1{

  /* We have one parameter only */
  return(param1);

}

- (NSString *) method1:(NSString *)param1{

  /* This will not compile as we already have a
   method called [method1] with one parameter */
  return(param1);

}
As a result, you need to change the number of parameters or the name of (at least) one parameter that each method accepts. Here is an example where we have changed the number of parameters:
- (int) method1:(NSInteger)param1{

  return(param1);

}

- (NSString*) method1:(NSString *)param1
            andParam2:(NSString *)param2{

  NSString *result = param1;

  if (param1 != nil &&
      param2 != nil){
    result = [result stringByAppendingString:param2];
  }

  return(result);

}
Here is an example of changing the name of a parameter:
- (void) drawCircleWithCenter:(CGPoint)paramCenter
                       radius:(CGFloat)paramRadius{

  /* Draw the circle here */

}

- (void) drawCircleWithCenter:(CGPoint)paramCenter
                       Radius:(CGFloat)paramRadius{

  /* Draw the circle here */

}
Can you spot the difference between the declarations of these two
methods? The first method’s second
parameter is called radius (with a
lowercase r) whereas the second method’s second
parameter is called Radius (with an
uppercase R). This will set these two methods apart
and allows your program to get compiled. However, Apple has guidelines
for choosing method names as well as what to do and what not to do when
constructing methods. For more information, please refer to the “Coding
Guidelines for Cocoa” Apple documentation available at this URL:
| http://developer.apple.com/iphone/library/documentation/Cocoa/Conceptual/CodingGuidelines/CodingGuidelines.html |
Here is a concise extract of the things to look out for when constructing and working with methods:
Have your method names describe what the method does clearly, without using too much jargon and abbreviations. A list of acceptable abbreviations is in the Coding Guidelines.
Have each parameter name describe the parameter and its purpose. On a method with exactly three parameters, you can use the word and to start the name of the last parameter if the method is programmed to perform two separate actions. In any other case, refrain from using and to start a parameter name.
Start method names with a lowercase letter.
For delegate methods, start the method name with the name of the class that invokes that delegate method. For more information about delegates, please refer to Recipe 1.7.
See Also
1.4. Defining and Accessing Properties
Solution
Use the @property directive in
the .h file of your object:
#import <Foundation/Foundation.h>

@interface MyObject : NSObject {
@public
  NSString    *stringValue;
@private
  NSUInteger  integerValue;
}

@property (nonatomic, copy)   NSString    *stringValue;
@property (nonatomic, assign) NSUInteger  integerValue;

@end
Only properties that are objects can be of type copy or retain. Usually only properties that are
scalars (such as NSUInteger, NSInteger, CGRect, and CGFloat) can have the assign setter attributes. For more information
about this, please refer to the “Declared Properties” section of Apple’s
“The Objective-C Programming Language” guide, available at the following
URL:
| http://developer.apple.com/iphone/library/documentation/cocoa/conceptual/objectivec/Introduction/introObjectiveC.html |
Now use the @synthesize
directive in the .m file of your
object, like so:
#import "MyObject.h"

@implementation MyObject

@synthesize stringValue;
@synthesize integerValue;

- (id) init {
  self = [super init];

  if (self != nil){
    stringValue = [@"Some Value" copy];
    integerValue = 123;
  }

  return(self);
}

- (void) dealloc{
  [stringValue release];
  [super dealloc];
}

@end
Discussion
In Objective-C, you can create and access variable data within an object in two ways:
Declaring properties
Declaring variables
It is important to note that properties are not simply variables.
They are in fact, depending on their declaration (whether they are
synthesized or not), methods. Simple variables can also be defined in
Objective-C for an object, but they need to be managed and accessed in a
different way. A property can be created, managed, and released in much
more flexible ways than a mere instance variable. For example, a
synthesized and retained property of type NSObject will retain its new value and release
the previous value whenever we assign a new value to it with dot
notation, whereas an instance variable that is being managed by the
programmer (not synthesized and not defined as an @property) will not be accessible with dot
notation and will not have a getter or a setter method created for it.
So, let’s focus on properties for now. You should declare a property in
three steps:
Declare the variable.
Declare the property.
Declare the implementation method of that property.
After step 2, our variable becomes a property.
By synthesizing our properties, Objective-C will create the setter and
getter methods (depending on whether the property being synthesized is
read/write or read-only). Whenever the program writes to the property
using dot notation (object.property),
the setter method will be invoked, whereas when the program reads the
property, the getter method will be invoked.
1.5. Managing Properties Manually
Problem
You want to be able to control the values that are set for and returned by your properties. This can be particularly useful, for instance, when you decide to save the values of your properties to disk as soon as they are modified.
Solution
Declare your property in the .h file of your object and implement the setter and getter methods in the .m file manually:
#import <Foundation/Foundation.h>

@interface MyObject : NSObject {
@public
  NSString  *addressLine;
}

@property (nonatomic, copy) NSString  *addressLine;

@end
In your .m file, implement your getter and setter methods:
#import "MyObject.h"

@implementation MyObject

@synthesize addressLine;

- (void) setAddressLine:(NSString *)paramValue{

  if (paramValue != addressLine){
    [addressLine release];
    addressLine = [paramValue copy];
  }

}

- (void) dealloc {
  [addressLine release];
  [super dealloc];
}

@end
Discussion
The @synthesize directive
creates setter and getter methods for a property. A
property, by default, is readable and writable. If a synthesized
property is declared with the readonly directive, only its getter method
will be generated. Assigning a value to a property without a setter
method will throw an error.
This means that, by referring to a property in Objective-C using
dot notation, you are accessing the setter/getter methods of that property. For instance, if you attempt to assign a
string to a property called myString
of type NSString in an object using
dot notation, you are eventually calling the setMyString: method in that object. Also,
whenever you read the value of the myString property, you are implicitly calling
the myString method in that object.
This method must have a return value of type NSString; in other words, the return value of
the getter method of this property (called myString) must return a value of the same data
type as the property that it represents. This method must not have any
parameters.
Instead of using the @synthesize directive to generate getter and
setter methods for your properties automatically, you can create the
getter and setter methods manually as explained before. This directive
will generate the getter and setter methods of a property if they don’t
already exist. So, you can synthesize a property but still specify its
getter, its setter, or both manually.
You might be asking: why should I create my own getter and setter methods? The answer is that you may want to carry out custom operations during the read or write. A good way to explain this is through an example.
Imagine you have an object with a property called addressLine of type NSString. You want this address to accept only
strings that are 20 characters or less in length. You can define the
setter method in this way:
#import <Foundation/Foundation.h>

@interface MyObject : NSObject {
@public
  NSString  *addressLine;
}

@property (nonatomic, copy) NSString  *addressLine;

@end
Here is the implementation of the validation rule on our property’s setter method:
#import "MyObject.h"

@implementation MyObject

@synthesize addressLine;

- (void) setAddressLine:(NSString *)paramValue{

  if ([paramValue length] > 20){
    return;
  }

  if (paramValue != addressLine){
    [addressLine release];
    addressLine = [paramValue copy];
  }

}

- (void) dealloc {
  [addressLine release];
  [super dealloc];
}

@end
Now we will attempt to set the value of this property to one string that is 20 characters and another string that is 21 characters in length:
  MyObject *someObject = [[MyObject alloc] init];

  someObject.addressLine = @"12345678901234567890";

  NSLog(@"%@", someObject.addressLine);

  someObject.addressLine = @"123456789012345678901";

  NSLog(@"%@", someObject.addressLine);

  [someObject release];
What we can see in the console window proves that our validation rule is working on our custom setter method (see Figure 1-4).
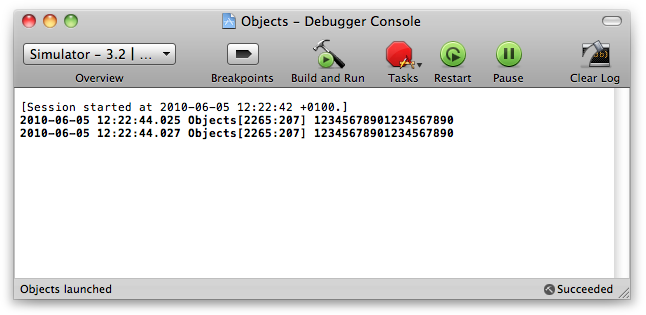
As you can see, the value of our property stayed intact after we tried to change that property’s value to a string of 21 characters.
See Also
1.6. Reusing a Block of Code
Problem
You want to be able to reuse a block of code you’ve written or call another reusable block of code somewhere else in your application.
Solution
Create instance or class methods for your classes in order to create reusable blocks of code, or simply call a method in your program.
Discussion
In programming languages such as C, we create procedures and functions. A procedure is a block of code with a name and an optional set of parameters. A procedure does not have a return value. A function is a procedure with a return value. Here is a simple procedure (with an empty body) written in C:
void sendEmailTo(const char *paramTo,
                 const char *paramSubject,
                 const char *paramEmailMessage){

  /* send the email here ... */
}
This procedure is named sendEmailTo and has three parameters, namely
paramTo, paramSubject, and
paramEmailMessage. We can then call
this procedure in this way:
  sendEmailTo("somebody@somewhere.com",
              "My Subject",
              "Please read my email");
Turning this procedure into a function that returns a Boolean value, we will have code similar to this:
BOOL sendEmailTo(const char *paramTo,
                 const char *paramSubject,
                 const char *paramEmailMessage){

  /* send the email here ... */

  if (paramTo == nil ||
      paramSubject == nil ||
      paramEmailMessage == nil){
    /* One or some of the parameters are nil */
    NSLog(@"Nil parameter(s) is/are provided.");
    return(NO);
  }

  return(YES);
}
Calling this function is similar to calling the sendEmailTo procedure except that with a
function, we can retrieve the return value, like so:
  BOOL isSuccessful = sendEmailTo("somebody@somewhere.com",
                                "My Subject",
                                "Please read my email");

  if (isSuccessful == YES){
    /* Successfully sent the email */
  } else {
    /* Failed to send the email. Perhaps we should display
     an error message to the user */
  }
In Objective-C, we create methods for classes. Creating Objective-C methods is quite different from writing procedures and functions in a programming language such as C. As mentioned before, we can have either instance or class methods. Instance methods are methods that can be called on an instance of the class, and class methods are methods that get called on the class itself and do not require an instance of the class to be created by the programmer. To create a method in Objective-C, follow these steps in the .m file of your target class:
Type
−if you want an instance method or+if you want a class method.Choose the return type of your method and enclose it within parentheses—for instance,
(void)for no return value,(BOOL)for a Boolean value,(NSObject *)to return an instance ofNSObject, and so on.Choose a name for your method. Start the name with a lowercase letter. It is common in Objective-C to start method names with a lowercase letter—for instance,
sendEmailToinstead ofSendEmailTo.If you do not want any parameters for your method, jump to step 9.
Choose two names for your parameter. One name becomes a part of the method name and will be used from outside the method (this is an optional name). The other name will be used as a parameter name inside the method. There is an exception to this in which the first name of the first parameter of a method is part of the name of the method that you chose in step 3. For this first parameter, you must only choose a second name, which becomes the parameter name used inside the method itself.
Once you are done choosing the name for your parameter, choose the data type of the method and enclose this within parentheses.
Put a colon after your parameter’s first chosen name (if any), and put the parentheses that carry the data type of your method followed by the second name for your parameter.
Repeat steps 5 through 7 for any other parameters that you might have.
Insert an open curly brace (
{) after the method name and parameter names (if you have parameters) and a closing curly brace (}) at the end.
Going back to the sendEmailTo
procedure example that we saw earlier, let’s attempt to create the same
procedure as a method in Objective-C:
- (BOOL) sendEmailTo:(NSString *)paramTo
         withSubject:(NSString *)paramSubject
     andEmailMessage:(NSString *)paramEmailMessage{

  /* Send the email and return an appropriate value */

  if (paramTo == nil ||
      paramSubject == nil ||
      paramEmailMessage == nil){
    /* One or some of the parameters are nil */
    NSLog(@"Nil parameter(s) is/are provided.");
    return(NO);
  }

  return(YES);

}
This is an instance method (-)
that returns a Boolean value (BOOL).
The name of this method is sendEmailTo:withSubject:andEmailMessage: and
it has three parameters. We can then call this method in this
way:
  [self sendEmailTo:@"someone@somewhere.com"
        withSubject:@"My Subject"
    andEmailMessage:@"Please read my email."];
As mentioned previously, the first name of every parameter (except
the first parameter) is optional. In other words, we can construct the
sendEmailTo:withSubject:andEmailMessage:
method in another way with a different name:
- (BOOL) sendEmailTo:(NSString *)paramTo
                    :(NSString *)paramSubject
                    :(NSString *)paramEmailMessage{

  /* Send the email and return an appropriate value */

  if (paramTo == nil ||
      paramSubject == nil ||
      paramEmailMessage == nil){    /* One or some of the parameters are nil */
    NSLog(@"Nil parameter(s) is/are provided.");
    return(NO);
  }

  return(YES);

}
We can call this method like so:
  [self sendEmailTo:@"someone@somewhere.com"
                   :@"My Subject"
                   :@"Please read my email."];
As you can see, the first implementation is easier to understand when you look at the invocation calls since you can see the name of each parameter in the call itself.
Declaring and implementing a class method is similar to declaring and implementing an instance method. Here are a couple of things you have to keep in mind when declaring and implementing a class method:
The method type identifier of a class method is
+instead of the-type identifier for instance methods.You can access
selfin a class method. However, the class methods ofselfcan be accessed only inside a class method’s implementation.Class methods are useful when you want to provide new methods of instantiation for your classes. For example, a class method named
allocAndInitcould both allocate and initialize an object and return the object to its caller.
1.7. Communicating with Objects
Problem
You want to pass values from one object to another without introducing tightly coupled objects.
Solution
Define a protocol using the @protocol
directive, like so:
@protocol TrayProtocol <NSObject>
@required
  - (void) trayHasRunoutofPaper:(Tray *)paramSender;
@end
Conform to this protocol in another object, which will then be responsible for handling the protocol’s messages.
Discussion
The more experienced programmers become, the better they understand the value of decoupling in their code. Decoupling simply means making two or more objects “understand” each other without needing each another in particular; in other words, if Object A has to talk to Object B, in a decoupled design, Object A won’t know if it is Object B that it is talking to. All it knows is that whatever object is listening understands the language in which it is speaking. Enter protocols!
The best way to describe the value of protocols is to go through a real-life example. Let’s imagine we have a printer and we intend to print a 200-page essay. Our printer has a paper tray that, when empty, tells the printer to ask us to insert more paper. The application, in effect, passes a message from the tray to the printer.
Let’s go ahead and create a printer and a tray object. The printer owns the tray, so the printer object, upon initialization, must create an instance of the tray object. We will define our printer class and object in this way:
#import <Foundation/Foundation.h>
#import "Tray.h"

@interface Printer : NSObject {
@public
  Tray  *paperTray;
}

@property (nonatomic, retain) Tray  *paperTray;

@end
We will also implement the printer object in this way:
#import "Printer.h"

@implementation Printer

@synthesize paperTray;

- (id) init {
  self = [super init];

  if (self != nil){
    Tray *newTray = [[Tray alloc] initWithPrinter:self];
    paperTray = [newTray retain];
    [newTray release];
  }

  return(self);
}

- (void) dealloc {
  [paperTray release];
  [super dealloc];

}

@end
We have not yet written any code for the paper tray object. The
printer and paper tray objects inherit from NSObject. The printer object can speak to the
tray object by directly invoking its various selectors. However, when
the tray object is created, it has no way of finding its corresponding
printer and has no way of speaking to this printer because no
communication protocol is defined for these two objects.
This is when protocols play a major role. A protocol is a set of rules that an object that conforms to that protocol must agree with. For instance, humans conform to various protocols such as eating, sleeping, and breathing. In the eating protocol, there is a rule that governs the input of food. In sleeping, there is a rule that governs going to bed or finding a comfortable place to sleep.
Now, going back to our example, there are two things that we want our paper tray object to do:
Contain 10 pieces of paper by default.
Let the printer know when it runs out of paper.
To meet the second requirement, we must give the paper tray access to the printer.
Our first step will be to give the paper tray a reference to the printer. Then we will make sure the paper tray talks to the printer, in a well-defined manner, using a protocol. For this, our paper tray must define the protocol since it is the object that wants to talk to the printer in its own way. The printer, in turn, must conform to that protocol.
This is how we will define the header for our paper tray object:
#import <Foundation/Foundation.h>

@class    Tray;

@protocol TrayProtocol <NSObject>
@required
  - (void) trayHasRunoutofPaper:(Tray *)paramSender;
@end

@interface Tray : NSObject {
@public
  id<TrayProtocol>          ownerDevice;
@private
  NSUInteger                paperCount;
}

@property (nonatomic, retain) id<TrayProtocol>  ownerDevice;
@property (nonatomic, assign) NSUInteger        paperCount;

- (BOOL)  givePapertoPrinter;
/* Designated Initializer */
- (id)    initWithOwnerDevice:(id<TrayProtocol>)paramOwnerDevice;

@end
Note
The trayHasRunoutofPaper:
method defined in the TrayProtocol
protocol is a required method and the printer object must implement
it.
Now we will implement the paper tray:
#import "Tray.h"

@implementation Tray

@synthesize paperCount;
@synthesize ownerDevice;

- (id) init {
  /* Call the designated initializer */
  return([self initWithOwnerDevice:nil]);

}

- (id) initWithOwnerDevice:(id<TrayProtocol>)paramOwnerDevice {

  self = [super init];

  if (self != nil){
    ownerDevice = [paramOwnerDevice retain];
    /* Initially we have only 10 sheets of paper */
    paperCount = 10;
  }

  return(self);
}

- (BOOL) givePapertoPrinter{

  BOOL result = NO;

  if (self.paperCount > 0){
    /* We have some paper left */
    result = YES;
    self.paperCount--;
  } else {
    /* We have run out of paper */
    [self.ownerDevice trayHasRunoutofPaper:self];
  }

  return(result);

}

- (void) dealloc {
  [ownerDevice release];
  [super dealloc];
}

@end
The givePapertoPrinter instance
method is the only method in the paper tray’s implementation that needs
a description. Whenever the printer wants to print on a piece of paper,
it calls this method in the paper tray to ask for a sheet of paper. If
the paper tray doesn’t have enough paper, it will call the trayHasRunoutofPaper: method in the printer.
This is the important bit indeed. The trayHasRunoutofPaper: method is defined in the
TrayProtocol protocol and the printer
object is expected to conform to this protocol. Simply said, the tray
object is telling the printer what methods the printer object needs to
implement in order to let the paper tray speak to the printer.
The paper tray has 10 sheets of paper initially. Whenever the printer asks for a sheet of paper, the tray will reduce this number by one. Eventually, when there is no paper left, the tray lets the printer know.
Now it is time to define the printer object (the .h file):
#import <Foundation/Foundation.h>
#import "Tray.h"

@interface Printer : NSObject <TrayProtocol> {
@public
  Tray  *paperTray;
}

@property (nonatomic, retain) Tray  *paperTray;

- (BOOL) printPaperWithText:(NSString *)paramText
             numberofCopies:(NSUInteger)paramNumberOfCopies;

@end
Finally, we will implement the printer object (the .m file):
#import "Printer.h"

@implementation Printer

@synthesize paperTray;

- (void) trayHasRunoutofPaper:(Tray *)Sender{
  NSLog(@"No paper in the paper tray. Please load more paper.");
}

- (void) print {

  /* Do the actual printing here after we have a sheet of paper */

}

- (BOOL) printPaperWithText:(NSString *)paramText
             numberofCopies:(NSUInteger)paramNumberOfCopies{

  BOOL result = NO;

  if (paramNumberOfCopies > 0){

    NSUInteger copyCounter = 0;
    for (copyCounter = 0;
         copyCounter < paramNumberOfCopies;
         copyCounter++){
      /* First get a sheet of paper from the tray */
      if ([self.paperTray givePapertoPrinter] == YES){
        NSLog(@"Print Job #%lu", (unsigned long)copyCounter+1);
        [self print];
      } else {
        /* No more paper in the tray */
        return(NO);
      }
    }
    result = YES;
  } /* if (paramNumberOfCopies > 0){ */

  return(result);

}

- (id) init {
  self = [super init];

  if (self != nil){
    Tray *newTray = [[Tray alloc] initWithOwnerDevice:self];
    paperTray = [newTray retain];
    [newTray release];
  }

  return(self);
}

- (void) dealloc {
  [paperTray release];
  [super dealloc];

}

@end
The printPaperWithText:numberofCopies: method gets
called with a number of pieces of paper to print. Every time a page
needs to be printed, the printer object will perform the following
tasks:
Ask the tray to provide one sheet of paper to the printer.
If the tray has run out of paper, it will return from this method.
If the paper tray can give the printer a sheet of paper, the printer will call its
printmethod.
Now let’s go ahead and instantiate an object of type Printer and attempt to print a couple of
sheets of paper:
  Printer *myPrinter = [[Printer alloc] init];

  [myPrinter printPaperWithText:@"My Text"
                 numberofCopies:100];

  [myPrinter release];
Figure 1-5 shows the output we will get in the console window.
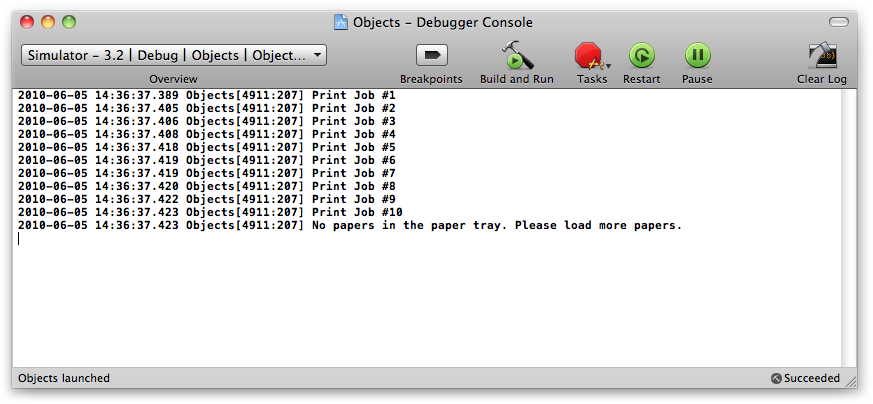
The 11th page cannot be printed because the paper tray has reported to the printer that it has run out of paper. Great, isn’t it?
1.8. Invoking the Selectors of an Object Dynamically
Problem
You want to be able to dynamically call any method in any object given the name of the method and its parameters.
Solution
Use the NSInvocation class,
like so:
- (NSString *) myMethod:(NSString *)param1 withParam2:(NSNumber *)param2{ NSString *result = @"Objective-C"; NSLog(@"Param 1 = %@", param1); NSLog(@"Param 2 = %@", param2); return(result); } - (void)invokeMyMethodDynamically{ SEL selector = @selector(myMethod:withParam2:); NSMethodSignature *methodSignature= [[self class] instanceMethodSignatureForSelector:selector]; NSInvocation *invocation = [NSInvocation invocationWithMethodSignature:methodSignature]; [invocationsetTarget:self]; [invocationsetSelector:selector]; NSString *returnValue = nil; NSString *argument1= @"First Parameter"; NSNumber *argument2= [NSNumber numberWithInt:102]; [invocationsetArgument:&argument1atIndex:2]; [invocationsetArgument:&argument2atIndex:3]; [invocationretainArguments]; [invocationinvoke]; [invocationgetReturnValue:&returnValue]; NSLog(@"Return Value = %@", returnValue); }
Discussion
Objective-C is so dynamic that you can invoke a method in another
object just by knowing the name of that object, the name of the method,
and its parameters. Then you can form a selector out of the method name
and parameters, form a method signature, and assign parameters to that
invocation. Eventually you can, depending on how your method is defined,
attempt to fetch the return value of that method as well. NSInvocation, used in this recipe, is not the optimal way of invoking
a method in another object. This technique is usually used when you want
to forward a method invocation to another object. NSInvocation is also useful if you are
constructing and calling selectors dynamically and on the fly for
dynamic methods. However, for an average iOS application, you probably
will not need to use such a dynamic mechanism to call methods on an
object.
To do this, you need to follow these steps:
Form a
SELvalue using the name of the method and its parameter names (as explained in Recipe 1.7).Form a method signature of type
NSMethodSignatureout of yourSELvalue.Form an invocation of type
NSInvocationout of your method signature.Tell the invocation what object you are targeting.
Tell the invocation what selector in that object you want to invoke.
Assign any arguments, one by one, to the invocation.
Invoke the method using the invocation object and demand a return value (if any).
After calling the invokeMyMethodDynamically method, as seen in
this recipe’s Solution, we will
observe the following values printed in the console window:
Param 1 = First Parameter
Param 2 = 102
Return Value = Objective-C
See Also
1.9. Managing Memory with the iOS SDK
Problem
You want to allocate, deallocate, and use autorelase objects in Objective-C without causing memory leaks.
Solution
Each object allocated in the Objective-C runtime has a retain count. The retain count can be thought of as the number of references that have been made to the current object. Once the retain count is zero, the object will be deallocated.
  /* After this line:
   foo's retain count is 1 */
  NSObject *foo = [[NSObject alloc] init];
  NSLog(@"%lu", (unsigned long)[foo retainCount]);

  /* After this line:
   foo's retain count = 2
   bar is equal to foo */
  NSObject *bar = [foo retain];
  NSLog(@"%lu", (unsigned long)[foo retainCount]);

  /* After this line:
   foo's retain count = 2
   bar is equal to foo
   baz is equal to bar and foo */
  NSObject *baz = bar;
  NSLog(@"%lu", (unsigned long)[foo retainCount]);

  /* After this line:
   baz's retain count = 1
   bar's retain count = 1
   foo's retain count = 1 */
  [baz release];

  /* After this line:
   foo, bar and baz are deallocated here and
   should not be referenced */
  [bar release];
Autorelease objects get deallocated at the end of the current run loop’s cycle
(when the autorelease pool gets
released). If you create autorelease objects in a thread, you must
provide your own autorelease pool object in order to deallocate the
autorelease objects at the end of the thread’s life. Autorelease objects
are similar to the foo object in the
previous example, with one difference: as long as there is an
autorelease pool around, the autorelease object should not be released
directly in code.
Discussion
When an object is allocated using the alloc method, its retain count is set to 1. For every time an object is
retained, it must be released using the release method. An object will never get
deallocated if the retain count of that object is greater than or equal
to 1. Therefore, to prevent memory leaks, you must release the objects
that you allocate for as many times as they are retained.
You usually don’t need to call the retainCount method of objects directly. You might do it as a part of your
logging or debugging process. Just keep in mind the rule in Objective-C
that you must issue a release on an object for every time that it is
retained. In the case of autorelease objects, they are sent a release message by the autorelease pool that
contains them.
Note
Autorelease objects require autorelease pools. Incorrect use of these objects can cause dramatic performance hits on your application. Because of this, I strongly suggest that you refrain from using autorelease objects in iOS, and release the objects that you have retained or copied manually as demonstrated in various places in this book.
1.10. Managing Untyped Objects
Solution
Use the class instance method
of the object to find that object’s class name:
  /* The MyBundle variable is of type NSBundle */
  NSBundle *myBundle = [NSBundle mainBundle];

  /* The UntypedObject is of type id, an untyped object indeed */
  id untypedObject = myBundle;

  /* We now get the class of our untyped object */
  Class untypedObjectClass = [untypedObject class];

  /* Do a comparison here */
  if ([untypedObjectClass isEqual:[NSBundle class]] == YES){
    /* This is an object of type NSBundle */
  } else {
    /* Process other classes... */
  }
Discussion
There are various ways to determine whether a particular object
inherits from a certain other object. For instance, you can invoke the NSStringFromClass function in order to
retrieve the class name of an object as a string. However, there are
certain cases where neither NSStringFromClass nor direct comparison of
class names is effective:
  NSNumber *integerNumber = [NSNumber numberWithInt:10];
  NSNumber *boolNumber = [NSNumber numberWithBool:10];
  NSNumber *longNumber = [NSNumber numberWithLong:10];

  NSLog(@"%@", NSStringFromClass([integerNumber class]));
  NSLog(@"%@", NSStringFromClass([boolNumber class]));
  NSLog(@"%@", NSStringFromClass([longNumber class]));
The output of this code is:
  NSCFNumber
  NSCFBoolean
  NSCFNumber
This example demonstrates that the class instance method
does not always return the actual name of the class from
which a certain object is instantiated. For this reason, the NSObject protocol defines an instance method called isKindOfClass: that tells you whether a certain object is of a certain
type or class:
  NSNumber *integerNumber = [NSNumber numberWithInt:10];
  NSNumber *boolNumber = [NSNumber numberWithBool:10];
  NSNumber *longNumber = [NSNumber numberWithLong:10];

  if ([integerNumber isKindOfClass:[NSNumber class]] &&
      [boolNumber isKindOfClass:[NSNumber class]] &&
      [longNumber isKindOfClass:[NSNumber class]]){
    NSLog(@"They are all of type NSNumber.");
  } else {
    NSLog(@"They are not all of type NSNumber.");
  }
The output of this code is:
They are all of type NSNumber.
Get iOS 4 Programming Cookbook now with the O’Reilly learning platform.
O’Reilly members experience books, live events, courses curated by job role, and more from O’Reilly and nearly 200 top publishers.

