3.4. Configuring Auto Layout Constraints in Interface Builder
Problem
You want to be able to utilize Interface Builder’s power in order to create your UI constraints.
Solution
Follow these steps:
Open the XIB that you want to edit in Interface Builder.
In Interface Builder, make sure that you have selected the view object on which you want to enable Auto Layout, simply by clicking on that view object.
Click on the View → Utilities → Show File Inspector menu item.
In the File Inspector, under the Interface Builder Document section, make sure that the Use Auto Layout check is enabled, as shown in Figure 3-11.
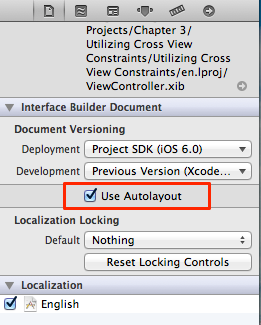
Figure 3-11. Enabling Auto Layout in Interface Builder
Discussion
Interface Builder can help us programmers a lot in creating constraints without much involvement from us. Normally, before the introduction of Auto Layout to iOS, the guideline bars that appeared on the screen while you moved UI components around on a view were related to Autosizing masks that you could also create in code, just like Constraints. However, after switching on the Use Auto Layout option in Interface Builder, the guidelines tell you something else. They are telling you about the constraints that Interface Builder is creating for you in the background.
Let’s do a little experiment. Create a new Single View Application project in Xcode. This will create an application with a single view controller for you. The class ...
Get iOS 6 Programming Cookbook now with the O’Reilly learning platform.
O’Reilly members experience books, live events, courses curated by job role, and more from O’Reilly and nearly 200 top publishers.

