Conform to the UITableViewDataSource
protocol in an object and assign that object to the dataSource property of a table view.
Create an object that conforms to the UITableViewDataSource protocol and assign it
to a table view instance. Then, by responding to the data source
messages, provide information to your table view. For this example,
let’s go ahead and declare the .h
file of our view controller, which will later create a table view on its
own view, in code:
#import <UIKit/UIKit.h>@interfacePopulating_a_Table_View_with_DataViewController:UIViewController<UITableViewDataSource>@property(nonatomic,strong)UITableView*myTableView;@end
In the viewDidLoad
method of our view controller, we will create the table view and
will assign our view controller as its data source:
-(void)viewDidLoad{[superviewDidLoad];self.view.backgroundColor=[UIColorwhiteColor];self.myTableView=[[UITableViewalloc]initWithFrame:self.view.boundsstyle:UITableViewStylePlain];self.myTableView.dataSource=self;/* Make sure our table view resizes correctly */self.myTableView.autoresizingMask=UIViewAutoresizingFlexibleWidth|UIViewAutoresizingFlexibleHeight;[self.viewaddSubview:self.myTableView];}
Now we need to make sure our table view responds to the @required methods of the UITableViewDataSource protocol. Hold down the
Command key on your keyboard and click on the UITableViewDataSource protocol’s mention in
your view controller’s .h file.
This will show you the required methods for this protocol.
The UITableView class defines a
property called dataSource. This is
an untyped object that must conform to the UITableViewDataSource protocol. Every time a
table view is refreshed and reloaded using the reloadData method, the table view will call
various methods in its data source to find out about the data you intend
to populate it with. A table view data source can implement three
important methods, two of which are mandatory for every data
source:
numberOfSectionsInTableView:This method allows the data source to inform the table view of the number of sections that must be loaded into the table.
tableView:numberOfRowsInSection:This method tells the view controller how many cells or rows have to be loaded for each section. The section number is passed to the data source in the
numberOfRowsInSectionparameter. The implementation of this method is mandatory in the data source object.tableView:cellForRowAtIndexPath:This method is responsible for returning instances of the
UITableViewCellclass as rows that have to be populated into the table view. The implementation of this method is mandatory in the data source object.
So let’s go ahead and implement these methods in our view controller, one by one. First, let’s tell the table view that we want it to render three sections:
-(NSInteger)numberOfSectionsInTableView:(UITableView*)tableView{NSIntegerresult=0;if([tableViewisEqual:self.myTableView]){result=3;}returnresult;}
Then we tell the table view how many rows we want it to render, for each section:
-(NSInteger)tableView:(UITableView*)tableViewnumberOfRowsInSection:(NSInteger)section{NSIntegerresult=0;if([tableViewisEqual:self.myTableView]){switch(section){case0:{result=3;break;}case1:{result=5;break;}case2:{result=8;break;}}}returnresult;}
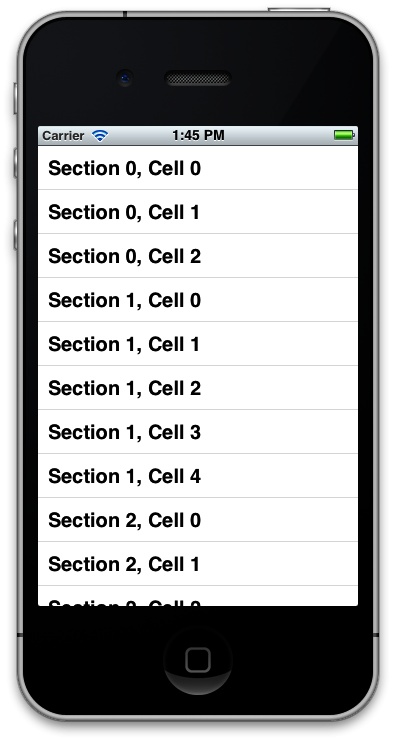
So up to now, we have asked the table view to render three
sections with three rows in the first, five rows in the second, and
eight rows in the third section. What’s next? We have to return
instances of UITableViewCell to the
table view—the cells that we want the table view to render:
-(UITableViewCell*)tableView:(UITableView*)tableViewcellForRowAtIndexPath:(NSIndexPath*)indexPath{UITableViewCell*result=nil;if([tableViewisEqual:self.myTableView]){staticNSString*TableViewCellIdentifier=@"MyCells";result=[tableViewdequeueReusableCellWithIdentifier:TableViewCellIdentifier];if(result==nil){result=[[UITableViewCellalloc]initWithStyle:UITableViewCellStyleDefaultreuseIdentifier:TableViewCellIdentifier];}result.textLabel.text=[NSStringstringWithFormat:@"Section %ld, Cell %ld",(long)indexPath.section,(long)indexPath.row];}returnresult;}
Now if we run our app in iPhone Simulator, we will see the results of our work (Figure 4-2).
When a table view is reloaded or refreshed, it queries its data
source through the UITableViewDataSource protocol, asking for
various bits of information. Among the important
methods previously mentioned, the table view will first ask for the
number of sections. Each section is responsible for holding rows or
cells. After the data source specifies the number of sections, the table
view will ask for the number of rows that have to be loaded into each
section. The data source gets the zero-based index of each section and,
based on this, can decide how many cells have to be loaded into
each section.
The table view, after determining the number of cells in the
sections, will continue to ask the data source about the view that will
represent each cell in each section. You can allocate instances of the
UITableViewCell class and return them
to the table view. There are, of course, properties that can be set for
each cell, including the title, subtitle, and color of each cell, among
other properties.
Get iOS 6 Programming Cookbook now with the O’Reilly learning platform.
O’Reilly members experience books, live events, courses curated by job role, and more from O’Reilly and nearly 200 top publishers.

