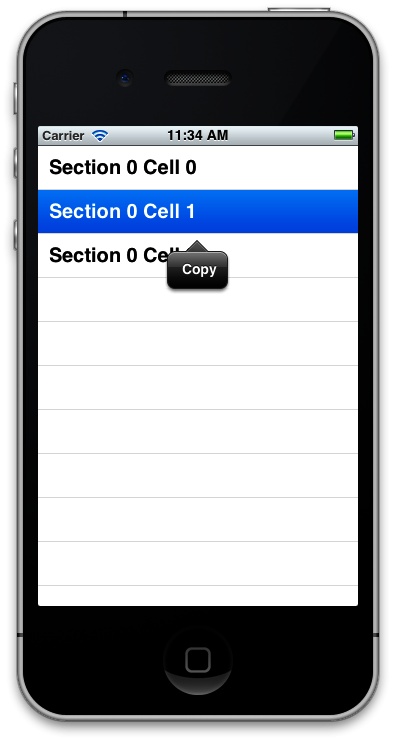
You want to give your users the ability to use copy/paste options among other operations that they can choose, by holding down one of their fingers on a table view cell in your app.
Implement the following three methods of the UITableViewDelegate protocol in the delegate
object of your table view:
tableView:shouldShowMenuForRowAtIndexPath:The return value of this method is of type
BOOL. If you returnYESfrom this method, iOS will display the context menu for the table view cell whose index gets passed to you through theshouldShowMenuForRowAtIndexPathparameter.tableView:canPerformAction:forRowAtIndexPath:withSender:The return value of this method is also of type
BOOL. Once you allow iOS to display a context menu for a table view cell, iOS will call this method multiple times and pass you the selector of the action that you can choose to display in the context menu or not. So, if iOS wants to ask you whether you would like to show the Copy menu to be displayed to the user, this method will get called in your table view’s delegate object and thecanPerformActionparameter of this method will be equal to@selector(copy:). We will read more information about this in this recipe’s Discussion.tableView:performAction:forRowAtIndexPath:withSender:Once you allow a certain action to be displayed in the context menu of a table view cell, when the user picks that action from the menu, this method will get called in your table view’s delegate object. In here, you must do whatever needs to be done to satisfy the user’s request. For instance, if it is the Copy menu that the user has selected, you will need to use a pasteboard to place the chosen table view cell’s content into the pasteboard.
A table view can give a yes/no answer to iOS, allowing or disallowing the display of available system menu items for a table view cell. iOS attempts to display a context menu on a table view cell when the user has held down his finger on the cell for a certain period of time, roughly about one second. iOS then asks the table view whose cell was the source of the trigger for the menu. If the table view gives a yes answer, iOS will then tell the table view what options can be displayed in the context menu, and the table view will be able to say yes or no to any of those items. If there are five menu items available, for instance, and the table view says yes to only two of them, then only those two items will be displayed.
After the menu items are displayed to the user, the user can either tap on one of the items or tap outside the context menu to cancel it. Once the user taps on one of the menu items, iOS will send a delegate message to the table view informing it of the menu item that the user has picked. Based on this information, the table view can make a decision as to what to do with the selected action.
I suggest that we first see what actions are actually available for a context menu on a table view cell, so let’s create our table view and then display a few cells inside it:
-(NSInteger)tableView:(UITableView*)tableViewnumberOfRowsInSection:(NSInteger)section{return3;}-(UITableViewCell*)tableView:(UITableView*)tableViewcellForRowAtIndexPath:(NSIndexPath*)indexPath{UITableViewCell*result=nil;staticNSString*CellIdentifier=@"CellIdentifier";result=[tableViewdequeueReusableCellWithIdentifier:CellIdentifier];if(result==nil){result=[[UITableViewCellalloc]initWithStyle:UITableViewCellStyleDefaultreuseIdentifier:CellIdentifier];}result.textLabel.text=[[NSStringalloc]initWithFormat:@"Section %ld Cell %ld",(long)indexPath.section,(long)indexPath.row];returnresult;}-(void)viewDidLoad{[superviewDidLoad];self.view.backgroundColor=[UIColorwhiteColor];self.myTableView=[[UITableViewalloc]initWithFrame:self.view.boundsstyle:UITableViewStylePlain];self.myTableView.autoresizingMask=UIViewAutoresizingFlexibleWidth|UIViewAutoresizingFlexibleHeight;self.myTableView.dataSource=self;self.myTableView.delegate=self;[self.viewaddSubview:self.myTableView];}
Now we will implement the three aforementioned methods defined in
the UITableViewDelegate protocol and
simply convert the available actions (of type SEL) to strings and print them out to the
console:
-(BOOL)tableView:(UITableView*)tableViewshouldShowMenuForRowAtIndexPath:(NSIndexPath*)indexPath{/* Allow the context menu to be displayed on every cell */returnYES;}-(BOOL)tableView:(UITableView*)tableViewcanPerformAction:(SEL)actionforRowAtIndexPath:(NSIndexPath*)indexPathwithSender:(id)sender{NSLog(@"%@",NSStringFromSelector(action));/* Allow every action for now */returnYES;}-(void)tableView:(UITableView*)tableViewperformAction:(SEL)actionforRowAtIndexPath:(NSIndexPath*)indexPathwithSender:(id)sender{/* Empty for now */}
Now run your app in the simulator or on the device. You will then see three cells loaded into the table view. Hold down your finger (if on a device) or your pointer (if using iOS Simulator) on one of the cells and observe what gets printed out to the console window:
cut:
copy:
select:
selectAll:
paste:
delete:
_promptForReplace:
_showTextStyleOptions:
_define:
_accessibilitySpeak:
_accessibilityPauseSpeaking:
makeTextWritingDirectionRightToLeft:
makeTextWritingDirectionLeftToRight:
cut:
copy:
select:
selectAll:paste:
delete:
_promptForReplace:
_showTextStyleOptions:
_define:
_accessibilitySpeak:
_accessibilityPauseSpeaking:
makeTextWritingDirectionRightToLeft:
makeTextWritingDirectionLeftToRight:
These are all the actions that iOS will allow you to show your users, should you need
them. So for instance, if you would like to allow your users to have the
Copy option, in the tableView:canPerformAction:forRowAtIndexPath:withSender:
method, simply find out which action iOS is asking your permission for
before displaying it, and either return YES or
NO:
-(BOOL)tableView:(UITableView*)tableViewcanPerformAction:(SEL)actionforRowAtIndexPath:(NSIndexPath*)indexPathwithSender:(id)sender{if(action==@selector(copy:)){returnYES;}returnNO;}
The next step is to intercept what menu item the user actually
selected from the context menu. Based on this information, we can then
take appropriate action. For instance, if the user selected the Copy
item in the context menu (see Figure 4-12),
then we can use UIPasteBoard to copy
that cell into the pasteboard for later use:
-(void)tableView:(UITableView*)tableViewperformAction:(SEL)actionforRowAtIndexPath:(NSIndexPath*)indexPathwithSender:(id)sender{if(action==@selector(copy:)){UITableViewCell*cell=[tableViewcellForRowAtIndexPath:indexPath];UIPasteboard*pasteBoard=[UIPasteboardgeneralPasteboard];[pasteBoardsetString:cell.textLabel.text];}}
Get iOS 6 Programming Cookbook now with the O’Reilly learning platform.
O’Reilly members experience books, live events, courses curated by job role, and more from O’Reilly and nearly 200 top publishers.


