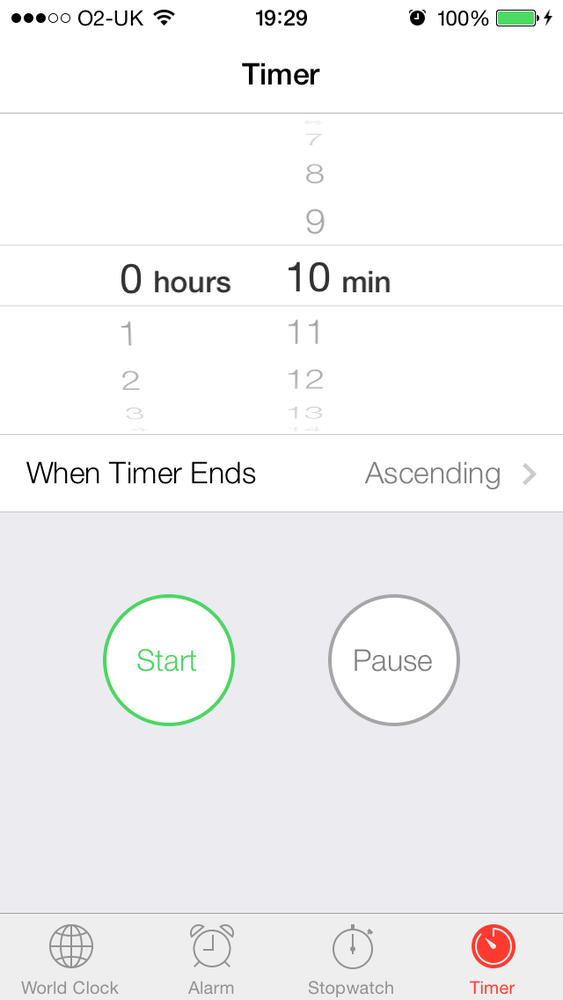
A picker view is a graphical element that allows you to display a series of values to your users and allow them to pick one. The Timer section of the Clock app on the iPhone is a great example of this (Figure 1-10).
As you can see, this specific picker view has two separate and independent visual elements. One is on the left, and one is on the right. The element on the left is displaying hours (such as 0, 1, 2 hours, etc.) and the one on the right is displaying minutes (such as 10, 11, 12 mins, etc.). These two items are called components. Each component has rows. Any item in any of the components is in fact represented by a row, as we will soon see. For instance, in the left component, “0 hours” is a row, “1” is a row, etc.
Let’s go ahead and create a picker view on our view controller’s view. If you don’t know where your view controller’s source code is, please have a look at Recipe 1.2, where this subject is discussed.
First let’s go to the top of the .m (implementation) file of our view controller and define our picker view:
@interfaceViewController()@property(nonatomic,strong)UIPickerView*myPicker;@end@implementationViewController...
Now let’s create the picker view in the viewDidLoad method of our view
controller:
-(void)viewDidLoad{[superviewDidLoad];self.myPicker=[[UIPickerViewalloc]init];self.myPicker.center=self.view.center;[self.viewaddSubview:self.myPicker];}
It’s worth noting that in this example, we are centering our picker view at the center of our view. When you run this app on iOS 7 Simulator, you will see a blank screen because the picker on iOS 7 is white and so is the view controller’s background.
The reason this picker view is showing up as a plain white
color is that we have not yet populated it with any values. Let’s do
that. We do that by specifying a data source for the picker view and
then making sure that our view controller sticks to the protocol that
the data source requires. The data source of an instance of UIPickerView must conform to the UIPickerViewDataSource protocol, so let’s go
ahead and make our view controller conform to this protocol in the
.m file:
@interfaceViewController()<UIPickerViewDataSource,UIPickerViewDelegate>@property(nonatomic,strong)UIPickerView*myPicker;@end@implementationViewController...
Good. Let’s now change our code in the implementation file to make sure we select the current view controller as the data source of the picker view:
-(void)viewDidLoad{[superviewDidLoad];self.myPicker=[[UIPickerViewalloc]init];self.myPicker.dataSource=self;self.myPicker.center=self.view.center;[self.viewaddSubview:self.myPicker];}
After this, if you try to compile your application, you will
get warnings from the compiler telling you that you have
not yet implemented some of the methods that the
UIPickerViewDataSource protocol wants
you to implement. The way to fix this is to press Command+Shift+O, type
in UIPickerViewDataSource, and press
the Enter key on your keyboard. That will send you to the place in your
code where this protocol is defined, where you will see something
similar to this:
@protocolUIPickerViewDataSource<NSObject>@required// returns the number of 'columns' to display.-(NSInteger)numberOfComponentsInPickerView:(UIPickerView*)pickerView;// returns the # of rows in each component..-(NSInteger)pickerView:(UIPickerView*)pickerViewnumberOfRowsInComponent:(NSInteger)component;@end
Can you see the @required
keyword there? That is telling us that whichever class wants to become
the data source of a picker view must implement
these methods. Good deal. Let’s go implement them in our view
controller’s implementation file:
-(NSInteger)numberOfComponentsInPickerView:(UIPickerView*)pickerView{if([pickerViewisEqual:self.myPicker]){return1;}return0;}-(NSInteger)pickerView:(UIPickerView*)pickerViewnumberOfRowsInComponent:(NSInteger)component{if([pickerViewisEqual:self.myPicker]){return10;}return0;}
So what is happening here? Let’s have a look at what each one of these data source methods expects:
numberOfComponentsInPickerView:This method passes you a picker view object as its parameter and expects you to return an integer, telling the runtime how many components you would like that picker view to render.
pickerView:numberOfRowsInComponent:For each component that gets added to a picker view, you will need to tell the system how many rows you would like to render in that component. This method passes you an instance of picker view, and you will need to return an integer indicating the number of rows to render for that component.
So in this case, we are asking the system to display 1 component
with only 10 rows for a picker view that we have created before,
called myPicker.
Compile and run your application on iPhone Simulator (Figure 1-11). Ewww, what is that?
It looks like our picker view knows how many components it
should have and how many rows it should render in that component but
doesn’t know what text to display for each row.
That is something we need to do now, and we do that by providing a
delegate to the picker view. The delegate of an instance of UIPickerView has to conform to the UIPickerViewDelegate protocol and must
implement all the @required methods
of that protocol.
There is only one method in the UIPickerViewDelegate we are interested in: the
pickerView:titleForRow:forComponent:
method. This method will pass you the index of the current section and
the index of the current row in that section for a picker view, and it
expects you to return an instance of NSString. This string will then get rendered
for that specific row inside the component. In here, I would simply like
to display the first row as Row 1, and then continue to Row 2, Row 3,
etc., till the end. Remember, we also have to set the delegate property of our picker view:
self.myPicker.delegate=self;
And now we will handle the delegate method we just learned about:
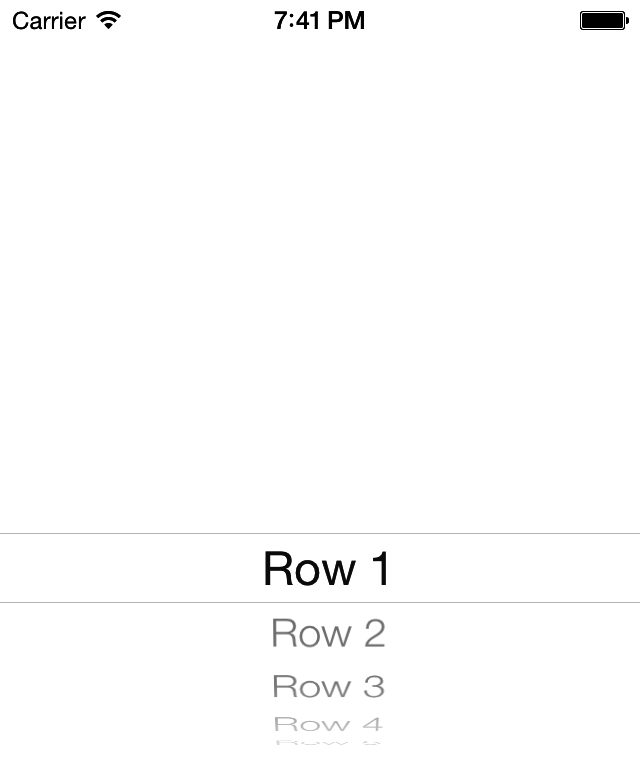
-(NSString*)pickerView:(UIPickerView*)pickerViewtitleForRow:(NSInteger)rowforComponent:(NSInteger)component{if([pickerViewisEqual:self.myPicker]){/* Row is zero-based and we want the first row (with index 0)to be rendered as Row 1, so we have to +1 every row index */return[NSStringstringWithFormat:@"Row %ld",(long)row+1];}returnnil;}
Now let’s run our app and see what happens (Figure 1-12).
Picker views in iOS 6 and older can highlight the current
selection using a property called showsSelectionIndicator, which by default is
set to NO. You can either directly
set the value of this property to YES
or use the setShowsSelectionIndicator: method of the
picker view to turn this indicator on:
self.myPicker.showsSelectionIndicator=YES;
Now imagine that you have created this picker view in your
final application. What is the use of a picker view if we cannot detect
what the user has actually selected in each one of its components? Well,
it’s good that Apple has already thought of that and given us
the ability to ask the picker view what is selected. Call the selectedRowInComponent: method of a UIPickerView and pass the zero-based index of
a component. The method will return an integer indicating the zero-based
index of the row that is currently selected in that component.
If you need to modify the values in your picker view at runtime,
you need to make sure that your picker view reloads its data from its
data source and delegate. To do that, you can either force all the
components to reload their data, using the reloadAllComponents method, or you can ask a
specific component to reload its data, using the reloadComponent: method and passing the index
of the component that has to be reloaded.
Get iOS 7 Programming Cookbook now with the O’Reilly learning platform.
O’Reilly members experience books, live events, courses curated by job role, and more from O’Reilly and nearly 200 top publishers.


