Chapter 4. Object Types
In the preceding chapter, I discussed some built-in object types. But I have not yet described how object types in general really work. As I mentioned in Chapter 1, Swift object types come in three flavors: enum, struct, and class. What are the differences between them? And how would you create your own object type? That’s what this chapter is about. I’ll describe object types in general, and then each of the three flavors. Then I’ll explain three Swift ways of giving an object type greater flexibility: protocols, generics, and extensions. Finally, the survey of Swift’s built-in types will come to an end with three umbrella types and three collection types.
Object Type Declarations and Features
Object types are declared with the flavor of the object type (enum, struct, or class), the name of the object type (which should start with a capital letter), and curly braces:
class Manny {
}
struct Moe {
}
enum Jack {
}
An object type declaration can appear anywhere: at the top level of a file, at the top level of another object type declaration, or in the body of a function. The visibility (scope), and hence the usability, of this object type by other code depends upon where it appears (see Chapter 1):
- Object types declared at the top level of a file will, by default, be visible to all files in your project (module). This is the usual place for object type declarations.
- Sometimes it’s useful to declare a type inside the declaration of another type, thus giving it a namespace.
- An object type declared within the body of a function will exist only inside the scope of the curly braces that surround it; such declarations are legal but rare.
Declarations for any object type may contain within their curly braces the following things:
- Initializers
- An object type is merely the type of an object. The purpose of declaring an object type will usually (though not always) be so that you can make an actual object — an instance — that has this type. An initializer is a special function, declared and called in a special way, allowing you to do that.
- Properties
A variable declared at the top level of an object type declaration is a property. By default, it is an instance property. An instance property is scoped to an instance: it is accessed through a particular instance of this type, and its value can be different for every instance of this type.
Alternatively, a property can be a static/class property. For an enum or struct, it is declared with the keyword
static; for a class, it may instead be declared with the keywordclass. Such a property belongs to the object type itself: it is accessed through the name of the type, and it has just one value, associated with the type.- Methods
A function declared at the top level of an object type declaration is a method. By default, it is an instance method: it is called by sending a message to a particular instance of this type. Inside an instance method,
selfis the instance.Alternatively, a function can be a static/class method. For an enum or struct, it is declared with the keyword
static; for a class, it may be declared instead with the keywordclass. It is called by sending a message to the type. Inside a static/class method,selfis the type.- Subscripts
- A subscript is a special kind of instance method. It is called by appending square brackets to an instance reference.
- Object type declarations
- An object type declaration can contain an object type declaration. From inside the containing object type, the contained object type is in scope; from outside the containing object type, the contained object type must be referred to through the containing object type. Thus, the containing object type is a namespace for the contained object type.
Initializers
An initializer is a function called in order to bring an instance of an object type into existence. Strictly speaking, it is a static/class method, because it is called by talking to the object type. It is called using special syntax: a reference to the type is followed directly by parentheses, as if the type itself were a function. When you use that syntax, a new instance is created, the corresponding initializer function is called, and the new instance is returned as a result. You will need to do something with the returned instance, such as assigning it to a variable, in order to work with it further.
For example, suppose we have a Dog class:
class Dog {
}
Then we can make a Dog instance like this:
Dog()
That code, however, though legal, is silly. We have created a Dog instance, but there is no reference to that instance. Without such a reference, the Dog instance comes into existence and then immediately vanishes in a puff of smoke. The usual sort of thing is more like this:
let fido = Dog()
Now our Dog instance will persist as long as the variable fido persists (see Chapter 3) — and the variable fido gives us a reference to our Dog instance, so that we can use it.
Observe that Dog() calls an initializer even though our Dog class doesn’t declare any initializers! The reason is that object types may have implicit initializers. These are a convenience that save you from the trouble of writing your own initializers. But you can write your own initializers, and you will often do so.
An initializer is kind of function, and its declaration syntax is rather like that of a function. To declare an initializer, you use the keyword init followed by a parameter list, followed by curly braces containing the code. What distinguishes one initializer from another is the parameter list; an object type can have multiple initializers, distinguished by their parameters. The parameter names are externalized by default (though of course you can prevent this by putting an underscore before a parameter name). A frequent use of the parameters is to set the values of instance properties.
For example, here’s a Dog class with two instance properties, name (a String) and license (an Int). We give these instance properties default values that are effectively placeholders — an empty string and the number zero. Then we declare three initializers, so that the caller can create a Dog instance in three different ways: by supplying a name, by supplying a license number, or by supplying both. In each initializer, the parameters supplied are used to set the values of the corresponding properties:
class Dog {
    var name = ""
    var license = 0
    init(name:String) {
        self.name = name
    }
    init(license:Int) {
        self.license = license
    }
    init(name:String, license:Int) {
        self.name = name
        self.license = license
    }
}
Observe that in that code, in each initializer, I’ve given each parameter the same name as the property to which it corresponds. There’s no reason to do that apart from stylistic clarity. In the code for each initializer, I can distinguish the local variable supplied as the parameter from the property by using self to access the property.
The result of that declaration is that I can create a Dog in three different ways:
let fido = Dog(name:"Fido")
let rover = Dog(license:1234)
let spot = Dog(name:"Spot", license:1357)
What I can’t do is to create a Dog with no initializer parameters. I wrote initializers, so my implicit initializer went away. This code is no longer legal:
let puff = Dog() // compile error
Of course, I could make that code legal by explicitly declaring an initializer with no parameters:
class Dog {
    var name = ""
    var license = 0
    init() {
    }
    init(name:String) {
        self.name = name
    }
    init(license:Int) {
        self.license = license
    }
    init(name:String, license:Int) {
        self.name = name
        self.license = license
    }
}
Now, the truth is that we don’t need those four initializers, because an initializer is a function, and a function’s parameters can have default values. Thus, I can condense all that code into a single initializer, like this:
class Dog {
    var name = ""
    var license = 0
    init(name:String = "", license:Int = 0) {
        self.name = name
        self.license = license
    }
}
I can still make an actual Dog instance in four different ways:
let fido = Dog(name:"Fido")
let rover = Dog(license:1234)
let spot = Dog(name:"Spot", license:1357)
let puff = Dog()
Now comes the Really Interesting Part. In my property declarations, I can eliminate the assignment of default initial values (as long as I declare explicitly the type of each property):
class Dog {
    var name : String // no default value!
    var license : Int // no default value!
    init(name:String = "", license:Int = 0) {
        self.name = name
        self.license = license
    }
}
That code is legal (and common) — because an initializer initializes! In other words, I don’t have to give my properties initial values in their declarations, provided I give them initial values in all initializers. That way, I am guaranteed that all my instance properties have values when the instance comes into existence, which is what matters. Conversely, an instance property without an initial value when the instance comes into existence is illegal. A property must be initialized either as part of its declaration or by every initializer, and the compiler will stop you otherwise.
The Swift compiler’s insistence that all instance properties be properly initialized is a valuable feature of Swift. (Contrast Objective-C, where instance properties can go uninitialized — and often do, leading to mysterious errors later.) Don’t fight the compiler; work with it. The compiler will help you by giving you an error message (“Return from initializer without initializing all stored properties”) until all your initializers initialize all your instance properties:
class Dog {
    var name : String
    var license : Int
    init(name:String = "") {
        self.name = name // compile error
    }
}
Because setting an instance property in an initializer counts as initialization, it is legal even if the instance property is a constant declared with let:
class Dog {
    let name : String
    let license : Int
    init(name:String = "", license:Int = 0) {
        self.name = name
        self.license = license
    }
}
In our artificial examples, we have been very generous with our initializer: we are letting the caller instantiate a Dog without supplying a name argument or a license argument. Usually, however, the purpose of an initializer is just the opposite: we want to force the caller to supply all needed information at instantiation time. Thus, in real life, it is much more likely that our Dog class would look like this:
class Dog {
    let name : String
    let license : Int
    init(name:String, license:Int) {
        self.name = name
        self.license = license
    }
}
In that code, our Dog has a name and a license, and values for these must be supplied at instantiation time (there are no default values), and those values can never be changed thereafter (these properties are constants). In this way, we enforce a rule that every Dog must have a meaningful name and license. There is now only one way to make a Dog:
let spot = Dog(name:"Spot", license:1357)
Optional properties
Sometimes, there is no meaningful default value that can be assigned to an instance property during initialization. For example, perhaps the initial value of this property will not be obtained until some time has elapsed after this instance has come into existence. This situation conflicts with the requirement that all instance properties be initialized either in their declaration or through an initializer. You could, of course, just circumvent the problem by assigning a default initial value anyway; but this fails to communicate to your own code the fact that this isn’t a “real” value.
A sensible and common solution, as I explained in Chapter 3, is to declare your instance property as a var having an Optional type. An Optional has a value, namely nil, signifying that no “real” value has been supplied; and an Optional var is initialized to nil automatically. Thus, your code can test this instance property against nil and, if it is nil, it won’t use the property. Later, the property will be given its “real” value. Of course, that value is now wrapped in an Optional; but if you declare this property as an implicitly unwrapped Optional, you have the additional advantage of being able to use the wrapped value directly, without explicitly unwrapping it — as if this weren’t an Optional at all — once you’re sure it is safe to do so:
// this property will be set automatically when the nib loads
@IBOutlet var myButton: UIButton!
// this property will be set after time-consuming gathering of data
var albums : [MPMediaItemCollection]!
Referring to self
Except in order to set an instance property, an initializer may not refer to self, explicitly or implicitly, until after all instance properties are initialized. This rule guarantees that the instance is fully formed before it is used. This code, for example, is illegal:
struct Cat {
    var name : String
    var license : Int
    init(name:String, license:Int) {
        self.name = name
        meow() // too soon - compile error
        self.license = license
    }
    func meow() {
        println("meow")
    }
}
The call to the instance method meow is implicitly a reference to self — it means self.meow(). The initializer can say that, but not until it has fulfilled its primary contract of initializing all uninitialized properties. The call to the instance method meow simply needs to be moved down one line, so that it comes after both name and license have been initialized.
Delegating initializers
Initializers within an object type can call one another by using the special syntax self.init(...). This is the only situation in which init can be used explicitly as the name of a called method. An initializer that calls another initializer is called a delegating initializer. When an initializer delegates, the other initializer — the one that it delegates to — must completely initialize the instance first, and then the delegating initializer can work with the fully initialized instance, possibly setting again a var property that was already set by the initializer that it delegated to. A delegating initializer cannot refer to self, not even to set a property, until after the call to the other initializer. For example:
struct Digit {
    var number : Int
    var meaningOfLife : Bool
    init(number:Int) {
        self.number = number
        self.meaningOfLife = false
    }
    init() {
        self.init(number:42)
        self.meaningOfLife = true
    }
}
Moreover, a delegating initializer cannot set an immutable property (a let variable) at all. That is because it cannot refer to the property until after it has called the other initializer, and at that point the instance is fully formed — initialization proper is over, and the door for initialization of immutable properties has closed. Thus, the preceding code would be illegal if meaningOfLife were declared with let, because the second initializer is a delegating initializer and cannot set an immutable property.
Be careful not to let an initializer delegate to itself, or to create a vicious circle of delegating initializers; the compiler won’t stop you (I regard that as a bug), but your running app will hang. For example, don’t say this:
struct Digit { // do not do this!
    var number : Int = 100
    init(value:Int) {
        self.init(number:value)
    }
    init(number:Int) {
        self.init(value:number)
    }
}
Failable initializers
An initializer can return an Optional wrapping the new instance. In this way, nil can be returned to signal failure. An initializer that behaves this way is a failable initializer. To mark an initializer as failable when declaring it, put a question mark (or, for an implicitly unwrapped Optional, an exclamation mark) after the keyword init. If your failable initializer needs to return nil, explicitly write return nil. It is up to the caller to test the resulting Optional for equivalence with nil, unwrap it, and so forth, as with any Optional.
Here’s a version of Dog with an initializer that returns an implicitly unwrapped Optional, returning nil if the name: or license: arguments are invalid:
class Dog {
    let name : String
    let license : Int
    init!(name:String, license:Int) {
        self.name = name
        self.license = license
        if name.isEmpty {
            return nil
        }
        if license <= 0 {
            return nil
        }
    }
}
The resulting value is typed as Dog! — the Optional is implicitly unwrapped — so the caller who instantiates a Dog in this way can use the result directly as if it were simply a Dog instance. But if nil was returned, any attempt on the caller’s part to access members of the Dog instance without testing for nil will result in a crash at runtime:
let fido = Dog(name:"", license:0)
let name = fido.name // crash
Cocoa and Objective-C conventionally return nil from initializers to signal failure; the API for such initializers has been hand-tweaked as a Swift failable initializer if initialization really might fail. For example, the UIImage initializer init?(named:) is a failable initializer, because there might be no image with the given name. It is not implicitly unwrapped, so the resulting value is a UIImage? and must be unwrapped before you can use it. (Most Objective-C initializers, however, are not bridged as failable initializers, even though in theory any Objective-C initializer might return nil.)
Properties
A property is a variable — one that happens to be declared at the top level of an object type declaration. That means that everything said about variables in Chapter 3 applies. A property has a fixed type; it can be declared with var or let; it can be stored or computed; it can have setter observers. An instance property can also be declared lazy.
A stored instance property must be given an initial value. But, as I explained a moment ago, this doesn’t have to be through assignment in the declaration; it can be through an initializer instead. Setter observers are not called during initialization of properties.
Code that initializes a property cannot fetch an instance property or call an instance method. Such behavior would require a reference, explicit or implicit, to self; and during initialization, there is no self yet — self is exactly what we are in the process of initializing. For example, this is illegal (and removing the explicit references to self doesn’t make it legal):
class Moi {
    let first = "Matt"
    let last = "Neuburg"
    let whole = self.first + " " + self.last // compile error
}
One solution in that situation would be to make whole a computed property:
class Moi {
    let first = "Matt"
    let last = "Neuburg"
    var whole : String {
        return self.first + " " + self.last
    }
}
That’s legal because the computation won’t actually be performed until after self exists. Another solution is to declare whole as lazy:
class Moi {
    let first = "Matt"
    let last = "Neuburg"
    lazy var whole : String = self.first + " " + self.last
}
Again, that’s legal because the reference to self won’t be performed until after self exists. Similarly, a property initializer can’t call an instance method:
class Moi {
    let first = "Matt"
    let last = "Neuburg"
    var whole : String = self.wholeName() // compile error
    func wholeName() -> String {
        return self.first + " " + self.last
    }
}
But a computed property can:
class Moi {
    let first = "Matt"
    let last = "Neuburg"
    var whole : String {return self.wholeName()}
    func wholeName() -> String {
        return self.first + " " + self.last
    }
}
And so can a lazy property:
class Moi {
    let first = "Matt"
    let last = "Neuburg"
    lazy var whole : String = self.wholeName()
    func wholeName() -> String {
        return self.first + " " + self.last
    }
}
As I demonstrated in Chapter 3, a variable’s initializer can consist of multiple lines of code if you write it as a define-and-call anonymous function. If this variable is a property, and if that code is to refer to self, the variable must be declared lazy:
class Moi {
    let first = "Matt"
    let last = "Neuburg"
    lazy var whole : String = {
        var s = self.first
        s.extend(" ")
        s.extend(self.last)
        return s
    }()
}
If a property is an instance property (the default), it can be accessed only through an instance, and its value is separate for each instance. For example, let’s start once again with a Dog class:
class Dog {
    let name : String
    let license : Int
    init(name:String, license:Int) {
        self.name = name
        self.license = license
    }
}
Our Dog class has a name instance property. Then we can make two different Dog instances with two different name values, and we can access each Dog instance’s name through the instance:
let fido = Dog(name:"Fido", license:1234)
let spot = Dog(name:"Spot", license:1357)
let aName = fido.name // "Fido"
let anotherName = spot.name // "Spot"
A static/class property, on the other hand, is accessed through the type, and is scoped to the type, which usually means that it is global and unique. I’ll use a struct as an example:
struct Greeting {
    static let friendly = "hello there"
    static let hostile = "go away"
}
Now code elsewhere can fetch the values of Greeting.friendly and Greeting.hostile. That example is neither artificial nor trivial; immutable static/class properties are a convenient and effective way to supply your code with nicely namespaced constants.
Unlike instance properties, static properties can be initialized with reference to one another; the reason is that static property initializers are lazy (see Chapter 3):
struct Greeting {
    static let friendly = "hello there"
    static let hostile = "go away"
    static let ambivalent = friendly + " but " + hostile
}
Notice the lack of self in that code. In static/class code, self means the type itself. I like to use self explicitly wherever it would be implicit, but here I can’t use it without arousing the ire of the compiler (I regard this as a bug). To clarify the status of the terms friendly and hostile, I can use the name of the type, just as any other code would do:
struct Greeting {
    static let friendly = "hello there"
    static let hostile = "go away"
    static let ambivalent = Greeting.friendly + " but " + Greeting.hostile
}
On the other hand, if I write ambivalent as a computed property, I can use self:
struct Greeting {
    static let friendly = "hello there"
    static let hostile = "go away"
    static var ambivalent : String {
        return self.friendly + " but " + self.hostile
    }
}
On the other other hand, I’m not allowed to use self when the initial value is a called anonymous function (again, I regard this as a bug):
struct Greeting {
    static let friendly = "hello there"
    static let hostile = "go away"
    static var ambivalent : String = {
        return self.friendly + " but " + self.hostile // compile error
    }()
}
Methods
A method is a function — one that happens to be declared at the top level of an object type declaration. That means that everything said about functions in Chapter 2 applies.
By default, a method is an instance method. This means that it can be accessed only through an instance. Within the body of an instance method, self is the instance. To illustrate, let’s continue to develop our Dog class:
class Dog {
    let name : String
    let license : Int
    let whatDogsSay = "Woof"
    init(name:String, license:Int) {
        self.name = name
        self.license = license
    }
    func bark() {
        println(self.whatDogsSay)
    }
    func speak() {
        self.bark()
        println("I'm \(self.name)")
    }
}
Now I can make a Dog instance and tell it to speak:
let fido = Dog(name:"Fido", license:1234)
fido.speak() // Woof I'm Fido
In my Dog class, the speak method calls the instance method bark by way of self, and obtains the value of the instance property name by way of self; and the bark instance method obtains the value of the instance property whatDogsSay by way of self. This is because instance code can use self to refer to this instance. Such code can omit self if the reference is unambiguous; thus, for example, I could have written this:
func speak() {
    bark()
    println("I'm \(name)")
}
But I never write code like that (except by accident). Omitting self, in my view, makes the code harder to read and maintain; the loose terms bark and name seem mysterious and confusing. Moreover, sometimes self cannot be omitted. For example, in my implementation of init(name:license:), I must use self to disambiguate between the incoming local parameter name and the property self.name. Therefore, I prefer to write self explicitly wherever it can be written.
Recall that the default rules for externalization of method parameter names are special: by default, the name of the first parameter is not externalized and the names of the other parameters are. This is the example I gave in Chapter 2:
class Dog {
    func say(s:String, times:Int) {
        for _ in 1...times {
            println(s)
        }
    }
}
That method’s name is say(times:), and here’s how to call it:
let d = Dog()
d.say("woof", times:3)
A static/class method is accessed through the type, and self means the type. I’ll use our Greeting struct as an example:
struct Greeting {
    static let friendly = "hello there"
    static let hostile = "go away"
    static var ambivalent : String {
        return self.friendly + " but " + self.hostile
    }
    static func beFriendly() {
        println(self.friendly)
    }
}
And here’s how to call the static beFriendly method:
Greeting.beFriendly() // hello there
There is a kind of conceptual wall between static/class members, on the one hand, and instance members on the other; even though they may be declared within the same object type declaration, they inhabit different worlds. A static/class method can’t refer to “the instance” because there is no instance; thus, a static/class method cannot directly refer to any instance properties or call any instance methods. An instance method, on the other hand, can refer to the type by name, and can thus access static/class properties and can call static/class methods. (I’ll talk later in this chapter about another way in which an instance method can refer to the type.)
For example, let’s return to our Dog class and grapple with the question of what dogs say. Presume that all dogs say the same thing. We’d prefer, therefore, to express whatDogsSay not at instance level but at class level. This would be a good use of a static property. Here’s a simplified Dog class that illustrates:
class Dog {
    static var whatDogsSay = "Woof"
    func bark() {
        println(Dog.whatDogsSay)
    }
}
Now we can make a Dog instance and tell it to bark:
let fido = Dog()
fido.bark() // Woof
Subscripts
A subscript is an instance method that is called in a special way — by appending square brackets to an instance reference. The square brackets can contain arguments to be passed to the subscript method. You can use this feature for whatever you like, but it is suitable particularly for situations where this is an object type with elements that can be appropriately accessed by key or by index number. I have already described (in Chapter 3) the use of this syntax with strings, and it is familiar also from dictionaries and arrays; you can use square brackets with strings and dictionaries and arrays exactly because Swift’s String and Dictionary and Array types declare subscript methods.
The syntax for declaring a subscript method is somewhat like a function declaration and somewhat like a computed property declaration. That’s no coincidence! A subscript is like a function in that it can take parameters: arguments can appear in the square brackets when a subscript method is called. A subscript is like a computed property in that the call is used like a reference to a property: you can fetch its value or you can assign into it.
To illustrate, I’ll write a struct that treats an integer as if it were a string, returning a digit that can be specified in square brackets; for simplicity, I’m deliberately omitting any sort of error-checking:
struct Digit {
var number : Int
init(_ n:Int) {
self.number = n
}
subscript(ix:Int) -> Int { 
 get {
get {  let s = String(self.number)
return String(Array(s)[ix]).toInt()!
}
}
}
let s = String(self.number)
return String(Array(s)[ix]).toInt()!
}
}
}-
After the keyword
subscriptwe have a parameter list stating what parameters are to appear inside the square brackets; by default, their names are not externalized.-
Then, after the arrow operator, we have the type of value that is passed out (when the getter is called) or in (when the setter is called); this is parallel to the type declared for a computed property, even though the syntax with the arrow operator is like the syntax for the returned value in a function declaration.
-
Finally, we have curly braces whose contents are exactly like those of a computed property. You can have
getand curly braces for the getter, andsetand curly braces for the setter. If there’s a getter and no setter, the wordgetand its curly braces can be omitted. The setter receives the new value asnewValue, but you can change that name by supplying a different name in parentheses after the wordset.
Here’s an example of calling the getter; the instance with appended square brackets containing the arguments is used just as you were getting a property value:
var d = Digit(1234)
let aDigit = d[1] // 2
Now I’ll expand my Digit struct so that its subscript method includes a setter (and again I’ll omit error-checking):
struct Digit {
    var number : Int
    init(_ n:Int) {
        self.number = n
    }
    subscript(ix:Int) -> Int {
        get {
            let s = String(self.number)
            return String(Array(s)[ix]).toInt()!
        }
        set {
            var arr = Array(String(self.number))
            arr[ix] = Character(String(newValue))
            self.number = String(arr).toInt()!
        }
    }
}
And here’s an example of calling the setter; the instance with appended square brackets containing the arguments is used just as if you were setting a property value:
var d = Digit(1234)
d[0] = 2 // now d.number is 2234
An object type can declare multiple subscript methods, provided their signatures distinguish them as different functions.
Namespaced Object Types
An object type may be declared inside an object type declaration:
class Dog {
    struct Noise {
        static var noise = "Woof"
    }
    func bark() {
        println(Dog.Noise.noise)
    }
}
Such an object type is no different from any other object type, but the rules for referring to it from the outside are changed; the surrounding object type acts as a namespace, and must be referred to explicitly in order to access the embedded object type:
Dog.Noise.noise = "Arf"
The Noise struct is thus namespaced inside the Dog class. This namespacing provides clarity: the name Noise does not float free, but is explicitly associated with the Dog class to which it belongs. Namespacing also allows more than one Noise struct to exist, without any clash of names. Swift built-in object types often take advantage of namespacing; for example, the String struct is one of several structs that contain an Index struct, with no clash of names.
(It is also possible, through Swift’s privacy rules, to hide an embedded object type, in such a way that it cannot be referenced from the outside at all. This is useful for organization and encapsulation when one object type needs a second object type as a helper, but no other object type needs to know about the second object type. Privacy is discussed in Chapter 5.)
Instance References
On the whole, the names of object types will be global, and you will be able to refer to them simply by using their names. Instances, however, are another story. Instances must be deliberately created, one by one. That is what instantiation is for. Once you have created an instance, you can cause that instance to persist, by storing the instance in a variable with sufficient lifetime; using that variable as a reference, you can send instance messages to that instance, accessing instance properties and calling instance methods.
Direct instantiation of an object type is the act of creating a brand new instance of that type, directly, yourself. It involves you calling an initializer. In many cases, though, some other object will create or provide the instance for you.
A simple example is what happens when you manipulate a String, like this:
let s = "Hello, world"
let s2 = s.uppercaseString
In that code, we ended up with two String instances. The first one, s, we created using a string literal. The second one, s2, was created for us when we accessed the first string’s uppercaseString property. Thus we have two instances, and they will persist independently as long as our references to them persist; but we didn’t get either of them by calling an initializer.
In other cases, the instance you are interested in will already exist in some persistent fashion; the problem will then be to find a way of getting a reference to that instance.
Let’s say, for example, that this is a real-life iOS app. You will certainly have a root view controller, which will be an instance of some type of UIViewController. Let’s say it’s an instance of the ViewController class. Once your app is up and running, this instance already exists. It would then be utterly counterproductive to attempt to speak to the root view controller by instantiating the ViewController class:
let theVC = ViewController()
All that code does is to make a second, different instance of the ViewController class, and your messages to that instance will be wasted, as it is not the particular already existing instance that you wanted to talk to. That is a very common beginner mistake; don’t make it.
Getting a reference to an already existing instance can be, of itself, an interesting problem. Instantiation is definitely not how to do it. But how do you do it? Well, it depends. In this particular situation, the goal is to obtain, from any code, a reference to your app’s root view controller instance. I’ll describe, just for the sake of the example, how you would do it.
Getting a reference always starts with something you do have a reference to. Often, this will be a class. In iOS programming, the app itself is an instance, and there is a class that holds a reference to that instance and will hand it to you whenever you ask for it. That class is the UIApplication class, and the way to get a reference to the app instance is to call its sharedApplication class method:
let app = UIApplication.sharedApplication()
Now we have a reference to the application instance. The application instance has a keyWindow property:
let window = app.keyWindow
Now we have a reference to our app’s key window. That window owns the root view controller, and will hand us a reference to it, as its own rootViewController property; the app’s keyWindow is an Optional, so to get at its rootViewController we must unwrap the Optional:
let vc = window?.rootViewController
And voilà, we have a reference to our app’s root view controller. In this case, we don’t need to worry about the persistence of the resulting instance; it persists as part of the app itself. To obtain the reference to this persistent instance, we created, in effect, a chain of method calls and properties leading from the known to the unknown, from a globally available class to the particular desired instance:
let app = UIApplication.sharedApplication()
let window = app.keyWindow
let vc = window?.rootViewController
Clearly, we can write that chain as a single chain, using repeated dot-notation:
let vc = UIApplication.sharedApplication().keyWindow?.rootViewController
You don’t have to chain your instance messages into a single line — chaining through multiple let assignments is completely efficient, possibly more legible, and certainly easier to debug — but it’s a handly formulaic convenience and is particularly characteristic of dot-notated object-oriented languages like Swift.
The general problem of getting a reference to a particular already existing instance is so interesting and pervasive that I will devote much of Chapter 13 to it.
Enums
An enum is an object type whose instances represent distinct predefined alternative values. Think of it as a list of known possibilities. An enum is the Swift way to express a set of constants that are alternatives to one another.
For example, in my Albumen app, different instances of the same view controller can list any of four different sorts of music library contents: albums, playlists, podcasts, or audiobooks. The view controller’s behavior is slightly different in each case. So I need a sort of four-way switch that I can set once when the view controller is instantiated, saying which sort of contents this view controller is to display. That sounds like an enum!
Here’s the basic declaration for that enum:
enum ListType {
    case Albums
    case Playlists
    case Podcasts
    case Books
}
The enum declaration includes case statements. Each case is the name of one of the alternatives. Every instance of a ListType will represent exactly one alternative, which cannot be changed.
Observe that my ListType enum doesn’t have an initializer. You can write an initializer for an enum, but there is a default mode of initialization that you’ll probably use instead most of the time: use the name of the enum followed by dot-notation and one of the cases. For example, here’s how to make an instance of ListType representing the Albums case:
let type = ListType.Albums
As a shortcut, if the type is known in advance, you can omit the name of the enum; the bare case must still be preceded by a dot. For example:
let type : ListType = .Albums
You can’t say .Albums just anywhere out of the blue, because Swift doesn’t know what enum it belongs to. But in that code, the variable is explicitly declared as a ListType, so Swift knows what .Albums means. A similar thing happens when passing an enum instance as an argument in a function call:
func listTypeExpecter(type:ListType) {}
listTypeExpecter(.Albums)
In the second line, I create an instance of ListType and pass it, all in one move, and without having to include the name of the enum. That’s because Swift knows from the function declaration that a ListType is expected here.
In real life, the space savings when omitting the enum name can be considerable — especially because, when talking to Cocoa, the enum type names are often long. For example:
let v = UIView()
v.autoresizingMask = .None
A UIView’s autoresizingMask property is typed as a UIViewAutoresizing enum. Our code is neater and simpler because we don’t have to include the name UIViewAutoresizing explicitly here. .None is nicer than UIViewAutoresizing.None. But either is legal.
Tip
Code inside an enum declaration can use a case name without dot-notation. The enum is a namespace; code inside the declaration is inside the namespace, so it can see the case names directly.
Instances of an enum with the same case are regarded as equal. Thus, you can compare an enum instance for equality against a case. Again, the type of enum is known from the first term in the comparison, so the second term can omit the enum name:
func listTypeExpecter(type:ListType) {
    if type == .Albums {
        println("it's albums")
    }
}
listTypeExpecter(.Albums) // "it's albums"
In the console, logging an enum with println yields, by default, an opaque, unhelpful description — (Enum Value). But the Xcode debugger’s variables list displays the actual case name (Figure 4-1).

Case With Fixed Value
Optionally, when you declare an enum, you can add a type declaration. The cases then all carry with them a fixed (constant) value of that type. If the type is an integer numeric type, the values can be implicitly assigned, and will start at zero automatically:
enum ListType : Int {
    case Albums
    case Playlists
    case Podcasts
    case Books
}
In that code, .Albums carries a value of 0, .Playlists carries of a value of 1, and so on. Alternatively, you can assign values as part of the case declarations, and if the type is not an integer type, you must do so:
enum ListType : String {
    case Albums = "Albums"
    case Playlists = "Playlists"
    case Podcasts = "Podcasts"
    case Books = "Audiobooks"
}
The types attached to an enum in this way are limited to numbers and strings, and the values assigned must be literals. The values carried by the cases are called their raw values. An instance of this enum has just one case, so it has just one raw value, which can be retrieved with its rawValue property:
let type = ListType.Albums
println(type.rawValue) // Albums
Having each case carry a value with it can be quite useful. In my Albumen app, the ListType cases really do have those String values, and so when the view controller wants to know what title string to put at the top of the screen, it simply retrieves the current type’s rawValue.
The raw value associated with each case must be unique within this enum; the compiler will enforce this rule. Therefore, the mapping works the other way: given a raw value, you can derive the case. For example, you can instantiate an enum that has raw values by using its rawValue: initializer:
let type = ListType(rawValue:"Albums")
However, the attempt to instantiate the enum in this way might fail, because you might supply a raw value corresponding to no case; therefore, this is a failable initializer, and the value returned is an Optional. In that code, type is not a ListType; it’s an Optional wrapping a ListType. This might not be terribly important, however, because the thing you are most likely to want to do with an enum is to compare it for equality with a case of the enum; you can do that with an Optional without unwrapping it. This code is legal and works correctly:
let type = ListType(rawValue:"Albums")
if type == .Albums { // ...
Other uses of an Optional wrapping an enum, however, may require that you unwrap it first.
Case With Typed Value
The raw values discussed in the preceding section are fixed in advance: a given case carries with it a certain raw value, and that’s that. Alternatively, you can construct a case whose constant value can be set when the instance is created. To do so, do not declare any type for the enum as a whole; instead, append a tuple type to the name of the case. There will usually be just one type in this tuple, so what you’ll write will look like a type name in parentheses. Any type may be declared. Here’s an example:
enum Error {
    case Number(Int)
    case Message(String)
    case Fatal
}
That code means that, at instantiation time, an Error instance with the .Number case must be assigned an Int value, an Error instance with the .Message case must be assigned a String value, and an Error instance with the .Fatal case can’t be assigned any value. Instantiation with assignment of a value is really a way of calling an initialization function, so to supply the value, you pass it as an argument in parentheses:
let err : Error = .Number(4)
The attached value here is called an associated value. What you are supplying here is actually a tuple, so it can contain literal values or value references; this is legal:
let num = 4
let err : Error = .Number(num)
The tuple can contain more than one value, with or without names; if the values have names, they must be used at initialization time:
enum Error {
    case Number(Int)
    case Message(String)
    case Fatal(n:Int, s:String)
}
let err : Error = .Fatal(n:-12, s:"Oh the horror")
Now let’s talk about how to extract the associated value from an actual instance of the enum later on. This requires an elaborate dance using a switch statement to distinguish each case along with a variable binding to capture the associated value in a variable name. I’ll explain about switch statements with variable bindings in Chapter 5; until then, you’ll just have to trust me. The typical syntax will have this form:
switch err {
case .Number(let theNumber):
    println("number: \(theNumber)")
case .Message(let theMessage):
    println("message: \(theMessage)")
case .Fatal(let theNumber, let theMessage):
    println("number: \(theNumber), message: \(theMessage)")
}
At the risk of sounding like a magician explaining his best trick, I will now reveal how an Optional works. An Optional is simply an enum with two cases: .None and .Some. If it is .None, it carries no associated value, and it equates to nil. If it is .Some, it carries the wrapped value as its associated value. Thus, we can unwrap an Optional using exactly the same switch syntax:
let s : String? = "howdy"
switch s {
case .Some(let theString):
    println(theString) // howdy
case .None:
    println("it's nil")
}
Enum Initializers
An explicit enum initializer must do what the built-in initialization syntax does: it must return a particular case of this enum. To do so, set self to the case. In this example, I’ll expand my ListType enum so that it can be initialized with a numeric argument:
enum ListType : String {
    case Albums = "Albums"
    case Playlists = "Playlists"
    case Podcasts = "Podcasts"
    case Books = "Audiobooks"
    static var cases : [ListType] = [Albums, Playlists, Podcasts, Books]
    init(_ ix:Int) {
        self = ListType.cases[ix]
    }
}
Now there are three ways to make a ListType instance:
let type1 = ListType.Albums
let type2 = ListType(rawValue:"Playlists")!
let type3 = ListType(2) // .Podcasts
In that example, we’ll crash in the third line if the caller passes a number that’s out of range (less than 0 or greater than 3). If we want to avoid that, we can make this a failable initializer and return nil if the number is out of range:
enum ListType : String {
    case Albums = "Albums"
    case Playlists = "Playlists"
    case Podcasts = "Podcasts"
    case Books = "Audiobooks"
    static var cases : [ListType] = [Albums, Playlists, Podcasts, Books]
    init!(_ ix:Int) {
        if !(0...3).contains(ix) {
            return nil
        }
        self = ListType.cases[ix]
    }
}
An enum can have multiple initializers. Enum initializers can delegate to one another by saying self.init(...). The only requirement is that, at some point in the calling chain, self must be set to a case; if that doesn’t happen, your enum won’t compile.
In this example, I improve my ListType enum so that it can be initialized with a String raw value without having to say rawValue: in the call. To do so, I declare a failable initializer with no parameters that delegates to the built-in failable rawValue: initializer:
enum ListType : String {
    case Albums = "Albums"
    case Playlists = "Playlists"
    case Podcasts = "Podcasts"
    case Books = "Audiobooks"
    static var cases : [ListType] = [Albums, Playlists, Podcasts, Books]
    init!(_ ix:Int) {
        if !(0...3).contains(ix) {
            return nil
        }
        self = ListType.cases[ix]
    }
    init!(_ rawValue:String) {
        self.init(rawValue:rawValue)
    }
}
Now there are four ways to make a ListType instance:
let type1 = ListType.Albums
let type2 = ListType(rawValue:"Playlists")
let type3 = ListType(2) // .Podcasts
let type4 = ListType("Playlists")
Enum Properties
An enum can have properties, but there’s a limitation: an enum instance property can’t be a stored property. This makes sense, because if two instances of the same case could have different stored instance property values, they would no longer be equal to one another — which would undermine the nature and purpose of enums.
Computed properties are fine, however. For example, you’ll often implement a description read-only instance property, so as to be able to log something other than an opaque value:
enum ListType : String {
    case Albums = "Albums"
    case Playlists = "Playlists"
    case Podcasts = "Podcasts"
    case Books = "Audiobooks"
    var description : String { return self.rawValue }
}
That gives us a way to learn, in the console, what case we’ve actually got:
let type = ListType.Albums
println(type.description) // "Albums"
Later, I’ll show how to make println fetch our description property value automatically, so that simply calling println(type) will log "Albums".
If an enum instance property is a computed variable with a setter, other code can assign to this property. However, that code’s reference to the enum instance must be a variable (var), not a constant (let). If you try to assign to an enum instance property through a let reference, you’ll get a compile error.
Enum Methods
Writing an enum method is straightforward. Here’s an example from my own code. In a card game, the cards draw themselves as rectangles, ellipses, or diamonds. I’ve abstracted the drawing code into an enum that draws itself as a rectangle, an ellipse, or a diamond, depending on its case:
enum ShapeMaker {
    case Rectangle
    case Ellipse
    case Diamond
    func drawShape (p: CGMutablePath, inRect r : CGRect) -> () {
        switch self {
        case Rectangle:
            CGPathAddRect(p, nil, r)
        case Ellipse:
            CGPathAddEllipseInRect(p, nil, r)
        case Diamond:
            CGPathMoveToPoint(p, nil, r.minX, r.midY)
            CGPathAddLineToPoint(p, nil, r.midX, r.minY)
            CGPathAddLineToPoint(p, nil, r.maxX, r.midY)
            CGPathAddLineToPoint(p, nil, r.midX, r.maxY)
            CGPathCloseSubpath(p)
        }
    }
}
An enum instance method that modifies the enum itself in any way must be marked as mutating. For example, an enum instance method might assign to an instance property of self; even though this is a computed property, such assignment is illegal unless the method is marked as mutating. An enum instance method can even change the case of self, by assigning to self; but again, the method must be marked as mutating. The caller of a mutating instance method must have a variable reference to the instance (var), not a constant reference (let).
In this example, I add an advance method to my ListType enum. The idea is that the cases are a sequence, and the sequence can cycle. By calling advance, I transform a ListType instance into an instance of the next case in the sequence:
enum ListType : String {
    case Albums = "Albums"
    case Playlists = "Playlists"
    case Podcasts = "Podcasts"
    case Books = "Audiobooks"
    static var cases : [ListType] = [Albums, Playlists, Podcasts, Books]
    mutating func advance() {
        var ix = find(ListType.cases, self)!
        ix = (ix + 1) % 4
        self = ListType.cases[ix]
    }
}
And here’s how to call it:
var type = ListType.Books
type.advance() // type is now ListType.Albums
(A subscript setter is always considered mutating and does not have to be specially marked.)
Why Enums?
An enum is a switch whose states have names. There are many situations where that’s a desirable thing. You could implement a multistate value yourself; for example, if there are five possible states, you could use an Int whose values can be 0 through 4. But then you would have to provide a lot of additional overhead — making sure that no other values are used, and interpreting those numeric values correctly. A list of five named cases is much better! Even when there are only two states, an enum is often better than, say, a mere Bool, because the enum’s states have names. With a Bool, you have to know what true and false signify in a particular usage; with an enum, the name of the enum and the names of its cases tell you its significance. Moreover, you can store extra information in an enum’s associated value or raw value; you can’t do that with a mere Bool.
For example, in my LinkSame app, the user can play a real game with a timer or a practice game without a timer. At various places in the code, I need to know which type of game this is. The values are an enum whose cases are .Timed and .Practice:
enum InterfaceMode : Int {
    case Timed = 0
    case Practice = 1
}
The current game type is stored in an instance property interfaceMode, whose value is an InterfaceMode. Thus, it’s easy to set the game type by case name:
// ... initialize new game ...
self.interfaceMode = .Timed
And it’s easy to examine the game type by case name:
// notify of high score only if user is not just practicing
if self.interfaceMode == .Timed { // ...
So what are the raw value integers for? That’s the really clever part. They correspond to the segment indexes of a UISegmentedControl in the interface! Whenever I change the interfaceMode property, a setter observer also selects the corresponding segment of the UISegmentedControl, simply by fetching the rawValue of the current enum case:
var interfaceMode : InterfaceMode = .Timed {
    willSet (mode) {
        self.timedPractice.selectedSegmentIndex = mode.rawValue
    }
}
Structs
A struct is the Swift object type par excellence. An enum, with its fixed set of cases, is a reduced, specialized kind of object. A class, at the other extreme, will often turn out to be overkill; it has some features that a struct lacks, but if you don’t need those features, a struct may be preferable.
Nearly all the built-in object types provided by Swift itself are structs. Of the numerous object type declarations in the Swift header, only three are class declarations. A String is a struct. An Int is a struct. A Range is a struct. An Array is a struct. And so on. That shows how powerful a struct can be.
Struct Initializers, Properties, and Methods
A struct that doesn’t have an explicit initializer and that doesn’t need an explicit initializer — because it has no stored properties, or because all its stored properties are assigned default values as part of their declaration — automatically gets an implicit initializer with no parameters, init(). For example:
struct Digit {
    var number = 42
}
That struct can be initialized by saying Digit(). But if you add any explicit initializers of your own, you lose the implicit initializer:
struct Digit {
    var number = 42
    init(number:Int) {
        self.number = number
    }
}
Now you can say Digit(number:42), but you can’t say Digit() any longer. Of course, you can add an explicit initializer that does the same thing:
struct Digit {
    var number = 42
    init() {}
    init(number:Int) {
        self.number = number
    }
}
Now you can say Digit() once again, as well as Digit(number:42).
A struct that has stored properties and that doesn’t have an explicit initializer automatically gets an implicit initializer derived from its instance properties. This is called the memberwise initializer. For example:
struct Digit {
    var number : Int // can use "let" here
}
That struct is legal — indeed, it is legal even if the number property is declared with let instead of var — even though it seems we have not fulfilled the contract requiring us to initialize all its stored properties in their declaration or in an initializer. The reason is that this struct automatically has a memberwise initializer which does initialize all its properties. In this case, the memberwise initializer is called init(number:).
The memberwise initializer exists even for var stored properties that are assigned a default value in their declaration; thus, this struct has a memberwise initializer init(number:), in addition to its implicit init() initializer:
struct Digit {
    var number = 42
}
But if you add any explicit initializers of your own, you lose the memberwise initializer (though of course you can write an explicit initializer that does the same thing).
If a struct has any explicit initializers, then they must fulfill the contract that all stored properties must be initialized either by direct initialization in the declaration or by all initializers. If a struct has multiple explicit initializers, they can delegate to one another by saying self.init(...). (See the discussion of delegating initializers earlier in this chapter.)
A struct can have instance properties and static properties, and they can be stored or computed variables. If other code wants to set a property of a struct instance, its reference to that instance must be a variable (var), not a constant (let).
A struct can have instance methods and static methods. If an instance method sets a property, it must be marked as mutating, and the caller’s reference to the struct instance must be a variable (var), not a constant (let). A mutating instance method can even replace this instance with another instance, by setting self to a different instance of the same struct. (A subscript setter is always considered mutating and does not have to be specially marked.)
Struct As Namespace
I very often use a degenerate struct as a handy namespace for constants. I call such a struct “degenerate” because it consists entirely of static members; I don’t intend to use this object type to make any instances. Nevertheless, there is absolutely nothing wrong with this use of a struct.
For example, let’s say I’m going to be storing user preference information in Cocoa’s NSUserDefaults. NSUserDefaults is a kind of dictionary: each item is accessed through a key. The keys are typically strings. A common programmer mistake is to write out these string keys literally every time a key is used; if you then misspell a key name, there’s no penalty at compile time, but your code will mysteriously fail to work correctly. The proper approach is to embody these keys as constant strings and use the names of the strings; that way, if you make a mistake typing the name of a string, the compiler can catch you. A struct with static members is a great way to define those constant strings and clump their names into a namespace:
struct Default {
    static let Size = "Size"
    static let Style = "Style"
    static let HazyStripy = "HazyStripy"
}
That code means that I can now refer to an NSUserDefaults key with a name, such as Default.HazyStripy.
If a struct declares static members whose values are instances of the same struct type, you can omit the struct name when supplying a static member where an instance of this struct type is expected — as if the struct were an enum:
struct Thing {
    var val : Int = 0
    static var One : Thing = Thing(val:1)
    static var Two : Thing = Thing(val:2)
}
let thing : Thing = .One // no need to say Thing.One here
The example is artificial, but the situation is not; many Objective-C enums are bridged to Swift as that kind of struct.
Classes
A class is similar to a struct, with the following key differences:
- Reference type
Classes are reference types. This means, among other things, that a class instance has two remarkable features that are not true of struct instances or enum instances:
- Mutability
-
A class instance is mutable in place. Even if your reference to an instance of a class is a constant (
let), you can change the value of an instance property through that reference. An instance method of a class never has to be markedmutating(and cannot be). - Multiple references
- When a given instance of a class is assigned to multiple variables or passed as argument to a function, you get multiple references to one and the same object.
- Inheritance
- A class can have a superclass. A class that has a superclass is a subclass of that superclass. Class types can thus form a hierarchical tree.
In Objective-C, classes are the only object type. Some built-in Swift struct types are magically bridged to Objective-C class types, but your custom struct types don’t have that magic. Thus, in Swift, a primary reason for declaring a class, rather than a struct, is as a form of interchange with Objective-C and Cocoa.
Value Types and Reference Types
A major difference between enums and structs, on the one hand, and classes, on the other hand, is that enums and structs are value types, whereas classes are reference types. When an enum instance or a struct instance is assigned to a variable, or passed to or from a function, what is assigned or passed is essentially a new copy of that instance. But when a class instance is assigned to a variable, or passed to or from a function, what is assigned or passed is a reference to the same instance.
An easy way to encounter this difference in practice is with a constant reference. Consider a variable declared with let. As you know, a variable declared with let cannot be assigned to. Now let’s talk about what happens when the variable refers to a struct instance, and that struct instance has a property — and we try to assign to that property. Even if the property is declared with var, we can’t assign to it through a let reference:
struct Digit {
    var number : Int
    init(_ n:Int) {
        self.number = n
    }
}
let d = Digit(123)
d.number = 42 // compile error: cannot assign to 'number' in 'd'
The reason is that a struct is a value type. This means that the only way to change a property of a struct instance is, behind the scenes, to make a new struct instance and replace the first struct instance with it. But we can’t replace the Digit instance pointed to by d with another Digit instance, because that would mean assigning into d — which the let declaration forbids us to do.
To prove to yourself that what I’m saying is true, try putting a setter observer on a reference to a struct; you will see that setting a property of that struct calls the setter observer:
var d : Digit = Digit(123) {
    didSet {
        println("d was set")
    }
}
d.number = 42 // "d was set"
In that code, we didn’t actually set d; we set a property of d. But it amounts to the same thing, because d refers to a struct instance, a value type. To set a property of the instance referred to by d requires us to set d to another struct instance — which, as the setter observer shows, is what we are doing when we set the number property by way of d.
That is why an instance method of a struct or enum that sets a property of the instance must be marked explicitly with the mutating keyword. For example:
struct Digit {
    var number : Int
    init(_ n:Int) {
        self.number = n
    }
    mutating func changeNumberTo(n:Int) {
        self.number = n
    }
}
Without the mutating keyword, that code won’t compile. The mutating keyword assures the compiler that you understand what’s really happening here: if that method is called, it mutates the instance, and so it can be called only on a reference declared with var, not let. (A subscript setter is always a mutating method; you don’t need to, and cannot, declare a subscript with the mutating keyword.)
None of what I’ve just said, however, applies to class instances! Class instances are reference types, not value types. An instance property of a class, to be settable, must be declared with var, obviously; but the reference to a class instance does not have to be declared with var in order to set that property through that reference:
class Dog {
    var name : String = "Fido"
}
let rover = Dog()
rover.name = "Rover" // fine
In the last line of that code, the class instance pointed to by rover is being mutated in place. No implicit assignment to rover is involved, and so the let declaration is powerless to prevent the mutation. A setter observer on a Dog variable is not called when a property is set:
var rover : Dog = Dog() {
    didSet {
        println("did set rover")
    }
}
rover.name = "Rover" // nothing in console
The setter observer would be called if we were to set rover explicitly (to another Dog instance), but it is not called merely because we change a property of the Dog instance already pointed to by rover.
Those examples involve a declared variable reference. Exactly the same difference between a value type and a reference type may be seen with an argument passed as parameter to a function call. The compiler will stop us in our tracks if we try to assign into an enum parameter’s instance property or a struct parameter’s instance property. This doesn’t compile:
func digitChanger(d:Digit) {
    d.number = 42 // compile error: cannot assign to 'number' in 'd'
}
To make that code compile, we must declare the parameter with var:
func digitChanger(var d:Digit) {
    d.number = 42
}
But this compiles even without the var declaration:
func dogChanger(d:Dog) {
    d.name = "Rover"
}
The underlying reason for these differences between value types and reference types is that, with a reference type, there is in effect a concealed level of indirection between your reference to the instance and the instance itself; the reference actually refers to a pointer to the instance. This, in turn, has another important implication: it means that when a class instance is assigned to a variable or passed as an argument to a function, you can wind up with multiple references to the same object. That is not true of structs and enums.
To prove it, I’ll assign one reference to another and then mutate the second reference — and then I’ll examine what happened to the first reference. Let’s start with the struct:
var d = Digit(123)
println(d.number) // 123
var d2 = d // assignment!
d2.number = 42
println(d.number) // 123
In that code, we changed the number property of d2, a struct instance; but nothing happened to the number property of d. Now let’s try the class:
var fido = Dog()
println(fido.name) // Fido
var rover = fido // assignment!
rover.name = "Rover"
println(fido.name) // Rover
In that code, we changed the name property of rover, a class instance — and the name property of fido was changed as well! That’s because, after the assignment in the third line, fido and rover refer to one and the same instance. When an enum or struct instance is assigned, it is effectively copied; a fresh, separate instance is created. But when a class instance is assigned, you get a new reference to the same instance.
The same thing is true of parameter passing. Let’s start with the struct:
func digitChanger(var d:Digit) {
    d.number = 42
}
var d = Digit(123)
println(d.number) // 123
digitChanger(d)
println(d.number) // 123
We passed our Digit struct instance d to the function digitChanger, which set the number property of its local parameter d to 42. Nevertheless, the number property of our Digit d remains 123. That’s because the Digit that arrives inside digitChanger is quite literally a different Digit. The act of passing a Digit as a function parameter creates a separate copy. But with a class instance, what is passed is a reference to the same instance:
func dogChanger(d:Dog) { // no "var" needed
    d.name = "Rover"
}
var fido = Dog()
println(fido.name) // "Fido"
dogChanger(fido)
println(fido.name) // "Rover"
The change made to d inside the function dogChanger affected our Dog instance fido! Handing a class instance to a function does not copy that instance; it is more like lending that instance to the function.
The ability to generate multiple references to the same instance is significant particularly in a world of object-based programming, where objects persist and can have properties that persist along with them. If object A and object B are both long-lived objects, and if they both have a Dog property (where Dog is a class), and if they have each been handed a reference to one and the same Dog instance, then either object A or object B can mutate its Dog, and this mutation will affect the other’s Dog. You can thus be holding on to an object, only to discover that it has been mutated by someone else behind your back. The problem is even more acute in a multithreaded app, where one and the same object can be mutated differently, in place, by two different threads. None of these issues arise with a value type.
The fact that class instances are reference types can thus be bad. But it is also good! It’s good because it means that passing a class instance is extremely simple and efficient: all you’re doing is passing a pointer. No matter how big and complicated a class instance may be, no matter how many properties it may have containing vast amounts of data, passing the instance is incredibly fast and efficient, because no new data is generated.
Subclass and Superclass
Two classes can be subclass and superclass of one another. For example, we might have a class Quadruped and a class Dog and make Quadruped the superclass of Dog. A class may have many subclasses, but a class can have only one immediate superclass. I say “immediate” because that superclass might itself have a superclass, and so on in a rising chain, until we get to the ultimate superclass, called the base class, or root class. Because a class can have many subclasses but only one superclass, there is a hierarchical tree of subclasses, each branching from its superclass, and so on, with a single class, the base class, at the top.
As far as the Swift language itself is concerned, there is no requirement that a class should have any superclass, or that, if it does have a superclass, it should ultimately be descended from any particular base class. Thus, a Swift program can have many classes that have no superclass, and it can have many independent hierarchical subclass trees, each descended from a different base class.
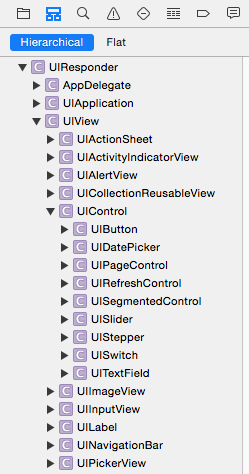
Cocoa, however, doesn’t work that way. In Cocoa, there is effectively just one base class — NSObject, which embodies all the functionality necessary for a class to be a class in the first place — and all other classes are subclasses, at some level, of that one base class. Cocoa thus consists of one huge tree of hierarchically arranged classes, even before you write a single line of code or create any classes of your own. We can imagine diagramming this tree as an outline. And in fact Xcode will show you this outline (Figure 4-2): in an iOS project window, choose View → Navigators → Show Symbol Navigator and click Hierarchical, with the first and third icons in the filter bar selected (blue). The Cocoa classes are the part of the tree descending from NSObject.
The reason for having a superclass–subclass relationship in the first place is to allow related classes to share functionality. Suppose, for example, we have a Dog class and a Cat class, and we are considering declaring a walk method for both of them. We might reason that both a dog and a cat walk in pretty much the same way, by virtue of both being quadrupeds. So it might make sense to declare walk as a method of the Quadruped class, and make both Dog and Cat subclasses of Quadruped. The result is that both Dog and Cat can be sent the walk message, even if neither of them has a walk method, because each of them has a superclass that does have a walk method. We say that a subclass inherits the methods of its superclass.
To declare that a certain class is a subclass of a certain superclass, add a colon and the superclass name after the class’s name in its declaration. So, for example:
class Quadruped {
    func walk () {
        println("walk walk walk")
    }
}
class Dog : Quadruped {}
class Cat : Quadruped {}
Now let’s prove that Dog has indeed inherited walk from Quadruped:
let fido = Dog()
fido.walk() // walk walk walk
Observe that, in that code, the walk message can be sent to a Dog instance just as if the walk instance method were declared in the Dog class, even though the walk instance method is in fact declared in a superclass of Dog. That’s inheritance at work.
The purpose of subclassing is not merely so that a class can inherit another class’s methods; it’s so that it can also declare methods of its own. Typically, a subclass consists of the methods inherited from its superclass and then some. If Dog has no methods of its own, after all, it’s hard to see why it should exist separately from Quadruped. But if a Dog knows how to do something that not every Quadruped knows how to do — let’s say, bark — then it makes sense as a separate class. If we declare bark in the Dog class, and walk in the Quadruped class, and make Dog a subclass of Quadruped, then Dog inherits the ability to walk from the Quadruped class and also knows how to bark:
class Quadruped {
    func walk () {
        println("walk walk walk")
    }
}
class Dog : Quadruped {
    func bark () {
        println("woof")
    }
}
Again, let’s prove that it works:
let fido = Dog()
fido.walk() // walk walk walk
fido.bark() // woof
Within a class, it is a matter of indifference whether that class has an instance method because that method is declared in that class or because the method is declared in a superclass and inherited. A message to self works equally well either way. In this code, we have declared a barkAndWalk instance method that sends two messages to self, without regard to where the corresponding methods are declared (one is native to the subclass, one is inherited from the superclass):
class Quadruped {
    func walk () {
        println("walk walk walk")
    }
}
class Dog : Quadruped {
    func bark () {
        println("woof")
    }
    func barkAndWalk() {
        self.bark()
        self.walk()
    }
}
And here’s proof that it works:
let fido = Dog()
fido.barkAndWalk() // woof walk walk walk
It is also permitted for a subclass to redefine a method inherited from its superclass. For example, perhaps some dogs bark differently from other dogs. We might have a class NoisyDog, for instance, that is a subclass of Dog. Dog declares bark, but NoisyDog also declares bark, and defines it differently from how Dog defines it. This is called overriding. The very natural rule is that if a subclass overrides a method inherited from its superclass, then when the corresponding message is sent to an instance of that subclass, it is the subclass’s version of that method that is called.
In Swift, when you override something inherited from a superclass, you must explicitly acknowledge this fact by preceding its declaration with the keyword override. So, for example:
class Quadruped {
    func walk () {
        println("walk walk walk")
    }
}
class Dog : Quadruped {
    func bark () {
        println("woof")
    }
}
class NoisyDog : Dog {
    override func bark () {
        println("woof woof woof")
    }
}
And let’s try it:
let fido = Dog()
fido.bark() // woof
let rover = NoisyDog()
rover.bark() // woof woof woof
Observe that a subclass function by the same name as a superclass’s function is not necessarily, of itself, an override. Recall that Swift can distinguish two functions with the same name, provided they have different signatures. Those are different functions, and so an implementation of one in a subclass is not an override of the other in a superclass. An override situation exists only when the subclass redefines the same function that it inherits from a superclass — using the same name, the same signature, and the same external parameter names.
It often happens that we want to override something in a subclass and yet access the thing overridden in the superclass. This is done by sending a message to the keyword super. Our bark implementation in NoisyDog is a case in point. What NoisyDog really does when it barks is the same thing Dog does when it barks, but more times. We’d like to express that relationship in our implementation of NoisyDog’s bark. To do so, we have NoisyDog’s bark implementation send the bark message, not to self (which would be circular), but to the keyword super; this causes the search for a bark instance method implementation to start in the superclass rather than in our own class:
class Dog : Quadruped {
    func bark () {
        println("woof")
    }
}
class NoisyDog : Dog {
    override func bark () {
        for _ in 1...3 {
            super.bark()
        }
    }
}
And it works:
let fido = Dog()
fido.bark() // woof
let rover = NoisyDog()
rover.bark() // woof woof woof
A subscript function is a method. If a superclass declares a subscript, the subclass can declare a subscript with the same signature, provided it designates it with the override keyword. To call the superclass subscript implementation, the subclass can use square brackets after the keyword super (e.g. super[3]).
Along with methods, a subclass also inherits its superclass’s properties. Naturally, the subclass may also declare additional properties of its own. It is possible to override an inherited property (with some restrictions that I’ll talk about later).
A class declaration can prevent the class from being subclassed by preceding the class declaration with the final keyword. A class declaration can prevent a class member from being overridden by a subclass by preceding the member’s declaration with the final keyword.
Class Initializers
Initialization of a class instance is considerably more complicated than initialization of a struct or enum instance, because of the existence of class inheritance. The chief task of an initializer is to ensure that all properties have an initial value, thus making the instance well-formed as it comes into existence; and an initializer may have other tasks to perform that are essential to the initial state and integrity of this instance. A class, however, may have a superclass, which may have properties and initializers of its own. Thus we must somehow ensure that when a subclass is initialized, its superclass’s properties are initialized and the tasks of its initializers are performed in good order, in addition to initializing the properties and performing the initializer tasks of the subclass itself.
Swift solves this problem coherently and reliably — and ingeniously — by enforcing some clear and well-defined rules about what a class initializer must do. These rules begin with a distinction between the kinds of initializer that a class can have:
- No initializer
-
A class with no stored properties, or with stored properties all of which are initialized as part of their declaration, and that has no explicit initializers, has an implicit initializer
init(). - Designated initializer
-
A class initializer, by default, is a designated initializer. A class with any stored properties that are not initialized as part of their declaration must have at least one designated initializer, and when the class is instantiated, exactly one of its designated initializers must be called, and must see to it that all stored properties are initialized. A designated initializer may not delegate to another initializer in the same class; it is illegal for a designated initializer to use the phrase
self.init(...). - Convenience initializer
-
A convenience initializer is marked with the keyword
convenience. It is a delegating initializer; it must contain the phraseself.init(...). Moreover, a convenience initializer’s delegation must end with a designated initializer. In other words, a convenience initializer must call a designated initializer in the same class — or else it must call another convenience initializer in the same class, thus forming a chain of convenience initializers which ends by calling a designated initializer in the same class.
Here are some examples. This class has no stored properties, so it has an implicit init() initializer:
class Dog {
}
let d = Dog()
This class’s stored properties have default values, so it has an implicit init() initializer too:
class Dog {
    var name = "Fido"
}
let d = Dog()
This class has stored properties without default values; all of those properties are initialized in all of its initializers:
class Dog {
    var name : String
    var license : Int
    init(name:String, license:Int) {
        self.name = name
        self.license = license
    }
}
let d = Dog(name:"Rover", license:42)
This class is similar to the previous example, but it also has two convenience initializers. The caller doesn’t have to supply any parameters, because a convenience initializer with no parameters calls through a chain of convenience initializers ending with a designated initializer:
class Dog {
    var name : String
    var license : Int
    init(name:String, license:Int) {
        self.name = name
        self.license = license
    }
    convenience init(license:Int) {
        self.init(name:"Fido", license:license)
    }
    convenience init() {
        self.init(license:1)
    }
}
let d = Dog()
Note that the rules about what else an initializer can say and when it can say it, as I described them earlier in this chapter, are still in force. A designated initializer cannot, except in order to initialize a property, say self until all of this class’s properties have been initialized. A convenience initializer is a delegating initializer, so it cannot say self until after it has called, directly or indirectly, a designated initializer (and cannot set an immutable property at all).
Having defined and distinguished between designated initializers and convenience initializers, we are ready for the rules about what happens with regard to initializers when a class has a superclass:
- No initializers
- If a subclass doesn’t have to have any initializers of its own, and if it declares no initializers of its own, then its initializers consist of the initializers inherited from its superclass.
- Convenience initializers only
-
If a subclass doesn’t have to have any initializers of its own, it is eligible to have convenience initializers, and these work exactly as convenience initializers always do, because inheritance provides the missing designated initializers in
selfthat the convenience initializers must call. - Designated initializers
If a subclass has any designated initializers of its own, the entire game changes drastically. Now, no initializers are inherited! The existence of an explicit designated initializer blocks initializer inheritance. The only initializers the subclass now has are the initializers that you explicitly write. (However, there’s an exception, which I’ll come to in a moment.)
Every designated initializer in the subclass now has an extra requirement: it must call one of the superclass’s designated initializers, by saying
super.init(...). Moreover, the rules about sayingselfcontinue to apply. A subclass designated initializer must do things in this order:- It must ensure that all properties of this class (the subclass) are initialized.
-
It must call
super.init(...), and the initializer that it calls must be a designated initializer. -
Only then may this initializer say
selffor any other reason — to call an instance method, say, or to access an inherited property.
Convenience initializers in the subclass are still subject to the rules I’ve already outlined. They must call
self.init(...), calling a designated initializer directly or (through a chain of convenience initializers) indirectly. In the absence of inherited initializers, the initializer that a convenience initializer calls must be explicitly present in the subclass.- Override initializers
Superclass initializers can be overridden in the subclass, in accordance with these restrictions:
-
An initializer whose signature matches a convenience initializer of the superclass must be a convenience initializer and is not marked
override. -
An initializer whose signature matches a designated initializer of the superclass can be a designated initializer or a convenience initializer, and must be marked
override.
Override initializers are subject to the rules I’ve already outlined; the fact that this is an override initializer changes nothing. A designated initializer marked
overridemust still callsuper.init(...)on a superclass designated initializer (and the superclass designated initializer that it calls can even be the one that it overrides).As I said a moment ago, if a subclass has any designated initializers, no initializers are inherited. But here’s the exception: If a subclass overrides all of its superclass’s designated initializers, then the subclass does inherit the superclass’s convenience initializers.
-
An initializer whose signature matches a convenience initializer of the superclass must be a convenience initializer and is not marked
- Failable initializers
A failable class initializer cannot say
return niluntil after it has completed all of its own initialization duties. Thus, for example, a failable subclass designated initializer must see to it that all the subclass’s properties are initialized and must callsuper.init(...)before it can sayreturn nil. (There is a certain delicious irony here: before it can tear the instance down, the initializer must finish building the instance up.)If an initializer called by a failable initializer is failable, the calling syntax does not change, and no additional test is needed — if a called failable initializer fails, the whole initialization process will fail (and will be aborted) immediately.
A failable initializer that returns an implicitly unwrapped Optional (
init!) is treated just like a normal initializer (init) for purposes of overriding and delegation. For a failable initializer that returns an ordinary Optional (init?), there are some additional restrictions:-
initcan overrideinit?, but not vice versa. -
init?can call (delegate to)init, but not vice versa.
-
Tip
At no time can a subclass initializer set a constant (let) property of a superclass. This is because, by the time the subclass is allowed to do anything other than initialize its own properties and call another initializer, the superclass has finished its own initialization and the door for initializing its constants has closed.
Here are some basic examples. We start with a class whose subclass has no explicit initializers of its own:
class Dog {
    var name : String
    var license : Int
    init(name:String, license:Int) {
        self.name = name
        self.license = license
    }
    convenience init(license:Int) {
        self.init(name:"Fido", license:license)
    }
}
class NoisyDog : Dog {
}
Given that code, you can make a NoisyDog like this:
let nd1 = NoisyDog(name:"Fido", license:1)
let nd2 = NoisyDog(license:2)
That code is legal, because NoisyDog inherits its superclass’s initializers as its own. However, you can’t make a NoisyDog like this:
let nd3 = NoisyDog() // compile error
That code is illegal. Even though a NoisyDog has no properties of its own, it has no implicit init() initializer; its initializers are its inherited initializers, and its superclass, Dog, has no implicit init() initializer to inherit.
Now here is a class whose subclass’s only explicit initializer is a convenience initializer:
class Dog {
    var name : String
    var license : Int
    init(name:String, license:Int) {
        self.name = name
        self.license = license
    }
    convenience init(license:Int) {
        self.init(name:"Fido", license:license)
    }
}
class NoisyDog : Dog {
    convenience init(name:String) {
        self.init(name:name, license:1)
    }
}
Observe how NoisyDog’s convenience initializer fulfills its contract by calling self.init(...) to call a designated initializer — which it happens to have inherited. Given that code, there are three ways to make a NoisyDog, just as you would expect:
let nd1 = NoisyDog(name:"Fido", license:1)
let nd2 = NoisyDog(license:2)
let nd3 = NoisyDog(name:"Rover")
Next, here is a class whose subclass declares a designated initializer:
class Dog {
    var name : String
    var license : Int
    init(name:String, license:Int) {
        self.name = name
        self.license = license
    }
    convenience init(license:Int) {
        self.init(name:"Fido", license:license)
    }
}
class NoisyDog : Dog {
    init(name:String) {
        super.init(name:name, license:1)
    }
}
NoisyDog’s explicit initializer is now a designated initializer. It fulfills its contract by calling a designated initializer in super. NoisyDog has now cut off inheritance of all initializers; the only way to make a NoisyDog is like this:
let nd1 = NoisyDog(name:"Rover")
Finally, here is a class whose subclass overrides its designated initializers:
class Dog {
    var name : String
    var license : Int
    init(name:String, license:Int) {
        self.name = name
        self.license = license
    }
    convenience init(license:Int) {
        self.init(name:"Fido", license:license)
    }
}
class NoisyDog : Dog {
    override init(name:String, license:Int) {
        super.init(name:name, license:license)
    }
}
NoisyDog has overridden all of its superclass’s designated initializers, so it inherits its superclass’s convenience initializers. There are thus two ways to make a NoisyDog:
let nd1 = NoisyDog(name:"Rover", license:1)
let nd2 = NoisyDog(license:2)
Those examples illustrate the main rules that you should keep in your head. You probably don’t need to memorize the remaining rules, because the compiler will enforce them, and will keep slapping you down until you get them right.
Required initializers
There’s one more thing to know about class initializers: a class initializer may be preceded by the keyword required. This means that a subclass may not lack it. This, in turn, means that if a subclass implements designated initializers, thus blocking inheritance, it must override this initializer. Here’s a (rather pointless) example:
class Dog {
    var name : String
    required init(name:String) {
        self.name = name
    }
}
class NoisyDog : Dog {
    var obedient = false
    init(obedient:Bool) {
        self.obedient = obedient
        super.init(name:"Fido")
    }
} // compile error
That code won’t compile. The reason is that, having implemented a designated initializer init(obedient:) in NoisyDog, we have blocked inheritance of init(name:). But init(name:) is marked required. Thus, our code won’t compile unless we inherit or override init(name:) in NoisyDog. We cannot inherit it, because we have blocked inheritance. Therefore we must override it:
class Dog {
    var name : String
    required init(name:String) {
        self.name = name
    }
}
class NoisyDog : Dog {
     var obedient = false
    init(obedient:Bool) {
        self.obedient = obedient
        super.init(name:"Fido")
    }
    required init(name:String) {
        super.init(name:name)
    }
}
Observe that our overridden required intializer is not marked with override, but is marked with required, thus guaranteeing that the requirement continues drilling down to any further subclasses.
I have explained what declaring an initializer as required does, but I have not explained why you’d need to do it. I’ll give an example later in this chapter.
Surprises from Cocoa
The initializer inheritance rules can cause some rude surprises to pop up when you’re subclassing one of Cocoa’s classes. For example, when programming iOS, you will surely declare a UIViewController subclass. Let’s say you give your subclass a designated initializer. A designated initializer in the superclass, UIViewController, is init(nibName:bundle:), so, in obedience to the rules, you call that from your designated initializer:
class ViewController: UIViewController {
    init() {
        super.init(nibName:"MyNib", bundle:nil)
    }
}
So far, so good; but you are then surprised to find that code elsewhere that makes a ViewController instance no longer compiles:
let vc = ViewController(nibName:"MyNib", bundle:nil) // compile error
That code was legal until you wrote your designated initializer; now it isn’t. The reason is that by implementing a designated initializer in your subclass, you have blocked initializer inheritance! Your ViewController class used to inherit the init(nibName:bundle:) initializer from UIViewController; now it doesn’t. You need to override that initializer as well, even if all your implementation does is to call the overridden initializer:
class ViewController: UIViewController {
    init() {
        super.init(nibName:"MyNib", bundle:nil)
    }
    override init(nibName: String?, bundle: NSBundle?) {
        super.init(nibName:nibName, bundle:bundle)
    }
}
Here’s an even more insidious surprise. Let’s say you subclass UIBarButtonItem and give it a designated initializer that calls the UIBarButtonItem designated initializer init(customView:), like this:
class LabelBarButtonItem: UIBarButtonItem {
    init(text: String) {
        let label = UILabel()
        label.text = text
        super.init(customView: label)
    }
}
And then elsewhere in your code, you make an instance of your UIBarButtonItem subclass:
let lbbi = LabelBarButtonItem(text:"Howdy")
Here’s the insidious part: that code compiles just fine. Nevertheless, you are headed for a train wreck; your program crashes when that line is executed. The reason is that, unbeknownst to you, Cocoa’s implementation of UIBarButtonItem’s designated initializer init(customView:) calls another designated initializer, namely init(). That would be illegal in Swift, but Cocoa is written in Objective-C. The result is that the init() message is sent to your LabelBarButtonItem class. But your LabelBarButtonItem class doesn’t implement init(), because you didn’t know that this was necessary — and the inherited init() is now no longer inherited, because the existence of a designated initializer has blocked initializer inheritance.
This is not an easy problem to solve — a private implementation of init() that calls super.init() is probably the most satisfactory resolution — and the frustrating part is that it isn’t your fault and the compiler didn’t help you. (I regard this as a bug, but I’m undecided as to whether to call it a bug in Cocoa or a bug in Swift.)
Warning
Actually, both my revised ViewController code and my revised LabelBarButtonItem code still refuse to compile — because there is an additional required initializer that still needs to be implemented. This mysterious complication has to do with protocols; I’ll explain it later in this chapter.
Class Deinitializer
A class, and only a class (not the other flavors of object type), can have a deinitializer. This is a function declared with the keyword deinit followed by curly braces containing the function body. You never call this function yourself; it is called by the runtime when an instance of this class goes out of existence. If a class has a superclass, the subclass’s deinitializer (if any) is called before superclass’s deinitializer (if any).
The idea of a deinitializer is that you might want to perform some cleanup, or just log to the console to prove to yourself that your instance is going out of existence in good order. I’ll take advantage of deinitializers when I discuss memory management issues in Chapter 5.
Class Properties and Methods
A subclass can override its inherited properties. The override must have the same name and type as the inherited property, and must be marked with override. (A property cannot have the same name as an inherited property but a different type, as there is no way to distinguish them.) The following additional rules apply:
- The subclass property cannot be stored (because that would be the very same property, not a distinctive override).
- If the superclass property is stored, the subclass’s computed variable override must have both a getter and a setter.
- If the superclass property is computed, the subclass’s computed variable override must reimplement all the accessors that the superclass implements. Thus, if the superclass property has both a getter and a setter, the override must have both a getter and a setter; however, if the superclass property is read-only (it has just a getter), the override can have a setter.
- Regardless of whether the superclass property is stored or computed, provided it is writable (a stored property or a computed property with a setter), the subclass’s override can consist of adding setter observers to this property.
The overriding property’s functions may refer to — and may read from and write to — the inherited property, through the super keyword.
A class can have static members, marked static, just like a struct or an enum. It can also have class members, marked class. Both static and class members are inherited by subclasses (as static and class members).
The chief difference between static and class methods from the programmer’s point of view is that a static method cannot be overridden; it is as if static were a synonym for class final.
Here, for example, I’ll use a static method to express what dogs say:
class Dog {
    static func whatDogsSay() -> String {
        return "woof"
    }
    func bark() {
        println(Dog.whatDogsSay())
    }
}
A subclass now inherits whatDogsSay, but can’t override it. No subclass of Dog may contain any implementation of a class method or a static method whatDogsSay with this same signature.
Now I’ll use a class method to express what dogs say:
class Dog {
    class func whatDogsSay() -> String {
        return "woof"
    }
    func bark() {
        println(Dog.whatDogsSay())
    }
}
A subclass inherits whatDogsSay, and can override it, either as a class function or as a static function:
class NoisyDog : Dog {
    override class func whatDogsSay() -> String {
        return "WOOF"
    }
}
The difference between static properties and class properties is similar, but with an additional, rather dramatic qualification: static properties can be stored, but class properties can only be computed.
Here, I’ll use a static class property to express what dogs say:
class Dog {
    static var whatDogsSay = "woof"
    func bark() {
        println(Dog.whatDogsSay)
    }
}
A subclass inherits whatDogsSay, but can’t override it; no subclass of Dog can declare a class or static property whatDogsSay.
Now I’ll use a class property to express what dogs say. It cannot be a stored property, so I’ll have to use a computed property instead:
class Dog {
    class var whatDogsSay : String {
        return "woof"
    }
    func bark() {
        println(Dog.whatDogsSay)
    }
}
A subclass inherits whatDogsSay and can override it either as a class property or as a static property. But even as a static property the subclass’s override cannot be a stored property, in keeping with the rules of property overriding that I outlined earlier:
class NoisyDog : Dog {
    override static var whatDogsSay : String {
        return "WOOF"
    }
}
Polymorphism
When a computer language has a hierarchy of types and subtypes, it must resolve the question of what such a hierarchy means for the relationship between the type of an object and the declared type of a reference to that object. Swift obeys the principles of polymorphism. In my view, it is polymorphism that turns an object-based language into a full-fledged object-oriented language. We may summarize Swift’s polymorphism principles as follows:
- Substitution
- Wherever a certain type is expected, a subtype of that type may be used instead.
- Internal identity
- An object’s type is a matter of its internal nature, regardless of how the object is referred to.
To see what these principles mean in practice, imagine we have a Dog class, along with its subclass, NoisyDog:
class Dog {
}
class NoisyDog : Dog {
}
let d : Dog = NoisyDog()
The substitution rule says that the last line is legal: we can assign a NoisyDog instance to a reference, d, that is typed as a Dog. The internal identity rule says that, under the hood, d now is a NoisyDog.
Tip
The substitution rule works for Optionals as well — that is, it works for the type wrapped by an Optional. For example, if an Optional wrapping a Dog is expected (a Dog?), an Optional wrapping a NoisyDog (a NoisyDog?) can be used. The reason has to do with the mechanism by which an Optional has a specific wrapped type in the first place: an Optional is a generic, as I’ll explain later in this chapter, and a type used by a generic is subject to substitution just like any other type.
You may be asking: How is the internal identity rule manifested? If a reference to a NoisyDog is typed as a Dog, in what sense is this “really” a NoisyDog? I have several very good answers to that question. Let’s start with what happens when a subclass overrides an inherited method. Let me redefine Dog and NoisyDog to demonstrate:
class Dog {
    func bark() {
        println("woof")
    }
}
class NoisyDog : Dog {
    override func bark() {
        super.bark(); super.bark()
    }
}
Now look at this code and tell me whether it compiles and, if so, what happens when it runs:
func tellToBark(d:Dog) {
    d.bark()
}
var d : Dog
d = NoisyDog()
tellToBark(d)
let d2 : NoisyDog = NoisyDog()
tellToBark(d2)
That code does compile. We create a NoisyDog instance and assign it to a variable typed as Dog. This is permitted because NoisyDog is a Dog subclass (substitution). Moreover, we pass both a variable typed as Dog and a variable typed as NoisyDog to a function that expects a Dog parameter. This is permitted, again, because NoisyDog is a Dog subclass (substitution). A NoisyDog can be used wherever a Dog is expected. Typologically, a NoisyDog is a kind of Dog.
But when the code actually runs, how does the object referred to by the local variable d inside the tellToBark function react to being told to bark each time? On the one hand, d is typed as Dog, and a Dog barks by saying "woof" once. On the other hand, in our code, both times tellToBark is called, what is really passed is a NoisyDog instance, and a NoisyDog barks by saying "woof" twice. What will happen?
func tellToBark(d:Dog) {
    d.bark()
}
var d : Dog
d = NoisyDog()
tellToBark(d) // woof woof
let d2 : NoisyDog = NoisyDog()
tellToBark(d2) // woof woof
Both times, the result is "woof woof". The internal identity rule says that what matters when a message is sent is not how the recipient of that message is typed through this or that reference, but what that recipient actually is. What arrives inside tellToBark in both calls is a NoisyDog, regardless of the type of variable that holds it, or the type declared by the parameter that receives it; thus, the bark message causes this object to say "woof" twice. It is a NoisyDog!
Here’s another important consequence of polymorphism — the meaning of the keyword self. It means the actual instance, and thus its meaning depends upon the actual type of the actual instance — even if the word self appears in a superclass’s code. For example:
class Dog {
    func bark() {
        println("woof")
    }
    func speak() {
        self.bark()
    }
}
class NoisyDog : Dog {
    override func bark() {
        super.bark(); super.bark()
    }
}
What happens when we tell a NoisyDog to speak? Let’s try it:
let d : NoisyDog = NoisyDog()
d.speak() // woof woof
let d2 : Dog = NoisyDog()
d2.speak() // woof woof
First, observe that we are allowed to tell a NoisyDog to speak. The speak method is declared only in Dog, but of course this means that it is inherited by NoisyDog. Even if a reference to a NoisyDog is typed as a NoisyDog, we are allowed to send the speak message to that reference.
Next, what happens when we do tell a NoisyDog to speak? This is the really interesting part. The speak method is declared in Dog, the superclass — not in NoisyDog. The speak method calls the bark method. It does this by way of the keyword self. (I could have omitted the explicit reference to self here, but self would still be involved implicitly, so I’m not cheating by making self explicit.) There’s a bark method in Dog, and an override of the bark method in NoisyDog. Which bark method will be called?
The word self is encountered within the Dog class’s implementation of speak. But what matters is not where the word self appears but what it means. It means this instance. And the internal identity principle tells us that, in both speak calls, this instance is a NoisyDog! Thus, it is NoisyDog’s override of bark that is called, both times.
Thanks to polymorphism, you can take advantage of subclasses to add power and customization to existing classes. This is important particularly in the world of iOS programming, where most of the classes are defined by Cocoa and don’t belong to you. The UIViewController class, for example, is defined by Cocoa; it has lots of built-in methods that Cocoa will call, and these methods perform various important tasks — but in a generic way. In real life, you’ll make a UIViewController subclass and override those methods to do the tasks appropriate to your particular app. This won’t bother Cocoa in the slightest, because (substitution principle) wherever Cocoa expects to receive or to be talking to a UIViewController, it will accept without question an instance of your UIViewController subclass. And this substitution will also work as expected, because whenever Cocoa calls one of those UIViewController methods on your subclass, it is your subclass’s override that will be called (internal identity principle).
Casting
The Swift compiler, with its strict typing, imposes severe restrictions on what messages can be sent to an object reference. The messages that the compiler will permit to be sent to an object reference are those permitted by the reference’s declared type, including its inheritance.
This means that, thanks to the internal identity principle of polymorphism, an object may be capable of receiving messages that the compiler won’t permit us to send. This puts us in a serious bind. For example, let’s give NoisyDog a method that Dog doesn’t have:
class Dog {
    func bark() {
        println("woof")
    }
}
class NoisyDog : Dog {
    override func bark() {
        super.bark(); super.bark()
    }
    func beQuiet() {
        self.bark()
    }
}
In that code, we configure a NoisyDog so that we can tell it to beQuiet. Now look at what happens when we try to tell an object typed as a Dog to be quiet:
func tellToHush(d:Dog) {
    d.beQuiet() // compile error
}
let d: NoisyDog = NoisyDog()
tellToHush(d)
Our code doesn’t compile. We can’t send the beQuiet message to this object, even though it is in fact a NoisyDog and has a beQuiet method. That’s because the reference, d inside the function body, is typed as a Dog — and a Dog has no beQuiet method. There is a certain irony here: for once, we know more than the compiler does! We know that our code would run correctly — because d really is a NoisyDog — if only we could get our code to compile in the first place. We need a way to say to the compiler, “Look, compiler, just trust me: this thing is going to turn out to be a NoisyDog when the program actually runs, so let me send it this message.”
There is in fact a way to do this — casting. To cast, you use a form of the keyword as followed by the name of the type you claim something really is. Swift will not let you cast just any old type to any old other type — for example, you can’t cast a String to an Int — but it will let you cast a superclass to a subclass. This is called casting down. When you cast down, the form of the keyword as that you must use is as! with an exclamation mark. The exclamation mark reminds you that you are forcing the compiler to do something it would rather not do:
func tellToHush(d:Dog) {
    (d as! NoisyDog).beQuiet()
}
let d: NoisyDog = NoisyDog()
tellToHush(d)
That code compiles, and works. A useful way to rewrite the example is like this:
func tellToHush(d:Dog) {
    let d2 = d as! NoisyDog
    d2.beQuiet()
    d2.beQuiet()
}
let d: NoisyDog = NoisyDog()
tellToHush(d)
The reason that way of rewriting the code is useful is in case we have other NoisyDog messages to send to this object. Instead of casting every time we want to send a message to it, we cast the object once to its internal identity type, and assign it to a variable. Now that variable’s type — inferred, in this case, from the cast — is that internal identity type, and we can send multiple messages to the variable.
A moment ago, I said that the as! operator’s exclamation mark reminds you that you are forcing the compiler’s hand. It also serves as a warning: your code can now crash! The reason is that you might be lying to the compiler. Casting down is a way of telling the compiler to relax its strict type checking and to let you call the shots. If you use casting to make a false claim, the compiler may permit it, but you will crash when the app runs:
func tellToHush(d:Dog) {
    (d as! NoisyDog).beQuiet() // compiles, but prepare to crash...!
}
let d: Dog = Dog()
tellToHush(d)
In that code, we told the compiler that this object would turn out to be a NoisyDog, and the compiler obediently took its hands off and allowed us to send the beQuiet message to it. But in fact, this object was a Dog when our code ran, and so we ultimately crashed when the cast failed because this object was not a NoisyDog.
To prevent yourself from lying accidentally, you can test the type of an instance at runtime. One way to do this is with the keyword is. You can use is in a condition; if the condition passes, then cast, in the knowledge that your cast is safe:
func tellToHush(d:Dog) {
    if d is NoisyDog {
        let d2 = d as! NoisyDog
        d2.beQuiet()
    }
}
The result is that we won’t cast d to a NoisyDog unless it really is a NoisyDog.
An alternative way to solve the same problem is to use Swift’s as? operator. This casts down, but with the option of failure; therefore what it casts to is (you guessed it) an Optional — and now we are on familiar ground, because we know how to deal safely with an Optional:
func tellToHush(d:Dog) {
    let noisyMaybe = d as? NoisyDog // an Optional wrapping a NoisyDog
    if noisyMaybe != nil {
        noisyMaybe!.beQuiet()
    }
}
That doesn’t look much cleaner or shorter than our previous approach. But remember that we can safely send a message to an Optional by optionally unwrapping the Optional! Thus we can skip the assignment and condense to a single line:
func tellToHush(d:Dog) {
    (d as? NoisyDog)?.beQuiet()
}
First we use the as? operator to obtain an Optional wrapping a NoisyDog (or nil). Then we optionally unwrap that Optional and send a message to it. If d isn’t a NoisyDog, the Optional will be nil and the message won’t be sent. If d is a NoisyDog, the Optional will be unwrapped and the message will be sent. Thus, that code is safe.
Recall (from Chapter 3) that comparison operators applied to an Optional are automatically applied to the object wrapped by the Optional. The as!, as?, and is operators work the same way. Consider an Optional d wrapping a Dog (that is, d is a Dog? object). This might, in actual fact, be wrapping either a Dog or a NoisyDog. To find out which it is, you might be tempted to use is. But can you? After all, an Optional is neither a Dog nor a NoisyDog — it’s an Optional! Well, the good news is that Swift knows what you mean; when the thing on the left side of is is an Optional, Swift pretends that it’s the value wrapped in the Optional. Thus, this works just you would hope:
let d : Dog? = NoisyDog()
if d is NoisyDog { // it is!
When using is with an Optional, the test fails in good order if the Optional is nil. Thus our is test really does two things: it checks whether the Optional is nil, and if it is not, it then checks whether the wrapped value is the type we specify.
What about casting? You can’t really cast an Optional to anything. But you can use the as! operator with an Optional, because Swift knows what you mean; when the thing on the left side of as! is an Optional, Swift treats it as the wrapped type. Moreover, the consequence of applying the as! operator is that two things happen: Swift unwraps first, and then casts. This code works, because d is unwrapped to give us d2, which is a NoisyDog:
let d : Dog? = NoisyDog()
let d2 = d as! NoisyDog
d2.beQuiet()
That code, however, is not automatically safe. You shouldn’t cast like that, without testing first, unless you are very sure of your ground. If d were nil, you’d crash in the second line because you’re trying to unwrap a nil Optional. And if d were a Dog, not a NoisyDog, you’d still crash in the second line when the cast fails. That’s why there’s also an as? operator, which is safe — but yields an Optional:
let d : Dog? = NoisyDog()
let d2 = d as? NoisyDog
d2?.beQuiet()
Another way you’ll using casting is during a value interchange between Swift and Objective-C when two types are equivalent. For example, you can cast a Swift String to a Cocoa NSString, and vice versa. That’s not because one is a subclass of the other, but because they are bridged to one another; in a very real sense, they are the same type. When you cast from String to NSString, you’re not casting down, and what you’re doing is not dangerous, so you use the as operator, with no exclamation mark. I gave an example, in Chapter 3, of a situation where you might need to do that:
let s = "hello"
let range = (s as NSString).rangeOfString("ell") // (1,3), an NSRange
The cast from String to NSString tells Swift to stay in the Cocoa world as it calls rangeOfString, and thus causes the result to be the Cocoa result, an NSRange, rather than a Swift Range.
A number of common classes are bridged in this way between Swift and Objective-C. Often, you won’t need to cast as you cross the bridge from Swift to Objective-C, because Swift will automatically cast for you. For example, a Swift Int and a Cocoa NSNumber are two very different things; nevertheless, you can often use an Int where an NSNumber is expected, without casting, like this:
let ud = NSUserDefaults.standardUserDefaults()
ud.setObject(1, forKey: "Test")
In that code, we used an Int (1) where Objective-C expects an NSObject instance. An Int is not an NSObject instance; it isn’t even a class instance (it’s a struct instance). But Swift sees that an NSObject is expected, decides that an NSNumber would best represent an Int, and crosses the bridge for you. Thus, what winds up being stored in NSUserDefaults is an NSNumber.
Coming back the other way, however, when you call objectForKey:, Swift has no information about what this value really is, so you have to cast explicitly if you want an Int — and now you are casting down (as I’ll explain in more detail later):
let i = ud.objectForKey("Test") as! IntThat cast works because ud.objectForKey("Test") yields an NSNumber wrapping an integer, and casting that to a Swift Int is permitted — the types are bridged. But if ud.objectForKey("Test") were not an NSNumber, you’d crash. If you’re not sure of your ground, use is or as? to be safe.
Type Reference
It can be useful for an instance to be able to refer to its own type — for example, to send a message to that type. In an earlier example, a Dog instance method fetched a Dog class property by sending a message to the Dog type explicitly — by using the word Dog:
class Dog {
    class var whatDogsSay : String {
        return "Woof"
    }
    func bark() {
        println(Dog.whatDogsSay)
    }
}
This seems clumsy and inflexible. Why should we have to hard-code into Dog a knowledge of what class it is? It has a class; it should just know what it is.
In Objective-C, you may be accustomed to using the class instance method to deal with this situation. In Swift, an instance might not have a class (it might be a struct instance or an enum instance); what a Swift instance has is a type. The instance method that Swift provides for this purpose is the dynamicType method. An instance can access its type through this method. Thus, if you don’t like the notion of a Dog instance calling a Dog class method by saying Dog explicitly, there’s another way:
class Dog {
    class var whatDogsSay : String {
        return "Woof"
    }
    func bark() {
        println(self.dynamicType.whatDogsSay)
    }
}
An important thing about using dynamicType instead of hard-coding a class name is that it obeys polymorphism:
class Dog {
    class var whatDogsSay : String {
        return "Woof"
    }
    func bark() {
        println(self.dynamicType.whatDogsSay)
    }
}
class NoisyDog : Dog {
    override class var whatDogsSay : String {
        return "Woof woof woof"
    }
}
That code works correctly:
let nd = NoisyDog()
nd.bark() // Woof woof woof
If we tell a NoisyDog instance to bark, it says "Woof woof woof". The reason is that dynamicType means, “The type that this instance actually is, right now.” That’s what makes this type dynamic. We send the bark message to a NoisyDog instance. The bark implementation refers to self.dynamicType; self means this instance, which is a NoisyDog, and so self.dynamicType is the NoisyDog class, and it is NoisyDog’s version of whatDogsSay that is fetched. (Compare what I said about polymorphism and self earlier.)
You can also use dynamicType for learning the name of an object’s type, as a string — typically for debugging purposes. When you say println(myObject.dynamicType), you’ll see something legible in the console; it will be namespaced, so it will have the module name (and possibly some other information) attached to it, but the name of this object’s type will be plain to see.
In some situations, you may want to pass an object type as a value. This is legal; an object type is itself an object. Here’s what you need to know:
-
To specify an object type as acceptable — for example, to declare the type of a variable or parameter — use dot-notation with the name of the type and the keyword
Type. -
To use an object type as a value — for example, to assign something to a variable or pass it as a parameter — use a reference to the type (the type’s name, or some instance’s
dynamicType), possibly followed by the keywordselfusing dot-notation.
For example, here’s a function that accepts a Dog type as its parameter:
func typeExpecter(whattype:Dog.Type) {
}
And here’s an example of calling that function:
typeExpecter(Dog) // or: typeExpecter(Dog.self)
Or you could call it like this:
let d = Dog() // or: let d = NoisyDog()
typeExpecter(d.dynamicType) // or: typeExpecter(d.dynamicType.self)
Why might you want to do something like that? A typical situation is that your function is a factory for instances: given a type, it creates an instance of that type, possibly prepares it in some way, and returns it. For example, here’s a Dog class with an init(name:) initializer, and its NoisyDog subclass:
class Dog {
    var name : String
    init(name:String) {
        self.name = name
    }
}
class NoisyDog : Dog {
}
And here’s a factory method that creates a Dog or a NoisyDog, as specified, gives it a name, and returns it:
func dogMakerAndNamer(whattype:Dog.Type) -> Dog {
    let d = whattype(name:"Fido") // compile error
    return d
}
As you can see, since whattype is a type, we can call its initializer to make an instance of that type. However, there’s a problem. The code doesn’t compile. The reason is that the compiler is in doubt as to whether the init(name:) initializer is implemented by every possible subtype of Dog. To reassure it, we must declare that initializer with the required keyword:
class Dog {
    var name : String
    required init(name:String) {
        self.name = name
    }
}
class NoisyDog : Dog {
}
That reassures the compiler. Now our code compiles, and we can call our function:
let d = dogMakerAndNamer(Dog) // d is a Dog named Fido
let d2 = dogMakerAndNamer(NoisyDog) // d2 is a NoisyDog named Fido
In a class method, self stands for the class — polymorphically. This means that, in a class method, you can put parentheses after self to call an initializer polymorphically. Here’s an example. Let’s say we want to move our instance factory method into Dog itself, as a class method. Let’s call this class method makeAndName. We want this class method to create and return a named Dog of whatever class we send the makeAndName message to. If we say Dog.makeAndName(), we should get a Dog. If we say NoisyDog.makeAndName(), we should get a NoisyDog. That type is the polymorphic self class, so our makeAndName class method initializes self:
class Dog {
    var name : String
    required init(name:String) {
        self.name = name
    }
    class func makeAndName() -> Dog {
        let d = self(name:"Fido")
        return d
    }
}
class NoisyDog : Dog {
}
It works as expected:
let d = Dog.makeAndName() // d is a Dog named Fido
let d2 = NoisyDog.makeAndName() // d2 is a NoisyDog named Fido
But there’s a problem with that code. Although d2 is in fact a NoisyDog, it is typed as a Dog. This is because our makeAndName class method is declared as returning a Dog. That isn’t what we meant to say. What we want to say is that this method returns an instance of the same type as the class to which the makeAndName message was originally sent. In other words, we need a polymorphic type declaration! In the declaration of a method, Self (notice the capitalization) is the polymorphic return type. Thus:
class Dog {
    var name : String
    required init(name:String) {
        self.name = name
    }
    class func makeAndName() -> Self {
        let d = self(name:"Fido")
        return d
    }
}
class NoisyDog : Dog {
}
Now when we call NoisyDog.makeAndName() we get a NoisyDog typed as a NoisyDog.
Self also works for instance method declarations. Therefore, we can write an instance method version of our factory method. Here, we start with a Dog or a NoisyDog and tell it to have a puppy of the same type as itself:
class Dog {
    var name : String
    required init(name:String) {
        self.name = name
    }
    func havePuppy(#name:String) -> Self {
        return self.dynamicType(name:name)
    }
}
class NoisyDog : Dog {
}
And here’s some code to test it:
let d = Dog(name:"Fido")
let d2 = d.havePuppy(name:"Fido Junior")
let nd = NoisyDog(name:"Rover")
let nd2 = nd.havePuppy(name:"Rover Junior")
As expected, d2 is a Dog, but nd2 is a NoisyDog (and is typed as a NoisyDog).
All this terminology can get a bit confusing, so here’s a quick summary:
-
.dynamicType -
In code, sent to an instance: the polymorphic (internal) type of this instance, regardless of how the instance reference is typed. Static/class members are accessible through an instance’s
dynamicType. -
.Type -
In declarations, sent to a type: the type (as opposed to an instance of the type). For example, in a function declaration,
Dogmeans a Dog instance is expected, butDog.Typemeans that the Dog type itself is expected. -
.self -
In code, sent to a type: the type. For example, to pass the Dog type where
Dog.Typeis expected, you can passDog.self. (It is not illegal to send.selfto an instance, but it is pointless.) -
self In instance code, this instance, polymorphically.
In static/class code, this type, polymorphically;
self(...)instantiates this type.-
Self - In a method declaration, when specifying the return type, this class or this instance’s class, polymorphically.
Protocols
A protocol is a way of expressing commonalities between otherwise unrelated types. For example, a Bee object and a Bird object might need to have certain features in common by virtue of the fact that both a bee and a bird can fly. Thus, it might be useful to define a Flier type. The question is: In what sense can both Bee and Bird be Fliers?
One possibility, of course, is class inheritance. If Bee and Bird are both classes, there’s a class hierarchy of superclasses and subclasses. So Flier could be the superclass of both Bee and Bird. The problem is that there may be other reasons why Flier can’t be the superclass of both Bee and Bird. A Bee is an Insect; a Bird isn’t. Yet they both have the power of flight — independently. We need a type that cuts across the class hierarchy somehow, tying remote classes together.
Moreover, what if Bee and Bird are not both classes? In Swift, that’s a very real possibility. Important and powerful objects can be structs instead of classes. But there is no struct hierarchy of superstructs and substructs! That, after all, is one of the major differences between structs and classes. Yet structs need the ability to possess and express formal commonalities every bit as much as classes do. How can a Bee struct and a Bird struct both be Fliers?
Swift solves this problem through the use of protocols. Protocols are tremendously important in Swift; the Swift header defines over 70 of them! Moreover, Objective-C has protocols as well; Swift protocols correspond roughly to these, and can interchange with them. Cocoa makes heavy use of protocols.
A protocol is an object type, but it doesn’t make any objects of its own. You can’t instantiate a protocol. A protocol is much more lightweight than that. A protocol declaration is just a list of properties and methods. The properties have no values, and the methods have no code! The idea is that a “real” object type can formally declare that it belongs to a protocol type; this is called adopting or conforming to the protocol. An object type that adopts a protocol is signing a contract stating that it actually implements the properties and methods listed by the protocol.
For example, let’s say that being a Flier consists of no more than implementing a fly method. Then a Flier protocol could specify that there must be a fly method; to do so, it lists the fly method with no function body, like this:
protocol Flier {
    func fly()
}
Any type — an enum, a struct, a class, or even another protocol — can then adopt this protocol. To do so, it lists the protocol after a colon after its name in its declaration. (If the adopter is a class with a superclass, the protocol comes after the superclass specification; in other words, if there is a superclass specification, it must come first after the colon in the declaration.)
Let’s say Bird is a struct. Then it can adopt Flier like this:
struct Bird : Flier {
} // compile error
So far, so good. But that code won’t compile. The Bird struct has made a promise to implement the features listed in the Flier protocol. Now it must keep that promise! To satisfy that requirement, I’ll just give Bird an empty fly method:
protocol Flier {
    func fly()
}
struct Bird : Flier {
    func fly() {
    }
}
That’s all there is to it! We’ve defined a protocol, and we’ve made a struct adopt that protocol. Of course, in real life you’ll probably want to make the adopter’s implementation of the protocol’s methods do something; but the protocol says nothing about that.
Why Protocols?
Perhaps at this point you’re scratching your head over why this is a useful thing to do. We made a Bird a Flier, but so what? If we wanted a Bird to know how to fly, why didn’t we just give Bird a fly method without adopting any protocol? The answer has to do with types. Don’t forget, a protocol is a type. Our protocol, Flier, is a type. Therefore, I can use Flier wherever I would use a type — to declare the type of a variable, for example, or the type of a function parameter:
func tellToFly(f:Flier) {
    f.fly()
}
Think about that code for a moment, because it embodies the entire point of protocols. A protocol is a type — so polymorphism applies. Protocols give us another way of expressing the notion of type and subtype. This means that, by the substitution principle, a Flier here could be an instance of any object type — an enum, a struct, or a class. It doesn’t matter what object type it is, as long as it adopts the Flier protocol. If it adopts the Flier protocol, then it must have a fly method, because that’s exactly what it means to adopt the Flier protocol! Therefore the compiler is willing to let us send the fly message to this object. A Flier is, by definition, an object that can be told to fly.
The converse, however, is not true: an object with a fly method is not automatically a Flier. It isn’t enough to obey the requirements of a protocol; the object type must adopt the protocol. This code won’t compile:
struct Bee {
    func fly() {
    }
}
let b = Bee()
tellToFly(b) // compile error
A Bee can be sent the fly message, qua Bee. But tellToFly doesn’t take a Bee parameter; it takes a Flier parameter. Formally, a Bee is not a Flier. To make a Bee a Flier, simply declare formally that Bee adopts the Flier protocol. This code does compile:
struct Bee : Flier {
    func fly() {
    }
}
let b = Bee()
tellToFly(b)
Enough of birds and bees; we’re ready for a real-life example! As I’ve already said, Swift is chock full of protocols already. Let’s make one of our own object types adopt one. One of the most useful Swift protocols is Printable. The Printable protocol requires that we implement a description String property. If we do that, a wonderful thing happens: when an instance of this type is used in string interpolation or println, the description property value is used automatically to represent it.
Recall this example, the ListType enum, from earlier in this chapter:
enum ListType : String {
    case Albums = "Albums"
    case Playlists = "Playlists"
    case Podcasts = "Podcasts"
    case Books = "Audiobooks"
    var description : String { return self.rawValue }
}
Wait — what are the chances? By an amazing coincidence, this enum already has a description property! Previously, though, in order to learn, in the console, what case we’ve actually got, we had to fetch the description property ourselves (otherwise, the enum prints in the console as an opaque Enum Value):
let type = ListType.Albums
println(type.description) // Albums
But now we’re going to make one tiny change in our declaration of the ListType enum: we’re going to adopt the Printable protocol formally. There is already a colon and a type in the ListType declaration; the rule is that in that case any adopted protocols must come last, using a comma separator, like this:
enum ListType : String, Printable {
    case Albums = "Albums"
    case Playlists = "Playlists"
    case Podcasts = "Podcasts"
    case Books = "Audiobooks"
    var description : String { return self.rawValue }
}
We have now made ListType formally adopt the Printable protocol. The Printable protocol requires that we implement a description String property; we do implement a description String property, so our code compiles. Now we can hand a ListType to println and its description will be printed automatically:
let type = ListType.Albums
println(type) // Albums
Behold the power of protocols. You can give any object type the power of printability in exactly the same way.
Note that a type can adopt more than one protocol! For example, the built-in Double type adopts Printable, Hashable, Comparable, and other built-in protocols. One way to declare adoption of multiple protocols is to put the names of the adopted protocols as a list separated by comma after the colon. For example:
struct MyType : Printable, Hashable, Comparable {
    // ...
}
(Of course, that code won’t compile unless I also declare the required methods in MyType, so that MyType really does adopt those protocols.)
Protocol Type Testing and Casting
A protocol is a type, and an adopter of a protocol is its subtype. Therefore, the operators for working with an object’s real type work with an object declared as a protocol type. For example, given a protocol Flier that is adopted by both Bird and Bee, we can use the is operator to test whether a particular Flier is in fact a Bird:
func isBird(f:Flier) -> Bool {
    return f is Bird
}
Similarly, as! and as? can be used to cast an object declared as a protocol type down to its actual type. This is important to be able to do, because the adopting object will typically be able to receive messages that the protocol can’t receive. For example, let’s say that a Bird can get a worm:
struct Bird : Flier {
    func fly() {
    }
    func getWorm() {
    }
}
A Bird can fly qua Flier, but it can getWorm only qua Bird. Thus, you can’t tell just any old Flier to get a worm:
func tellGetWorm(f:Flier) {
    f.getWorm() // compile error
}
But if this Flier is a Bird, clearly it can get a worm. This is exactly what casting is all about:
func tellGetWorm(f:Flier) {
    (f as? Bird)?.getWorm()
}
That’s precisely parallel to what we did earlier with Dog and NoisyDog. In real life, testing or casting an object typed as a protocol arises most commonly with regard to AnyObject, a catch-all protocol used for interchange with Objective-C. I’ll give examples later in this chapter.
Declaring a Protocol
Protocol declaration can take place only at the top level of a file. To declare a protocol, use the keyword protocol followed by the name of the protocol, which, being an object type, should start with a capital letter. Then come curly braces which may contain the following:
- Properties
A property declaration in a protocol consists of
var(notlet), the property name, a colon, its type, and curly braces containing the wordgetor the wordsget set. The syntax is rather like declaring a computed property with a getter or both a getter and a setter, but without any implementation of that getter and setter. However, that’s just a matter of syntax; the adopter has many more options:- The adopter can implement this property as a stored property.
-
If the protocol specifies
getonly, the adopter can declare this property as a stored property withlet. -
Even if the protocol specifies
getonly, the adopter can make this property a read-write property.
What the adopter can’t do is to implement this property as a read-only computed property or a constant (
let) stored property if the protocol specifiesget set; in other words, if the protocol says that this property must be writable, it must be writable.To declare a static/class property, precede it with the keyword
static. A class adopter is free to implement this as a class property.
- Methods
A method declaration in a protocol is a function declaration without a function body — that is, it has no curly braces and thus it has no code. Any object function type is legal, including
initandsubscript. (The syntax for declaring a subscript in a protocol is the same as the syntax for declaring a subscript in an object type, except that there will be no function bodies, so the curly braces, like those of a property declaration in a protocol, will containgetorget set.)To declare a static/class method, precede it with the keyword
static. A class adopter is free to implement this as a class method.If a method, as implemented by an enum or struct, might need to be declared
mutating, the protocol must specify themutatingdesignation; the adopter cannot addmutatingif the protocol lacks it. However, the adopter can omitmutatingif the protocol has it.- Type alias
A protocol can introduce a local synonym for a type that it mentions in its declarations by declaring a type alias. For example,
typealias Time = Doubleallows the Time type to be referred to inside the protocol’s curly braces; elsewhere (such as in an adopting object type), the Time type doesn’t exist, but the Double type is a match for it.There are other ways to use a type alias in a protocol, which I’ll discuss later.
- Protocol adoption
A protocol can itself adopt one or more protocols; the syntax is just as you would expect — a colon after the protocol’s name in the declaration, followed by a comma-separated list of the protocols it adopts. In effect, this gives you a way to create an entire secondary hierarchy of types! The Swift headers make heavy use of this.
A protocol that adopts another protocol may repeat the contents of the adopted protocol’s curly braces, for clarity; but it doesn’t have to, as this repetition is implicit. An object type that adopts such a protocol must satisfy the requirements of this protocol and all protocols that the protocol adopts.
Tip
If the only purpose of a protocol would be to combine other protocols by adopting all of them, without adding any new requirements, and if this combination is used in just one place in your code, you can avoid formally declaring the protocol in the first place by creating the combining protocol on the fly. To do so, use a type name protocol<..., ...>, where the contents of the angle brackets is a comma-separated list of protocols. For example, in a function declaration, a parameter type could be specified as protocol<Printable, DebugPrintable>, meaning that this value must be an object type that adopts Printable and DebugPrintable.
Optional Protocol Members
In Objective-C, a protocol member can be declared optional, meaning that this member doesn’t have to be implemented by the adopter, but it may be. For compatibility with Objective-C, Swift allows optional protocol members, but only in a protocol explicitly bridged to Objective-C by preceding its declaration with the @objc attribute. In such a protocol, an optional member — meaning a method or property — is declared by preceding its declaration with the keyword optional:
@objc protocol Flier {
    optional var song : String {get}
    optional func sing()
}
Only a class can adopt such a protocol, and this feature will work only if the class is an NSObject subclass, or the class is marked with the @objc attribute, or the optional member is marked with the @objc attribute:
@objc class Bird : Flier {
    func sing() {
        println("tweet")
    }
}
An optional member is not guaranteed to be implemented by the adopter, so Swift doesn’t know whether it’s safe to send a Flier either the song message or the sing message. In the case of an optional property like song, Swift solves the problem by wrapping its value in an Optional. If the Flier doesn’t implement the property, the result is nil and no harm done:
let f : Flier = Bird()
let s = f.song // s is an Optional wrapping a String
Tip
This is one of those rare situations where you can wind up with a double-wrapped Optional. For example, if the value of the optional property song were a String?, then fetching its value from a Flier would yield a String??.
In the case of an optional method like sing, things are more elaborate. If the method is not implemented, we must not be permitted to call it in the first place. To handle this situation, the method itself is automatically typed as an Optional version of its declared type. To send the sing message to a Flier, therefore, you must unwrap it. The safe approach is to unwrap it optionally, with a question mark:
let f : Flier = Bird()
f.sing?()
That code compiles — and it also runs safely. The effect is to send the sing message to f only if this adopter implements sing. If the actual type of this adopter doesn’t implement sing, nothing happens. You could have force-unwrapped the call — f.sing!() — but then your app would crash if the adopter doesn’t implement sing.
If an optional method returns a value, that value is wrapped in an Optional as well. For example:
@objc protocol Flier {
    optional var song : String {get}
    optional func sing() -> String
}
If we now call sing?() on a Flier, the result is an Optional wrapping a String:
let f : Flier = Bird()
let s = f.sing?() // s is an Optional wrapping a String
If we force-unwrap the call — sing!() — the result is either a String (if the adopter implements sing) or a crash (if it doesn’t).
Many Cocoa protocols have optional members. For example, your iOS app will have an app delegate class that adopts the UIApplicationDelegate protocol; this protocol has many methods, all of them optional.
Warning
An optional property can be declared {get set} by its protocol, but there is no legal syntax for setting such a property in an object of that protocol type. For example, if f is a Flier and song is declared {get set}, you can’t set f.song. I regard this as a bug in the language.
Class Protocol
A protocol declared with the keyword class after the colon after its name is a class protocol, meaning that it can be adopted only by class object types:
protocol SecondViewControllerDelegate : class {
    func acceptData(data:AnyObject!)
}
Like the @objc attribute, this feature is provided for compatibility with Objective-C. (In fact, the @objc attribute implies that this is also a class protocol.)
A typical reason for declaring a class protocol is to take advantage of special memory management features that apply only to classes. I haven’t discussed memory management yet, but I’ll continue the example anyway (and I’ll repeat it when I do talk about memory management, in Chapter 5):
class SecondViewController : UIViewController {
    weak var delegate : SecondViewControllerDelegate?
    // ...
}
The keyword weak marks the delegate property as having special memory management. Only a class instance can participate in this kind of special memory management. The delegate property is typed as a protocol, and a protocol might be adopt by a struct or an enum type. So to satisfy the compiler that this object will in fact be a class instance, and not a struct or enum instance, the protocol is declared as a class protocol.
Implicitly Required Initializers
Suppose that a protocol declares an initializer. And suppose that a class adopts this protocol. By the terms of this protocol, this class and any subclass it may ever have must implement this initializer. Therefore, the class must not only implement the initializer, but it must also mark it as required. An initializer declared in a protocol is thus implicitly required, and the class is forced to make that requirement explicit.
Consider this simple example, which won’t compile:
protocol Flier {
    init()
}
class Bird : Flier {
    init() {} // compile error
}
That code generates an elaborate but perfectly informative compile error message: “Initializer requirement init() can only be satisfied by a required initializer in non-final class Bird.” To compile our code, we must designate our initializer as required:
protocol Flier {
    init()
}
class Bird : Flier {
    required init() {}
}
The alternative, as the compile error message informs us, would be to mark the class Bird as final. This would mean that it cannot have any subclasses — thus guaranteeing that the problem will never arise in the first place. If Bird were marked final, there would be no need to mark its init as required.
In the above code, Bird is not marked as final, and its init is marked as required. This, as I’ve already explained, means in turn that any subclass of Bird that implements any designated initializers — and thus loses initializer inheritance — must implement the required initializer and mark it required as well.
That fact is responsible for one of the strangest and most annoying features of real-life iOS programming with Swift. Let’s say you subclass the built-in Cocoa class UIViewController — something that you are extremely likely to do. And let’s say you give your subclass an initializer — something that you are also extremely likely to do:
class ViewController: UIViewController {
    init() {
        super.init(nibName: "ViewController", bundle: nil)
    }
}
That code won’t compile. The compile error says: “required initializer init(coder:) must be provided by subclass of UIViewController.” What on earth is going on? Well, it turns out that UIViewController adopts a protocol, NSCoding. And this protocol requires an initializer init(coder:). None of that is your doing; UIViewController and NSCoding are declared by Cocoa, not by you. But that doesn’t matter! This is the same situation I was just describing. In order to adopt NSCoding, UIViewController must not only implement init(coder:), but also it must mark it required. Therefore, because your subclass has implemented a designated initializer of its own — thus cutting off initializer inheritance — it must also implement init(coder:) and mark it required!
But that makes no sense, especially if you are not expecting init(coder:) ever to be called on your UIViewController subclass. You are being asked to write an initializer for which you can provide no meaningful functionality. Fortunately, Xcode’s Fix-It feature will offer to write the initializer for you, like this:
required init(coder aDecoder: NSCoder) {
    fatalError("init(coder:) has not been implemented")
}
That code satisfies the compiler. (I’ll explain in Chapter 5 why it’s a legal initializer even though it doesn’t fulfill an initializer’s contract.) It also deliberately crashes if it is ever called. If you do have functionality for this initializer, you will delete the fatalError line and insert your own functionality in its place.
Not only UIViewController but lots of built-in Cocoa classes adopt NSCoding. You will encounter this problem if you subclass any of those classes and implement your own initializer. It’s just something you’ll have to get used to.
Literal Convertibles
One of the wonderful things about Swift is that so many of its features, rather than being built-in and accomplished by magic, are implemented in Swift and are exposed to view in the Swift header. Literals are a case in point. The reason you can say 5 to make an Int whose value is 5, instead of formally initializing Int by saying Int(5), is not because of magic (or at least, not entirely because of magic). It’s because Int adopts a protocol, IntegerLiteralConvertible. Not only Int literals, but all literals work this way. The following literal convertible protocols are declared in the Swift header:
- NilLiteralConvertible
- BooleanLiteralConvertible
- IntegerLiteralConvertible
- FloatLiteralConvertible
- StringLiteralConvertible
- ExtendedGraphemeClusterLiteralConvertible
- UnicodeScalarLiteralConvertible
- ArrayLiteralConvertible
- DictionaryLiteralConvertible
Your own object type can adopt a literal convertible protocol as well. This means that a literal can appear where an instance of your object type is expected! For example, here we declare a Nest type that contains some number of eggs (its eggCount):
struct Nest : IntegerLiteralConvertible {
    var eggCount : Int = 0
    init() {}
    init(integerLiteral val: Int) {
        self.eggCount = val
    }
}
Because Nest adopts IntegerLiteralConvertible, we can pass an Int where a Nest is expected, and our init(integerLiteral:) will be called automatically, causing a new Nest object with the specified eggCount to come into existence at that moment:
func reportEggs(nest:Nest) {
    println("this nest contains \(nest.eggCount) eggs")
}
reportEggs(4) // this nest contains 4 eggs
Generics
A generic is a sort of placeholder for a type, into which an actual type will be slotted later. This is useful because of Swift’s strict typing. Without sacrificing that strict typing, there are situations where you can’t or don’t want to specify too precisely in a certain region of your code what the exact type of something is going to be.
It is important to understand that generics do not in any way relax Swift’s strict typing. In particular, they do not postpone resolution of a type until runtime. When you use a generic, your code will still specify its real type; that real type is known with complete specificity at compile time! The particular region of your code where the type is expected uses a generic so that it doesn’t have to specify the type fully, but at the point where that code is used by other code, the type is fully resolved.
An Optional is a good example. Any type of value can be wrapped up in an Optional. Yet you are never in any doubt as to what type is wrapped up in a particular Optional. How can this be? It’s because Optional is a generic type. Here’s how an Optional works.
I have already said that an Optional is an enum, with two cases: .None and .Some. If an Optional’s case is .Some, it has an associated value — the value that is wrapped by this Optional. But what is the type of that associated value? On the one hand, one wants to say that it can be any type; that, after all, is why anything can be wrapped up in an Optional. On the other hand, any given Optional that wraps a value wraps a value of some specific type. When you unwrap an Optional, that unwrapped value needs to be typed as what it is, so that it can be sent messages appropriate for that type.
The solution to this sort of problem is a Swift generic. The declaration for the Optional enum in the Swift header starts like this:
enum Optional<T> {
    // ...
}
That syntax means: “In the course of this declaration, I’m going to be using a made-up type — a type placeholder — that I call T. It’s a real and individual type, but I’m not going to say more about it right now. All you need to know is that whenever I say T, I mean this one particular type. When an actual Optional is created, it will be perfectly clear what type T stands for, and then, wherever I say T, you should substitute the type that it stands for.”
Let’s look at more of the Optional declaration:
enum Optional<T> {
    case None
    case Some(T)
    init(_ some: T)
    // ...
}
Having declared that T is a placeholder, we proceed to use it. That code says: “There’s a case .None. There’s also a case .Some, which has an associated value — of type T. We also have an initializer which takes a parameter of type T. Thus, the type with which we are initialized — whatever type that may be — is type T, and thus is the type of value that is associated the .Some case.”
It is this identity between the type of the initializer parameter and the type of the .Some associated value that allows the latter to be resolved. In the declaration of the Optional enum, T is a placeholder. But in real life, when an actual Optional is created, it will be initialized with an actual value of some definite type. Usually, we’ll use the question-mark syntactic sugar (type String?) and the initializer will be called for us behind the scenes, but let’s call the initializer explicitly for the sake of clarity:
let s = Optional("howdy")That code resolves the type of T for this particular Optional instance! Obviously, "howdy" is a String. Thus, the compiler knows — at compile time, before any code runs — that for this particular Optional<T>, T is String. Under the hood, wherever T appears in the declaration of the Optional enum, the compiler substitutes String. Thus, the declaration for the particular Optional referred to by the variable s looks, in the compiler’s mind, like this:
enum Optional {
    case None
    case Some(String)
    init(_ some: String)
    // ...
}
That is the pseudo-code declaration of an Optional whose T placeholder has been replaced everywhere with the String type. We can summarize this by saying that s is an Optional<String>. In fact, that is legal syntax! We can create the same Optional like this:
let s : Optional<String> = "howdy"
A great many of the built-in Swift types involve generics. In fact, this feature of the language seems to be designed with the Swift types in mind; generics exist exactly so that the Swift types can do what they need to do.
Generic Declarations
Here’s a list of the places where generics, in one form or another, can actually be declared in Swift:
-
Generic protocol with
Self In a protocol, use of the keyword
Self(note the capitalization) turns the protocol into a generic.Selfis a placeholder meaning the type of the adopter. This is parallel toSelfas a return type in method declarations in classes; but in a protocol, it is not confined to return types. For example, here’s a Flier protocol that declares a method that takes aSelfparameter:protocol Flier { func flockTogetherWith(f:Self) }That means that if, for example, the Bird object type were to adopt the Flier protocol, its implementation of
flockTogetherWithwould need to declare itsfparameter as a Bird.- Generic protocol with empty type alias
A protocol can declare a type alias without any assignment defining what the type alias stands for. This turns the protocol into a generic, and the alias name (also called an associated type) is a placeholder. For example:
protocol Flier {
    typealias Other
    func flockTogetherWith(f:Other)
    func mateWith(f:Other)
}
An adopter will declare some particular type where the generic uses the type alias name, and this resolves, by inference, the type alias for this particular adopter. Here, for example, the Bird struct adopts the Flier protocol and declares a Bird as the
fparameter offlockTogetherWith; that declaration resolves Other to Bird for this particular adopter, so now Bird must declare Bird as thefparameter formateWithas well:struct Bird : Flier { func flockTogetherWith(f:Bird) {} func mateWith(f:Bird) {} }
- Generic functions
A function declaration can use a generic placeholder type for any of its parameters, for its return type, and within its body. Declare the placeholder name in angle brackets after the function name:
func takeAndReturnSameThing<T> (t:T) -> T {
    return t
}
The caller will use some particular type where the placeholder appears in the function declaration; that usage resolves the placeholder type by inference. In this example, the type of the argument
"howdy"used in the call resolves T to String; therefore this call totakeAndReturnSameThingwill also return a String, and the variable capturing the result,thing, is inferred to String as well:let thing = takeAndReturnSameThing("howdy")
- Generic object types
An object type declaration can use a generic placeholder type anywhere within its curly braces. Declare the placeholder name in angle brackets after the object type name:
struct HolderOfTwoSameThings<T> {
    var firstThing : T
    var secondThing : T
    init(thingOne:T, thingTwo:T) {
        self.firstThing = thingOne
        self.secondThing = thingTwo
    }
}
A user of this object type will use some particular type where the placeholder appears in the object type declaration; that usage resolves the placeholder. In this example, the type of the
thingOneargument,"howdy", used in the initializer call, resolves T to String; thereforethingTwomust also be a String, and the propertiesfirstThingandsecondThingare Strings as well:let holder = HolderOfTwoSameThings(thingOne:"howdy", thingTwo:"getLost")
For generic functions and object types, which use the angle bracket syntax, the angle brackets can contain multiple placeholder names, separated by comma. For example:
func flockTwoTogether<T, U>(f1:T, f2:U) {}After that declaration, the two parameters can be resolved to two different types (though they do not have to be different).
Type Constraints
All our examples so far have permitted any type to be substituted for the placeholder; but you can limit the types that are eligible to be used for resolving a particular placeholder. This is called a type constraint. The simplest form of type constraint is to put a colon and a type name after the placeholder’s name when it first appears. The type name after the colon can be a class name or a protocol name.
For example, let’s return to our Flier and its flockTogetherWith function. Suppose we want to say that the parameter of flockTogetherWith should be declared by the adopter as a type that adopts Flier. You would not do that by declaring the type of that parameter as Flier in the protocol, like this:
protocol Flier {
    func flockTogetherWith(f:Flier)
}
That code says: You can’t adopt this protocol unless you declare a function flockTogetherWith whose f parameter is declared as Flier, like this:
struct Bird : Flier {
    func flockTogetherWith(f:Flier) {}
}
That isn’t what we want to say! We want to say that Bird should be able to adopt Flier while declaring f as being of some Flier adopter type, such as Bird. The way to say that is to use a placeholder constrained as a Flier. For example, we could do it like this:
protocol Flier {
typealias Other : Flier
func flockTogetherWith(f:Other)
}Now Bird can be a legal adopter like this:
struct Bird : Flier {
func flockTogetherWith(f:Bird) {}
}(You may be thinking that since Other is used in only one place in the protocol Flier’s declaration, we could dispense with the type alias and just have Flier declare a generic function instead. That’s not true, because that would mean something else entirely. If a protocol declares a generic function, it is saying that adopters must declare that same generic function, which is a very different thing.)
In a generic function or a generic object type, the type constraint appears in the angle brackets. For example:
func flockTwoTogether<T:Flier>(f1:T, f2:T) {}That code means that, if Bird and Insect both adopt Flier, flockTwoTogether can be called with two Bird parameters or with two Insect parameters — but not with a Bird and an Insect, because T is just one type. And it must be a type of Flier; you can’t call flockTwoTogether with two String parameters, because a String is not a Flier.
A type constraint on a placeholder is often useful as a way of assuring the compiler that some message can be sent to an instance of the placeholder type. For example, let’s say we want to implement a function myMin that returns the smallest from a list of the same type. Here’s a promising implementation as a generic function, but there’s one problem — it doesn’t compile:
func myMin<T>(things:T ...) -> T {
var minimum = things[0]
for ix in 1..<things.count {
if things[ix] < minimum { // compile error
minimum = things[ix]
}
}
return minimum
}The problem is the comparison things[ix] < minimum. How does the compiler know that the type T, the type of things[ix] and minimum, will be resolved to a type that can in fact be compared using the less-than operator in this way? It doesn’t, and that’s exactly why it rejects that code. The solution is to promise the compiler that the resolved type of T will in fact work with the less-than operator. The way to do that, it turns out, is to constrain T to Swift’s built-in Comparable protocol; adoption of the Comparable protocol exactly guarantees that the adopter does work with the less-than operator:
func myMin<T:Comparable>(things:T ...) -> T { // ...Now myMin compiles, because it cannot be called except by resolving T to an object type that adopts Comparable and hence can be compared with the less-than operator. Naturally, built-in object types that you think should be comparable, such as Int, Double, String, and Character, do in fact adopt the Comparable protocol! If you look in the Swift headers, you’ll find that the built-in min function is declared in just this way, and for just this reason.
A generic protocol (a protocol whose declaration mentions Self or has an empty type alias) can be used as a type only in a generic, as a type constraint. This won’t compile:
protocol Flier {
typealias Other
func fly()
}
func flockTwoTogether(f1:Flier, f2:Flier) { // compile error
f1.fly()
f2.fly()
}To use a generic Flier protocol as a type, we must write a generic and use Flier as a type constraint. For example:
protocol Flier {
typealias Other
func fly()
}
func flockTwoTogether<T1:Flier, T2:Flier>(f1:T1, f2:T2) {
f1.fly()
f2.fly()
}Explicit Specialization
In the examples so far, the user of a generic resolves the placeholder’s type through inference. But there’s another way to perform resolution: the user can resolve the type manually. This is called explicit specialization. In some situations, explicit specialization is mandatory — namely, if the placeholder type cannot be resolved through inference. There are two forms of explicit specialization:
- Generic protocol with empty type alias
The adopter of a protocol can resolve the protocol’s empty alias type manually through a
typealiasdeclaration using the protocol’s alias name with an explicit type assignment. For example:protocol Flier { typealias Other } struct Bird : Flier { typealias Other = String }- Generic object type
The user of a generic object type can resolve the object’s placeholder type(s) manually using the same angle bracket syntax used to declare the generic in the first place, with actual type names in the angle brackets. (That explains the
Optional<String>type declaration I showed a moment ago.) For example:class Dog<T> { var name : T? = nil } let d = Dog<String>()
You cannot explicitly specialize a generic function. You can, however, declare a generic type with a nongeneric function that uses the generic type’s placeholder; explicit specialization of the generic type resolves the placeholder, and thus resolves the function:
protocol Flier {
init()
}
struct Bird : Flier {
init() {}
}
struct FlierMaker<T:Flier> {
static func makeFlier() -> T {
return T()
}
}
let f = FlierMaker<Bird>.makeFlier() // returns a BirdWhen a class is generic, it is quite tricky to subclass it in a way that’s acceptable to the compiler (I regard this as a bug in Swift itself). My solution is to declare the subclass as a generic subclass of a manually resolved version of the superclass, even if the subclass’s placeholder isn’t used for anything:
class Dog<T> {
var name : T? = nil
}
class NoisyDog<U> : Dog<String> {
}To use the subclass, you have to resolve the placeholder manually, even if your resolution is pointless:
let nd = NoisyDog<Int>() // the Int is pointless nd.name = "Fido"
Where Clauses
The angle brackets of a generic function or object type declaration can contain a where clause, which can solve some knotty expressive problems by honing further the constraints on the placeholder type.
For example, what if you want to put multiple constraints on a placeholder’s type? For a generic protocol, you can use a comma-separated list of protocols or classes when you constrain the type alias:
protocol Flier {
}
protocol Walker {
}
protocol FlierWalker {
typealias T : Flier, Walker // T must adopt Flier and Walker
}For a generic function or object type, the solution is a where clause after the placeholder name(s) in the angle brackets, consisting of the word where and one or more comma-separated clauses consisting of an already defined placeholder and a constraint. For example:
protocol Flier {
}
protocol Walker {
}
func flyAndWalk<T where T:Walker, T:Flier> (f:T) {}Another powerful use of where clauses is to constrain further a generic protocol type used as a constraint in a generic function or object type. For example:
protocol Flier {
typealias Other
}
func flockTogether<T:Flier where /*???*/> (f:T) {}The generic protocol’s placeholder is its empty type alias (its associated type), so what you’re constraining here is that associated type. The goal, then, is to restrict what sort of thing Other must resolve to. The name Other exists only in the namespace of Flier, and here is to be applied to the placeholder T. So the syntax is:
protocol Flier {
typealias Other
}
func flockTogether<T:Flier where T.Other /*???*/ > (f:T) {}(If Other were itself constrained to a generic protocol type, the dot-notation could be extended to its type alias. I’ll show an example in a moment.)
The missing part of the where clause may be one of the following:
- A colon and a protocol type. The resolved type alias is constrained to be an adopter of this protocol.
- An equality operator and an object type. The resolved type alias is constrained to be of this type.
- An equality operator and another placeholder-plus-type-alias. The resolved type aliases are constrained to be the same type as one another.
Here’s a (silly) example where the type alias is constrained to a protocol:
protocol Flier {
typealias Other
}
struct Bird : Flier {
typealias Other = String
}
struct Insect : Flier {
typealias Other = Bird
}
func flockTogether<T:Flier where T.Other:Equatable> (f:T) {}In that example, the function flockTogether can be called with a Bird parameter, because a Bird’s Other type alias is resolved to String, and String adopts the built-in Equatable protocol — but the function flockTogether can’t be called with an Insect parameter, because an Insect’s Other type alias is resolved to Bird, and Bird doesn’t adopt the Equatable protocol.
The Swift header makes extensive use of where clauses of this kind. For example, here’s the declaration of the built-in find function:
func find<C : CollectionType where C.Generator.Element : Equatable>
(domain: C, value: C.Generator.Element) -> C.Index?The Find function returns the index number of a requested object within a given collection; I gave some examples in Chapter 3, such as find("howdy","o"). Observe the chaining of the type alias names in C.Generator.Element. A CollectionType is something like a String or an Array; it has an empty type alias Generator, which is constrained to be a GeneratorType, which in turn has an empty type alias Element. That’s fancy talk for a simple concept — it means, “The kind of thing this is a collection of.” The where clause then says that the kind of thing the placeholder C is a collection of must be an Equatable — very sensibly, because there is no way to find an object in a collection if there is no way to know whether two objects are equal! You can’t find a needle in a haystack unless you have a way of identifying a needle when you see it.
Based on that model, we can write a where clause specifying that we want a collection of some specific element type, such as Character; this is an object type, not a protocol, so we use == and not a colon:
func printc<C : CollectionType where C.Generator.Element == Character>(c:C) {
for char in c {
println(char)
}
}Either of these two calls to printc is legal, because a String is a collection of Character and an array of Character is a collection of Character:
printc("howdy")
printc(["h" as Character, "i" as Character])Finally, here’s an example (again silly) of a where clause constraining two type aliases to be the same type as one another:
protocol Flier {
typealias Other
}
struct Bird : Flier {
typealias Other = String
}
struct Insect : Flier {
typealias Other = Int
}
func flockTwoTogether<T:Flier, U:Flier where T.Other == U.Other>
(f1:T, f2:U) {}In that code, the function flockTwoTogether can be called with a Bird and a Bird, and it can be called with an Insect and an Insect, but it can’t be called with an Insect and a Bird because their Other type aliases are not resolved to the same type.
(Interestingly, the type of a generic protocol’s resolved type alias can also be referred to outside a where clause. I’ll give an example later in this chapter.)
Extensions
An extension is a way of injecting your own code into an object type that has already been declared elsewhere. This could be one of your own object types; in that case, you could have put this functionality into the original object type declaration, and the extension is merely a device to allow you to organize your code more clearly and conveniently. However, it could be one of Swift’s object types or one of Cocoa’s Objective-C object types; in that case, you are adding functionality to a type that doesn’t belong to you!
To declare an extension, put the keyword extension followed by the name of an existing object type, then optionally a colon plus the names of any protocols you want to add to the list of those adopted by this type, and finally curly braces containing the usual things that go inside an object type declaration — with the following restrictions:
- An extension can’t redefine (override) an existing member.
- An extension can’t declare a stored property (but it can declare a computed property).
- An extension of a class can’t declare a designated initializer or a deinitializer (but it can declare a convenience initializer).
In my real programming life, I sometimes extend a built-in Swift or Cocoa type just to encapsulate some missing functionality by expressing it as a property or method. Here are a couple of examples from actual apps.
In a card game, I need to shuffle the deck, which is stored in an array. I extend Swift’s built-in Array type to give it a shuffle method (I’ll discuss the stride function in Chapter 5):
extension Array {
mutating func shuffle () {
for i in stride(from:self.count-1, to:0, by:-1) {
let ix1 = i
let ix2 = Int(arc4random_uniform(UInt32(i+1)))
(self[ix1], self[ix2]) = (self[ix2], self[ix1])
}
}
}Cocoa’s Core Graphics framework has many useful functions associated with the CGRect struct, and Swift itself extends CGRect to add some helpful properties and methods; but there’s no shortcut for getting the center point (a CGPoint) of a CGRect, something that in practice one very often needs. I extend CGRect to give it a center property:
extension CGRect {
var center : CGPoint {
return CGPointMake(self.midX, self.midY)
}
}An extension can declare a static or class method; since an object type is usually globally available, this can often be an excellent way to slot a global function into an appropriate namespace. For example, in one of my apps, I find myself frequently using a certain color (a UIColor). Instead of creating that color repeatedly, it makes sense to encapsulate the instructions for generating it in a global function. But instead of making that function completely global, I make it — appropriately enough — a class method of UIColor:
extension UIColor {
class func myGolden() -> UIColor {
return self(red:1.000, green:0.894, blue:0.541, alpha:0.900)
}
}Now I can use that color throughout my code simply by saying UIColor.myGolden(), completely parallel to built-in class methods such as UIColor.redColor().
A frequent use of extensions is to make an object type adopt a protocol. Of course, you then also have to implement the members required by that protocol, if they are not implemented already.
For example, the Core Graphics CGAffineTransform struct isn’t logged nicely in the console with println; it isn’t a Printable. It’s easy to make it a Printable, though, because there’s a Cocoa function for representing a CGAffineTransform as a string:
extension CGAffineTransform : Printable {
public var description : String {
return NSStringFromCGAffineTransform(self)
}
}As I mentioned earlier, extensions on one’s own object types can help to organize one’s code. A frequently used convention is to add an extension for each protocol one’s object type needs to adopt, like this:
class ViewController: UIViewController {
// ... UIViewController method overrides go here ...
}
extension ViewController : UIPopoverPresentationControllerDelegate {
// ... UIPopoverPresentationControllerDelegate methods go here ...
}
extension ViewController : UIToolbarDelegate {
// ... UIToolbarDelegate methods go here ...
}An extension on your own object type is also a good way to spread your definition of that object type over multiple files, if you feel that several shorter files are better than one long file.
When you extend a generic object type, you cannot add new placeholders to this object type, and you cannot add new constraints to its existing placeholder types. However, the existing placeholder type names are in scope inside your extension declaration. That’s good, because you might need to use them; but it makes your code a little mystifying, because you seem to be using some undefined type names out of the blue. It might be a good idea to add a comment, to remind yourself what you’re up to. Here’s an artificial example (and I’ll give a real example later in this chapter):
class Dog<T> {
var name : T? = nil
}
extension Dog {
func sayYourName() -> T? { // T is the type of self.name
return self.name
}
}When you extend a Swift struct, a curious thing happens with initializers: it becomes possible to declare an initializer and keep the implicit initializers:
struct Digit {
var number : Int
}
extension Digit {
init() {
self.init(number:42)
}
}That code means that you can instantiate a Digit by calling the explicitly declared initializer — Digit() — or by calling the implicit memberwise initializer — Digit(number:7). Thus, the explicit declaration of an initializer through an extension did not cause us to lose the implicit memberwise initializer, as would have happened if we had declared the same initializer inside the original struct declaration.
Umbrella Types
Swift provides a few built-in types as general umbrella types, capable of embracing multiple real types under a single heading.
AnyObject
The umbrella type most commonly encountered in real-life iOS programming is AnyObject. It is actually a protocol; as a protocol, it is completely empty, requiring no properties or methods. It has the special feature that all class types conform to it automatically. Thus, it is possible to assign or pass any class instance where an AnyObject is expected, and to cast in either direction:
class Dog {
}
let d = Dog()
let any : AnyObject = d
let d2 = any as! DogThe common way to encounter an AnyObject is in the course of interchange with Objective-C. Swift’s ability to cast any class type to and from an AnyObject parallels Objective-C’s ability to cast any class type to and from an id. In effect, AnyObject is the Swift version of id.
Certain basic Swift types, which are not class types — such as String and the numeric types — are bridged to Objective-C types, which are class types, defined by the Foundation framework. This means that, in the presence of the Foundation framework, a Swift bridged type can be assigned, passed, or cast to an AnyObject, even if it is not a class type — because it will be cast first to its Objective-C bridged class type automatically, behind the scenes — and an AnyObject can be cast down to a Swift bridged type. For example:
let s = "howdy" let any : AnyObject = s // implicitly casts to NSString let s2 = any as! String let i = 1 let any2 : AnyObject = i // implicitly casts to NSNumber let i2 = any2 as! Int
Many Cocoa values are typed as id in the APIs, and such values will arrive from Cocoa into Swift typed as AnyObject. If you know what such a value really is, you’re probably going to want to cast it down to that type, so that you can work with it as that type. The Swift compiler will prompt you, by warning whenever AnyObject is used as an implicit type. For example:
let vc = self.storyboard!.instantiateViewControllerWithIdentifier("vc")The compiler warns that vc is “inferred to have type AnyObject!, which may be unexpected.” This is not an error — your code will compile and run — but the compiler is trying to be helpful, and it’s a good idea to deal with all compiler warnings.
There are two ways to quiet the compiler’s warning. One is to declare vc as AnyObject explicitly, thus acknowledging to the compiler that you’re aware of what’s going on:
let vc : AnyObject =
self.storyboard!.instantiateViewControllerWithIdentifier("vc")The other way is to cast down. We happen to know that instantiateViewControllerWithIdentifier will return a UIViewController, so casting is probably a better solution:
let vc =
self.storyboard!.instantiateViewControllerWithIdentifier("vc")
as! UIViewControllerThat cast is permitted, because AnyObject can be cast to just about any Cocoa object type. Of course, you’d better be telling the truth when you cast, or you will crash when the code runs and the cast turns out to be impossible. You can use the is and as? operators, if you’re in doubt, to make sure your cast is safe. That might be a good idea here, because instantiateViewControllerWithIdentifier can return nil to indicate that no view controller in this storyboard matches this identifier.
The need to cast here is somewhat surprising, because it seems obvious that, with a name like instantiateViewControllerWithIdentifier, this method is going to return a UIViewController. But the fault lies in the Cocoa API, not with Swift. The API declares the return type here as an id — in Swift, an AnyObject — and that’s all Swift can know about the matter. In the future, perhaps this API will be hand-tweaked to return a UIViewController?, which in my view is how this value should be typed. Until then, Swift provides a helpful warning, and the rest is up to you.
(A particularly common way to receive values typed as AnyObject from Cocoa is when it hands you an array. All Objective-C arrays arrive into Swift as arrays of AnyObject. I’ll have more to say about that when I discuss arrays later in this chapter.)
Suppressing type checking
A surprising feature of AnyObject is that it can be used to suspend the compiler’s judgment as to whether a certain message can be sent to an object. This convenience deliberately mimics Objective-C, where typing something as an id causes the compiler to suspend judgment about what messages can be sent to it. Thus, you can do in Swift what you could have done in Objective-C, namely, send a message to an AnyObject without bothering to cast to its real type. (Nevertheless, if you know the object’s real type, you probably will cast to that type.)
You can’t send just any old message to an AnyObject; the message must correspond to a class member that meets one of the following criteria:
- It is part of an Objective-C class.
- It is declared in your own Swift subclass of an Objective-C class.
- It is declared in your own Swift extension of an Objective-C class.
-
It is declared in a Swift class marked
@objc. -
It is declared in a Swift class, and is itself marked
@objc(ordynamic).
This feature is fundamentally parallel to optional protocol members, which I discussed earlier in this chapter — with some slight differences. To see what I mean, let’s start with two classes:
class Dog {
@objc var noise : String = "woof"
@objc func bark() -> String {
return "woof"
}
}
class Cat {}The Dog property noise and the Dog method bark are marked @objc, so they are visible as potential messages to be sent to an AnyObject. To prove it, I’ll type a Cat as an AnyObject and send it one of these messages. Let’s start with the noise property:
let c : AnyObject = Cat() let s = c.noise
That code, amazingly, compiles. Moreover, it doesn’t crash when the code runs! The noise property has been typed as an Optional wrapping its original type. Here, that’s an Optional wrapping a String. If the object typed as AnyObject doesn’t implement noise, the result is nil and no harm done. Moreover, unlike an optional protocol property, the Optional in question is implicitly unwrapped. Therefore, if the AnyObject turns out to have a noise property (for example, if it had been a Dog), the resulting implicitly unwrapped String can be treated directly as a String.
Now let’s try it with a method call:
let c : AnyObject = Cat() let s = c.bark?()
Again, that code compiles and is safe. If the Object typed as AnyObject doesn’t implement bark, no bark() call is performed; the method result type has been wrapped in an Optional, so s is typed as String? and has been set to nil. If the AnyObject turns out to have a bark method (for example, if it had been a Dog), the result is an Optional wrapping the returned String. If you call bark!() on the AnyObject instead, the result will be a String, but you’ll crash if the AnyObject doesn’t implement bark.
There’s another difference between AnyObject members and optional protocol members. With AnyObject, you can send the message with no unwrapping. This is legal:
let c : AnyObject = Cat() let s = c.bark()
That’s just like force-unwrapping the call: the result is a String, but it’s possible to crash.
Object identity
Sometimes, what you want to know is not what type an object is, but whether an object itself is the particular object you think it is. If an object type adopts AnyObject, you can use the identity operator (===) to compare one object reference with another. This is not a comparison of values for equality, like the equality operator (==); you’re asking whether two object references refer to one and the same object. There is also a negative version of the identity operator (!==).
A typical use case is that an object arrives from Cocoa, and you need to know whether it is in fact a particular object to which you already have a reference. For example, an NSNotification has an object property that helps identify the notification (usually, it is the original sender of the notification). When a notification is sent to you, you can use the identity operator to make sure that its object property is the object you expect:
func changed(n:NSNotification) {
let player = MPMusicPlayerController.applicationMusicPlayer()
if n.object === player { // ...A class is an object, and each class object is a singleton. So the identity operator is also a way of comparing the classes of two objects with one another (by comparing their dynamicType).
AnyClass
AnyClass is the class of AnyObject. It corresponds to the Objective-C Class type. It arises typically in declarations where a Cocoa API wants to say that a class is expected.
For example, the UIView layerClass class method is declared, in its Swift translation, like this:
class func layerClass() -> AnyClass
That means: if you override this method, implement it to return a class. This will presumably be a CALayer subclass. To return an actual class in your implementation, send the self message to the name of the class:
override class func layerClass() -> AnyClass {
return CATiledLayer.self
}Any
The Any type is a type alias for an empty protocol that is automatically adopted by all types. Thus, where an Any object is expected, absolutely any object can be passed:
func anyExpecter(a:Any) {}
anyExpecter("howdy") // a struct instance
anyExpecter(String) // a struct
anyExpecter(Dog()) // a class instance
anyExpecter(Dog) // a class
anyExpecter(anyExpecter) // a functionAn object typed as Any can be tested against, or cast down to, any object or function type. To illustrate, here’s a protocol with an empty type alias, and two adopters who explicitly resolve it:
protocol Flier {
typealias Other
}
struct Bird : Flier {
typealias Other = Insect
}
struct Insect : Flier {
typealias Other = Bird
}Now here’s a function that takes a Flier along with a second parameter typed as Any, and tests whether that second parameter’s type is the same as the Flier’s resolved Other type; the test is legal because Any can be tested against any type:
func flockTwoTogether<T:Flier>(flier:T, other:Any) {
if other is T.Other {
println("they can flock together")
}
}If we call flockTwoTogether with a Bird and an Insect, the console says “they can flock together.” If we call it with a Bird and an object of any other type, it doesn’t.
Collection Types
Swift, in common with most modern computer languages, has built-in collection types, Array and Dictionary. They are sufficiently important that the language accommodates them with some special syntax. At the same time, like most Swift types, they are quite thinly provided with related functions; some missing functionality is provided by Cocoa’s NSArray and NSDictionary, to which they are respectively bridged.
New in Swift 1.2, a third collection type, Set, has been added, which is bridged to Cocoa’s NSSet.
Array
An array (Array, a struct) is an ordered collection of object instances (the elements of the array) accessible by index number, where an index number is an Int numbered from 0. Thus, if an array contains four elements, the first has index 0 and the last has index 3. A Swift array cannot be sparse: if there is an element with index 3, there is also an element with index 2 and so on.
The most salient feature of Swift arrays is their strict typing. Unlike some other computer languages, a Swift array’s elements must be uniform — that is, the array must consist solely of elements of the same definite type. Even an empty array must have a definite element type, despite the fact that it happens to lack elements at this moment. An array is itself typed in accordance with its element type. Arrays whose elements are of different types are considered, themselves, to be of two different types: an array of Int elements is of a different type from an array of String elements. Array types are polymorphic in accordance with their element types: if NoisyDog is a subclass of Dog, then an array of NoisyDog can be used where an array of Dog is expected. If all this reminds you of Optionals, it should. Like an Optional, a Swift array is a generic. It is declared as Array<T>, where the placeholder T is the type of a particular array’s elements.
The uniformity restriction is not as severe as it might seem at first glance. An array must have elements of just one type, but types are very flexible. By a clever choice of type, you can have an array whose elements are of different types internally. For example:
- If there’s a Dog class with a NoisyDog subclass, an array of Dog can contain both Dog objects and NoisyDog objects.
- If both Bird and Insect adopt the Flier protocol, an array of Flier can contain both Bird objects and Insect objects.
- An array of AnyObject can contain instances of any class and of any Swift bridged type — such as an Int, a String, and a Dog.
- A type might itself be a carrier of different possible types. My Error enum, earlier in this chapter, is an example; its associated value might be an Int or it might be a String, so an array of Error elements can carry both Int values and String values within itself.
To declare or state the type of a given array’s elements, you could explicitly resolve the generic placeholder; an array of Int elements would thus be an Array<Int>. However, Swift offers syntactic sugar for stating an array’s element type, using square brackets around the name of the element type, like this: [Int]. That’s the syntax you’ll use most of the time.
A literal array is represented as square brackets containing a list of its elements separated by comma (and optional spaces): for example, [1,2,3]. The literal for an empty array is empty square brackets: [].
An array’s default initializer init(), called by appending empty parentheses to the array’s type, yields an empty array of that type. Thus, you can create an empty array of Int like this:
var arr = [Int]()
Alternatively, if a reference’s type is known in advance, the empty array [] can be inferred to that type. Thus, you can also create an empty array of Int like this:
var arr : [Int] = []
If you’re starting with a literal array containing elements, you won’t usually need to declare the array’s type, because Swift will infer it by looking at the elements. For example, Swift will infer that [1,2,3] is an array of Int. If the array element types consist of a class and its subclasses, like Dog and NoisyDog, Swift will infer the common superclass as the array’s type. Even [1, "howdy"] is a legal array literal; it is inferred to be an array of NSObject. However, in some cases you will need to declare an array reference’s type explicitly even while assigning a literal to that array:
let arr : [Flier] = [Insect(), Bird()]
An array also has an initializer whose parameter is a sequence. This means that if a type is a sequence, you can split an instance of it into the elements of an array. Array(1...3) generates the array of Int [1,2,3]. Array("hey") generates the array of Character ["h","e","y"]. Array(d), where d is a Dictionary, generates an array of tuples of the key–value pairs of d. (There is also a global reverse method that turns a sequence into an array in reverse order.)
Another array initializer, init(count:repeatedValue:), lets you populate an array with the same value. In this example, I create an array of 100 Optional strings initialized to nil:
let strings : [String?] = Array(count:100, repeatedValue:nil)
That’s the closest you can get in Swift to a sparse array; we have 100 slots, each of which might or might not contain a string (and to start with, none of them do).
Array casting and type testing
When you assign, pass, or cast one array type to another array type, you are operating on the individual elements of the array. Thus, for example:
let arr : [Int?] = [1,2,3]
That code is actually a shorthand: to treat an array of Int as an array of Optionals wrapping Int means that each individual Int in the original array must be wrapped in an Optional. And that is exactly what happens:
let arr : [Int?] = [1,2,3] println(arr) // [Optional(1), Optional(2), Optional(3)]
Similarly, suppose we have a Dog class and its NoisyDog subclass; then this code is legal:
let dog1 : Dog = NoisyDog() let dog2 : Dog = NoisyDog() let arr = [dog1, dog2] let arr2 = arr as! [NoisyDog]
In third line, we have an array of Dog. In the fourth line, we cast this array down to an array of NoisyDog, meaning that we cast each individual Dog in the first array to a NoisyDog (and we won’t crash when we do that, because each element of the first array really is a NoisyDog).
You can test all the elements of an array with the is operator by testing the array itself. For example, given the arr array of Dog from the previous code, you can say:
if arr is [NoisyDog] { // ...That will be true if each element of the array is in fact a NoisyDog.
Similarly, the as? operator will cast an array to an Optional wrapping an array, which will be nil if the underlying cast cannot be performed:
let dog1 : Dog = NoisyDog() let dog2 : Dog = NoisyDog() let dog3 : Dog = Dog() let arr = [dog1, dog2] let arr2 = arr as? [NoisyDog] // Optional wrapping an array of NoisyDog let arr3 = [dog2, dog3] let arr4 = arr3 as? [NoisyDog] // nil
The reason for casting down an array is exactly the same as the reason for casting down any value — it’s so that you can send appropriate messages to the elements of that array. If NoisyDog declares a method that Dog doesn’t have, you can’t send that message to an element of an array of Dog. Somehow, you need to cast that element down to a NoisyDog so that the compiler will let you send it that message. You can cast down an individual element, or you can cast down the entire array; you’ll do whichever is safe and makes sense in a particular context.
Array comparison
Array equality works just as you would expect: two arrays are equal if they contain the same number of elements and all the elements are pairwise equal in order:
let i1 = 1
let i2 = 2
let i3 = 3
if [1,2,3] == [i1,i2,i3] { // they are equal!Two arrays don’t have to be of the same type to be compared against one another for equality, but the test won’t succeed unless they do in fact contain objects that are equal to one another. Here, I compare a Dog array against a NoisyDog array; they are in fact equal because the dogs they contain are the same dogs in the same order:
let nd1 = NoisyDog()
let d1 = nd1 as Dog
let nd2 = NoisyDog()
let d2 = nd2 as Dog
if [d1,d2] == [nd1,nd2] { // they are equal!Arrays are value types
Because an array is a struct, it is a value type, not a reference type. This means that every time an array is assigned to a variable or passed as argument to a function, it is effectively copied. I do not mean to imply, however, that merely assigning or passing an array is expensive, or that a lot of actual copying takes place every time. If the reference to an array is a constant, clearly no copying is actually necessary; and even operations that yield a new array derived from another array, or that mutate an array, may be quite efficient. You just have to trust that the designers of Swift have thought about these problems and have implemented arrays efficiently behind the scenes. Nevertheless, some inefficiencies may still be encountered; bear in mind that Swift is a relatively new language and that such inefficiences may be dealt with in the future as it evolves further.
Although an array itself is a value type, its elements are treated however those elements would normally be treated. In particular, an array of class instances, assigned to multiple variables, results in multiple references to the same instances.
Array subscripting
The Array struct implements subscript methods to allow access to elements using square brackets after a reference to an array. You can use an Int inside the square brackets. For example, in an array consisting of three elements, if the array is referred to by a variable arr, then arr[1] accesses the second element.
You can also use a Range of Int inside the square brackets. For example, if arr is an array with three elements, then arr[1...2] signifies the second and third elements. Technically, an expression like arr[1...2] yields something called a Slice. However, a Slice is very similar to an array; for example, you can subscript a Slice in just the same ways you would subscript an array, and a Slice can be passed where an array is expected. In general, therefore, you will probably pretend that a Slice is an array.
If the reference to an array is mutable (var, not let), then a subscript expression can be assigned to. This alters what’s in that slot. Of course, what is assigned must accord with the type of the array’s elements:
var arr = [1,2,3] arr[1] = 4 // arr is now [1,4,3]
If the subscript is a range, what is assigned must be an array. This can change the length of the array being assigned to:
var arr = [1,2,3] arr[1..<2] = [7,8] // arr is now [1,7,8,3] arr[1..<2] = [] // arr is now [1,8,3]
It is a runtime error to access an element by a number larger than the largest element number or smaller than the smallest element number. If arr has three elements, speaking of arr[-1] or arr[3] is not illegal linguistically, but your program will crash.
Nested arrays
It is legal for the elements of an array to be arrays. For example:
let arr = [[1,2,3], [4,5,6], [7,8,9]]
That’s an array of arrays of Int. Its type declaration, therefore, is [[Int]]. (No law says that the contained arrays have to be the same length; that’s just something I did for clarity.)
To access an individual Int inside those nested arrays, you can chain subscript operations:
let arr = [[1,2,3], [4,5,6], [7,8,9]] let i = arr[1][1] // 5
If the outer array reference is mutable, you can also write into a nested array:
var arr = [[1,2,3], [4,5,6], [7,8,9]] arr[1][1] = 100
You can modify the inner arrays in other ways as well; for example, you can insert additional elements into them.
Basic array properties and methods
An array’s count read-only property reports the number of elements it contains. If an array’s count is 0, its isEmpty property is true.
An array’s largest accessible index is one less than its count. You will often find yourself calculating index values with reference to the count; for example, to refer to the last two elements of arr, you can say:
let arr = [1,2,3] let arr2 = arr[arr.count-2...arr.count-1] // [2,3]
Swift doesn’t adopt the modern convention of letting you use negative numbers as a shorthand for that calculation. On the other hand, for the common case where you want the last n elements of an array, you can use the global suffix method:
let arr = [1,2,3] let arr2 = suffix(arr,2) // [2,3]
An array’s first and last read-only properties return its first and last elements, but they are wrapped in an Optional because the array might be empty and so these properties would need to be nil. This is one of those rare situations in Swift where you can wind up with an Optional wrapping an Optional. For example, consider an array of Optionals wrapping Ints, and what happens when you get the last property of such an array:
let arr : [Int?] = [1,2,3] let i = arr.last
After that code, i is an Optional wrapping an Optional wrapping an Int. That’s because the last property wraps the last element of the array in an Optional, and the last element of the array was itself an Optional wrapping an Int. This changes nothing about how you work with i; it’s just something to be aware of. You’ll test i against nil to find out whether there was a last element and whether it’s safe to unwrap the Optional; then you’ll unwrap the Optional to get the Optional wrapping an Int that’s inside it.
If the reference to an array is mutable, the append and extend instance methods add elements to the end of it. The difference between them is that append takes a single value of the element type, while extend takes an array (actually, a sequence) of the element type. For example:
var arr = [1,2,3] arr.append(4) arr.extend([5,6]) arr.extend(7...8) // arr is now [1,2,3,4,5,6,7,8]
The + operator is overloaded to behave like extend (not append!) when the left-hand operand is an array, except that it generates a new array, so it works even if the reference to the array is a constant. If the reference to the array is mutable, you can extend it in place with the += operator. Thus:
let arr = [1,2,3] let arr2 = arr + [4] // arr2 is now [1,2,3,4] var arr3 = [1,2,3] arr3 += [4] // arr3 is now [1,2,3,4]
If the reference to an array is mutable, the instance method insert(atIndex:) inserts a single element at the given index. To insert multiple elements at once, use assignment into a range-subscripted array, as I described earlier.
If the reference to an array is mutable, the instance method removeAtIndex removes the element at that index; the instance methods removeFirst and removeLast remove the first and last elements. These methods also return the value that was removed from the array; you can ignore the returned value if you don’t need it. These methods do not wrap the returned value in an Optional, and accessing an out-of-range index will crash your program. If the reference is not mutable, you can use the global dropFirst and dropLast functions to return an array with the end element removed.
The join instance method takes an array of arrays. It extracts their individual elements, and interposes the elements of this array repeatedly between each sequence of extracted elements, returning the result as a single array. For example:
let arr = [[1,2], [3,4], [5,6]] let arr2 = [10,11].join(arr) // [1, 2, 10, 11, 3, 4, 10, 11, 5, 6]
Calling join on an empty array is thus a way to flatten the parameter array:
let arr = [[1,2], [3,4], [5,6]] let arr2 = [].join(arr) // [1, 2, 3, 4, 5, 6]
The reverse instance method yields a new array whose elements are in the opposite order from the original.
The sort and sorted instance methods respectively sort the original array (if the reference to it is mutable) and yield a new sorted array based on the original. They both take a function as their parameter; this function must take two parameters of the correct element type and return a Bool stating whether the first parameter is ordered before the second in accordance with your criterion for order. For example:
var arr = [4,3,5,2,6,1]
arr.sort {$0 < $1} // [1, 2, 3, 4, 5, 6]In that example, I provided the function as an anonymous function, omitting the parentheses according to the standard shortcut. Alternatively, of course, you can pass as argument the name of a declared function. In Swift, operators such as the less-than comparison operator are the names of functions. Therefore, I can do the same thing more briefly, like this:
var arr = [4,3,5,2,6,1] arr.sort(<) // [1, 2, 3, 4, 5, 6]
The global contains function reports whether an array (of Equatables) contains an element:
let arr = [1,2,3] let ok = contains(arr,2)
The global find function reports the index of the first occurrence of an element in an array (of Equatables), but it is wrapped in an Optional so that nil can be returned if the element doesn’t appear in the array:
let arr = [1,2,3] let ix = find(arr,2) // Optional wrapping 1
The global startsWith and endsWith functions report whether the starting or ending elements of an array match the elements of a second array; you supply a function that takes two values of the element type and returns a Bool stating whether they match:
let arr = [1,2,3]
let ok = startsWith(arr, [1,2]) {$0 == $1}As in the sort example a moment ago, I can shorten that code because the equality comparison operator is the name of a function:
let arr = [1,2,3] let ok = startsWith(arr, [1,2], ==)
The minElement and maxElement global functions return the smallest or largest element in an array (of Comparables):
let arr = [3,1,2] let min = minElement(arr) // 1
The global split function breaks an array into an array of arrays at the elements that pass a specified test, which is a function that takes a value of the element type and returns a Bool; the elements passing the test are eliminated:
let arr = [1,2,3,4,5,6]
let arr2 = split(arr) {$0 % 2 == 0} // split at evens: [[1], [3], [5]]Array enumeration and transformation
The simplest way to enumerate an array, and thus to inspect or operate with each element in turn, is by means of a for...in loop; I’ll have more to say about this construct in Chapter 5:
let pepboys = ["Manny", "Moe", "Jack"]
for pepboy in pepboys {
println(pepboy) // prints Manny, then Moe, then Jack
}If you need the index numbers as well as the elements, wrap the array in a call to the built-in enumerate function and use a for...in loop on that; what you get on each iteration is a tuple:
let pepboys = ["Manny", "Moe", "Jack"]
for (ix,pepboy) in enumerate(pepboys) {
println("Pep boy \(ix) is \(pepboy)") // Pep boy 0 is Manny, etc.
}In Swift, however, you will not be using for...in enumeration on an array as much as you might suppose. Instead, you’ll prefer one of three powerful array transformation instance methods. These methods all enumerate the array for you, so that the loop is buried implicitly inside the method call, making your code tighter and cleaner.
Let’s start with the map instance method. It yields a new array, each element of which is the result of passing the corresponding element of the old array through a function that you supply. This function accepts a parameter of the element type and returns a result which may be of some other type; Swift can usually infer the type of the resulting array elements by looking at the type returned by the function.
For example, here’s how to multiply every element of an array by 2:
let arr = [1,2,3]
let arr2 = arr.map {$0 * 2} // [2,4,6]Here’s another example, to illustrate the fact that map can yield an array with a different element type:
let arr = [1,2,3]
let arr2 = arr.map {Double($0)} // [1.0, 2.0, 3.0]Here’s a real-life example showing how neat and compact your code can be when you use map. In order to remove all the table cells in a section of a UITableView, I have to specify the cells as an array of NSIndexPath objects. If sec is the section number, I can form those NSIndexPath objects individually like this:
let path0 = NSIndexPath(forRow:0, inSection:sec) let path1 = NSIndexPath(forRow:1, inSection:sec) // ...
Hmmm, I think I see a pattern here! I could generate my array of NSIndexPath objects by looping through the row values using for...in. But with map, there’s a much tighter way to express the same loop (ct is the number of rows in the section):
let paths = Array(0..<ct).map {NSIndexPath(forRow:$0, inSection:sec)}A common idiom is to misuse map as if it were something like Ruby’s each. In the function that you supply, you do something in response to each element — and then you ignore the array returned by map itself. map thus becomes the functional equivalent of the imperative for...in loop. The function itself doesn’t have to return a result; a function that returns no result returns Void, which is an empty tuple, so the output of map here is an array of empty tuples which we are not bothering to capture:
let pepboys = ["Manny", "Moe", "Jack"]
pepboys.map {println($0)} // prints Manny, then Moe, then JackOnce again, println is itself the name of a function of the required type — it takes one parameter — so we can write that even more briefly:
let pepboys = ["Manny", "Moe", "Jack"] pepboys.map(println)
The filter instance method also yields a new array. Each element of the new array is an element of the old array, in the same order; but some of the elements of the old array may be omitted — they were filtered out. What filters them out is a function that you supply; it accepts a parameter of the element type and returns a Bool stating whether this element should go into the new array.
For example:
let pepboys = ["Manny", "Moe", "Jack"]
let pepboys2 = pepboys.filter{$0.hasPrefix("M")} // [Manny, Moe]Finally, we come to the reduce instance method. If you’ve learned LISP or Scheme, you’re probably accustomed to reduce; otherwise, it can be a bit mystifying at first. It’s a way of combining all the elements of an array into a single value. This value’s type — the result type — doesn’t have to be the same as the array’s element type. You supply a function that takes two parameters; the first is of the result type, the second is of the element type, and the result is the combination of those two parameters, as the result type. The result of each iteration becomes the first parameter in the next iteration, along with the next element of the array as the second parameter. Thus, the output of combining pairs accumulates, and the final accumulated value is the final output of the reduce function. However, that doesn’t explain where the first parameter for the first iteration comes from. The answer is that you have to supply it as the first argument of the reduce call.
That will all be easier to understand with a simple example. Let’s assume we’ve got an array of Int. Then we can use reduce to sum all the elements of the array. Here’s some pseudo-code where I’ve left out the first argument of the reduce call, so that you can think about what it needs to be:
let sum = arr.reduce(/*???*/) {$0 + $1}Each pair of parameters will be added together to get the first parameter on the next iteration. The second parameter on every iteration is an element of the array. So the question is, what should the first element of the array be added to? We want the actual sum of all the elements, no more and no less; so clearly the first element of the array should be added to 0! So here’s actual working code:
let arr = Array(1...100)
let sum = arr.reduce(0) {$0 + $1} // 5050Once again, we can write that code more briefly, because the + operator is the name of a function of the required type:
let sum = arr.reduce(0, combine:+)
Here’s another example. Earlier, I showed that join could be used as a way to flatten an array of arrays into a single array consisting of the elements from the original subarrays. Here’s another way:
let arr = [[1,2], [3,4], [5,6]] let flat = arr.reduce([], combine:+) // [1, 2, 3, 4, 5, 6]
You can readily see why I say that you won’t use a for...in loop to enumerate an array as often as you might have expected. Much of the time, you’ll use map, filter, or reduce instead — possibly combining them into a chain. In my real iOS programming life, I depend heavily on these three methods, often using two or even all three of them together, nested or chained or both.
Here’s an example; it’s rather elaborate, but it’s very typical of how neatly you can do things with arrays using Swift, so bear with me. I have a table view that displays data divided into sections. Under the hood, the data is an array of arrays of String — a [[String]] — where each subarray represents the rows of a section. Now I want to filter that data to eliminate all strings that don’t contain a certain substring. I want to keep the sections intact, but if removing strings removes all of a section’s strings, I want to eliminate that section array entirely.
The heart of the action is the test for whether a string contains a substring. I’m going to use Cocoa methods for that, in part because they allow me to do a case-insensitive search. If s is a string from my array, and target is the substring we’re looking for, then the code for looking to see whether s contains target case-insensitively is as follows:
let options = NSStringCompareOptions.CaseInsensitiveSearch let found = s.rangeOfString(target, options: options)
Recall the discussion of rangeOfString in Chapter 3. If found is not nil, the substring was found. Here, then, is the actual code, preceded by some sample data for exercising it:
let arr = [["Manny", "Moe", "Jack"], ["Harpo", "Chico", "Groucho"]]
let target = "m"
let arr2 = arr.map {
$0.filter {
let options = NSStringCompareOptions.CaseInsensitiveSearch
let found = $0.rangeOfString(target, options: options)
return (found != nil)
}
}.filter {$0.count > 0}After the first two lines, setting up the sample data, what remains is a single command — a map call, whose function consists of a filter call, with a filter call chained to it. If that code doesn’t prove to you that Swift is cool, nothing will.
Tip
In addition to these Array instance methods, there are global map, filter, and reduce functions that operate on sequences in general. I’ll give an example later.
Swift Array and Objective-C NSArray
When you’re programming iOS, you import the Foundation framework (or UIKit, which imports it) and thus the Objective-C NSArray type. Swift’s Array type is bridged to Objective-C’s NSArray type. But in Objective-C, an NSArray is just an NSArray; it has no further element type information. In theory, any NSArray can contain elements of any type, and they can be of different types; the only requirement is that they must be objects, which means, in Objective-C’s mind, that they are class instances. Thus, the typological medium of exchange between a Swift array and an NSArray is the [AnyObject] type. In Swift’s rendering of the Cocoa APIs, you’ll see [AnyObject] wherever an NSArray is expected or provided by Objective-C.
Passing a Swift array to Objective-C is usually easy, provided your Swift array consists of things that can be cast up to AnyObject. You’ll just pass the array, either by assignment or as an argument in a function call, and it will be accepted because your array’s element type is acceptable where an AnyObject is expected, as this artificial example demonstrates:
let arr = [UIBarButtonItem(), UIBarButtonItem()] self.navigationItem.leftBarButtonItems = arr self.navigationItem.setLeftBarButtonItems(arr, animated: true)
To call an NSArray method on a Swift array, you have to cast to NSArray:
let arr = ["Manny", "Moe", "Jack"]
let s = (arr as NSArray).componentsJoinedByString(", ")
// s is "Manny, Moe, Jack"A Swift Array seen through a var reference is mutable, but an NSArray isn’t mutable no matter how you see it. For mutability in Objective-C, you need an NSMutableArray, a subclass of NSArray. You can’t cast, assign, or pass a Swift array to an NSMutableArray; you have to coerce. The best way is with the NSMutableArray initializer init(array:), to which you can pass a Swift array directly:
let arr = ["Manny", "Moe", "Jack"]
let arr2 = NSMutableArray(array:arr)
arr2.removeObject("Moe")You can’t pass just any old Swift array to Objective-C. Your Swift array must consist of an element type that can itself be bridged to Objective-C as an AnyObject; otherwise, the compiler will stop you. Swift will bridge for you wherever it can. For example, a Swift array of Int is fine, because each Int will be bridged to NSNumber; and a Swift array of String is fine, because each String will be bridged to NSString. But many Swift arrays can’t cross the bridge. In such cases, you’ll need to transform the array before bridging it.
Here, for example, I have a Swift array of CGPoint. That’s perfectly fine in Swift, but CGPoint is a struct, which Objective-C doesn’t see as an object, so you can’t put one in an NSArray. The solution is to wrap each CGPoint in an NSValue, an Objective-C object type specifically designed to act as a carrier for various nonobject types; now we have a Swift array of NSValue, which can subsequently be handed to Objective-C:
let arrNSValues = arrCGPoints.map { NSValue(CGPoint:$0) }Similarly, recall the sparse array of strings from earlier in this chapter. I implemented it as an array of Optionals wrapping strings. But now let’s say I want to hand this array over to Cocoa. I have to prepare the array before I can do that. An Optional can’t be cast to an AnyObject, so I need to unwrap all the Optionals. That’s fine for the Optionals that wrap Strings; I end up with a String. But what about the Optionals that are nil? I can’t just unwrap them; if you try to unwrap a nil Optional, you’ll crash at runtime:
let arr2 = arr.map{$0!} // crash if an element is nilMoreover, an Objective-C NSArray can’t contain nil; to Objective-C, nil isn’t an object. So for the nil Optionals, I substitute the special object NSNull(), which is designed to represent nil in an Objective-C collection. But now my code doesn’t compile:
let arr2 = arr.map{if $0 == nil {return NSNull()} else {return $0!}} // errorThe problem is that Swift can’t infer this array’s type! I have to declare it explicitly as an [AnyObject], a Swift array capable of holding both String objects and NSNull objects:
let arr2 : [AnyObject] =
arr.map{if $0 == nil {return NSNull()} else {return $0!}}Now let’s talk about what happens when an NSArray arrives from Objective-C into Swift. What you’ll get will typically be a Swift array of AnyObject — an [AnyObject]. You can leave it at that, but usually you’ll want to cast down to an array of the type of object actually contained in the array, or a Swift type to which it is bridged. For example, this Cocoa class method call returns a Swift array of AnyObject:
let arr = UIFont.familyNames()
But you know very well that these AnyObject objects are all NSString objects, so it’s reasonable to cast this array down to a String array immediately:
let arr = UIFont.familyNames() as! [String]
Similarly, a UIView’s subviews arrives as an [AnyObject]. But you know perfectly well that it’s really an array of UIView objects, so you’ll cast down:
let views = self.view.subviews as! [UIView]
You’ll find yourself casting down from [AnyObject] in this way very frequently in working with Cocoa, and it’s a little infuriating. One wants to slap Cocoa on the side of the head and say, “You knucklehead! Of course this is an array of UIViews! What else could a view’s subviews possibly be?” However, you’ll just have to get over it. Some day, perhaps, the APIs will be tweaked so that all such obvious casts are performed for you; until then, you’ll have to perform them yourself.
As with any cast, though, be sure you don’t lie! An Objective-C array can contain more than one type of object. Don’t force such an array to be cast down to a type to which not all the elements can be cast, or you’ll crash when the cast fails. If you want to cast from a mixed bag of AnyObject elements to a more specific Swift type, you’ll need a strategy. In this example from my own code, arr contains both NSString and NSNull objects. I know that none of the NSString objects are the empty string, so I substitute the empty string for all the NSNull objects, thus giving me an array of strings only, which Swift can deal with:
let arr2 : [String] = arr.map {
if $0 is String {
return $0 as! String
} else {
return ""
}
}Now arr2 is a pure Swift [String] array. (That code can be shortened considerably by using the ?? operator, as I’ll explain in Chapter 5.)
Dictionary
A dictionary (Dictionary, a struct) is an unordered collection of object pairs. In each pair, the first object is the key; the second object is the value. The idea is that you use a key to access a value. Keys are usually strings, but they don’t have to be; the formal requirement is that they be types that adopt the Hashable protocol, meaning that they adopt Equatable and also have a hashValue property (an Int) such that two equal keys have equal hash values and two unequal keys do not. Thus, the hash values can be used behind the scenes for rapid key access. Swift numeric types, strings, and enums are Hashables.
As with arrays, a given dictionary’s types must be uniform. The key type and the value type don’t have to be the same type, and they often will not be. But within any dictionary, all keys must be of the same type, and all values must be of the same type. Formally, a dictionary is a generic, and its placeholder types are ordered key type, then value type: Dictionary<Key,Value>. As with arrays, however, Swift provides syntactic sugar for expressing a dictionary’s type, which is what you’ll usually use: [KeyType: ValueType]. That’s square brackets containing a colon (and optional spaces) separating the key type from the value type. This code creates an empty dictionary whose keys (when they exist) will be Strings and whose values (when they exist) will be Strings:
var d = [String:String]()
The colon is used also between each key and value in the literal syntax for expressing a dictionary. The key–value pairs appear between square brackets, separated by comma, just like an array. This code creates a dictionary by describing it literally (and the dictionary’s type of [String:String] is inferred):
var d = ["CA": "California", "NY": "New York"]
The literal for an empty dictionary is square brackets containing just a colon: [:]. This notation can be used provided the dictionary’s type is known in some other way. Thus, this is another way to create an empty [String:String] dictionary:
var d : [String:String] = [:]
If you try to fetch a value through a nonexistent key, there is no error, but Swift needs a way to report failure; therefore, it returns nil. This, in turn, implies that the value returned when you successfully access a value through a key must be an Optional wrapping the real value!
It is also possible to access a dictionary’s pairs by index number. Each pair accessed in this way is a tuple consisting of a key and its corresponding value. Keep in mind, however, that a dictionary is unordered! This means that there are no guarantees, and you should have no expectations, about the order in which successive index numbers will access key–value pairs. Moreover, the index numbers are not Ints; they are of a special DictionaryIndex type. Thus, this feature is rarely used explicitly (though it is used implicitly in enumerating a dictionary, as I’ll explain later).
Access to a dictionary’s contents is usually by subscripting. To fetch a value by key, subscript the key to the dictionary reference:
let d = ["CA": "California", "NY": "New York"] let state = d["CA"]
Bear in mind, however, that after that code, state is not a String — it’s an Optional wrapping a String! Forgetting this is a common beginner mistake.
If the reference to a dictionary is mutable, you can also assign into a key subscript expression. If the key already exists, its value is replaced. If the key doesn’t already exist, it is created and the value is attached to it:
var d = ["CA": "California", "NY": "New York"] d["CA"] = "Casablanca" d["MD"] = "Maryland" // d is now ["MD": "Maryland", "NY": "New York", "CA": "Casablanca"]
Alternatively, call updateValue(forKey:); it has the advantage that it returns the old value wrapped in an Optional, or nil if the key wasn’t already present.
By a kind of shorthand, assigning nil into a key subscript expression removes that key–value pair if it exists:
var d = ["CA": "California", "NY": "New York"] d["NY"] = nil // d is now ["CA": "California"]
Alternatively, call removeValueForKey; it has the advantage that it returns the removed value before it removes the key–value pair. The removed value is returned wrapped in an Optional, so a nil result tells you that this key was never in the dictionary to begin with.
As with arrays, a dictionary type is legal for casting down with as!; typically, only the value types will differ:
let dog1 : Dog = NoisyDog() let dog2 : Dog = NoisyDog() let d = ["fido": dog1, "rover": dog2] let d2 = d as! [String : NoisyDog]
As with arrays, is can be used to test the actual types in the dictionary, and as? can be used to test and cast safely. Dictionary equality, like array equality, works as you would expect.
Native utility methods involving dictionaries in Swift are disappointingly thin on the ground — in fact, there really aren’t any. Swift Dictionary is bridged to Cocoa NSDictionary — the intermediate Swift type, as I’ll explain in a moment, is [NSObject:AnyObject] — so you can drop into Cocoa in order to use NSDictionary methods. As with NSArray and NSMutableArray, if you want Cocoa to mutate a dictionary, you must coerce to NSMutableDictionary. In this example, I want to do a join between two dictionaries, so I harness the power of NSMutableDictionary, which has an addEntriesFromDictionary: method:
var d1 = ["NY":"New York", "CA":"California"] let d2 = ["MD":"Maryland"] let mutd1 = NSMutableDictionary(dictionary:d1) mutd1.addEntriesFromDictionary(d2) d1 = mutd1 as [NSObject:AnyObject] as! [String:String] // d1 is now ["MD": "Maryland", "NY": "New York", "CA": "California"]
That sort of thing is needed quite often. On the one hand, it’s annoying; on the other hand, Apple could reply that Cocoa and the Foundation framework are right there, so there’s no point duplicating in Swift the functionality that already exists in Foundation. If having to drop into Cocoa really bothers you, you can write your own library of replacement functions; for example, addEntriesFromDictionary: is easily reimplemented as a Swift Dictionary instance method through an extension:
extension Dictionary {
mutating func addEntriesFromDictionary(d:[Key:Value]) {
for (k,v) in d {
self[k] = v
}
}
}(In that code, the Key and Value types are the placeholder types from the original generic Dictionary declaration; recall that these are in scope in an extension.)
Basic dictionary properties and enumeration
A dictionary has a count property reporting the number of key–value pairs it contains, and an isEmpty property reporting whether that number is 0.
A dictionary has a keys property reporting all its keys, and a values property reporting all its values. They are effectively opaque structs (a LazyForwardCollection, if you must know), but you can enumerate them with for...in:
var d = ["CA": "California", "NY": "New York"]
for s in d.keys {
println(s)
}You can extract all a dictionary’s keys or values at once, with the keys or values property’s array property:
var d = ["CA": "California", "NY": "New York"] var keys = d.keys.array
You can also enumerate a dictionary itself. As you might expect from what I’ve already said, each iteration provides a key–value tuple:
var d = ["CA": "California", "NY": "New York"]
for (abbrev, state) in d {
println("\(abbrev) stands for \(state)")
}You can extract a dictionary’s entire contents at once as an array (of key–value tuples) by coercing the dictionary to an array:
var d = ["CA": "California", "NY": "New York"]
let arr = Array(d) // [("NY", "New York"), ("CA", "California")]A dictionary and its keys and values properties are all sequences. Thus, you can often operate directly on them without converting them to an array. For example, as I mentioned earlier, there’s a global reduce function that generalizes the array reduce instance method; so if a dictionary d has Int values, you can sum them without converting d.values to an array first:
let sum = reduce(d.values,0,+)
Swift Dictionary and Objective-C NSDictionary
The Foundation framework dictionary type is NSDictionary, and Swift’s Dictionary type is bridged to it. Considerations for passing a dictionary across the bridge are parallel to those I’ve already discussed for arrays. The bridged API characterization of an NSDictionary will be [NSObject:AnyObject], using the Objective-C Foundation object base class for the keys; there are various reasons for this choice, but from Swift’s point of view the main one is that AnyObject is not a Hashable. NSObject, on the other hand, is extended by the Swift APIs to adopt Hashable; and since NSObject is the base class for Cocoa classes, any Cocoa class type will be Hashable. Thus, any NSDictionary can cross the bridge.
The most common key type in a real-life Cocoa NSDictionary is NSString, which accords with the fact that you’ll usually use String keys in a Swift dictionary. Unlike an array, however, dictionaries that you pass to and receive from Cocoa will very often have values of different types. It is not at all surprising to have a dictionary whose keys are strings but whose values include a string, a number, a color, and an array. For this reason, you will usually not cast down the entire dictionary’s type; instead, you’ll work with the dictionary as having AnyObject values, and cast when fetching an individual value from the dictionary. Since the value returned from subscripting a key is itself an Optional, you will typically unwrap and cast the value as a standard single move.
Here’s an example. A Cocoa NSNotification object comes with a userInfo property. It is an NSDictionary that might itself be nil, so the Swift API characterizes it like this:
var userInfo: [NSObject : AnyObject]? { get }Let’s say I’m expecting this dictionary to be present and to contain a "progress" key whose value is an NSNumber containing a Double. My goal is to extract that NSNumber and assign the Double that it contains to a property, self.progress. Here’s one way to do that safely, using optional unwrapping and optional casting (n is the NSNotification object):
let prog = n.userInfo?["progress"] as? NSNumber
if prog != nil {
self.progress = prog!.doubleValue
}That code is safe, because if there is no userInfo dictionary, or if it doesn’t contain a "progress" key, or if that key’s value isn’t an NSNumber, nothing happens. In Chapter 5 I’ll describe another syntax for accomplishing the same goal, arguably more legibly (using conditional binding).
Finally, just for the sake of completeness, I’ll show a typical example of creating a dictionary and handing it off to Cocoa. This dictionary is a mixed bag: its values are a UIFont, a UIColor, and an NSShadow. Its keys are all strings, which I obtain as constants from Cocoa. I form the dictionary as a literal and pass it, all in one move, with no need to cast anything:
let shad = NSShadow()
shad.shadowOffset = CGSizeMake(1.5,1.5)
UINavigationBar.appearance().titleTextAttributes = [
NSFontAttributeName : UIFont(name: "ChalkboardSE-Bold", size: 20)!,
NSForegroundColorAttributeName : UIColor.darkTextColor(),
NSShadowAttributeName : shad
]Set
A set (Set, a struct, new in Swift 1.2) is an unordered collection of unique objects. It is rather like the keys of a dictionary! Its elements must be all of one type; it has a count and an isEmpty property; it can be initialized from any sequence; you can cycle through its elements with for...in; you can even use subscripting with it (though you probably won’t, because it is indexed with SetIndex, not with Int). But the order of elements is not guaranteed, and you should make no assumptions about it.
The uniqueness of set elements is implemented by constraining their type to adopt the Hashable protocol, just like the keys of a Dictionary. Thus, the hash values can be used behind the scenes for rapid access. Checking whether a set contains a given element, which you can do with the contains instance method, is very efficient — far more efficient than doing the same thing with an array. Therefore, if element uniqueness is acceptable (or desirable) and you don’t need indexing or a guaranteed order, a set can be a much better choice of collection than an array.
There are no set literals in Swift, but you won’t need them because you can pass an array literal where a set is expected. There is no syntactic sugar for expressing a set type, but the Set struct is generic, so you can express the type by explicitly specializing the generic:
let set : Set<Int> = [1, 2, 3, 4, 5]
It sometimes happens (more often than you might suppose) that you want to examine one element of a set as a kind of sample. You won’t fetch the element by index, because order is meaningless; it’s sufficient to obtain any element, such as the first element. For this purpose, a first instance property is provided; it returns an Optional, just in case the set is empty and has no first element.
The special and distinctive feature of a set is the uniqueness of its objects. If an object is added to a set and that object is already present, it isn’t added a second time. Conversion from an array to a set and back to an array is thus a quick and reliable way of uniquing the array — though of course order is not preserved:
let arr = [1,2,1,3,2,4,3,5] let set = Set(arr) let arr2 = Array(set) // [5,2,3,1,4] perhaps
If the reference to a set is mutable, a number of instance methods spring to life. You can add an object with insert; if the object is already in the set, nothing happens, but there is no penalty. You can remove an object and return it by specifying the object itself (or something equatable to it), with the remove method; it returns nil if the object was not present. You can remove and return the first object (whatever “first” may mean) with removeFirst; it crashes if the set is empty, so take precautions.
Equality comparison (==) is defined for sets as you would expect; two sets are equal if every element of each is also an element of the other.
If the notion of a set brings to your mind visions of Venn diagrams from elementary school, that’s good, because sets have instance methods giving you all those set operations you remember so fondly. The parameter can be a set, or it can be any sequence, which will be converted to a set; for example, it might an array, a range, or even a string:
-
intersect,intersectInPlace - Yields the elements of this set that also appear in the parameter.
-
union,unionInPlace - Yields the elements of this set along with the (unique) elements of the parameter.
-
exclusiveOr,exclusiveOrInPlace - Yields the elements of this set that don’t appear in the parameter, plus the (unique) elements of the parameter that don’t appear in this set.
-
subtract,subtractInPlace - Yields the elements of this set except for those that appear in the parameter.
-
isSubsetOf,isStrictSubsetOf
isSupersetOf,isStrictSupersetOf -
Returns a Bool reporting whether the elements of this set are respectively embraced by or embrace the elements of the parameter. The “strict” variant yields
falseif the two sets consist of the same elements.
A set doesn’t have map, filter, and reduce instance methods, but it is a sequence, so it can be used with the global versions of those methods. The result is an array, but of course you can turn this right back into a set if you need to:
let set : Set = [1,2,3,4,5]
let set2 = Set(map(set) {$0+1}) // {6, 5, 2, 3, 4}, perhapsA Swift Set is bridged to an Objective-C NSSet. The medium of interchange is Set<NSObject>, because NSObject is seen as Hashable. Of course, the same rules apply as for arrays. An Objective-C NSSet expects its elements to be class instances, and Swift will help by bridging where it can. In real life, you’ll probably start with an array and coerce it to a set, as in this example from my own code:
let types : UIUserNotificationType = .Alert | .Sound
let category = UIMutableUserNotificationCategory()
category.identifier = "coffee"
// ...
let categories = Set([category])
let settings = // second parameter is an NSSet
UIUserNotificationSettings(forTypes: types, categories: categories)Coming back from Objective-C, you’ll get a Set of NSObject and you’ll probably cast down as needed:
override func touchesBegan(
touches: Set<NSObject>, withEvent event: UIEvent) {
let set = touches as! Set<UITouch>
// ...
}Get iOS 8 Programming Fundamentals with Swift now with the O’Reilly learning platform.
O’Reilly members experience books, live events, courses curated by job role, and more from O’Reilly and nearly 200 top publishers.

