Chapter 4. Managing Home Appliances with HomeKit
4.0. Introduction
A variety of accessories have been built that can interact with iOS over the years. Many of these accessories work in a home environment. For instance, the projector in a cinema room inside the house or an accessory that adjusts the temperature of the water in a swimming pool can be controlled via Apple’s new technology, appropriately named HomeKit. This is a framework that allows us to initiate contact with these accessories in the context of a home.
Now let’s have a look at a simple home setup. This house has four floors: a basement and the ground, first, and the second floors. The house has seven bedrooms on two different floors. The underground floor has a few things that excite us. One is a cinema room with a fantastic projector and some comfortable cinema seats. The chairs are reclining chairs whose positions can be adjusted to suit each viewer’s needs. In front of the projector, a few meters away, a white screen can descend from the ceiling to cover the wall so that the projector can project there, giving us a great picture while playing games or watching TV and videos.
We open the door from inside the cinema room and reach the indoor pool. There is a device that allows us to cover the swimming pool with a hard material that reclines as well, so that we can cover the pool when we don’t need it and makes sure the kids won’t fall into it at night or when not under supervision of an adult. We also have a Jacuzzi with a few switches to light up inside in various colors and to control the heat for the water.
All of these devices in the underground level of this house are rather complex to work with and require some sort of “techy-ness” before anybody can really adjust their settings. This is where HomeKit comes in. It allows us to build apps that can work with HomeKit-ready appliances inside the premises of our home and control them with ease. Throughout this chapter, I am going to use examples that come back to this basement setup.
Everything in this house can be controlled with a single iOS device. And this is not just inside the house. All these appliances can be controlled remotely. Let’s say you are on vacation and you have forgotten to turn the cinema room’s projector off. You can simply open up an app on your phone, which has been programmed to talk to all the appliances in your home, and turn that projector off. Alternatively, the company from whom you bought the projector might provide an app on the App Store that you can download to control the projector inside your cinema room.
HomeKit has more than 10 classes that we will learn about in this
chapter. The master class in HomeKit is named HMHomeManager. This is our entry point to all the appliances inside our house.
Every house is represented by the HMHome class and then
divided into rooms, and every room (of type HMRoom) has appliances, or, as HomeKit calls
them, accessories represented by the HMAccessory
class.
Every accessory then has services that it can provide to
the user. In the case of the Jacuzzi in the house, one of the services can
be the bubble generator or the lights that can be adjusted to various
colors. Services are represented by the HMService
class.
Every zone has characteristics as well. For instance, take the projector in
the cinema room. One of its services is to “project a movie on the white
wall.” However, is this service on or off at the moment? This is a
characteristic of that service. Another
characteristic of this service might be “needs repair.” This may be a
Boolean and, if set to true, indicates
that the projector needs to be repaired because the “project movie on the
white wall” service isn’t working as expected.
You can also define zones for this house. For
instance, we can have a zone called “floor 1” and then many accessories
under that zone so that we can, for instance, turn all the lights off in
that particular zone. Zones are represented by the HMZone class. You can
also define service groups in HomeKit, represented by the HMServiceGroup class.
Service groups are great for giving a logical order to services from
different accessories. For instance, if you have a “turn off” service for
various appliances in your house, such as lights, computers, projectors,
oven, and so on, you might decide to group that service together into a
“turn off all appliances” service group. And when going outside the house,
you can just run that service group to turn everything off—except for your
fridge and freezer, that is. I have made that mistake before. Never
again!
HomeKit integrates very well with Siri. That is why everything that you define using HomeKit has to have a unique name so that when you tell Siri, “Turn off the projector,” it knows that “projector” is a unique item in the house and can then call its “turn off” service. Therefore, you cannot have two accessories with the same name defined in the context of your house.
Integrating your app with HomeKit APIs requires a bit of setup, which we are going to see how to do in this chapter. One thing that you have to do before proceeding further with this chapter is to set up your provision profile to support HomeKit and then turn on HomeKit in the Capabilities section of your project. You can learn about setting up provision profiles that support HomeKit by reading Recipe 1.22.
4.1. Simulating HomeKit Accessories
Problem
You want to be able to use the HomeKit APIs without having to purchase a third-party appliance that is built to work with HomeKit, or alternatively, you want to speed up your development of an app that can speak with a third-party appliance that will eventually integrate with HomeKit at some point—but for the time being, you need to do some development of your own.
Note
This recipe uses the example house that we talked about in Recipe 4.0, so make sure you read that introduction before proceeding with this recipe to get a better understanding of what we are trying to achieve.
Solution
Download the HomeKit Accessory Simulator from Apple’s Developer website.
Discussion
The HomeKit Accessory Simulator has been very wisely developed by Apple to allow us to test our apps on simulated third-party accessories and be able to proceed with our development before purchasing an accessory that works with HomeKit. This is great stuff because not everybody can afford to purchase a real HomeKit integrated device while developing a simple application. However, you will always need to test your apps on real devices and with real accessories before sending them to Apple for approval, so I highly discourage working only with the iOS simulator and the HomeKit Accessory Simulator without trying your app with real devices.
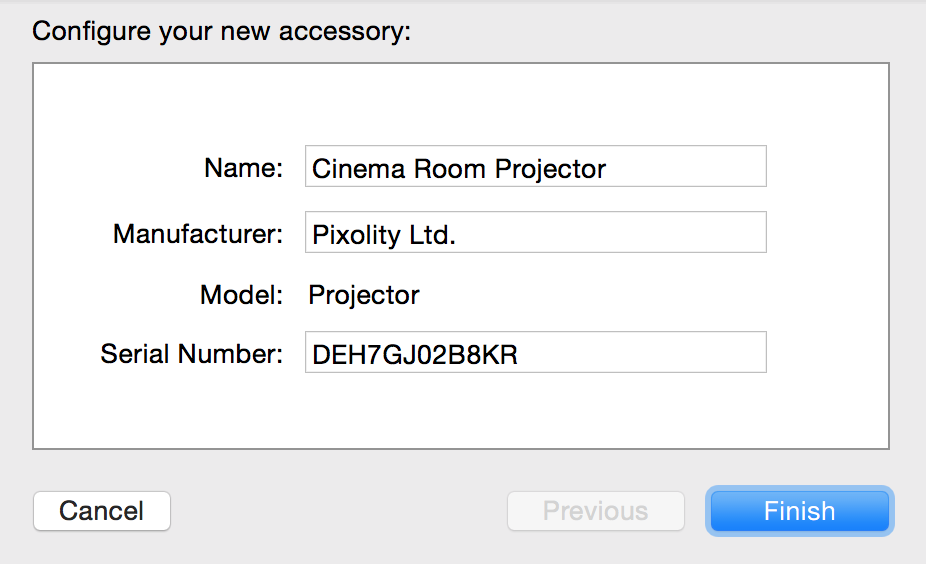
Open the HomeKit Accessory Simulator, press the little add (+) button, and choose New Accessory from the list. This will allow you to create a new accessory in the simulator. We are going to create the cinema room’s projector right now. You will be presented with a dialog similar to that shown in Figure 4-1, so please enter the same values that I did and then press the Finish button. You can change the Manufacturer to whatever you want. I have used my limited company’s name for that.
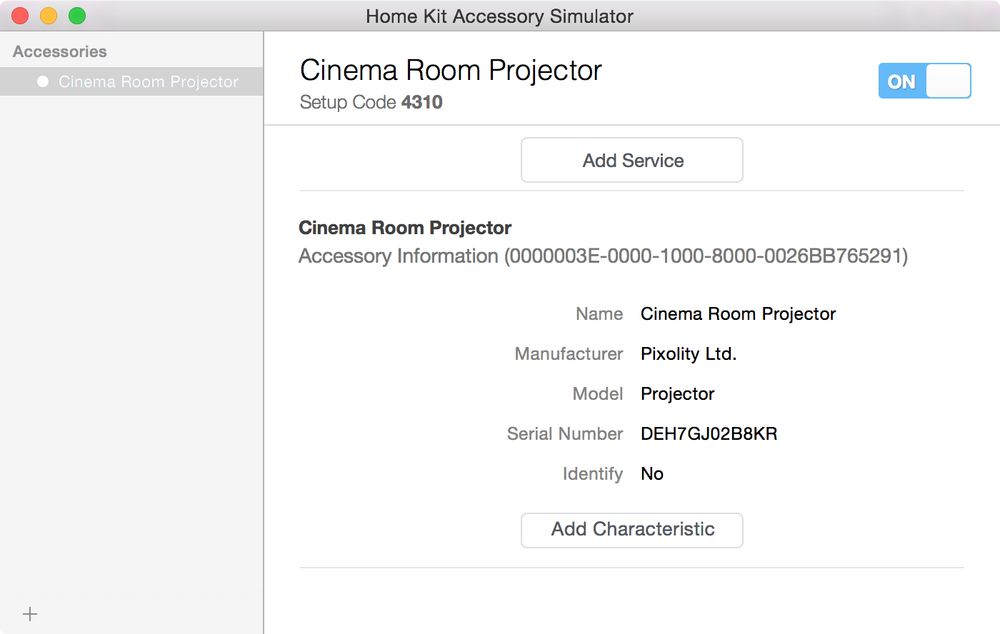
Now you will see the information for your accessory that has been generated by the HomeKit Accessory Simulator (Figure 4-2).
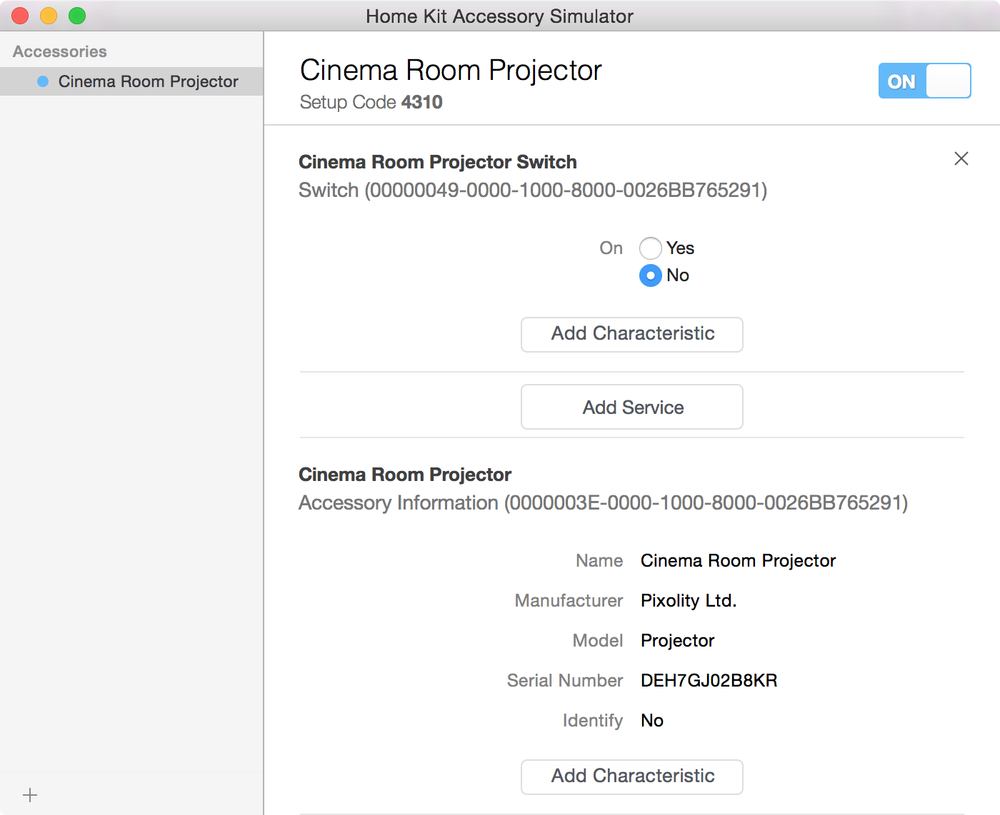
Let’s go and add a service to our projector. Press the Add Service button and
then choose the Add Switch option. This is the switch that turns our
projector on or off. Change the On value of this service to No and
rename it to Cinema Room Projector Switch.
Now your simulator should look like that shown in Figure 4-3.
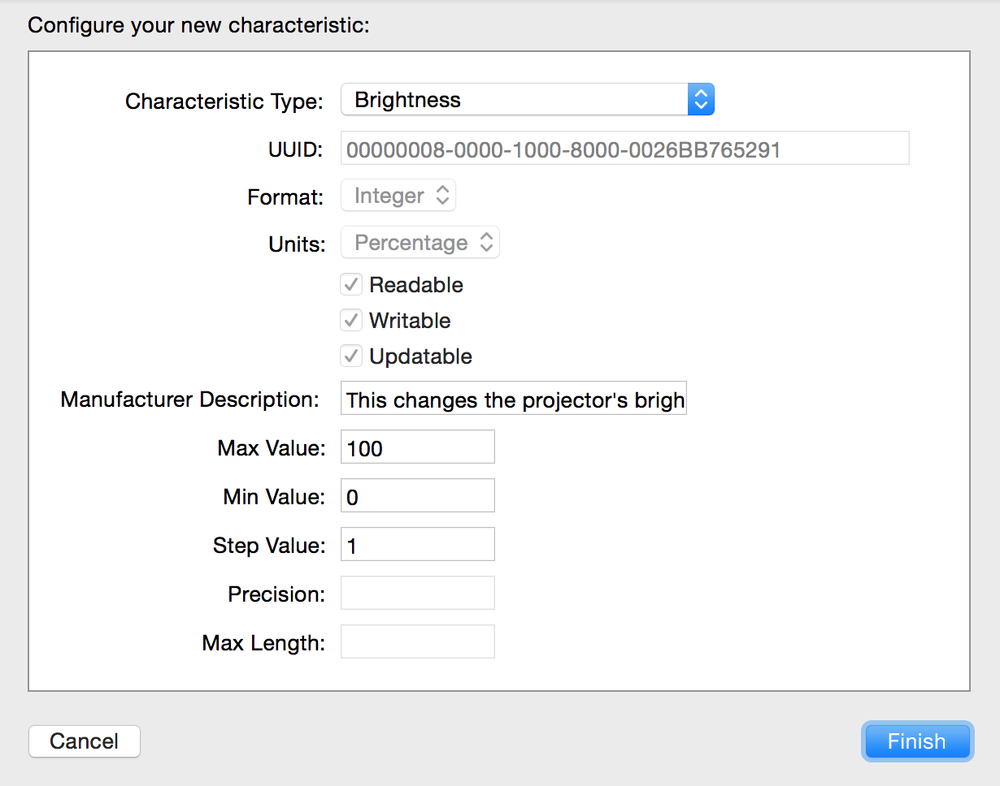
Now, under the Cinema Room Projector accessory, press the Add Characteristic button. A new page will appear on your screen where you will be able to change the characteristic that you are about to add to the accessory. From the Characteristic Type menu, choose Brightness and then enter a description of “This changes the projector’s brightness on the wall.” To allow users to raise the brightness to the screen’s maximum value, ensure the maximum value here is 100, while the minimum value must be 0. Use 1 as the step value. Your screen must now look like that shown in Figure 4-4. When you are done, press the Finish button to add the brightness characteristic to your projector accessory.
Return to the main screen of the HomeKit Accessory Simulator and
change the current value of the Brightness characteristic of your
projector to a value right in the middle, 50. We are going to play with
this value later in this chapter. Now add another characteristic to the
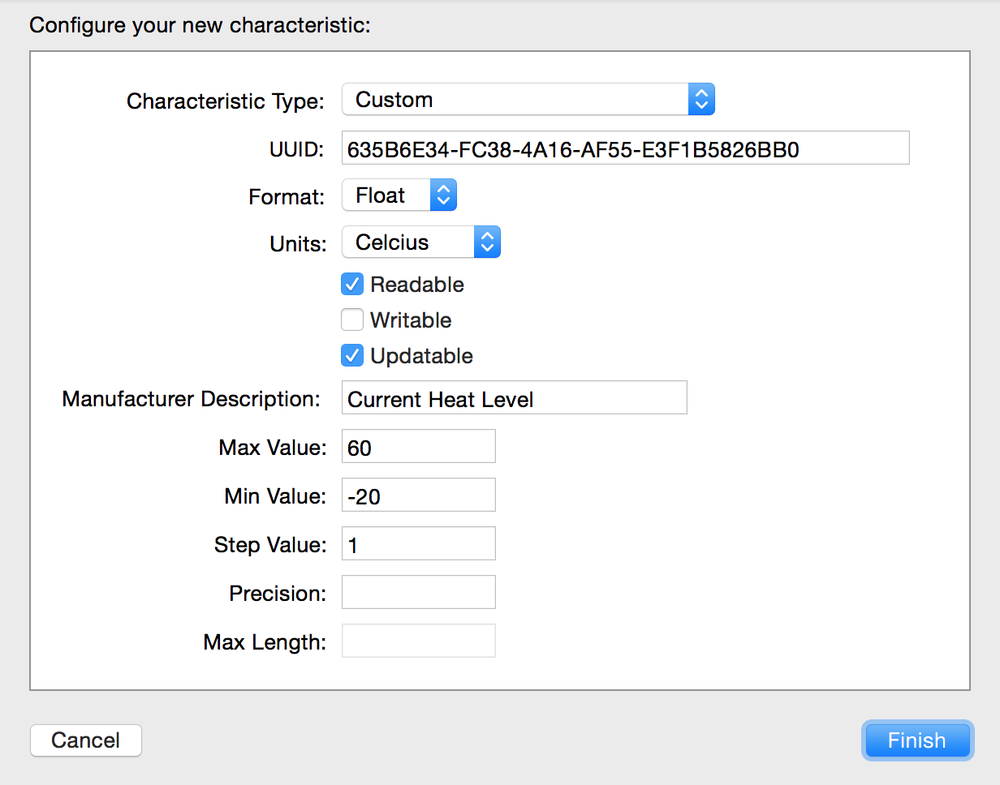
projector and this time, set the type of the characteristic to Custom.
You will then be asked to provide a UUID for this characteristic. You can use the NSUUID class in
your project to create a new UUID and use it here:
println(NSUUID().UUIDString)
Choose Float for the format of the characteristic and choose Celcius for its Units section. Ensure that the Readable and the Updatable checkmarks are checked, but uncheck the Writable checkmark. This means that we want to be able to read this characteristic but do not want to allow app programmers to write to it.
For the manufacturer description, enter “Current Heat Level.” For the maximum value, enter 60; for the minimum value, enter -10; and for the step value, enter 1. Your HomeKit Accessory Simulator should now look like that shown in Figure 4-5.
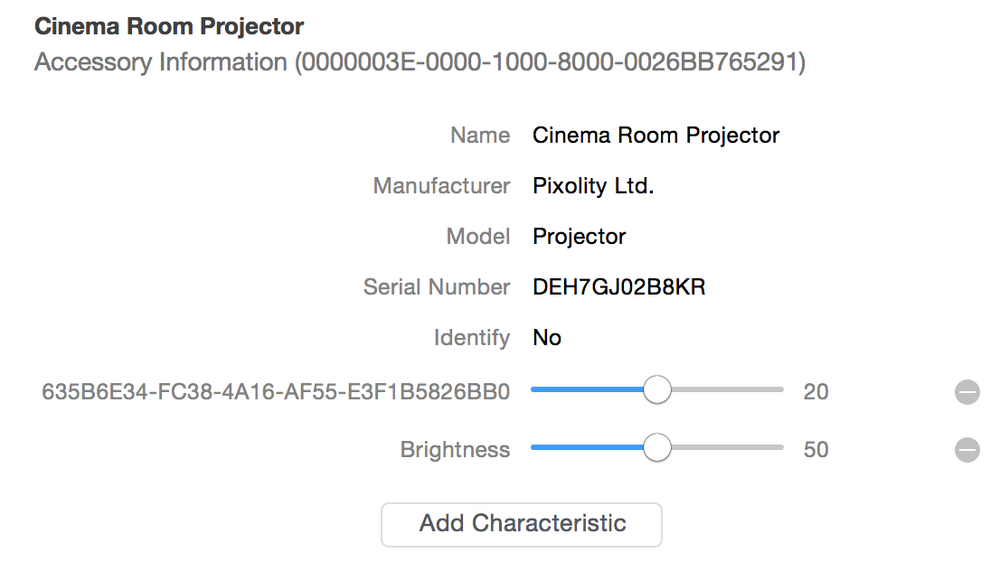
Now press the Finish button and change the current value of the heat level to 20 as shown in Figure 4-6.
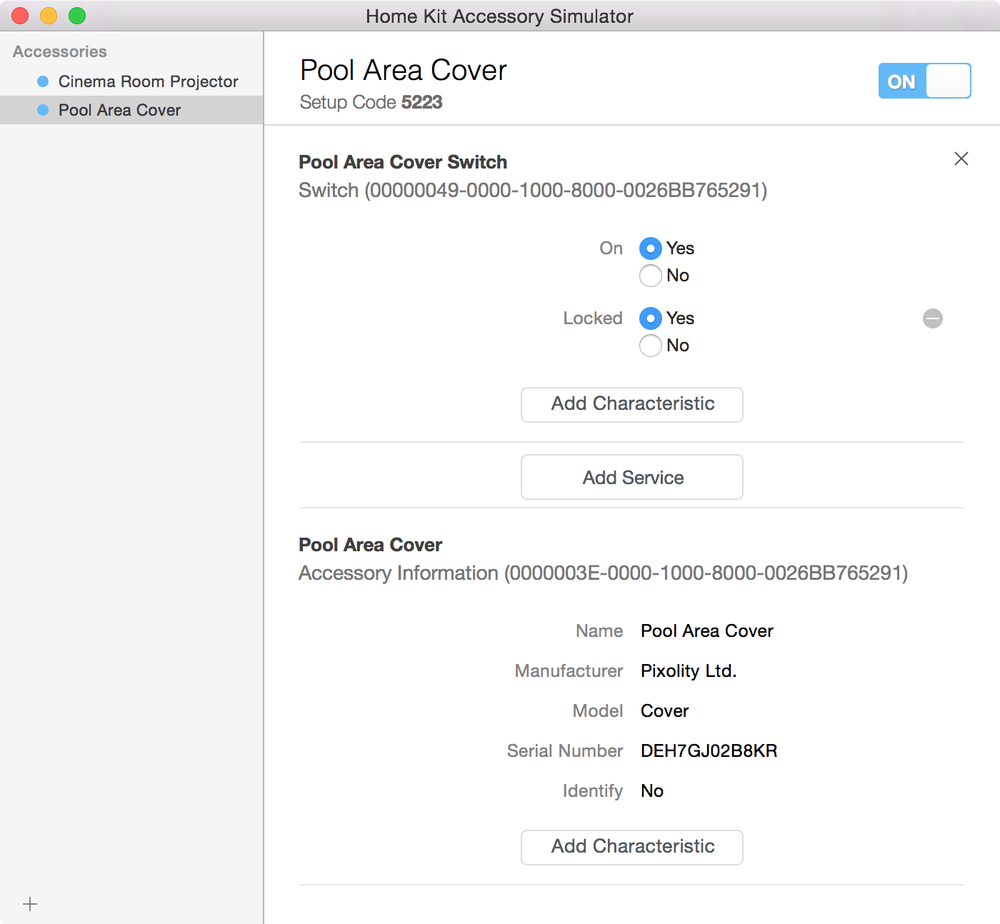
Now that you have learned how to add accessories, services, and characteristics, create a Pool Area Cover accessory, add a Switch service to it, and set its value to Yes for now. Then add a characteristic to the switch of type Locked and give it a description that makes sense to you. We are going to pretend that this is the parental lock we have on the pool cover. So the pool cover has a switch that can be on or off, and it is set to on by default so that the pool is covered. We have also applied a parental lock characteristic on this switch so that we can lock it and prevent the kids from opening the pool cover if we don’t want them to. The default value of this lock is on, meaning that the parental lock has been applied. So now you should have something that looks like Figure 4-7.
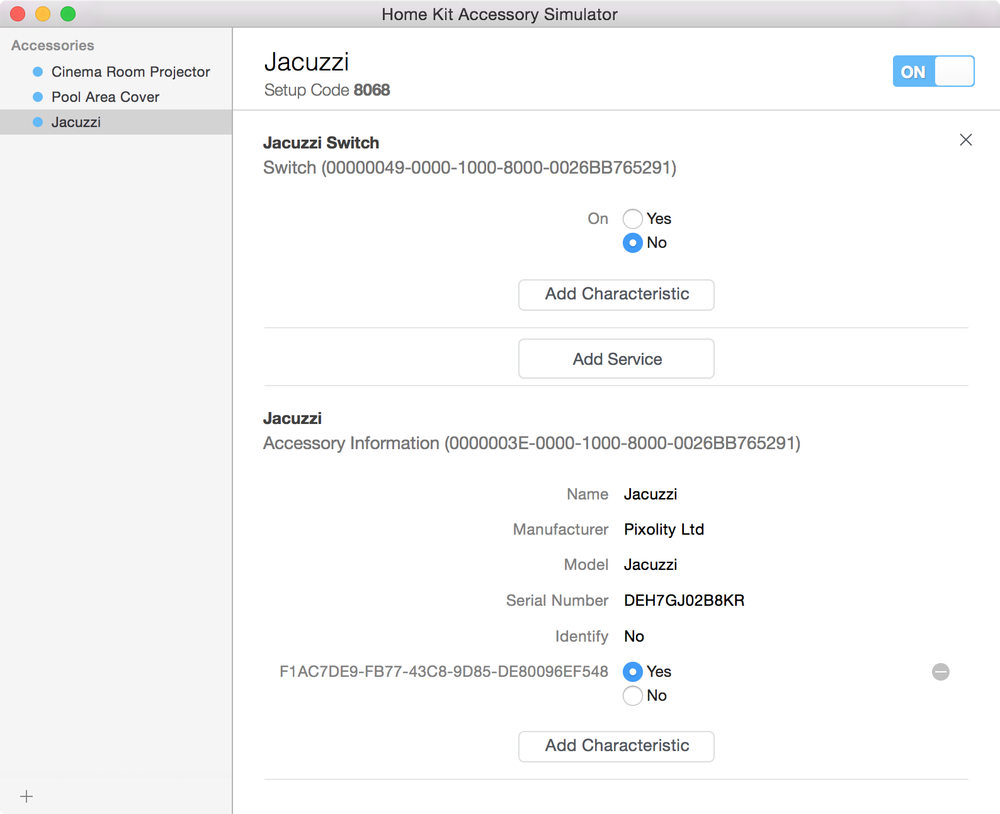
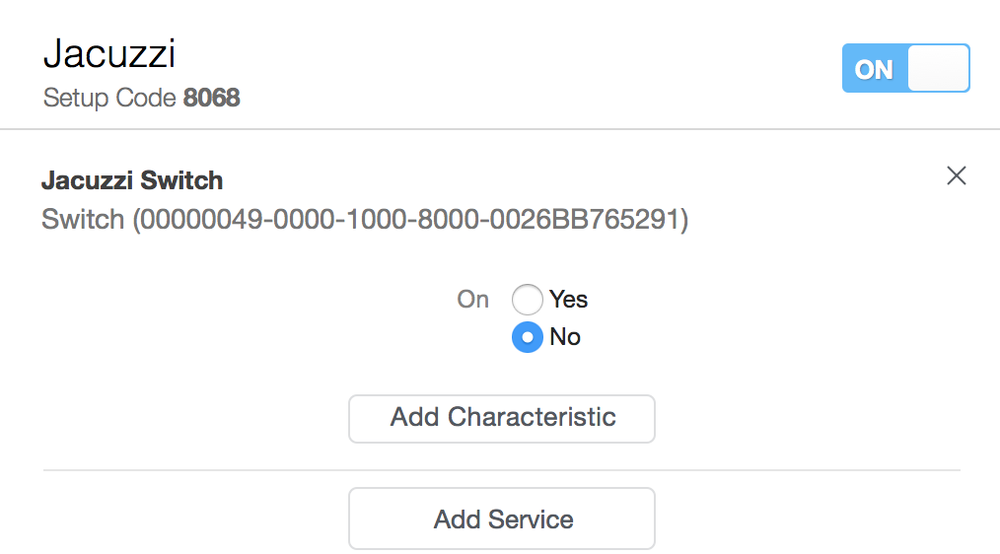
The last thing we are going to do is add a new accessory to the list in HomeKit Accessory Simulator and
call it Jacuzzi. Then add a switch service to
it to identify whether the Jacuzzi is currently on or off. Add a custom
characteristic of type Bool to the Jacuzzi itself, and give it a
description of “Does the Jacuzzi have enough water?”. Make this property
readable and updatable but not writable. Set the default value of this
property to Yes to indicate that currently there is enough water in the
Jacuzzi for it to function normally. Now your HomeKit Accessory
Simulator screen should look like that shown in Figure 4-8:
Okay, that is perfect for now. We are going to base the rest of this chapter on what we have created in this recipe, so this was a very important step in getting you started with the HomeKit Accessory Simulator. Just as a side note, since it is really easy to mess up what we have created in the HomeKit Accessory Simulator, I suggest that you export all the accessories that you have created so far in the simulator and save them on disk. Simply select an accessory on the lefthand side of the HomeKit Accessory Simulator, choose File, and then choose the Export Accessory menu option. Do this for all three of the accessories that we created in this recipe and keep a copy of all of them in case something goes wrong in the HomeKit Accessory Simulator or you accidentally delete an accessory or its services or characteristics.
4.2. Managing the User’s Home in HomeKit
Problem
You want to be able to work with the user’s home objects in HomeKit and define a home if one does not exist. You would also like to be able to work with various HomeKit delegate methods pertaining to the user’s home, so that you can be notified when various aspects of the user’s home change, such as an accessory becoming available.
Solution
Instantiate an object of type HMHomeManager.
After the home manager signals to you (through delegation) that the list
of homes is ready to be read, read the instance’s primaryHome or homes propeties. If a home is defined for the
user, you may want to become the delegate of the home manager object by
conforming to the HMHomeManagerDelegate protocol.
Note
This recipe uses the example house that we talked about in Recipe 4.0, so to get a better understanding of what we are trying to achieve, please read that introduction before proceeding with this recipe.
Discussion
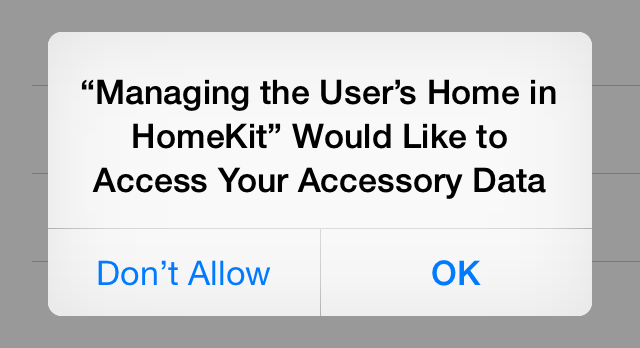
As soon as you instantiate an object of type HMHomeManager, ensure that you set its
delegate property. This delegate must conform to the HMHomeManagerDelegate protocol. As soon as you
do this, the user will be prompted to grant or reject access to HomeKit
for your app. The dialog that the user will see will be similar to that
shown in Figure 4-9.
Once you are granted permission to work with the HomeKit APIs, the
first delegation call you may want to implement in the HMHomeManagerDelegate protocol is the homeManagerDidUpdateHomes: method. This method
gets called whenever the home manager object detects a change to the
list of homes that are registered for the user. You cannot begin reading
the values of the primaryHome or the
homes properties of the home manager
until this delegate method is called on your delegate object. Before
that, the state of the home manager is unknown.
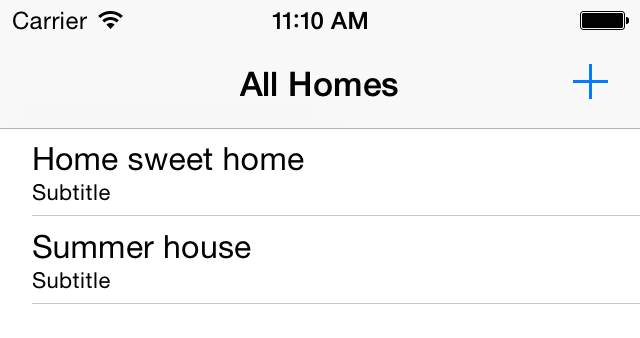
In this recipe, let’s start building an app that can list the
currently-registered homes for the user in a table view and allow the
user to add homes to the list with another view controller. We will call
the first view controller the ListHomesViewController and the second one
AddHomeViewController. We want the
first view controller to look like Figure 4-10.
So let’s begin with the most important variables that our view controller needs:
importUIKitimportHomeKitclassListHomesViewController:UITableViewController,HMHomeManagerDelegate{letsegueIdentifier="addHome"structTableViewValues{staticletidentifier="Cell"}<#restofthecode#>}
The segue name is a variable I defined to contain the name of the segue between this view controller and the next. Whenever this segue is triggered, I will catch that action and set the home manager property of the second view controller so that the view controller can save a home into HomeKit with the name that the user chooses. Don’t worry about this for now. We will see how it works in practice.
Then we need to define our home manager:
lazyvarhomeManager:HMHomeManager={letmanager=HMHomeManager()manager.delegate=selfreturnmanager}()
Then, for every home that we can find in the home manager, we will display a cell:
overridefunctableView(tableView:UITableView,numberOfRowsInSectionsection:Int)->Int{returnhomeManager.homes.count}overridefunctableView(tableView:UITableView,cellForRowAtIndexPathindexPath:NSIndexPath)->UITableViewCell{letcell=tableView.dequeueReusableCellWithIdentifier(TableViewValues.identifier,forIndexPath:indexPath)asUITableViewCelllethome=homeManager.homes[indexPath.row]asHMHomecell.textLabel.text=home.namereturncell}
As soon as the home manager is ready with the list of homes, we will update our table view:
funchomeManagerDidUpdateHomes(manager:HMHomeManager!){tableView.reloadData()}
Last but not least, as soon as the segue between our plus (+) button is tapped on the navigation bar, we will set the home manager property of the second view controller so that it can save a new home in the manager:
overridefuncprepareForSegue(segue:UIStoryboardSegue,sender:AnyObject!){ifsegue.identifier==segueIdentifier{letcontroller=segue.destinationViewControllerasAddHomeViewControllercontroller.homeManager=homeManager}super.prepareForSegue(segue,sender:sender)}
OK, great stuff! Now let’s begin with the implementation of the
second view controller, named AddHomeViewController. Here, we will have a
reference to the home manager and our text field outlet:
importUIKitimportHomeKitclassAddHomeViewController:UIViewController{@IBOutletweakvartextField:UITextField!varhomeManager:HMHomeManager!<#restofthecode#>}
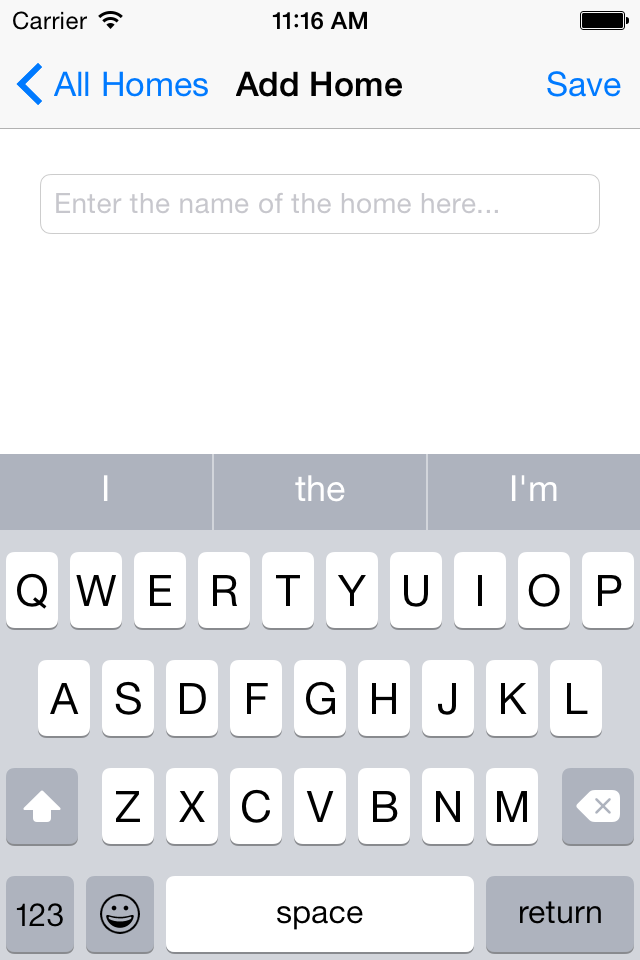
The text field is on the screen to allow the user to enter a name for the home they are about to add to HomeKit and the UI is going to look like that shown in Figure 4-11.
As soon as the view controller is displayed to the user, we will make the keyboard pop up for the text field, ready for the user to start typing:
overridefuncviewDidAppear(animated:Bool){super.viewDidAppear(animated)textField.becomeFirstResponder()}
We have linked the Save button on our navigation bar with the
addHome method of our view
controller. Here, we will use the addHomeWithName:completionHandler: method of
the home manager. This method adds a new home with a given name and then
calls the completion handler on the current thread. In the completion
handler, you will be given an error object that you can check to ensure
that the home was added successfully:
funcdisplayAlertWithTitle(title:String,message:String){letcontroller=UIAlertController(title:title,message:message,preferredStyle:.Alert)controller.addAction(UIAlertAction(title:"OK",style:.Default,handler:nil))presentViewController(controller,animated:true,completion:nil)}@IBActionfuncaddHome(){ifcountElements(textField.text)==0{displayAlertWithTitle("Home name",message:"Please enter the home name")return}homeManager.addHomeWithName(textField.text,completionHandler:{[weakself](home:HMHome!,error:NSError!)inletstrongSelf=self!iferror!=nil{strongSelf.displayAlertWithTitle("Error happened",message:"\(error)")}else{strongSelf.navigationController!.popViewControllerAnimated(true)}})}
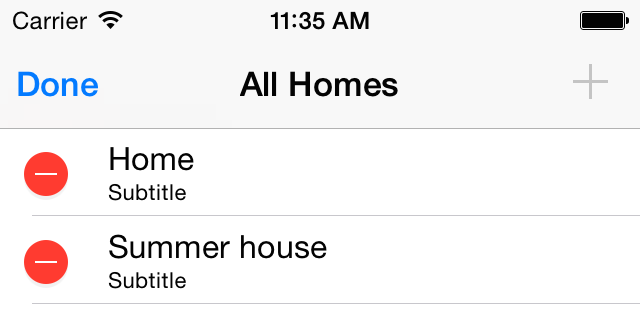
The next thing we are going to do is to add deletion capabilities
to the first view controller so that the user can delete homes if she
wants to. In order to delete a home from the home manager, invoke the
removeHome:completionHandler: method
of the home manager. The completion handler will be a closure that gets
an instance of the NSError indicating
whether the home was successfully removed. So let’s modify our first
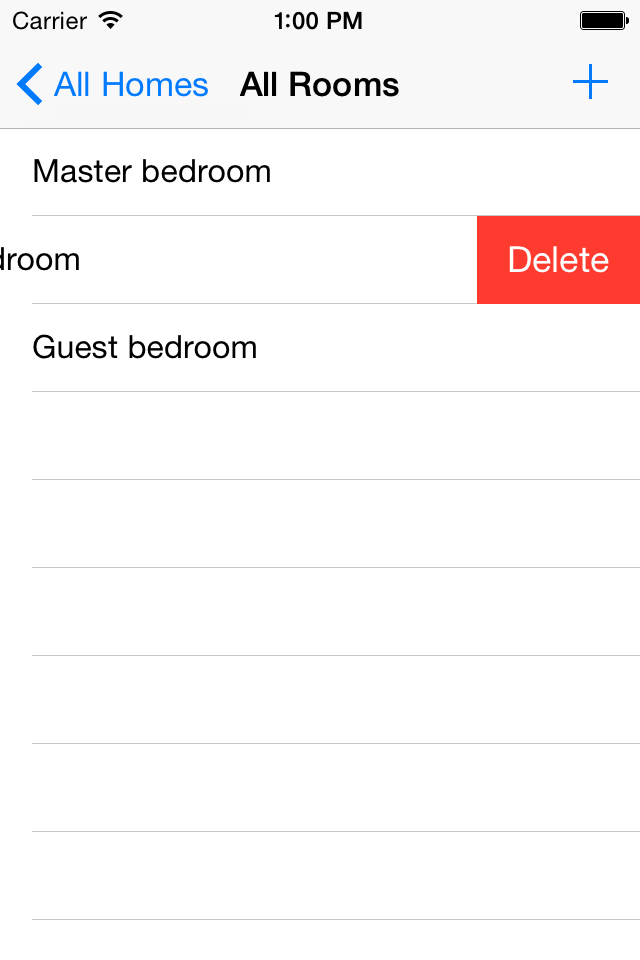
view controller to make it look more like that shown in Figure 4-12.
We want to allow the user to push the Edit button on the
navigation bar and start deleting homes from the list if she wants to.
Since we are going to use the UIAlertController class every now
and then, I am going to create an extension on this class to give us a
type method that we can use to display alert messages to the user with
ease:
extensionUIAlertController{classfuncshowAlertControllerOnHostController(hostViewController:UIViewController,title:String,message:String,buttonTitle:String){letcontroller=UIAlertController(title:title,message:message,preferredStyle:.Alert)controller.addAction(UIAlertAction(title:buttonTitle,style:.Default,handler:nil))hostViewController.presentViewController(controller,animated:true,completion:nil)}}
Then I am going to display an Edit button to the user on the navigation bar. When the Edit button is pressed, I will disable the add (+) button so that the user can focus only on the task of editing the list of homes:
overridefuncsetEditing(editing:Bool,animated:Bool){super.setEditing(editing,animated:animated)/* Don't let the user add another home while they are editingthe list of homes. This makes sure the user focuses on the taskat hand */self.navigationItem.rightBarButtonItem!.enabled=!editing}overridefuncviewWillAppear(animated:Bool){super.viewWillAppear(animated)navigationItem.leftBarButtonItem=editButtonItem()}
When the user presses the Delete action on any of the cells, we
will intercept that action and delete the selected home from the list of
homes using the removeHome:completionHandler: of the home
manager:
overridefunctableView(tableView:UITableView,commitEditingStyleeditingStyle:UITableViewCellEditingStyle,forRowAtIndexPathindexPath:NSIndexPath){ifeditingStyle==.Delete{lethome=homeManager.homes[indexPath.row]asHMHomehomeManager.removeHome(home,completionHandler:{[weakself](error:NSError!)inletstrongSelf=self!iferror!=nil{UIAlertController.showAlertControllerOnHostController(strongSelf,title:"Error",message:"An error occurred = \(error)",buttonTitle:"OK")}else{tableView.deleteRowsAtIndexPaths([indexPath],withRowAnimation:.Automatic)}})}}
Also, when we have no homes in the home manager, we should disable the Edit button because it makes no sense to have it there:
overridefunctableView(tableView:UITableView,numberOfRowsInSectionsection:Int)->Int{letnumberOfRows=homeManager.homes.countifnumberOfRows==0&&editing{setEditing(!editing,animated:true)}editButtonItem().enabled=(numberOfRows>0)returnnumberOfRows}
This code snippet will also take the view controller out of editing mode if the last cell has just been deleted. Great stuff! Now give this a go in your simulator or on a device and see how you get on.
See Also
4.3. Adding Rooms to the User’s Home
Solution
Use the addRoomWithName:completionHandler: method of
your home object (see Recipe 4.2)
and you will receive either an error or the created room of type
HMRoom.
Note
In this recipe, I am going to base our solution on what we learned in Recipe 4.2 and just expand the same app to allow the user to add rooms to houses. So it is beneficial to read the aforementioned recipe first, before proceeding with this one.
Discussion
Every home can have rooms. Every room is represented by the HMRoom class in
HomeKit. You can read the list of rooms that every home can have by
checking the value of the rooms
property of the home. Every home object also has a delegate of
type HMHomeDelegate.
This delegate will receive updates on the state of the home. One of the
important methods that this delegate has is the home:didAddRoom: method that gets called
whenever a new room is added to the home. The other method is the
home:didRemoveRoom: method which, as
you can guess, gets called whenever a room is removed from a
home.
In this recipe, we are going to expand the same app that we wrote
in Recipe 4.2, but this time allow
the user to add rooms to a home and delete those rooms if she wants to.
So we are going to have two new view controllers. One is going to show
the list of rooms for a home and the other is going to allow us to add a
room to a home by entering the room’s name. The first view controller
will be called ListRoomsTableViewController and all it has to
do is to read the list of the rooms that a home has and display it on
the table view. I am assuming that the ListHomesViewController class that we coded in
the previously mentioned recipe is passing the home manager reference,
along with the home object that was tapped, to this view controller so
that we have a reference to both and will be able to add rooms to the
home if needed.
importUIKitimportHomeKitclassListRoomsTableViewController:UITableViewController,HMHomeDelegate{varhomeManager:HMHomeManager!varhome:HMHome!{didSet{home.delegate=self}}structTableViewValues{staticletidentifier="Cell"}letaddRoomSegueIdentifier="addRoom"<#restofthecode#>}
Can you see how I am setting the delegate of the home object? This
delegate is getting set to our view controller as soon as the value of
the home object changes. This value is passed to us from the ListHomesViewController class like so:
overridefuncprepareForSegue(segue:UIStoryboardSegue,sender:AnyObject!){ifsegue.identifier==addHomeSegueIdentifier{letcontroller=segue.destinationViewControllerasAddHomeViewControllercontroller.homeManager=homeManager}elseifsegue.identifier==showRoomsSegueIdentifier{letcontroller=segue.destinationViewControllerasListRoomsTableViewControllercontroller.homeManager=homeManagerlethome=homeManager.homes[tableView.indexPathForSelectedRow()!.row]asHMHomecontroller.home=home}super.prepareForSegue(segue,sender:sender)}
We can also add the delegate methods for our home to get notified whenever a room gets added or deleted:
funchome(home:HMHome!,didAddRoomroom:HMRoom!){println("Added a new room to the home")}funchome(home:HMHome!,didRemoveRoomroom:HMRoom!){println("A room has been removed from the home")}
When the table view is displayed, we will read the value of the
rooms property of the home variable
and then display all the rooms that have currently been saved in the
home, in our table view:
overridefunctableView(tableView:UITableView,numberOfRowsInSectionsection:Int)->Int{returnhome.rooms.count}overridefunctableView(tableView:UITableView,cellForRowAtIndexPathindexPath:NSIndexPath)->UITableViewCell{letcell=tableView.dequeueReusableCellWithIdentifier(TableViewValues.identifier,forIndexPath:indexPath)asUITableViewCellletroom=home.rooms[indexPath.row]asHMRoomcell.textLabel.text=room.namereturncell}
We will also allow the user to delete a room in the selected home.
To delete a room, we will use the removeRoom:completionHandler: method of the
instance of the HMHome object:
overridefunctableView(tableView:UITableView,commitEditingStyleeditingStyle:UITableViewCellEditingStyle,forRowAtIndexPathindexPath:NSIndexPath){ifeditingStyle==.Delete{letroom=home.rooms[indexPath.row]asHMRoomhome.removeRoom(room,completionHandler:{[weakself](error:NSError!)inletstrongSelf=self!iferror!=nil{UIAlertController.showAlertControllerOnHostController(strongSelf,title:"Error",message:"An error occurred = \(error)",buttonTitle:"OK")}else{tableView.deleteRowsAtIndexPaths([indexPath],withRowAnimation:.Automatic)}})}}
So our “list rooms” view controller is going to look like Figure 4-13.
When the user taps on the little add (+) button on the navigation bar, we will display the Add Room view controller, which is going to look like Figure 4-14.

In this view controller, we will simply use the addRoomWithName:completionHandler: method of
our home instance and add the room to it:
@IBActionfuncaddRoom(){ifcountElements(textField.text)==0{UIAlertController.showAlertControllerOnHostController(self,title:"Room name",message:"Please enter the room name",buttonTitle:"OK")return}home.addRoomWithName(textField.text,completionHandler:{[weakself](room:HMRoom!,error:NSError!)inletstrongSelf=self!iferror!=nil{UIAlertController.showAlertControllerOnHostController(strongSelf,title:"Error happened",message:"\(error)",buttonTitle:"OK")}else{strongSelf.navigationController!.popViewControllerAnimated(true)}})}
See Also
4.4. Specifying Zones in the User’s Home
Problem
You want to define virtual zones in the user’s home to group various rooms into logical groups. For instance, you want to group all kids’ rooms into a zone called Kids’ Rooms and all the bathrooms into a zone called Bathrooms so that you can later interact with accessories only in these zones.
Solution
Use the addZoneWithName:completionHandler: method of
your home object to add a new zone to the home. To remove a zone, use
the removeZone:completionHandler:
method of the home. The created zone will be of type HMZone and you can interact with the various
methods that it provides.
Every zone has a name and a
rooms property. The name property is a string and the rooms property is an array of HMRoom instances. To
add a room to a zone, use its addRoom:completionHandler: method and to
remove a room (correct, you guessed it!), use the removeRoom:completionHandler: method. Both
these methods accept a completion handler whose only parameter is an
instance of NSError, which
indicates whether the room could be added or removed
successfully.
Discussion
Zones are very useful if you want to bring more logic than rooms into a house. We can categorize “things” inside a house into zones. These “things” are usually appliances but can also be rooms. For instance, let’s say that you defined all the rooms in the house using what we learned in Recipe 4.3. Now the user wants to turn off all the lights in the kids’ bedrooms, but not in other rooms. This is where zones are really useful. You can add the kids’ bedrooms to a zone with a name similar to Kids’ Bedrooms, for instance, and then see that zone in your app and allow the user to interact with various accessories that are present in rooms added to that zone.
So let’s have a look at an example. We want to do the following:
Create a home object with a random name.
Add three rooms to the home, two of which are bedrooms and the other one a gaming room.
Add a Bedrooms zone to the home and add the two bedrooms to the zone.
At the end, delete the zones and the home altogether.
Let’s start with the most basic variables that we need in our view controller:
importUIKitimportHomeKitclassViewController:UIViewController,HMHomeManagerDelegate{/* We use this name to search in the list of rooms added to the homeand read their names and find this string in them. If wefind this string, we are sure that the room is a bedroom indeed */letbedroomKeyword="bedroom"varnumberOfBedroomsAddedSoFar=0letnumberOfBedroomsToAdd=2varhome:HMHome!varbedroomZone:HMZone!<#restofthecode#>}
Then we will generate a random name for the house:
varrandomHomeName:String={return"Home \(arc4random_uniform(UInt32.max))"}()varhomeManager:HMHomeManager!
As soon as our view is loaded, we will start up the home manager:
overridefuncviewDidLoad(){super.viewDidLoad()homeManager=HMHomeManager()homeManager.delegate=self}
This will then go through all the homes that have been defined for
the current user and call our homeManagerDidUpdateHomes: method. In that
method, I am going to add a home to the home manager’s database using
what we learned in Recipe 4.2.
Then if that goes well, I will add a Bedrooms zone to the home:
funchomeManagerDidUpdateHomes(manager:HMHomeManager!){manager.addHomeWithName(randomHomeName,completionHandler:{[weakself](home:HMHome!,error:NSError!)inletstrongSelf=self!iferror!=nil{println("Failed to add the home. Error = \(error)")return}strongSelf.home=home/* Now let's add the Bedrooms zone to the home */home.addZoneWithName("Bedrooms",completionHandler:strongSelf.addZoneCompletionHandler)})}
The completion handler for adding the zone is set to the addZoneCompletionHandler closure of this view
controller. That closure has to take in a parameter of type HMZone, which will
be the zone that we added to the home and an error parameter of
type NSError. In this
closure, if the zone could be created, we will add three rooms to the
home before we add them to the zone. It is important to note that rooms
that you are trying to add to a zone must have already been added to a
home to which the zone also belongs.
funcaddZoneCompletionHandler(zone:HMZone!,error:NSError!){iferror!=nil{println("Failed to add the zone. Error = \(error)")return}else{println("Successfully added the zone")println("Adding bedrooms to the home now...")}bedroomZone=zone/* Now add rooms to this home */home.addRoomWithName("Master bedroom",completionHandler:self.roomAddedToHomeCompletionHandler)home.addRoomWithName("Kids' bedroom",completionHandler:self.roomAddedToHomeCompletionHandler)home.addRoomWithName("Gaming room",completionHandler:self.roomAddedToHomeCompletionHandler)}
The completion handler of the addRoomWithName:completionHandler: method of
the home is set to the roomAddedToHomeCompletionHandler closure of
this view controller. This closure must take in a parameter of type
HMRoom and one of type NSError. After the rooms are added to the
home, we will check for the ones that have the name “bedroom” in them
and then if we find them, we will add them to the Bedrooms zone:
funcroomAddedToHomeCompletionHandler(room:HMRoom!,error:NSError!){iferror!=nil{println("Failed to add room to home. Error = \(error)")}else{if(room.nameasNSString).rangeOfString(bedroomKeyword,options:.CaseInsensitiveSearch).location!=NSNotFound{println("A bedroom is added to the home")println("Adding it to the zone...")bedroomZone.addRoom(room,completionHandler:self.roomAddedToZoneCompletionHandler)}else{println("The room that is added is not a bedroom")}}}
Now when we add the rooms to our zone, the completion handler of
the addRoom:completionHandler: of the
zone is set to the roomAddedToZoneCompletionHandler closure of
our view controller. In that closure, we will check to make sure we have
added all the bedrooms that we intended to add (numberOfBedroomsToAdd), and if yes, we will
then start removing the zone and subsequently the home from the HomeKit
database:
funcroomAddedToZoneCompletionHandler(error:NSError!){iferror!=nil{println("Failed to add room to zone. Error = \(error)")}else{println("Successfully added a bedroom to the Bedroom zone")numberOfBedroomsAddedSoFar++}ifnumberOfBedroomsAddedSoFar==numberOfBedroomsToAdd{home.removeZone(bedroomZone,completionHandler:{[weakself](error:NSError!)inletstrongSelf=self!iferror!=nil{println("Failed to remove the zone")}else{println("Successfully removed the zone")println("Removing the home now...")strongSelf.homeManager.removeHome(strongSelf.home,completionHandler:{(error:NSError!)iniferror!=nil{println("Failed to remove the home")}else{println("Removed the home")}})}})}}
If you now run this on your simulator or on a device, you will see results similar to this printed to the console:
Successfully added the zone
Adding bedrooms to the home now...
A bedroom is added to the home
Adding it to the zone...
A bedroom is added to the home
Adding it to the zone...
The room that is added is not a bedroom
Successfully added a bedroom to the bedroom zone
Successfully added a bedroom to the bedroom zone
Successfully removed the zone
Removing the home now...
Removed the home
See Also
4.5. Discovering and Managing HomeKit Enabled Accessories
Problem
You want to write an app that is able to discover all HomeKit-enabled accessories on the current network to which the user’s iOS device is connected.
Solution
Instantiate an object of type HMAccessoryBrowser and then assign your own view controller or any other object as the
delegate of the accessory browse. Once you are ready to start
discovering accessories that are reachable on the network, call the
startSearchingForNewAccessories
method of your accessory browser. This will then call the accessoryBrowser:didFindNewAccessory: delegate
method of the HMAccessoryBrowserDelegate protocol for every
accessory that has been found. Equally, it will call the
accessoryBrowser:didRemoveNewAccessory: method
for accessories that are either not discoverable anymore or have now
been added to a home.
Discussion
Accessories that are HomeKit compatible are connected to a network
and can be discovered by an instance of the HMAccessoryBrowser class. For an instance of
this class to work, the current device running your app must have an
active and enabled Internet connection. Sometimes your device might seem like
it is connected to the Internet but in reality is stuck behind a
firewall. For instance, you might go to a hotel and see that your phone
is connected to the “free” Wifi. Then you attempt to open a web page and
you see a login screen from the hotel asking for your username and
password. Even though you thought you were on the Internet, you are
still on a closed network.
In this recipe, we are going to have a look at a simple
application that is based on the accessories we set up in Recipe 4.1, in the HomeKit Accessory
Simulator. As soon as our app runs, we will use the home manager to get
access to the user’s HomeKit database and then create a home object with
a random name. Then we will create a room and add it to the home. After
that, we will add a few accessories to the home and then assign them to
the room using the assignAccessory:toRoom:completionHandler:
method of the home. After the accessories are assigned to a room, we
will go through the services that they offer. In each service, we will
find all the characteristics of the service and print the information to
the screen.
Let us begin by defining our accessory browser, the home manager, and the home and room name variables:
importUIKitimportHomeKitclassViewController:UIViewController,HMHomeManagerDelegate,HMAccessoryBrowserDelegate{varaccessories=[HMAccessory]()varhome:HMHome!varroom:HMRoom!lazyvaraccessoryBrowser:HMAccessoryBrowser={letbrowser=HMAccessoryBrowser()browser.delegate=selfreturnbrowser}()varrandomHomeName:String={return"Home \(arc4random_uniform(UInt32.max))"}()letroomName="Bedroom 1"varhomeManager:HMHomeManager!<#restofthecode#>}
As soon as our view is created, we will start our home manager to ask the user for permission to use HomeKit in our app:
overridefuncviewDidLoad(){super.viewDidLoad()homeManager=HMHomeManager()homeManager.delegate=self}
When the home manager has finished finding all the homes in the
user’s HomeKit database, it will call the homeManagerDidUpdateHomes: method of its
delegate (our view controller). In this method, we will add our home to
the list of homes that already exist. If the home can be added, we will
add a room to it as well:
funchomeManagerDidUpdateHomes(manager:HMHomeManager!){manager.addHomeWithName(randomHomeName,completionHandler:{[weakself](home:HMHome!,error:NSError!)iniferror!=nil{println("Could not add the home")}else{letstrongSelf=self!strongSelf.home=homeprintln("Successfully added a home")println("Adding a room to the home...")home.addRoomWithName(strongSelf.roomName,completionHandler:{(room:HMRoom!,error:NSError!)iniferror!=nil{println("Failed to add a room...")}else{strongSelf.room=roomprintln("Successfully added a room.")println("Discovering accessories now...")strongSelf.accessoryBrowser.startSearchingForNewAccessories()}})}})}
You can see that as soon as our room can be added to the home, we
use the startSearchingForNewAccessories method of our
accessory browser. As soon as the accessory browser finds a new
accessory in reach, it calls the accessoryBrowser:didFindNewAccessory: method
of our view controller. This method is defined in the HMAccessoryBrowserDelegate protocol, which our
view controller conforms to. In this method, as soon as the accessory is
found, we add it to the home using the addAccessory:completionHandler: method of the
home object. After the accessory is added to the home, we will use the
assignAccessory:toRoom:completionHandler: of
our home object to assign the accessory to the room we created:
funcaccessoryBrowser(browser:HMAccessoryBrowser!,didFindNewAccessoryaccessory:HMAccessory!){println("Found a new accessory")println("Adding it to the home...")home.addAccessory(accessory,completionHandler:{[weakself](error:NSError!)inletstrongSelf=self!iferror!=nil{println("Failed to add the accessory to the home")println("Error = \(error)")}else{println("Successfully added the accessory to the home")println("Assigning the accessory to the room...")strongSelf.home.assignAccessory(accessory,toRoom:strongSelf.room,completionHandler:{(error:NSError!)iniferror!=nil{println("Failed to assign the accessory to the room")println("Error = \(error)")}else{println("Successfully assigned the accessory to the room")strongSelf.findServicesForAccessory(accessory)}})}})}
When the accessory is successfully assigned to the room, we are
calling the findServicesForAccessory:
method of our view controller. This method goes through all the services
that this accessory has and prints their information to the
screen.
funcfindServicesForAccessory(accessory:HMAccessory){println("Finding services for this accessory...")forserviceinaccessory.servicesas[HMService]{println(" Service name = \(service.name)")println(" Service type = \(service.serviceType)")println(" Finding the characteristics for this service...")findCharacteristicsOfService(service)}}
When a new service is found in this code, we will call the
findCharacteristicsOfService: method
of the view controller to go through the characteristic of each one of
the services:
funcfindCharacteristicsOfService(service:HMService){forcharacteristicinservice.characteristicsas[HMCharacteristic]{println(" Characteristic type = "+"\(characteristic.characteristicType)")}}
We will also implement the accessoryBrowser:didRemoveNewAccessory: method
of the view controller, which is defined in the HMAccessoryBrowserDelegate protocol:
funcaccessoryBrowser(browser:HMAccessoryBrowser!,didRemoveNewAccessoryaccessory:HMAccessory!){println("An accessory has been removed")}
This method gets called on the delegate of the accessory browser whenever an accessory is moved out of range and/or cannot be accessed anymore. It will also get called if the accessory has just been added to a home.
Having created all the accessories that we talked about in Recipe 4.1, I run this code on my simulator and first see the screen in Figure 4-15.
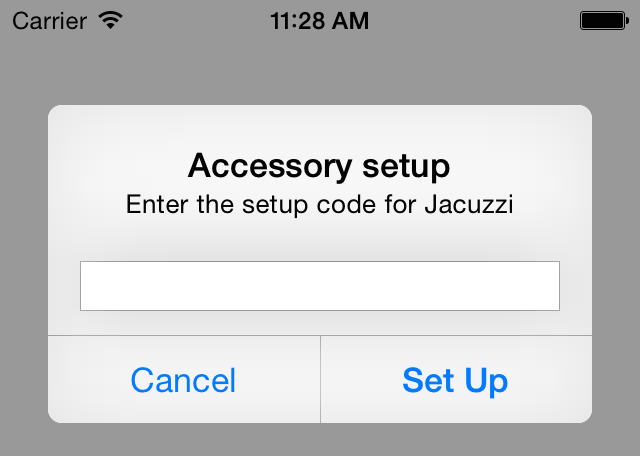
Every HomeKit accessory has a code that is similar to Bluetooth pairing codes that you are probably familiar with. Before an app on a device can start working with an accessory, the user has to enter this code. In the HomeKit Accessory Simulator earlier, when we created the accessories (see Recipe 4.1), you might have noticed that every accessory had a setup code generated for it (Figure 4-16).
This code will be different for you, so please have a look at your HomeKit Accessory Simulator and then enter the relevant codes for every accessory that is being discovered. As you carry out this experiment for yourself in Xcode, have a look at the logs that are being printed to the console. You will then be able to see information for every accessory and its services and the characteristics of every service. Later in this chapter, we will talk more about services and characteristics of services for accessories.
See Also
4.6. Interacting with HomeKit Accessories
Problem
You want to be able to discover and modify the value of the characteristics of a service inside an accessory. For instance, you may want to change the brightness (a characteristic) of a cinema room projector (an accessory). The cinema room projector that we created in Recipe 4.1 is both a service and an accessory, and the brightness of the projector was a characteristic of the projector accessory. You can change the value of any characteristic of any service as long as that value is writable.
Solution
First, find the characteristic of a service inside an accessory
whose value you want to change. Then go through the properties property of the characteristic and
look for the HMCharacteristicPropertyReadable value. If
this value exists, it means that you can read the value of the
characteristic. When you are sure you can read the value of the
characteristic, issue the readValueWithCompletionHandler: method of the
characteristic to prepare its value for reading. Then read the value
from the value property of the
characteristic.
To be able to write to a characteristic, you need to ensure that
the HMCharacteristicPropertyWritable
property exists for this characteristic. When you are sure that you can
write a value, issue the writeValue:completionHandler: method of the
characteristic to change the value.
Discussion
What we are going to do in this recipe is quite simple: we are going to create a home in the user’s HomeKit database and then add a room to it. Then we are going to add the Cinema Room Projector accessory that we created in Recipe 4.1 to the home and assign it to the room. The second time the user opens the app, we are going to retrieve the same home, room, and accessory instead of creating a new home. So the first time, we will set a random name on the home and store that name in the user defaults. The next time the user opens the app, we will read the home name from user defaults and attempt to find it. If it doesn’t exist, we will create it.
If you remember from Recipe 4.1, our projector accessory had a brightness characteristic, which was a floating point value. In this recipe, we will find that characteristic and reduce its value by 1. So if the brightness is currently set to 50, our app will change it to 49. Every time the app runs, it will reduce this value by 1 until the value reaches the minimum value that was specified for it.
As part of this recipe, we will read the value of the brightness
characteristic and reduce it. Before we read the value, we need to find
out whether this characteristic is readable and before writing to it, we
need to make sure it is writable. You can find this information out by
going through the properties property
of the characteristic instance as mentioned in the Solution of this
recipe. Since this is a very important part of the project, I’ve decided
to extend the HMCharacteristic class
and add two functions that allow us to find out with ease whether a
characteristic is readable and/or writable:
importUIKitimportHomeKitextensionHMCharacteristic{funccontainsProperty(paramProperty:String)->Bool{ifletpropeties=self.properties{forpropertyinpropertiesas[String]{ifproperty==paramProperty{returntrue}}}returnfalse}funcisReadable()->Bool{returncontainsProperty(HMCharacteristicPropertyReadable)}funcisWritable()->Bool{returncontainsProperty(HMCharacteristicPropertyWritable)}}
Now in your view controller, define your home, room, and projector accessory variables:
classViewController:UIViewController,HMHomeManagerDelegate,HMAccessoryBrowserDelegate{varhome:HMHome!varroom:HMRoom!varprojectorAccessory:HMAccessory!<#restofthecode#>}
Then let’s create a computed property that can generate a random home name for our home, if we have to create one. This property has to be able to persist its value between app runs, so it has to save the value and be able to read it back:
/* The first time it is read, it will generate a random string.The next time it is read, it will give you the string that it createdthe first time. Works between application runs and persist thedata in user defaults */varhomeName:String={lethomeNameKey="HomeName"letdefaults=NSUserDefaults.standardUserDefaults()/* Can we find the old value? */ifletname=defaults.stringForKey(homeNameKey){ifcountElements(name)>0{returnname}}/* Create a new name */letnewName="Home \(arc4random_uniform(UInt32.max))"defaults.setValue(newName,forKey:homeNameKey)returnnewName}()
We will also define our room name, which is part of the home, and the accessory name that we are going to be looking for. Again, remember that we created this accessory as part of Recipe 4.1:
lazyvaraccessoryBrowser:HMAccessoryBrowser={letbrowser=HMAccessoryBrowser()browser.delegate=selfreturnbrowser}()letroomName="Bedroom"letaccessoryName="Cinema Room Projector"varhomeManager:HMHomeManager!
As soon as our view is loaded into memory, we start looking for existing home objects:
overridefuncviewDidLoad(){homeManager=HMHomeManager()homeManager.delegate=self}
This will call the homeManagerDidUpdateHomes: method of the home
manager delegate. In that method, we will try to find the existing home
and the bedroom in it.
funchomeManagerDidUpdateHomes(manager:HMHomeManager!){forhomeinmanager.homesas[HMHome]{ifhome.name==homeName{println("Found the home")self.home=homeforroominhome.roomsas[HMRoom]{ifroom.name==roomName{println("Found the room")self.room=roomfindCinemaRoomProjectorAccessory()}}ifself.room==nil{/* We have to create the room */println("The room doesn't exist. Creating it...")createRoom()}}}ifhome==nil{println("Home doesn't exist. Creating it...")createHome()}}
If we could not find the home, we created it by calling the
createHome method of our view
controller. If we found the home but couldn’t find the bedroom in it, we
called the createRoom method of our
view controller. And if we found both the home and the bedroom, we
called the findCinemaRoomProjectorAccessory method. First
let’s see how we create a home if one doesn’t exist:
funccreateHome(){homeManager.addHomeWithName(homeName,completionHandler:{[weakself](home:HMHome!,error:NSError!)iniferror!=nil{println("Failed to create the home")}else{println("Successfully created the home")letstrongSelf=self!strongSelf.home=homeprintln("Creating the room...")strongSelf.createRoom()}})}
This is what we have already learned in Recipe 4.2, so it isn’t new to us. If the home doesn’t exist, it means that its bedroom doesn’t exist either, so let’s create the room now.
funccreateRoom(){home.addRoomWithName(roomName,completionHandler:{[weakself](room:HMRoom!,error:NSError!)iniferror!=nil{println("Failed to create the room")}else{println("Successuflly created the room")letstrongSelf=self!strongSelf.room=roomstrongSelf.findCinemaRoomProjectorAccessory()}})}
When we have the home and the room, we will reach the findCinemaRoomProjectorAccessory function. In
this method, we will find the “Cinema Room Projector” accessory that we
had created in Recipe 4.1 by going
through accessories properties of the
room which we found. If we cannot find this accessory, we have to start
looking for that accessory by using the accessory browser, which we
learned about in Recipe 4.5:
funcfindCinemaRoomProjectorAccessory(){ifletaccessories=room.accessories{foraccessoryinaccessoriesas[HMAccessory]{ifaccessory.name==accessoryName{println("Found the projector accessory in the room")self.projectorAccessory=accessory}}}/* Start searching for accessories */ifself.projectorAccessory==nil{println("Could not find the projector accessory in the room")println("Starting to search for all available accessories")accessoryBrowser.startSearchingForNewAccessories()}else{lowerBrightnessOfProjector()}}
If we can find the accessory attached to the room, we immediately
attempt to lower its brightness by 1. But if we cannot find it in the
room, our accessory browser will find it in the HomeKit Accessory
Simulator. The browser will then call the accessoryBrowser:didFindNewAccessory: method
of its delegate (our view controller) and let us know that an accessory
was found. Then we will check the name of the accessory to make sure
that we found the projector because there may be other accessories that
are being discovered, but we are interested only in the
projector.
funcaccessoryBrowser(browser:HMAccessoryBrowser!,didFindNewAccessoryaccessory:HMAccessory!){println("Found an accessory...")ifaccessory.name==accessoryName{println("Discovered the projector accessory")println("Adding it to the home")home.addAccessory(accessory,completionHandler:{[weakself](error:NSError!)iniferror!=nil{println("Failed to add it to the home")}else{println("Successfully added it to home")println("Assigning the projector to the room...")letstrongSelf=self!strongSelf.home.assignAccessory(accessory,toRoom:strongSelf.room,completionHandler:{(error:NSError!)iniferror!=nil{println("Failed to assign the projector to the room")}else{strongSelf.projectorAccessory=accessoryprintln("Successfully assigned the projector to the room")strongSelf.lowerBrightnessOfProjector()}})}})}}
Now off to the lowerBrightnessOfProjector method of our view
controller. When we get to this method, we already have the home, the
room, and the projector accessory as properties of our view controller.
All we have to do is this:
Go through the services of the projector using its
servicesarray property and find the characteristic of typeHMCharacteristicTypeBrightness.After the brightness characteristic is found, find out whether it is readable. If it is readable, read its value.
If we can read the value, find out whether the characteristic is writable. If writable, reduce the read value by 1 and write the value back to the characteristic.
Ensure that we handle all the errors appropriately.
funclowerBrightnessOfProjector(){varbrightnessCharacteristic:HMCharacteristic!println("Finding the brightness characteristic of the projector...")forserviceinprojectorAccessory.servicesas[HMService]{forcharacteristicinservice.characteristicsas[HMCharacteristic]{ifcharacteristic.characteristicType==HMCharacteristicTypeBrightness{println("Found it")brightnessCharacteristic=characteristic}}}ifbrightnessCharacteristic==nil{println("Cannot find it")}else{ifbrightnessCharacteristic.isReadable()==false{println("Cannot read the value of the brightness characteristic")return}println("Reading the value of the brightness characteristic...")brightnessCharacteristic.readValueWithCompletionHandler{[weakself](error:NSError!)iniferror!=nil{println("Cannot read the brightness value")}else{println("Read the brightness value. Setting it now...")ifbrightnessCharacteristic.isWritable(){letnewValue=(brightnessCharacteristic.valueasFloat)-1.0brightnessCharacteristic.writeValue(newValue,completionHandler:{(error:NSError!)iniferror!=nil{println("Failed to set the brightness value")}else{println("Successfully set the brightness value")}})}else{println("The brightness characteristic is not writable")}}}ifbrightnessCharacteristic.valueisFloat{}else{println("The value of the brightness is not Float. Cannot set it")}}}
Run this code for yourself and experiment a little bit with the characteristic’s value. Note that if the value of the brightness characteristic of the projector is already set to its minimum, our code will fail to set the value and will print an appropriate message to the console informing you of this fact.
See Also
4.7. Grouping Services of HomeKit Accessories
Problem
You want to group a few services together for easy access later, or you want to allow the user to access those services with ease using Siri on their iOS devices.
Solution
Go through all the service groups of type HMServiceGroup in
the serviceGroups property of the
home object of type HMHome. If you
cannot find one, create one using the addServiceGroupWithName:completionHandler:
method of the home. This will either give you an error in the completion
handler or a service group of type HMServiceGroup. If you successfully add a
service group to the home, you can start adding services to it using its
addService:completionHandler:
method.
After the service group has some services, you can then enumerate
through its services using its services property and perform actions on those
services as you wish.
Discussion
Service groups are useful if you want to perform actions on services that are similar to each other. Let’s say that you have a “Switch” service on all your HomeKit accessories and when you go on holidays, you want to switch everything off. You can therefore create a service group and call it, for example, “Switches off all accessories.” Then you can go through the services in this group in one go and turn all the switches off instead of finding all accessories in the home and then finding their services.
I am going to base my example now on the code that we wrote in Recipe 4.6 except here, after we get our home and room reference, I am going to try to find my “All Switches” service group. If I cannot find it, I will create it:
funcfindOrCreateSwitchServiceGroup(){/* Find out whether we already have our switch service group */ifletgroups=home.serviceGroups{forserviceGroupingroupsas[HMServiceGroup]{ifserviceGroup.name==switchServiceGroupName{switchServiceGroup=serviceGroup}}}ifswitchServiceGroup==nil{println("Cannot find the switch service group. Creating it...")home.addServiceGroupWithName(switchServiceGroupName,completionHandler:{[weakself](group:HMServiceGroup!,error:NSError!)iniferror!=nil{println("Failed to create the switch service group")}else{letstrongSelf=self!println("The switch service group was created successfully")strongSelf.switchServiceGroup=groupstrongSelf.discoverServicesInServiceGroup(group)}})}else{println("Found an existing switch service group")discoverServicesInServiceGroup(switchServiceGroup)}/* First, start finding new accessories */println("Finding new accessories...")accessoryBrowser.startSearchingForNewAccessories()}
When the switch has been found or created, I call the discoverServicesInServiceGroup: method of my
view controller, which will go through all the accessories in the only
room in the house. If any of those accessories has a switch, it will
attempt to add that switch to the group. Eventually, it will enumerate
all the services in the group:
funcdiscoverServicesInServiceGroup(serviceGroup:HMServiceGroup){addAllSwitchesToServiceGroup(serviceGroup,completionHandler:{[weakself](error:NSError!)iniferror!=nil{println("Failed to add the switch to the service group")}else{letstrongSelf=self!strongSelf.enumerateServicesInServiceGroup(serviceGroup)}})enumerateServicesInServiceGroup(serviceGroup)}
The enumeration of services in the group is purely done by
accessing the services property of
the group:
funcenumerateServicesInServiceGroup(serviceGroup:HMServiceGroup){println("Discovering all the services in this service group...")ifletservices=serviceGroup.services{forserviceinservicesas[HMService]{println(service)}}}
We find all the switch services in all accessories of the room by
enumerating the accessories in the room, finding the switch services,
and adding them to the group using the group’s addService:completionHandler: method.
funcaddAllSwitchesToServiceGroup(serviceGroup:HMServiceGroup,completionHandler:((NSError!)->Void)?){ifletaccessories=room.accessories{foraccessoryinaccessoriesas[HMAccessory]{ifletservices=accessory.services{forserviceinservicesas[HMService]{if(service.nameasNSString).rangeOfString("switch",options:.CaseInsensitiveSearch).location!=NSNotFound{/* This is a switch, add it to the service group */println("Found a switch service. Adding it to the group...")serviceGroup.addService(service,completionHandler:completionHandler)}}}}}}
Give this a go for yourself and see how it goes. You will then have a service group that contains all the switch services of all accessories that we could find in reach:
letswitchServiceGroupName="All Switches"
See Also
Get iOS 8 Swift Programming Cookbook now with the O’Reilly learning platform.
O’Reilly members experience books, live events, courses curated by job role, and more from O’Reilly and nearly 200 top publishers.

