Citizens of the world bought 53 million digital cameras in 2004, and analysts predict that those sales could climb as high as 82 million by 2008. Already, digital cameras outsell film cameras—a shift of culture-jarring proportions.
The major players in this market are Sony, Olympus, Nikon, HP, Kodak, and Canon. They’re not alone, however. Every company ever associated with electronics or cameras—Panasonic, Casio, Leica, Kyocera, Minolta, Konica, and so on—also has a finger in the pie. Each company offers a variety of models and a wide range of prices, which compete fiercely for your dollars. Some of these companies release new models every six to twelve months. And, exactly as in other high-tech industries, each generation offers better features, improved resolution, and lower prices.
If you’re in the market for a new digital camera, the rest of this chapter is for you. It’s dedicated to helping you find that diamond in the rough: the camera with the features you need at a price you can afford.
Don’t worry about the different marketing categories for cameras: entry level, consumer, prosumer, pro, whatever. Just read about the features available in the following pages—presented here roughly in order of importance—and consider how much they’re worth to you.
The first number you probably see in the description of a digital camera is the number of megapixels it offers.
A pixel (short for picture element) is one tiny colored dot, one of the thousands or millions that compose a single digital photograph. You can’t escape learning this term, since pixels are everything in computer graphics.
You need at least one million pixels—that is, one megapixel—for something as simple as a 4 x 6 inch print. Thus the shorthand: Instead of saying that your camera has 4,100,000 pixels, you’d say that it’s a 4.1-megapixel camera.
What you’re describing is its resolution. For instance, a 5-megapixel camera has better resolution than a 3-megapixel camera. (It also costs more.)
So how many pixels do you need?
Many digital photos are destined to be shown solely on a computer screen: to be sent by email, posted on a Web page, pasted into a FileMaker database, turned into a screen saver, or used as a desktop picture.
If this is what you have in mind when you think about digital photography, congratulations. You’re about to save a lot of money on a camera, because you can get by with one that has very few megapixels. Even a $150, two-megapixel camera produces graphics files that measure 1600 by 1200 pixels—which is already too big to fit on, for example, the 1024 x 768–pixel screen of an iBook laptop without zooming or scrolling.
If you intend to print out your photos, however, it’s a very different story.
The typical computer screen is actually a fairly low-resolution device; most pack in somewhere between 72 and 96 pixels per inch. But for the photo to look as smooth as a real photograph, a printer must cram the color dots much closer together on the paper—150 pixels per inch or more.
Remember the two-megapixel photo that would spill off the edges of the iBook screen? Its resolution (measured in dots per inch) is adequate only for a 5 x 7 print; any larger, and the dots become distractingly visible and speckled. Everybody in your circle of friends will look like they have some kind of skin disorder.
If you intend to make prints of your photos—and you’ll be in very good company—shop for your camera with this table in mind:
Table 1-1.
|
Camera Resolution |
Max Print Size |
|---|---|
|
0.3 megapixels (some camera phones) |
2.25 x 3 inches |
|
1.3 megapixels |
4 x 6 inches |
|
2 megapixels |
5 x 7 inches |
|
3.3 megapixels |
8 x 10 inches |
|
4 megapixels |
11 x 14 inches |
|
5 megapixels |
12 x 16 inches |
|
6.3 megapixels |
14 x 20 inches |
|
8 megapixels |
16 x 22 inches |
These are extremely crude guidelines, by the way. Many factors contribute to the quality of an 8 x 10 print—lens quality, file compression, exposure, camera shake, paper quality, the number of different color cartridges your printer has, and so on. Youmay be perfectly happy with larger prints than the sizes listed here. But these figures provide a rough guide to getting the highest quality from your prints.
The memory card that came with your camera is a joke. It probably holds only about six or eight best-quality pictures. It’s nothing more than a cost-saving placeholder, foisted on you by a camera company that knew full well that you’d have to go buy a bigger one.
When you’re shopping for a camera, then, it’s imperative that you also factor in the cost of a bigger card.
It’s impossible to overstate how glorious it is to have a huge memory card in your camera (or several smaller ones in your camera bag). You quit worrying that you’re about to run out of storage, so you shoot more freely, increasing the odds that you’ll get great pictures. You can go on longer trips without dragging a laptop along, too, because you don’t feel the urge to run back to your hotel room every three hours to offload your latest pictures.
You’ll have enough worries when it comes to your camera’s battery life. The last thing you need is another chronic headache in the form of your memory card. Bite the bullet and buy a bigger one.
Here’s a table that helps you calculate how much storage you’ll need. Find the column that represents the resolution of your camera, in megapixels (MP), and then read down to see how many best-quality JPEG photos each size card will hold.
Table 1-2.
|
Camera Resolution |
2 MP (1600 x 1200) |
3.3 MP (2048 x 1536) |
4.1 MP (2272 x 1704) |
5 MP (2560 x 1920) |
|---|---|---|---|---|
|
Card Capacity |
How many pictures |
How many pictures |
How many pictures |
How many pictures |
|
32 MB |
30 |
17 |
14 |
8 |
|
64 MB |
61 |
35 |
30 |
17 |
|
128 MB |
123 |
71 |
61 |
35 |
|
256 MB |
246 |
142 |
122 |
70 |
|
512 MB |
492 |
284 |
244 |
140 |
|
1 GB |
984 |
568 |
488 |
280 |
The kind of memory card your camera uses isn’t nearly as important as the factors listed earlier in this discussion. But once you’ve narrowed down your potential purchase to a short list of candidates, it’s worth weighing the pros and cons of the cards they use.
CompactFlash.CompactFlash cards are rugged, inexpensive, and easy to handle, which makes them very popular. You can buy them in capacities all the way up to 8 GB. That’s a lot of pictures—hundreds and hundreds. Pro: Readily available; inexpensive; wide selection. Con: They’re the largest of any memory card format, which dictates a bigger camera. A brand-name 512 MB CompactFlash card costs less than $60.
SmartMedia. These cards are wafer-thin and reasonably priced. Unfortunately, their capacity is limited. Pro: Affordable. Con: Storage capacity limited to 128 MB. These cards are quickly disappearing, in favor of more compact formats like xD-Picture Card and Secure Digital (SD). A 128 MB card costs about $35.
Memory Stick. Sony created this format as an interchangeable memory card for its cameras, camcorders, and laptops. Memory Sticks are great if you’re already knee-deep in Sony equipment, but few other companies use them. Pro: Works with most Sony digital gadgets. Cons: Works primarily with Sony gear; maximum size is 256 MB. A 128 MB Memory Stick starts at about $35, depending on the brand (Sony’s own are the most expensive).
Memory Stick Pro. Sony’s latest memory card is the same size as the traditional Memory Stick, but can hold much more. Sony’s latest digital cameras accept both the Pro type and the older Memory Stick format, but the Pro cards don’t work in older cameras. At this writing you can buy Pro sticks in capacities like 512 MB ($80), 1 GB (about $150), 2 GB ($350), and 4 GB ($650).
Secure Digital (SD). These extremely tiny cards are no bigger than postage stamps, which is why you also find them in Palm organizers and MP3 players. In fact, you can pull this card from your camera and insert it into many palmtops for enhanced viewing. Pro: Very small, perfect for subcompact cameras. Con: None, really, unless you’re prone to losing small objects. 1 GB cards are now around $100 and 2 GB models are in the $200 range.
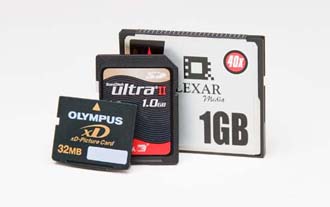
xD-Picture Card. The latest Fuji camera and Olympus cameras require a new, proprietary format called xD (see Figure 1-1). Its dimensions are so inconveniently small that the manual warns that “they can be accidentally swallowed by
Figure 1-1. The tiny Secure Digital card (middle) is gaining popularity because you can use it in both your digicam and palmtop. The even tinier XD-Picture Card (left) works only with Fuji and Olympus cameras. The larger CompactFlash card is still the most common (especially in larger cameras).
small children.” Pro: Some cool cameras accept them. Con: Relatively expensive compared to other memory cards (256 MB=$40, 512 MB = $60, 1 GB=$200ish). Incompatible with cameras from other companies. Also incompatible with the memory card slots in most printers, card readers, television front panels, and so on.
Microdrive. Some CompactFlash cameras can also accommodate the IBM Microdrive—a miniature hard drive that looks like a thick CompactFlash card (in capacities up to 4 GB). For a while, 1 GB drives were popular with pros, but it’s slipping in the polls now that you can get CompactFlash cards of up to 8 GB.
If you already own some memory cards from a previous camera (or even an MP3 player), you have a good incentive to buy a new camera that uses the same format. Otherwise, compare price per megabyte, availability, and what works with your other digital gear.
If all other factors are equal, however, choose a camera that takes CompactFlash cards. They’re plentiful, inexpensive, and have huge capacity.
In many ways, digital cameras have arrived. They’re not like cell phones, which still drop calls, or wireless palmtops, which are excruciatingly slow connecting to the Internet. Digital cameras are reliable, high quality, and generally extremely rewarding.
Except for battery life.
Thanks to that LCD screen on the back, digital cameras go through batteries like Kleenex. The battery, as it turns out, will probably be the one limiting factor to your photo shoots. When the juice is gone, your session is over.
Here’s what you’ll find as you shop for various cameras:
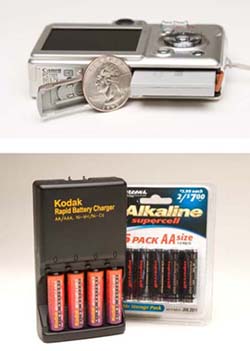
Proprietary, built-in rechargeable. Many smaller cameras come with a “brick” battery: a dark gray, lithium-ion rechargeable battery, as shown at top in Figure 1-2. (These subcompact cameras are simply too small to accommodate AA-style batteries, as described next.)
The problem with proprietary batteries is that you can’t replace them when you’re on the road. If you’re only three hours into your day at Disney World when the battery dies, that’s just tough—your shooting session is over. You can’t exactly duck into a drugstore to buy a new one.
Some cameras come with a separate, external charger for this battery. The advantage here is that you can buy a second battery (usually for $50 or so). You can keep one battery in the charger at all times. That way, when the main battery gives up the ghost, you can swap it with the one in the charger, and your day goes on. (Or, in Disney World situations, you can take both batteries with you for the day.)
All of this is something of a pain, and not nearly as handy as the rechargeable AAs described next.
But it sure beats any system in which the camera is the battery charger. When the battery dies, so does your creative muse. You have no choice but to return home and plug in the camera itself, taking it out of commission for several hours as it recharges the battery.
Two or four AA-size batteries—Some cameras accept AA batteries, and may even come with a set of alkalines to get you started.
If you learn nothing else from this chapter, however, learn this: Don’t use standard alkaline AAs. You’ll get a better return on your investment by tossing $5 bills out your car window on the highway.
Alkalines may be fine for flashlights and radios, but they’re no match for the massive power drain of the modern digital camera—not even “premium” alkalines. A set of four AAs might last 20 minutes in the digital camera, if you’re lucky.
So what are you supposed to put in there? Something you may have never even heard of: rechargeable nickel-metal-hydride (NiMH) AAs (Figure 1-2, bottom). They last much longer than alkalines, and because you can use them over and over again, they’re far less expensive.
The beauty of digital cameras that accept AAs is that they accommodate so many different kinds of batteries. In addition to rechargeable NiMH batteries, most cameras can also accept something called AA photo lithium batteries. They’re a lot like alkalines, in that they’re disposable and can’t be recharged. They’re also ideal to carry in the camera case for emergency backup. However, because they last many times longer than regular AAs, they’re much more expensive.
Figure 1-2. Top: Many digital cameras come with special, proprietary batteries. They’re not very big–and neither is their capacity. Invest in a spare. (Quarter not included.)Bottom: If you find a digicam that accepts AA batteries, use alkalines (right) only for emergency. In the long run, you’re better off investing in a couple sets of NiMH rechargeables (left).You generally won’t find NiMHs in department stores, but they’re available in national drugstore chains, and they’re easy to find online (for example, http://www.buy.com). A charger and a set of four NiMH AAs cost about $30.
The final advantage of this kind of camera is that, in a pinch—yes, in the middle of your Disney World day—you can even hit up a drugstore for a set of standard alkaline AAs. Sure enough, you’ll be tossing them in the trash after only about 20 minutes of use in the camera—but in an emergency, 20 minutes is a lot better than nothing.
Tip
Some cameras offer the best of all worlds. Certain Nikon CoolPix cameras, for example, come with a proprietary lithium-ion “brick” and a matching charger—but they also accept all kinds of AAs, including alkalines, rechargeables, and the Duracell CRV3 battery (a disposable lithium battery that looks like two AAs fused together at the seam). You should always be able to get juice on the road with these babies.
You could have the best digital camera on the planet, but if it’s bulkier than a Volvo, you’ll wind up leaving it home and missing lots of good shots.
The trick is to balance the features you need with the package you want; unfortunately, the smaller the camera, the fewer the features you usually get. For example, you’ll rarely see a connector for an external flash (a hotshoe) or a rotating flip screen on a camera that fits in your shirt pocket.
Once you’ve balanced features against size, do whatever you can to get your hands on your leading candidate. Is it too small to hold comfortably? Does your index finger naturally align with the shutter release? Are you constantly smudging the lens with your other fingers?
Your camera should become a natural extension of your vision. If you’re not bonding with it, your pictures will reflect that—or, rather, your lack of pictures.
In the early days of digital photography, cameras had interesting electronics, but only so-so lenses. And if you’ve ever tried reading fine print through a cheesy magnifying glass, then you have some idea of how the world looks though bad optics—lousy.
Fortunately, the scene is much sharper now. Sony, Olympus, Canon, Leica, and Nikon all take pride in the lenses for their digital cameras, and they have solid reputations for great glass as a result. (The camera makers not listed here sometimes buy their lenses from Olympus, Canon, and Nikon.)
This particular criterion, important though it may be, isn’t something you’ll have much control over. There’s no measurement for the quality of a lens, and no way for you to tell how good it is simply by looking. The closest you can come is to read the reviews in photo magazines or the Web sites listed in Appendix C.
When you read the specs for a camera—or read the logos painted on its body—you frequently encounter numbers like this: “3X/10X ZOOM!” The number before the slash tells you how many times the camera can magnify a distant image, much like a telescope. That number measures the optical zoom, which is the actual amount that the lenses can zoom in (to magnify a subject that’s far away).
Note
If you’re used to traditional photography, you may need some help converting consumer-cam zoom units (3X, 4X, and so on) into standard focal ranges. It breaks down like this: A typical 3X zoom goes from 6.5mm (wide angle) to 19.5mm(telephoto). That would be about the same as a 38mm to 105mm zoom lens on a 35mm film camera.
Then there’s digital zoom, the number after the slash. Much as computer owners mistakenly jockey for superiority by comparing the megahertz rating of their computers—little suspecting that higher megahertz ratings don’t necessarily make faster computers—camera makers seem to think that what consumers want most in a digital camera is a powerful digital zoom. “7X!” your camera’s box may scream. “10X! 20X!”
When a camera uses its digital zoom, it simply reinterprets the individual pixels, in effect enlarging them. The image gets bigger, but the image quality deteriorates. In most cases, you’re best off avoiding digital zoom altogether.
Base your camera-buying decision on the optical zoom range—that’s the zoom that counts.
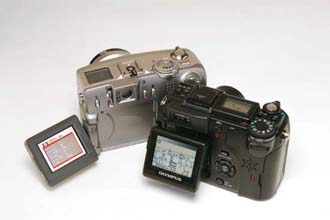
Every digital camera has a little LCD screen, but on some specially endowed models, you can flip and swivel the screen around to allow multiple viewing angles (Figure 1-3). These cameras let you hold it any way you want—at your waist, above your head, even at your ankles—and still frame the shot without contorting yourself into a pretzel.
Figure 1-3. Flip screens first appeared on camcorders and were soon adapted to digital cameras.Left: The best ones flip all the way out from the camera, providing multiple viewing angles.Right: Others allow tilting upward and downward, but remain attached to the camera back.
If you’re stuck in the middle of a crowd, but want a shot of the parade, then tilt the screen, raise the camera over your head, frame the shot, and shoot. Want to create that low-angle Orson Welles shot for added drama, or snap a terrific baby’s-eye-view photo without having to crawl around in the dirt? It’s easy with a flip screen.
Cheapo digital cameras are often called point-and-shoot models with good reason: You point, you shoot. The camera is stuck in perennial program mode, which means it does all the thinking.
More expensive cameras, on the other hand, let you take your camera off autopilot.
Don’t assume that all you’ll ever need is a point-and-shoot. Read Chapter 3 first. There you’ll learn all the amazing, special-situation photos—sports photos, nighttime shots, fireworks, indoor portraits, and so on—you can take only if your camera offers manual controls.
If you opt for a camera with manual controls, shop for these features:
Aperture-priority mode lets you specify how wide the camera’s shutter opens when you take the shot. It’s probably the most popular manual control mode, because it’s easy to use but offers lots of control. Chapter 3 describes how to use aperture priority to create backgrounds with softly out-of-focus backgrounds, among other great effects.
Shutter-priority mode is particularly handy for freezing or blurring shots. It lets you tell the camera how fast the shutter should open and close: fast to freeze sports shots; slow for nighttime shots, or to turn a babbling brook into an abstract, fuzzy blur.
Manual mode allows you to set the aperture and the shutter speed independently. When you hit the right combination, the camera lets you know that you’ve set the right exposure and can take the picture.
If you’re looking for a camera that you can grow with as your photo skills increase, then manual controls are features worth paying for.
Even though autofocus technology has been around for years, it’s still not a perfect science. There are plenty of lighting conditions, like dark interiors, where your camera will struggle to focus correctly. Autofocus works by looking for patches of contrast between light and dark—and if there’s no light, there’s no focusing.
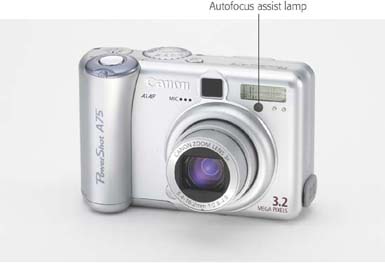
An autofocus assist light (or AF assist) neatly solves the problem (Figure 1-4). In dim light, the camera briefly beams a pattern of light onto the subject, so the camera has enough visual information on which to focus.
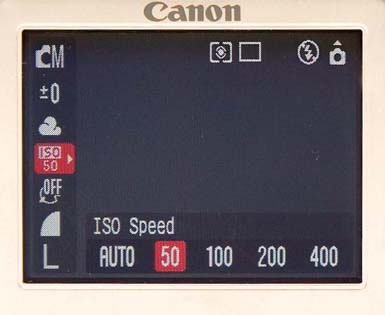
Back in the old days, when photographers had to walk through ten-foot snow drifts just to get to school (uphill both ways), they also had to carry around different film types for different lighting situations. They would use 400-speed film in dim lighting, 100-speed film in bright outdoor light, and so on. You might have heard these film speeds referred to as ISO settings.
Figure 1-4. An AF assist light, like the one on the Canon PowerShot series, will greatly improve your percentage of properly focused shots. You might want to put this item near the top of your desirable- features list.
Even though digital cameras don’t need different kinds of film, most still let you “bump up” the speed by pushing a button (Figure 1-5).
Figure 1-5. Some cameras provide a menu of film speed options, often under the label “ISO,” which is a measurement of light sensitivity familiar to film photographers.
You’ll find out more about speeds in Chapters 2 and 3. For now, it’s enough to note that a choice of film speeds gives you greater flexibility when shooting indoors or at night outdoors.
Let’s face it: Detachable lens covers are a pain. If you tie it to the camera with that little loop of black thread, it bangs against your hand, or the lens, when it’s windy. If it’s loose, it’s destined to fall behind the couch cushions, pop off in your camera bag, or get mixed in with the change in your pocket.
Some cameras, especially compact models, eliminate this madness. They have sliding lens covers that protect the optics. Just sliding the cover open both turns the camera on and makes its zoom lens extend, ready for action. When you’re done shooting, the lens retracts and the cover slides back in place.
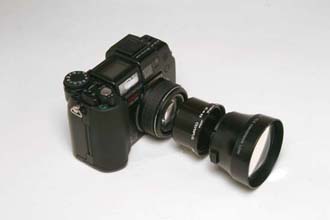
The drawback of built-in lens protectors is that they generally prevent you from adding filters, telephoto lenses, and other attachments. If you’re looking for a portable travel mate to take on vacation, the sliding lens cover should be high on your list. On the other hand, if a serious picture-making tool is your focus, then make sure it accepts attachments.
Digital camera owners usually don’t consider attaching filters, telephoto lenses, and external flashes. But if you’re coming from a traditional film-camera background, and you’re a fairly serious photographer, this may be one of the first features you think about.
In general, most of the big, heavy, traditional-design digital cameras can accept such attachments. Most tiny, capsule-shaped, subcompact pocket cameras can’t.
Figure 1-6. Some consumer digital cameras can accommodate accessory lenses and filters using an optional adapter. You can extend the power of this Olympus, for example, by adding telephoto, wide angle, and macro lenses.
The trick to a happy accessory life is calculating how hard they are to attach. The process often entails fitting the camera with tubular lens adapters (attachable via tiny threads). Nothing is more frustrating than stripping the threads on your camera body because you couldn’t get the adapter ring to screw in properly (Figure 1-6).
So after you find a camera that accepts the attachments you want to use, pay attention to how they attach. Usually the smaller the adapter and the finer the threads, the more patience you’ll need. Your sanity may be at stake here.
Shutter lag is the time it takes for the camera to calculate the correct focus and exposure before it actually captures the scene. In many camera models under $700 or so, this interval amounts to an infuriating one-second or half-second delay between the time you press the shutter button and the instant the picture is actually recorded. Unfortunately, that’s more than enough time for you to miss the precise moment your daughter blows out the candles on her birthday cake, your son’s first step, and that adorable expression on your cat’s face. Fractions of a second are a lifetime in photography (Figure 1-7).
Figure 1-7. “Did you get my head spin?” says the break dancer. “Did you get it? Tell me you got that shot! Tell me you got it…” Every digital photographer has a collection of these missed shots, thanks to shutter lag.
You can reduce or minimize shutter lag in either of two ways. First, you can set the camera’s focus and exposure manually, as described in the next two chapters. That way, there’s no thinking left for the camera to do when you actually squeeze the shutter button.
Most people, though, eventually learn instead to prefocus. This trick involves squeezing the shutter button halfway, ahead of time, forcing the camera to do its calculations. Keep your finger halfway down until the moment of truth. Now, when you finally squeeze it down all the way, you get the shot you wanted with very little delay.
Unfortunately, neither of these techniques works in all situations. Manually focusing and prefocusing both take time and eliminate spontaneity.
Until the electronics of digital cameras improves, the best you can hope for is to buy a model with the smallest shutter lag possible. You won’t find this spec in brochures, though; your best bet is to visit one of the camera-review Web sites listed in Appendix C. Many of them list the shutter-lag timings for popular cameras.
When you press the shutter button on a typical digital camera, the image begins a long tour through the camera’s guts. First, the lens projects the image onto an electronic sensor—a CCD (Charge-Coupled Device) or CMOS (Complementary Metal Oxide Semiconductor). Second, the sensor dumps the image temporarily into the camera’s built-in memory (a memory buffer). Finally, the camera’s circuitry feeds the image from its memory buffer onto the memory card.
You might be wondering about that second step. Why don’t digital cameras record the image directly to the memory card?
The answer is simple: Unless your camera has state-of-the-art-electronics, it would take forever. You’d only be able to take a new picture every few seconds or so. By stashing shots into a memory buffer as a temporary holding tank (a very fast process) before recording the image on the memory card (a much slower process), the camera frees up its attention so that you can take another photo quickly. The camera catches up later, when you’ve released the shutter button. (This is one reason why digital cameras aren’t as responsive as film cameras, which transfer images directly from lens to film.)
The size of your camera’s memory buffer affects your life in a couple of different ways. First, it permits certain cameras to have a burst mode, which lets you fire off several shots per second. That’s a great feature when you’re trying to capture an extremely fleeting scene, such as a great soccer goal, a three-year-old’s smile, or Microsoft being humble.
A big memory buffer also permits movie mode, described later. It can even help fight shutter lag, because the ability to fire off a burst of five or six frames improves your odds of capturing that perfect moment.
Note
A few expensive cameras can bypass the buffer and save photos directly on the memory card, so that you can keep shooting until the card fills up. This trick usually requires a so-called high-speed memory card—preferably a big one.
As you shop, you probably won’t see the amount of memory in a certain camera advertised. But keeping your eye out for cameras with burst mode (and checking out how many frames per second it can capture) is good advice.
How many times have you showed a travel picture to a friend and remarked,"It looked a lot bigger in real life”? That’s because it was bigger, and your camera couldn’t capture it all. Capturing a vast landscape with a digital camera is like looking at the Grand Canyon through a paper-towel tube.
Digital camera makers have created an ingenious solution to widen this narrow view of life: Panorama mode (Figure 1-8). With it, you can stitch together a series of individual images to create a single, beautiful vista, similar to what you saw when you were standing there in real life. The camera’s onscreen display helps align the edge of the last shot with the beginning of the next one.
When reviewing the software bundle included with a camera you’re considering, look for Mac OS X compatibility—not for importing and organizing the pictures (you’ve got iPhoto for that), but for editing them and stitching together panoramas, if your camera offers that feature.
Don’t rule out a good camera if the software isn’t perfect; for most purposes, iPhoto may be all the software you ever need. But if you’re torn between two cameras, favor the one with Mac OS X software in the box.
Tip
You can keep track of all the latest imaging programs for Mac OS X by checking Apple’s Web site:http://www.apple.com/downloads/macosx/imaging_3d/.
The longer the exposure to record a scene, the more important noise reduction becomes. When you shoot nighttime shots, what should be a jet-black sky may exhibit tiny colored specks—artifacts—that put a considerable damper on your photo’s impact. (The longer the shutter stays open, the more artifacts you’ll get, as the camera’s sensor gradually heats up.)
A noise reduction feature usually works like this: When you press the shutter, the camera takes two shots—the one that you think you’re getting, and a second shot with the shutter completely closed. Since the camera’s electronics produce the visual noise, both shots theoretically should contain the same colored speckles in the same spots. The camera compares the two shots, concludes that all of the colored specks it finds in the closed-shutter shot must be unwanted, and deletes them from the real shot.
Chances are you’ll have to dig through the literature or the specs on the manufacturer’s Web site to find out whether the camera you’re considering has this feature. But if you’re a nighttime shooter, it’s worth investigating.
Nobody likes to use a tripod with a digital camera. But there are moments when a tripod is necessary for a beautiful artistic shot, such as streaking car lights across a bridge, or almost anything at night.
So take a moment to turn your camera candidate upside down and inspect the socket. Is it plastic or metal? Metal is better. Where is it positioned? Near the center of the base is better than way off on one side or another.
The location and composition of the tripod mount isn’t going to be a deal breaker, but it’s certainly worth the short time it takes to examine while the sales clerk is writing up your order.
Almost every digital camera claims to capture video; some do it better than others.
Cheaper cameras produce movies that are tiny, low-resolution QuickTime flicks. These mini-movies have their novelty value, and are better than nothing when your intention is to email your newborn baby’s first cry to eager relatives across the globe.
But more expensive cameras these days can capture QuickTime flicks at a decent size (320 x 240 pixels, or even full-frame 640 x 480 pixels) and smoothness (15 or 30 frames per second), usually complete with soundtrack. Better cameras place no limit on the length of your captured movies (except when you run out of memory card space). More on this topic in Chapter 3.
The “P” word is a painful subject in the world of electronic photography. Feature for feature, digital cameras simply cost more than traditional film cameras. Yet whereas a 35mm film camera will probably remain current and serviceable for at least five years, whatever digital camera you buy will probably be discontinued by its manufacturer in under a year.
Figure 1-9. At http://www.shopping.com (a price-comparison site), start by searching for the brand, price range, or resolution you want. Then sort the results by the store’s customer rating. Buy your camera from a store that has been rated with four stars or more. Watch out for low prices that come with ridiculously inflated “shipping” charges.
The pace of obsolescence will slow down as the technology levels off. But for now, when you evaluate how much you’re willing to spend, keep in mind that this might be a one-year purchase at worst, and a two-year investment at best.
At this writing, a good 3-megapixel camera costs about $200; you’ll pay $275 to $500 for prosumer cameras in the 4- to 5-megapixel range. Digital SLR (single-lens-reflex) cameras, like the widely adored Canon Digital Rebel and the Nikon D70, cost $750 to $900. (Of course, you can also find professional models that cost many times more.)
Whatever you do, compare prices before you buy. You’ll be astonished at the differences in prices you’ll find from store to store. Begin your search at, for example, http://www.shopping.com (Figure 1-9).
Get iPhoto 5: The Missing Manual, Fourth Edition now with the O’Reilly learning platform.
O’Reilly members experience books, live events, courses curated by job role, and more from O’Reilly and nearly 200 top publishers.
