Phase 2: Publishing Options
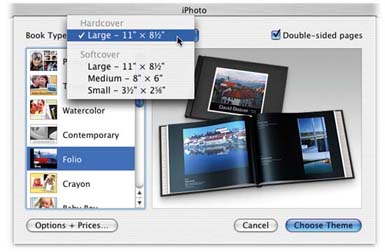
Once you’ve selected an album or a batch of photos, click the Book button below the main picture area (Figure 10-1), or choose File → New Book.
Now you see something like Figure 10-1: a dialog box in which you can specify what you want your book to look like. The dialog box looks pretty simple, but it’s crawling with important design options, many of which are offered in iPhoto 5 for the first time.
Book Type
This pop-up menu, shown open in Figure 10-1, lets you specify whether you want to publish your book as a hardbound volume (classier and more durable, but more expensive) or as a paperback. If you choose the softcover option, you can also choose one of three book sizes. The options are 11 x 8½ inches, which feels the slickest and most formal; 8 x 6, which is more portable; and 3½ x 2⅝.

Figure 10-1. You can change these settings later, even after you’ve started laying out your book pages. But if you have the confidence to make these decisions now, you’ll save time, effort, and (if you want captions for your photos) possibly a lot of typing.
This last option gives you a tiny, wallet-size flip book, with one photo filling each page, edge to edge. You must order these in sets of three (for $12), which suggests that Apple imagines them to serve as simultaneous giveaways to relatives, wedding guests, business clients and so on. In any case, they’re absolutely ...
Get iPhoto 5: The Missing Manual, Fourth Edition now with the O’Reilly learning platform.
O’Reilly members experience books, live events, courses curated by job role, and more from O’Reilly and nearly 200 top publishers.

