Want to share your excellent taste in music with your buddies? This hack will show you how to take your iTunes library data and export it as a web page for all the world to see.
Back in the day, you used to show with pride your immense CD collection (or, if you go way back, your LP collection). Now that so many of us have iPods, it is hard to share with your friends and family your excellent taste in music. This hack will allow you to show off your digital tunes in a digital fashion on the World Wide Web.
First, get hold of Kavasoft’s iTunes Catalog (http://www.kavasoft.com/iTunes Catalog/index.html; $9.99; free demo available) . After downloading and installing the program, go ahead and launch it. The free demo will work on letters A–E of your collection. You can always try this hack out, and if you love what iTunes Catalog does for you, go ahead and purchase it.
If you’ve purchased music from the iTunes Music Store, the associated cover artwork should be in iTunes, and if you’ve already taken a stab at “Work with Album Artwork” [Hack #56] , you should have all your album artwork in iTunes. If you haven’t yet, go take a peek at the hack and import all your album artwork into iTunes. You don’t have to have the artwork available for this hack to work, but your web page will look a lot snazzier if you do. If you already have some artwork in iTunes, you can import your artwork into iTunes Catalog from there. Otherwise, iTunes Catalog will attempt to retrieve your artwork from Amazon.com. Depending on the size of your iTunes library and the speed of your Internet connection, this can take anywhere from a minute to half an hour.
Once iTunes Catalog has your artwork, you can publish a listing of your entire iTunes library to the Web! If you have a .Mac account, with one click you can post your catalog to your .Mac site. Otherwise, you can publish your catalog to the shared folder on your Mac, or save it as an HTML file and FTP the file to your web site.
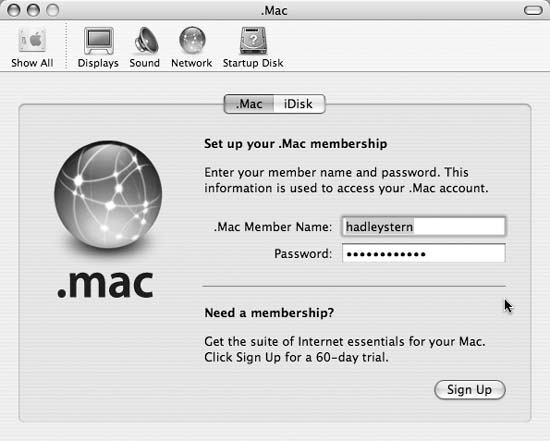
iTunes Catalog uses OS X’s .Mac system preferences. If you haven’t set up your Mac to work with your .Mac account, you need to do so before publishing through iTunes Catalog. To access your .Mac account, simply go to System Preferences under the Apple menu (or in your Applications folder if you are still running Jaguar or—gasp!—Puma) and select .Mac. To allow your computer to connect to your .Mac account, enter your .Mac username and password, as shown in Figure 4-42. That’s it!
Tip
If you don’t have a .Mac account and want to get one, all you have to do is click the Sign Up button.
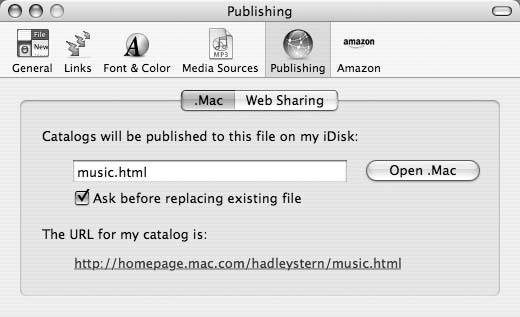
Now that your machine knows what your .Mac account is, you are ready to publish your catalog. Go to iTunes Catalog → Preferences and select the Publishing tab, shown in Figure 4-43. By default, iTunes Catalog names your file Music.html.
iTunes Catalog also shows you the URL of your catalog in the Preferences window, which is handy. Before publishing, take a look at the Links tab in the Preferences window. If you have a favorite site (say, MTV.com) that you’d like your friends to go to when they click on an artist within your catalog, you can specify it here. Apart from the myriad of options iTunes Catalog presents, you can also add your own sites by clicking the New Link button and entering the pertinent information.
Under the General tab in Preferences, iTunes Catalog also allows you to specify how artists and compilations are arranged.
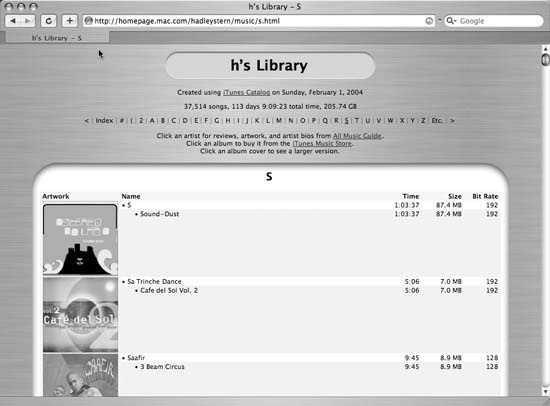
Now you are ready to publish your catalog to your .Mac account! Just click on the Publish on .Mac button in iTunes Catalog, and the program compiles your catalog into an HTML page complete with album images. If an album cover isn’t available on Amazon.com, iTunes Catalog substitutes a nice, shiny iTunes logo. Your friends will be able to see the size of your collection, the dates the albums were released, and much more, as shown in Figure 4-44.
iTunes Catalog is a snazzy way to let the world know of your eclectic (and, of course, good) taste in music. But what if you are on a PC?
Windows users don’t have the luxury of iTunes Catalog. While your web page won’t have the album covers and link-love that iTunes Catalog provides, you can still create an XHTML-compliant web page from your iTunes library.
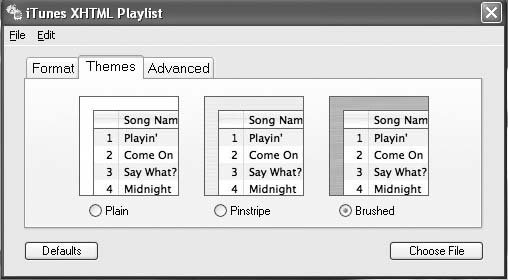
The software that will help you do it is iTunes XHTML Playlist (http://spark. is-a-geek.net/itunesxhtmlplaylist/; free). Download and install the program, then open up iTunes and select your library. Go to File → Export Song List, and save the file in text format. Then, open iTunes XHTML Playlist. The program’s main interface (shown in Figure 4-45) has three tabs: Format, Themes, and Advanced.
The Format tab lets you choose which of the following to include on your library web page: Name, Artist, Composer, and Album. You can also adjust the maximum character count of each item. The Theme tab is pretty straightforward because your page is going to be rendered in web standards–compliant XHTML. You have a choice of three themes. The Advanced tab lets you add the following information:
Genre | Bit Rate |
Size | Sample Rate |
Time | Kind |
Disc Number | Equalizer |
Track Number | Play Count |
Year | Last Played |
Date Modified | My Rating |
Date Added |
You are now ready to export your web page. Click the Choose File button in the lower-right corner of the interface. iTunes XHTML Playlist will prompt you to choose a source file. Browse to your exported iTunes song list and open it. You will be prompted to choose a location to save your HTML page. Click OK, and iTunes XHTML Playlist will do its magic. You will notice that the export is very speedy. At the end, you will have one HTML file (the program includes CSS stylesheet information within the HTML file).
Open the file, and you should see your iTunes library’s contents laid out in a nice and tidy web page. That’s it! Now, you can email the page to your friends or post it on your web site.
Your music collection is a reflection of who you are. With this hack, you can share your unbelievably sound taste in music with your friends. So, get exporting!
Get iPod and iTunes Hacks now with the O’Reilly learning platform.
O’Reilly members experience books, live events, courses curated by job role, and more from O’Reilly and nearly 200 top publishers.


