At its heart, iTunes is nothing more than a glorified database. Its job is to search, sort, and display information, quickly and efficiently. Here, for example, are some powerful managerial tasks it stands ready to handle.
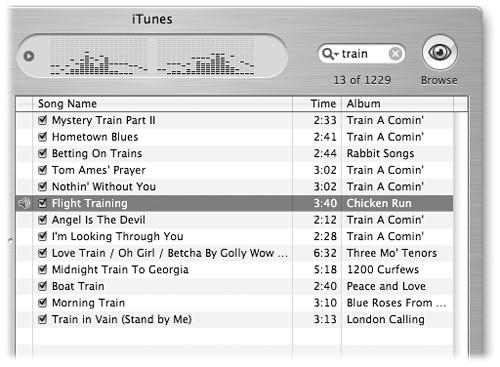
You can call up a list of all the songs that have a specific word in their title, album name, or artist attribution, just by typing a few letters into the Search box at the top of the window. With each letter you type, iTunes shortens the list of songs that are visible, confining it to tracks that match what you’ve typed.
For example, in Figure 4-13, typing train brings up a list of songs by different performers that all have the word “train” somewhere in the song’s information—maybe the title of the song, maybe the band name. This sort of thing could be useful for creating themed playlists, like a mix for a Memorial Day barbecue made from songs that all have word “sun” or “summer” in the title.
The Browse button is the eyeball in the upper-right corner of the window. (It appears only when the Library icon is selected in the source list at the left side of the screen.) It produces a handy, supplementary view of your music database, this time organized like a Finder column view (shown in Figure 4-14).
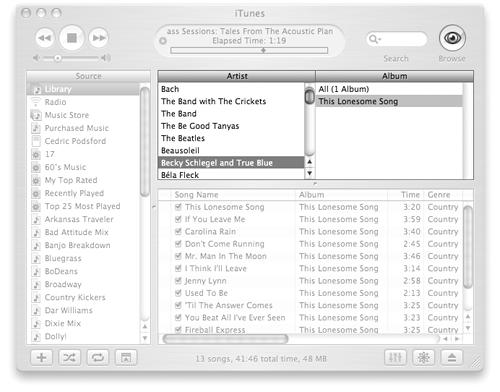
Figure 4-14. When you click an Artist name in the left column, you get a list of all attributed albums on the right side. To see the songs you’ve imported from each listed album, click the album name. The songs on it appear in the main list area of the iTunes window, beneath the Browser panes.
Tip
Can’t get back that full list of albums on the right Album pane after you’ve clicked on a name in the Artist list in the left pane? Go to the top of the Artist list and click All. The complete album list reappears.
It’s worth noting, by the way, that this two-panel Browser can become a three-panel browser, much to the delight of people who enjoy the phrase “drill down.” Figure 4-15 has details.
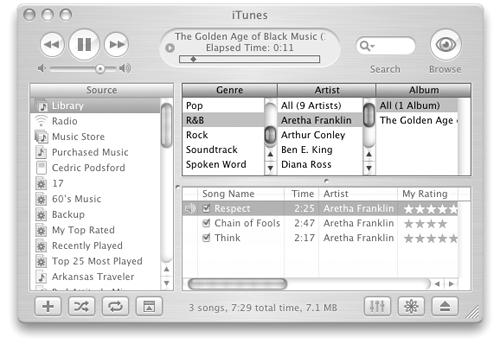
Figure 4-15. The Genre pane in iTunes preferences can add another whole layer of categorizing for your music collection. If you don’t see the Genre pane when you start iTunes for the first time, you need to turn it on in Preferences. Press ![]() -comma (Mac) or Ctrl+comma (Windows), or choose iTunes→Preferences→General (Mac) or Edit→Preferences→General (Windows), and then turn on “Show genre when browsing.”
-comma (Mac) or Ctrl+comma (Windows), or choose iTunes→Preferences→General (Mac) or Edit→Preferences→General (Windows), and then turn on “Show genre when browsing.”
Although there’s no way to give a song two thumbs up within iTunes, you can label each song in your collection with a star rating (one to five). Not only can you, too, now feel like a Rolling Stone record critic, but you can also use your personal rating system to spontaneously produce playlists of the hits, nothing but the hits.
To add a rating to a song in the Song list window, first make sure the My Rating field is turned on in the iTunes Options box (![]() -J [Mac] or Ctrl+J [Windows]). Then proceed as shown in Figure 4-16.
-J [Mac] or Ctrl+J [Windows]). Then proceed as shown in Figure 4-16.
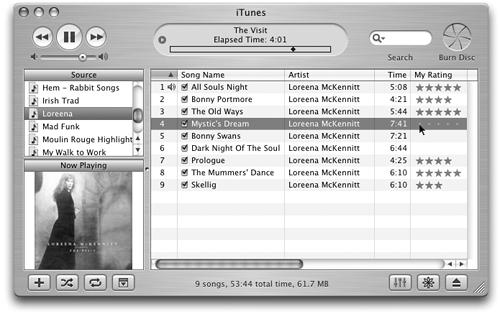
Figure 4-16. Click inside the My Rating column. The horizontal position of your click determines how many stars you’re giving. You can also add a rating by selecting a song title, pressing ![]() -I (Mac) or Ctrl+I (Windows) to open its Get Info box, and then clicking the Options tab.
-I (Mac) or Ctrl+I (Windows) to open its Get Info box, and then clicking the Options tab.
Once you’ve assigned ratings, you can sort your list by star rating (click the My Rating column title), create playlists of only your personal favorites (Section 4.9.3), and so on.
Tip
One the newer iPods, you can even rate songs on the go; your ratings will transfer back to iTunes 4. To rate a song on the iPod, start playing it and tap the Select button twice from the Now Playing screen. Use the scroll wheel to spin across the ghostly gray dots onscreen and transform them into the number of stars you feel the song deserves.
You have a couple different ways to change song titles in iTunes—to fix a typo or other incorrect information, for example.
In the song list, click the text you want to change, wait a moment, then click again to make the renaming rectangle appear. Type to edit the text, exactly as when you change a file name on the desktop.
Another way to change the song’s title, artist name, or other information is to click the song in the iTunes window and press ![]() -I (Mac) or Ctrl+I (Windows) to bring up the Get Info box. (Choose File→Get Info if you forget the keyboard shortcut.) Click the Info tab (Figure 4-17) and type in the new track information. This is the way to go if you have several pieces of information to change.
-I (Mac) or Ctrl+I (Windows) to bring up the Get Info box. (Choose File→Get Info if you forget the keyboard shortcut.) Click the Info tab (Figure 4-17) and type in the new track information. This is the way to go if you have several pieces of information to change.
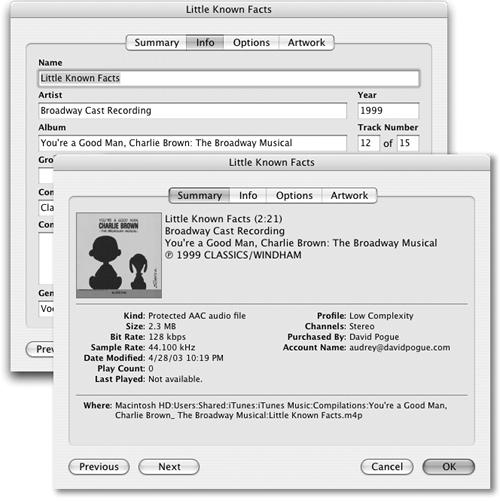
Figure 4-17. Lower right: The Get Info box for each is where you can add, correct, and customize information for each song. Upper left: Click the Summary tab for the lowdown on the song’s bit rate, file format, and other fascinating technical details.
Tip
Once you’ve got a song’s Get Info box up on the screen, you can use the Previous and Next buttons to navigate to the other tracks grouped with it in the iTunes song list window. This way, if you want to rapidly edit all the track information on the same playlist, on the same album, in the same genre, or by the same artist, you don’t have to keep closing and opening each song’s Get Info box.
iTunes isn’t just a cupboard for music; it’s also a food processor. You can convert any song or sound file into almost any other format: MP3 to AIFF, AAC to WAV, MP3 to AAC, and so on.
Tip
If you’re going from a compressed format like MP3 to a full-bodied, uncompressed format like AIFF, you shouldn’t hear much difference in the resulting file. Quality could take a hit, however, if you convert a file from one compressed format to another, like MP3 to AAC. If you’re a stickler for sound but still want the space-saving benefit of the AAC format, it’s best just to set the iTunes preferences to encode in AAC (Section 3.1.6) and re-rip the song from the original CD.
To get the conversion underway, choose iTunes→Preferences (File→Preferences on a PC) and click the Importing button. From the Import Using pop-up menu, pick the format you want to convert to, then click OK.
Now, in your iTunes library, select the song file you want to convert, and then choose Advanced→Convert Selection to AAC (or MP3 or AIFF or WAV, depending on what you just picked as your import preference).
If you have a whole folder or disk full of potential converts, hold down the Option key (Mac) or Shift key (Windows) as you choose Advanced→Convert to AAC (or your chosen encoding format). A window pops up, which you can use to navigate to the folder or disk holding the files you want to convert. The only files that don’t get converted are protected ones: Audible.com tracks and AAC songs purchased from the iTunes Music Store.
The song or songs in the original format, as well as the freshly converted tracks are now in your library.
If you want a seamless chunk of music without the typical two-second gap of silence between CD tracks, you can use the Join Tracks feature to stitch together a sonic sampler in one big file. This feature is great for live albums or other CDs that run one song into the next.
To rip multiple songs as one track, pop in the CD you want to use, download the song information, make sure the list is sorted by track number, and then Shift-click to select the tracks you want to join during the ripping process. You can only join tracks that are in sequential order on the CD.
Once you’ve got the tracks selected, go to Advanced→Join CD Tracks. iTunes displays a bracket around the selected tracks, and indents the names of the tacked-on ones. If you change your mind and want to separate one of the tracks from the group, select it and go to Advanced→Unjoin CD Tracks. (You can Shift-click to peel off multiple tracks from the group, too.)
Click the Import button to rip the selected songs to one big track.
Most of the time, there’s musical interest in every juicy moment of the songs that you download, buy, or rip from CDs. Every now and then, though, some self-indulgent musician releases a song with a bunch of onstage chitchat before the music starts. Or maybe you’ve got a live album with endless jamming at the end, as a song plays out.
Fortunately, you don’t have to sit there and listen to the filler each time you play the file. You can adjust the start and stop times of a song, so that you’ll hear only the juicy middle part.
As you play the song you want to adjust, observe the iTunes status display window; watch for the point in the timeline where you get bored (Figure 4-18, top). Say, for example, that the last two minutes of that live concert jam is just the musicians riffing around and goofing off. Note where you want the song to end.
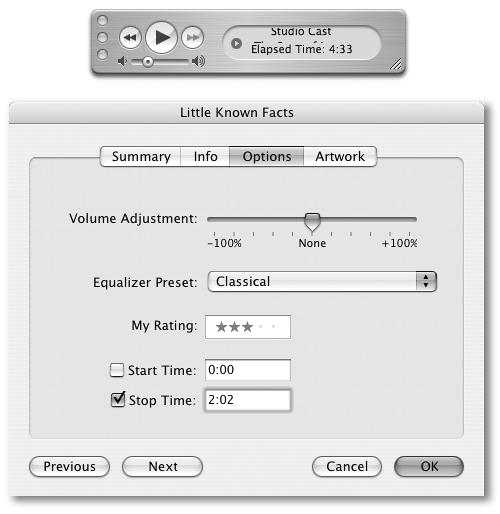
Figure 4-18. Top: Song too long for your taste? Bottom: Click the Options tab and take a look at the Stop Time box, which shows the full duration of the song. Change the number to the length of time you want the song to run, as you noted earlier. iTunes automatically turns on the Stop Time box. Click OK to lop off those last two boring minutes of the song. (You can do the exact same trick at the beginning of a song by adjusting the time value in the Start Time box.)
Then select the track you want to adjust. Choose File→Get Info to call up the information box for the song, and proceed as shown in Figure 4-18 at bottom.
The shortened version plays in iTunes and on the iPod, but the additional recorded material isn’t really lost. If you ever change your mind, you can go back to the song’s Options box, turn off the Stop Time box, and return the song to its full length.
Get iPod & iTunes: The Missing Manual, Second Edition now with the O’Reilly learning platform.
O’Reilly members experience books, live events, courses curated by job role, and more from O’Reilly and nearly 200 top publishers.

