Chapter 1. Connecting to IRC
Introduction: Hacks #1-4
One of the great features about IRC is its accessibility. You can connect to any IRC network using an IRC client (read: application). For many users, the IRC client is the friendly face of IRC, allowing you to chat with individuals or groups of users. IRC clients are available for virtually all operating systems. In fact, several different IRC clients are available for Windows, Linux, and Mac OS X, so you are spoiled for choice if you have time to experiment with all available choices.
This chapter will show you how to use some of the most popular IRC clients to connect to IRC. Later hacks will then show you how to go beyond the basics and enhance the functionality of some of these IRC clients by exploiting existing features and writing your own IRC client scripts.
IRC from Windows
Ask any Windows user what he uses to connect to IRC, and the chances are he will say mIRC.
mIRC is undoubtedly the most popular IRC client for Windows, offering lots of tools, functions, and features. mIRC is shareware, but this fact has not dampened its success over free clients such as Bersirc (http://bersirc.free2code.net) and ChatZilla [Hack #4] . This can be partly attributed to its ease of use, but seasoned IRC users will also find that it provides all of the powerful features they want. mIRC provides extensive scripting support, and thousands of mIRC scripts are available on the Web. mIRC is under active development.
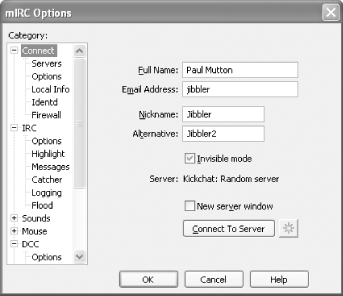
You can grab mIRC from http://www.mirc.com. Like most Windows software, installation is quite straightforward, and it will offer you the chance to create a desktop icon to run it. The first time you run mIRC, it will pop up the Connect dialog automatically, where you must provide some details (as in Figure 1-1).
- Full Name
This is where you can specify your full name (if you want!). Because this is visible to all other IRC users, most people try to protect their anonymity to some extent by entering something funny instead.
- Email Address
This is obviously useful if you want other IRC users to be able to contact you, but most people tend to enter fake addresses for fear of spam.
- Nickname and Alternative
Here you can specify your nicknames. Whenever you say something on IRC, it will appear to come from your nickname. Because all nicknames on an IRC server must be unique, the dialog requests an alternative nickname, as somebody else may already be connected and using your preferred nickname.
If you are ultraparanoid about your privacy, then make sure you leave the Invisible Mode checkbox ticked. This will make it harder for people to find you, unless they know your nickname or are in the same channels as you.
Click on the OK button, and you will be faced with the main Status
window. Messages from the IRC server typically end up here.
freenode is an IRC network where many
people gather to discuss peer-directed projects, and it is often a
good place to ask questions about
Java,
Perl, PHP, and other programming languages. You can use the freenode
IRC network by entering
/server irc.freenode.net into the Status window. After a moment,
you will be connected to one of the servers in this IRC network.
When you
join a
channel by typing /join
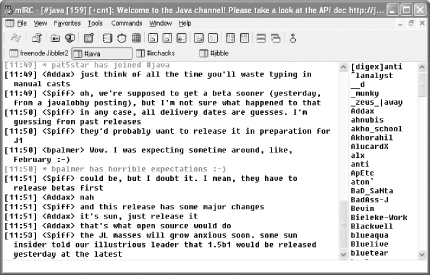
#irchacks, you will see a new window
appear inside mIRC. This will be used to display all messages sent to
that channel. It also contains a list of all users in that channel,
as shown in Figure 1-2. Typing a message and
pressing Enter will cause your message to be sent to the channel and
received by all of these users.
You can send a private message directly to another user by double-clicking on her nickname. This brings up a new window in which you can talk directly to that user.
As you become more experienced with mIRC, you will probably feel like exploring the configuration options. With these, you can change colors, fonts, aliases, pop-up menus, and sounds and use advanced scripting features. Some of the hacks later in this book will show you how to get the most out of mIRC.
IRC from Linux
XChat is a popular IRC client with a graphical user interface. You can download the source code or precompiled binaries for a variety of platforms.
XChat can be downloaded from http://xchat.org, either as source code or in
the form of precompiled binaries or packages. If you have a
packaging system such as
apt or Gentoo’s
emerge, then you may be able to get away with
apt-get xchat or emerge xchat.
Nicknames, Usernames, and Real Names
When you first run XChat, you will be presented with a Server List dialog box. The first task is to go down to the bottom and select Edit Mode. From there, you can see all your server settings. Next examine the top area marked Global User Info. The top three boxes are for your nickname . Most of the time, you will connect with your first listed nickname; however, if that name is already in use by another user, it will try again with the second and then with the third. You shouldn’t make these the same, but they can be close variants, for example:
Bob, Bob_, Bobby
Foo, FooBar, Foo_Bar
CoolDude, Cool_Dude, Kewld00d
Your username is used internally by the server to form your host mask, although some servers will try to use an Ident call [Hack #80] to look up your username instead. Your chosen username will be used if the Ident call fails. You can use your nickname, an alternate nickname, or just about anything you want here—although it may be truncated and must not contain any special characters. Your real name can also be anything you want, but it can be longer and can include spaces. As an example, your IRC nickname might be “Han” with username “solo” and real name “Harrison Ford.” Be as creative as you like.
Server Configuration
The next step is to configure your servers. XChat comes with a lot of servers listed, and it may already have the one you want; if not, you can click Add above the list of servers to create a new one. This will create a New Network. To rename this network to something more informative, slowly click it twice (don’t double-click, as that will make XChat connect to the server). Once you’ve done this, you should look at the list of Servers on the far right. This is a list of servers; each server is of the form server/port. Your network will be set with newserver/6667 and, unless you’ve explicitly set one up on your local network, chances are there is no server called “newserver.” So instead, click on this, and replace it with the address and port of the server you want. If you leave off the /port portion, the default port number of 6667 will be used. Most IRC servers will let you connect to this port, and many will even have alternative ports as well. Here are some example servers:
irc.freenode.net
irc.worldirc.org/6660
Finally, if you know what channels you want to connect to, place them in the Join Channels box. Use commas to specify more than one channel, for example:
#wikipedia,#java,#gimp,#jibble
You are now ready to connect to an IRC server. Click the
Connect button and wait until you are connected.
If you’d like to connect to another server as well,
return to the list with Ctrl-S,
or use the menu: XChat→Server List. Select the new server
from the list, but this time use Connect in a New
Tab to create a separate tab for this new server. If you
forget to do this, you will disconnect from your current server and
connect to the new one in the existing tab.
Advanced Options and Autoconnects
If you use IRC only occasionally, you probably won’t mind picking your favorite network from the list every time you start XChat. But if you connect to several IRC servers regularly, you’ll probably want to connect to all of them automatically. To do this, select the network from your server list and check Auto Connect at Startup. If you do this, you may also want to check the No Server List at Startup option.
Setting Up Autologin
If you’re on a standard IRC network, you can usually set yourself up to automatically log in by specifying a Connect command in the server details screen. For example:
msg nickserv identify passwordNotice that this command does not begin with a /
character. If you’d like to use more than one
command here, you need to set up a user command (as described later)
with multiple entries and type its name here instead.
Selecting a Stable Server
Most IRC networks are made up of more than one server; many will list these at the network’s web site. In most cases, you will connect to a round-robin server, which will automatically pick a server and direct you there. Generally, you won’t need to change this, but you may sometimes want to connect to a specific server. If you find a particular server that behaves more stably that any of the others, you can set the server of your choice at the top of the server list for your network. You can then click the Add button to add another one in case your preferred one is down. For example:
Klagenfurt.AT.EU.WorldIRC.org, Bleisen.DE.EU.WorldIRC.org, irc.worldirc.org
Different Nicknames on Different Networks
If you want to use a different nickname on a certain network, select the network in the server list and uncheck Use Global User Info. You can then fill in a nickname, username, and real name for this server.
Setting Up the User Interface
The XChat interface can be customized in a number of ways. The first few are simple visibility options. Right-click a blank area in the IRC window, and you can select on and off options for the menu bar, topic bar, mode buttons, and user list buttons. Select whatever combination makes you happy. The next set is available from the menu bar or the right-click menu, Settings→Preferences. There are far too many preferences to detail here, so you may like to play around with them and see what you can achieve. Here are some items worth noting:
Interface/Text Box
Besides setting the colors and fonts for chatting, the checkboxes also affect the way you see your chat. Try turning on Nick Coloring or Timestamp, for example, or perhaps you prefer to turn off the Indented Nicknames feature?
- Input Box
The Nick Completion Suffix is used for two things. First, if you type a partial nickname at the start of the line and press the Tab key, XChat will attempt to complete the nickname and add this suffix to it. Second, if you check Automatic Nick Completion, whenever you type a partial nickname followed by this suffix, XChat will replace it with the full nickname.
- User List
The Lag Meter and Throttle don’t take up much room and are informative; it is a good idea to set this to Both. Here you can also change the user list sort order or set a double-click command.
- Tabs
Tabs are used to store channel and server windows. This lets you adjust the layout of your screen and how you use tabs.
- Colors
These settings let you change the colors of your text box and user list.
Chatting/General
Here you can set the default messages for when you quit IRC, leave a channel, or go away. You can add words that will trigger the highlight/beep feature. Also, if you don’t like the way XChat announces your away messages, you can uncheck that here.
Logging
If you wish to log conversations (for reference or for generating IRC statistics), you can check Enable Logging of Conversations here. You shouldn’t change the other options unless you know what you’re doing, especially if you want to use a third-party program to generate statistics.
Network/Setup
Most users won’t need to make any changes to the settings here, but there are some useful options for file transfers. This lets you change where XChat places incoming files or adjust the speed at which the files are transferred. If you are behind a firewall, you can also restrict the DCC ports used when you send files.
Hacking XChat
Here are some neat hacks you can do with XChat:
Tab in a window
If you want to
remove a tab and give it its
own window, press Ctrl-I. Press
them again to place it back as a tab. You can also right-click on the
tab and select Detach Tab. If
you’d like to change the default behavior of
windows and tabs, see the
Preferences dialog box under the Tabs section.
Per-channel options
Right-click on a tab, and choose the Channel Name submenu. You can turn off join/part messages for the busy channels, set the channel to beep on activity for the important but quiet channels, or allow color pasting in the channel.
All-server commands
If you’d like to set up a
command to go to all your servers or
all your channels, type /allserv
command or /allchan
command. For example:
down south in DixieThis will set your status to Away (and your away message to “down south in Dixie”) for all of the servers you are connected to.
Use colors
Many people recommend that you don’t use colors. They’re more often abused than used effectively. Many consider them to be garish and ugly. Furthermore, they’re not IRC standards, they’re not supported by all clients, and you can’t even tell whether another person’s IRC client has a white background or a black one. However, if you find you simply must use color codes:
-
%C## Typing this as part of a message will cause it to be interpreted as a color code. The ## must be replaced with a two-digit number (see Settings→Preferences →Colors for the list).
-
%B This will make a message bold.
-
%U This will underline your message.
-
%0 This will set your output back to normal, using the default color.
Alternatively, you can right-click the channel tab and select Insert mIRC Color Code.
Display output with /exec
Under Unix and Linux systems, you can display output from any command that you run. For example:
/exec uptimeThis will execute the uptime command and show your
system’s uptime and load averages. This, however, is
displayed in the window and not sent to the IRC server. If you want
to brag about your system’s uptime, though, you can
do this:
/exec -o uptimeThe output will now be sent to the IRC channel you’re currently active in.
You can also call commands that do not immediately exit. For instance:
/exec -o tail -f/var/log/httpd/access_log
This will print the accesses to your web server as they occur, if you
really need to. You can even send input to the command with
/execwrite, stop it with
/execstop, resume with
/execcont, and kill it with
/execkill.
Be careful what programs you call. /exec
-o
yes or
/exec
-o
cat
/dev/urandom, especially in a DCC chat, will
probably crash XChat, and they are generally considered silly things
to try. Having heard that, you’ll probably want to
try it just to see what happens.
Setting up auto-replace strings
An auto-replace is a string of text that gets automatically replaced with another. For example, XChat will automatically replace “teh” with “the” as you type it. To review or change this behavior or add new auto-replace options, go to Settings→Lists→Auto-replace. To add a new option, click the New button and then edit the New and EDIT ME regions. For example:
billy => Over and Under General War Commander Sergeant Billy Goat-Legs
Now, whenever you type in billy followed by a
space or Enter, you’ll see his full title appear.
Setting up user commands
Setting up a user command in XChat is simple. First, go to Settings→Lists→User Commands. Click Add New, and choose a name. Then you can type in your command. You can click the Help button for a list of substitution strings. Here’s an example:
whine => me whines, complains, and makes a nuisance of himself.
Now, go to your least-favorite channel and type
/whine. You’ll be making
yourself feel unwelcome in no time.
You can also give your commands arguments:
greet => me greets %2 in the manner of the Courts of Chaos.
You can now stab your friends in the
back—erm—greet your friends with a
flourish, with a simple command, like /greet Corwin or /greet JackBauer.
If you want the rest of your string to be used as an argument instead
of just one word per argument, you use the &
character:
hero => say &2 is my hero!
Now, with a simple /hero Linus Torvalds, you can
cast your vote in support of free software!
Commands can be multiple action as well. They will be performed in the order listed, for example:
rofl => me is on the floor
rofl => me is rolling around...
rofl => me is laughing!!!
You can call external commands with the
/exec
command detailed
earlier. For example, to counter those annoying
mIRC
“sysinfo”
scripts, you could try this:
sysinfo => exec -o uname -a && uptime &&df -h | egrep "(hda1|hda3|hda5)"
If you have other system information scripts, you can call them instead of, or in addition to, the ones found here.
Customize messages/colors and set sounds
You can change the message format and colors of any event in IRC or assign a custom sound to play. First, go to the Settings→Lists→Events menu. Then find the event you want to change.
For example, to have a sound play whenever the topic changes, you would select Topic Change and enter a path to a sound file.
If you want your messages to be surrounded with, say, yellow square
brackets ([]) instead of purple pointy brackets
(<>), select Your
Message and enter:
%C8[%O$1%C8]%O$t$2%O
The arguments to each message ($1,
$2, etc.) are listed below the message as you
select them.
$t
refers to the tabbed line,
if you have
Indented
Nicknames on. %C,
%B, and %O are color codes, as
described earlier.
One often-requested format change is to display an
@ in front of operators and a
+
in front of voiced
users. To do this,
modify the
Channel Message format string like so:
%C2<%O$3$1%C2>%O$t$2%O
$3 will display an @,
+, or nothing, as appropriate.
Add user list buttons and menu commands
Assuming you have the user list buttons turned on (right-click empty space, then select User List Buttons), you can add buttons to this list or to the user list pop up (which appears when you right-click a username in the chat window or the user list). The syntax for such a command is the same as for a user command, except the name of the command is used for the label of the button or the menu item, and there are more substitutions available. Use existing entries as guidelines if you want to.
Add CTCP replies
Care to set up some useful information for
CTCP? Want to mess up people
who PING and VERSION you? Using
Settings→Lists→CTCP replies, you can set it up to
do anything when someone sends you a CTCP message. In general, use
the same guidelines as the other lists (and see
Help for useful substitutions). Note, however,
that the proper way to send a reply is:
nctcp %s (query) (result)
So a sample reply to a TIME request would be:
nctcp %s TIME Sat Nov 12 22:04:00 1955
This will ensure maximum compatibility with other clients.
—Thomas Whaples
IRC from Mac OS X
Several IRC clients are available for Mac OS X. Check them out for your favorite features.
There is no shortage of IRC clients for Macintosh users. ChatZilla [Hack #4] , the truly outstanding IRC client integrated into Mozilla, is popular among Mac users and can also be used on other operating systems. Non-Mozilla users have many alternatives, too. Some applications, such as Fire (http://fire.sourceforge.net), combine IRC chat with ICQ, AIM, and JabberIM. However, because the features of IRC are different than the set for other chat applications, IRC users may find themselves frustrated with these programs. The server-channel model is not clearly supported, and sending standard IRC commands is difficult when they are not all fully supported. One of the friendliest and three of the more popular, and more powerful, IRC clients available for OS X are presented here: Conversation, X-Chat Aqua, Snak, and IRCle.
Conversation
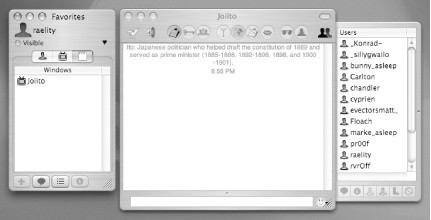
Conversation (http://www.conversation.pwp.blueyonder.co.uk) is about as close as you’ll come to using iChat for IRC. It sports a rather iChat-like look-and-feel (Figure 1-3) with just about everything accessible through an intuitive set of buttons and switches and drag-and-drop support throughout. A Favorites list holds your best buddies and preferred channels so you can just log on and click your way to conversation. A Recent Channels and Users list helps you find that person you were chatting with yesterday or where you had that fabulous conversation last week. Or just set things up so you automatically log in and join your various discussion channels automatically.
While you’re best off comparing and contrasting Conversation’s feature set with the other clients covered here, it’s a good bet you’ll find it an intuitive vehicle for your first foray into IRC.
X-Chat Aqua
X-Chat Aqua is an OS X version of the popular Unix IRC client, XChat. It is freeware that can be downloaded from http://xchataqua.sourceforge.net.
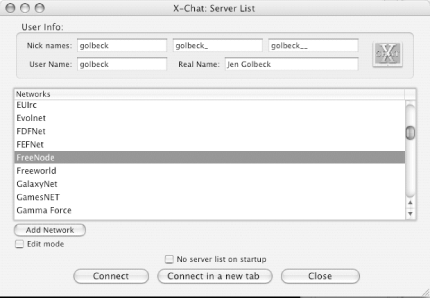
When X-Chat launches, you are prompted to enter nicknames and personal information and to choose a server in the Server List window (see Figure 1-4). A list of networks is provided by default, and you have the option to add to the list. Once nicks and server are selected, clicking Connect will connect and open a server window.
X-Chat Aqua can use a tab- or window-based view of channels and servers. The default setup puts each channel in a tab at the bottom of the window as it is joined. Channels can be opened in new windows, instead of as tabs, by using File → New Channel Window.
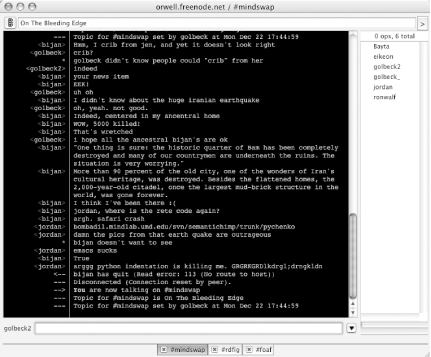
Figure 1-5 shows a connection to the freenode IRC network (shown at the top of the window) and three channels (shown in tabs at the bottom of the window). Channel participants are displayed in the bar on the right. While this window is white on black, colors can be configured to your preferences.
The File menu also has options to connect directly to a new server in either a tab or a new window or to use the Server List to establish a new connection. All commands and messages can be given in the input line at the bottom of each window, and some are also included as selectable options under the User menu.
Snak
The Snak IRC client is shareware that is free for 30 days. After that time, Snak will automatically quit after 30 minutes until it is registered for $20. Snak can be downloaded from http://www.snak.com.
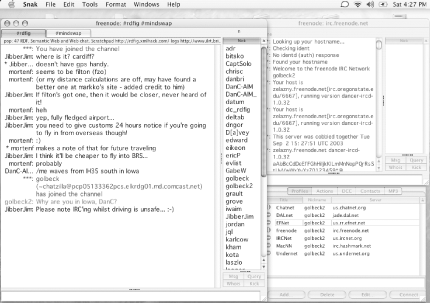
The Server List is the window in the lower-right corner (Figure 1-6). Notice that the #rdfig and #mindswap channels have been grouped into one window, while the server, http://irc.freenode.net, is in a separate window in the upper right.
The first time Snak is launched, a wizard walks you through the process of creating a nickname and selecting a preferred channel. This information is stored in the Preferences. Connections to any server can be made through the Profile list. This window will come up by default and can also be found in the Windows menu. It lists all of the stored IRC servers with your preferred nick and startup commands. To connect to one of the servers, you can just locate it in the Server List and click Connect.
Docking is an interesting feature of Snak. Channels can be open in separate windows. Using the Dock command in the Windows menu, the windows can be changed into tabs in other windows. This allows you to group multiple channels any way you like; they need not necessarily be docked with the server window. Channels can also be customized by appearance. Each channel window can have its own color scheme, set using Edit → Channel Settings.
IRCle
IRCle is a Macintosh-only IRC client. It is available as shareware from http://www.ircle.com. The trial period is 30 days, and all features are enabled during the trial. Registration is $20 and gets rid of the warning messages that will appear when the application is launched.
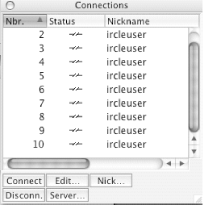
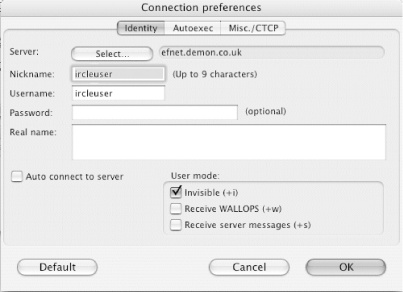
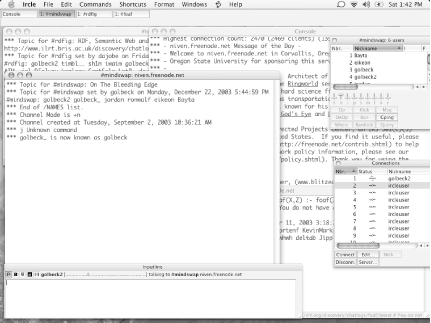
When IRCle is run for the first time, the Connections list needs to be modified. The Connections window should appear by default (as shown in Figure 1-7) but can also be found in the Windows menu if it doesn’t. There will be 10 default connections—the maximum number of server connections that IRCle supports—and they will all be configured to use the nickname “ircleuser.” To change this, click on a connection and then click the Edit... button at the bottom of the window. This will bring up a dialog box (Figure 1-8) where you can change your nickname, real name, exit message, and other properties.
To connect to an IRC server with this new nickname, select the connection in the Connections window, and then click the Server... button. A window with a long list of servers will come up. You can choose from that list or click Add to add a new server. Once you have found the server you want in the list, click it, and then click Select. The connection is now configured to connect to the server. Click the Connect button in the Connections window to attach to the server.
The server messages will appear in the
Console window. The Inputline window is
used to join channels, send commands, and type messages to a channel.
Each channel will appear in its own window. Depending on which window
is in focus, the Userlist window will change to show the name and
participants of the current channel.
Private chats established using
/query will also get their own window. If someone
else sends a private message to you without a separate window, the
message will appear in the Console.
The multitude of windows in IRCle, as seen in Figure 1-9, can become overwhelming. A feature called the Channelbar is available to make them a bit more manageable. Found under the Windows menu, the Channelbar puts a bar across the top of the window with buttons for each channel, console, and chat window. Clicking a button brings the corresponding channel to the foreground. Using option-click on a button will hide the selected channel window without disconnecting from it.
Now that you know about lots of Mac OS X IRC clients, it’s up to you to decide which one you want to use. Perhaps after you’ve read this book, you may even be tempted to write your own.
Jennifer Golbeck
IRC with ChatZilla
Jump around platforms with the ChatZilla IRC client for Mozilla-based web browsers.
ChatZilla is a cross-platform IRC client written for Mozilla-based browsers. If you’re like me and work under various operating systems, you’ll have a consistent IRC interface across the board.
If you are using Netscape or a Mozilla build, ChatZilla is quick and easy to start using. If you are using Internet Explorer, Safari, or another non-Mozilla browser, you will need to download the latest version of either Netscape from http://home.netscape.org/downloads or Mozilla from http://mozilla.org.
Installing ChatZilla
ChatZilla can be installed directly through the web browser at http://www.hacksrus.com/~ginda/chatzilla. This page contains news and installers. Toward the bottom of the page, you will find the Download section. Several revisions will be listed in the table. If the version has a yellow star next to it, this means the release is probably stable but may contain some bugs. Releases that are expected to be stable will be marked with a green tick. Every version will contain a list of any reported bugs, so you can decide which one you want to install.
The last column of the table has install links, each pointing to an XPI file. These types of files are installers for Mozilla chrome packages. When you click an install link, you will be prompted to accept the install. When you click OK, the software will automatically download and install itself (see Figure 1-10).
Once the installation is complete, you should close your browser. Some versions of Windows may also require you to restart the operating system. Once all the restarts are complete, ChatZilla is ready to use.
Using ChatZilla
ChatZilla
can be launched in three ways. The IRC Chat option will appear in the
Window menu in your browser. Selecting this will launch the client.
You can also use the irc command in the URL bar.
Typing just irc: will launch ChatZilla. You
can also type a full URL, like
irc://irc.mozilla.org, and that will take the
additional step of connecting to the specified server. These URL
methods are currently the only way to launch ChatZilla if you are
using the Mozilla Firebird web browser. Finally, if you launch
Netscape or Mozilla from the command line, you can use the
-chat option to start up ChatZilla instead of the
normal browser window.
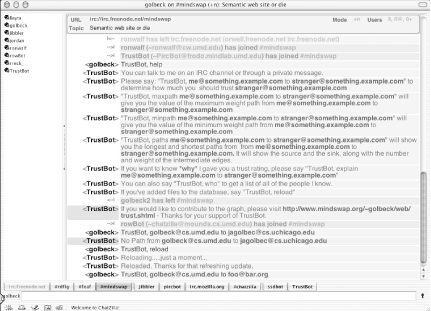
Once ChatZilla has launched (Figure 1-11), you can use all of the basic IRC commands. Nickname and command completion are both supported. After typing a few characters of the nickname or command, pressing the Tab key will fill in the rest. If there is more than one option for the characters you typed, ChatZilla will complete up until there is a choice to be made.
For example, typing /q followed by the Tab key
will fill in the command up to /qu. It stops
there because there are several options for what comes next. A quick
double-Tab will display all of the options that can complete the
text. In this case, ChatZilla shows the following line:
4 matches for "/qu": [/query, /quit, /quit-mozilla, /quote]
Mousing over a message will show the
timestamp in the status bar at the bottom of the window. It also
gives the nickname and IP address/hostname of the sender.
Each sender’s
nickname appears as a link next to
the message. Clicking that link will open a private chat
session with the person. Private messages and chats can also be
started with commands. Typing /msg
nickname message will send a
private message to the nickname you
provide. If someone sends a private message to you using the
/msg
command, it will automatically open a
new tab to show your conversation. Using the /query
nickname
command will open this private tab as well, but without
sending a message. The tab will be labeled with your chat
partner’s nickname. Messages typed in these new
tabbed windows are, obviously, private.
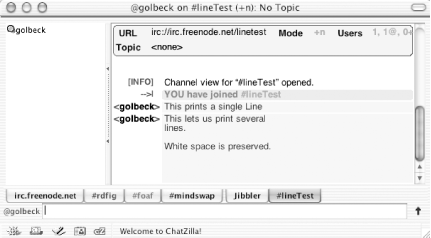
When sending messages, the default input field lets you type one line of text. For pasting multiline text, such as snippets of programming code where lines really matter, it can be tedious to cut and paste each individual line. In ChatZilla, there is an up arrow next to the input field (see Figure 1-12). Clicking that arrow expands the text box into a text field.
Multiple lines can be typed or pasted into the larger box (see Figure 1-13) and will appear in much the same way in the actual chat. Clicking the new, bent arrow next to the text area will send the message. To return to single-line input, click the down arrow.
If you are using multiline text entry, as shown in Figure 1-13, you will see this appear identically in your client, as shown in Figure 1-14.
ChatZilla has great support for
changing the appearance of the chat windows with motifs. A few
default options come installed. Several more motifs are available at
http://www.hacksrus.com. However,
motifs are just CSS files. That means that you can
easily use a CSS from another web site or create your own motif
especially for chat. To set a motif, choose a default one from the
View→Color Scheme menu or set your own. To use your own CSS
file, either drag a link to the .css file into
the message window, or use the /motif command.
/motifhttp://example.com/myMotif.css
Any CSS file accessible over the Web can be used in this way.
See Also
FAQs, links, source code, bug reports, and a wealth of other information are available at the Mozilla project’s homepage for ChatZilla (http://www.mozilla.org/projects/rt-messaging/chatzilla).
The ChatZilla page on hacksrus (http://www.hacksrus.com/~ginda/chatzilla) has installs, motifs, and more technical information.
The ChatZilla newsgroup is
netscape.public.mozilla.rt-messagingand can be found on the public news servernews.mozilla.org. There is, of course, an IRC channel for ChatZilla: http://irc.mozilla.org/#chatzilla.
—Jennifer Golbeck
Get IRC Hacks now with the O’Reilly learning platform.
O’Reilly members experience books, live events, courses curated by job role, and more from O’Reilly and nearly 200 top publishers.
