Even though you’ve already created a few polished documents with the examples in this chapter, you might have noticed that you’ve barely touched the program’s menus, toolbar buttons, or inspectors. As you’ve seen, the nuts-and-bolts editing of text and images takes place directly in the window’s main work area with lots of typing and a bit of light mousework.
Over the next few chapters, as you get acquainted with Pages’ more advanced formatting and layout tools, you’ll set aside this mitts-off approach. Mastering the placement of the buttons and controls that light up your Pages dashboard is the next step to creating and editing great Pages documents. Fortunately, Apple’s software designers have gone easy on you. Rather than cramming every possible tool and button into Pages’ document window in a noisy clutter, they’ve pared the window down to the bone, opting for a Danish-modern starkness instead of the rococo of most word-processing programs.
In fact, when you first opened a new document (Figure 1-3), your first thought might have been, “Where is everything?” Don’t panic, it’s all there. Despite its minimalist design, Pages gives you easy access to the tools and features you’re most likely to need by placing them at the top of the window, while keeping the ones you need less often—or for more esoteric tasks—hidden just below the surface. Figure 1-20 tours the highlights of your document-window cockpit.
You can choose to live with this minimalist window design, embellish it with more controls, or give the window a virtual makeover to express your own sense of style. All that’s covered in the following pages.
The toolbar graces the top of the document window with a set of colorful buttons for one-click access to common features, saving mileage on your mouse and strain on your menu memory. You’ll learn more about each of these buttons in the coming chapters, but here’s the condensed version for the standard button set:
View. The first button is a pop-up menu (indicated by the tiny black triangle next to the icon) that lets you show and hide parts of your document window. You can slide out the Styles drawer (see Style Central: Meet the Styles Drawer), reveal the thumbnail view or Search sidebar (see Thumbnail view), show the Comments pane (see Changing the style of new and deleted text), or toggle the display of the Format Bar, rulers, invisible characters, or layout view.
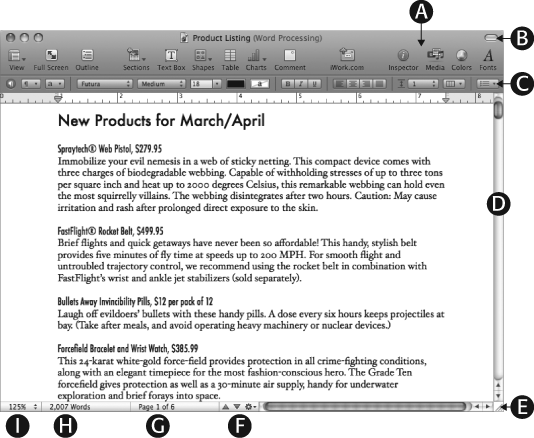
Figure 1-20. The toolbar (A) is the most prominent component of your document dashboard, giving you one-click access to commonly used features. Use these buttons to change your document view, add design elements, make comments, share your work online, apply formatting, fetch photos, and access many more commands in the master toolbox known as the Inspector. Hide or show the toolbar by clicking the Hide/Show “Tic Tac” button (B). The oh-so-useful Format Bar (C) changes according to the active page element; when you’re editing text, for example, it displays text-formatting options, as shown here. The vertical scroll bar (D) lets you move up and down through your document. Resize the window by dragging the resize handle (E) in the lower-right corner. Jump a page at a time through your document by clicking the page up and down buttons (F). The page indicator (G) shows you what page you’re on, and the word countometer (H) tracks your accumulated verbiage. In the lower-left corner, the View pop-up menu (I) lets you change the size of the page display on your screen.
Full Screen. Click this button to make your document your sole focus of attention, tucking away all other windows and digital distractions behind a virtual curtain (see Editing in Full-Screen View).
Outline. Switch in and out of outline view with this button. In outline mode, your document is stripped down to a skeleton view with topics and subtopics—ideal for big-picture organization of your ideas (see Organizing Text with Outlines). This option is available for word-processing documents, not page layout.
Sections. This pop-up menu appears only on word-processing documents and lets you add new sections to give parts of your document their own formatting or layout rules. Many templates provide a choice of preformatted section layouts, and this pop-up shows thumbnail previews of each one (see Adding Sections).
Pages. This pop-up menu appears only on page-layout documents and lets you add new pages to your document with your choice of prefab layouts, or template pages, based on your current template (see Adding Sections).
Text Box. The Text Box button inserts a text box into your document (see Adding Objects).
Shapes. The Shapes pop-up menu lets you add lines, arrows, or geometric shapes to your document (see Adding Shapes).
Table. This button inserts a table or mini-spreadsheet into your document (see Making Tables).
Charts. Click this pop-up button to insert one of 19 varieties of charts into the page (see Creating Charts).
Comment. This button adds a note to your text, letting you annotate the document with comments, handy for collaboration and tag-team editing (see Changing the style of new and deleted text).
iWork.com. This button shares your document online at iWork.com, where you can collaborate with others to review and share feedback on any iWork document (see Sharing on iWork.com).
Inspector. This button summons or dismisses the Inspector window, the command center for formatting your document and all the elements it contains. The 10 inspectors inside this window contain controls for document and text formatting, chart and table construction, bookmark and hyperlink creation, and more. You’ll learn more about the Inspector window throughout this book.
Media. Click this button to show or hide the Media Browser, the shortcut to your entire collection of tunes, photos, and movies. For example, just drag a photo from the Media Browser to add a picture to your document (see Adding Images).
Colors. These last two buttons actually access tools that are part of Mac OS X, though they’re seamlessly integrated with Pages. The Color Picker appears when you click this button. Use this palette any time you need to change the color of text, objects, backgrounds, and so on (see Filling with Colors, Gradients, and Images).
Fonts. The Mac OS X Fonts window comes to the fore when you click this button, giving you control of your entire font collection. You can select fonts, adjust their size, view their appearance in a preview pane, add strikethrough or text shadow, and more (see The Fonts Window).
If you find it too distracting, you can banish the toolbar’s banner of buttons by choosing View → Hide Toolbar, pressing ⌘-Option-T, or easiest of all, by pressing the “Tic Tac,” button in the upper-right corner of the document window. You can call the toolbar back by repeating any of the three commands just listed—except this time the menu reads View → Show Toolbar.
Chances are, though, you’ll probably want to keep the toolbar around while you’re working on most documents. It’s handy! Rather than hiding the toolbar, you might instead customize it to show only the buttons you want.
In that case, choose View → Customize Toolbar (or Control-click the toolbar and choose Customize Toolbar from the pop-up menu) and Pages displays its entire collection of buttons on a sheet that drops from the toolbar (Figure 1-21). Now you can drag buttons you don’t want off the toolbar and see them vanish in a puff of smoke. Add to the toolbar by dragging individual items into place on the bar; the buttons already there politely shuffle aside to make room for the newcomer. Once the buttons are in the bar, you can drag them around to change their position.
Most of the toolbar buttons perform various commands you’d otherwise have to dig through the menus to find. But you’ll find three items in the bottom row of buttons designed to help keep your newly customized toolbar organized: a separator line, a fixed space, and a flexible space.
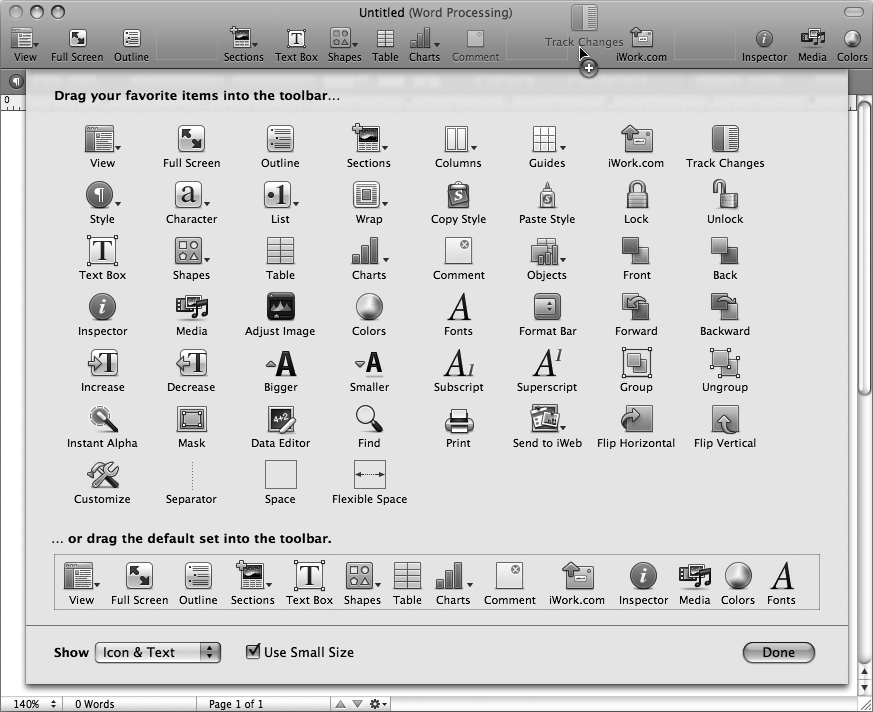
Figure 1-21. Choose View → Customize Toolbar to reveal Pages’ library of toolbar buttons, and add new buttons by dragging them into the toolbar as shown here. Drag buttons off the toolbar to remove them, reorder them by dragging buttons to a new location, or organize them by adding separator lines and spaces. Use the Show pop-up menu at the bottom to choose whether your buttons display as icons, text, or both. Use Small Size is a space-conscious option to squeeze more buttons into the toolbar or give yourself more workspace—it’s great for laptop owners.
If you’re really crazy for customization, you can even add a Customize button to the toolbar so you can quickly summon the customization sheet when the spirit moves you to modify your button collection. If you add more buttons than can fit in the window—or if you make your window narrower—a double arrow appears at the end of the toolbar. Click it and a mini menu appears, presenting the button overflow in a list of tiny icons.
After a frenzy of toolbar transformation, if you decide you liked it better the way Apple shipped it from the factory, just drag the entire default set back up to the toolbar and Pages replaces your custom arrangement with the batch of basic buttons.
The Format Bar is the toolbar’s can-do sidekick, the narrow little strip of menus and buttons that rides along just below the toolbar. If you’ve used other word processors, you’ve used formatting toolbars for quick changes like italicizing a word or adding a list to your text, and the Format Bar works the same way here. The difference, though, is that other programs often make you add layer after layer of toolbars if you want to have one-click access to all your favorite features. That means giving up valuable onscreen real estate and burying your document under a cluttered mess of controls.
Pages cleans things up by giving you one and only one Format Bar, but Pages gives it chameleon-like qualities to shift its display depending on what you’re doing. If you’re typing inside a text box, the Format Bar shows options for formatting text to change the font, text alignment, line spacing, and so on. Click a photo, and options show up to let you adjust the image quality, add a drop shadow, or apply a mask. You get the idea: No matter what part of the document you’re editing, the Format Bar keeps up with you, dispatching tools that are no longer relevant to make room for options you might actually want to use.
If even the toolbar’s slim silhouette requires more space than you care to give up, you can send it packin’ by choosing View → Hide Format Bar. Change your mind? Bring it back by choosing View → Show Format Bar.
Pages always shows you your document just the way it will look on the printed page, complete with margins, page breaks, and the like. You can change the way it organizes your pages in the document window by choosing different options in the View pop-up menu in the bottom-left corner of the document window.
Choices include zooming in on the page or pulling back to get a big-picture view of your document design. The View pop-up menu offers options to shrink or magnify your document view anywhere from 25 to 400 percent. Just click the percentage you want to use. You can also press ⌘-> (that’s ⌘-Shift-period) to tell Pages to enlarge the page to the next zoom level, or ⌘-< (⌘-Shift-comma) to zoom back out (these options are also available from the View → Zoom submenu). Zooming in and out doesn’t affect the actual size of your document, only the way that Pages previews it for you onscreen. Think of it as holding up a sheet of paper for a close look or pushing it away; it doesn’t change the size of the document, just how much detail you can see.
Note
In Pages’ standard settings, new documents open at 125 percent magnification, a comfortable medium-sized view and about the size of your document when it prints. If you prefer a different size, choose Pages → Preferences: Click the General button and set the Default Zoom setting to your liking.
You’ll find two other sets of options sandwiching the zoom percentages in the View pop-up menu. At the top of the menu, you can choose One Up or Two Up to tell Pages how many pages to show side-by-side in the document window (Figure 1-22, circled). New documents always open as One Up (the normal view, with only one page across in the window). Choose Two Up to show two pages side by side, a useful view when you’re designing a booklet or other document that you plan to bind or fold into facing pages.
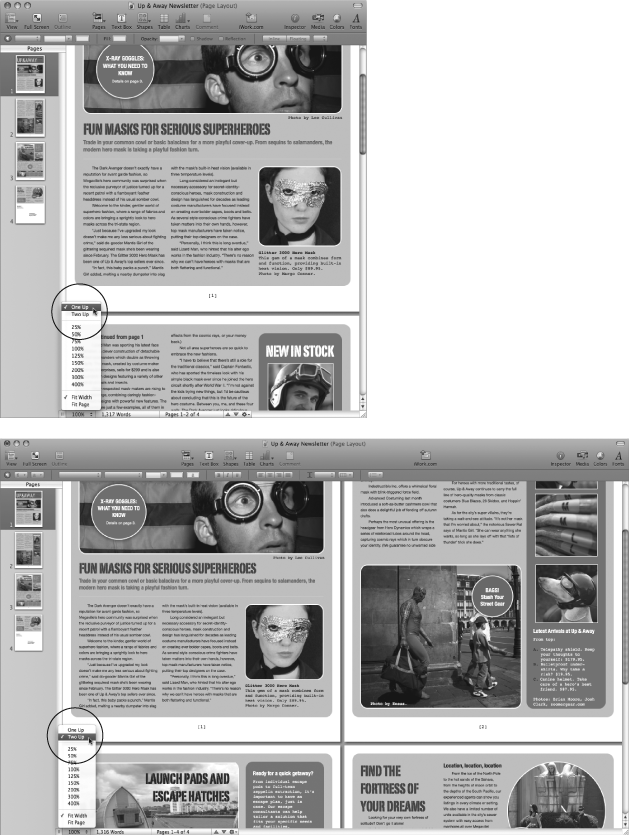
Figure 1-22. Top: The usual way to view a Pages document onscreen is in One Up view. The pages appear stacked on top of one another, like a ribbon stretching above and below your monitor. Use the scroll bar or the Page Up and Down buttons to move through the document. Bottom: When you choose Two Up in the View pop-up menu, Pages presents your document as if it were an open book. This is the best way to get the overall feel of the spread and make sure page elements—headlines and pictures, for example—are in visual harmony across both pages.
At the bottom of the View pop-up, you’ll find two automatic zoom settings that you can use as alternatives to the percentage settings. Fit Width adjusts the magnification so the page (or pair of pages, in Two Up mode) precisely fits the width of the document window—no matter how narrow or wide (don’t you wish that your pants had this setting at Thanksgiving?). Fit Page, on the other hand, adjusts the magnification so that an entire single page—or two-page spread in Two Up mode—fits into your window. Turn on either of these settings and the magnification automatically changes as you adjust the window size with the window-resizing handle in the bottom-right corner of the window. You can also find these options in the View → Zoom menu.
Scooting around a one-page letter doesn’t present many challenges, but finding your way through a 200-page manifesto can be much tougher. Pages provides a number of tools for orienting yourself and moving quickly through your document. Just like most other computer programs, Pages documents sport scroll bars, and you can use the vertical scroll bar to move up and down through your document. Figure 1-23 shows you how things work.
You can also use OS X’s little-known Scroll to here option. If you think of the vertical scroll bar as a diagram of your document, from the first page (at the top) to the last (at the bottom), you can Option-click anywhere on the scroll bar and the document jumps directly to that point. For example, Option-click three-quarters of the way down the scroll bar, and Pages jumps to a point three-quarters of the way through your document. Or click the page indicator to reveal the Go to Page field. Type the page you want to jump to, press Return, and Pages takes you there.
You can also move up or down an entire page at a time by clicking the upward- and downward-pointing arrows at the bottom of the window, next to the page indicator. You can even change the behavior of these handy little arrows to leap to something other than the next page. Click the gear-shaped Action menu next to the arrows and choose a different item (section, comment, footnote, specific text style, and so on). Instead of going to the next or previous page when you click the arrows, you’ll now skip to the selected item. This is handy, for example, if you want to jump to the next heading or comment instead of the next page. You’ll learn more about all of these different document items in the coming chapters.

Figure 1-23. Fundamentals of scrolling: Click the up or down arrow buttons (A) in the bottom-right corner of the window to bring earlier or later parts of your document into view. The blue jellybean moves to show the relative position of your spot in the document. You can click the scroll bar above or below that jellybean to jump to the previous, or next, screenful (B). You can also drag the jellybean (C) straight to a different position in the document.
True efficiency experts dismiss all this mousing around as so much wasted arm action when there are perfectly good navigation keys right on the keyboard. Table 1-2 reveals all.
Table 1-2. Pages keyboard shortcuts
|
Press this |
To do this | |
|---|---|---|
|
Page Up (on laptops, fn-Up Arrow) |
Scroll up a page | |
|
Page Down (on laptops, fn-Down Arrow) |
Scroll down a page | |
|
Home (on laptops, fn-Left Arrow) |
Jump to the beginning of the document | |
|
End (on laptops, fn-Right Arrow) |
Jump to the end of the document | |
|
Left or right arrow |
Move insertion point one character to the left or right | |
|
Up or down arrow |
Move insertion point to the line above or below | |
|
Option-left arrow |
Move insertion point to the beginning of the current or previous word | |
|
Option-right arrow | ||
|
⌘-left or -right arrow |
Move insertion point to the beginning or end of the line | |
|
⌘-up or -down arrow |
Move insertion point to the beginning or end of the document | |
|
Option-up or -down arrow |
Move insertion point to the beginning or end of the paragraph |
You can also scroll by pressing the arrow keys: Hold down the up or down arrow key to move the insertion point up or down through your text. (When the insertion point reaches the edge of the screen, Pages scrolls a half screen, putting the insertion point back into the middle of the newly scrolled screen.)
Use Pages’ thumbnail view to see a visual table of contents for your document, browsing your tome as a sequence of miniature pages. Thumbnail view is enabled for new page-layout documents but turned off when you open a new word-processing document. To turn it on or off, choose View → Page Thumbnails. The Pages sidebar opens along the left side of the window (Figure 1-24).
The Pages sidebar shows numbered thumbnail images of each page in your document—adding a scroll bar if there are too many to fit in the window. You’ll find that thumbnail view makes it easy to find the page you’re looking for in your document—especially if your document features colorful illustrations or distinctive page layouts. You can recognize the page you’re after at a glance, since the thumbnails are actual images of the page—including headlines, columns of text, pictures, and so on.
To jump to a specific page, click its thumbnail. The page appears in the main viewing area, ready for editing, and the page’s thumbnail highlights to indicate your place in the document. As you’ll learn later, you can also use these thumbnails to rearrange or delete pages or entire sections of your document (see Customizing headers and footers).
The Search sidebar is the brainy alternative to the Page sidebar’s visual approach. It lets you build a smart table of contents on the fly, based on your own search keywords. This is handy when you want to see at a glance every one of your newsletter’s references to X-ray goggles, for example. Choose View → Search, and the Search sidebar Search sidebar appears at the left side of the document window in place of the thumbnail view (sorry, you can’t have both panes open at once, it’s an either-or situation).
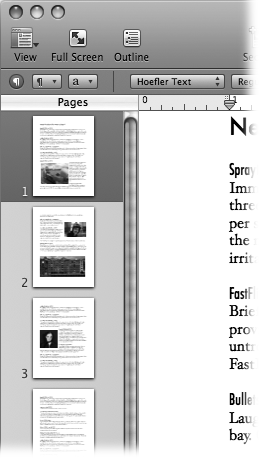
Figure 1-24. In thumbnail view, the Pages sidebar shows your document’s pages in miniature. Choose View → Page Thumbnails to show or hide the Pages sidebar, and click a thumbnail image to jump to the corresponding page in your document.
Type a word or phrase in the search field—as you type, results materialize in the Search sidebar. By default, the search is not case-sensitive and also finds matches in the middle of words. That means that a search for “cap” matches “Caped” and “escape,” as well as the word “cap” itself. You can change this behavior (and also revisit previous search terms) by clicking the magnifying-glass pop-up menu in the search field. Figure 1-25 shows the results.
Note
Pages also offers other, more advanced search tools in its Find and Find & Replace features (see Find), but only the Search pane lets you browse all search results simultaneously in a single view.
The marvelous curse of your Mac is that it plays so many roles. It turns out that your work machine is also an engine for entertainment, communication, news, and—if you’re not disciplined—rampant procrastination. When you’re just trying to buckle down and actually do some work, your Mac’s many tools and toys can be powerfully distracting. Pages’ full-screen view helps you focus by making your document the one and only thing on your screen, hushing the siren calls of email, Web, and all the other goodies vying for your attention.

Figure 1-25. Search results show the page numbers with matches for your search text, along with some nearby text to give you some context. When you click a search result, Pages takes you to that page in the main viewing area, with the matching word or phrase highlighted. Double-click the search result, and you can start editing the text right away; just type to replace the selected text. The pop-up menu in the search field lets you fine-tune your search by choosing “Match case” or “Whole words” options. With “Match case” selected, Pages shows results only if they match the capitalization of your search text. With “Whole words” selected, results no longer show matches from the middle of a word. The pop-up menu also lets you jump to the results for a previous search term, and even clear your search history.
Click the Full Screen button on the toolbar or choose View → Enter Full Screen, and Pages banishes everythingin full-screen view except for the document text. Even the menu bar, toolbar, and scroll bars disappear, leaving nothing but you and your words…along with a word and page count at the bottom of the screen (Figure 1-26). Type away without distraction.
If this stripped-down look makes you feel a bit naked, don’t get nervous. Your scroll bars and menus haven’t gone far; they’re waiting quietly behind the scenes for you to call them into action:
Show the scroll bar by moving the pointer to the right edge of your document; it disappears again when you move away.
Show the page thumbnails by pushing the pointer to the very left edge of the screen.
Show the menu bar and Format Bar by moving the pointer to the top of the screen. Choose View → Show Inspector to call up the Inspector window.
In full-screen view, the View pop-up menu moves to the far right of the Format Bar instead of its normal home at the bottom of the document window. There, you can adjust the zoom as usual—with all this screen space devoted only to your Pages document, you may want to choose a more magnified view. If the black screen background feels too somber, you can choose a new background color from the Background color well in the Format Bar.
Figure 1-26. Pages’ full-screen mode draws a curtain across your desktop, letting you focus exclusively on your document. The background dims to black, leaving only the document text, word count, and page count on the screen. To leave full-screen view, press Escape (Esc), click the Format Bar’s Exit button, or choose View → Exit Full Screen.
Tip
Full-screen mode is a handy way to review documents in meetings, too. Choose Fit Width from the View pop-up to make your document fill the entire screen—big enough for several people huddled around your Mac to see, or for an entire room when you’re projecting onto a screen.
When you’re done with full-screen view and want to return to the regular window view, press Escape, click the Format Bar’s Exit button, or choose View → Exit Full Screen.
With this newfound ability for extraordinary focus, you’re ready to start cranking out words. The next chapter gives you a leg up by exploring everything you need to know about adding, editing, and formatting text.
Get iWork '09: The Missing Manual now with the O’Reilly learning platform.
O’Reilly members experience books, live events, courses curated by job role, and more from O’Reilly and nearly 200 top publishers.

